

Greenworks 2600802 User Manual
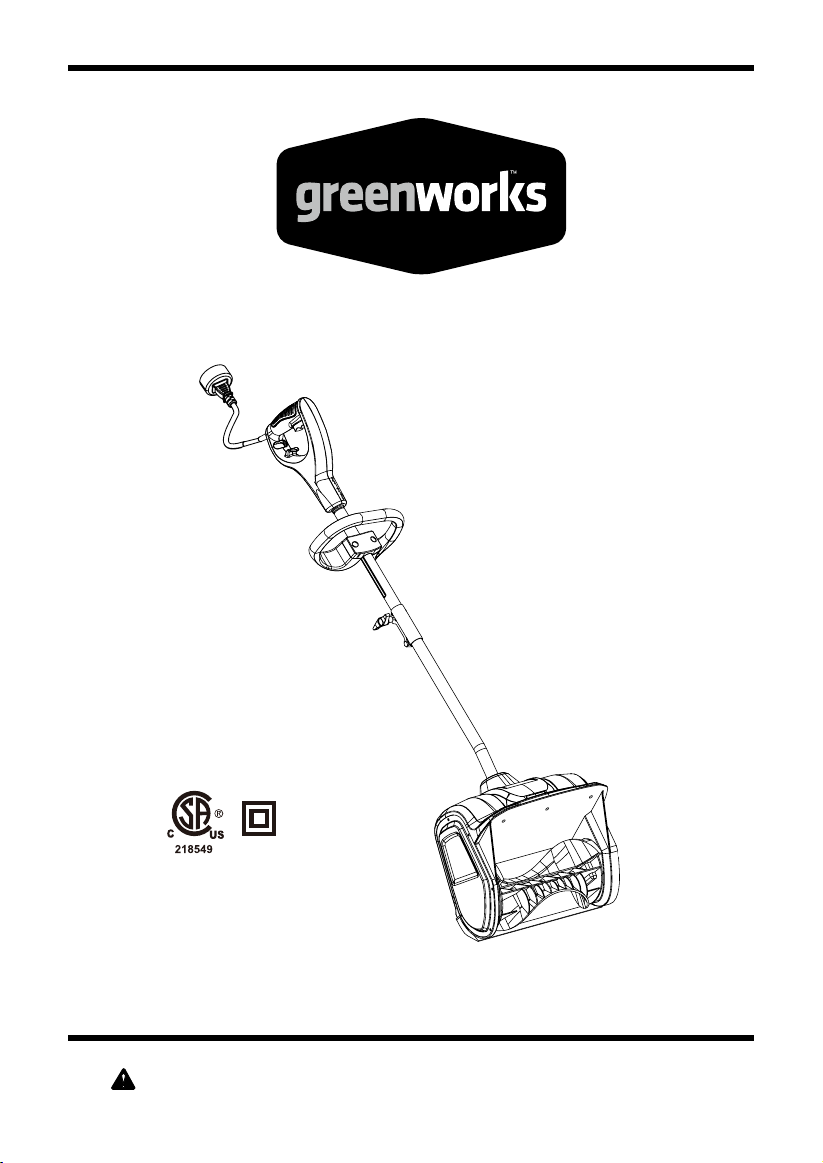
12" 8A Electric Snow Shovel
2600802
Owner’s Manual
(888.909.6757)
TOLL-FREE HELPLINE: 1-888-90WORKS
Read all safety rules and instructions carefully before operating this tool.

CONTENTS
Contents .............................................................................................................................. 2
Product specications .......................................................................................................... 2
Safety information .............................................................................................................3-4
Symbols ............................................................................................................................5-6
Electrical ........................................................................................................................... 7- 8
Know your snow shovel ....................................................................................................... 9
Assembly ...................................................................................................................... 10 -12
Operation ...................................................................................................................... 13-15
Maintenance ................................................................................................................. 16-20
Troubleshooting ................................................................................................................. 21
Warranty ............................................................................................................................ 22
Exploded View ................................................................................................................... 23
Parts List....................................................................................................................... 24-25
PRODUCT SPECIFICATIONS
12" 8A ELECTRIC SNOW SHOVEL
Motor ....................................................................................................120 V, 60 Hz, 8 A
No-load speed ................................................................................................ 2 60 0 RPM
Clearing width.................................................................................................12 in. (30 cm)
Clearing depth...............................................................................................4 in. (10.2 cm)
Impeller size.................................................................................................11 in. (27.8 cm)
Discharge distance.............................................................................................20 ft. (6 m)
Weight ....................................................................................................14.4 lbs (6.5 kg)
2
SAFETY INFORMATION
FOLLOW THESE RULES WHILE OPERATING THE SNOW SHOVEL
I M POR T ANT
READ AND UNDERSTAND ALL INSTRUCTIONS. Failure to follow all instructions listed below
• Walk. Do not run.
• Verify that the snow shovel is not in contact with anything before turning it on.
• Stay away from the discharge opening at all times. Keep face, hands, and feet away from
concealed, moving, or rotating parts.
• Be attentive when using the snow shovel, and stay alert for holes in the terrain and other
• Do not use on graveled surface.
• Move up and down slopes when clearing snow. Do not go across a slope. Use caution when
changing direction. Do not use this snow shovel to clear snow from steep slopes.
• Do not attempt to use the snow shovel on a roof or on any steeply inclined slippery surface.
• Do not operate the snow shovel if the guards, plates, and other safety protective devices are
not in place.
• Do not operate the snow shovel near glass enclosures, automobiles, trucks, window wells,
drop-offs, etc. without
pets away from the work area.
• Do not force or overload the snow shovel. The snow shovel will perform better and safer when
it is used at the rate that it was designed to work at.
• Do not operate the snow shovel at high speeds on slippery surfaces. Look behind, and
exercise caution when backing up.
• Do not direct the discharge toward people, and do not allow anyone to move in front of the
snow shovel while it is in use.
• Wear safety glasses or g
•
• Avoid accidental start-ups. Remain in the starting position when turning the snow shovel on.
The operator and the snow shovel must be in a stable position during start-up. See the section
entitled Starting/Stopping Instructions.
• Use the proper tool. Only use this snow shovel for the purpose that it was designed for.
• Do not overreach. Always keep proper footing and balance.
• Hold the snow shovel with both hands while it is in use. Keep a
• Keep hands, face, and feet away from all moving parts. Do not touch or try to stop the impeller
while it is rotating.
• If the impeller does not rotate freely due to frozen ice, thaw the snow shovel thoroughly before
attempting to use it.
• Keep the impeller clear of debris.
properly adjusting the angle of the snow discharge. Keep children and
oggles that meet ANSI Z87.1 standards.
.
3

SAFETY INFORMATION
• Do not attempt to clear the impeller while the motor is running or while it is plugged in. Turn the
motor off and unplug the snow shovel from the extension cord or the outlet.
• Keep clothing and body parts away from the impeller.
• Dress Properly – Do not wear loose clothing or jewelry. They can be caught in moving parts.
• Keep guards in place and in working order.
• Wear suitable winter footware when operating the snow shovel.
• Do not operate the motor at a faster speed than necessary. Do not run the motor at high speed
while not clearing snow.
• Stop the motor when snow clearing is delayed or when moving from one location to another.
• Unplug the snow shovel when it is being transported and when it is not in use.
• After striking a foreign object, turn the snow shovel off and unplug it, and then inspect it for
damage. Repair any damage before restarting and using the snow shovel.
• If the snow shovel starts to vibrate abnormally, stop the snow shovel immediately and attempt
to determine the cause. Vibration is generally an indication of danger.
• Stop the motor and unplug the snow shovel whenever the operator is not in the operating
position, before unclogging the impeller, and before making any repairs, adjustments, or
inspections.
•
• Allow the snow shovel to run for a few minutes after clearing snow in order to prevent moving
parts from freezing.
• Use only the manufacturer's original replacement parts and accessories for this snow shovel.
The use of unauthorized parts or accessories could lead to serious injury to the user or damage
the snow shovel, and will void the warranty.
• Do not use the snow shovel in the hand held position. Do not pick up the snow shovel while it is
plugged in and running. The snow shovel is designed to travel along the ground.
GENERAL SAFETY RULES
• Verify that the snow shovel is secure while transporting.
• Store the snow shovel in a dry area, locked up or high enough to prevent unauthorized use or
damage, and out of the reach of children.
• Do not douse or squirt the unit with water or any other liquid. Keep handles dry, clean, and
free of debris. Clean the snow shovel after each use. See the section entitled Cleaning and
Storage.
• I
f the labels on the snow shovel become defaced or start to lift off, contact the Toll- Free
Helpline, at 1-888-909-6757.
• Keep these instructions in a safe place for future reference. Refer to them often, and use them to
instruct other users. Anyone who uses this snow shovel must read these instructions carefully.
• Maintain the snow shovel with care. Follow the instructions for lubricating and changing
accessories.
SAVE THESE INSTRUCTIONS
4
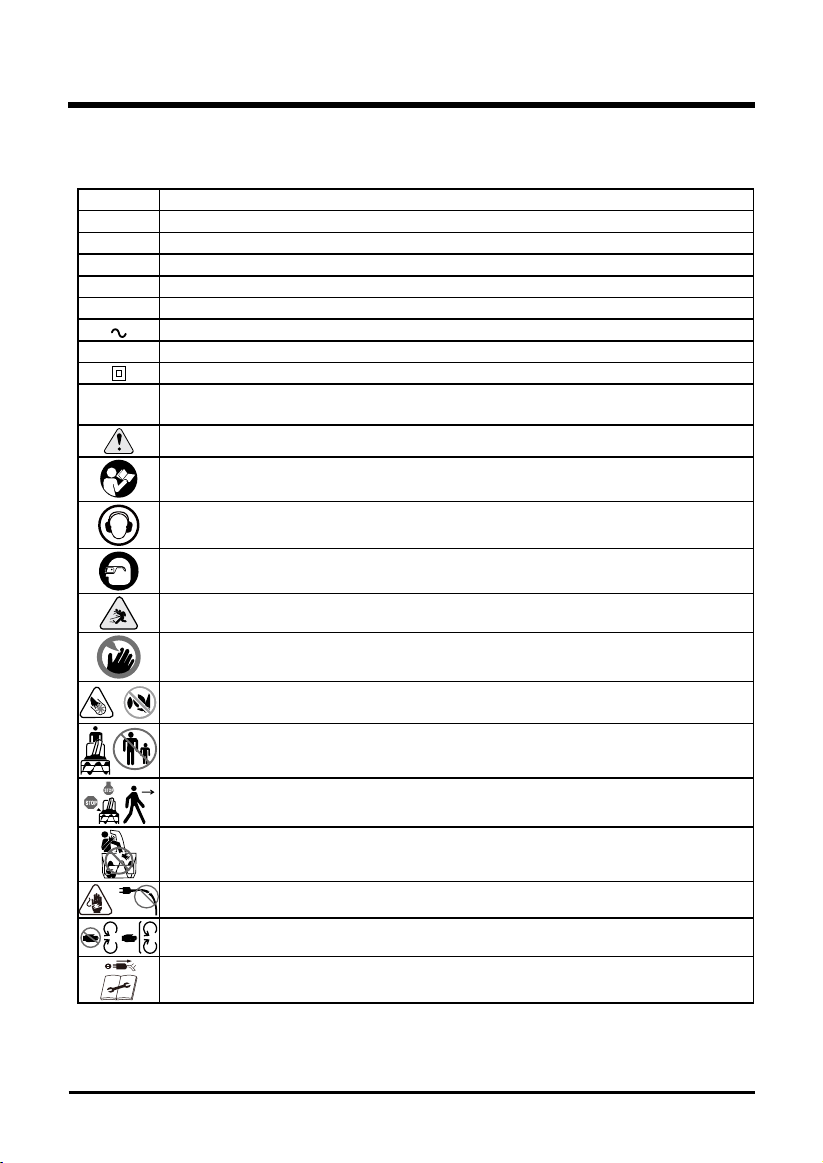
SYMBOLS
Some of the following symbols may be used on this product. Please study them and learn their
meaning. Proper interpretation of these symbols will allow you to operate the product better and safer.
SYMBOL DESIGNATION/EXPLANATION
V Voltage
A Current
Hz Frequency (cycles per second)
W Power
min Time
Type of current
n
Rotational speed, at no load
o
Double-insulated construction
/min Revolutions, strokes, surface speed, orbits etc.,
per minute
Indicates a potential personal injury hazard.
To reduce the risk of injury user must read and understand operator’s manual
before using this product.
Wear ear protection at all times while operating the machine.
Always wear eye protection with side shields marked to comply with ANSI Z87.1
when operating this equipment.
Thrown objects can ricochet and result in personal injury or property damage.
Keep hands and feet away.
Keep hands and feet away from rotating impeller.
Keep bystanders a safe distance from the machine.
Stop the motor and unplug the machine before leaving the machine.
Keep hands, feet away from the discharge area.
Do not use a damaged power cord.
Stay away from moving parts. Keep all guards and shields in place.
Before carrying out maintenance on the machine, unplug the machine.
5
5
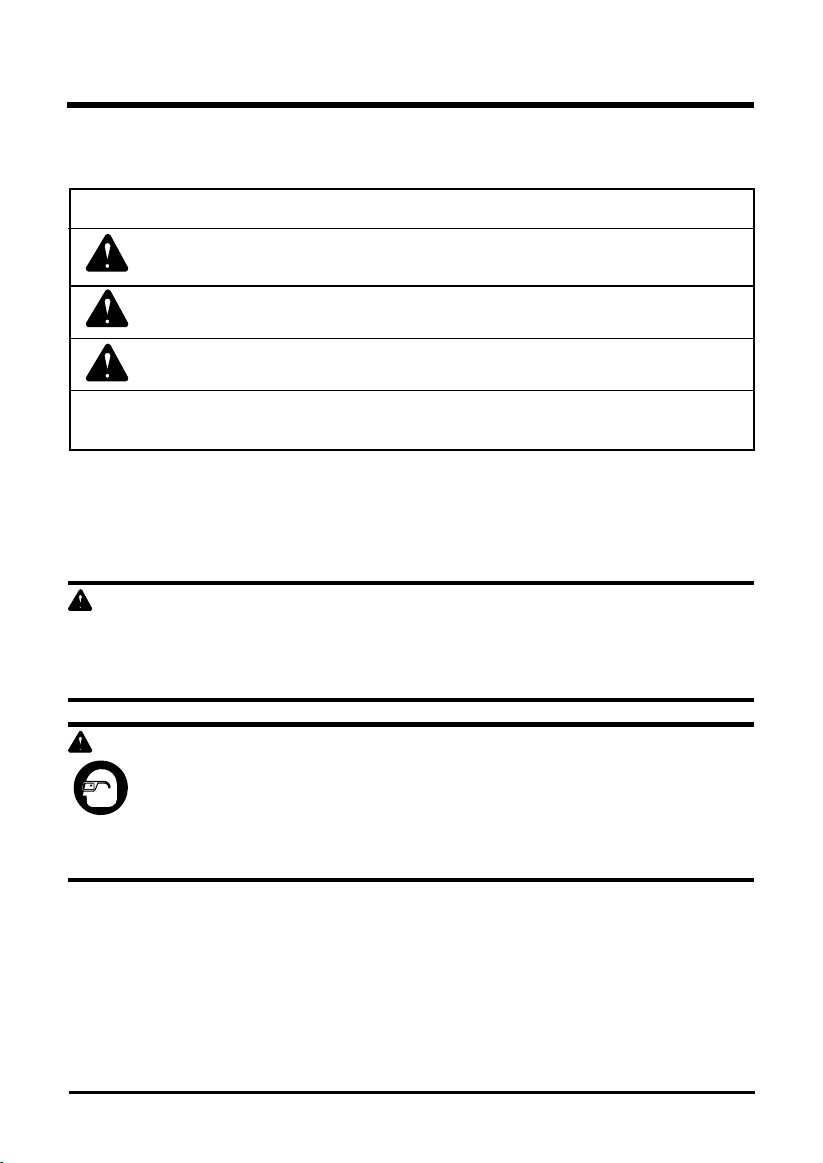
SYMBOLS
The following signal words and meanings are intended to explain the levels of risk associated
with this product.
SYMBOL SIGNAL MEANING
DANGER Indicates an imminently hazardous situation, which, if not
avoided, will result in death or serious injury.
WARNING Indicates a potentially hazardous situation, which, if not avoided,
could result in death or serious injury.
CAUTION Indicates a potentially hazardous situation, which, if not avoided,
may result in minor or moderate injury.
CAUTION (Without Safety Alert Symbol) Indicates a situation that may
result in property damage.
SERVICE
Servicing requires extreme care and knowledge and should be performed only by a qualied
service technician. For service we suggest you return the product to your nearest AUTHORIZED
SERVICE CENTER for repair. When servicing, use only identical replacement parts.
WARNING
To avoid serious personal injury, do not attempt to use this product until you have read this
Owner's Manual thoroughly and understand it completely. If you do not understand the warnings
and instructions in this Owner's Manual, do not use this product. Call the Toll-free Helpline (1888-909-6757) for assistance.
WARNING
The operation of any power tool can result in foreign objects being thrown into your
eyes, which can result in severe eye damage. Before beginning power tool operation,
always wear safety goggles or safety glasses with side shields and, when needed, a
full face shield. We recommend Wide Vision Safety Mask for use over eyeglasses or
standard safety glasses with side shields. Always use eye protection which is marked
to comply with ANSI Z87.1.
SAVE THESE INSTRUCTIONS
6

ELECTRICAL
DOUBLE INSULATED SNOW SHOVEL
DANGER
Basic safety precautions should always be followed when using electric tools in order to reduce
the risk of fire, electric shock, and personal injury. Read the entire Owner's Manual carefully
and understand it thoroughly before using this snow shovel. Pay close attention to the operating
instructions and safety rules.
This snow shovel is “DOUBLE INSULATED”
W ARNI N G
In order to reduce the risk of electric shock when operating this snow shovel, use only a CSA-listed
extension cord that is approved for outdoor use, such as Type SJTW, 16AWG, and that has a lower
temperature rating of -40° F (-40° C).
• Ground Fault Circuit Interrupter (GFCI) protection should be provided on the circuit(s)
or outlet(s) that will be used for this snow shovel. For an extra measure of safety, use a
receptacle that has built-in GFCI protection.
• The nameplate on the snow shovel indicates the voltage used. Do not connect the snow
shovel to
the nameplate.
an AC circuit that provides a different voltage from the voltage that is indicated on
MINIMUM GAUGE FOR EXTENSION CORDS (AWG)
(WHEN USING 120 V ONLY)
Amp Rating Total Length of Cord in Feet (meters)
More Than Not More Than 25' (7.6 m) 50' (15 m) 100' (30.4 m) 150' (45.7 m)
0 6 18 16 16 14
6 10 18 16 14 12
10 12 16 16 14 12
W ARNI N G
In order to prevent electric shock, use an extension cord that is suitable for outdoor use.
• Inspect the extension cord and the power cord on a regular basis. Look for deterioration,
cuts, or cracks in the insulation. Inspect the connections for damage. Repair or replace the
extension cord or the power cord if any damage is found.
• Verify that the rotor and all moving parts have come to a complete stop, and disconnect the
snow shovel from the power supply in ord
performing any inspections or repairs.
• Don’t Abuse Cord– Never carry snow shovel by cord or yank it to disconnect from receptacle.
Keep cord from heat, oil, and sharp edges. ( Never carry the snow shovel by the cord or yank
it to disconnect receptacle. )
er to prevent accidental start-ups before cleaning or
7

ELECTRICAL
• Keep the extension cord away from heat, oil, and sharp edges in order to prevent damage.
• If the extension cord is damaged in any manner while it is plugged in, disconnect it from the
outlet immediately.
• Prevent any possible disconnection of the power cord from the extension cord while the snow
shovel is in use by using the cord retainer and guide bar. Refer to the section entitled Using
the Cord Retainer.
•
plugged in. Verify that the switch is in the "OFF" position before plugging in the snow shovel.
• Unplug the snow shovel and allow it to cool down before putting it into storage. Store the snow
shovel indoors.
• Unplug the snow shovel when it is not in use and before performing any maintenance or
repairs.
W ARNI N G
To prevent electric shock use only with an extension cord suitable for outdoor use, such as SW,
SOW, STW, STOW, SJW, SJOW, SJTW, or SJTOW.(Does not apply to battery-operated snow
shovels.)
SAVE THESE INSTRUCTIONS
8
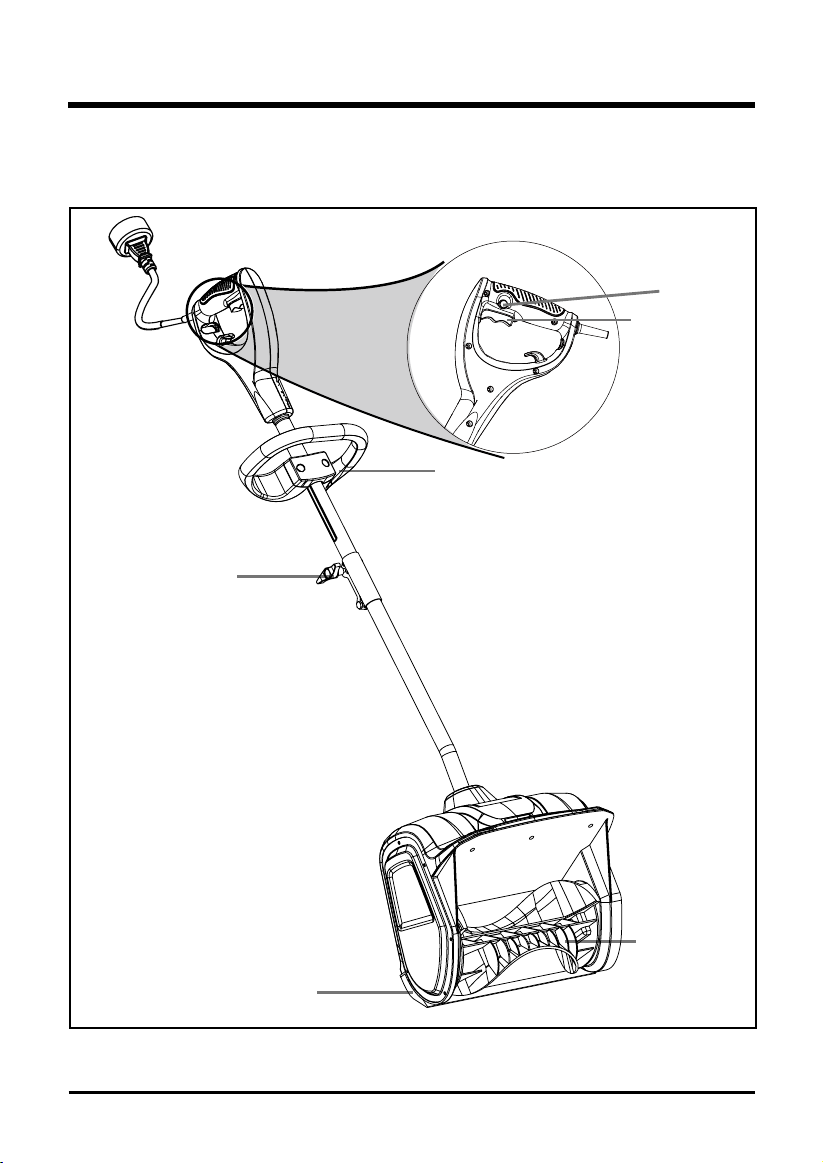
KNOW YOUR SNOW SHOVEL
Read this operator's manual and safety rules before operating your snow shovel. Compare the
illustration in Figure 1 to your snow shovel in order to familiarize yourself with the location of
various controls and adjustments. Save this manual for future reference.
Lock-out
button
Trigger switch
Auxiliary handle
Lock knob
Scraper
Impeller
Fig. 1
9

ASSEMBLY INSTRUCTIONS
UNPACKING
• Carefully remove the product and any accessories from the box. Make sure that all items
listed in the packing list are included.
• Inspect the product carefully to make sure no breakage or damage occurred during shipping.
• Do not discard the packing material until you have carefully inspected and satisfactorily
operated the product.
• If any parts are damaged or missing, please call 1-888-909-6757 for assistance.
PACKING LIST
• Snow shovel
• Owner's Manual
WARNING
If any parts are damaged or missing, do not operate this product until the parts are replaced.
Failure to heed this warning could result in serious personal injury.
WARNING
Do not connect to power supply until assembly is complete. Failure to comply could result in
accidental starting and possible serious personal injury.
WARNING
Do not attempt to modify this product or create accessories not recommended for use with this
product. Any such alteration or modication is misuse, and could result in a hazardous condition
leading to possible serious personal injury.
10
ASSEMBLY INSTRUCTIONS
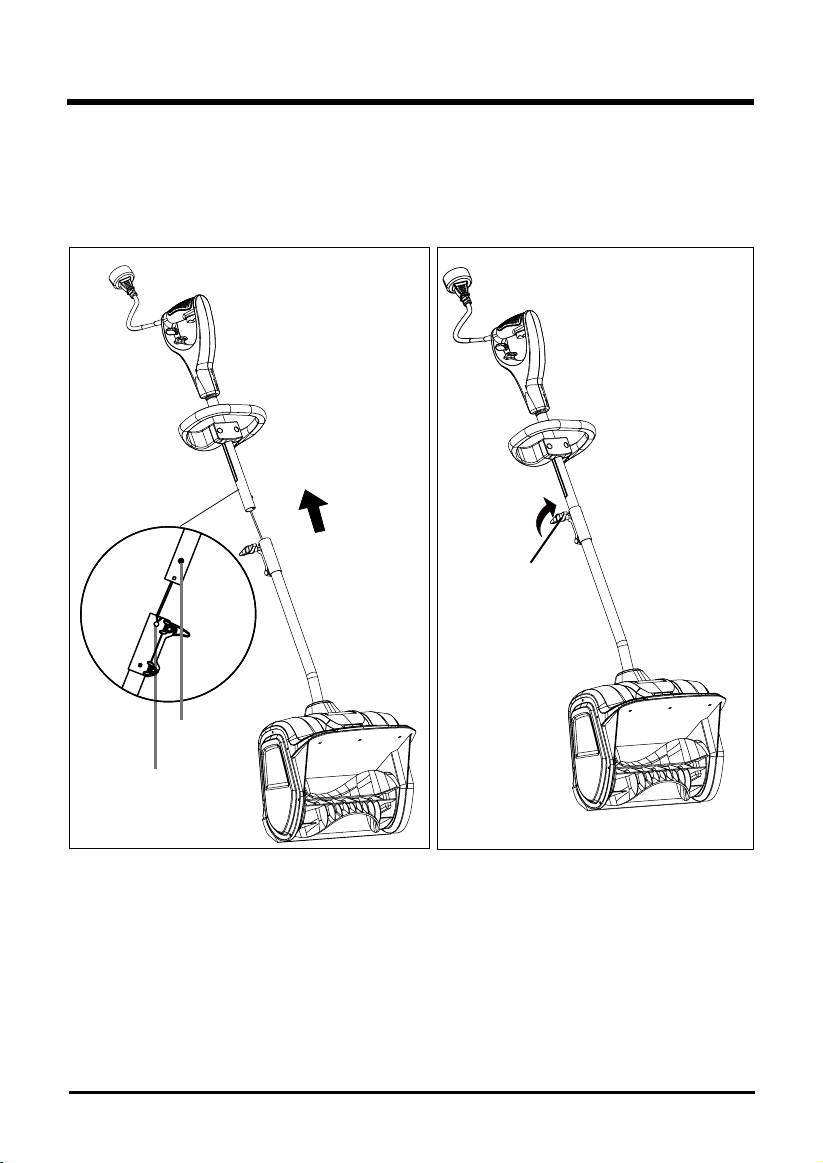
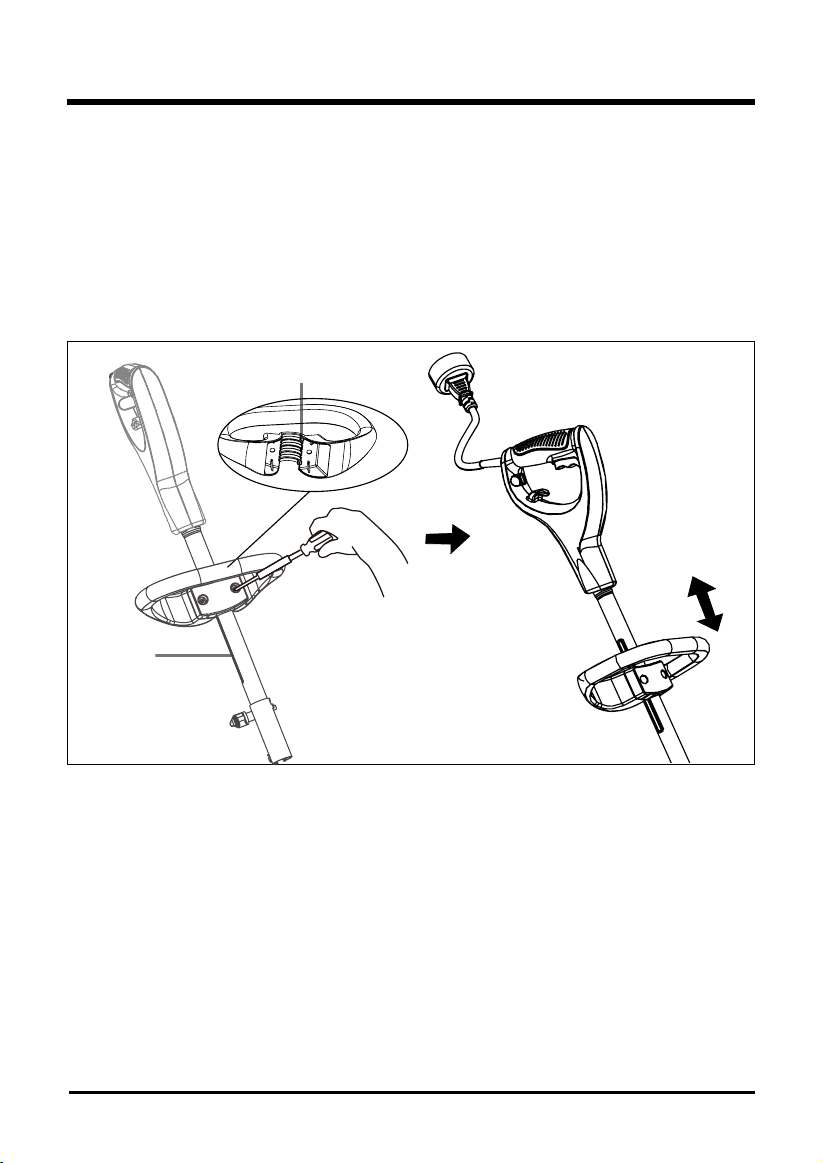
CONNECTING THE SHAFTS (See Figures 2-3)
• Align the pin on the handle shaft and the hole on the lower shaft. (Fig. 2).
• Turn the lock knob clockwise until it is fully tightened. (Fig. 3).
Lock knob
Fig. 2
Pin
Hole
Fig. 3
11
ASSEMBLY INSTRUCTIONS
WARNING
Do not allow familiarity with this product to make you careless. Remember that a careless
fraction of a second is sufcient to inict serious injury.
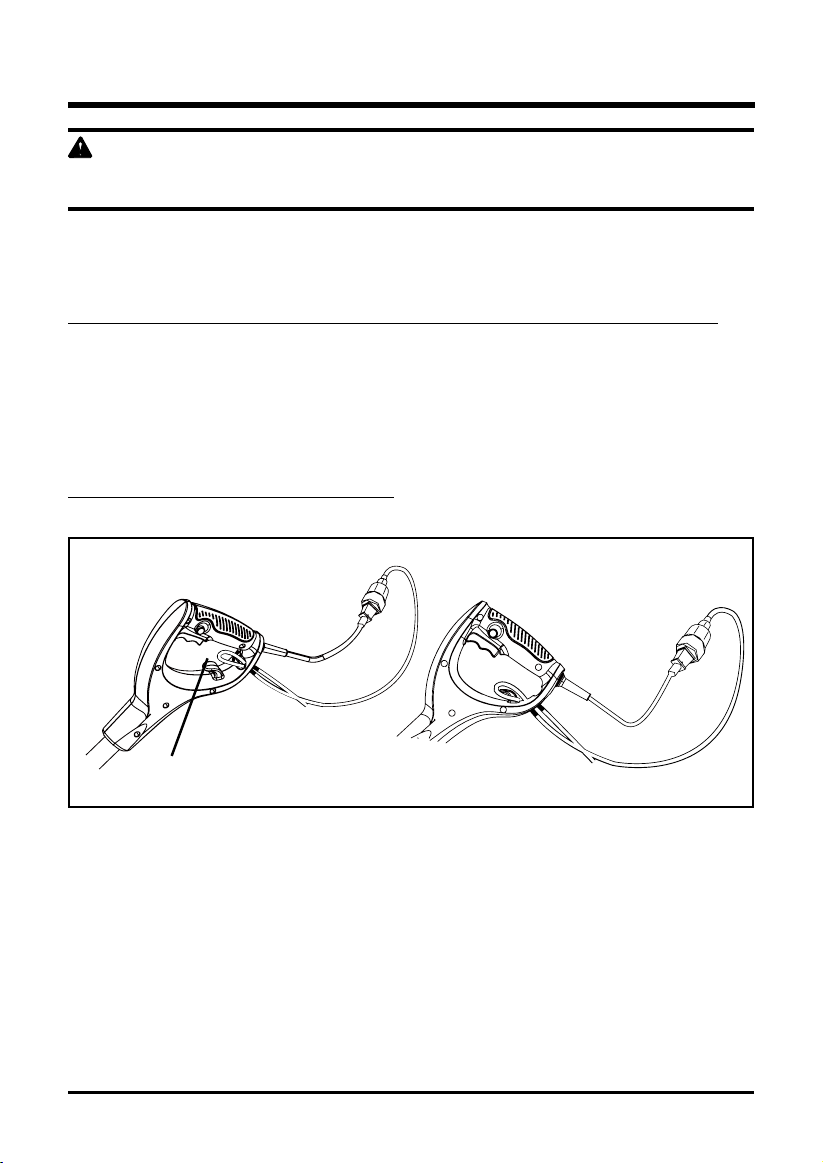
USING THE CORD RETAINER (See Figure 4)
This snow shovel is equipped with a cord retainer in order to prevent the extension cord from
disconnecting from the power cord while the snow shovel is in use.
NOTE: Do not plug the extension cord into the outlet until it has been connected to the cord retainer and
plugged into the snow shovel.
To use the cord retainer:
• Fold the extension cord to form a tight loop near the retainer.
• Push the loop through the bottom hole in the rear handle.
• Slide the loop over the retaining clip, and pull down until the cord is secured.
NOTE: Use a CSA or CuL-approved extension cord.
Cord retainer
Fig. 4
12
OPERATING INSTRUCTIONS
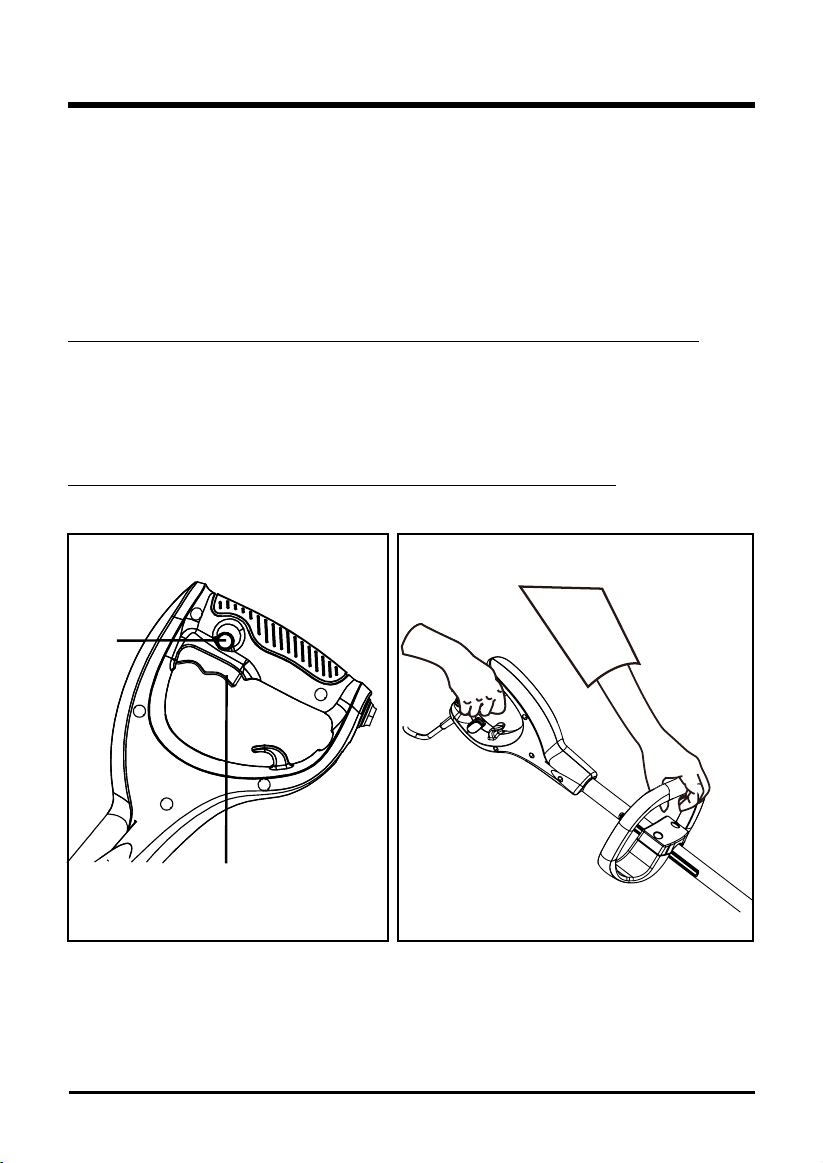
STARTING THE SNOW SHOVEL (See Figures 5-6)
In order to avoid serious injury, the operator and unit must be in a stable position when starting
the snow shovel.
Follow this sequence exactly in order to start the snow shovel.
• Verify that the snow shovel is plugged in.
• Press and hold the lock-out button (Fig. 5).
• While holding the lock-out button, press and hold the trigger switch.
NOTE: The Snow Shovel will not start if the lock-out button is not held until the trigger switch is lifted.
• Hold the handles and begin to use the snow shovel (Fig.6).
STOPPING THE SNOW SHOVEL
• Release the trigger switch.
Note: Once the unit has been turned on, there is no need to engage the lock- out button.
Lock-Out
Button
Trigger
switch
Fig. 6Fig. 5
13
CONTENTS
OPERATING INSTRUCTIONS
ADJUST THE AUXILIARY HANDLE HEIGHT (See Figure 7)
• Loosen the bolts until the auxiliary handle is no longer secured.
• Move the auxiliary handle to the height you prefer, make sure the raised points on the auxiliary
handle are aligned with the grooves on one side of the handle shaft.
• Once the handle is set to desired setting, tighten the bolts with a phillips screwdriver until
auxiliary handle is secured.
Raised points
Groove
Fig. 7
14
OPERATING INSTRUCTIONS
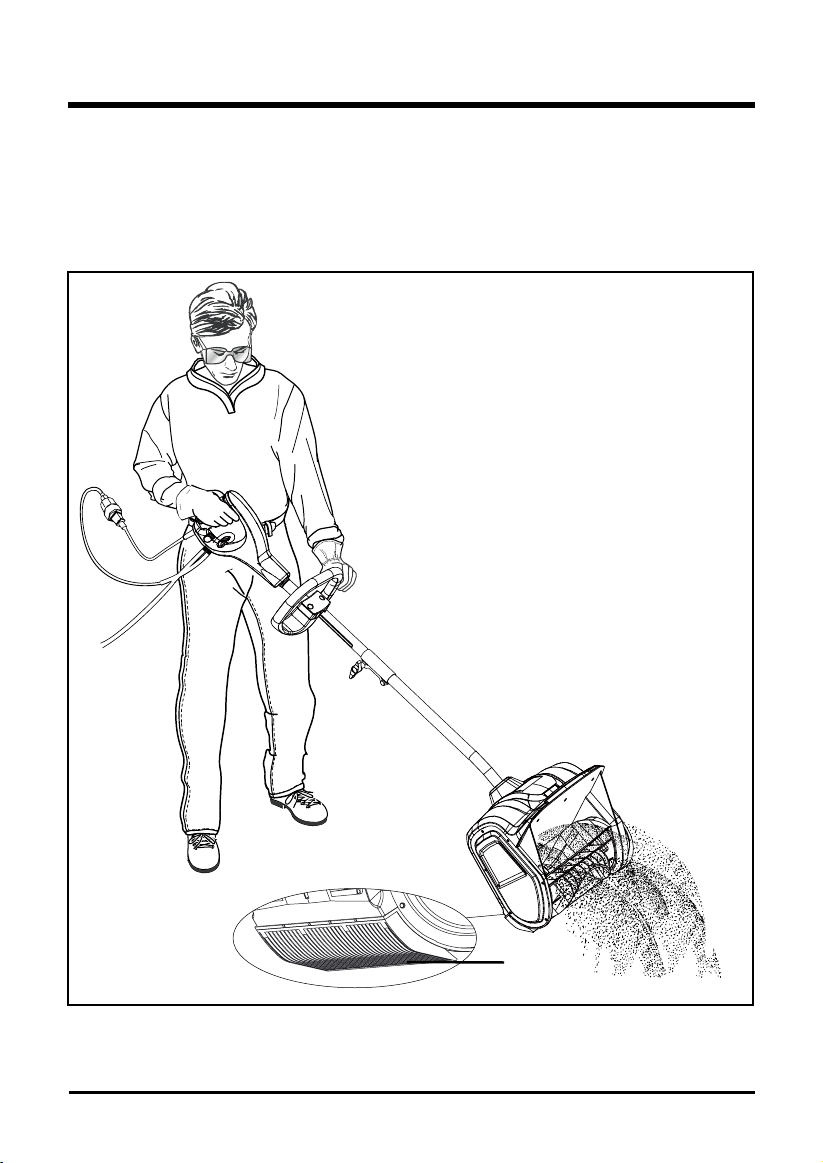
USING THE SNOW SHOVEL (See Figure 8)
• Start the snow shovel by following the Starting Instructions. The depth and weight of the snow
will determine the forward speed.
• Push the snow shovel forward so that it rides on the scraper.
• Verify that the power cord is attached to the cord retainer. The power cord should trail to the
side of the operator.
Fig. 8
Scraper
15

MAINTENANCE
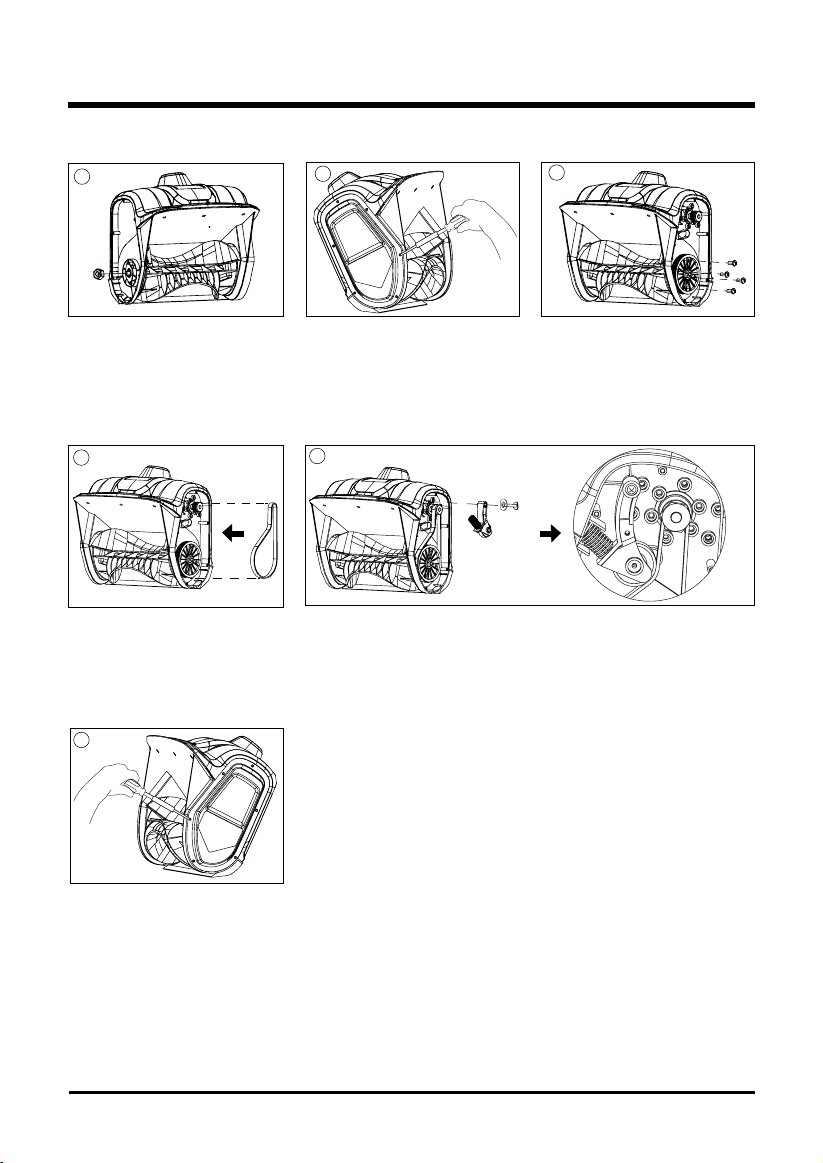
REPLACING THE SCRAPER (See Figures 9-10)
W ARNI N G
IN ORDER TO AVOID SERIOUS PERSONAL INJURY, TURN THE SNOW SHOVEL
OFF AND UNPLUG IT BEFORE PERFORMING ANY MAINTENANCE.
Use only the manufacturer's original replacement parts.
• Place the snow shovel on the ground or on a work bench. Position the snow shovel so that
the impeller is facing up.
• Remove the four (4) screws that are located beneath the impeller that secure the scraper
to the housing using a phillips screwdriver. (Fig. 9).
screws
scraper
Fig. 9
• Remove the scraper, and disc
ard it in the proper manner. (Fig. 10).
Fig. 10
scraper
• Snap the new scraper into position, and attach it to the snow shovel by reinstalling the
four (4) screws.
16

CONTENTS
MAINTENANCE
STORAGE
• Allow the motor to cool down before storing.
• Store the snow shovel in a locked location in order to prevent unauthorized use or damage.
• Store the snow shovel in a dry, well-ventilated area.
• Store the snow shovel out of the reach of children.
CLEANING
In order to avoid serious personal injury, turn the snow shovel off and unplug it before cleaning
or servicing.
Use a small brush to clean the outside of the snow shovel. Do not use strong detergents.
Household cleaners that contain aromatic oils such as pine and lemon, and solvents such as
kerosene can damage the plastic housing and handles. Wipe off any moisture using a soft cloth.
17
MAINTENANCE
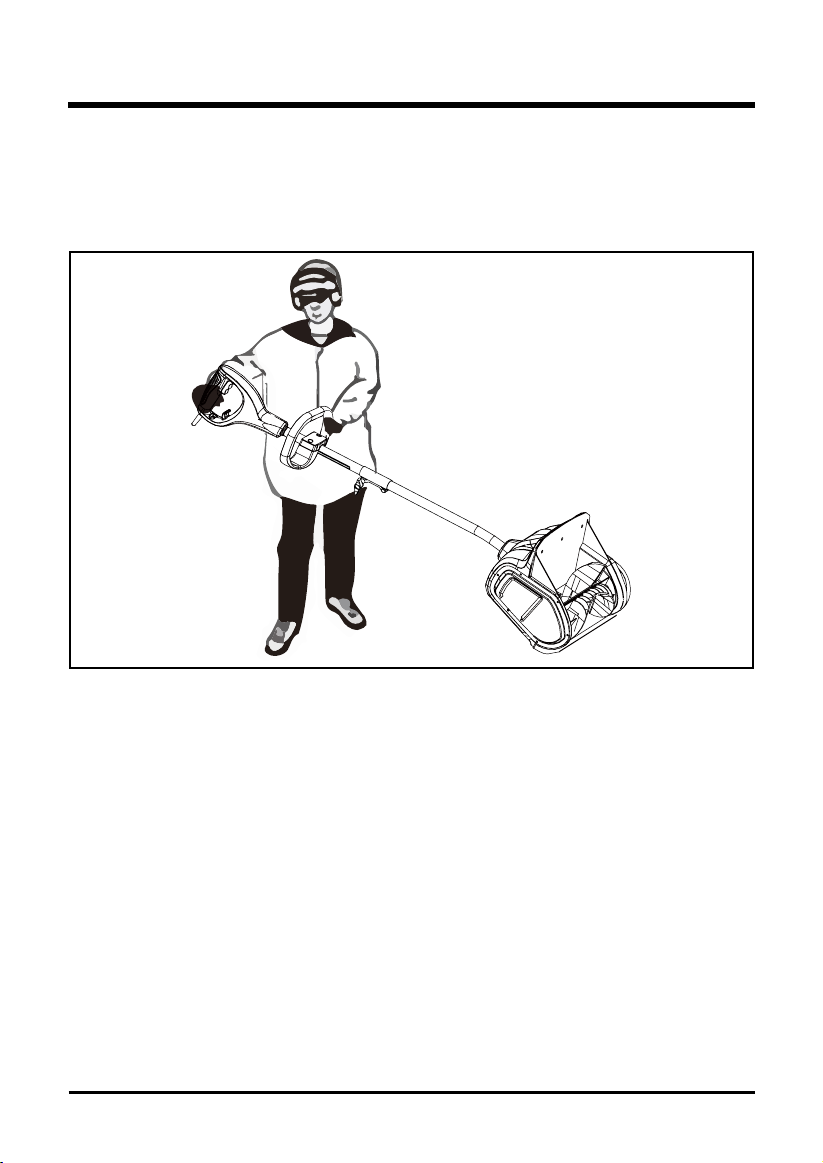
TRANSPORTING THE SNOW SHOVEL (See Figure 11)
• Allow the motor to cool down before transporting.
• Secure the snow shovel while transporting.
• When moving the snow shovel, grasp it by the top handle and auxiliary handle. (Fig. 11).
Fig. 11
18

MAINTENANCE
IMPELLOR REPLACEMENT
1 2 3
screw
Washer
• Remove the right side
cover by removing 6
screws.
4 65
• Remove the 4 screws.
7
• Remove the impellor shaft
with pulley assembly
attached.
• Pull the belt tensioner (idler
arm) away from the drive
pulley. Be sure not to lose the
washer, spring and screw left.
• Remove the left side cover
by removing 6 screws.
8
shaft sleeve
• Withdraw the old/damaged
impellor. Be sure not to
loose the shaft sleeve that
secures left side of the
shaft.
• Remove the belt.
• Remove the nut that
secures the left side plate.
9
• Insert the impellor shaft with
pulley assembly attached in the
new impellor. Be sure to replace
the retained shaft sleeve that
secures left side of the shaft.
19
19
MAINTENANCE
IMPELLOR REPLACEMENT
10
11
12
• Replace and tighten the
remaining nut to secure the
left side plate assembly.
13
• Place the belt back into its
place.
15
• Replace and tighten the
remaining screws to secure
the right side cover.
• Replace and tighten the
remaining screws to secure
the left side cover.
14
• Replace and tighten the
remaining screws to secure
the pulley assembly.
• Place the belt tensioner (idler arm) back into its place.
20
20

TROUBLESHOOTING
PROBLEM POSSIBLE CAUSE SOLUTION
The snow shovel does not
start.
The motor is on, but the
rotor does not turn.
The snow shovel leaves a
thin layer.
The snow shovel is
unplugged.
The lock-out button or
trigger switch were not used
properly.
Extension cord is damaged. Verify no damage in extension cord.
The belt is damaged.
The scraper is worn. 9-10).
Verify that the snow shovel is
plugged into an electrical outlet.
Press and hold the lock-out button,
while holding the lock-out button,
press the switch trigger. (See
Figure 5).
Replace the belt (see "IMPELLOR
REPLACEMENT" on page 19-20).
21

LIMITED FOUR-YEAR WARRANTY
GREENWORKS™ hereby warranties this product, to the original purchaser with proof of
purchase, for a period of four (4) years against defects in materials, parts or workmanship.
GREENWORKS™, at its own discretion will repair or replace any and all parts found to be
defective, through normal use, free of charge to the customer. This warranty is valid only for
units which have been used for personal use that have not been hired or rented for industrial/
commercial use, and that have been maintained in accordance with the instructions in the
owners’ manual supplied with the product from new.
ITEMS NOT COVERED BY WARRANTY:
1. Any part that has become inoperative due to misuse, commercial use, abuse, neglect,
accident, improper maintenance, or alteration; or
2. The unit, if it has not been operated and/or maintained in accordance with the owner's
manual; or
3. Normal wear, except as noted below;
4. Routine maintenance items such as lubricants, scraper, impeller;
5. Normal deterioration of the exterior nish due to use or exposure.
GREENWORKS HELPLINE (1 888 90WORKS):
Warranty service is available by calling our toll-free helpline, at 1 888 909 6757 (1 888
90WORKS).
TRANSPORTATION CHARGES:
Transportation charges for the movement of any power equipment unit or attachment are the
responsibility of the purchaser. It is the purchaser’s responsibility to pay transportation charges
for any part submitted for replacement under this warranty unless such return is requested in
writing by GREENWORKS.
22
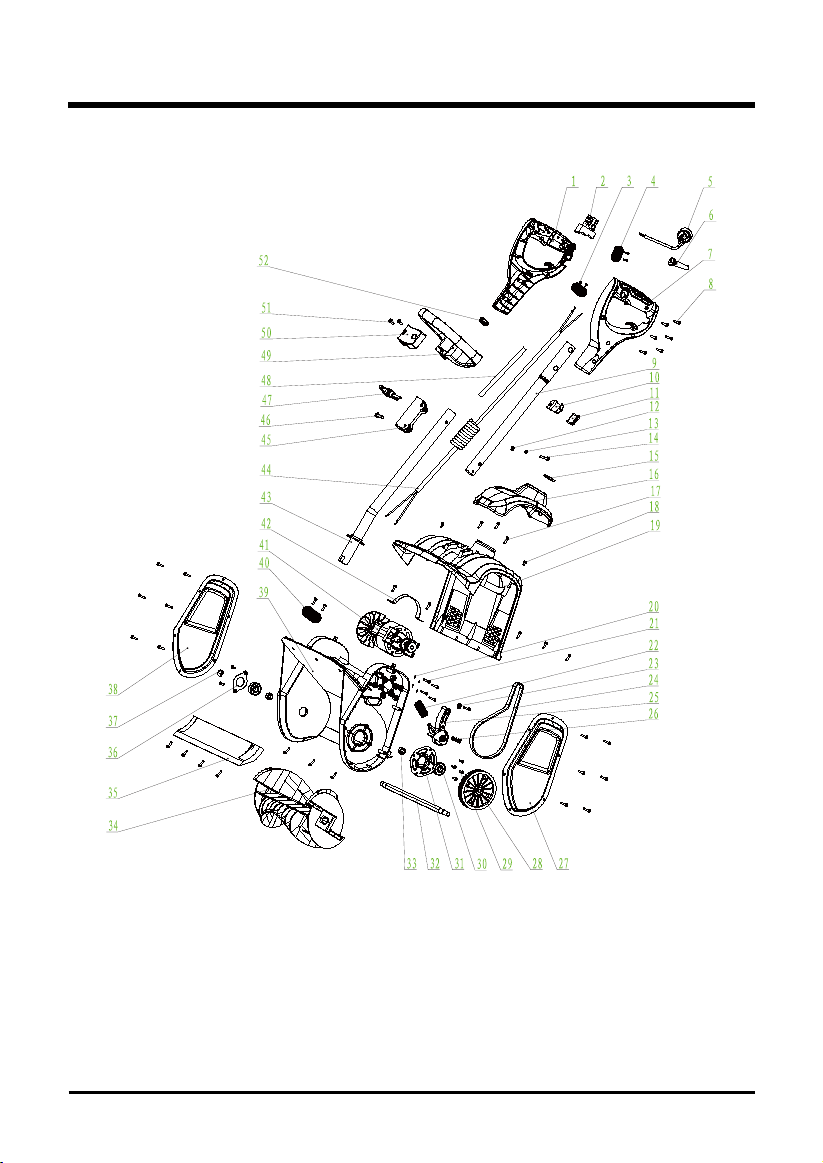
EXPLODED VIEW
23

PARTS LIST
ITEM NO. PART NO. DESCRIPTION QTY
1 34107263-12 Right handle 1
2 36301263AB Switch assembly 1
3 32202517 Screw 2
4 3410302 Wire clip 2
5 36401263 Power cord 1
6 3420102-1 Cord protector 1
7 34106263-12 Left handle 1
8 3220505D Screw 8
9 333011470 Upper shaft 1
10 33301836 Press board 1
11 34201877 Rubber sealing ring 1
12 32914131 Washer 1
13 32916131 Spring washer 1
14 3221137 Screw 1
15 342011468 Seal ring 1
16 341061468AB Cover 1
17 32205877 Screw 15
18 32205836 Screw 19
19 341011468AB Upper house 1
20 3290250 Spring washer 4
21 3220598 Screw 4
22 3390198 Spring 1
23 34901897 Washer 1
24 329011468 Belt 1
25 3111198 Belt tensioner assy 1
26 3390298 Press spring 1
27 333051468AB Left cover 1
28 341051468 Big pulley 1
29 3220401 Screw 4
30 321011468 Axle 1
31 333011468 Axle plate 1
32 332011468 Impeller shaft 1
33 332021468 Shaft sleeve 2
34 341031468 Impeller 1
35 341041468AB Scraper 1
36 333021468 Axle plate 1
37 32910131 Nut 1
38 333061468AB Right cover 1
39 341021468AB Lower house 1
24
 Loading...