

Greenwit Technologies MOTORINO XP SERIES Owner's Manual

Owner’s Manual
XP Series

2
MOTORINO™ XP SERIES OWNERS MANUAL
© 2012 by Greenwit Technologies Limited
Revised December 2012
All Rights Reserved
Any reprinting or unauthorized use without the written permission of
Greenwit Technologies Inc. is expressly prohibited.
All trademarks remain the property of their respective owners.
Important Information About This Manual

3
How to Read This Manual
A “WARNING!” label indicates that failure to abide by the following
instructions may result in serious personal injury or death to the rider or
others, as well as damage to equipment.
A “CAUTION!” label indicates that failure to abide by the following instructions may result in damage to your MOTORINO™ and related equipment and/or legal consequences and/or nes and/or denial of warranty
coverage.
A “Note:” label indicates information that is especially useful but does not
have safety consequences.
WARNING!
Please fully read and understand all sections of this manual
before operating this MOTORINO™ electric vehicle. Do not attempt to charge or operate this vehicle until you have attained
adequate knowledge of its features and controls and you have
been trained in safe riding techniques. Failure to do so could result in serious injury or death and/or damage to the vehicle and/
or denial of warranty coverage.
CAUTION!
In our constant efforts to improve and upgrade our products,
your MOTORINO™ may incorporate updated components and/
or features that are not specically covered by this version of the
Owner’s Manual. If you are not clear on how to operate or make
use of any components or features, contact your local MO-
TORINO™ dealer for clarication. Product design, features, and
specications are subject to change without notice.
Important Information About This Manual

4
Welcome
Your new MOTORINO™ is the culmination of our decade-long experience
in the engineering, sale, and maintenance of light electric vehicles. We’ve
put everything we know into our work and want to share, so please read
this manual carefully. It will help you to fully enjoy the benets of, and
ensure a long life for, your MOTORINO™.
“Thank you for purchasing our product!”
The Greenwit Technologies Team
Welcome

5
Table of Contents
Contents
Important Information About This Manual. . . . . . . . . . . . . . . . . . . 2
How to Read This Manual. . . . . . . . . . . . . . . . . . . . . . . . . 3
Welcome . . . . . . . . . . . . . . . . . . . . . . . . . . . . . . . . . . 4
Safety Information . . . . . . . . . . . . . . . . . . . . . . . . . . . . . 9
General Safety Warnings . . . . . . . . . . . . . . . . . . . . . . . . . 9
Rider Fitness . . . . . . . . . . . . . . . . . . . . . . . . . . . . 10
Protective Apparel . . . . . . . . . . . . . . . . . . . . . . . . . 10
Vehicle Fitness . . . . . . . . . . . . . . . . . . . . . . . . . . . 10
Loading . . . . . . . . . . . . . . . . . . . . . . . . . . . . . . 10
The MOTORINO Code of Rider Conduct . . . . . . . . . . . . . . . . . . . 11
Pre-Operation Checks . . . . . . . . . . . . . . . . . . . . . . . . . . 12
Charging, Instruments, Controls, and Equipment . . . . . . . . . . . . . . . . 13
Charging . . . . . . . . . . . . . . . . . . . . . . . . . . . . . . . . 13
Connecting the Charger. . . . . . . . . . . . . . . . . . . . . . . 13
Understanding The Charger’s Indicator Lights . . . . . . . . . . . . . 14
Approximate Charging Times . . . . . . . . . . . . . . . . . . . . 14
Instruments. . . . . . . . . . . . . . . . . . . . . . . . . . . . . . . 15
Speedometer and Odometer . . . . . . . . . . . . . . . . . . . . 15
Volt Gauge . . . . . . . . . . . . . . . . . . . . . . . . . . . . 15
Indicator Lights . . . . . . . . . . . . . . . . . . . . . . . . . . 16
Controls and Equipment . . . . . . . . . . . . . . . . . . . . . . . . . 17
Main Circuit Breaker . . . . . . . . . . . . . . . . . . . . . . . . 17
Ignition Switch and Steering Lock . . . . . . . . . . . . . . . . . . 17
Throttle Grip . . . . . . . . . . . . . . . . . . . . . . . . . . . . 18
Brakes . . . . . . . . . . . . . . . . . . . . . . . . . . . . . . 19
Regenerative Braking . . . . . . . . . . . . . . . . . . . . . . . . 19

6
Table of Contents
Headlight Main Switch . . . . . . . . . . . . . . . . . . . . . . . 20
Headlight Hi-Lo Beam Switch . . . . . . . . . . . . . . . . . . . . 20
Turn Signal Switch . . . . . . . . . . . . . . . . . . . . . . . . . 21
CCT Switch . . . . . . . . . . . . . . . . . . . . . . . . . . . . 21
Horn Buttons . . . . . . . . . . . . . . . . . . . . . . . . . . . 21
Pedals . . . . . . . . . . . . . . . . . . . . . . . . . . . . . . 22
Under Seat Storage Compartments . . . . . . . . . . . . . . . . . 22
Tail Storage Box . . . . . . . . . . . . . . . . . . . . . . . . . . 22
Alarm System . . . . . . . . . . . . . . . . . . . . . . . . . . . 23
12V Accessory Power Outlet. . . . . . . . . . . . . . . . . . . . . 23
About the Electric Drive Train . . . . . . . . . . . . . . . . . . . . . . . . 24
How it Works . . . . . . . . . . . . . . . . . . . . . . . . . . . . . . 24
E-Riding Tips . . . . . . . . . . . . . . . . . . . . . . . . . . . . . . 24
Battery Information, Care, and Feeding . . . . . . . . . . . . . . . . . . . . 25
Battery Types and Terms . . . . . . . . . . . . . . . . . . . . . . . . . 25
Caring for your Gel Cell Battery Pack . . . . . . . . . . . . . . . . . . . . 26
Caring for your Lithium (LiFePO4) Battery Pack . . . . . . . . . . . . . . . 27
Battery Lifespan. . . . . . . . . . . . . . . . . . . . . . . . . . . . . 28
A Word on Replacement Batteries . . . . . . . . . . . . . . . . . . . . . 28
Battery Disposal and Recycling . . . . . . . . . . . . . . . . . . . . . . 29
Extending Your Range by Adding Capacity . . . . . . . . . . . . . . . . . 29
Maintenance . . . . . . . . . . . . . . . . . . . . . . . . . . . . . . . . 30
Periodic Maintenance Schedule . . . . . . . . . . . . . . . . . . . . . . 30
Maintenance Procedures . . . . . . . . . . . . . . . . . . . . . . . . . 31
Brake Rotor Bolts . . . . . . . . . . . . . . . . . . . . . . . . . 31
Caliper Mounting Plate Bolts . . . . . . . . . . . . . . . . . . . . 32
Front Axle Bolt. . . . . . . . . . . . . . . . . . . . . . . . . . . 33

7
Table of Contents
Rear Axle Nuts, Keeper Plate Bolt, and Chain Tension . . . . . . . . . . 34
Front and Rear Wheels . . . . . . . . . . . . . . . . . . . . . . . 34
Brake Fluid Level, Topping-Up, Flushing and Bleeding . . . . . . . . . 34
Inspecting the Freewheel and Lubricating the Chain . . . . . . . . . . 35
Checking Brake Pads and Rotors for Wear . . . . . . . . . . . . . . . 36
Adjusting Rear Ride Height . . . . . . . . . . . . . . . . . . . . . 36
Lubricating Brake Lever Pivots . . . . . . . . . . . . . . . . . . . . 37
Checking Wheel Bearing Play . . . . . . . . . . . . . . . . . . . . 37
Checking for Steering Bearing Play . . . . . . . . . . . . . . . . . . 37
Lubricating Center and Side Stand Pivot Points . . . . . . . . . . . . 38
Adjusting Seat Latch Release Cable . . . . . . . . . . . . . . . . . 38
Tires . . . . . . . . . . . . . . . . . . . . . . . . . . . . . . . . . . 38
Tire Pressure . . . . . . . . . . . . . . . . . . . . . . . . . . . . 39
Using the Supplied Air Compressor . . . . . . . . . . . . . . . . . . 39
Dealing with a Flat Tire . . . . . . . . . . . . . . . . . . . . . . . 39
Checking Tires for Condition and Foreign Objects . . . . . . . . . . . 40
Checking the Tire Valve . . . . . . . . . . . . . . . . . . . . . . . 40
Using the Supplied Tubeless Tire Plug Kit . . . . . . . . . . . . . . . 40
Re-Seating a Tire . . . . . . . . . . . . . . . . . . . . . . . . . . 41
Preemptive Tire Sealant . . . . . . . . . . . . . . . . . . . . . . 41
MOTORINO™ Love . . . . . . . . . . . . . . . . . . . . . . . . . . . . . . 42
Washing . . . . . . . . . . . . . . . . . . . . . . . . . . . . . 42
Waxing . . . . . . . . . . . . . . . . . . . . . . . . . . . . . . 42
Protecting Metal Surfaces . . . . . . . . . . . . . . . . . . . . . . 42
Storage . . . . . . . . . . . . . . . . . . . . . . . . . . . . . . . . . . 43
Short-Term Storage (Under 1 Month). . . . . . . . . . . . . . . . . 43
Long-Term Storage. . . . . . . . . . . . . . . . . . . . . . . . . 43

8
Troubleshooting . . . . . . . . . . . . . . . . . . . . . . . . . . . . . . 44
Specications . . . . . . . . . . . . . . . . . . . . . . . . . . . . . . . . 47
Consumer Information . . . . . . . . . . . . . . . . . . . . . . . . . . . . 48
Warranty . . . . . . . . . . . . . . . . . . . . . . . . . . . . . . . . 48
Legal Classication and Regulatory Compliance. . . . . . . . . . . . . . . 50
Owner’s Information and Notes . . . . . . . . . . . . . . . . . . . . . . . . 51
Table of Contents

9
Safety Information
General Safety Warnings
WARNING!
Risks Inherent to Operation: Operating a Light Electric Vehicle
(LEV) involves risks and dangers that may cause serious bodily
injury. These include, but are not limited to, paralysis, disability, dismemberment, and death. These inherent risks may be
the result of purchaser’s own actions or non-actions involving
themselves, others, specic circumstances of the activity, and/or
the negligence of themselves or others. There may be other risks
known and/or unknown to the operator. The operator assumes
all risks and responsibility for events that may not be foreseeable
including economic loss, social distress, losses, costs, and damages caused as a result of operating the vehicle.
USE ONLY MOTORINO™-approved chargers specically designed for your
exact type and voltage of battery pack - severe damage may otherwise
result.
DO NOT attempt to open batteries - no servicing is required or possible.
DO NOT switch on ignition until properly seated and ready to ride.
DO NOT attempt to walk bike or place on either stand with ignition on.
DO NOT ride on roadways where the posted speed limit is in excess of 60
km/h.
DO NOT ride on sidewalks or pedestrian-only pathways.
DO NOT ride on sand, grass, gravel, or on bumpy, rough or loose unpaved
surfaces.
DO NOT ride in darkness without proper illumination.
DO NOT operate the bike at speeds in excess of 32 km/h (20 mph), with or
without motor propulsion (i.e. coasting downhill).
DO NOT ride without two hands on the handle bars.
DO NOT operate while not properly seated.
DO NOT jump ramps, curbs, or otherwise attempt any form of stunt riding.

10
Safety Information
Rider Fitness
Rider MUST be tall enough to be able to place feet rmly on ground.
Rider MUST be physically and mentally competent to operate a twowheeled motorized vehicle.
DO NOT ride while eating, drinking, smoking, wearing headphones, or
using any handheld electronic device.
DO NOT ride while under the inuence of alcohol or drugs.
DO NOT ride beyond your ability and experience.
Protective Apparel
DO NOT ride barefoot or with open-toed, high-heeled, platform, loose
and/or slip-on footwear.
DO wear an approved helmet, eye protection, highly visible protective
clothing, and gloves.
DO NOT wear or carry anything that obstructs your vision or interferes
with your complete control of the vehicle or which could become entangled in moving parts.
Vehicle Fitness
ALWAYS DO thorough pre-ride checks as outlined (Page12).
DO NOT operate the bike if it is materially defective in operation, damaged, or missing safety-related equipment.
Loading
Total payload, including the rider, is NOT TO EXCEED 135kg (300lbs).
Cargo and accessories MUST BE SECURELY ATTACHED OR STOWED, kept
as low on and as close to the centerline of the bike as possible, and
weight distributed evenly to avoid imbalance or instability.
FREQUENTLY CHECK all mounts and cargo restraints.
NEVER ATTACH heavy items to the front fork, fender, or handlebar as poor
handling and instability may result.

11
DO NOT carry more than 4.5kg (10lbs) of cargo in the tailbox.
If more cargo capacity is required, a trailer is a good option. Please refer
installation to your MOTORINO™ dealer.
The MOTORINO Code of Rider Conduct
In the interests of harmonious co-existence with other road users MOTORINO™ suggests the following common-sense code of conduct be
followed in addition to any formal rules of the road:
Always assume you are invisible to all other road users, regardless of
the lights and reectors you may have. Your life depends on it.
Share the road or path with others: motorists, pedestrians and cyclists
alike. Respect their rights and try to be forgiving if they infringe on yours.
Remember, your MOTORINO™ is probably the largest vehicle on the
bicycle path but the smallest vehicle on the road.
Ride defensively. You, and only you, are responsible for the safe operation of your vehicle.
Constantly scan from nearby to well ahead of where you are so you may
anticipate, and be ready to avoid road surface hazards as well as other
vehicles. Such hazards include:
Vehicles slowing or turning in front of you, entering the road ahead, •
or coming up behind you.
Car doors opening in front of you.•
Pedestrians stepping out in front of you.•
Children or dogs playing near the road.•
Potholes, sewer gratings, railroad tracks, expansion joints, road or •
sidewalk construction, debris and other road hazards that could
cause you to swerve, catch a wheel, lose traction, or otherwise have
a crash.
Always signal when turning and stopping.
Ride in a calm, smooth, predictable manner. Don’t weave through
trac or make sudden moves that may startle, provoke, or require evasive
action from other road users or pedestrians.
Never hitch a ride by holding on to another vehicle.
Safety Information

12
Pre-Operation Checks
WARNING!
Failure to perform checks on a regular basis could result in unsafe and/or unreliable vehicle condition leading to serious injury
or death and/or damage to the vehicle and/or denial of warranty
coverage.
Before Every Ride
Charge batteries (page 13).
Walk-around inspection. Make sure all parts are securely fastened.
Check tire pressure and condition (page 39).
Check brake operation front and rear; make sure there is no leakage of
brake uid.
Check for smooth throttle grip operation.
Check signals, lights, and horn.
Ensure the wheels spin freely and are well aligned.
Only turn the ignition on once you are seated and ready to ride.
After Every Ride
Be sure the ignition is turned o.
Plug the charger in and check for twin red lights and fan (page 14).
Be sure the charger will stay dry during operation.
If stored outside, cover the bike and arm the alarm.
Safety Information

13
Charging
WARNING!
DO NOT plug the AC power cable directly into the charging
socket on the bike.
WARNING!
Risk of overheating. Maintain air-ow around the charger at all
times. DO NOT enclose it in a storage compartment or other
unventilated space when charging.
The charger is designed for indoor, dry-area use only.
WARNING!
DO NOT expose charger to water.
If absolutely necessary, you could place the charger on the oorboard
and drape the bike with its cover allowing for sucient ventilation. You
do so at your own risk.
Connecting the Charger
1. Make sure the bike’s circuit breaker is ON.
To charge the battery pack, the bike’s main circuit breaker must be ON. If
the breaker is o, the charger will only seem like it is charging the battery.
2. Plug the charger’s AC power cable into the charger.
3. Plug the charger into a standard household 120V AC Power outlet.
4. Plug the charger output cable into the charging socket on the bike.
Charging, Instruments, Controls, and Equipment

14
Understanding The Charger’s Indicator Lights
The supplied MOTORINO™ charger is fully automatic and has two indicators lights to tell you what is happening. One red LED indicates that it
is connected to power, while the second LED changes between red, to
indicate “charging” and green, to indicate “full”.
Normal charger/indicator behaviour is as follows:
When the charger is connected to AC power but not plugged into •
the bike’s charge socket, you will see 1 red and 1 green light.
When the charger is then connected to a bike that needs charging, it •
will enter the “bulk-charge” mode and both lights will appear red and
the fan will run.
When a full charge is reached, it goes into “oat mode” and the lights •
will return to 1 red, 1 green.
NOTE:
Because the un-connected indicator state matches the fully-charged
state, always verify that charging has begun by looking for the 2 red
lights and listening for the fan. If you are not sure if the bike even
needs charging, just ride the bike a for a bit or rev the motor (with the
bike on the main stand and rear wheel in the air) to make it start the
charge cycle.
NOTE:
If you should happen to connect the charger only to the bike but not
to AC power, only one red LED will light. This light is being powered
by the battery pack and will only help drain it, so don’t leave your
charger plugged into the bike when not also connected to AC power.
Approximate Charging Times
Time to fully charge an empty pack:
20 A-h lead-acid pack: 8hrs.•
20A-h with 12 A-h secondary pack: 10hrs with 4A charger. •
26 A-h LiFePO•
4
pack: 6 Hrs (3hrs gives 80%).
Charging, Instruments, Controls, and Equipment
15
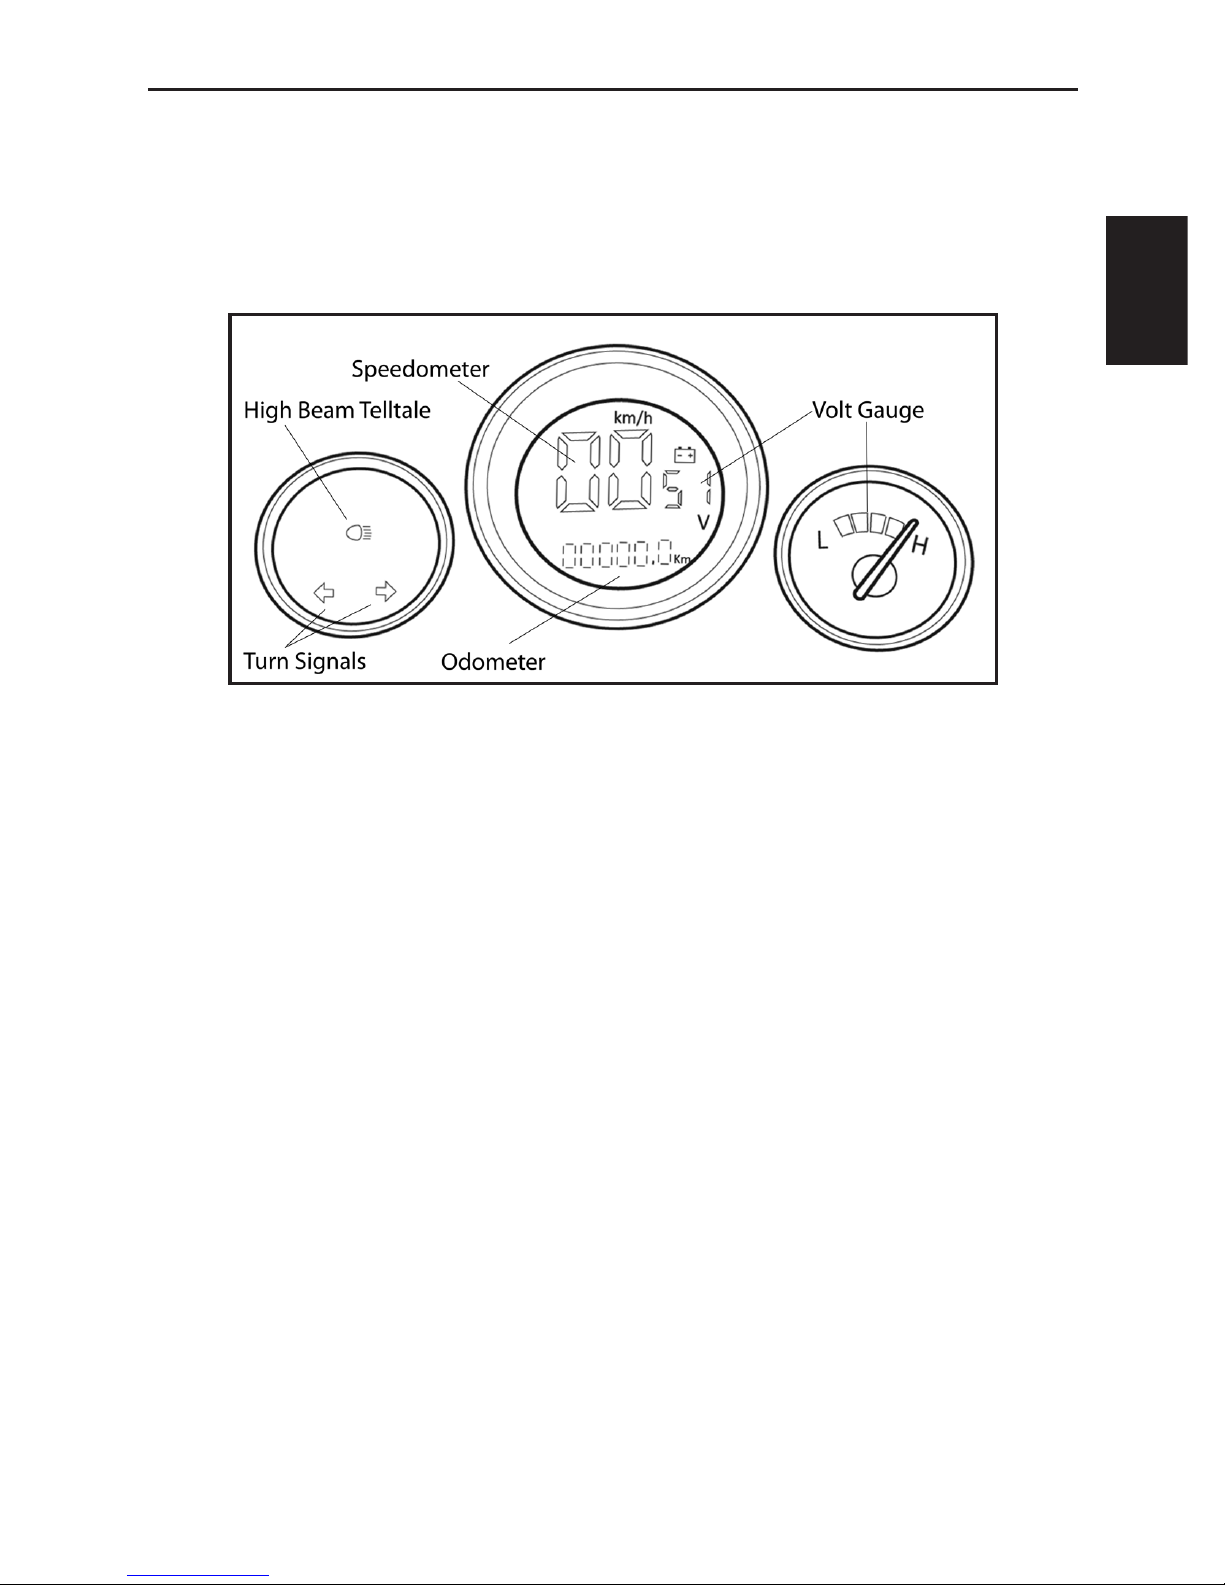
Instruments
Whether analog or digital, all MOTORINO™s have gauges that tell you the
same basic information. A speedometer, an odometer, and a voltmeter
which is the EV equivalent of a gas gauge (but not quite).
Typical gauge cluster.
Speedometer and Odometer
Everybody knows how to read a speedometer and odometer, so we won’t
go into detail other than to say that speedometers have a specied error
margin that is only on the plus side, so you won’t unwittingly be going
faster than you think. That means that speedometers usually read faster
than your actual speed. This is customary in the whole automotive industry. If absolute accuracy is required, a portable GPS or carefully calibrated
bicycle computer are your best options.
Volt Gauge
The battery pack voltage gauge, on the other hand, needs some interpretation in order to gain useful information about how much power you
have left. Much of this interpretation will be obvious after some time in
the saddle, but here are a few points to keep in mind.
The volt gauge, unlike a fuel gauge, is not a direct reading of how much
power or range you have left. It just shows the approximate voltage of
the battery pack.
Charging, Instruments, Controls, and Equipment

16
The volt gauge will read “high” for most of the time the bike is switched
on but stationary; only when the batteries are very weak will you see
lower readings.
The meaningful readings on a volt gauge only happen when a demand is
being placed on the batteries.
With gel cells fresh o the charger, you may not notice any swing in the
volt gauge o of “high”. However, as the batteries are drained, you will
notice a larger drop on the volt gauge as the bike is accelerated from a
stop or when going up hills.
When the batteries are still mostly charged, the volt gauge reading will
recover to full when the bike is cruising on level ground. However, as the
batteries drain further, you will notice the voltage reading drop more and
more when cruising. Also keep in mind that when regeneration is happening (such as lightly braking down a hill), the volt gauge reading will
show “high”.
Lithium batteries are a bit tougher to read because one major advantage
of LiFePO4 cells is also a slight disadvantage here: their voltage drops (or
“sags”) far less when under load. This means the volt gauge will almost
always show full, only deecting much in the last 4 or 5km.
NOTE:
On models with digital speedometers, there is an additional numerical voltage readout. This is interpreted in the same way as the analog
needle or bargraph-style volt gauges.
Optional, more advanced capacity gauge systems that track the total
power owing into and out of the battery during charging and use can
provide a much more accurate indication of the state of charge and are
especially desirable with lithium packs; ask your MOTORINO™ dealer for
details.
Ultimately, only the rider can get a solid feel for what their range is given
their usual specic use of the bike. Since range depends on the payload
of the bike, the terrain, tire pressures, braking technique, wind and many
other factors, there is no one way to interpret the gauge readings. Rest
assured that, eventually, you will get a feel for it.
Indicator Lights
In addition to the gauges, there are lights to inform the rider of turn
signal operation, headlight high beam operation, and on some models,
additional warnings for low battery.
Charging, Instruments, Controls, and Equipment
 Loading...