

Page 1
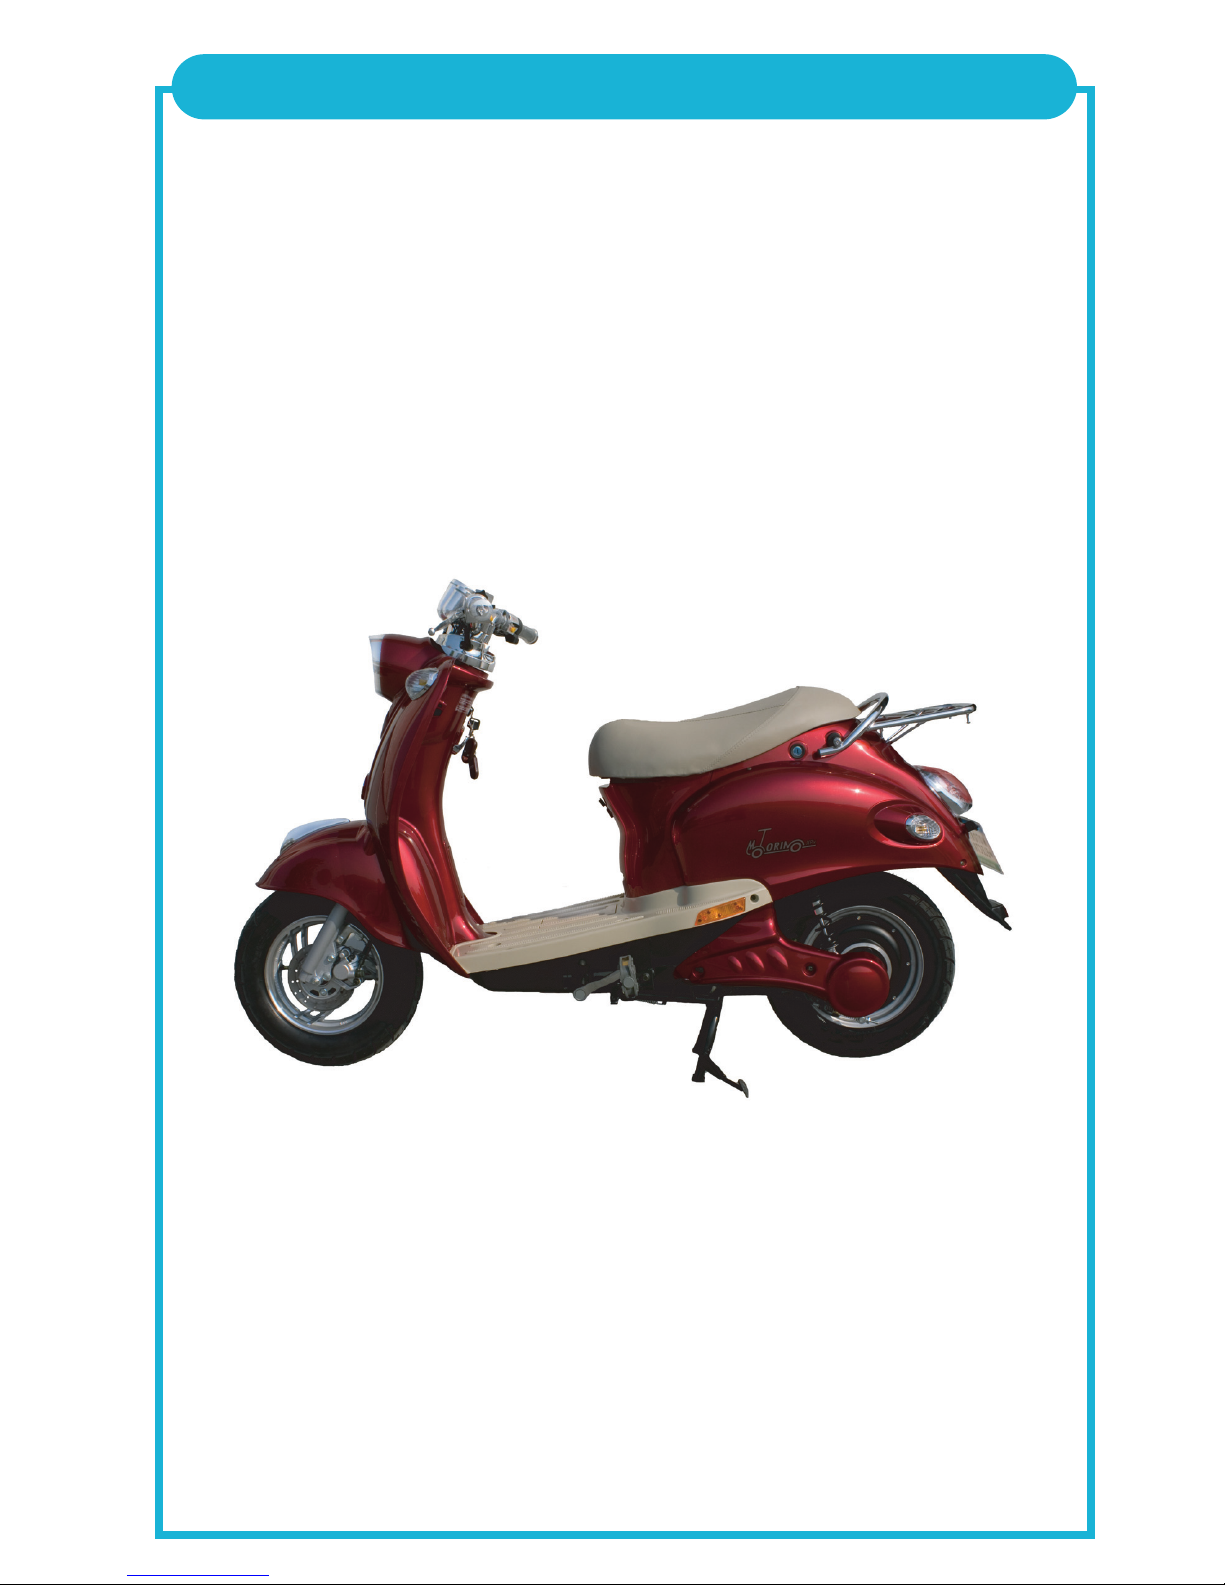
MOTORINO ASSEMBLY AND USER'S MANUAL
Model: XPv
For the most recent version of this user's manual and for all updated
product information please visit www.motorinocycles.com
or call your local dealer
GREENWIT TECHNOLOGIES Inc. 2009
READ THIS MANUAL BEFORE OPERATING YOUR
GREENWIT Ltd. STRONGLY SUGGESTS THE
OPERATOR OF THIS PRODUCT BE 16 YEARS OF AGE OR OLDER.
MOTORINO
TM
TM
Page 2
1
YOUR INSURANCE POLICIES MAY NOT PROVIDE COVERAGE FOR
ACCIDENTS INVOLVING THE USE OF THE . TO DETERMINE IF
COVERAGE IS PROVIDED YOU SHOULD CONTACT YOUR INSURANCE
MOTORINO
TM
THANK YOU FOR PURCHASING OUR PRODUCT
PLEASE READ THIS MANUAL CAREFULLY AS IT IS BASED ON OUR LONG
EXPERIENCE DEDICATED TO ENGINEERING, SALES AND MAINTANENCE OF
LIGHT ELECTRIC VEHICLES. IT WILL HELP YOU ENJOY YOUR
AND EXTEND ITS LIFE.
Greenwit Technologies team
MOTORINO
TM
Page 3

2
Table of Contents ..................................................................................................................
Features and Specifications ...............................................................................................
Contents of the box ..............................................................................................................
General safety guidelines ....................................................................................................
................
Before each ride .....................................................................................................
After each ride ........................................................................................................
Assembly Instructions..........................................................................................................
B
attery........................................................................................................................................
G
eneral Usage Notes............................................................................................................
M
aintenance............................................................................................................................
Break Maintenance................................................................................................
Flat Tire Repair ........................................................................................................
Op
erating Instructions.....................................................................................................
Key and Throttle operation................................................................................
Display........................................................................................................................
Main Components................................................................................................
T
roubleshooting ...................................................................................................................
W
arranty..................................................................................................................................
W
arranty Service .................................................................................................................
R
eturn Policy...........................................................................................................................
N
otes..........................................................................................................................................
2
3
3
4
6
7
8
10
12
13
13
14
15
15
16
17
18
19
20
21
22
TABLE OF CONTENTS
Page 4
3
FEATURES & SPECIFICATIONS
FEATURES AND SPECIFICATIONS
- Motor Specs: Brushless DC Motor, Continuous Rotational Power: 500W, Speed: 400rpm
- Controller - CCT type with three independent continuous current electronic gears
- Recharge Time for the Battery: 4-6 Hours
- One F
ull Charge Lasts up to 50 km with a single battery and 80 km with dual.
- S
peeds up to 32km/h on level pavement with a 75 kg rider
-
Weight of MOTORINO: 75 kg
* More details available at www.motorino.ca
CONTENT OF THE BOX
- 48V 22AH battery installed (charging required)
- Left and right pedals (to be attached, no tool required)
- 48V charger for 110V AC outlet
- R
ain cape and bike rain cover
-
Two Ignition Keys (also used for under seat storage and main battery compartment)
-
Two remote alarm controls
-
Two mirrors (left and right)
-
Two Storage Box Keys
UNDERSTANDING THIS MANUAL
Within this manual you will find sections marked with a sign. This is to warn
you that failure to abide by the following instructions may result in injury to the rider or
others. Although your MOTORINO is classified as a bicycle, it is a much heavier vehicle and
should be ridden with the care and control of a full sized motorcycle. A loss of control at
speed can result in serious injury or death.
We constantly strive to improve and upgrade our product; as such your MOTORINO may
include updated components which are not covered by this manual. If you notice that parts
of your bike differ from the parts pictured herein, contact your local MOTORINO dealer to
ensure that everything on your machine is up to specification.
Thank you for purchasing the low speed electrically powered
Your complies with the Canadian Motor Vehicle Safety Regulation Act
(CMV
SRA), and is classified as a Power Assisted Bicycle under section 1.2.1 of that act. It is also
c
ompliant with US Public Law 107-319 for importation and use in all states where it is enacted
MOTORINO
TM
MOTORINO
TM
Page 5

Your provincial motor vehicle branch or city or county may have additional laws
regulating the use of vehicles like the
MOTORINOTM. Some provinces or states may
require a driver's license or minimum age requirements for the
MOTORINO
TM
. Some
provinces in Canada and some states in the US may classify your
MOTORINOTMas a
Limited Speed Motorcycle or Moped. Please check with your local motor vehicle
branch or insurance company for information specific to your area.
If your province or state allows the
MOTORINOTM to be used on vehicle roadways
please make sure you are familiar with all traffic laws such as: yielding to pedestrians
and other motorists, signaling, riding as far to the right edge of the roadway as
possible, obeying traffic signs etc. Your provincial MVB or state DOT can provide you
with materials related to these traffic laws. In addition to those traffic laws abide by
the following general principals:
1. You are sharing the road or the path with others - motorists, pedestrians and other
cyclists.
Re
spect their rights, and be yielding if they infringe on yours.
2.
Ride defensively.
3.
Look ahead of where you're going, and be ready to avoid:
-
Vehicles slowing or turning in front of you, entering the road or your lane ahead of
y
ou, or coming up behind you.
- Pa
rked car doors opening in front of you.
- P
edestrians stepping out in front of you.
- C
hildren or dogs playing near the road.
-
Potholes, sewer gratings, railroad tracks, expansion joints, road or sidewalk
construction, debris and other obstructions that could cause you to swerve into
t
r
affic, catch your wheel, orotherwise lose control and have an accident.
4. Ride on the right side of the road, in the same direction as vehicle traffic and as
close t
o the outisde edge of the road as possible.
5. Stop at stop signs and traffic lights; slow down and look both ways at street
i
n
tersections.
6. Al
ways use signal lights or hand signals for turning and stopping. Learn the local
v
ehicle code for the correct signal.
7. Do
n't weave through traffic or make any moves that may surprise people with
whom y
ou are sharing the road.
8.
Never carry anything which obstructs your vision or your complete control of the
or which could become entangled in the moving parts of the
MOTORINO
TM
9. Never hitch a ride by holding on to another vehicle.Remember that the
MOTORINOTMwill always lose in a collision with a motor vehicle, so be prepared to yield
even if you have the right of way.
4
GENERAL SAFETY GUIDELINES & RESTRICTIONS
Page 6
GENERAL SAFETY GUIDELINES & RESTRICTIONS
US and Canadian safety regulations require that you
wear any helmet suitable for use with a regular bicycle.
The
MOTORINO
TM
should not be used under any
circumstances without properly wearing a helmet.
5
NEITHER GREENWIT Ltd. NOR THE RETAIL SELLER OF THE
MOTORINO
TM
IS RESPONSIBLE FOR THE CONSEQUENCES
OF FAILURE TO COMPLY WITH FEDERAL AND PROVINCIAL
TRAFFIC ORDINANCES
IN ADDITION TO THE REQUIREMENTS ABOVE, THE
MOTORINO
TM
IS NOT TO BE RIDDEN / USED:
ALWAYS USE A HELMET WHILE RIDING
THE
MOTORINO
TM
1" inch
22" inch
A
B
C
1. on any roadways where the speed limit is
in excess of 50 km/h
2. on any sidewalks or pedestrian walkways
3. on any bumpy, rough or unpaved surfaces
4. in darkness without proper illumination
5. on sandy or gravel surfaces
6. by any person weighing more than 225 lbs
7. by any person with an inseam of less than 22"
Page 7
8. by any physically or mentally challenged person
9. by any person with vision, balance, hearing or coordination impairments
10. by any person using headphones or a cellular phone
11.
to carry more than 10 lbs of cargo in the cargo compartment
12.
in excess of 20 mph (with or without the motor activated)
13.
by barefoot riders or those wearing sandals, open toed, high heeled, platform or
slip on fo
otwear
14.
by any person who has ingested any alcohol or drug that could impair their
abilit
y to operate the
15.
without two hands on the handle bar
16.
while not properly seated
17.
to jump ramps, curbs, or objects or attempt any stunts
18.
with clothing or extremities in close proximity to the drive chain or any moving
par
ts
19.
beyond your ability and experience
20.
by stopping with only the front brake. Use both brakes simultaneously
21.
Do not try to accelerate and engage the brake at the same time.
[
This may cause damage to the motor from excess heat]
BEFORE EACH RIDE:
1. Make sure you properly wear a helmet
2. Wear protective clothing and gloves
3. Wear eye protection that does not interfere with your peripheral vision
4.
Check local and state laws before operating the in any area
5.
Make sure all tail/brake lights, turn signals and the headlight are operational
6.
Make sure the horn is operational
7.
Make sure the brakes are properly adjusted and working correctly (see further
detailed instruc
tions).
8.
Make sure you understand how the brakes work and that your hands can reach
and squee
ze the le
vers comfortably and hard enough to stop the
safely.
9.
Make sure the chain is properly adjusted (see further detailed instructions).
GENERAL SAFETY GUIDELINES & RESTRICTIONS
6
MOTORINO
TM
MOTORINO
TM
MOTORINO
TM
Page 8
GENERAL SAFETY GUIDELINES & RESTRICTIONS
10. Make sure all parts of the are properly and securely fastened and
adjusted, including but not limited to pedals, crank arms, wheels, all controls and cargo
box (Please refer to Assembly Instructions)
11. Make sure the tires are not excessively worn, do not have tears or cuts, are properly
seated on the rim and inflated to the proper pressure on the sidewall (45-50psi)
(DO NOT USE GAS STATION PUMPS FOR INFLATION WITHOUT A PRESSURE GAUGE)
12. Make sure the wheels spin freely, are well aligned, and that the rims are not bent or
damaged (the front wheel must be undamaged for the front brake to work properly)
13. Do not turn the key until you are seated on the bike and have checked that the
throttle is OFF. Since the motor is silent it is easy to forget the bike is active; this can be
hazardous when pushing the bike with a hand on the throttle
AFTER EACH RIDE:
1. Make sure that the ignition key is turned OFF and that all keys are removed and
kept in a safe place
2. Make sure to plug the battery into an outlet to charge it
3. Make sure the throttle is rotated to the off position
4. Ensure that the kickstand is on stable ground so the will not fall
over and get damaged
5. Ensure the is not kept outdoors or where moisture can damage it
6. Do not charge or store the closer than 20 feet from any heat source
(e.g. furnace, fireplace, water heater, space heater)
7. Do not allow children under 16 to play on or near the unattended
FAILURE TO FOLLOW THESE OPERATION INSTRUCTIONS CAN RESULT IN
SERIOUS INJURY OR DEATH OR COULD RESULT IN AN ELECTRICAL SHORT OR FIRE.
DO NOT MAKE ANY ALTERATIONS OR MODIFICATIONS TO THE ,
OR ADD ANY PARTS NOT AUTHORIZED BY GREENWIT Ltd. EXCEPT THOSE
DISCUSSED IN THIS MANUAL OR THOSE REQUIRED BY LAW. DO NOT REMOVE ANY
REFLECTORS, LIGHTS OR OTHER STANDARD EQUIPMENT. DOING SO WILL VOID
YOUR WARRANTY.
All authorized replacement parts are listed on the parts list enclosed
or available at www.greenwit.com and www.motorino.ca or by calling your local
- dealer.
7
MOTORINO
TM
MOTORINO
TM
MOTORINO
TM
MOTORINO
TM
MOTORINO
TM
MOTORINO
TM
MOTORINO
TM
Page 9
ASSEMBLY INSTRUCTIONS
8
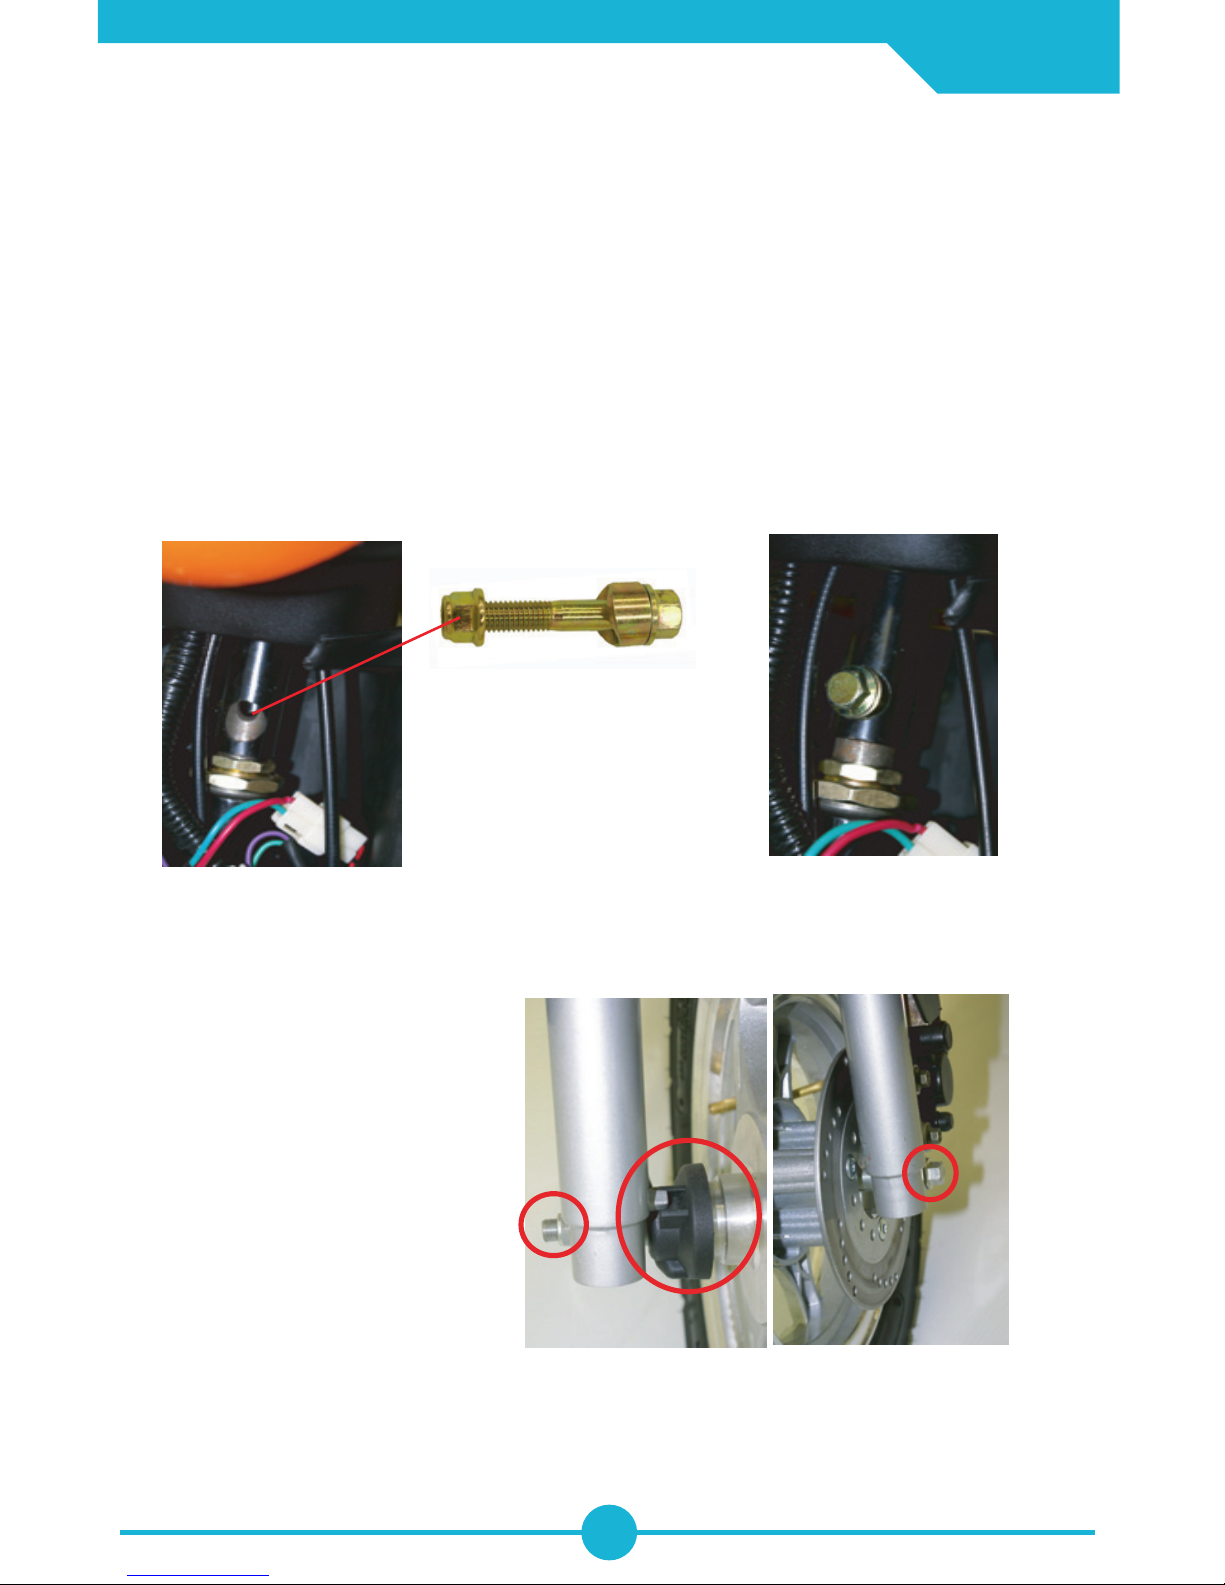
HANDLE BAR
Insert the top part of the handlebar into the handlebar post as shown on the picture. Locate
the attachment bolt with the nut and the spacer. Place the curved side of the spacer over the
hole on the front of the bar, insert the bolt through the spacer and the bar, screw the nut in
behind and tighten it. After attached, the handlebar should look as on the picture below.
Your Motorino will come in one of three different states:
a) 95% assembled - you only need to install the mirrors and the cargo box
b) 90% assembled - you need t
o install (a) plus front wheel
c) 85% assembled - you need t
o install (b) plus the handle bar and some plastic elements
All instructions for (a), (b) and (c) are described below with supporting pictures
FRONT WHEEL ASSEMBLY
If the front wheel of your bike is
assembled, proceed to the next
sec
tion. Otherwise read below:
B
efore installing the front wheel
gen
tly take apart disk break pads
using a wide fla
t scr
ewdriver so the
wheel disk can squee
ze between the
pads. Push the black speedometer
c
ap against the wheel and position
it in the w
ay tha
t the axle bolt can go
through it. Be sure that the two teeth in
the sp
eedometer cog properly mate with the wheel. Firmly tighten the nut at the opposite side.
Page 10
ASSEMBLY INSTRUCTIONS
9
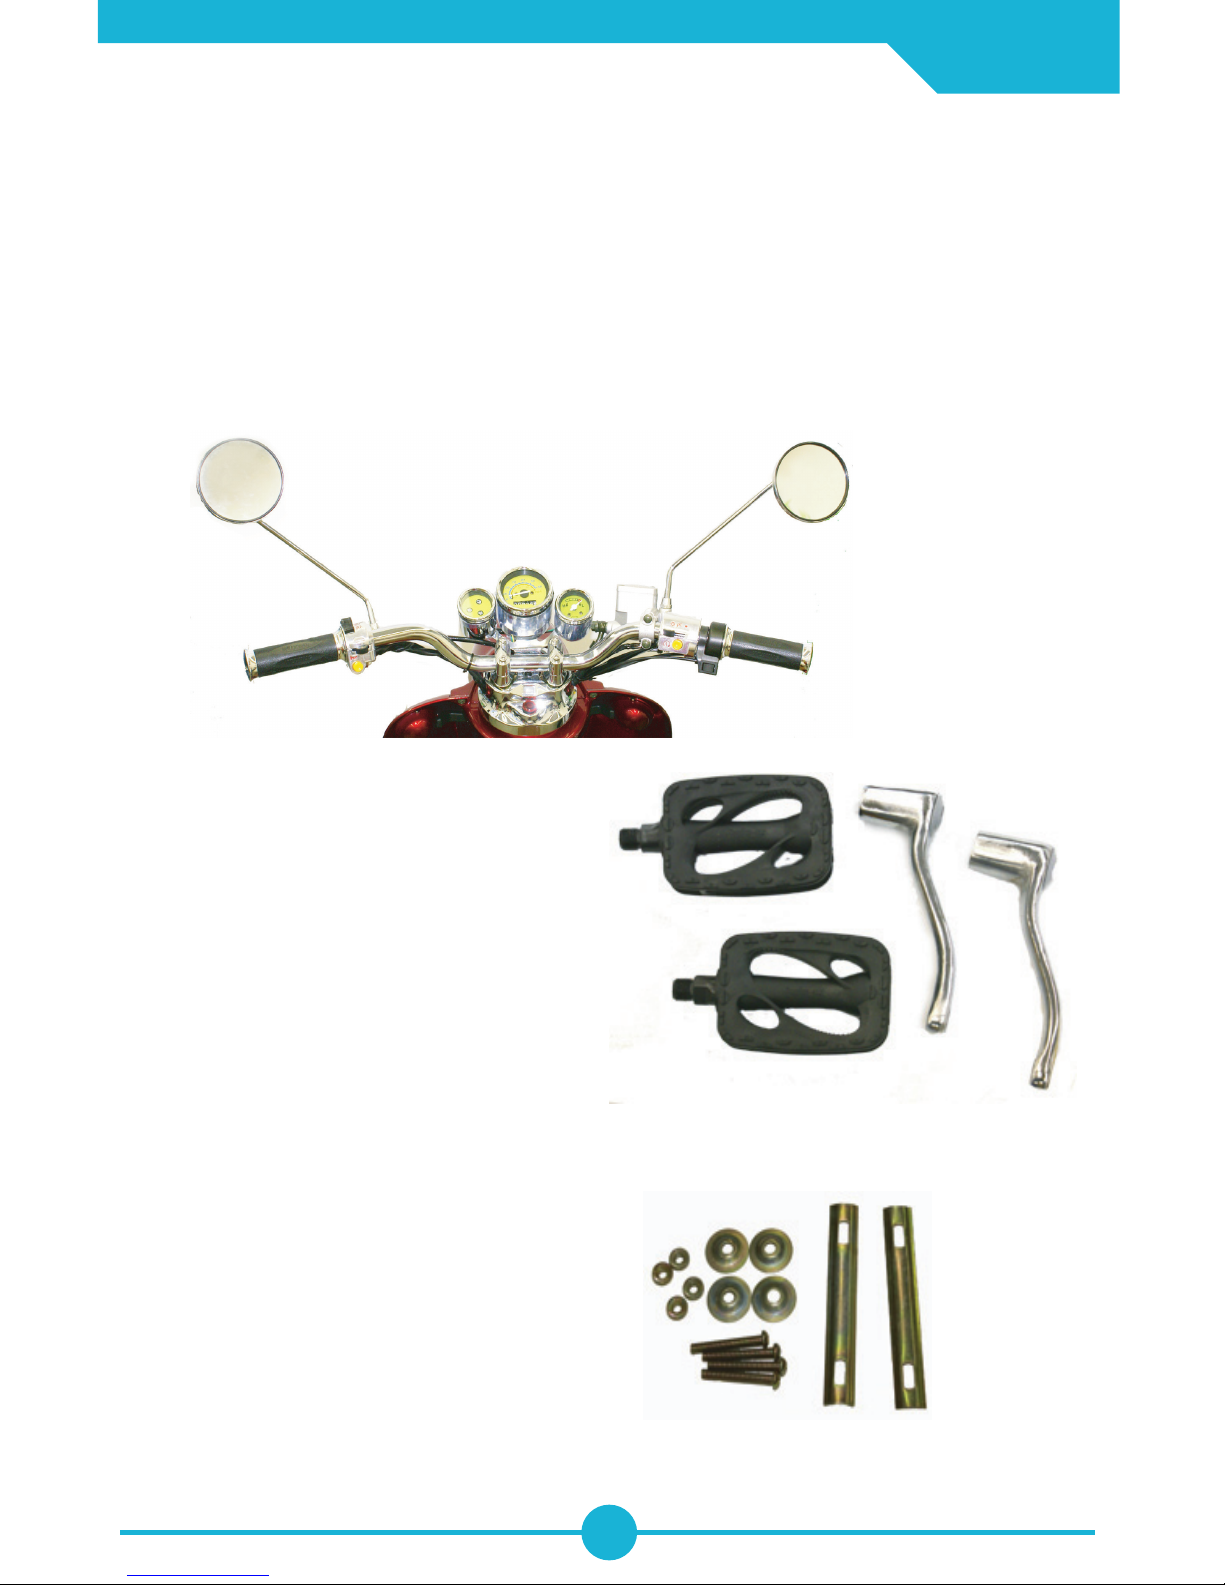
STORAGE BOX
Locate the storage box and the hardware
necessary to mount it on the back of the
scooter. Use the two metal brackets to secure the
box by placing them underneath the attachment
rack and connecting them to the box with the
supplied bolts. Tighten the bolts enough to achieve
a secure grip on the rack.
Locate Pedals (Set of 2). The pedals are labeled
L and R near the threads, the cranks are labeled
on their inside surface. The pedals have opposite
threading and are not interchangeable.
Screw the Left and Right pedals to their
cranks and tighten them with an adjustable
wrench. Align the hole in the crank with the
round pin in the pedal axle and connect the pedals.
To remove use a tool to depress the pin in the pedal axle
and briskly remove the pedal.
PEDALS
MIRRORS
Locate the mirrors included with your MOTORINO scooter. Insert the threaded part of
the mirrors to designated holes on the handle bar and secure them with provided nuts.
Turn the cone shape nut on top clock wise to secure the mirrors.
Make sure to adjust the mirrors before use.
Once mirrors are installed, they should look like the picture below.
Page 11

10
BATTERY
BEFORE OPERATING YOUR NEW , FOR THE FIRST TIME, CHARGE THE BATTERY
FOR 8-12 HOURS.
-The batteries will take about two weeks to become conditioned; slightly shorter
ranges may be experienced before this.
-Charge the batteries as often as possible;
Be sure to charge the after each
use. Keeping the battery properly charged will extend the battery life.
-Draining the battery completely is best avoided; they do not endure well when
deep-cycled. This is counterintuitive for many people because of their experience
with NiCAD and some Lithium batteries.
-Sulphation occurs when the battery is left discharged or partially charged for a
length of time. Insulating sulphur crystals accumulate on the Anode and will render
the battery useless in a matter of days. This is why we stress regular and frequent
charging.
-Us
ing a desulphator is a good preventative measure, but once sulphation reaches a
c
ertain point the cell is a loss. Best results are achieved when the desulphator is
used right from the beginning.
-Re
placing the batteries is an inevitable cost of ownership. With frequent charging
a
nd limited drain 350-400 full charge cycles is common. Partially drained and
promptly recharged battery is not considered a full cycle; maximum battery life is
achieved by partial drains and prompt charging.
-Installing a
second battery is a good way to prevent deep-cycling, this will not only
e
xtend the range but prolong the life of both batteries as well.
-If second battery is installed later, charge each battery separately before you
connec
t them in parallel. Unless charged separately the second battery will take a
long time to charge, and will not be properly conditioned.
-If
you need extra range we recommend to install a second battery in the first six
mon
ths of use. This will prevent an unequal charge of the older battery.
-Cold weather can shorten a batteries useful life and reduce its capacity. If you use
your
MOTORINOTM bike in colder climate avoid storing the battery under freezing
temperature.
-
If you notice anything unusual about the battery such as a cracked or leaking battery case,
a battery that gets hot while being used or charged, a battery case that appears "puffy"
or"bloated" etc, or there are any other problems with the battery, please contact your local
MOTORINO
TM
dealer.
-
Do not attempt to repair, remove, adjust or in any way alter any internal or electrical
components, controls or wiring without first speaking with a customer service
representative. Doing so will void your warranty.
MOTORINO
TM
MOTORINO
TM
Page 12
10
6. DO NOT KEEP THE CONNECTED TO THE CHARGER
FOR LONGER THAN 18 HOURS UNDER ANY CIRCUMSTANCES! DOING SO COULD
CAUSE THE BATTERY OR CHARGER TO OVERHEAT AND CAUSE A FIRE.
7.
When the light on the 48V charger is red, the
battery is being properly
charged. When the
MOTORINO
TM
battery is fully charged, the light will turn green. If this
does not occur after 16 hours of charging, unplug the charger and call your local
dealer. Normal recharge time for the main battery is 4-6 hours
(assuming it is not 100% discharged).
8. Disconnect the charger from the 110V Power Source.
9. Disconnect the Input Cord from the Charging Receptacle.
10. NEVER LEAVE THE BATTERY CHARGER CONNECTED TO THE 110V
POWER SOURCE OR THE WHEN NOT CHARGING THE BATTERY.
KEEPING THE CHARGER PLUGGED INTO THE 110V POWER SOURCE AND NOT
THE BATTERY COULD CAUSE THE CHARGER TO OVERHEAT AND OR CAUSE
A FIRE.
11. When storing your for lengthy periods of time, the battery should
be charged at least once a month to avoid full depletion.
FAILURE TO KEEP THE BATTERY CHARGED WILL
CAUSE TOTAL BATTERY FAILURE. DO NOT ALLOW BATTERY TO BECOME FULLY
DISCHARGED!!! ALWAYS RECHARGE THE BATTERY BEFORE THE POWER INDICATOR ON
THE INSTRUMENT PANEL SHOWS NO POWER.
BATTERY
11
MOTORINO
TM
MOTORINO
TM
MOTORINO
TM
1. DO NOT CHARGE OR STORE THE CLOSER THAN 20 FEET
FROM ANY HEAT SOURCE (E.G. FURNACE, FIREPLACE, WATER HEATER, SPACE HEATER)
2. Be sure to only use 110V AC with the charger.
3.
PLUG the POWER INPUT CORD into the charging receptacle located below
the fr
ont of the seat.
4.
Plug the 48V battery charger into a 110V AC power source.
5.
The CHARGER INDICATOR LIGHT will illuminate confirming that power is connected to the
char
ger. If the light does not come on check all connections. If it still does not come on after
check
ing all connections, fuses and that your AC plug is working, unplug the charger and call
y
our local dealer.
MOTORINO
TM
MOTORINO
TM
MOTORINO
TM
MOTORINO
TM
MOTORINO
TM
MOTORINO
TM
MOTORINO
TM
MOTORINO
TM
When maintained and used properly, (by following charging and storage guidelines),
the Lead Acid Battery Pack used in this product has a normal lifespan of two to three
years. When the battery pack no longer holds a charge or is unable to be charged
properly, it should be removed from the bike and delivered to a recycling facility.
Federal Lawsprohibit disposal of lead-acid batteries in everyday trash. Please contact
your local solid waste or recycling authority for recycling information in your area.
Page 13
BRAKE-IN PERIOD
Your will last longer and work better once it is broken in properly.
Brake control cables, chains and axle nuts may get loose when a new
is first used and may require adjustment. We suggest that the brakes and axle nuts
be checked every 30 days and adjusted if necessary. The scooter can be used without
pedals, but pedaling the during acceleration will save battery life and
will make it easier to balance. The can also be pedaled in situations
where the battery power is too low due to a failure to charge or exceeding its
maximum range. The rider can also rest his or her feet on the pedals while riding the
MOTORINO
TM
Riding constantly at full throttle will reduce the scooter's range and battery life. A
smart rider will accelerate gently, gradually turning the throttle until the vehicle is at
speed. When riding downhill or approaching an intersection, release the throttle and
let the vehicle coast to conserve power. Apply the brakes gently to draw stopping
force from the regenerative brakes, and not the mechanical brakes. Since all Motorino
XP scooters have tubeless tires, it is a good idea to purchase tubeless tire repair kit
and apply the plug when they have a puncture. A 48/12V inverter can be used to
power a small compressor via a cigarette lighter; with this a flat can be repaired and
pumped on the spot, rather than pushing the bike to a station, which may damage
the wheel.
A CRASH OR OTHER IMPACT CAN PUT EXTRAORDINARY STRESS ON
COMPONENTS, CAUSING THEM TO FATIGUE PREMATURELY. COMPONENTS
SUFFERING FROM STRESS FATIGUE CAN FAIL SUDDENLY AND CATASTROPHICALLY,
CAUSING LOSS OF CONTROL, SERIOUS INJURY OR DEATH.
First, check yourself for injuries, and take care of them as best you can. Seek medical
help if necessary. Next, if your is damaged, perform the checks described
in this manual. If you are unable to fix any or all damage/problems, or if you find any
bent, scored, or discolored parts, please call your local dealer
IF YOU HAVE ANY DOUBT ABOUT THE CONDITION OF THE
MOTORINO
TM
OR ANY OF ITS PARTS, DONT USE IT . CALL YOUR DEALER FOR
INSPECTION
GENERAL USAGE NOTES
12
MOTORINO
TM
MOTORINO
TM
MOTORINO
TM
MOTORINO
TM
MOTORINO
TM
MOTORINO
TM
MOTORINO
TM
Page 14
In order to minimize the chances of an accident and possible injury, it is critical that you
have all repair and maintenance work performed regularly
For more detailed maintenance instructions or for ordering replacement parts please
contact your dealer. Local bicycle retail stores, which have service facilities in your area
can also assist you with certain non-electrical repairs or adjustments that you are not
qualified to make, or for which you do not have the specific or specialized tools needed
to repair.
The fact that these scooters have no combustion engine, no transmission, no belts, no
chains
, no clutch, no ignition plugs, no carburetor, and use no gasoline and no lubricants
means it requires almost no maintenance. The unique design of the direct drive system
and the use of regenerative brushless motor braking system limits all friction in the
scooter to the two bearings of the front axle and the two bearings in the motor and
make it much easier to maintain than other electric scooters. In general, the only regular
maintenance is to:
- Adjust the brakes
- Check the axle nuts
- C
heck tire pressure
- Check the chain
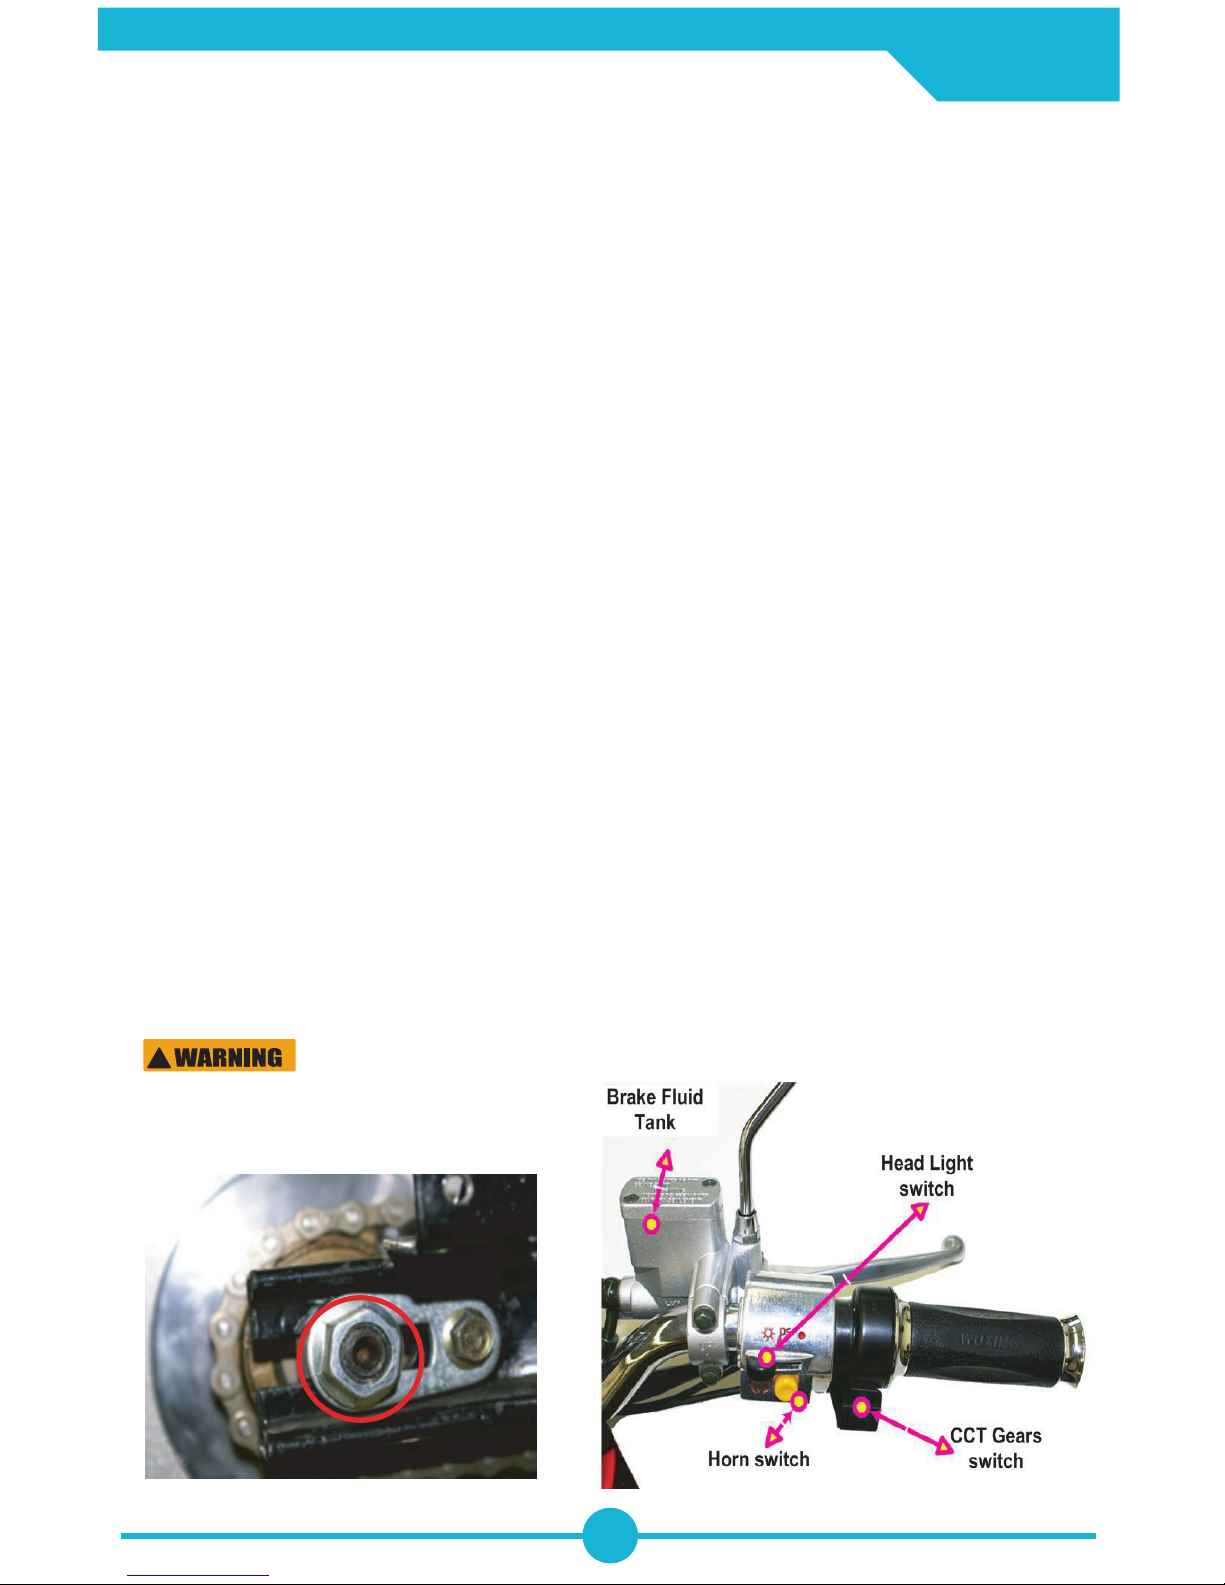
If your is equipped with hydraulic disk brakes you don'i need to adjust
them - they are self adjustable. You only have to check and maintain the brake fluid level
in the brake fluid tank.
If your has drum brakes they may need to be adjusted once in a while.
Front and rear break cables may get stretched. Tighten the nuts at the threaded end of
the cable to adjust them. If the breaking power decrease, check the break pads.
Check both axle nuts regularly
and especially the rear one. Make sure to
tighten the nuts firmly when you change
a tube.
MAINTENANCE
BRAKES MAINTENANCE
13
MOTORINO
TM
Rear Axle nuts - Check them regularly
MOTORINO
TM
Page 15
MAINTENANCE
If your comes with tube tires, follow the next instructions:
1. Depress the tire valve to let all the air out of the tube, which will assist in removing
the tube from the wheel .
2. Remove the wheel from the using a wrench. Loosen the nuts
counterclockwise and make sure to remove the wheel retention clips on the rear wheel.
Be sure to remember where all the spacers and washers belong. For rear tire removal
you will also need to slip the chain off the rear sprocket to remove the wheel. The chain
must be properly reinstalled and re-tentioned when reinstalling the rear wheel.
3. Remove one bead of the tire from the rim by grasping it at a point opposite the valve
stem with both hands and, at the same time, lifting and peeling one side of the tire off
the rim. If the bead is on too tight for you to unseat it with your hands use tire levers to
lift the bead carefully over the tire rim. Tire levers can be purchased at any local bike
shop. Push the valve stem through the wheel rim. Remove the inner tube.
4. Carefully check the outside and inside of the tire for the cause of the puncture and
remove any debris or damaging material from the inside or outside of the tire.
PATCHING A TUBE IS AN EMERGENCY REPAIR. CARELESS PATCHING OR
APPLYING SEVERAL PATCHES CAN SERIOUSLY WEAKEN THE TUBE, RESULTING IN
POSSIBLE TUBE FAILURE, WHICH COULD CAUSE YOU TO LOSE CONTROL AND FALL.
REPLACE A PATCHED TUBE AS SOON AS POSSIBLE.
5. Reinstall the tire and tube. Slip one tire bead over the rim. Insert the tube valve
through its hole in the rim. Feed the tube carefully into the cavity of the tire. Inflate the
tube just enough to give it some shape. Starting at the valve stem and working around
both sides of the rim to the side opposite the valve stem, use your thumbs to push and
seat the other bead of the tire inside the rim.
IF YOU USE A SCREWDRIVER OR ANY TOOL OTHER THAN A TIRE LEVER,
YOU ARE LIKELY TO PUNCTURE THE TUBE.
6. Check to make sure that the tire is evenly seated around both sides of the rim and
that the tube is inside the tire beads. Inflate the tube slowly to the recommended
pressure on the tire sidewall, all the while checking to make sure that the tire beads stay
seated in the rim.
14
MOTORINO
TM
FLAT TIRE REPAIR
Your may come with tubeless tires or tires with tubes. For tubeless tires we
recommend you carry a tubeless tire repair kit and use it on any minor puncture. Consult with
professional tire repair service shop to make sure your repair will hold. It is a good idea to
carry a portable compressor and tubeless tire liquid sealer. That will help you to be back on
road in a few minutes if you have flat without even removing the wheel.
Don't ride or push your with a flat tire. This will cause the tire
beads to detach from the rim and possibly damage the rim.
IF
THE TIRE IS CUT, or if the puncture is too large to be effectively plugged
YOU MUST REPLACE THE TIRE TO PREVENT ANY SUDDEN AND
C
ATASTROPHIC FAILURE CAUSING LOSS OF CONTROL, SERIOUS INJURY
OR DEA
TH.
MOTORINO
TM
MOTORINO
TM
MOTORINO
TM
Page 16
OPERATING INSTRUCTIONS
KEY AND THROTTLE OPERATION
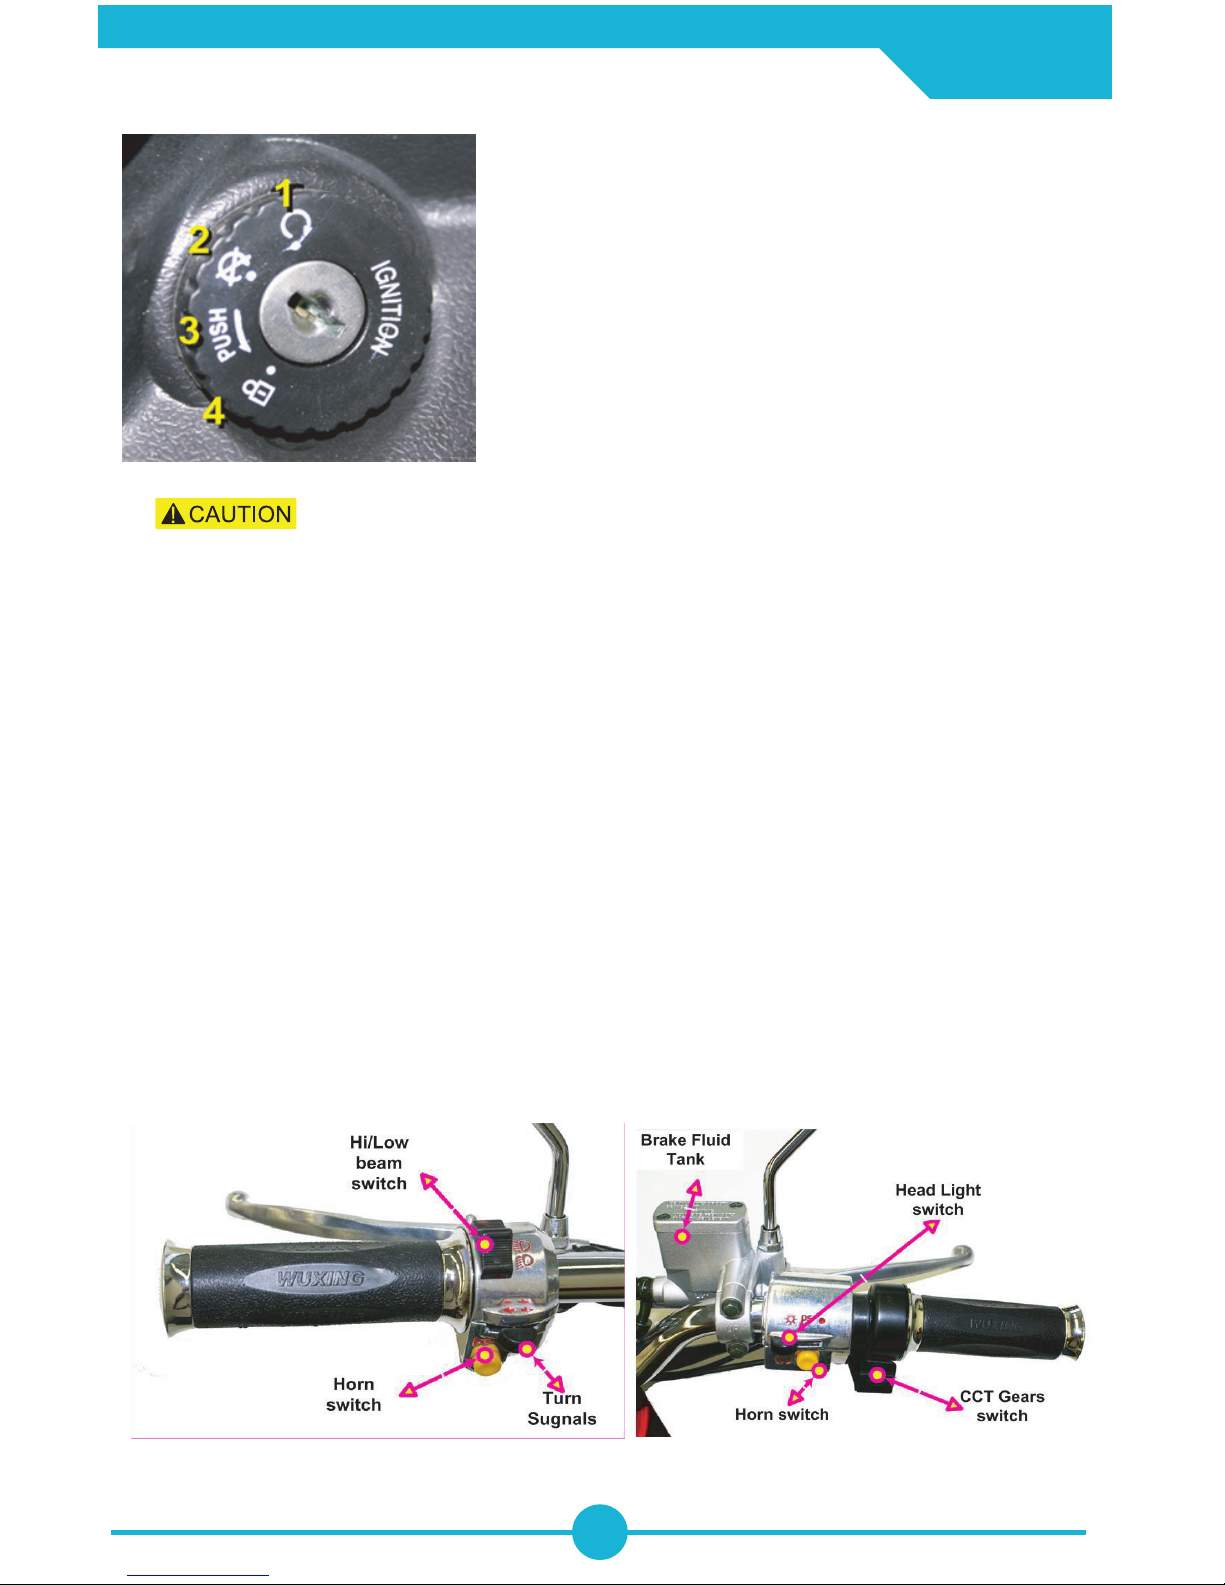
ON/OFF/LOCK Switch: (ignition)
1.
BEFORE OPERATING YOUR MAKE SURE THAT THE THROTTLE GRIP IS NOT ROTATED
TO THE "ON" POSITION!!! MAKE ALSO SURE THAT YOUR THROTTLE IS NOT "STICKY" AND ROTATES
FREELY BACK TO THE INITIAL POSITION
THROTTLE CONTROL
The uses a speed changing throttle grip. It is on the right side of the
handlebar. Rotate the throttle grip toward the seat to accelerate and rotate forward
away from the seat to slow down.
All MOTORINO XP models are equipped with a CCT electronic gear switch which allows
you to select between high torque, high speed and economy mode depending on the
road conditions or your preferences. High torque (middle position of the switch) is
suitable for hills and flat terrain. We suggest you to avoid using high speed mode on
hills to avoid draining your battery faster. Instead you can use high speed when
approaching hills and then switch to high torque when the bike begins to slow. Once
you are on flat pavement and your acceleration is constant the CCT automatically
switches to economy mode. We suggest you use high torque mode most of the
time, as the most practical MOTORINO CCT setting.
15
MOTORINO
TM
MOTORINO
TM
MOTORINO
TM
is ON. Turn it ON only when you are ready
to go. Turn it OFF when you are not riding and remove key.
2. is OFF. Turn it OFF when not in use to preserve
the ba
ttery.
3.
Push the key in on this position to lock the handlebar and
tur
n it to position 4
4.
Handlebar is locked. The key can be removed
MOTORINO
TM
It is suggested after acceleration to turn back 1/4 turn the throttle. This will increase your range
and increase your battery life.
LEFT
RIGHT
Page 17
OPERATING INSTRUCTIONS
BEFORE OPERATING YOUR MAKE SURE THAT THE THROTTLE GRIP IS NOT ROTATED
TO THE "ON" POSITION!!! MAKE ALSO SURE THAT YOUR THROTTLE IS NOT "STICKY" AND ROTATES
FREELY BACK TO THE INITIAL POSSITION
16
MOTORINO
TM
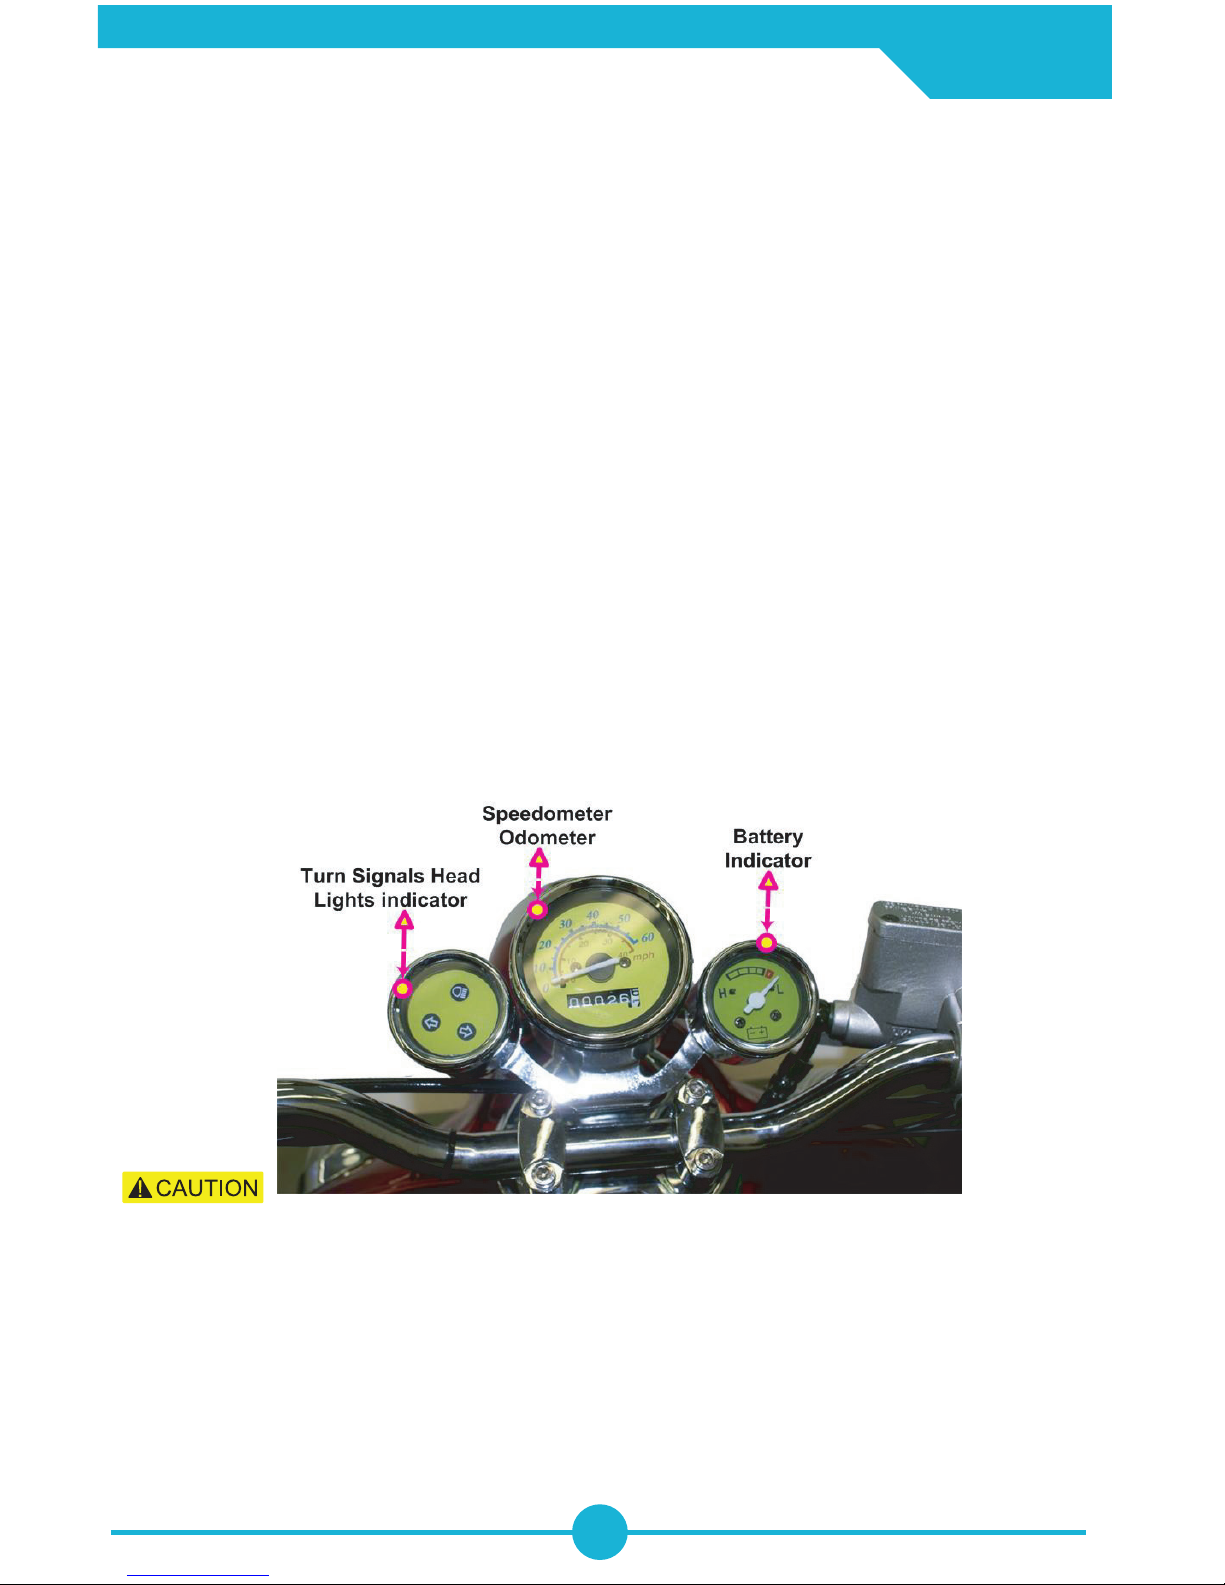
The distance and speed depend upon the riding style and the road conditions. A constant
speed and less stops will ensure longer range. Other factors include weather, vehicle
condition, and battery charge. Drivers must be cautious when driving on rough roads, in poor
weather, or when the battery charge is low. Always check the battery gauge while you are
riding and be sure that it does not get too low too often.
1. Position yourself behind the handlebar with your feet on both sides of your bike and turn
the ignition key on. Do not turn it on when you are beside the bike.
2. Push the bike forward to release it from the main kick stand and then turn the Throttle
gradually to accelerate. Do not turn the Throttle until you are in position to drive.
3. To prevent losing control of the vehicle, please turn the Throttle slowly until the speed
increases. This will also protect your battery from stress, increase your range and prolong
battery life.
4. To stop, release the throttle and apply the front and rear brake simultaneously. You can
dec
elerate by slightly pressing the brakes to start regeneration mode. The noise and slight
vibration caused by regeneration is normal.
6. When you change direction turn on the signal switch left or right and don't forget to press it
t
o turn it off.
7. The Brushless motor makes a small electromagnetic noise when accelerating.
8. Always remove the key from the ignition when not using the bike.
9.
We suggest you use the main kickstand rather than the side one.
Page 18
OPERATING INSTRUCTIONS
17
MOTORINO
TM
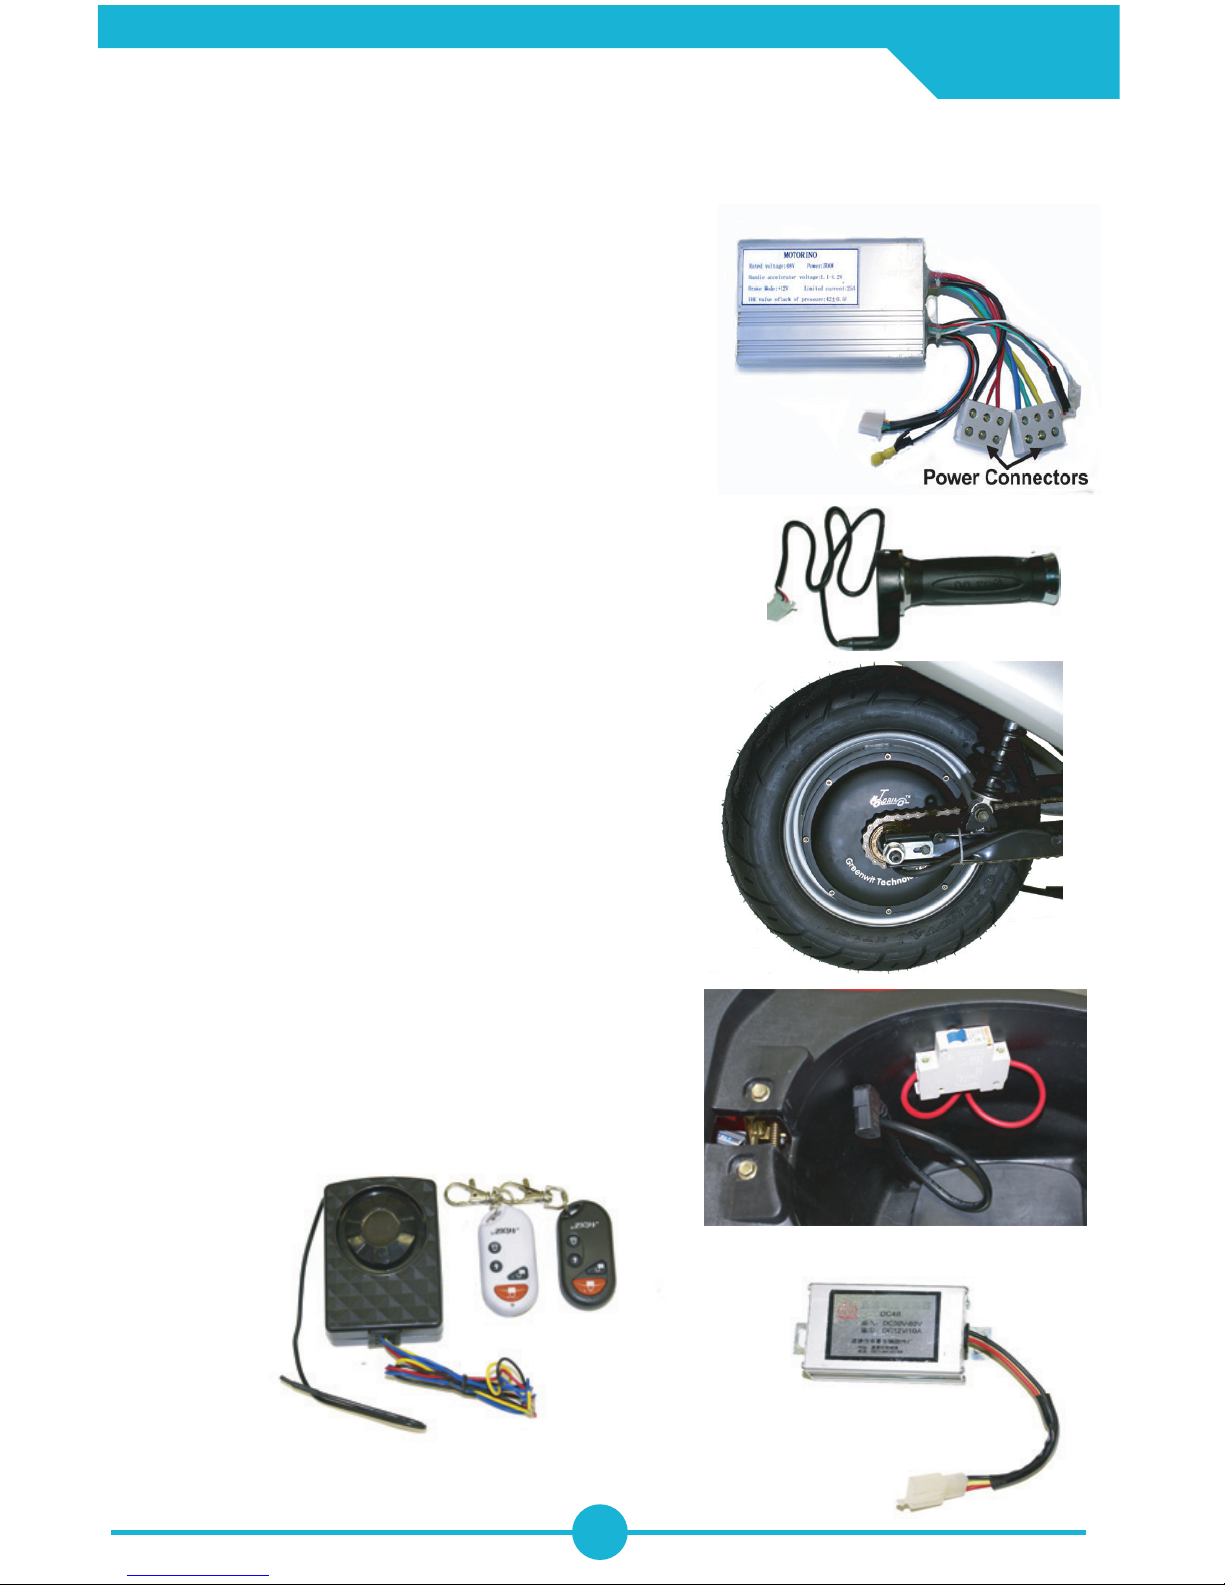
MAIN BREAKER
SECOND BATTERY
CABLE
48/12V DC/DC INVERTER
ALARM
The scooters driving system
consist of four main components:
- Battery
- Controller
- Throttle
- Motor
When the throttle is twisted a signal goes
to the controller communicating the desired
motor rpm. The controller then draws current
from the battery to accelerate to and maintain
the desired speed. Higher speeds and steep hill
climbing demand more from the battery, and
will reduce your range. A second battery can
be connected to the extra battery cable to
extend the range, and prolong the life of both
batteries.The main breaker under the seat
works as a high current protector.
48V DC to 12V DC inverter inverts the voltage
to 12V. All light bulbs work on 12V.
The alarm works on 48V. It is vibration sensitive.
No matter that it consumes very little amount of
power, it is recommended when the
is stored for a long period of time the main breaker
to be turned OFF.
CCT CONTROLLER
THROTTLE
MAIN COMPONENTS
MOTOR
MOTORINO
TM
Page 19

18
Troubleshooting
Problem
Condition
Check
Solution
When I turn my
vehicle on nothing
happens.
1. No light
indications on the
display.
1. Check that the main
breaker under the seat
is on “ON” position.
2. Check power plug
connection and battery
level.
1. Flip the breaker lever
to “ON”
2. Fasten connections
2. Power indication
light is on
3. Check battery and
motor connection. Contact the
supplier.
3. Clean and fasten
battery terminal
connectors
4. Fasten the motor
connections with the
controller under seat. Contact
the supplier.
3. Power indication
light is on and the
brake light is on
4. Check that the brake
levers return to their
normal position.
5. Loosen the brake. If
there is any corrosion,
replace. Contact the
supplier.
5. Battery voltage is
below 42 volts.
6. Charge or replace
battery. Inquire about
desulphation
The Throttle does
not function properly, the
vehicle
moves without
acceleration.
1. The Throttle does
not return to the OFF
position.
1. Check the grip for
Damage
2. Check the Throttle
spring.
3.Check if the Throttle handle
is loose
1.Use a flat head
screwdriver to adjust
the gap between the
rubber handle and the
cover.
2. Readjust the Throttle
spring position. Ensure the
spring is properly fastened to
the throttle interior
3. Tighten the bolt on the
underside with an Allen key
The range is low
Charger light is off
1. Bad connection
between the charger
and the battery.
2. Charger doesn’t
charge
1. Check the charger
plug for corrosion.
2. Check fuses inside the
charger, Replace the charger
or fuses.
Battery doesn’t hold
a charge
1. Connections between
the battery Batteries are lose
2. Bad battery cell
1.Check all connections
between the batteries
2. Replace the bad
battery cell
The brakes are not
working properly
1. Brake levers feel too soft
2. No braking power
1. Needs adjustment
2. Brake pads are dirty
or need replacement
3.Low level Brake fluid
1. Adjust the brake
cable – see instructions
2. Clean brake pads
using sand paper or
replace
3. Add Brake fluid
Page 20

22
WARRANTY INFO
Warranty
To activate your warranty you should go to www.motorino.ca/warranty,
or fill out the warranty form at the retailer you purchased your Greenwit
product from.
Greenwit Ltd. warrants to the original retail purchaser ("you") that the
Greenwit Motorino scooter for which this warranty has been issued is
free from defects in materials and workmanship as follows:
Frame - 24 month warranty (excluding kick stands)
Electric Motor - 12 month warranty
Controller and electric circuits - 12 month warranty
Battery and charger - 6 month warranty
This warranty is not transferable to a subsequent purchaser. Greenwit's
dealers sole obligation under this warranty is to repair or replace the
product, at their option. Greenwit's dealer must be notified in writing of
any claim under this warranty within 10 days of the discovery of any fault or defect.
Immediately report any abnormal product behavior to Greenwit or a Greenwit dealer.
Warranty Limitations
The duration of any implied warranty or condition, of merchantability for a particular
purpose, or otherwise, on this product shall be limited to the duration of the warranty
expressed above. In no event shall Greenwit or Greenwit dealers be liable for any loss,
inconvenience or damage, whether direct, incidental, consequential or otherwise,
resulting from a breach of any expressed or implied warranty condition, of
merchantability for a particular purpose, or otherwise with respect to this product,
except as set forth herein. This warranty gives you specific legal rights, in addition to
other consumer rights bestowed by your province or state.
This warranty will be interpreted pursuant to the laws of Canada and USA. The original
English language version of this warranty supersedes all translations and Greenwit is
not responsible for any errors in translation of this warranty or any product literature.
This warranty is not intended to confer any additional legal, jurisdictional or warranty
rights to you other that those set forth herein or required by law. If any portion of this
warranty is held to be invalid or unenforceable for any reason, such finding will not
invalidate any other provision. For products purchased outisde Canada please contact
Greenwit's authorized distributor in that country.
Under no circumstances is Greenwit liable for any consequences of the
assembly, inspection or service work of their dealers.
19
Page 21

Warr anty Service Options
To obtain service under this warranty you must call Greenwit or Greenwit dealer for
Customer Service/Technical Support on your Product BEFORE returning your Greenwit
product back to the place of purchase. If you return your Greenwit Product for warranty
service you must obtain a return authorization number by contacting Greenwit dealer. Send
your product (with the return authorization number on the outside of the shipping
container and affixed to the product), together with the retail seller's original receipt or other
satisfactory proof of the date of purchase to the dealer you have purchased it from
THE GREENWIT PRODUCT MUST BE RETURNED IN ITS ORIGINAL BOX, ALONG WITH ALL
KEYS, CHARGER, MIRRORS & LOCKS, FLOOR MATS, AND ANY OTHER ACCESSORIES THAT
CAME WITH YOUR UNIT. DUE TO TRANSPORTATION AND RECLAMATION ISSUES, IF THE
GREENWIT PRODUCT IS NOT IN THE ORIGINAL PACKAGE IT MAY NOT BE RETURNED UNDER
ANY CIRCUMSTANCES.
Any postage, insurance or other shipping costs incurred in sending your Greenwit product
for service under either option above is your responsibility. Greenwit Ltd. will not be
responsible for products lost or damaged in shipping.
Retailers and sellers of Greenwit products are not authorized to modify this warranty in any
way. It is your responsibility to regularly examine the product to determine the need for
normal service or replacement.
Warranty Exclusions are listed below:
l
Products that have been modified , neglected or poorly maintained, used f or commercial
purposes, misused or abused or involved in accidents.
l
Damage occurring during shipment of the products (such claims must be presented
directly to the shipper).
l
Damage to products resulting from improper assembly or repair, the use or installation
of parts or accessories not compatible with the original intended use of the product, or the
failure to follow the product warnings and usage instructions.
l
Damage or deterioration to the surface finish, aesthetics or appearance of the pr oduct.
l
The labor required to remove and/or r e-fit and re-adjust the item co vered b y this
warranty.
l
Normal wear to the product including but not limited to light bulbs, tubes, tires , brake
pads brake cables, kickstands
l
Any products for which the consumer does not follow the warran ty procedures
outlined above.
l
For the current version of this warr anty please visit www .motorrino .ca
(©2009 Greenwit Ltd.)
WARRANTY INFO
20
Page 22

RETURN POLICY
7 DAY RETURN/EXCHANGE POLICY
THIS WRITTEN POLICY SUPERCEDES ANY OTHER PREVIOUS POLICY, WRITTEN OR IMPLIED.
THIS WARRANTY IS TO BE POSTED AT THE STORE LEVEL IN PLAIN SIGHT OF THE CONSUMER.
ALL GREENWIT PRODUCTS PURCHASED AT RETAIL STORES IN CANADA ARE COVERED
UNDER THIS 7 DAY RETURN POLICY
ALL GREENWIT PRODUCTS ARE EXCHANGEABLE OR RETURNABLE FOR ANY REASON TO THE
RETAIL POINT OF PURCHASE, IF ACCOMPANIED BY A STORE RECEIPT, FOR A PERIOD OF
SEVEN (7) DAYS FROM THE DATE OF PURCHASE. TO BE ELIGIBLE FOR RETURN OR
EXCHANGE, ALL GREENWIT PRODUCTS MUST BE IN NEW CONDITION, IN THE ORIGINAL BOX,
OR IN ITS ORIGINAL STATE WHEN PURCHASED ALONG WITH ALL ACCESSORIES THAT
INCLUDE, BUT IS NOT LIMITED TO, KEYS, MIRRORS, TOOL KITS, LOCKS, MANUALS, FUSES,
CHARGERS, ETC. ALL PRODUCTS MUST HAVE THE KEYS REMOVED FROM THE KEY SLOT AND
ATTACHED WITH A ZIP TIE TO THE HANDLE BARS, THE FUSE REMOVED, AND THE BATTERY
DISCONNECTED EITHER BY THE QUICK DISCONNECT, OR BY REMOVING THE BATTERY LEADS
AND COVERING THE TERMINALS WITH TAPE. IN COMPLIANCE WITH PROVINCIAL AND
FEDERAL REGULATIONS.
GREENWIT OR THE RETAIL STORE MAY REFUSE ANY RETURN OR EXCHANGE IF THE
PRODUCT IN QUESTION APPEARS TO HAVE BEEN NEGLECTED BY THE OWNER OR IF THE
PRODUCT HAS BEEN DAMAGED OR IF THE CONSUMER FAILED TO COMPLY WITH THE
WRITTEN INSTRUCTION MANUAL, THIS SEVEN DAY RETURN POLICY OR THE GREENWIT
WARRANTY TERMS. RETAILERS AND SELLERS OF GREENWIT PRODUCTS ARE NOT
AUTHORIZED TO MODIFY THIS RETURN/EXCHANGE POLICY OR WARRANTY IN ANY WAY.
THE CURRENT WARRANTY IS AVAILABLE ON THE INTERNET BY VISITING
WWW.MOTORINO.CA
21
Page 23

22
NOTES
Page 24

26
NOTES
23
 Loading...