

GreenWave GL30000, GL30002-A, GL32200, GL32202-A User Manual

Lighting Kit
{Model Numbers}

Table of Contents
Lighting Kit Overview 1
Basic Concepts of Wireless Lighting 2
Planning Your Lighting Network 2
Installation 6
Installation without a Gateway 7
Installation with a Gateway 9
Remote Control 12
Turning Lights on and Off 14
Dimming and Brightening Lights 14
Programming Lighting Groups 15
Adding Additional Light Bulbs to the Network 17
Adding Additional Remote Controls to the Network 19
Installing Batteries 20
Mobile Application 22
Gateway 23
Adding a Gateway to a Lighting Network 26
Troubleshooting 27
Safety Information 30
About GreenWave 32
Product Specifications 34
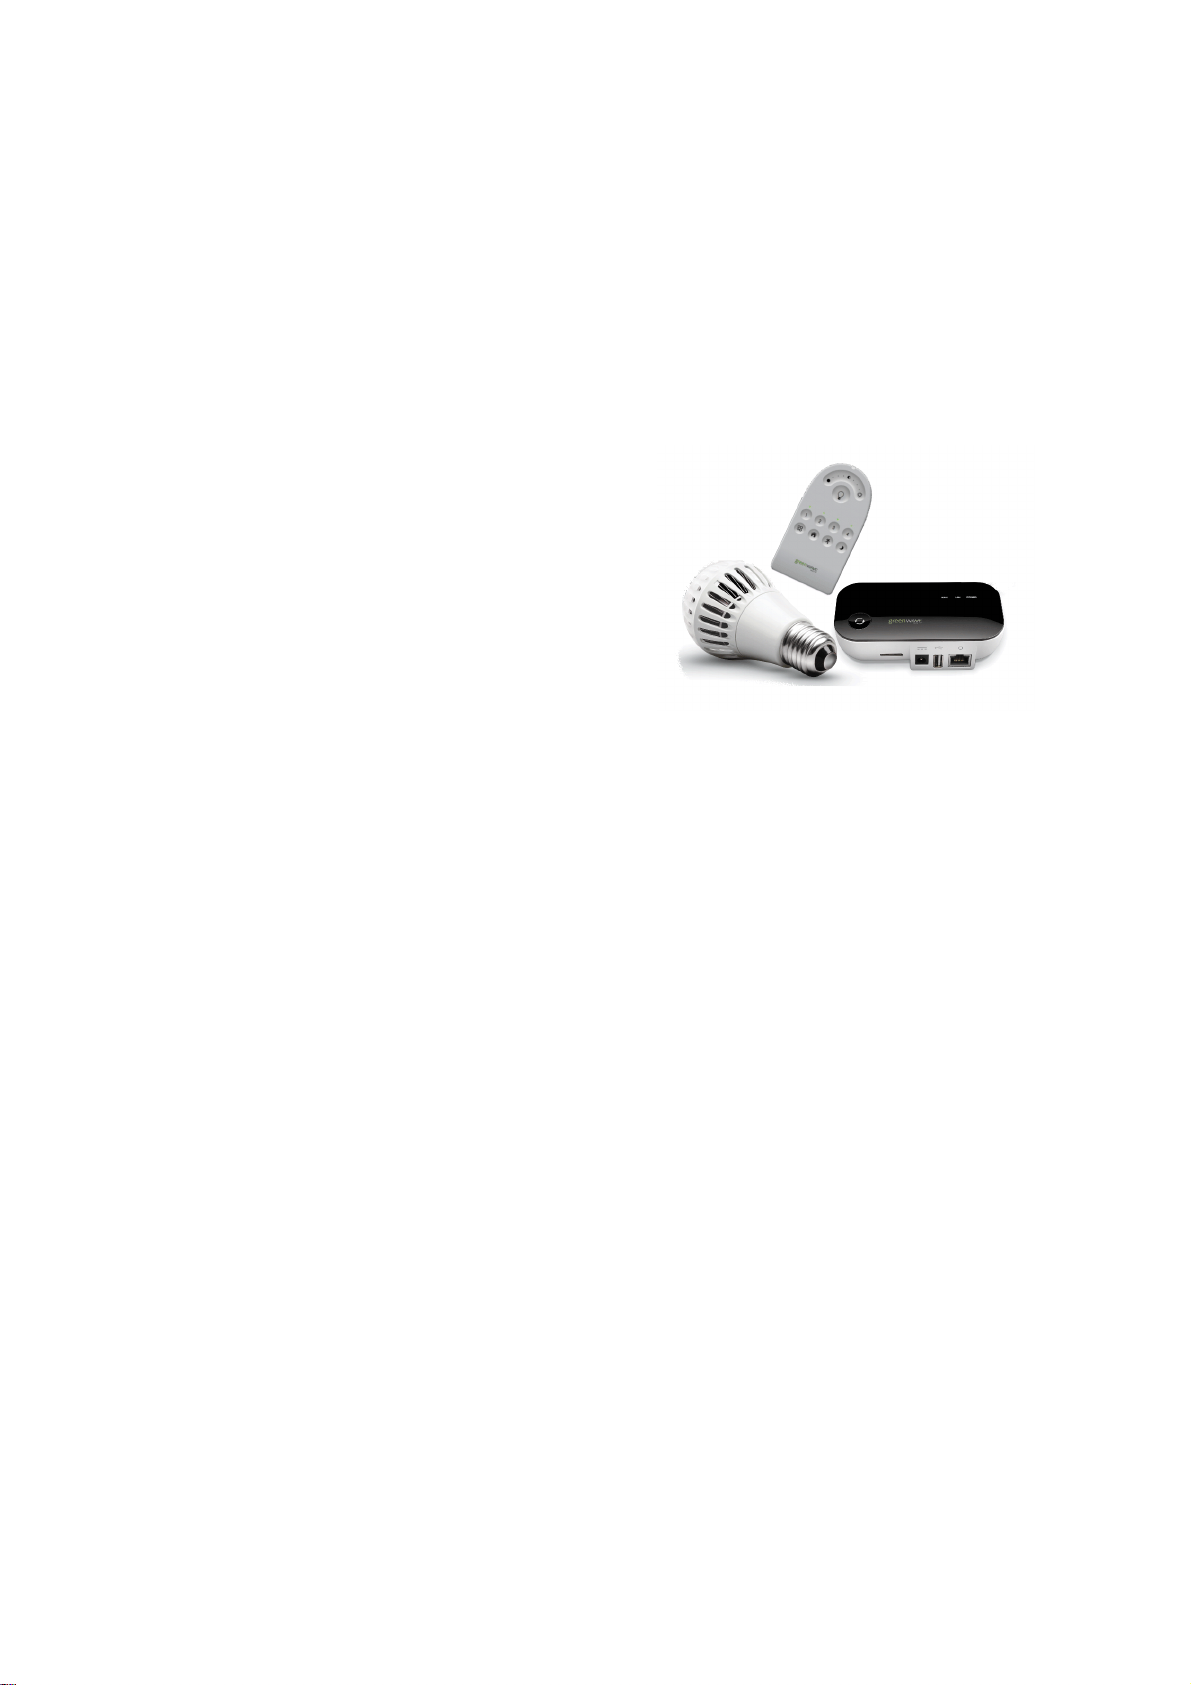
Lighting Kit Overview
The GreenWave Reality lighting kit includes a wireless smart lighting system that helps make the lighting in your
home more energy efficient and easier to manage. The kit includes LED light bulbs and a remote control that
work together to help you manage your lighting wirelessly.
Depending on your lighting kit, it may also include a
GreenWave Reality Gateway, which provides an enhanced
network connection to your light bulbs. This Gateway
connection allows you to use your smartphone to set up and
manage your home lighting system and to set up userdefined Smart Controls to set schedules and other controls
for automatically turning your lighting on or off.
1

Basic Concepts of Wireless Lighting
Wireless light bulbs work with your light fixtures the same way as standard light bulbs. They are different,
however, in a couple of ways:
• The lighting element in the light bulb uses LED technology, making your lighting more energy
efficient.
• The light bulb includes wireless technology that allows the light bulb to connect to a network and be
managed remotely.
Because the light bulbs can be connected to a network, you have greater flexibility in how you use them. For
example, you can program your lighting network so that when you press a button upon arriving home, an
entryway and a hallway light turn on. Or when you go to bed, your remote control can turn off all lights on the
network.
Planning Your Lighting Network
Whether you have only one wireless light bulb, or you are replacing your entire home lighting with wireless light
bulbs, you should plan how you want the lighting on your network to behave. For example, if you only have one
light bulb you might want to place it in a central location that would be optimum for turning on and off when you
are away or arrive home. If you have multiple light bulbs, however, you might want to set them up in lighting
groups to be able to better manage them across your home.
2

Lighting Groups
A lighting group is a set of network light bulbs that you can control together through your remote control or mobile
application (for kits with a Gateway). For example, you might have a lighting group that includes light bulbs on
the same floor. Or you might have a group that includes hallway and entryway lights, making it easy to turn on or
off as you arrive or leave home. All light bulbs in the same group turn on and off together and brighten or dim to
the same level. A light bulb can belong to more than one lighting group, allowing you to include it in different
groups for different purposes. There are some limitations:
• One light bulb can belong to a maximum of eight different lighting groups.
• One remote control can control up to four different lighting groups.
• You can add additional remote controls to add four more lighting groups per remote control.
• The Gateway (if included) does not have lighting group limitations other than the eight-group limit
on light bulbs.
Multi-fixture Lights
When installing light bulbs or setting up lighting groups, you should consider how you want multi-fixture lights to
behave. Since power to the light has to remain on (so the remote control or mobile application can access the
light bulb) you would either use all network light bulbs in a multi-fixture light or no network light bulbs at all. If you
are using network light bulbs in a multi-fixture light, you should add them all to the same group so that they turn
on and off together (though you do not have to).
3

Network Range
As with any remote control, your lighting kit’s remote control must be within range of your lighting network to be
able to control your lighting. However, this does not mean that it has to be within range of any particular light bulb.
Since the light bulbs on your network are interconnected across the network, they can pass commands to each
other as long as they are within network range of each other. This means that a nearby light bulb can receive
your remote control command and pass that command across the network of connected light bulbs, ultimately to
a light bulb you want to control in a distant room. Because of this effect, larger homes would make better use of
having more network light bulbs spread across the home, maintaining a distance that allows each light bulb to
communicate with one another.
If you are using the mobile application (for kits with a Gateway), the only restriction for your smartphone is that it
maintains network connectivity with the Gateway. If your Gateway is connected to the Internet through a router,
you could even access your lighting network from your smartphone from a remote location.
Maximum Number of Light Bulbs
If your lighting network includes a Gateway, you can install up to 250 light bulbs on the same network. If you are
using only a remote control, you can install up to 40 light bulbs.
Power and Power Failure with Wireless Light Bulbs
Wireless light bulbs are powered through light fixtures the same way standard light bulbs are. However, you must
leave the light fixtures in the on position so that power is available when using your remote control to turn the
4

wireless light bulbs on and off. If power is removed from a light bulb, whether from power failure or from manually
turning off the light fixture, the light bulb will of course turn off. When power is restored, all network light bulbs
affected by the power failure, regardless of whether they were previously on or off, will automatically turn on at
full brightness (even if their previous setting was not full brightness). The affected light bulbs will maintain their
previous network and lighting group settings.
5

Installation
Because of the wireless network technology inside each light bulb, installation involves more than simply
attaching the light bulb to a light fixture. You must also set up your light bulb to work on your lighting network.
This chapter explains how to install your lighting kit and add the light bulbs to your network.
The steps you must follow depend on whether or not your lighting kit includes a Gateway:
• If your kit does not include a Gateway, perform only the steps under the Installation without a
Gateway section in this chapter.
• If your kit includes a Gateway, perform only the steps under the Installation with a Gateway section
in this chapter.
Important: For the Gateway installation, you must also have an iPhone or iPad so that you can use
the required mobile application to manage your lighting network. If you do not have the required
iPhone or iPad you can follow the installation instructions under the section titled Installation
without a Gateway, and manage your lighting network with the remote control.
6

Installation without a Gateway
Note: Perform these steps only if your kit does not include a Gateway. If your kit includes a Gateway, perform
the steps in the Installation with a Gateway section in this chapter.
To install your lighting system without a Gateway, you must perform the following tasks:
1. Prepare the remote control.
2. Install the light bulbs to light fixtures and add to network.
1. Prepare the Remote Control
Insert two AAA 1.5V alkaline batteries (included) into the remote control, as shown in the Remote Control
chapter. The first time you insert batteries, the primary LED light will flash while the remote control determines
the best signal for your lighting system. When this process is complete, the LED light will remain on for
approximately five seconds. When the LED light turns off, your remote control is ready. Note that this process
occurs only during initial battery installation and does not occur when you replace batteries in the future.
2. Install Light Bulbs to Fixtures and Add to Network
Note: This step applies only for initial installation of the light bulbs that came with your lighting kit. For adding light
bulbs to your lighting network in the future, refer to the Remote Control chapter.
7

Before installing the light bulbs, determine the appropriate locations in your home for installing them. The
Lighting Kit Overview chapter provides information on planning your lighting network. When you are ready to
install the light bulbs, perform the following steps:
a. Keep your remote control nearby since you will need it as part of the light bulb installation process.
b. Make sure power to the fixture where you are installing the first light bulb is turned OFF.
c. Install a network light bulb into the fixture as you would any standard light bulb.
d. Turn power to the fixture on. The light bulb begins to brighten and dim while finding the remote control’s
network.
e. While the light bulb is brightening and dimming, press the {???PRG-ON???} buttons on the remote
control. The primary LED light will flash while the light bulb is being added to the network (the remote
control will remain in this mode and flash for approximately five minutes to give you time to install any
remaining light bulbs). When the light bulb has been added to the network, it will turn on at full
brightness.
f. Leave the fixture switch ON so that power is available when using your remote control to turn the light
bulb on and off.
g. Install the next light bulb by repeating steps a – f. Remember, if the primary LED light on the remote
control is still flashing from step e, then it will automatically find the new light bulb without you pressing
any buttons. However, if the LED light has stopped flashing, press the {???PRG-ON???} buttons again
so it can find the new light bulb. Repeat this for each additional light bulb you are adding.
h. When you are finished installing all light bulbs, you can turn the remote control back to normal operation
by pressing the {???PRG-OFF???} buttons. Otherwise the remote control will automatically return to
8

normal operation in five minutes. The primary LED light on the remote control turns off when returned to
normal operation.
Once these steps are complete, you can use the remote control as discussed in the Remote Control chapter to
operate your lighting network. By default, each light bulb in the kit is programmed to a different lighting group on
your network. You can change these groups by following the instructions in the Remote Control chapter.
Installation with a Gateway
Note: Perform these steps only if your kit includes a Gateway. If your kit does not include a Gateway, perform the
steps in the Installation without a Gateway section in this chapter. You must also have an iPhone or iPad so
that you can use the required mobile application to manage your lighting network. If you do not have the required
iPhone or iPad you can follow the installation instructions under the section Installation without a Gateway, and
manage your lighting network with the remote control.
To install your lighting system with a Gateway, you must perform the following tasks:
1. Install the Gateway (optional, if your lighting system includes a Gateway).
2. Install the mobile application (optional, if your lighting system includes a Gateway).
3. Install the light bulbs to light fixtures and add to network.
4. Optionally, prepare the remote control to work with the network.
9
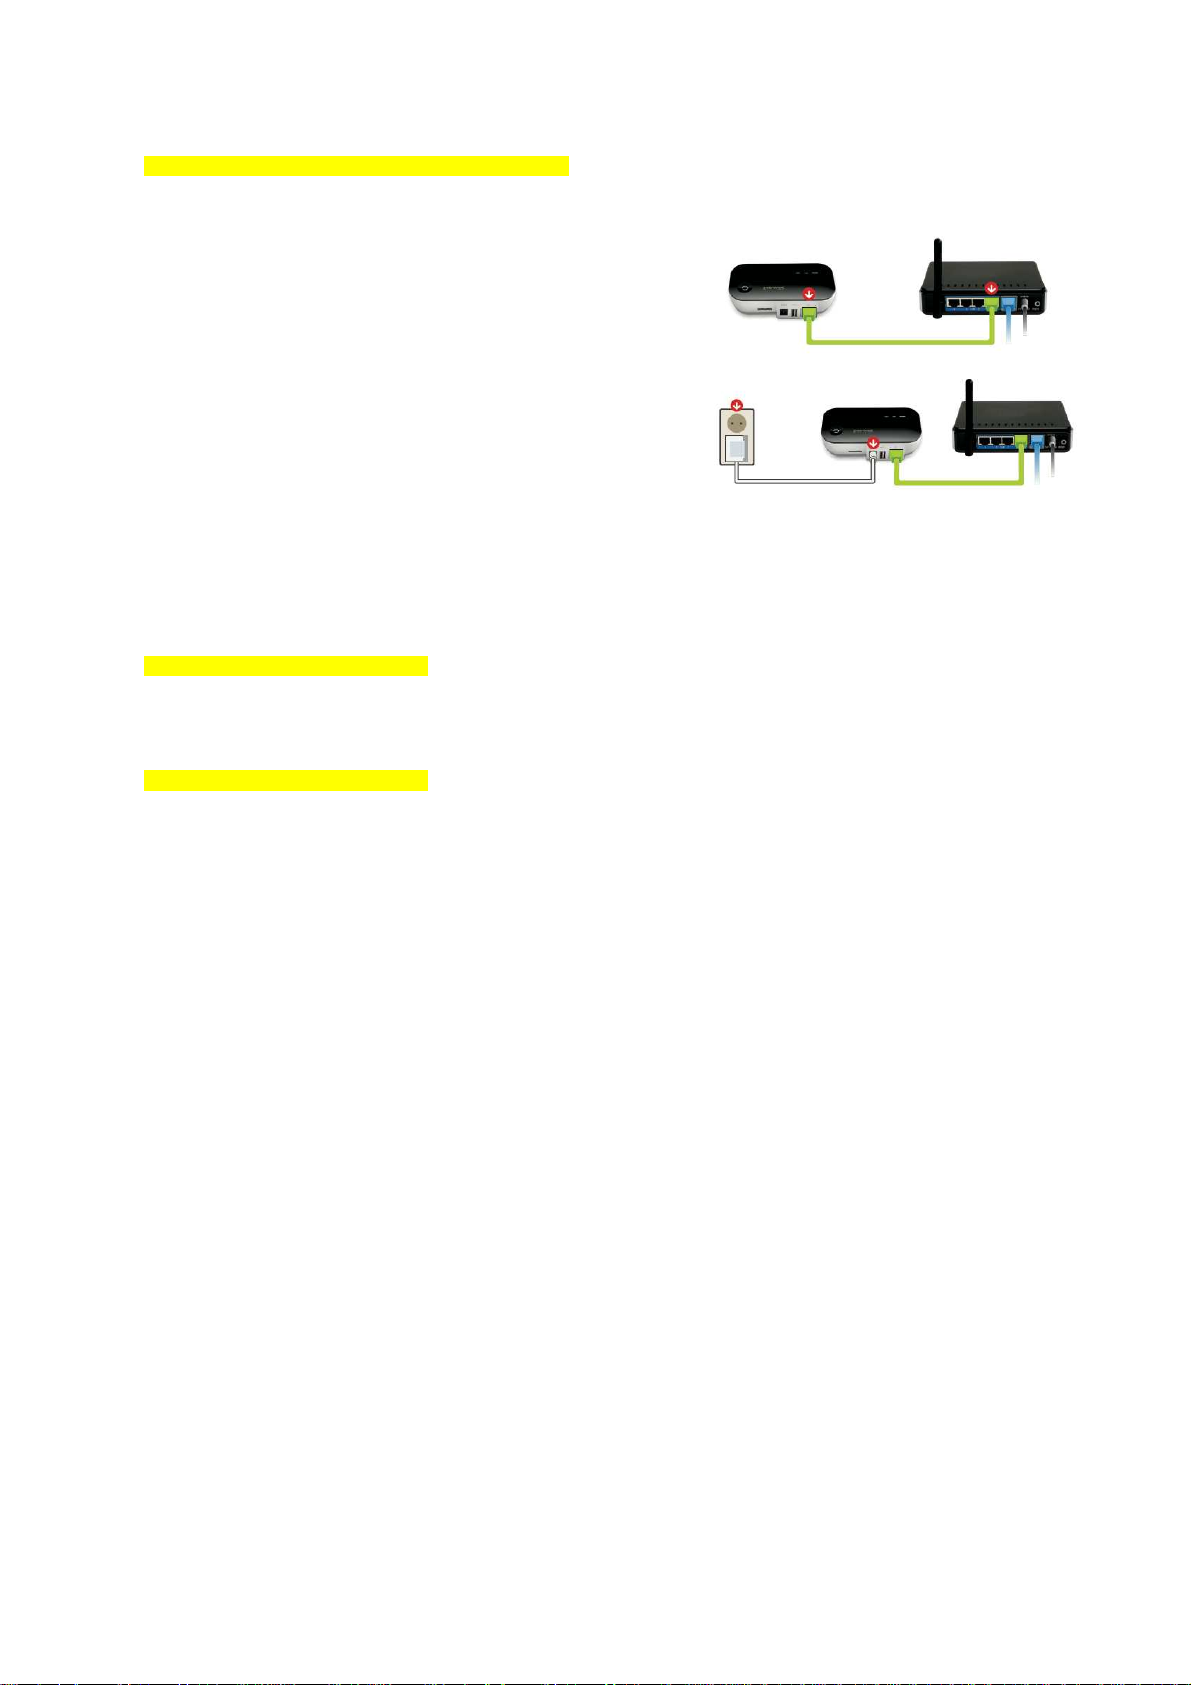
1. Install the Gateway
{Update this entire section with accurate information.}
If your lighting system includes a Gateway, you must first install it.
a. Connect the Gateway to any available port in your home
network router using the included Ethernet cable.
b. Power the Gateway by plugging it into an electrical outlet
using the included power adaptor. The Gateway
illuminates while it is attempting to connect to the Internet.
c. Verify that the Gateway is connected. Your Gateway is connected when both the network indicator and
the Internet indicator turn off, and the sync button changes from white to green.
2. Install the Mobile Application
{Add content for this entire section.}
3. Install Light Bulbs to Fixtures and Add to Network
{Add content for this entire section.}
10

4. Prepare Remote Control to Work with Network (Optional)
{Add content for this entire section.}
Installation Tips for All Installation Types
Review the safety information. Be sure to review the information contained in the “Safety Information” chapter
for important safety information you should follow.
Keep radio signals clear. The hardware in your lighting kit has antennas built-in for radio communication. Just
as you might experience reception problems on your mobile phone inside a building, the hardware in your
lighting kit can have trouble communicating if their radio signals are blocked by obstacles such as large metal
panels or walls containing wire mesh. When placing these devices in your home, imagine invisible lines
connecting between them. Try to keep these lines clear from obstruction as much as possible. Also place your
Gateway (if included) at least 5 feet (1.5 meters) above floor level to promote reception.
11
 Loading...