

Page 1
TABLE
Owner’s Manual
Table & Bar Height Models
Page 2

TABLE OF CONTENTS
About pureHeat Table ...........................................3
Features .......................................................3
Specications ..................................................3
Product Contents ...............................................4
Unit Diagram ...................................................4
Warnings ......................................................5
Unit Setup .....................................................6
Setup Diagram .................................................7
Using pureHeat Table ...........................................8
Usage Diagrams ................................................9
Maintenance/Cleaning/Storage .................................10
Warranty ......................................................11
RECORDS
Please record the name and phone number of your Dealer.
Name: ________________________________________________________________________
Phone #: ______________________________________________________________________
Please record the serial number of your pureHeat Table.
Serial #: ______________________________________________________________________
2
Page 3

ABOUT PUREHEAT TABLE
Saving space is a necessity in the world today; with pureHeat Table you’ll receive
the convenience of a side table and the comfort of a space heater in one compact
design. pureheat Table’s High-Efficiency Carbon Fiber Heating Element and Tip-Over
Shut Off Safety Feature offer a safe and reliable option for warming your space. To top
it all off, this unit incorporates an auto ON/OFF Proximity Sensor, so you don’t have to
worry about leaving it on or turning it off.
FEATURES
• High Efficiency Carbon Fiber Heating Element
• Auto On/Off Proximit y Sensor
• Safe-to-Touch Grill
• 360° Tip-Over Safety Shut-Off
• Audible Overheat Warning
• LED Center Light
• Tempered Glass Top
SPECIFICATIONS
Table Model Number: ..................................... pureHeat-Table
Bar Model Number: ......................................... pureHeat-Bar
Power: ...........................................................1500W
Heat Output: .................................................. 5100 BTU
Effective Proximity Range: .......................................... 2 Feet
Table Model Dimensions: ........................29.5” H x 19.7” W x 19.7” D
Table Model Weight: .............................................. 29.3 lbs
Bar Model Dimensions: ..........................37.4” H x 19.7” W x 19.7” D
Bar Model Weight: ................................................33.0 lbs
3
Page 4
PRODUCT CONTENTS
1 - Owner’s Manual
1 - pureHeat Table Body
1 - Tempered Glass Top
1 - Base
1 - Base Cover
2 - Oval Base Spacers
2 - Circular Base Washers
1 - Power Cord Plate
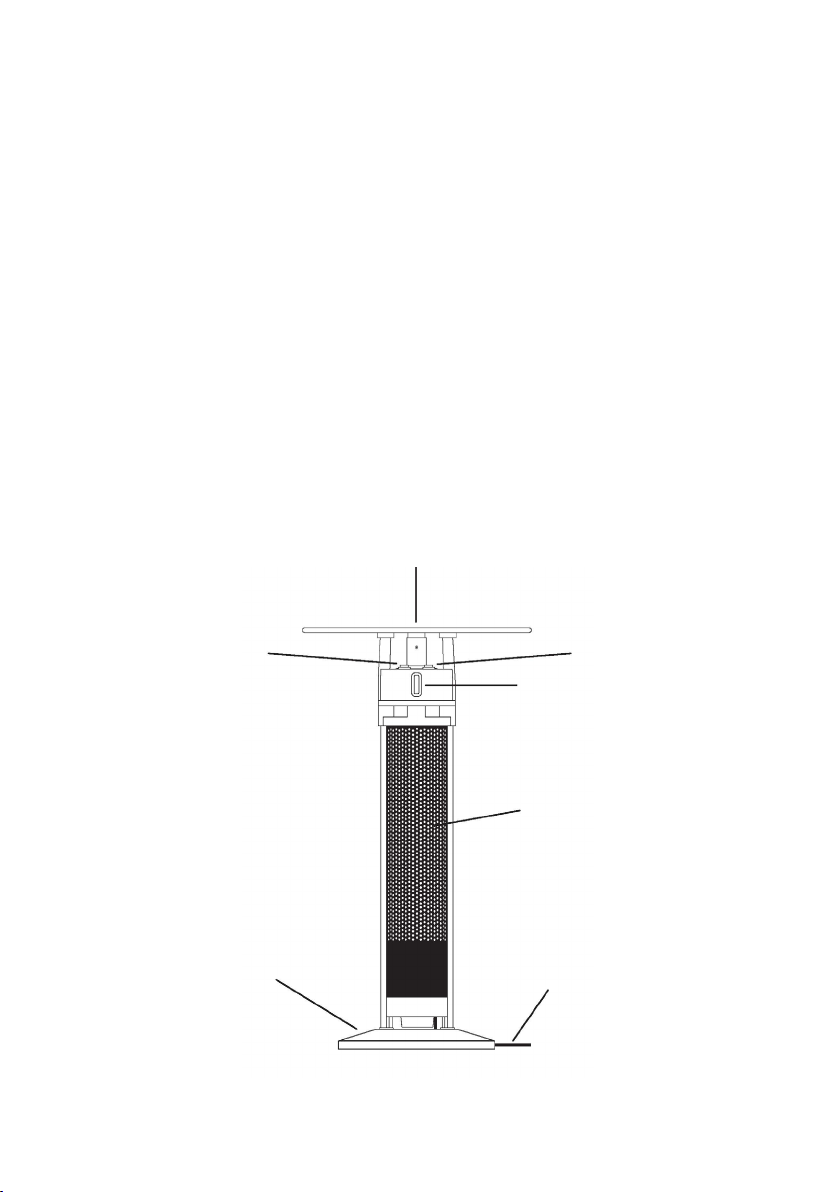
UNIT DIAGRAM
3 - L Brackets
2 - M6*20 Screws
3 - M6*16 Screws
2 - M4*35 Screws
3 - M8*6 Screws
3 - M4*6 Screws
1 - Allen Wrench
Tempered Glass Top
Mode ButtonLED Light Button
Proximity Sensor
Base
Main Body/
Carbon Heating Coil
Power Cord
4
Page 5

WARNINGS
For your safety and the safety of the product, please read through the warnings below
before beginning installation, use, or maintenance.
• Disconnect power before servicing.
• Connect to properly grounded outlets only. Do not use if plug does not t securely.
• Do not block the main body or cover the tempered glass top with any type of fabric.
• pureHeat Table is for household use only.
• Do no put more than 11 lbs of weight on the glass table.
• Do not operate the unit outdoors in inclement weather.
• Ensure any extension cable used has at least a 15A Current Rating.
• pureHeat Table will get hot when active. Avoid handling any part, besides the Tempered
Glass Top and handles, when the unit is on.
• Do not insert any foreign objects into the Main Body Grill.
• Do not run the Power Cord under carpeting, rugs, or any other covering.
• Do not operate pureHeat Table near any open sources of water.
• Keep combustible materials such as papers, furniture, and curtains at least 3 Feet away
from pureHeat Table.
• Don’t immerse in water to clean.
• Young children should be supervised when they are near the heater.
• pureHeat Table has an audible warning that will turn on when any part of the unit begins
to overheat. When this occurs, turn the unit off, unplug it from the outlet, and allow it to
cooldown before using it again.
5
Page 6

UNIT SETUP
Use the Setup Diagram (Page 7) for a visual representation of the assembly instructions.
INSPECT THE UNIT FOR DAMAGES BEFORE SETUP OR USE.
1. Remove the Main Body, Base, Base Cover, and assembly pieces from the packaging.
2. Stand the Main Body on its top.
3. Place the Base Spacers over the Base Brackets.
4. Place the Base Plate Cover over the Base Plate, then slide them over the Base Brackets,
orienting the Power Cord Port on your preferred side.
5. Pull your Power Cord through the main hole in the Base Plate Assembly.
6. Place the Base Washers in the Two (2) locations on the bottom of the Base Plate and fasten
with the (2) M6*20 Screws.
7. Lay the Power Cord over the edge of the Base where the Power Cord Port is located. Fasten
the Power Cord Plate over the Power Cord with the (2) M4*35 Screws.
8. Stand the Unit on its base.
9. Fasten the (3) L Brackets to the Tempered Glass with the edges in. Use the (3) M8*6 &
(3) M4*6 Screws to lock them in place.
10. Slide the Tempered Glass Top into the slots on the top of the main body and fasten them in
place with the (3) M6*16 Screws.
11. Plug your unit in and follow the instructions for proper use.
FOR YOUR SAFETY, READ ALL WARNINGS & CAUTIONS (PAGE 5) AND USAGE (PAGE 8) BEFORE
USING YOUR PUREHEAT TABLE.
6
Page 7

SETUP DIAGRAM
Tempered Glass Top
L Brackets
M4*6 Screws
Base Bracket
Base Washer
M8*6 Screws
M6*16 Screws
Power Cord
Base Spacer
Base Cover
Base
Power Cord Plate
M4*35 Screws
Power Cord Plate
M6*20 Screws
Power Cord
Base Washer
7
Page 8

USING PUREHEAT TABLE
READ ALL WARNINGS & CAUTIONS (PAGE 5) BEFORE USING YOUR PUREHEAT TABLE.
Modes
On
To turn the unit on, switch the Mode Button to “ - ”.
Proximity
pureHeat Table features a Proximity Sensor that will turn the unit on or off
when anyone approaches or leaves the immediate area (2 feet).
Switch the Mode Button to “ = ” for Proximity Mode. The Proximity Sensor on the
front and sides will flash Blue when the unit is in Proximity Mode.
LED Light
Use the LED Power Button to turn the LED Center Light On and Off.
pureHeat Table has an audible warning that will turn on when any part of the unit begins
to overheat. When this occurs, turn the unit off, unplug it from the outlet, and allow it to
cooldown before using it again.
8
Page 9

USAGE DIAGRAMS
LED Light
LED Power Button
Mode Button
Proximity Sensor
9
Page 10

MAINTENANCE
Your pureHeat Table should be maintenance free for many years, but sometimes the
unexpected happens. If you have any trouble with your unit, contact GreenTech
Environmental by phone or visit www.GreenTechEnv.com/Support.
CLEANING
DISCONNECT YOUR PUREHEAT TABLE FROM THE OUTLET BEFORE CLEANING.
To extend the life of your pureHeat Table, perform regular cleanings with a damp cloth.
STORAGE
To prevent accidents, or save some space, store your pureHeat Table in a cool,
dry place. Perform a cleaning, as described above, then wipe all parts dry before
packing it away.
10
Page 11

LIMITED WARRANTY INFORMATION
Your pureHeat Table (Product) is warranted to be free from all defects in material and workmanship in
normal household use for a period of 3 Years from date of purchase. The warranty is granted only to the
original purchaser. The warranty is subject to the following provisions:
Any damages or malfunctions caused by negligence, abuse, or use not in accordance with the Product
Owner’s Manual are not covered by this warranty. Likewise, any defects or damages caused by
unauthorized service or the use of other than Genuine pureHeat Parts are not covered.
All shipping charges are the responsibility of the purchaser. GreenTech Environmental will, at its option,
repair or replace a defective Product or part(s) for the Product that is/are covered by this warranty. As a
matter of warranty policy, GreenTech Environmental will not refund the customer’s purchase price.
OBTAINING WARRANTY SERVICE
To obtain warranty service you must return the defective product along with proof of purchase to the
pureHeat Authorized Service Center. All shipping costs submitted under this Warranty shall be borne by
purchaser. Unless this Warranty is expressly renewed or extended by pureHeat, any repaired or replaced
part of unit shall be warranted to the original purchaser only for the length of the unexpired portion of the
original warranty. For the location of the nearest pureHeat Authorized Service Center or for other service
information, please visit us online or contact Customer Service at:
www.GreenTechEnv.com/Support
Before any product is sent for service, the customer should contact the pureHeat Service Center to
obtain a Return Merchandise Authorization (RMA) Number. This RMA Number should be clearly written on
the box before shipping. All components/parts including the remote (if applicable), manuals, and original
packaging should be included in the return if available.
FURTHER LIMITATIONS AND EXCLUSIONS ARE AS FOLLOWS
Any warranty that may be implied in connection with your purchase or use of the Product, including any
warranty of merchantability or any warranty for Fitness For A Particular Purpose is limited to the duration
of this warranty. Some states do not allow limitations on how long an implied warranty lasts, so the above
limitations may not apply to you.
Your relief for the breach of this warranty is limited to the relief expressly provided above. In no event
shall pureHeat be liable for any consequential or incidental damages you may incur in connection with
your purchase or use of the Product. Some states do not allow the exclusion or limitation of incidental or
consequential damages, so the above limitation or exclusion may not apply to you.
This Warranty gives you specic legal rights, and you may also have other rights which vary from state to state.
REGISTRATION
Please register your Product within 10 days of purchase by visiting www.GreenTechEnv.com/Warranty.
Registering your new pureHeat product entitles you to the most up-to-date pureHeat warranty
and promotion information.
11
Page 12

www.GreenTechEnv.com
12
 Loading...