

Page 1

Owner’s Manual
Page 2

TABLE OF CONTENTS
About pureHeat PATIO ........................................3
Features ....................................................3
Specications ...............................................3
Product Contents ............................................4
Unit Diagram ................................................4
Warnings ...................................................5
Unit Setup ............................................... 6 - 7
Control Panel/Remote Diagrams ...............................8
Using pureHeat PATIO ........................................9
Maintenance/Cleaning/Storage ..............................10
Warranty ...................................................11
RECORDS
Please record the name and phone number of your Dealer.
Name: __________________________________________________________________
Phone #: ________________________________________________________________
Please record the serial number of your pureHeat PATIO.
Serial #: _________________________________________________________________
2
Page 3

ABOUT PUREHEAT PATIO
Thank you fo r your purchase of the pureHeat PATIO. This heater provides consis tent
warmth to outdoor spaces using ca rbo n infrared heating technology, warming your
friends and famil y are directly ins tead of just heating the surrounding air.
pureHeat PATIO can be mounted using easy-to- install xed bracket, or it can be
placed on an adj ustable aluminum stand for mobility. Either way, the silent and
odor les s heating element i s a safe distance from children and pets.
For optimum comfort, three different levels of heat can be produced with almost
no war m- up time. A 24-hour ti mer all ows fo r specic shut-of f time selection, and
all features can be adjusted using the included remote control. pure Heat PATIO
is du rabl e, lightweight, maintenance-free, and can connect to your standard
household electrical source.
FEATURES
• High Efficiency Carbon Fiber Heating Element
• 3 Power Modes
• Shut- Off Timer
• 360° Tip -Over Safety
• Stand and Wall Mounting Options
SPECIFICATIONS
Model Number: ....................................... pureHeat-PATIO
Power Input: ........................................120 VAC/60Hz | 15A
Power Usage: ......................................500W/1000W/1500W
Heat Output: ................................................ 5100 BTU
Unit Dimensions: .............................. 7.5” H x 30.0” W x 3.5” D
Unit Weight: .................................................... 4.5 lbs
Stand Dimensions ....................... 45.5” - 71” H x 34.0” W x 34.0” D
Stand Weight: ................................................. 6.0 lbs
Protection Rating: .................................................IP24
Warranty: .................................................... 3 Years
3
Page 4
PRODUCT CONTENTS
1 - Owner’s Manual
1 - pureHeat PATIO Heater
1 - Remote Control
1 - pureHeat PATIO Telescoping Stand
1 - pureHeat PATIO Grill Guard
1 - 2 Part Mounting Bracket
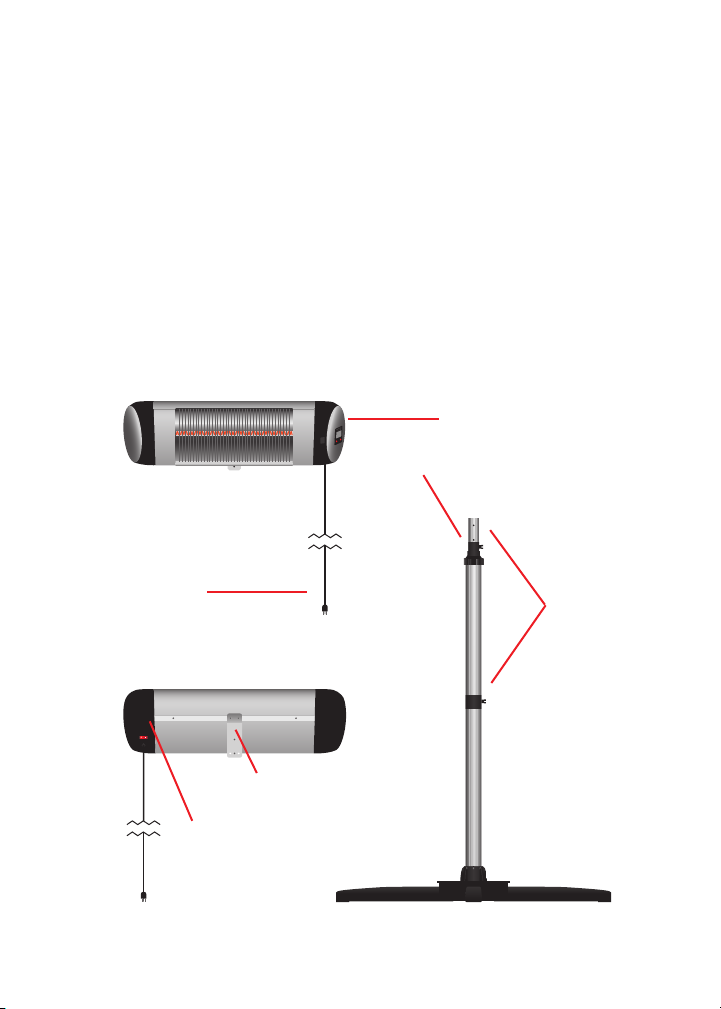
UNIT DIAGRAM
Power Cord
3 - Plastic Wall Anchors
2 - M6*14 Screws
4 - M5*12 Screws
2 - M6*38 Screws
3 - ST4*35 Screws
2 - Butterfly Nuts
Control Panel
Telescoping Lock
Cord Clips
Power Button
Mounting Bracket
4
Page 5

WARNINGS
For your safety and the safety of the product, please read through the warnings
below before beginning installation, use, or maintenance.
• Disconnect power before servicing.
• Connect to properly grounded outlets only. Do not use if plug does not t securely.
• Do not cover the unit with any type of fabric.
• Do not operate the unit outdoors in inclement weather.
• Ensure any extension cable used has at least a 15A Current Rating.
• pureHeat PATIO will get hot when active. Avoid handling any part, besides the stand,
when the unit is on.
• Do not insert any foreign objects into the Main Body Grill.
• Do not run the Power Cord under carpeting, rugs, or any other covering.
• Do not operate pureHeat PATIO near any open sources of water.
• Keep combustible materials such as papers, furniture, and curtains at least 3 Feet
away from pureHeat PATIO.
• Do not immerse in water to clean.
• Young children should be supervised when they are near the heater.
• pureHeat PATIO has an audible warning that will turn on when any part of the unit begins
to overheat. When this occurs, turn the unit off, unplug it from the outlet, and allow it to
cooldown before using it again.
5
Page 6

UNIT SETUP
INSPECT THE UNIT FOR DAMAGE BEFORE SETUP OR USE.
Floor Stand Setup
1. Assemble the Floor Stand by attaching
the Legs to the Base and then inserting
the Telescoping Pole.
2. Use Two (2) M6*14 Screws to combine
Bracket 1 and Bracket 2.
3. Use Two (2) M5*12 Screws to install the
Mounting Bracket to the rear of the
Heater Body.
4. Use Two (2) M6*38 Screws to install front
of the Mounting Bracket to the rear of
the Stand.
5. Use Two (2) M5*12 Screws to fix the Grill
Guard to the rear of the Heater Body.
This step is optional but recommended.
6. Loosen the Telescoping Lock and slide
the pole and unit up or down to your
desired height, then re-tighten the
Telescoping Lock.
x2
x2
6
Page 7

UNIT SETUP CONTINUED
Wall/Ceiling Mount Setup
1. Use Two (2) M6*14 Screws to combine
Bracket 1 and Bracket 2.
2. Use Two (2) M5*12 Screws to install the
Mounting Bracket to the rear of the
Heater Body.
3. Ensure the desired mounting location is
near an outlet but free from electrical
cables, communication lines, and
pipes that could be damaged by
excessive heat.
4. If needed, pre-drill your wall and insert
the 3 Wall Anchors.
x2
x2
5. Use the 3 ST4*35 Screws and fasten the
Mounting Bracket and Heater to the
Wall with a Horizontal Orientation.
Heater must be Mounted Horizontally or the Tip Over Safety Switch may Engage and the Unit will Turn Off.
FOR YOUR SAFETY, READ ALL WARNINGS & CAUTIONS (PAGE 5) AND USAGE (PAGE 9)
BEFORE USING YOUR PUREHEAT PATIO.
7
Page 8

CONTROL PANEL/REMOTE DIAGRAMS
Control Panel
Power Mode/Timer Hours
88
24
Function ON LED
Remote
Mode Button
Power Button
Power Mode 1
Power Mode 3
LED
MODE TIMER
P1 P2
P3 TIMER
8
Timer Button
Power Mode 2
Timer Button
Page 9

USING PUREHEAT PATIO
READ ALL WARNINGS & CAUTIONS (PAGE 5) BEFORE USING YOUR PUREHEAT PATIO.
Power
pureHeat PATIO starts in Standby Mode when rst turned on. The unit will have power but
is not actively heating.
To turn the unit on, switch the Power Button to “ - ”.
Modes
Changing the Power Mode increases the Heat Output.
P1 is the Lowest Heat Output Mode and P3 is the Maximum Heat Output Mode.
P1 Press the Mode Button once to change to Power Mode 1.
P2 Press the Mode Button again to change to Power Mode 2.
P3 Press the Mode Button a third time to change to Power Mode 3.
Pressing the Mode Button once more puts the unit in Standby Mode again.
Timer
While the unit is active, a timer can be set to turn the unit OFF after a desired amount of hours.
Press the Timer Button to change the amount of hours before the unit will shut off. The
time will increase in 1 Hour Increments, up to 24 Hours.
9
Page 10

MAINTENANCE
Your pureHeat PATIO should be maintenance free for many years, but sometimes the
unexpected happens. If you have any trouble with your unit, contact GreenTech
Environmental by phone or visit www.GreenTechEnv.com/Support.
CLEANING
DISCONNECT YOUR PUREHEAT PATIO FROM THE OUTLET BEFORE CLEANING.
To extend the life of your pureHeat PATIO, perform regular cleanings with a damp cloth.
STORAGE
To prevent accidents, or save some space, store your pureHeat PATIO in a cool,
dry place. Perform a cleaning, as described above, then wipe all parts dry before
packing it away.
10
Page 11

LIMITED WARRANTY INFORMATION
Your pureHeat PATIO (Product) is warranted to be free from all defects in material and workmanship in
normal household use for a period of 3 Years from date of purchase. The warranty is granted only to the
original purchaser. The warranty is subject to the following provisions:
Any damages or malfunctions caused by negligence, abuse, or use not in accordance with the Product
Owner’s Manual are not covered by this warranty. Likewise, any defects or damages caused by
unauthorized service or the use of other than Genuine pureHeat Parts are not covered.
All shipping charges are the responsibility of the purchaser. GreenTech Environmental will, at its option,
repair or replace a defective Product or part(s) for the Product that is/are covered by this warranty.
As a matter of warranty policy, GreenTech Environmental will not refund the customer’s purchase price.
OBTAINING WARRANTY SERVICE
To obtain warranty service you must return the defective product along with proof of purchase to the
pureHeat Authorized Service Center. All shipping costs submitted under this Warranty shall be bor ne by
purchaser. Unless this Warranty is expressly renewed or extended by pureHeat, any repaired or replaced
part of unit shall be warranted to the original purchaser only for the length of the unexpired portion of the
original warranty. For the location of the nearest pureHeat Authorized Service Center or for other service
information, please visit us online or contact Customer Service at:
www.GreenTechEnv.com/Support
Before any product is sent for service, the customer should contact the pureHeat Service Center to
obtain a Return Merchandise Authorization (RMA) Number. This RMA Number should be clearly written on
the box before shipping.All components/parts including the remote (if applicable), manuals, and original
packaging should be included in the return if available.
FURTHER LIMITATIONS AND EXCLUSIONS ARE AS FOLLOWS
Any warranty that may be implied in connection with your purchase or use of the Product, including any
warranty of merchantability or any warranty for Fitness For A Particular Purpose is limited to the duration
of this warranty. Some states do not allow limitations on how long an implied warranty lasts, so the above
limitations may not apply to you.
Your relief for the breach of this warranty is limited to the relief expressly provided above. In no event
shall pureHeat be liable for any consequential or incidental damages you may incur in connection with
your purchase or use of the Product. Some states do not allow the exclusion or limitation of incidental or
consequential damages, so the above limitation or exclusion may not apply to you.
This Warranty gives you specic legal rights, and you may also have other rights which vary from state to state.
REGISTRATION
Please register your Product within 10 days of purchase by visiting www.GreenTechEnv.com/Warranty.
Registering your new pureHeat product entitles you to the most up-to-date pureHeat warranty
and promotion information.
11
Page 12

www.GreenTechEnv.com
12
 Loading...