

Page 1
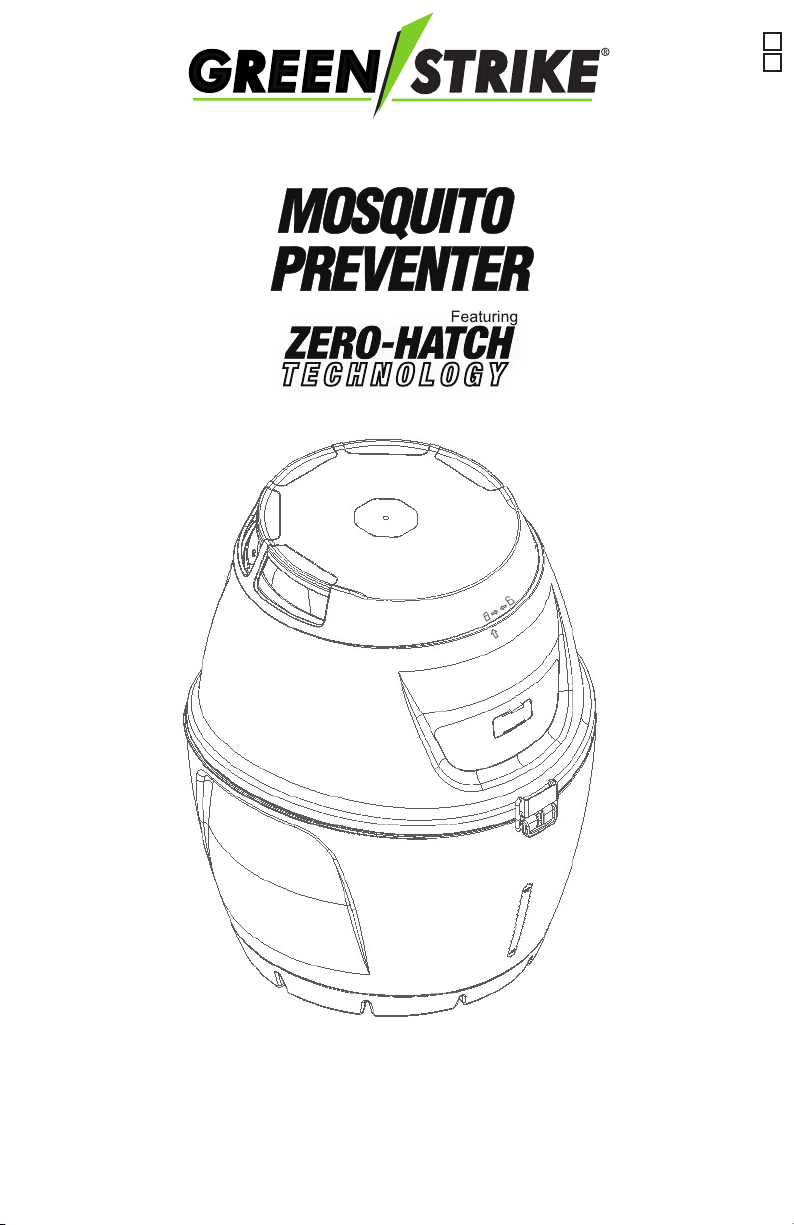
Model # 800CU
# 804AE
OWNER’S MANUAL
Invented, Designed, & Tested in Canada
www.green-stike.com
Page 2
SAFETY INFORMATION:
• This owner’s manual contains important information necessary for the proper
assembly and safe use of this product.
• Read and follow all warnings and instructions before assembling and using
the product.
• Keep this manual for future reference.
WARNINGS:
• AVOID all contact with eyes, ears, nose and mouth. After handling attractants,
throughly wash contacted skin. Keep out of reach of children and animals.
Avoid inhaling or ingesting.
• For outdoor use only! Do NOT use indoors!
• Store all attractants in a cool, dry place away from any source of intense heat
or moisture. Dispose of attractants in a trash receptacle.
• Do NOT empty water from Breeding-Zone in wet areas around your yard.
• Avoid looking directly into UV light for an extended period of time.
NOTICE TO USER:
This mosquito control device is intended to trap mosquito eggs and help to
reduce the overall mosquito population. Maxtech Mosquito Control Inc. does not
guarantee a complete elimination of mosquito populations in your area.
This is a pest control solution and is to be used only in accordance with the
directions on the label. The user assumes the risk to persons or property that
may arise from such use of this product.
Be diligent. Watch the news. Stay updated on potential mosquito diseases in
your area. Never use multiple attractants in the same unit.
Visit www.green-strike.com, follow us on Facebook, Twitter & Instagram for
frequent updates on mosquito born diseases that are potentially in your area.
WARRANTY:
warranties to the original purchaser that this product is free from
defective materials and workmanship. This warranty is limited to remedy any
defective part for a period of one year from the date of the original purchase.
Retain your original receipt as proof of purchase. This warranty does not apply
to electrical components, nor to, in our judgment, misuse or abuse. If this unit
has been altered, no warranty is in force. In no case shall be liable
for any accidental, punitive, consequential or any other damages of any kind
for breach of this or any other warranty, expressed or implied.
Register your warranty online through www.green-strike.com/register.
173 Roger Street
Waterloo, Ontario N2J 1B1
Toll Free: 1-800-265-8847 ©2018
Page 3
ABOUT YOUR MOSQUITO PREVENTER
Now that you have purchased a Mosquito Preventer, you are on
your way to preventing mosquitoes in your outdoor living areas. Just a reminder
that the Mosquito Preventer works great at reducing “second generation”
mosquitoes that otherwise would be multiplying in your backyard.
Please carefully read through this manual to understand how to use and
maintain this device.
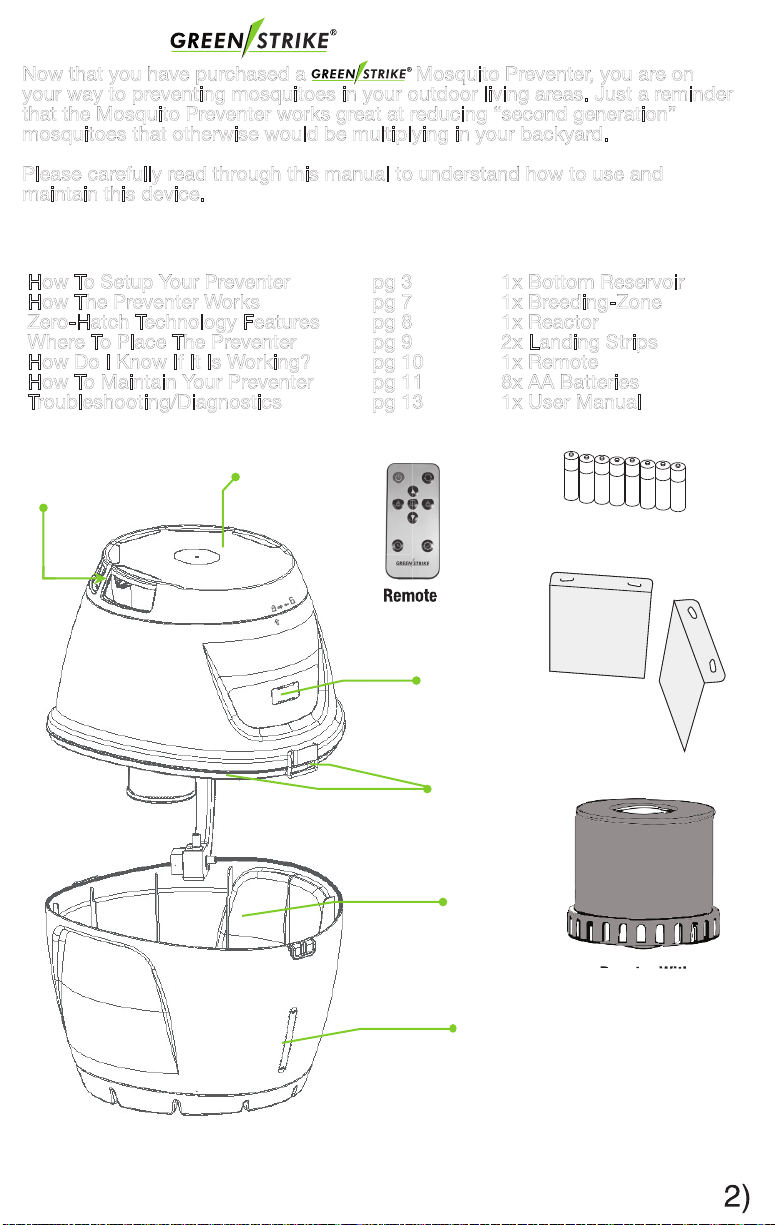
INCLUDED IN BOX:TABLE OF CONTENTS:
How To Setup Your Preventer pg 3
How The Preventer Works pg 7
Zero-Hatch Technology Features pg 8
Where To Place The Preventer pg 9
How Do I Know If It Is Working? pg 10
How To Maintain Your Preventer pg 11
Troubleshooting/Diagnostics pg 13
Lid
1x Bottom Reservoir
1x Breeding-Zone
1x Reactor
2x Landing Strips
1x Remote
8x AA Batteries
1x User Manual
Breeding-Zone
AA Batteries
Remote
Front Display
Landing Strips
Latch
(Front & Back)
Bottom
Reservoir
Reactor With
Attractant
Max/Min
Water Level Gauge
Page 4
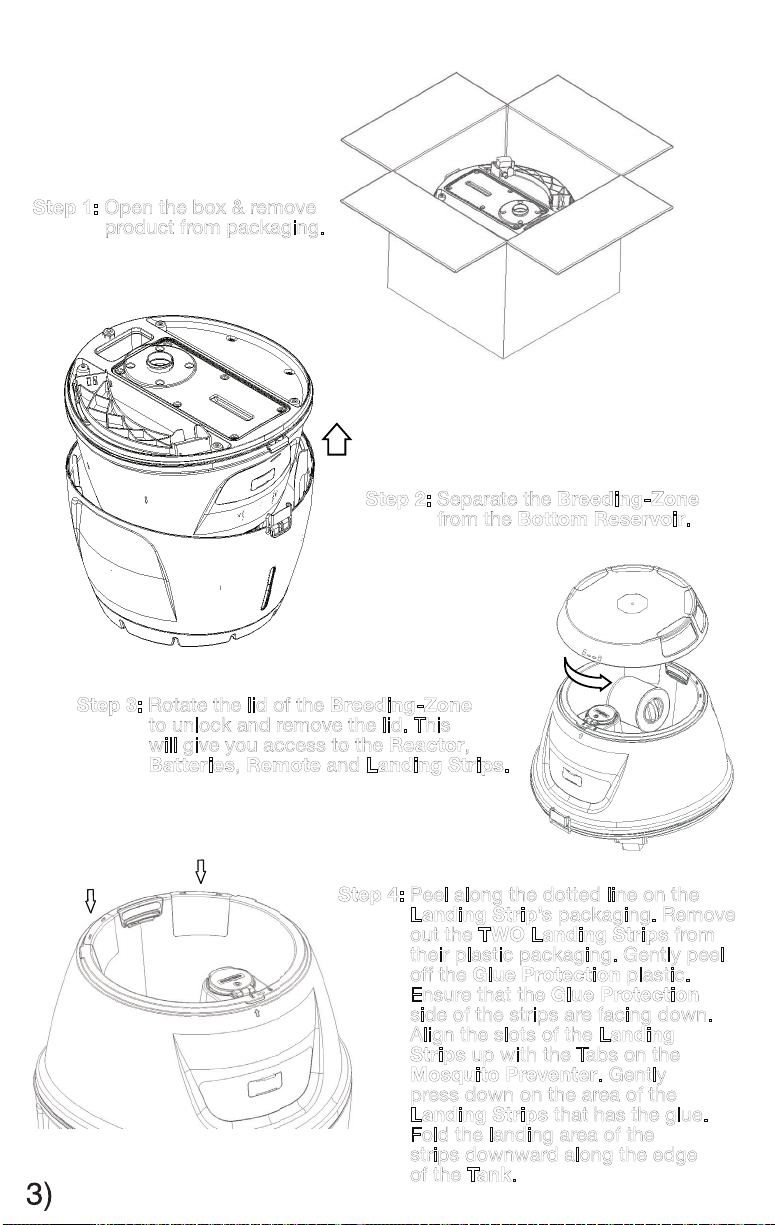
HOW TO SETUP YOUR MOSQUITO PREVENTER FOR THE FIRST TIME
Step 1: Open the box & remove
product from packaging.
Step 2: Separate the Breeding-Zone
from the Bottom Reservoir.
Step 3: Rotate the lid of the Breeding-Zone
to unlock and remove the lid. This
will give you access to the Reactor,
Batteries, Remote and Landing Strips.
Step 4: Peel along the dotted line on the
Landing Strip’s packaging. Remove
out the TWO Landing Strips from
their plastic packaging. Gently peel
off the Glue Protection plastic.
Ensure that the Glue Protection
side of the strips are facing down.
Align the slots of the Landing
Strips up with the Tabs on the
Mosquito Preventer. Gently
press down on the area of the
Landing Strips that has the glue.
Fold the landing area of the
strips downward along the edge
of the Tank.
Page 5
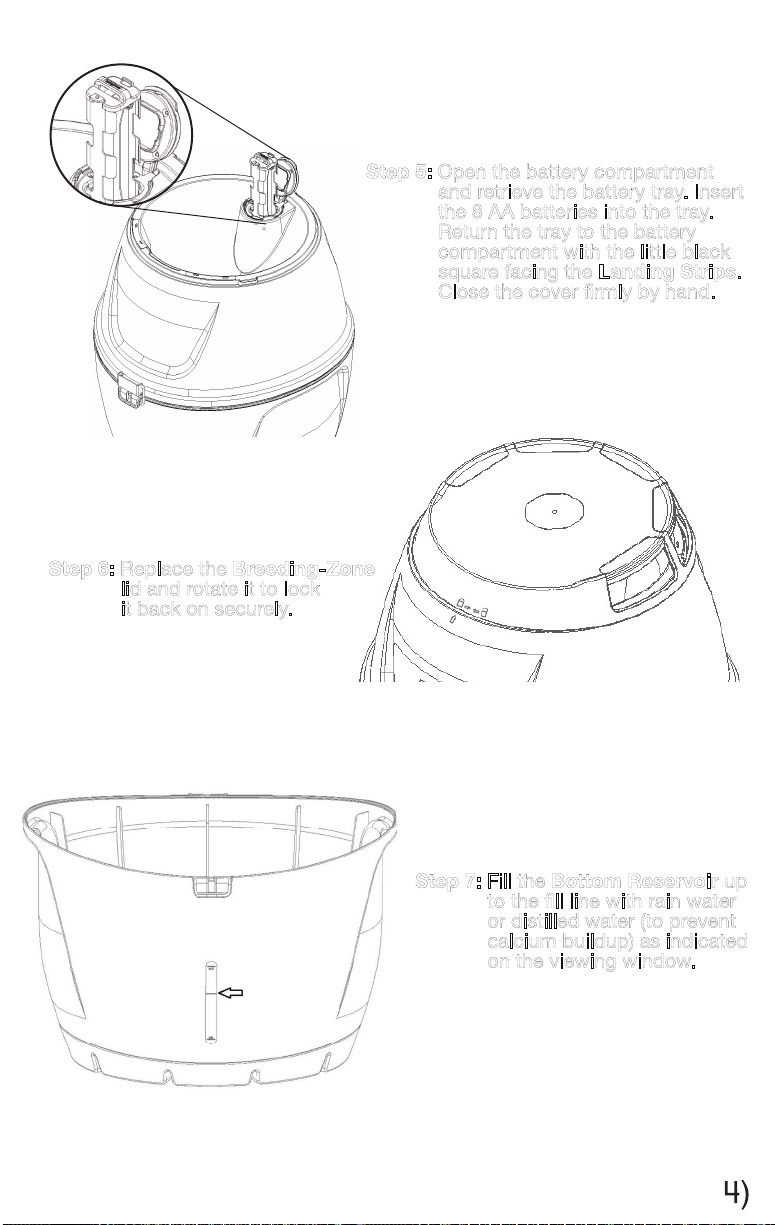
Step 6: Replace the Breeding-Zone
lid and rotate it to lock
it back on securely.
Step 5: Open the battery compartment
and retrieve the battery tray. Insert
the 8 AA batteries into the tray.
Return the tray to the battery
compartment with the little black
square facing the Landing Strips.
Close the cover rmly by hand.
Step 7: Fill the Bottom Reservoir up
to the ll line with rain water
or distilled water (to prevent
calcium buildup) as indicated
on the viewing window.
Page 6
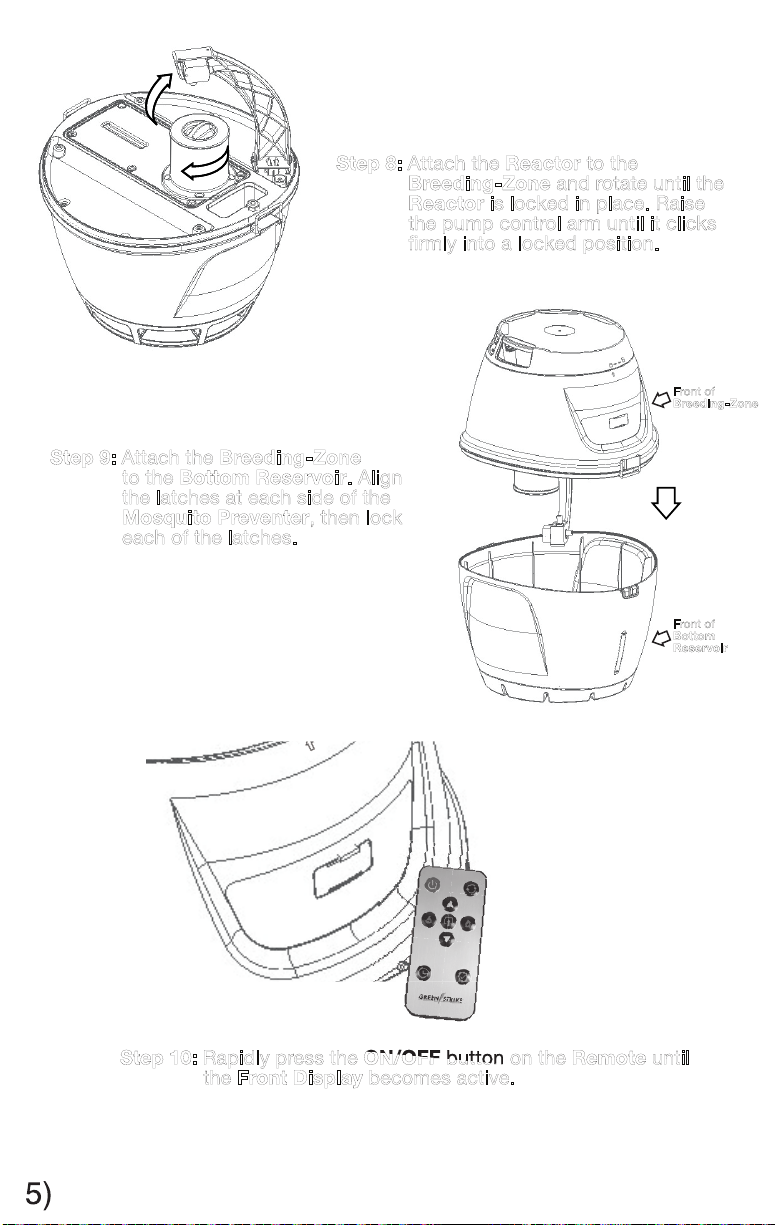
Step 8: Attach the Reactor to the
Breeding-Zone and rotate until the
Reactor is locked in place. Raise
the pump control arm until it clicks
rmly into a locked position.
Step 9: Attach the Breeding-Zone
to the Bottom Reservoir. Align
the latches at each side of the
Mosquito Preventer, then lock
each of the latches.
Front of
Breeding-Zone
Front of
Bottom
Reservoir
Step 10: Rapidly press the ON/OFF button on the Remote until
the Front Display becomes active.
Page 7
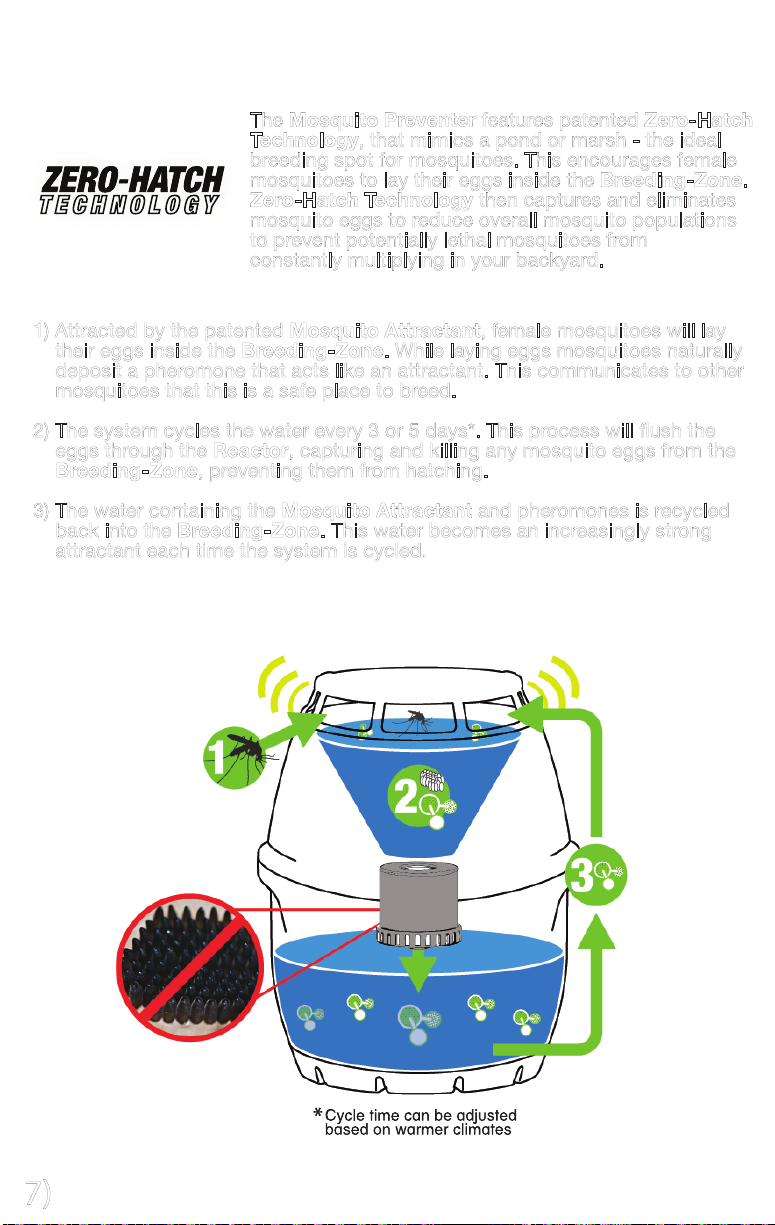
HOW THE MOSQUITO PREVENTER WORKS
The Mosquito Preventer features patented Zero-Hatch
Technology, that mimics a pond or marsh - the ideal
breeding spot for mosquitoes. This encourages female
mosquitoes to lay their eggs inside the Breeding-Zone.
Zero-Hatch Technology then captures and eliminates
mosquito eggs to reduce overall mosquito populations
to prevent potentially lethal mosquitoes from
constantly multiplying in your backyard.
1) Attracted by the patented Mosquito Attractant, female mosquitoes will lay
their eggs inside the Breeding-Zone. While laying eggs mosquitoes naturally
deposit a pheromone that acts like an attractant. This communicates to other
mosquitoes that this is a safe place to breed.
2) The system cycles the water every 3 or 5 days*. This process will ush the
eggs through the Reactor, capturing and killing any mosquito eggs from the
Breeding-Zone, preventing them from hatching.
3) The water containing the Mosquito Attractant and pheromones is recycled
back into the Breeding-Zone. This water becomes an increasingly strong
attractant each time the system is cycled.
7)
*
Page 8
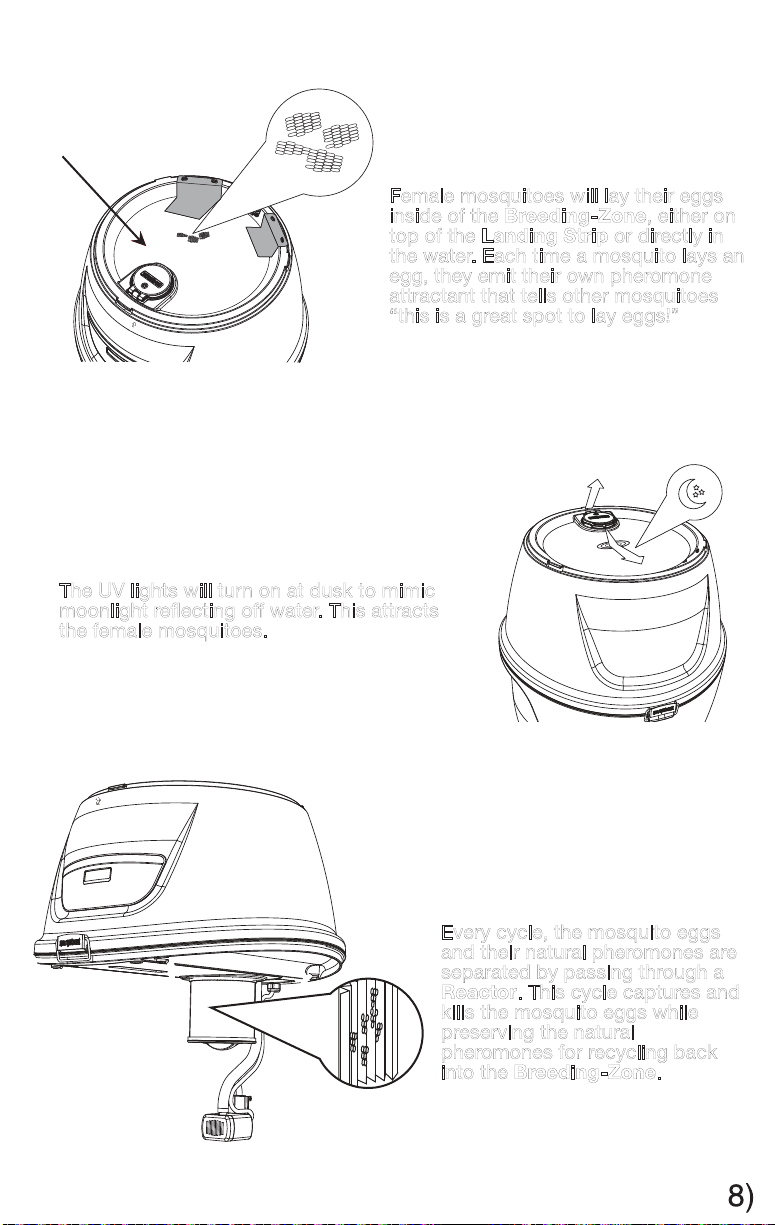
ZERO-HATCH TECHNOLOGY FEATURES
Breeding-Zone
BREEDING-ZONE:
Female mosquitoes will lay their eggs
inside of the Breeding-Zone, either on
top of the Landing Strip or directly in
the water. Each time a mosquito lays an
egg, they emit their own pheromone
attractant that tells other mosquitoes
“this is a great spot to lay eggs!”
MOONLIGHT:
The UV lights will turn on at dusk to mimic
moonlight reecting off water. This attracts
the female mosquitoes.
REACTOR:
Every cycle, the mosquito eggs
and their natural pheromones are
separated by passing through a
Reactor. This cycle captures and
kills the mosquito eggs while
preserving the natural
pheromones for recycling back
into the Breeding-Zone.
Page 9
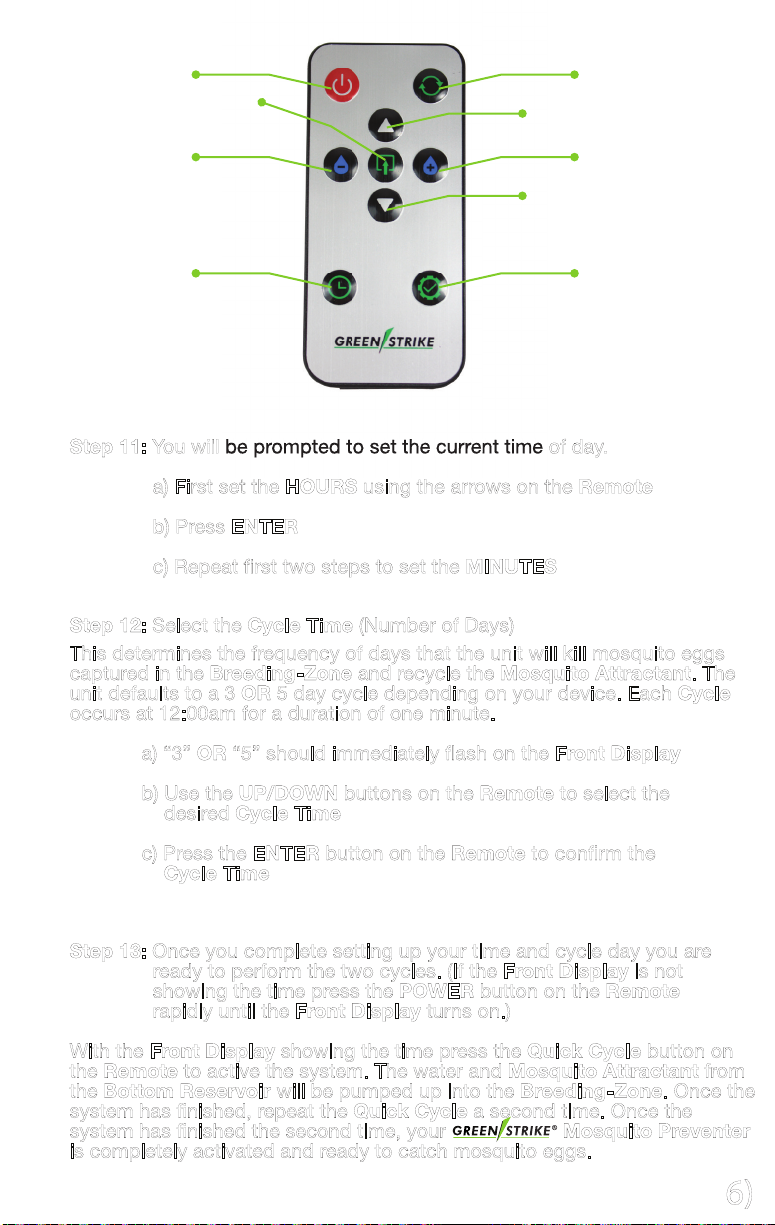
Power
Enter
Quick Cycle
Up Arrow
Drain Water
Set System
Raise/Add Water
Down Arrow
System Check
Step 11: You will be prompted to set the current time of day.
a) First set the HOURS using the arrows on the Remote
b) Press ENTER
c) Repeat rst two steps to set the MINUTES
Step 12: Select the Cycle Time (Number of Days)
This determines the frequency of days that the unit will kill mosquito eggs
captured in the Breeding-Zone and recycle the Mosquito Attractant. The
unit defaults to a 3 OR 5 day cycle depending on your device. Each Cycle
occurs at 12:00am for a duration of one minute.
a) “3” OR “5” should immediately ash on the Front Display
b) Use the UP/DOWN buttons on the Remote to select the
desired Cycle Time
c) Press the ENTER button on the Remote to conrm the
Cycle Time
Step 13: Once you complete setting up your time and cycle day you are
ready to perform the two cycles. (If the Front Display is not
showing the time press the POWER button on the Remote
rapidly until the Front Display turns on.)
With the Front Display showing the time press the Quick Cycle button on
the Remote to active the system. The water and Mosquito Attractant from
the Bottom Reservoir will be pumped up into the Breeding-Zone. Once the
system has nished, repeat the Quick Cycle a second time. Once the
system has nished the second time, your Mosquito Preventer
is completely activated and ready to catch mosquito eggs.
6)
Page 10
WHERE TO PLACE THE MOSQUITO PREVENTER
Your land for where mosquitoes are currently breeding. Eliminate as many
alternative breeding spots for mosquitoes as possible.
These May Include:
• Yard Waste
• Lawn Clippings
• Clogged Gutters/Eavestroughs
• Bird Baths
• Any Other Stagnant Water
The goal is to encourage the female
mosquito to lay their eggs in the
Mosquito Preventer.
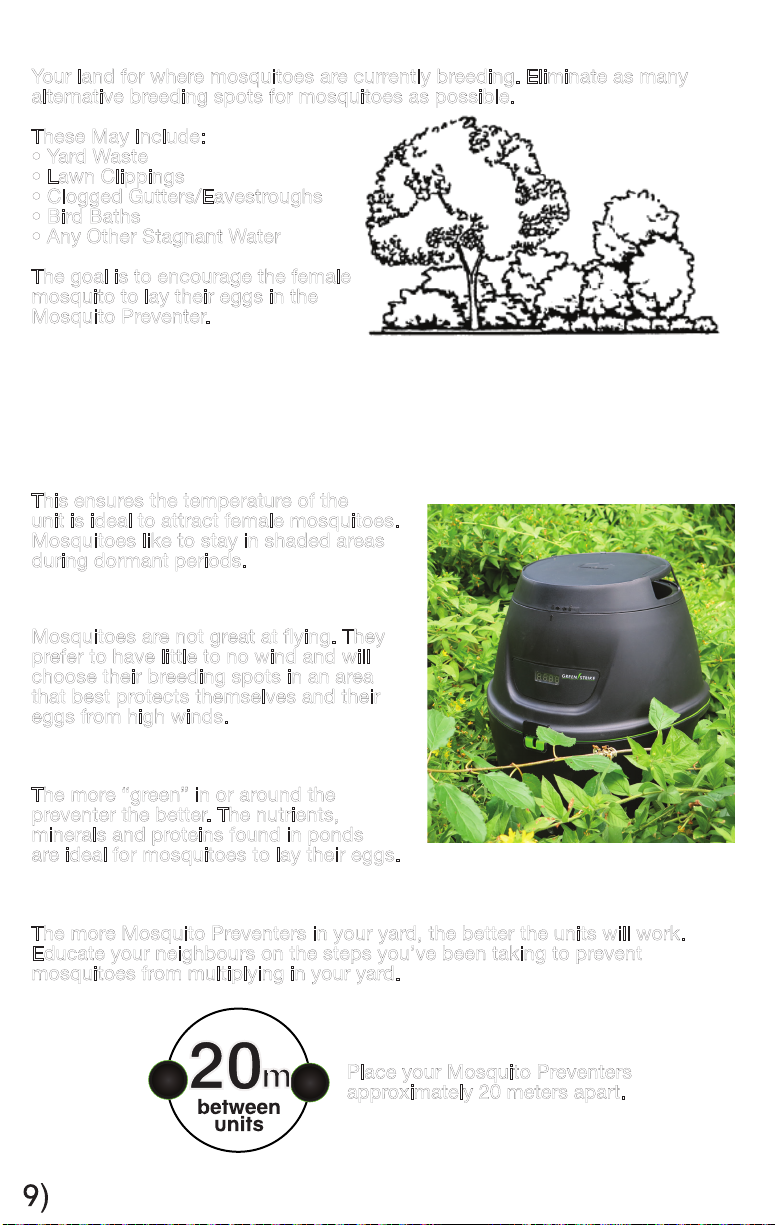
TRY TO PLACE THE MOSQUITO PREVENTER IN A SPOT THAT MEETS AS
MUCH OF THE BELOW CRITERIA AS POSSIBLE:
1) ALL DAY SHADE
This ensures the temperature of the
unit is ideal to attract female mosquitoes.
Mosquitoes like to stay in shaded areas
during dormant periods.
2) PROTECTION FROM WIND
Mosquitoes are not great at ying. They
prefer to have little to no wind and will
choose their breeding spots in an area
that best protects themselves and their
eggs from high winds.
3) LOTS OF VEGETATION
The more “green” in or around the
preventer the better. The nutrients,
minerals and proteins found in ponds
are ideal for mosquitoes to lay their eggs.
If you have two (2) Mosquito Preventers:
The more Mosquito Preventers in your yard, the better the units will work.
Educate your neighbours on the steps you’ve been taking to prevent
mosquitoes from multiplying in your yard.
Place your Mosquito Preventers
approximately 20 meters apart.
Page 11
HOW DO I KNOW IF MY MOSQUITO PREVENTER IS WORKING?
LANDING STRIPS
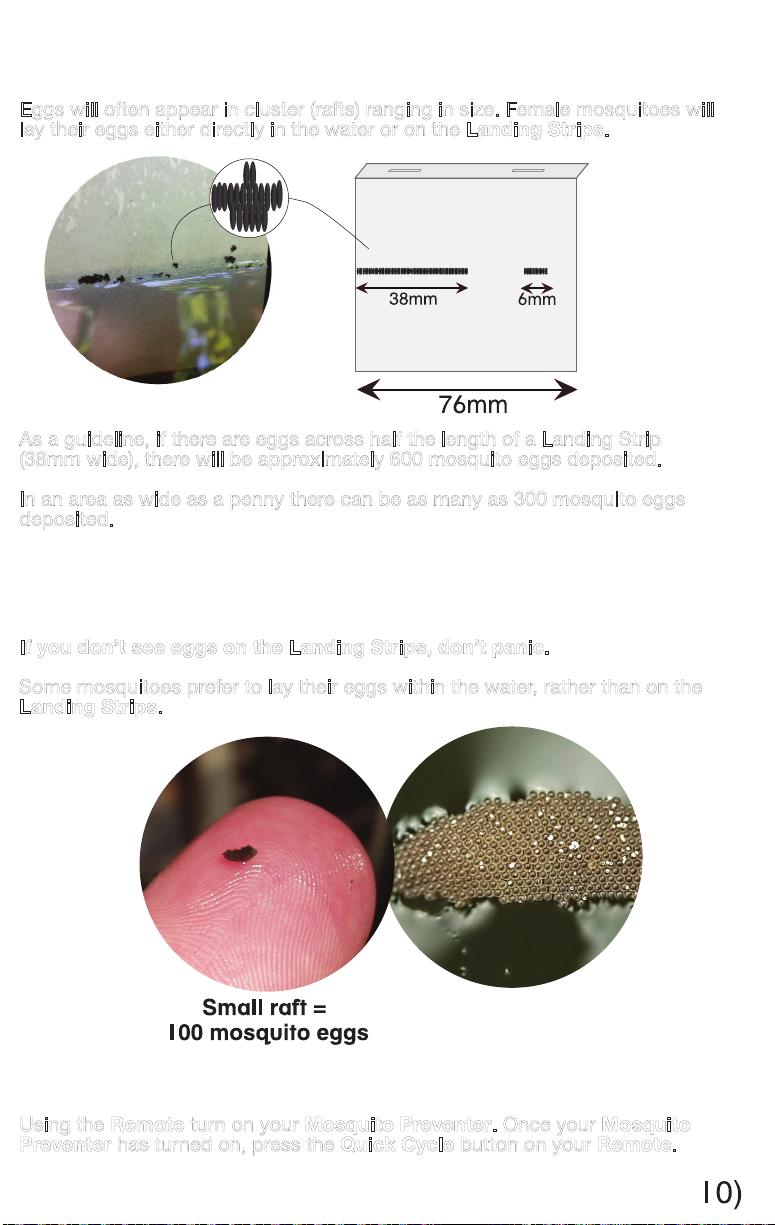
Eggs will often appear in cluster (rafts) ranging in size. Female mosquitoes will
lay their eggs either directly in the water or on the Landing Strips.
As a guideline, if there are eggs across half the length of a Landing Strip
(38mm wide), there will be approximately 600 mosquito eggs deposited.
In an area as wide as a penny there can be as many as 300 mosquito eggs
deposited.
RAFTS/EGGS IN WATER
If you don’t see eggs on the Landing Strips, don’t panic.
Some mosquitoes prefer to lay their eggs within the water, rather than on the
Landing Strips.
TURNING ON AND RUNNING A CYCLE
Using the Remote turn on your Mosquito Preventer. Once your Mosquito
Preventer has turned on, press the Quick Cycle button on your Remote.
Page 12
HOW TO MAINTAIN YOUR MOSQUITO PREVENTER
It is crucial that you keep up with the maintenance of your Mosquito Preventer
in order to keep mosquitoes coming back to the unit. Follow these steps on a
observational and monthly schedule to keep your unit running at peak
performance.
OBSERVATIONAL MAINTENANCE
A visual inspection is required that won’t take too much time.
Follow these steps:
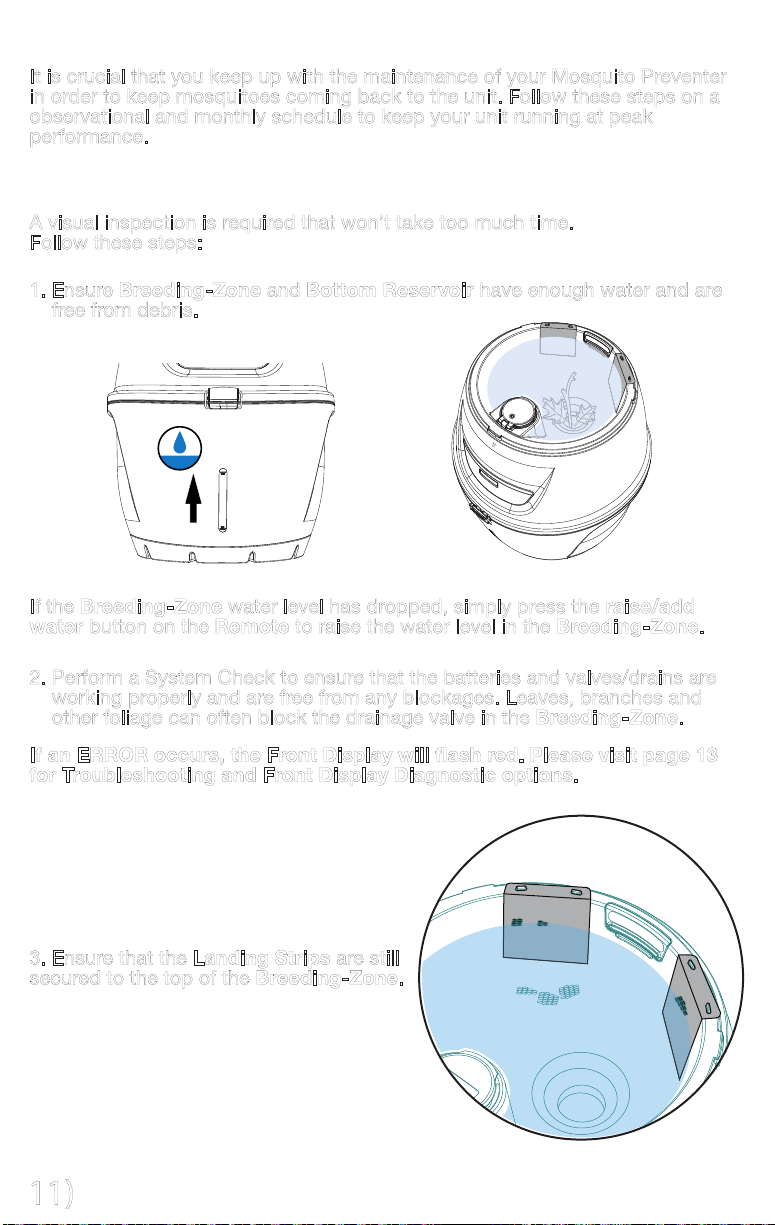
1. Ensure Breeding-Zone and Bottom Reservoir have enough water and are
free from debris.
If the Breeding-Zone water level has dropped, simply press the raise/add
water button on the Remote to raise the water level in the Breeding-Zone.
2. Perform a System Check to ensure that the batteries and valves/drains are
working properly and are free from any blockages. Leaves, branches and
other foliage can often block the drainage valve in the Breeding-Zone.
If an ERROR occurs, the Front Display will flash red. Please visit page 13
for Troubleshooting and Front Display Diagnostic options.
3. Ensure that the Landing Strips are still
secured to the top of the Breeding-Zone.
11)
Page 13
MONTHLY MAINTENANCE (EVERY 30 DAYS)
Every 30 days we recommend you replace certain elements of the Mosquito
Preventer. Ask the retailer, or place where you purchased your unit if they carry
the Reactor Kits. You can also order the Reactor Kit online at
www.green-strike.com/shop.
Follow these steps:
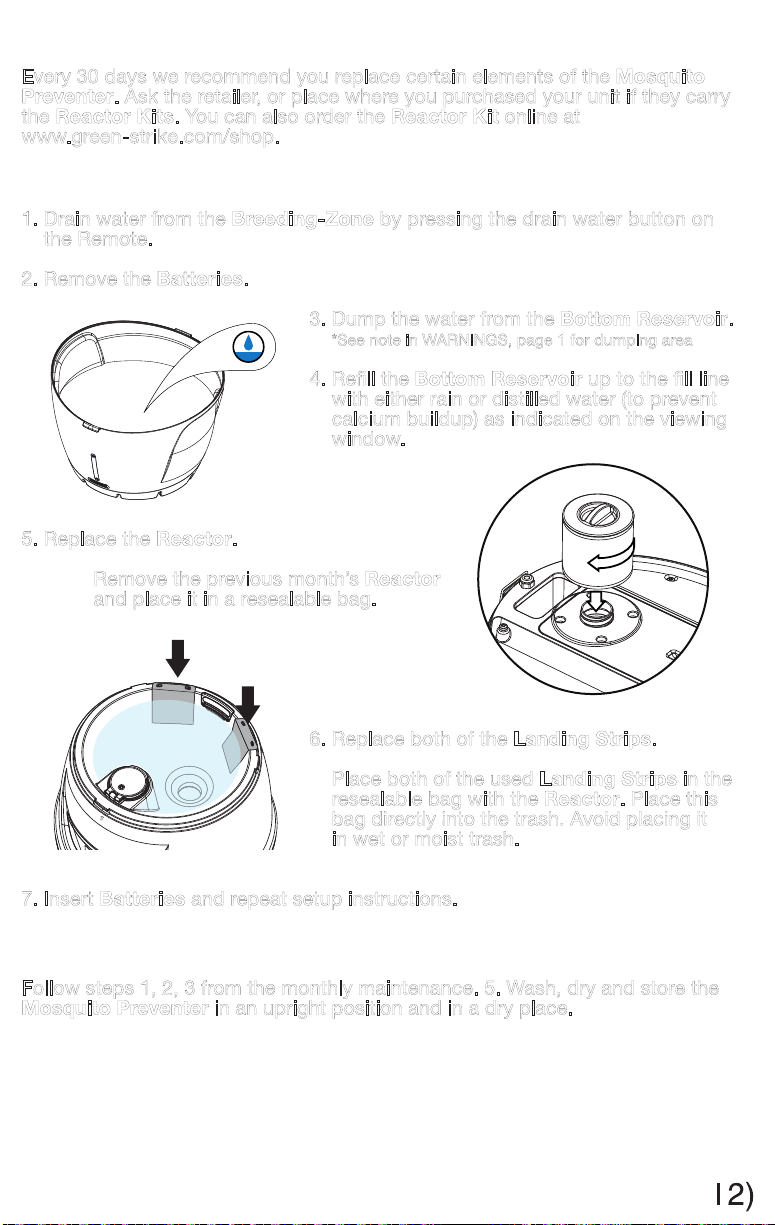
1. Drain water from the Breeding-Zone by pressing the drain water button on
the Remote.
2. Remove the Batteries.
3. Dump the water from the Bottom Reservoir.
*See note in WARNINGS, page 1 for dumping area
4. Rell the Bottom Reservoir up to the ll line
with either rain or distilled water (to prevent
calcium buildup) as indicated on the viewing
window.
5. Replace the Reactor.
Remove the previous month’s Reactor
and place it in a resealable bag.
6. Replace both of the Landing Strips.
Place both of the used Landing Strips in the
resealable bag with the Reactor. Place this
bag directly into the trash. Avoid placing it
in wet or moist trash.
7. Insert Batteries and repeat setup instructions.
END OF SEASON MAINTENANCE
Follow steps 1, 2, 3 from the monthly maintenance. 5. Wash, dry and store the
Mosquito Preventer in an upright position and in a dry place.
Page 14
TROUBLESHOOTING
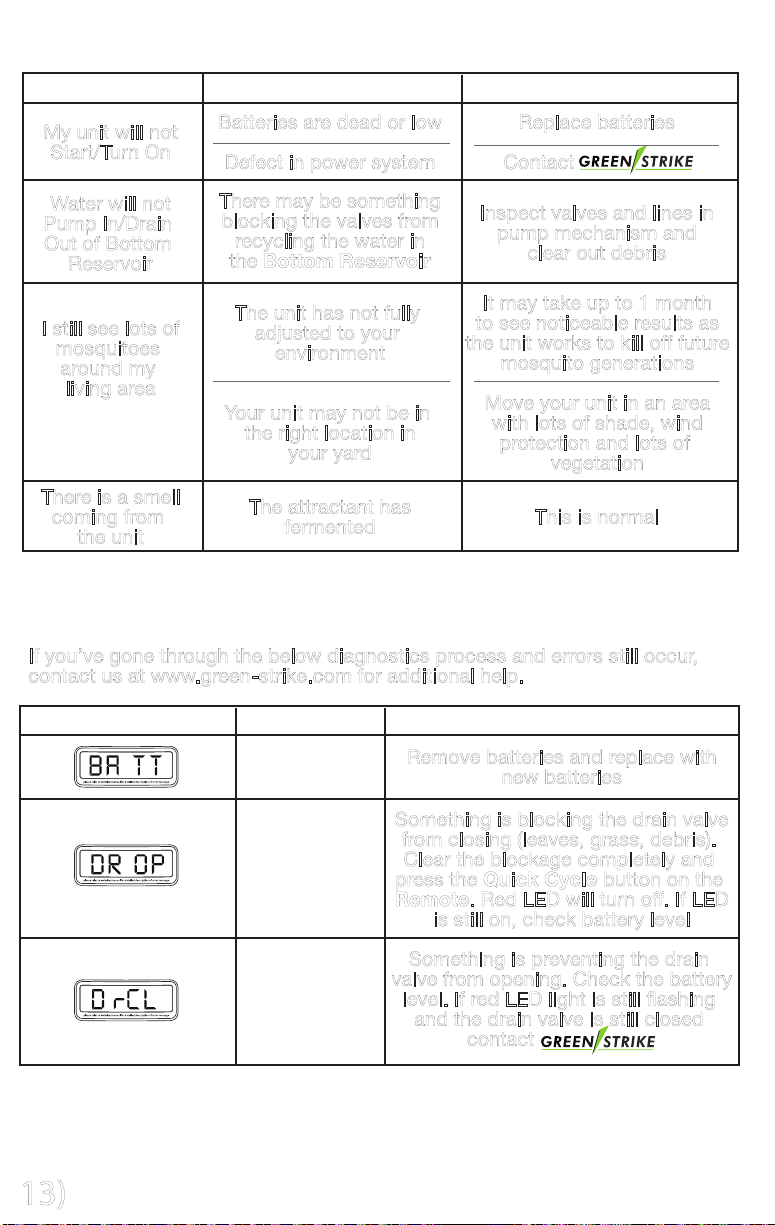
PROBLEM
My unit will not
Start/Turn On
Water will not
Pump In/Drain
Out of Bottom
Reservoir
I still see lots of
mosquitoes
around my
living area
There is a smell
coming from
the unit
POSSIBLE CAUSE SOLUTION
Batteries are dead or low
Defect in power system
There may be something
blocking the valves from
recycling the water in
the Bottom Reservoir
The unit has not fully
adjusted to your
environment
Your unit may not be in
the right location in
your yard
The attractant has
fermented
Replace batteries
Contact
Inspect valves and lines in
pump mechanism and
clear out debris
It may take up to 1 month
to see noticeable results as
the unit works to kill off future
mosquito generations
Move your unit in an area
with lots of shade, wind
protection and lots of
vegetation
This is normal
FRONT DISPLAY DIAGNOSTICS
If you’ve gone through the below diagnostics process and errors still occur,
contact us at www.green-strike.com for additional help.
13)
ERROR INDICATES
LOW BATTERY
DRAIN STUCK
OPEN
DRAIN STUCK
CLOSED
SOLUTION
Remove batteries and replace with
new batteries
Something is blocking the drain valve
from closing (leaves, grass, debris).
Clear the blockage completely and
press the Quick Cycle button on the
Remote. Red LED will turn off. If LED
is still on, check battery level
Something is preventing the drain
valve from opening. Check the battery
level. If red LED light is still ashing
and the drain valve is still closed
contact
Page 15
NOTES
14)
Page 16

Made in China
Mosquito Attractant Made in USA
is a trademark of Maxtech Mosquito Control Inc.
173 Roger St. Waterloo ON N2J 1B1
1-800-265-8847
519-885-1213
www.green-strike.com
www.maxtechinnovations.com
 Loading...