

Page 1
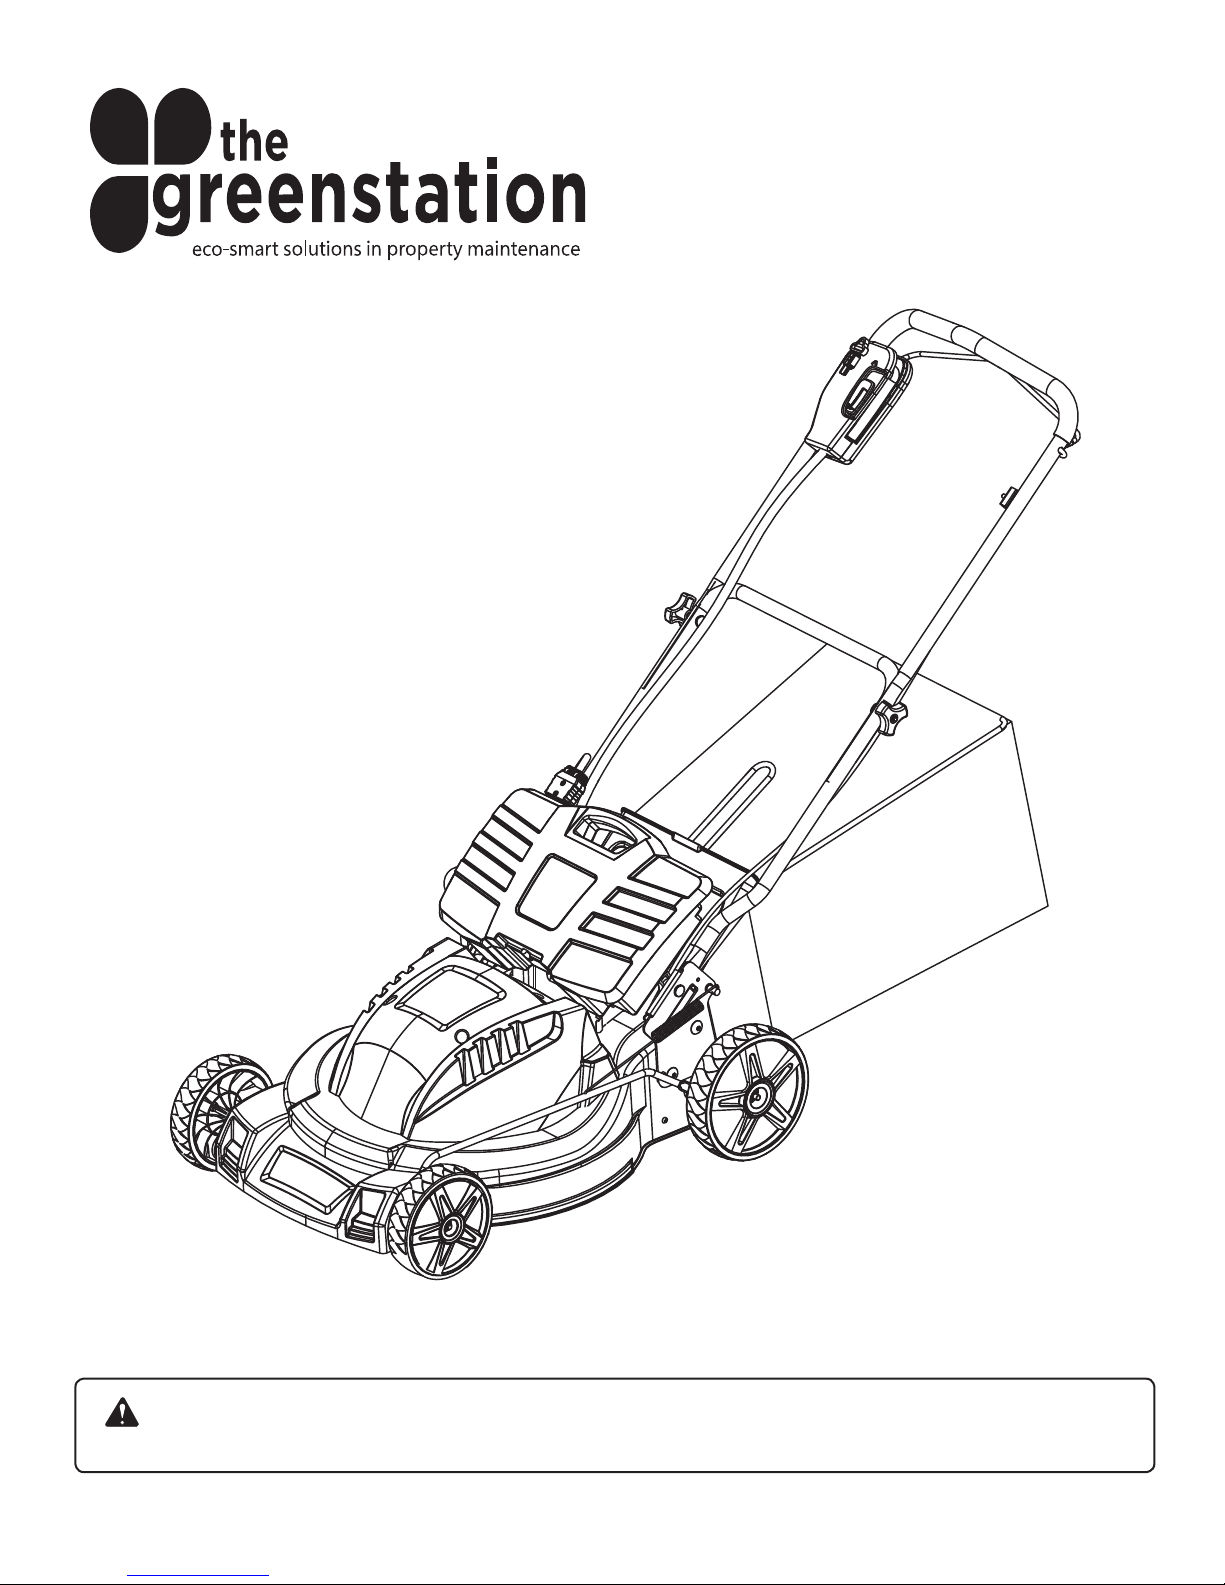
THE GREENSTATION LAWN N-2
OPERATOR’S MANUAL
CORDLESS LAWN MOWER
WARNING: To reduce the risk of injury, the user must read and understand the operator’s manual before
using this product.
Page 2
PRODUCT SPECIFICATION
Component
Battery Capacity
Charge Time
No-load Speed
Cutting Path
Height Adjustment
Wheels Size
Unit Weight
Specifications
24 V d.c.
12-hour
3,500 /min
19 in. (482 mm)
1-3/4–3-1/2 in. ( 45mm – 88mm)
7in. (front)/ 8-1/2 in. (rear)
97 lb (44 kg) with battery
64Ib (29kg) without battery
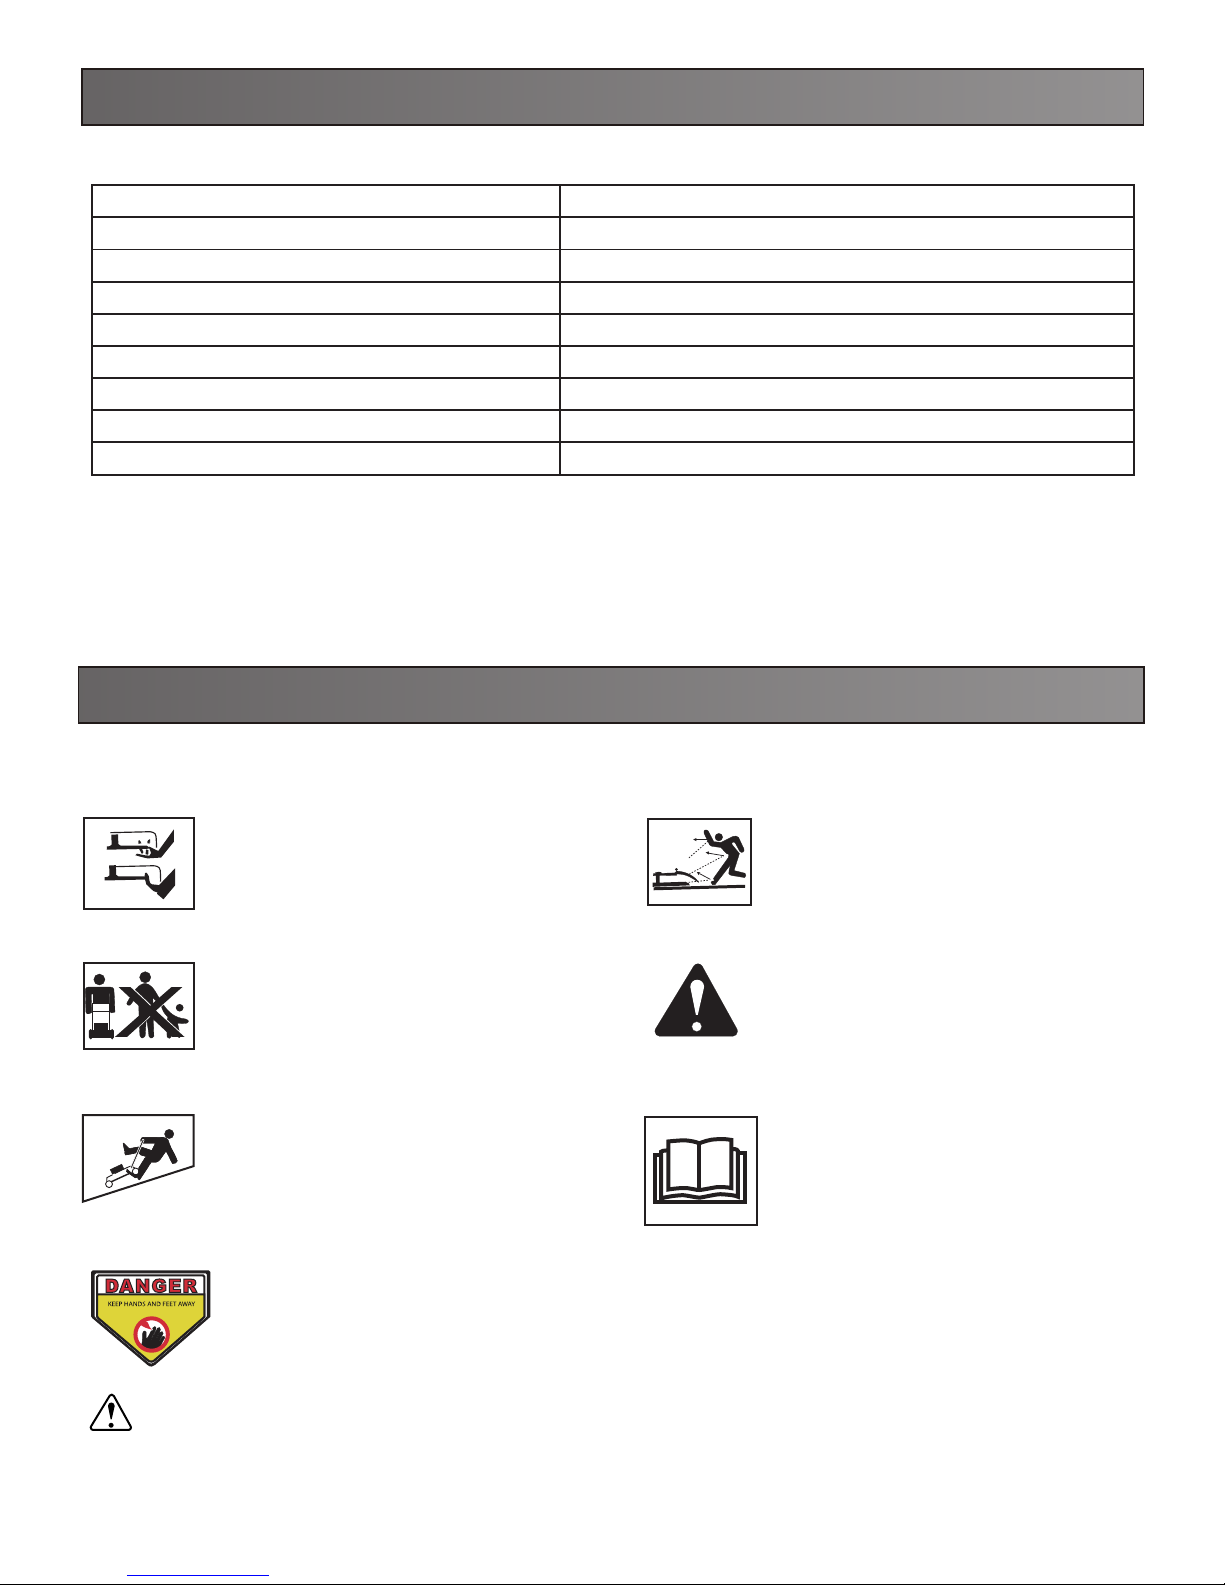
SYMBOL
SYMBOL NAME SYMBOL NAME
Severing of toes or fingers-rotary
mower blade.
Keep bystanders/children away.
Slip on slope.
CPSC Danger label.
Thrown objects from mower deck.
Safety alert.
Read the operator’s manual.
Please read and understand this entire manual before attempting to assemble, operate or install the product.
These safety instructions are not meant to cover every possible condition that could occur.
2
Page 3

SAFETY INSTRUCTIONS
WARNING: Read all instructions when using electric gardening appliances.
Basic safety precautions should always be followed to reduce the risk of fire, electric shock, and personal injury.
FOR ALL LAWN MOWERS
a) Avoid Dangerous Environment
Don’t use appliances in damp or wet locations.
b) Don’t Use In Rain.
c) Keep Children Away
All bystanders (visitors) should be kept at a safe distance from work area.
d) Dress Properly
Do not wear loose clothing or jewelry. They can be caught in moving parts. Use of rubber gloves and substantial footwear
is recommended when working outdoors. Wear protective hair covering to contain long hair.
e) Use safety glasses
Always use face or dust mask if operation is dusty.
f) Use right appliance
Do not use appliance for any job except that for which it is intended.
g) Don’t force appliance
It will do the job better and safer at the rate for which it was designed.
h) Don’t overreach
Keep proper footing and balance at all times.
i) Stay alert
Watch what you are doing. Use common sense. Do not operate appliance when you are tired.
j) Store idle appliances indoors
When not in use, appliances should be stored indoors in dry, and high or locked-up place -out of reach of children.
k) Maintain appliance with care
Keep cutting edge sharp and clean for best and safest performance and to reduce the risk of injury. Follow instructions for
lubricating and changing accessories. Keep handles dry, clean, and free from oil and grease.
l) Check damaged parts
Before further use of the appliance, a guard or other part that is damaged should be carefully checked to determine that it
will operate properly and perform its intended function. Check for alignment of moving parts, binding of moving parts,
breakage of parts, mounting, and any other condition that may affect its operation. A guard or other part that is damaged
should be properly repaired or replaced by an authorized service center unless indicated elsewhere in this manual.
m) Keep guards in place and in working order.
n) Keep blades sharp.
o) Keep hands and feet away from cutting area.
p) Objects struck by the lawn mower blade can cause severe injuries to persons.
The lawn should always be carefully examined and cleared of all objects prior to each mowing.
q) If lawn mower strikes a foreign object, follow these steps:
i) Stop lawn mower. Remove the safety key.
ii) Inspect for damage.
iii) Repair any damage before restarting and operating the lawn mower.
r) Use identical replacement blades only.
3
Page 4

SAFETY INSTRUCTIONS
SAFETY INSTRUCTIONS FOR BATTERY-OPERATED LAWN MOWERS
a) Do not charge lawn mower in rain, or in wet locations.
b) Do not use battery-operated lawn mower in rain.
c) Remove or disconnect safety key before servicing, cleaning, or removing material from the lawn mower.
d) Use only the following type and size battery: type A22001, A22002 lead acid battery
e) Do not dispose of the battery in a fire. The cell may explode. Check with local codes for possible special disposal
instructions.
f) Do not open or mutilate the battery. Released electrolyte is corrosive and may cause damage to the eyes or skin. It may
be toxic if swallowed.
g) Exercise care in handling batteries in order not to short the battery with conducting materials such as rings, bracelets,
and keys. The battery or conductor may overheat and cause burns.
CAUTION
The electrolyte is a dilute sulfuric acid that is harmful to the skin and eyes. It is electrically conductive and corrosive. The
following procedures should be observed:
a) Wear full eye protection and protective clothing.
b) If electrolyte contacts the skin, wash it off immediately with water.
c) If electrolyte contacts the eyes, flush thoroughly and immediately with water. Seek medical attention.
SAFETY INSTRUCTIONS FOR WALK-BEHIND MOWERS
I. GENERAL OPERATION
1. Read, understand, and follow all instructions on the machine and in the manual(s) before starting.
2. Do not put hands or feet near or under the machine. Keep clear of the discharge opening at all times.
3. Only allow responsible adults, who are familiar with the instructions, to operate this machine.
4. Clear the area of objects such as rocks, wire, toys, etc., which could be thrown by the blade. Stay behind the handle
when the motor is running.
5. Be sure the area is clear of bystanders before operating. Stop machine if anyone enters the area.
6. Do not operate machine barefooted or while wearing sandals. Always wear substantial footwear.
7. Do not pull machine backward unless absolutely necessary. Always look down and behind before and while moving
backward.
8. Never direct discharged material toward anyone. Avoid discharging material against a wall or obstruction. Material
may ricochet back toward the operator. Stop the blade when crossing gravel surfaces.
9. Do not operate machine without the entire grass catcher, rear guard, or other safety protective devices in place and
working.
10. Never leave a running machine unattended.
11. Stop the motor, remove the safety key and wait until the blade comes to a complete stop before cleaning the machine,
removing grass catcher.
12. Operate machine only in daylight or good artificial light.
13. Do not operate machine while under the influence of alcohol or drugs.
14. Never operate mower in wet grass. Always be sure of your footing; walk; never run.
15. Disengage the drive system, if so equipped, before starting the motor.
16. If the machine should start to vibrate abnormally, stop the engine (motor) and check for the cause immediately.
Vibration is generally a warning of trouble.
4
Page 5

SAFETY INSTRUCTIONS
17. Always wear eye protection when operating machine.
18. See manufacturer’s instructions for proper operation and installation of accessories.
Only use accessories approved by the manufacturer.
II. SLOPE OPERATION
Slopes are a major factor related to slip and fall accidents, which can result in severe injury. Operation on all slopes
requires extra caution. If you feel uneasy on a slope, do not mow it.
1. Mow across the face of slopes; never up and down. Exercise extreme caution when changing direction on slopes.
2. Watch for holes, ruts, bumps, rocks, or other hidden objects. Uneven terrain could cause a slip and fall accident. Tall
grass can hide obstacles.
3. Do not mow on wet grass or excessively steep slopes. Poor footing could cause a slip and fall accident.
4. Do not mow near drop-offs, ditches, or embankments. You could lose your footing or balance.
III. CHILDREN
Tragic accidents can occur if the operator is not alert to the presence of children.
Children are often attracted to the machine and the mowing activity. Never assume that children will remain where you last
saw them.
1. Keep children out of the mowing area and under the watchful care of a responsible adult other than the operator.
2. Be alert and turn mower off if a child enters the area.
3. Never allow children to operate the machine.
4. Use extra care when approaching blind corners, shrubs, trees, or other objects that may block your view of a child.
IV. SERVICE
GENERAL SERVICE
1. Keep all nuts and bolts tight to be sure the equipment is in safe working condition.
2. Never tamper with safety devices. Check their proper operation regularly.
3. Keep machine free of grass, leaves, or other debris build-up.
4. If you strike a foreign object, stop, remove the safety key and inspect the machine.
Repair, if necessary, before starting.
5. Never make any adjustments or repairs with the motor running.
6. Check grass catcher components and the mulch plug frequently and replace with manufacturer’s recommended
parts, when necessary.
7. Mower blades are sharp. Wrap the blade or wear gloves, and use extra caution when servicing them.
8. Maintain or replace safety and instruction labels, as necessary.
5
Page 6

BATTERY & CHARGER
CAUTION: USE ONLY APPROVED REPLACEMENT BATTERIES, OTHER BATTERIES MAY CAUSE INJURY
OR DAMAGE TO THE MOWER.
The battery that is supplied with this mower is a maintenance-free, sealed, 24 V storage battery. It can be tipped without
danger of acid spillage. The charger will require approximately 12 hours to recharge a fully discharged battery.
BATTERY SAFETY RULES
1. Allow at least 12 hours of battery charging before using the mower for the first time.
2. For optimal performance, charge the battery every two months, even when it is not in use.
3. Charge the battery in a cool, dry place.
4. The battery does not have to be fully discharged before recharging. This battery will not develop a memory.
5. 2 to 3 initial charging/discharging cycles may be required in order to reach the maximum run time/capacity.
6. Do not store battery in temperatures lower than 32° F (0° C)
PROPER CARE FOR BATTERY
Off-Season storage
In order to ensure optimal performance, it is recommended that the battery be charged every two months when not in use.
If all of the following conditions are met, the mower can be stored with the charger disconnected.
1. The mower is fully charged before storing.
2. The average temperature of the storage location is not below 50° F (10° C).
3. The battery should not be stored for more than 3 months.
CHARGER SAFETY RULES
Charge the mower battery in a dry area that is protected from the weather. Do not expose the mower or the charger to rain.
Do not charge the battery in a wet location. Operate the battery charger in temperatures between 32 ° and 90 ° F (0 °
and 32 ° C). In order to reduce the risk of electric shock, use only the charger that is provided by the manufacturer to
charge the battery.
DO NOT ABUSE THE CHARGE CORD. Never carry the charger by the cord. Do not disconnect the charger from
the outlet or from the mower by pulling the charger cord.
Do not service the mower with the charger connected or with the safety key installed. Do not use a damaged charger.
Replace the charger cords or the charger immediately.
Keep the mower and the charger away from water, heat sources (radiators, heaters, stoves, etc.), flames, and chemicals.
Do not dispose of this product in fire, batteries inside this product may explode or leak
6
Page 7
KNOW YOUR PRODUCT
KNOW YOUR PRODUCT
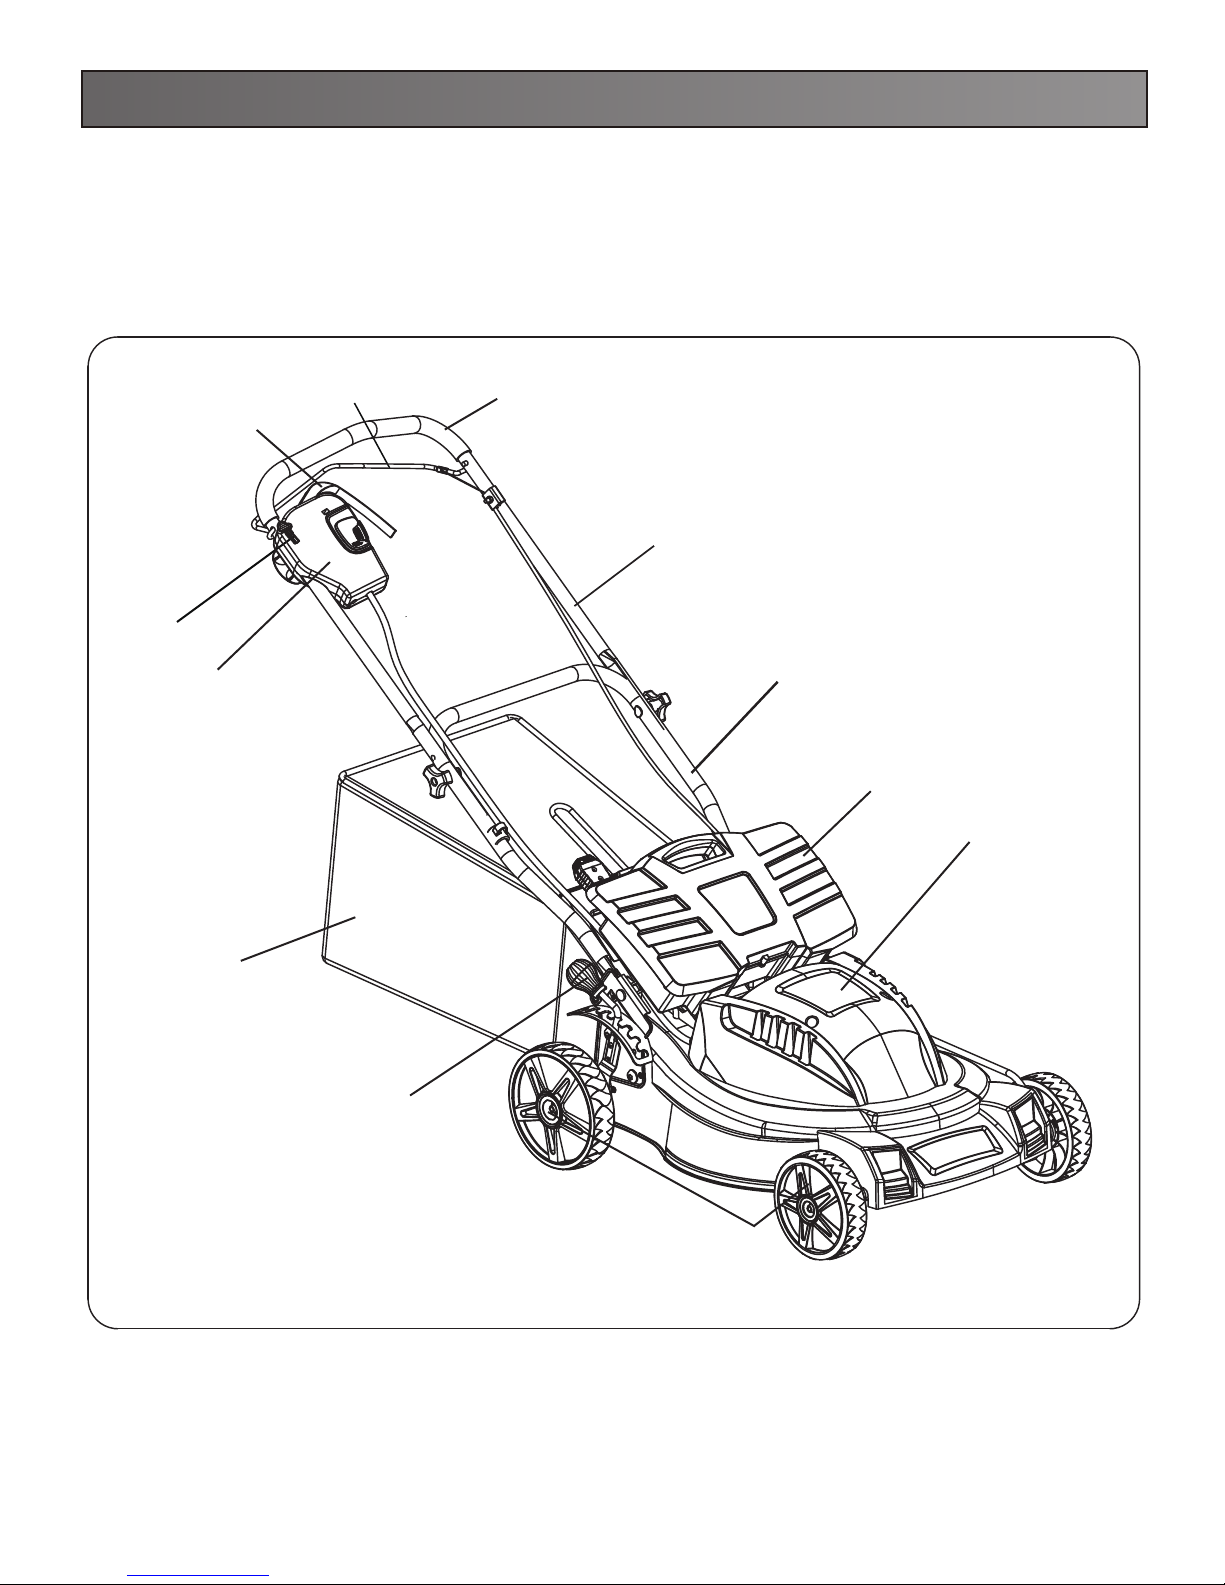
Read this owner's manual and safety rules carefully before operating the mower. Compare the illustration below to the
mower in order to become familiar with the location of the various controls and adjustments. Save this manual for future
reference.
Fig.1
Safety key
Power lever
Switch
Self-propelled
lever
Handle grip
Upper handle
Lower handle
Battery
Motor housing
Rear bag
Height adjustment lever
Wheels
7
Page 8
ASSEMBLING YOUR LAWN MOWER
KNOW YOUR PRODUCT
Parts List
• Mulch Plug (Installed at the rear of the mower at the factory)
• Grass Catcher Bag
• 24V Battery (Pre-installed at the factory)
• Battery Charger
• Manual
Note:
• Carefully remove the parts from the box.
• Inspect the parts carefully in order to verify that no breakage or damage occurred during shipping.
• Do not discard the packing material until all parts have been examined.
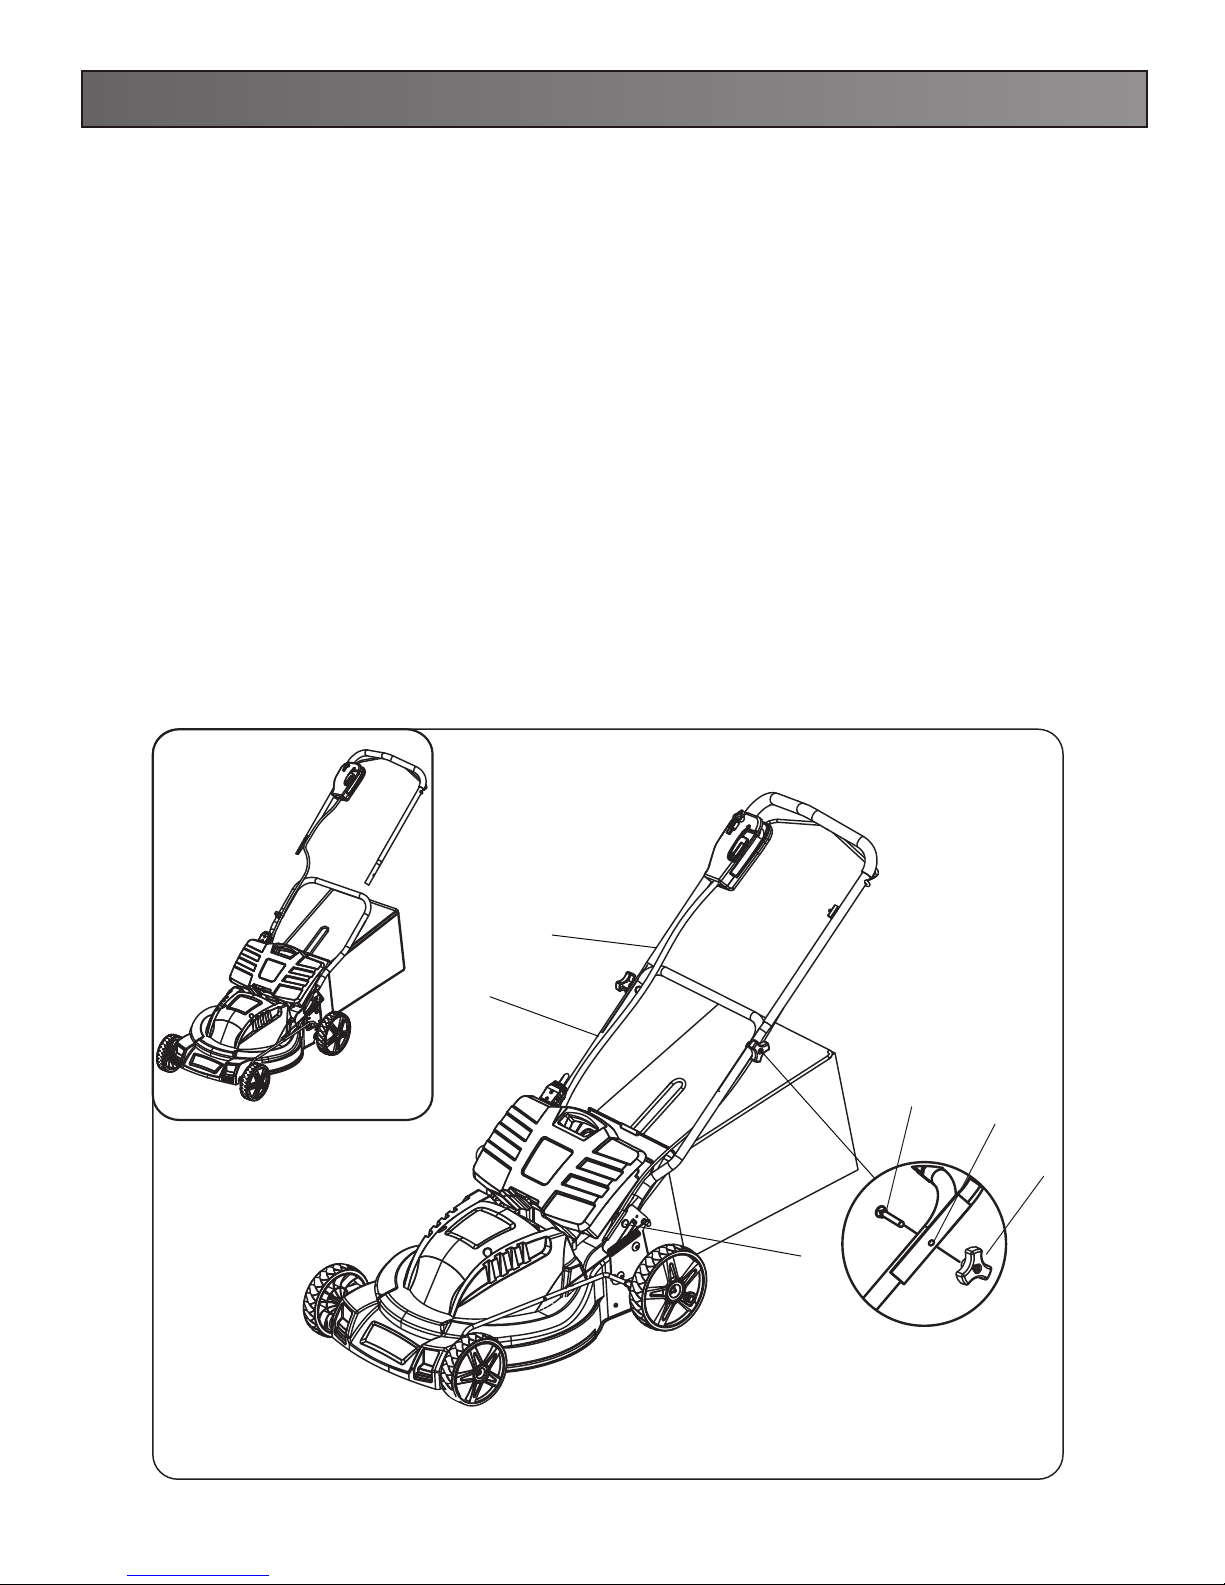
ASSEMBLING THE HANDLE
1. Remove any packing material which may be between the upper and lower handles for shipping purposes.
2. Pull up and back on the upper handle to raise the handle into the operating position. Make certain the lower handle is
seated securely into the handle mounting bracket (see Fig. 2).
3. Align the holes (3) between the upper handle (1) and lower (2) handles. Insert the bolts (4) and tighten them with the
handle knob (5) provided.
4. Secure the lower handle to the bracket with the handle knob (6) in each side (Fig. 3).
Fig 2
1
2
4
3
5
6
Fig.3
8
Page 9
ASSEMBLING YOUR LAWN MOWER
KNOW YOUR PRODUCT
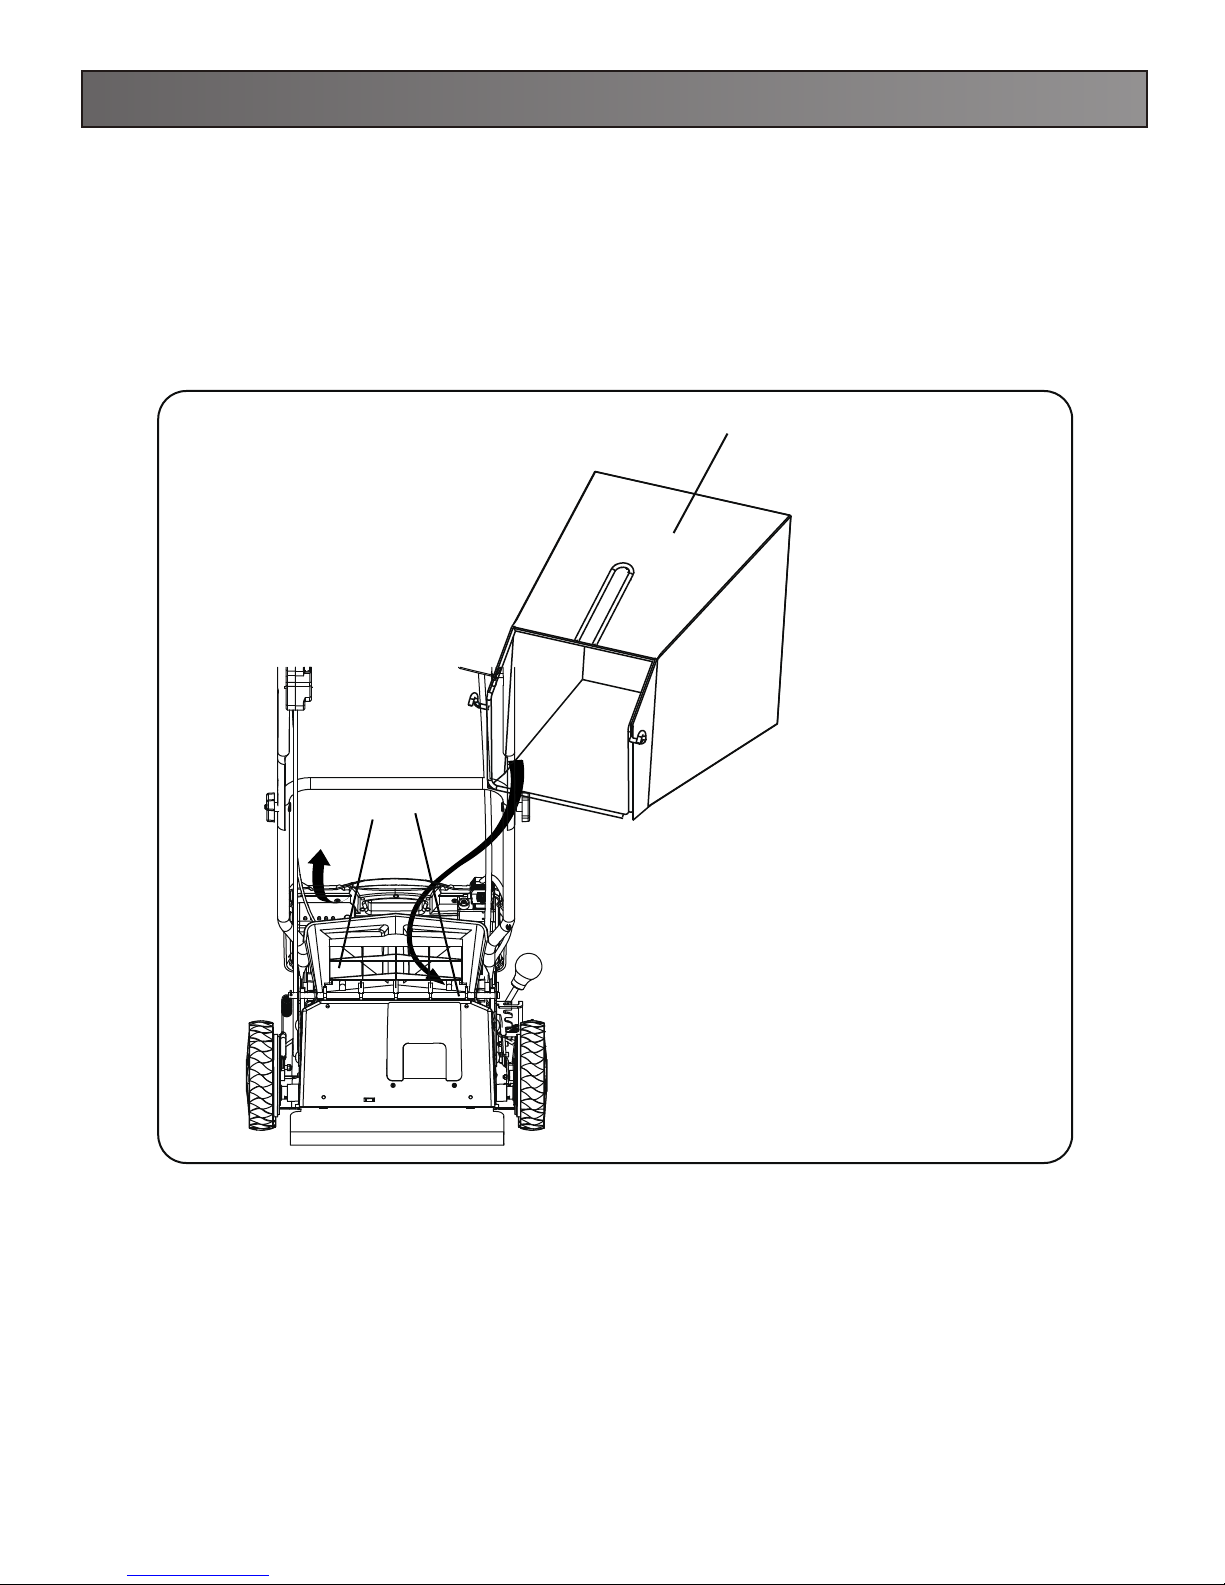
INSTALLING THE GRASS CATCHER BAG (see Fig.4)
1. UNPLUG THE POWER CORD, AND WAIT FOR BLADE TO COME TO A COMPLETE STOP.
2. Lift the chute cover (1) and remove the mulch plug if installed.
3. While holding up the cover (1), place the grass catcher bag hanger hooks (2) into the opening on the chute cover (1) to
allow the hanger hooks to attach to the rod (3) which secures the chute cover.
Fig.4
1
2
3
NOTE: For optimal performance empty grass bag often during use. A full grass bag will inhibit performance of the mower
and collection of grass clippings.
9
Page 10
ASSEMBLING YOUR LAWN MOWER
KNOW YOUR PRODUCT
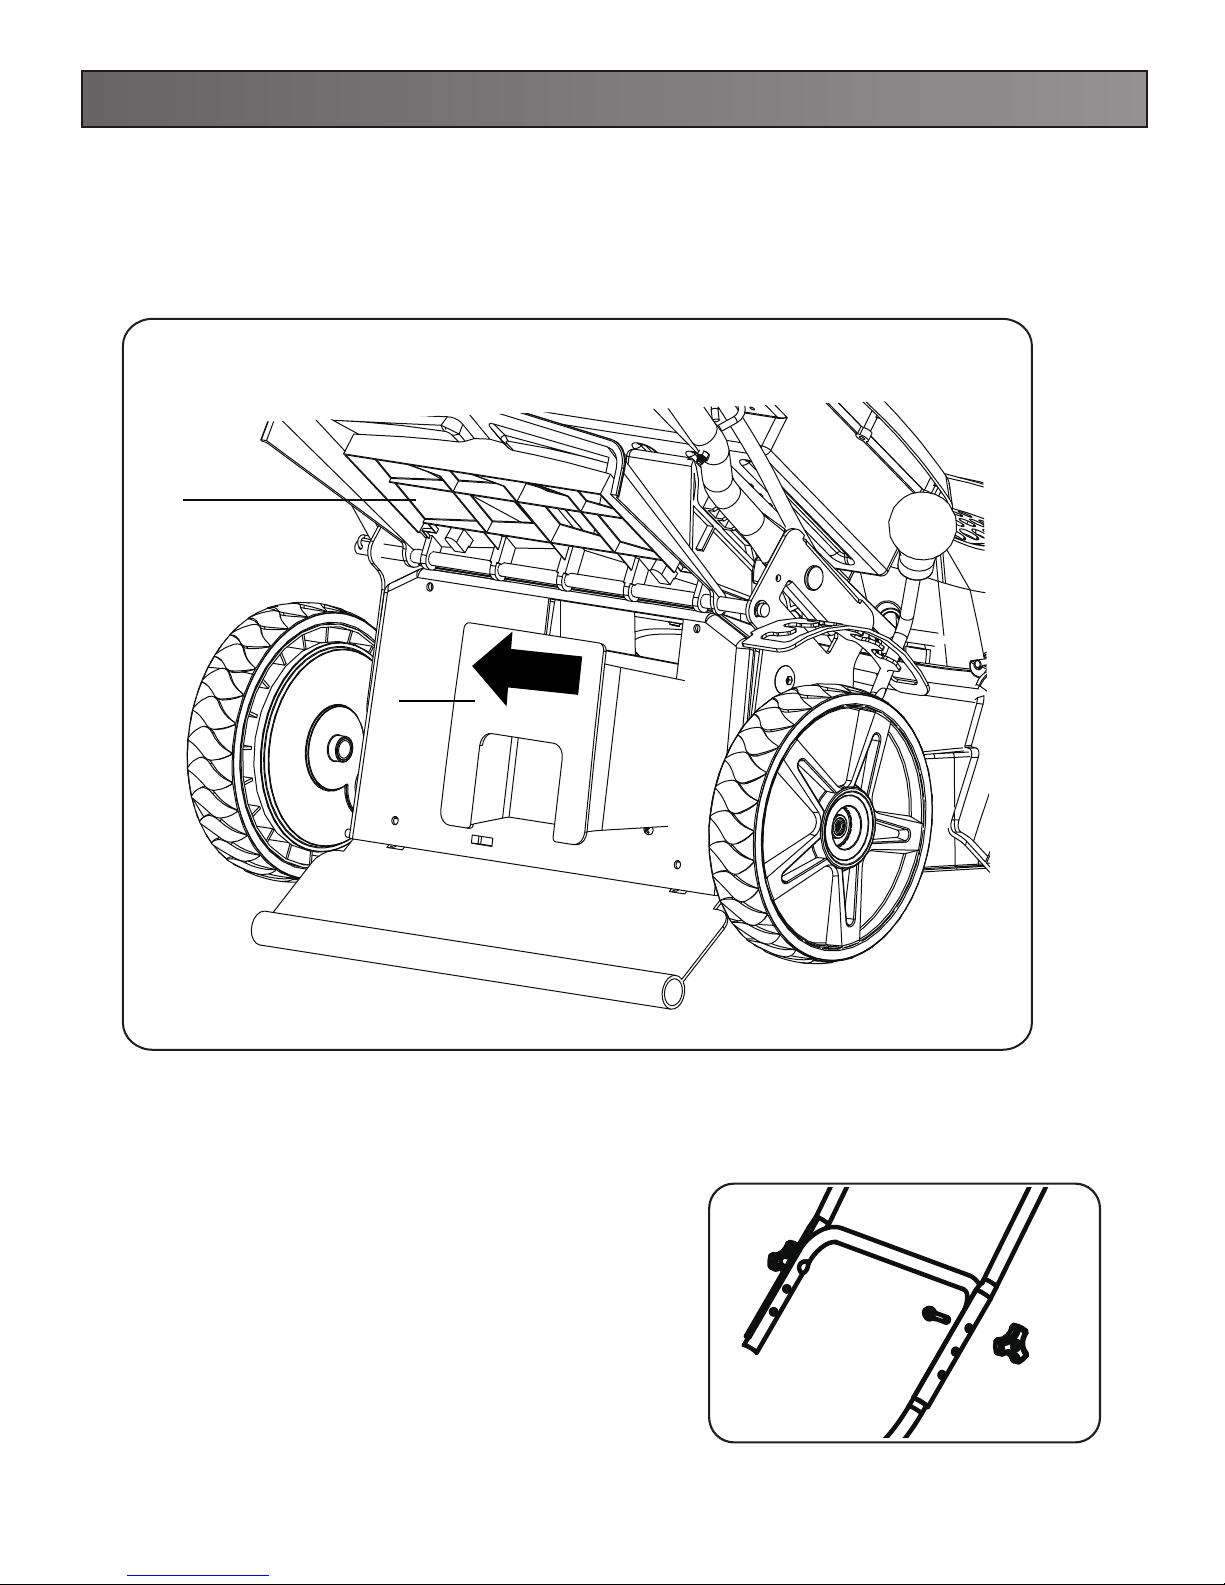
INSTALLATION OR REMOVAL OF THE MULCH PLUG (see Fig.5)
1. UNPLUG THE POWER CORD, AND WAIT FOR BLADE TO COME TO A COMPLETE STOP.
2. To remove the mulch plug lift the chute cover (1) and pull out on the handle.
3. The mulch plug (2) is inserted on an angle so it will require some force when removing.
Fig.5
1
2
ADJUST THE UPPER HANDLE HEIGHT (see Fig.6)
1. Loosen the upper handle knob.
2. Adjust the handle to the most comfortable of the 3 positions.
3. Tighten the upper handle knob as tight as you can.
Fig.6
10
Page 11
OPERATION OF YOUR MOWER
KNOW YOUR PRODUCT
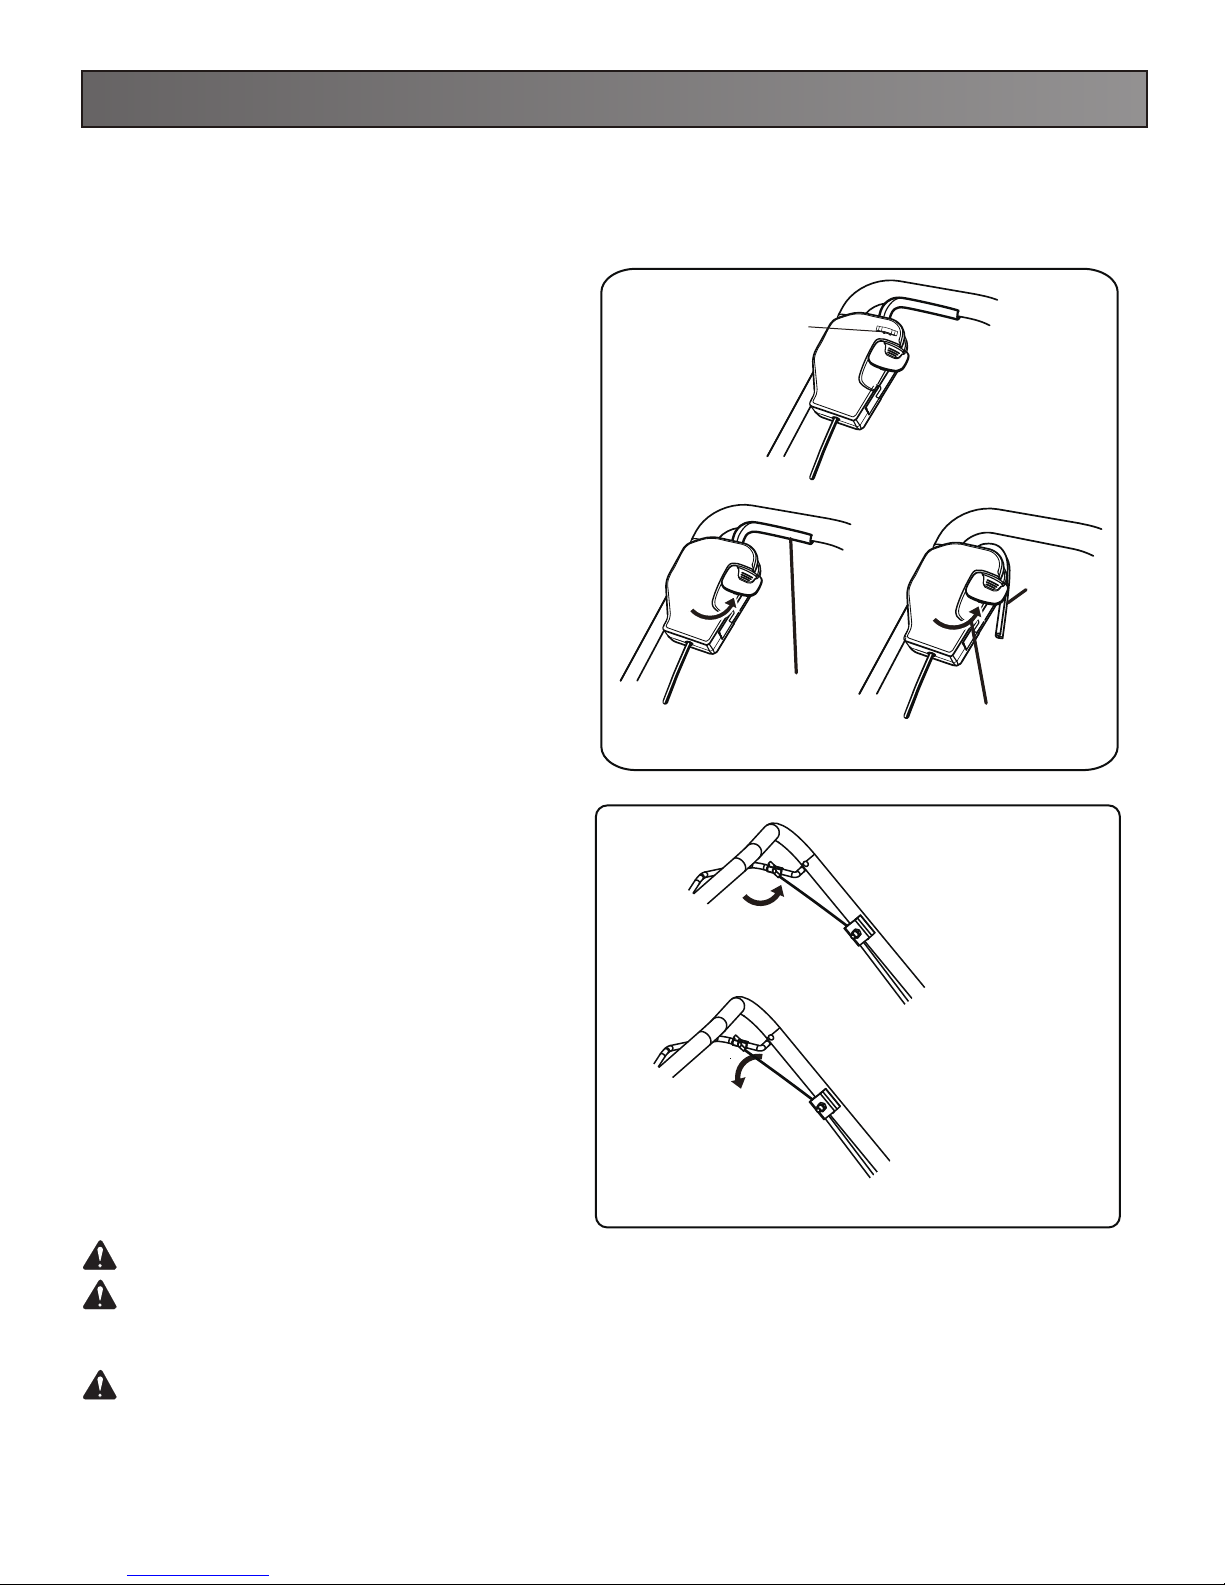
TO START & STOP THE MOWER:
Carefully follow the illustration below, in order, when starting or stopping the mower. (see Fig.7 & Fig.8)
STARTING/STOPPING THE MOWER
See Fig 7 & Fig 8.
1. For the proper operation of this lawn mower ,
first insert the safety key into position. The lawn
mower can be operated by pushing the lever
release to make the switch control lever available,
then hold the switch control lever for operation.
2. To stop the lawn mower, release the switch
control lever.
3.
If your lawn mower will not be used for a while,
remove the safety key. The machine cannot be
operated even if the switch lever is activated.
SELF-PROPELLED SWITCH (See Fig 8 )
1. Self-propelled Independently under non-mowing
condition.
Hold the pulling lever to allow mower to self-propel,
without having to pull the switch control lever.
Release the pulling lever to stop the self-propelled
function.
2. Self-propelled under mowing condition
Insert the key and pull the switch control lever to start
mowing. then repeat step 1 to start or stop
self-propelled function.
Disable key
SWITCH
CONTROL
LEVER
SWITCH
CONTROL
LEVER
LEVER RELEASE
Fig7
CAUTION: Do not attempt to override the operation of the safety key or lever.
WARNING: The operation of any mower can result in foreign objects being thrown into the eyes, which can cause
severe eye damage. Always wear safety glasses while operating the mower and while performing any adjustments or
repairs.
WARNING: Ensure that other people and pets remain at least 50 ft.(15m) away when the mower is in use.
INSPECT THE CUTTING AREA
Remove all stones, sticks, wire, bones, and other debris that might be thrown by the rotating blades.
NOTE: This mower is equipped with an internal circuit protector, If the mower stops, wait 10 seconds before restarting.
Fig8
11
Page 12
OPERATION OF YOUR MOWER
KNOW YOUR PRODUCT
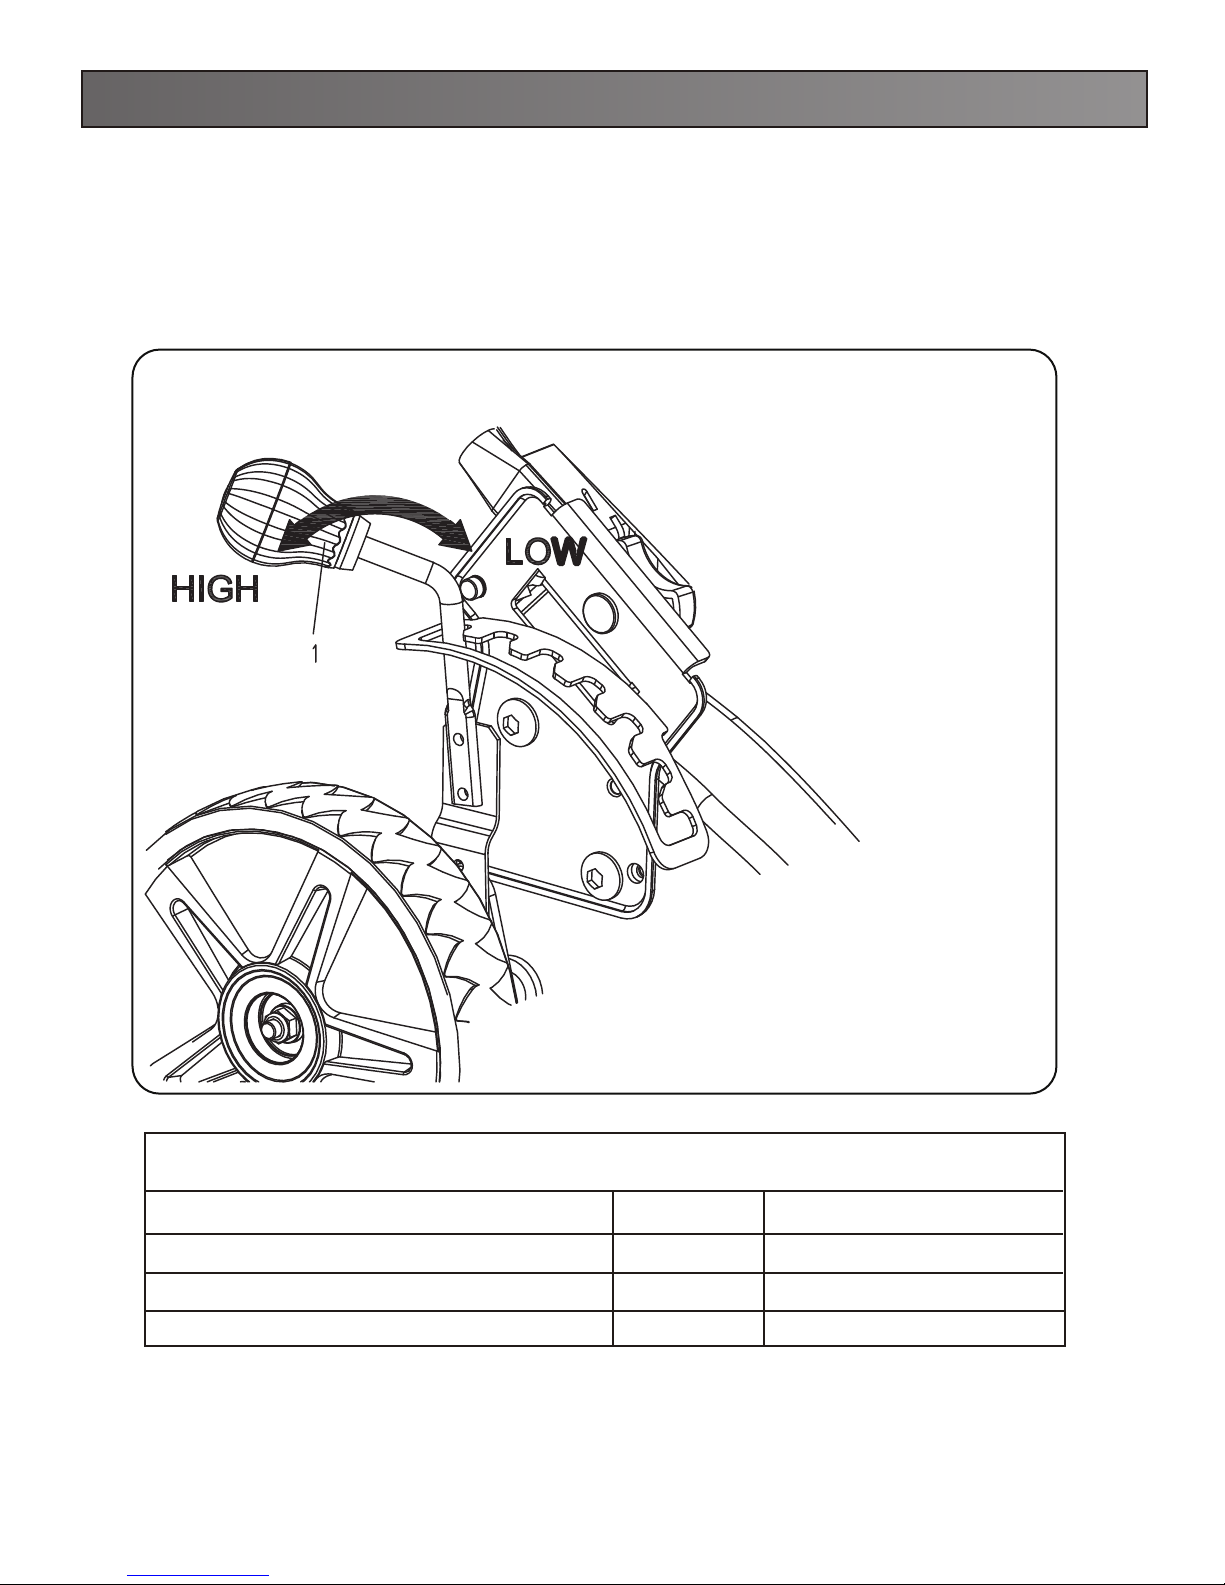
ADJUST THE CUTTING HEIGHT( see Fig.9)
1. Simply depress the lever (1) towards the wheel and move to desired position. This sets all wheels to the same position.
2. To raise the height, pull the height adjustment lever from the current stop position towards the back of the mower.
3. To lower the height, pull the height adjustment lever from the current stop position towards the front of the mower.
Fig.9
1. 1-3/4 in. (45mm)
2. 2 in. (50mm)
3. 2-1/4 in. (57mm)
4. 2-1/2 in. (63mm)
7-Position Height Adjustment
5. 2-3/4 in. (69mm)
6. 3 in. (76mm)
7. 3-1/4 in. (88mm)
12
Page 13
OPERATION OF YOUR MOWER
KNOW YOUR PRODUCT
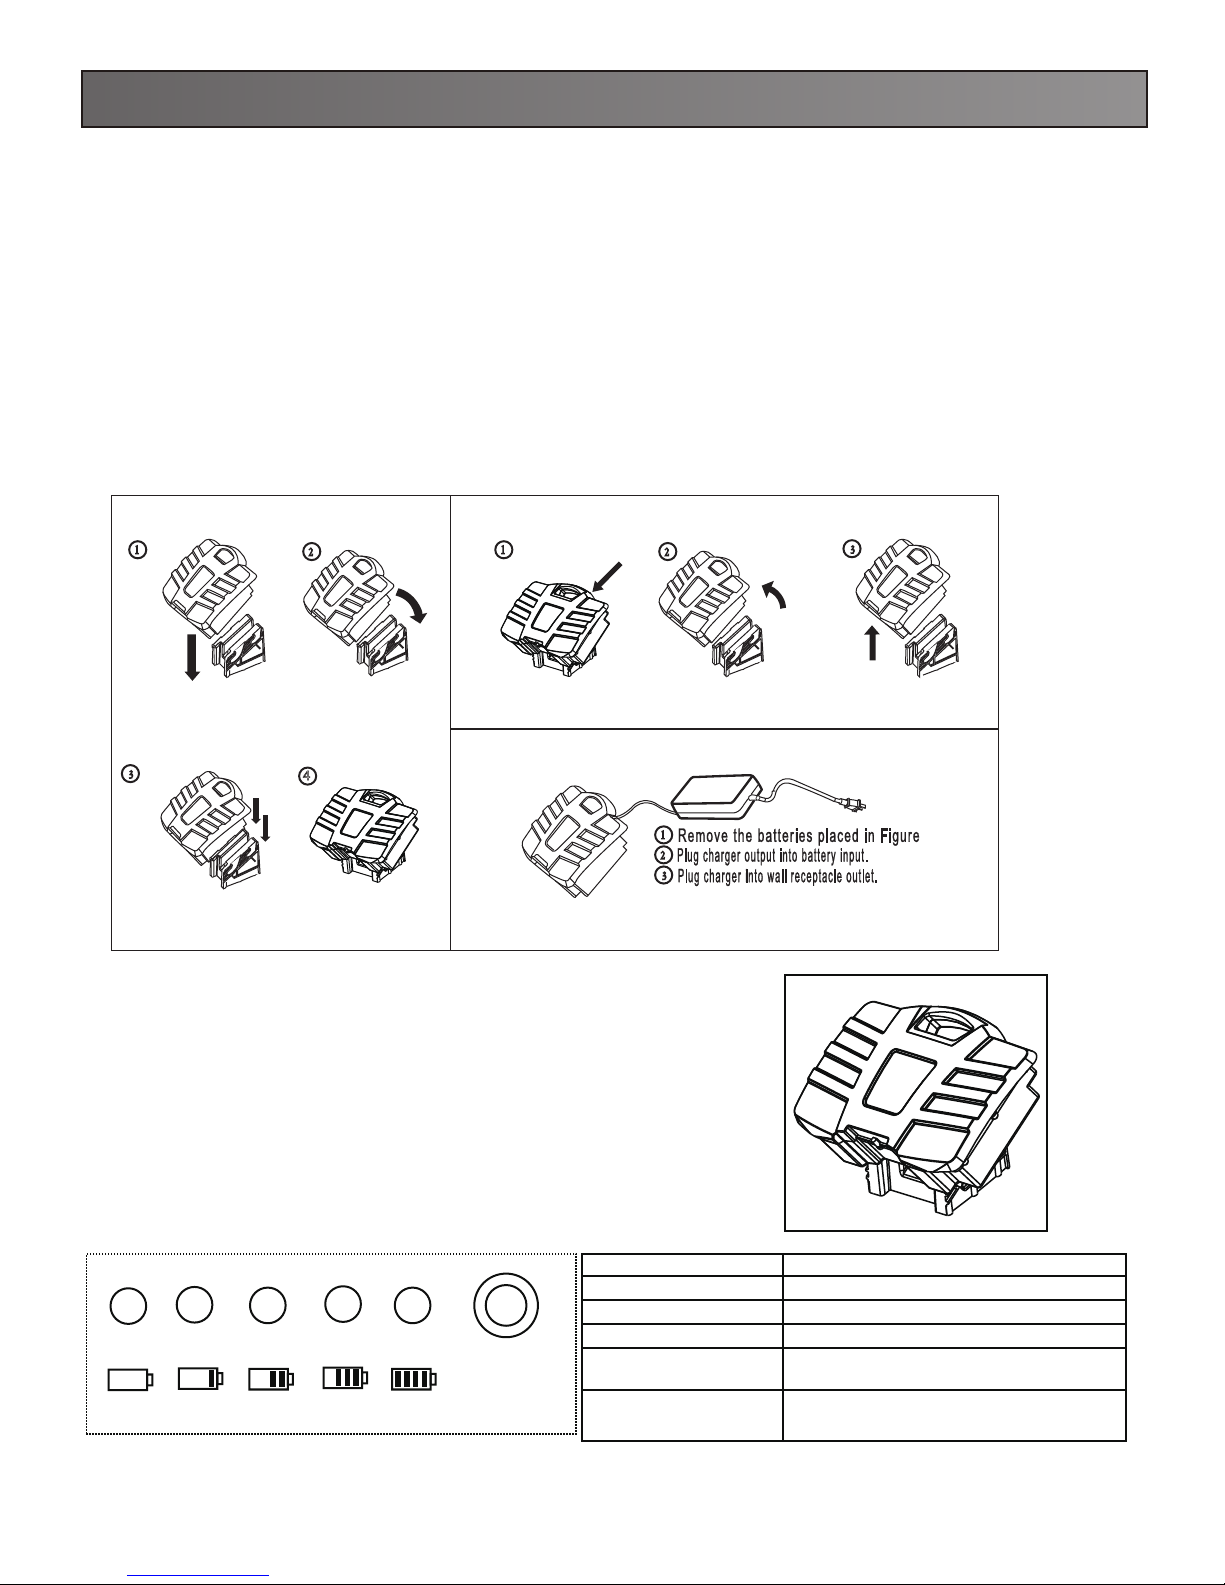
CHARGING PROCEDURE
Note: The battery can be charged in or out of the mower. The charger that is supplied with this mower is a specially
designed 2-stage charger.
Step 1: The red light will light up during the recharge cycle.
Step 2: The green light will light up when the battery is fully charged.
1. Plug the charger connector into the jack on the battery.
2. Insert the 120 V plug from the charger into the electrical outlet.
3. The red light on the charger should come on, which indicates that the charger is working and the battery is being
charged. The red light will go out and the green light will come on when the battery is completely charged (it takes
approximately 15 hours to charge a fully discharged battery).
INSTALLING BATTERY
Lower battery to
mounting seat
Level battery with Slide into position
two rails
WARNING: Do not store battery in temperatures lower than 32° F (0° C)
Lean battery back so
4 feet fit into slots
4
Pull up the
battery pack
REMOVING BATTERY
Rotate and bring forward
Charge battery before storing.
BATTERY USE
NOTE: If the switch does not reengage or the mower does not run when
the battery is installed, push the Battery Capacity Indicator (BCI) switch,
which is located on the back of the battery. The lights will indicate the
battery's capacity, according the following chart.
Lift battery
Yellow
Red
Green
Green
Green
BCI switch
Lights
3 Green Lights
2 Green Lights
1 Green Light
Yellow Light
Red Light
13
capacity
The battery is at full capacity
The battery is at 60% capacity
The battery is at 50% capacity
The battery is at 40% capacity and
requires charging soon
The battery is at 20% capacity and
requires charging
Page 14

OPERATION OF YOUR MOWER
KNOW YOUR PRODUCT
WARNING: Do not mow a slope that has an angle of greater than 15° (a rise of approximately2-1/2 ft. [ 75 m]every
10 ft. [3m]).Mow a cross the face of a slope, and never up and down.
MOWING TIPS
NOTE: A sharp blade will greatly enhance the performance of the mower, especially when cutting high grass.
Be sure to check the blade and to sharpen it at least once per year, as described in the Maintenance section
• Verify that the lawn is free of stones, sticks, wires, and other objects that could damage the blades or the motor.
These objects could be accidentally thrown by the mower in any direction, and could cause serious personal injury to the
operator and to others.
• In order to prevent electric shock, do not operate the mower in damp or wet conditions.
• Do not mow in circles. Travel back and forth across the lawn.
• When cutting thick grass, reduce walking speed in order to allow for a more effective cut and a proper discharge of the
clippings. For a healthy lawn, always cut off one-third or less of the total length of the grass. The average lawn should be
approximately 1-1/2 to 2 in. (3.8 to 5 cm) long during cool months, and more than 2 in. (5 cm) long during hot months. If
there is growth, the lawn should be cut in the fall.
MULCHING TIPS
NOTE: INSPECT THE AREA WHERE THE MOWER IS TO BE USED, AND REMOVE ALL STONES, STICKS,WIRE, AND
OTHER DEBRIS THAT MIGHT BE THROWN BY THE ROTATING BLADE.
1. Release the switch to turn the mower OFF when crossing any graveled area (stones can be thrown by the
blade).
2. Set mower to the highest cutting height when mowing on uneven ground or in tall weeds.
3. For effective mulching, do not cut wet grass, because it tends to stick to the underside of the deck, preventing proper
mulching of grass clippings. New or thick grass may require a narrower cut. The ground speed should be adjusted to the
condition of the lawn. If mowing has been delayed and the grass has been allowed to grow longer than 4 in. (10 cm), mow
the lawn twice in order to reduce the grass height to a maximum of 3-1/4 in. (8.3 cm).
4. Walk at a steady pace. Overlap the cutting rows. Do not let the grass get too tall. If the grass gets too long, start at the
highest cutting position and work down to the desired cutting height.
WARNING: If you strike a foreign object, stop the motor and disconnect the power cord. Thoroughly inspect the mower for
any damage. Repair any damage before operating the mower. Excessive vibration of the mower during operation is an
indication of damage. Thoroughly inspect the mower and repair any damage before operating the mower.
Using a 15-mm wrench or socket, turn the blade nut "CLOCKWISE” to secure the blade.
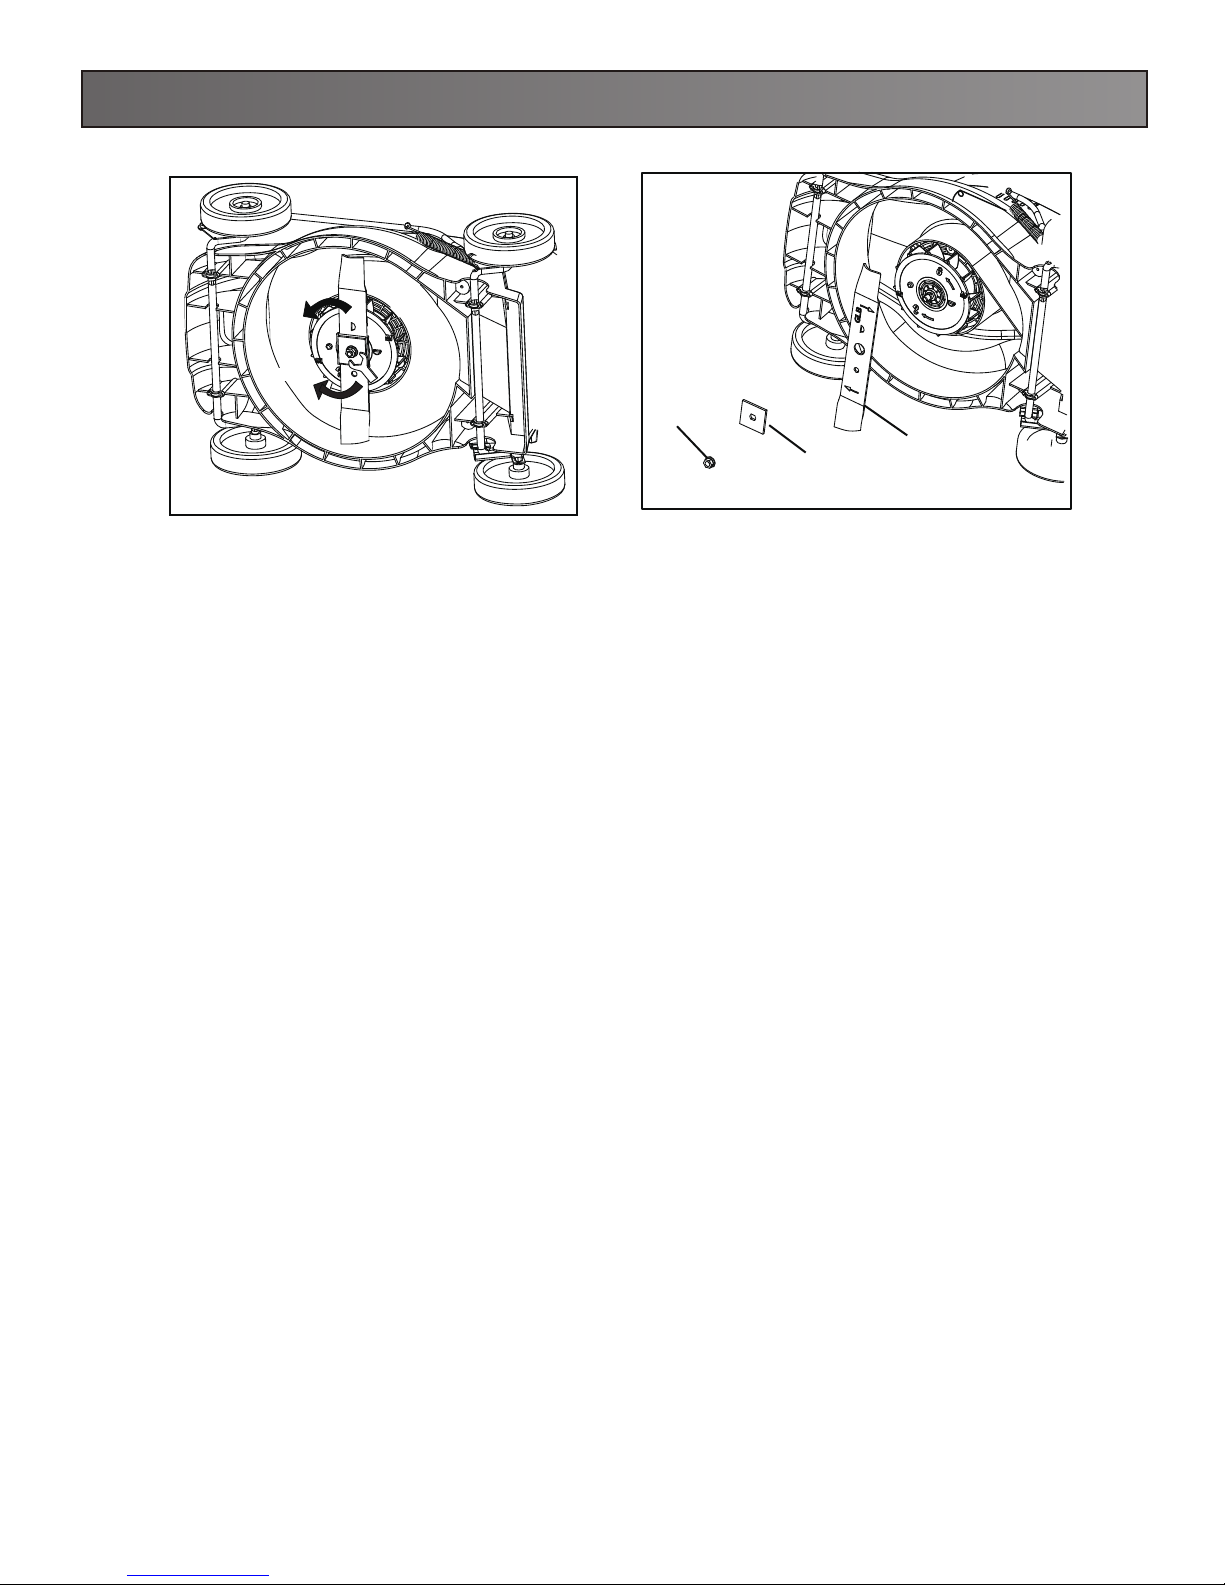
CUTTING BLADE REPLACEMENT (see Fig.10 & Fig.11)
WARNING: Always protect your hands by wearing heavy gloves and/or wrapping the cutting edges with
rags or other materials when performing any maintenance on the blades.
1. RELEASE THE SWITCH LEVER TO TURN THE MOWER OFF, WAIT FOR THE BLADE TO COME TO A
COMPLETE STOP, AND THEN REMOVE THE BATTERY
2. While wearing leather padded gloves, wedge a block of wood between the blade and the mower deck in order to prevent
the blade from turning when the nut is being removed.
3. Using a 15-mm wrench or socket, loosen the blade nut (1) and remove the blade (3). Turn the nut
"COUNTERCLOCKWISE" to loosen it and "CLOCKWISE" to tighten it (this is a reverse rotation nut).
4. Remove the blade nut (1), the square washer (2), the insulator washer (3), and the blade.
5. To re-install the blade, position the blade with the cutting edges toward the ground. Assemble the blade nut, the square
washer, and the insulator washer as shown in following. Using a 15-mm wrench or socket, turn
the blade nut "CLOCKWISE” to secure the blade.
14
Page 15
OPERATION OF YOUR MOWER
Loosen
Tighten
KNOW YOUR PRODUCT
Fig.10 Fig.11
1
2
3
NOTE: Be sure to replace the parts in the exact order in which they were removed. When installing the cutting blade,
verify that it is installed with the curved ends pointing toward the mower deck.
CLEAN THE MOWER
WARNING: To reduce the risk of electric shock, do not expose the mower to water.
The underside of mower deck should be cleaned after each use as grass clippings, leaves, dirt and other debris will
accumulate causing rust and corrosion.
Remove any buildup of grass and leaves on or around the motor cover (do not use water). Wipe the mower clean with a
dry cloth occasionally.
• If debris build up on the underside of the unit while using, stop the motor and disconnect it from the power supply. Tilt the
mower forward, or on its side, and scrape it clean with an appropriate tool.
STORAGE
The following steps should be taken to prepare the lawn mower for storage.
• Make certain the power cord is disconnected.
• Clean mower as instructed in previous section.
• Inspect and replace/sharpen blade, if required. Refer to the Maintenance section.
• Store mower in a dry, clean area. Do not store next to corrosive materials, such as fertilizer and rock salt.
• Store mower indoors, in a cool, dry place, out of the reach of children. Do not cover lawn mower with a solid plastic sheet.
Plastic coverings trap moisture around the mower causing corrosion.
The handle may be folded away completely for storage.
• Loosen the handle knobs on the sides of the handle, and fold the upper handle down.
• Loosen the handle knobs, pull outwards on each side of the lower handle, and lift the sides of the lower handle past the
edges of the handle mounting brackets. Fold the lower handle forward. Make sure not to bend or kink the power cord.
15
Page 16

ENVIRONMENTALLY SAFE BATTERY DISPOSAL
KNOW YOUR PRODUCT
WARNING
All toxic materials must be disposed of in a specified
manner to prevent contamination of the environment.
Dispose of batteries according to local by-laws because
this Lead-acid batteries contain lead that is a hazardous
material.
RE TOUR
RETURN
RECYCL
ERECYCLAGE
Pb
If the battery pack cracks or breaks, with or without leaks, do
not recharge it and do not use. Dispose of it and replace with
a new battery pack. DO NOT ATTEMPT TO REPAIR IT!
To avoid injury and risk of fire, explosion, or electric shock,
and to avoid damage to the environment:
• Cover the battery's terminals with heavy-duty adhesive
tape.
• DO NOT attempt to remove or destroy any of the battery
pack components.
• DO NOT attempt to open the battery pack.
• If a leak develops, the released electrolytes are corrosive
and toxic. DO NOT get the solution in the eyes or on skin,
and do not swallow it.
• DO NOT place these batteries in your regular household
trash.
• DO NOT incinerate.
• DO NOT place them where they will become part of any
waste landfill or municipal solid waste stream.
• Take them to a certified recycling or disposal center.
16
Page 17

KNOW YOUR PRODUCT
1. When servicing the mower, use only replacement parts that are available from the manufacturer. In order to obtain
replacement parts, call the toll-free helpline 866-646-4652. The use of parts that do not meet the original.
equipment specifications may lead to improper performance, and may compromise safety.
2. Before cleaning, repairing, or inspecting, verify that the blade and all moving parts have come to a complete stop, and
remove the safety key. In order to prevent accidental start-ups, remove the safety key when the mower is not in use.
Remove the battery when making any adjustments or when any of the four wheels must be lifted off the ground.
3. Keep the handles dry, clean, and free of oil and grease.
4. In order to reduce the risk of fire, keep the motor free of grass, leaves, and debris build-up.
5. Frequently check the blade and motor mounting bolts for proper tightness. Visually inspect blade for damage (e.g.:
bent, cracked, or worn).
8. For best and safest performance, maintain the mower with care. Keep the mower blade sharp and clean. Mower
blades are sharp, and can cut. Wrap the blades or wear gloves, and use extra caution when servicing.
8. Keep all nuts, bolts, and screws tight in order to be sure that the equipment is in safe working condition.
9. Never tamper with safety devices. Check them regularly for proper operation.
10. After striking a foreign object, stop the motor and remove the safety key. Thoroughly inspect the mower for any
damage. Repair any damage before operating the mower.
11. Lawn mower components are subject to wear and damage, which could expose moving parts or allow objects to be
thrown. As a safety precaution, frequently check components and replace those that show signs of wear or damage.
12. When it is not in use, store the mower indoors in a dry area, with the safety key removed, and out of the reach of
children.
SERVICE
WARRANTY
• The manufacturer warrants to the original purchaser that each new product and service part is free from defects in
material and workmanship and agrees to repair or replace under this warranty any defective product or part as follows
from the original date of purchase.
• 2 —Year Limited Warranty
• THIS WARRANTY IS NOT TRANSFERABLE AND DOES NOT COVER:
• Products sold damaged or incomplete, sold "as is", sold reconditioned or used as rental equipment.
• Delivery, installation or normal adjustments explained in the owner's manual.
• Damage or liability caused by shipping, improper handling, improper installation, incorrect voltage or improper wiring,
improper maintenance, improper modification, or the use of accessories and /or attachments not specifically recommended.
• Repairs necessary because of operator abuse or negligence, or the failure to install, operate, maintain and store the
product according to the instructions in the owner's manual.
• Damage caused by cold, heat, rain, excessive humidity, corrosive environments and materials, or other contaminants.
• Expendable items that become worn during normal use.
• Cosmetic defects that do not interfere with tool functionality. .
• Freight costs from customer to vendor.
• When servicing use only identical replacement parts.
• ANY INCIDENTAL, INDIRECT OR CONSEQUENTIAL LOSS, DAMAGE, OR EXPENSE THAT MAY RESULT FROM
ANY DEFECT, FAILURE OR MALFUNCTION OF THE PRODUCT
• Some states do not allow the exclusion or limitations on how long an implied warranty lasts, so the above limitations
may not apply to you.
• Battery and charger are under a (one) 1 year replacement guarantee against defects in workmanship and materials.
17
Page 18
Page 19
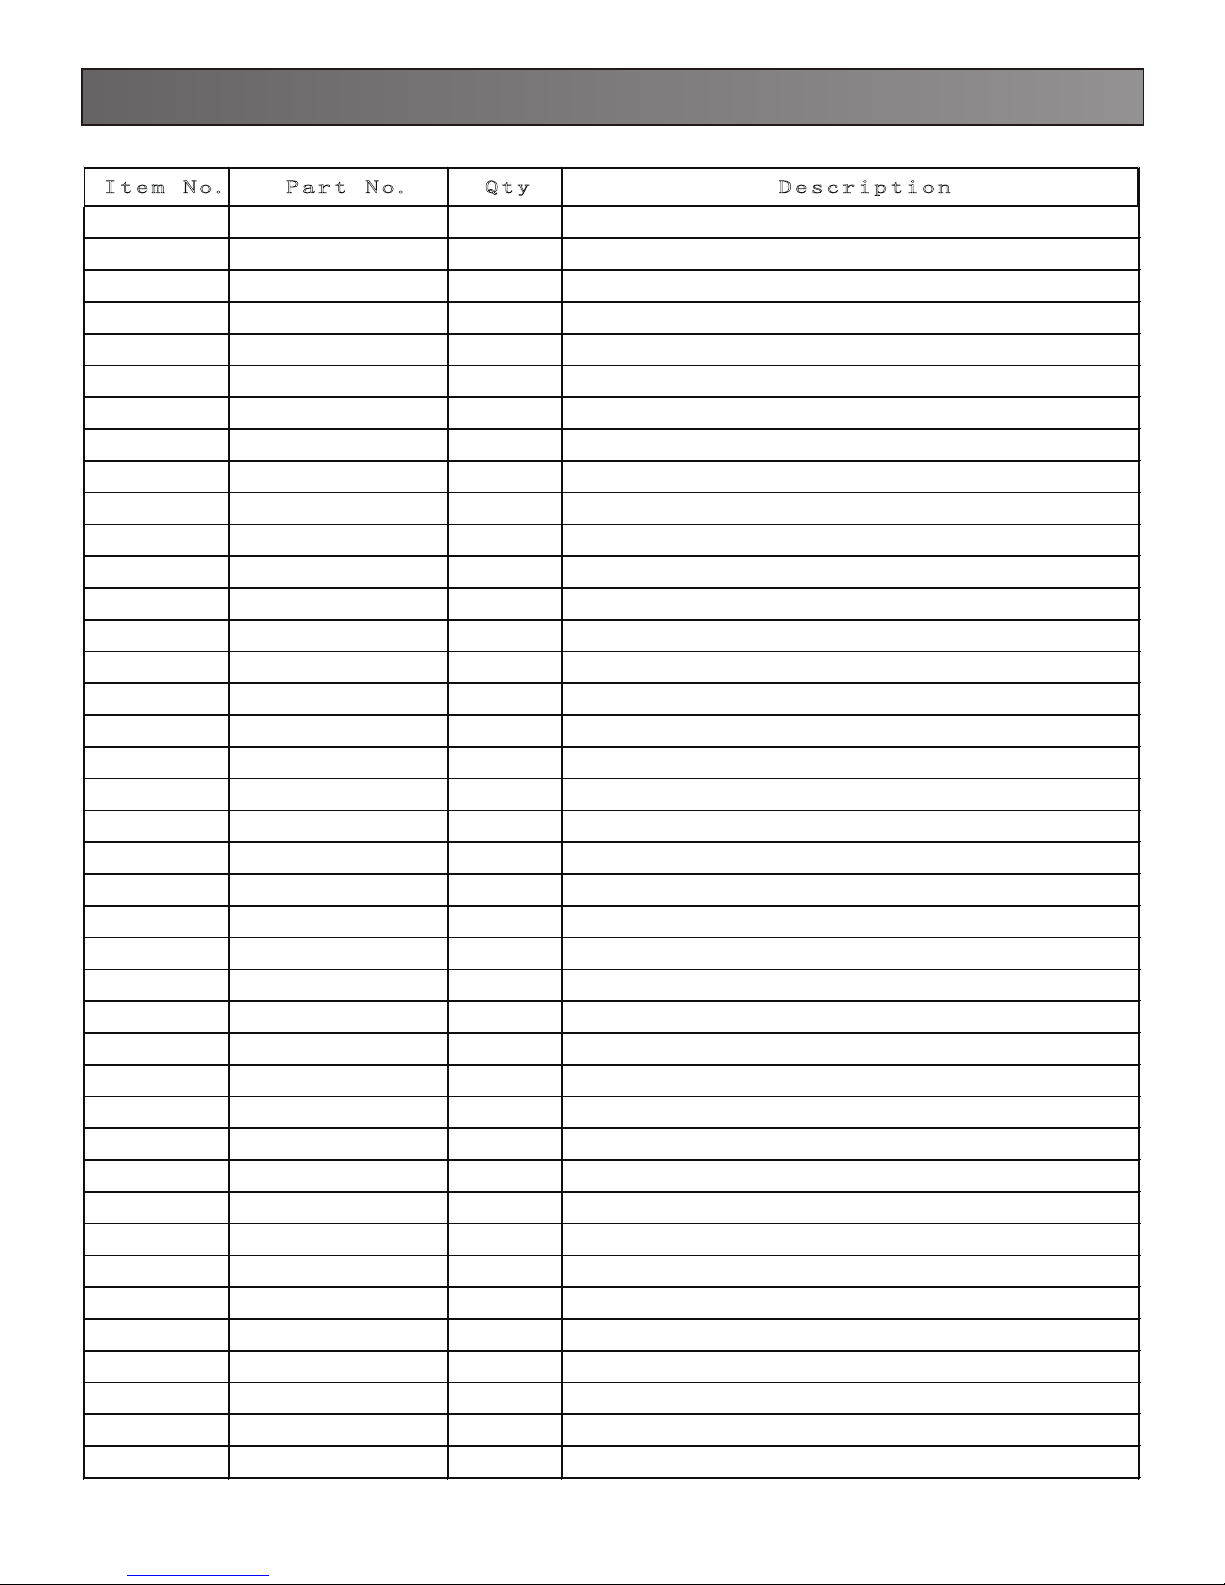
PARTS LIST
.
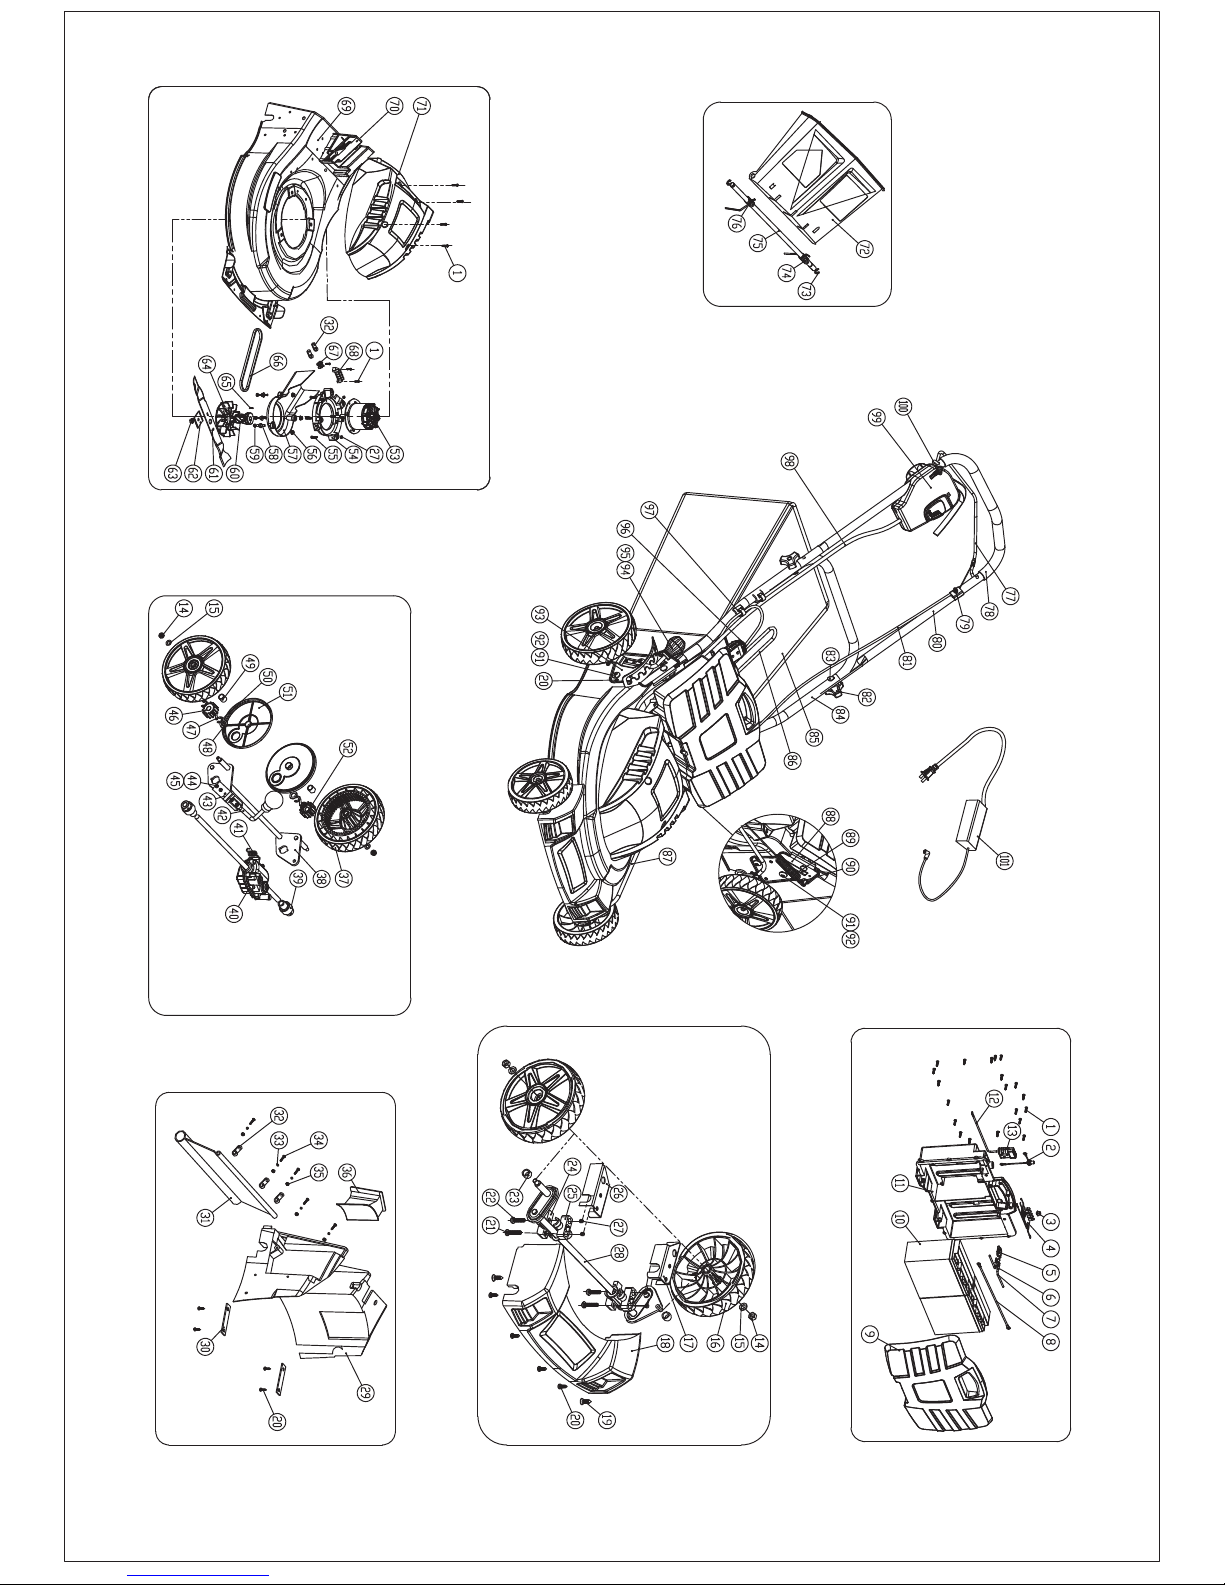
Item No
1 8220901 20 Self tapping screw ST4.2*16-F
2 8650401 1 Charger interface
3 8418901 1 Power display panel button
4 8620101 1 Power display panel
5 8690101 1 Fuse
6 8640401-1 1 Internal wire B1 Ass'y
7 8640401-2 1 Internal wire B2 Ass'y
8 8640501 1 Internal wire R Ass'y
9 8411001 1 Battery up cover
10 8610101-1 2 Battery
11 8410901 1 Batter Lower cover
12 8640401-3 1 Internal wire B3
13 8650201-1 2 Plug Ass'y
14 8220502 4 Hex lock nut M8
15 8240112 7 Washer
16 8410701 2 7' wheel ass'y
17 8331001 1 Left support
18 8410201 1 Front cover
19 8228901 2 Self tapping screw ST6.3*20-C
20 8220801 20 Self tapping screw ST4.8*18-F
21 8228908 2 Phillips pan screw M6*40
22 8228701 2 Phillips pan screw M6*30
23 8321002 2 Front axis sleeve
24 8410301 2 Front wheel lower press board
25 8410401 2 Front wheel up press board
26 8331101 1 Right support
27 8230201 13 Hex lock nut M6
28 8330316 1 Front axis Ass'y
29 8410
30 8330501 2 Rear axis press board
31 8430201 1 Rear block leather
32
33
34
35
36
37
38 8330416 1 Rear axis Ass'y
39 8411116 2 Rear sleeve
40 8120216 1 Gear case assembly
Part No . Descrip t i o nQty
φ8
216 1 Rear board
8330812 5 R type bushing
8247701 5 Washerφ4
8221201 5 Phillips Pan head screwM4*14
8221001 5 Hex lock nut M4
8411201 1 Rear block Board
8410516 2 8' wheel Ass'y
20
Page 20

PARTS LIST
.
Item No
41 8340116 1 Gear case tension spring
42 8321301 1 Adjustment rod
43 8331601 1 Spring board
44 8220401 4 Internal Hexagon bolt M5*14
45 8228401 4 Hex lock nut M5
46 8350316 1 Internal Gear R
47 8320216 2 Round pinφ5×21.8
48 8350912 2 Washerφ13.5*φ23*2
49 8320116 2 Rear wheel sleeve
50 8240312 4 Washerφ9
51 8410716 2 Block grass cover
52 8350216 1 Internal Gear L
53 8131231 1 24V Dc Motor(long axes)
54 8410116 1 Moter seat
55 8221801 3 Hex bolt M6*25
56 8227
57 8410616 1 Driving belt cover
58 8220116 1 Double head hex bolt M8
59 8230116 3 Hex nut M6
60 8310116 1 Blade seat
61 8331212 1 19' blade
62 8331901 1 Blade block plate
63 8220102 1 Lock axis nut
64 8412701 1 Fan
65 8270116 1 Common flat key(4×20)
66 8420216 1 V type belt
67 8650901 1 Tow lines connecter
68 8651001 1 Four lines connecter
69 8330216 1 Housing Ass'y
70 8412101 1 Battery bracket
71 8410101 1 Housing Cover
72 8410303 1 Rear cover
3 8247501 2 Lock ring φ7
7
74 8321001 1 Rear cover left spring
75 8320401 1 Rear cover axis
76 8322901 1 Rear cover right spring
77 8320316 1 Zipper Rod
78 8430101 1 Sponge sleeve
79 8220812 1 Phillips Pan head screwM6*45
80 8320416 1 Up handle
Part No. Qty De s c r i p t ion
502 3 Hex nut M8
21
Page 21
PARTS LIST
.
Item No
81 8450116 1 Zipper assembly
82 8410501 4 Push rod button
83 8220202 2 Push rod bolt M8*48
84 8320701 1 Lower handle
85 8440201 1 Grass bag
86 8321401 1 Grass bag bracket
87 8330916 1 Connection par ass'y
88 8330601 1 Left adjustment plate ass'y
89 8320901 1 Tension spring
90 8420201 2 Rubber spring sleeve
91 8220501 4 Half hexagon head bolt M10*20
92 8238301 4 Hex nut M10
93 8330801 1 Right adjustment plate ass'y
94 8412201 1 Adjustment height up han
95 8412301 1 Adjustment height low handel
96 8110401 1 Battery power cord ass'y
97 8412501 2 Plug below cover
98 8641101 1 Power cord
99 8110102 1 DC Switch box assembly without power cord
100 8414501 1 Switch Key
101 8120201 1 Charger(24v)
Part No. Qty De s c r i p tion
del
www.thegreenstationLA.com
22
 Loading...