

GREEN SERIES FITNESS CIR-TM8000-G Owner's Manual

John C. Jensen
Owner's Manual
Light Commercial
Full Commercial
Full Commercial Treadmill
Install Date: _________________________ Serial Number: ________________________
www.GreenSeriesFitness.com ©April 2017 Call Toll free at (800) 269-7130
CIR-TM8000-G
CIR-TM8000-G Revision 1.2

1
John C. Jensen
TABLE OF CONTENTS
SAFETY PRECAUTIONS …………………………………………………………………..2-8
Important voltage information, grounding instructions, how often you exercise,
how hard you exercise, how long you exercise, beginner treadmill program,
target heart rate zone.
TECHNICAL SPECIFICATIONS ……………………………………………….…………....9
UNPACKING & ASSEMBLY …………………………………………………………...10-18
Parts, hardware kit and assembly drawing
WARM UP & COOL DOWN ……………………………………………………….….........19
CONTROL PANEL ………………..…………………………………………….…….…20-21
Display and Keys
PROGRAMS ……………………………..………………………………………...….….22-66
Control panel function and programs
OPERATION ……………………………………………………………………….…..…67-68
BELT ADJUSTMENT ……………………………………………………………….……….69
CARE & MAINTENANCE ………………………………………………………….........70-71
TROUBLE SHOOTING …………………………………………………………….……72-73
PARTS LIST ………………………………………………………………………..…….74-75
EXPLODED DRAWINGS ……………………………………………………………….76-79
WARRANTY ……………………………………………………………………………...80-82
www.GreenSeriesFitness.com ©April 2017 all Toll free at 800-269-7130
CIR-TM8000-G Revision 1.2
2
John C. Jensen
SAFETY PRECAUTIONS
24”
600mm
79”
2000mm
12”
300mm
24”
600mm
24”
600mm
Location of the Treadmill
Before assembling the unit, verify the chosen site meets the following criteria:
Area is well lit and well ventilated.
Surface is structurally sound and properly leveled.
Free area for access to the unit and emergency dismount. Minimum clearance is 24 inches (0.6 meters)
on the sides of the unit and 78.7 inches (2.0 meters) behind the unit.
Adjacent units may share the free area.
Place in a location away from direct sunlight. The intense UV light can cause discoloration on the plastics.
Locate your treadmill in an area with cool temperatures and low humidity.
Do not install, use or store the treadmill in an area of high humidity, such as in the vicinity of a steam room,
sauna, indoor pool, garage, covered patio, near water or outdoors. Exposure to extensive water vapor,
chlorine and/or bromine could adversely affect the electronics as well as other parts of the unit.
The below minimum spacing recommendations are based on a combination of the ASTM (U.S.) voluntary standards and
EN (European) regulations as of October 1, 2012, for access, passage around, and emergency dismount:
ASTM standards are voluntary and may not reflect current industry standards. The actual area for access, passage around,
and emergency dismount is the responsibility of the facility. The facility should consider the total space requirements for
training on each unit, voluntary and industry standards, and any local, state, and federal regulations. Standards and
regulations are subject to change at any time.
Careful consideration should be given to the requirements of the Americans with Disabilities Act (ADA), US Code 28 CFR
(see Section 305).
In compliance with the ADA (American Disabilities Act) there must be clear floor space of at least 30 inches by 48 inches
and be served by an accessible route for at least one of each type of exercise equipment. If the clear space is enclosed on
three sides (e.g., by walls or the equipment itself), the clear space must be 36 inches by 48 inches.
Important: These spacing recommendations should be used when positioning equipment away from sources of heat,
such as radiators, heat registers, and stoves. Avoid temperature extremes.
www.GreenSeriesFitness.com ©April 2017 all Toll free at 800-269-7130
CIR-TM8000-G Revision 1.2

3
John C. Jensen
SAFETY PRECAUTIONS
WARNING
Environment
The unit is designed to function normally in an environment with a relative humidity range of 30% to 75%. The unit can be
shipped and stored in a relative humidity range of 10% to 90%. Climatic dry air may cause static electricity. During a
workout, a user may experience a shock due to a buildup of static electricity on the body and the discharge path of the unit.
If static electricity is experienced, increase humidity to a comfortable level through the use of a humidifier.
Temperature
The unit is designed to function in an environment with an ambient temperature range of 50°F (10°C) to 104°F (40°C).
The unit can be shipped and stored in an environment with an ambient temperature range of 32°F (0°C) to 140°F (60°C).
Electrical Power Requirements
The power requirements for this treadmill are a grounded, dedicated circuit rated for the following:
115 VAC, 50/60 HZ, 20A
Shock and electrocution hazard.
Connect unit to a grounded outlet.
Do not use a voltage adapter or extension cord.
Important Voltage Information
Before plugging the power cord into an electrical outlet, verify that the voltage requirements for your area match the
voltage of the treadmill that you have received. The power requirements for the treadmill include a grounded,
dedicated circuit, rated for one of the following figure. See the serial number decal for the exact voltage
requirements of your treadmill.
WARNING: Don't attempt to use this unit with an unapproved voltage adapter. All voltage adapters MUST be
approved and supplied by Green Series Fitness prior to use.
Don't attempt to use this unit with an extension cord which does not meet Green Series Fitness criteria of the following;
12 gauge SO3, maximum of 25 foot length with a 20 amp rating.
Grounding Instructions
This equipment must be grounded. If it should malfunction or break down, grounding provides
a path of least resistance for electric current to reduce the risk of electric shock.
This equipment is equipped with a cord having an equipment-grounding conductor and a grounding plug. The plug must be
plugged into an appropriate outlet that is properly installed and grounded in accordance with all local codes and ordinances.
Please make sure that the equipment is connected to an outlet having the same configuration as the plug. Do not use a
ground plug adapter to adapt the power cord to a non-grounded outlet.
120V EURO PLUG 208-240V
NEMA 5-20 CEE 7/7 NEMA 6-15
The power requirements for the equipment includes a grounded, dedicated circuit, rated for one of the
following:
120 VAC 5%, 60HZ and 20 amps;
208/240 VAC, 60HZ, 15 amps
240 VAC 5%, 50HZ and 15amps.
www.GreenSeriesFitness.com ©April 2017 all Toll free at 800-269-7130
CIR-TM8000-G Revision 1.2

4
John C. Jensen
SAFETY PRECAUTIONS
Waste Disposal
Products are recyclable. At the end of its useful life please dispose of this
article correctly and safely (local refuse sites).
▪The running belt must be set up on firm even ground. Ensure that the power cable is not pinched and that on-one can trip
over it.
▪Never touch the moving belt with your hands. Also ensure that there are no objects close to the belt or the rollers which
could be pulled into it thus causing injury or damaging the unit itself.
▪Repairs on the electrical components in the unit should be carried out by qualified persons only.
▪The treadmill has an emergency stop mechanism for your safety. Before starting your workout, fasten the cord of the safety
key to your clothing. If the treadmill has been shut down by removing the safety key, restart it by reinserting the key. An
automatic restart of the treadmill belt does not occur. Further instructions concerning the handling of the safety cut-out can
be found in the operating instructions for the training computer.
Thank you for your purchasing our products. Even though we go to great efforts to ensure the quality of each product,
occasional error, and/or omissions do occur. In any event should you find this product to be defective or missing parts
please contact us.
IMPORTANT: Read all instructions and warnings before assembly and operation.
IMPORTANT SAFETY INSTRUCTIONS
When using equipment, basic precautions should always be followed, including the following:
Read all instructions before using the Treadmill.
DANGER - To reduce the risk of electric shock: Always unplug this appliance from the electrical outlet
immediately after using and before cleaning.
WARNING - To reduce the risk of burns, fire, electric shock, or injury to persons:
1. The equipment should never be left unattended when plugged in. Unplug from outlet when not in use and before
putting on or taking off parts.
2. Close supervision is necessary when the equipment is used by, on, or near children, invalids, or disabled
persons.
3. Use the equipment only for its intended use as described in this manual. Do not use attachments not
recommended by the manufacture.
4. Never operate the equipment if it has a damaged cord or plug, if it is not working properly, if it has been dropped
or damaged, or dropped into water. Return the equipment to a service center for examination and repair.
5. Do not carry the equipment by supply cord or use cord as a handle.
6. Keep the cord away from heated surfaces.
7. Never operate the equipment with the air openings blocked. Keep the air openings free of lint, hair, and the like.
8. Never drop or insert any object into any opening.
9. Do not use outdoors.
10. Do not operate where aerosol (spray) products are being used or where oxygen is being administered.
11. To disconnect, turn all controls to the OFF position, then remove plug from outlet.
12. Connect the equipment to a properly grounded outlet only. See Grounding Instructions.
13. The equipment is intended for commercial use.
14. Store the safety key in a secured location while not in use and keep away from children.
15. Maximum user weight: 450Ibs (204 kg) .
www.GreenSeriesFitness.com ©April 2017 all Toll free at 800-269-7130
CIR-TM8000-G Revision 1.2
5
John C. Jensen
SAFETY PRECAUTIONS
Attach the safety key
to your waist.
EMERGENCY DISMOUNT:
In case you must leave the equipment in an EMERGENCY SITUATION,
grab the handrail and set both feet on the right and left foot platform
beside the running belt. Now you pull out the safety switch, in order to
slow down the equipment.
The function of the immobilization method:
If you would like to stop the equipment, then you can stop it either with
the switch on the console or pull out the safety switch. If you pull the
safety switch, in this case the computer shut down all functions
automatically and the running belt slow down immediately.
SAFETY KEY
Check if the safety key at the console and the clip at your clothes are secured. The safety key is intended for interrupting the
main connection in case you should fall. Thus, it was developed to bring the equipment to an immediate stop. For higher
speeds this can be unpleasant and somewhat dangerous as well. Please only use the safety key for an emergency stop. In
order to stop the equipment during training under normal circumstances in a safe, comfortable and complete manner, use the
STOP button.
ENTER AND LEAVE THE TREADMILL
Be careful when entering and leaving the treadmill. Use the handle bars. Do not position yourself on the treadmill when
preparing the use. Spread your feet and put them on the two side platforms next to the running surface. Put your feet on the
treadmill only if it has started moving at constant speed. For your own safety, only enter the treadmill if it is not running faster
than 2 km/h. Always look to the front during the training sessions. Never try to turn around on the treadmill as long as the
treadmill is activated. After having finished your training session, you can stop the treadmill by pressing the STOP button.
Wait until the treadmill has stopped completely before trying to leave the treadmill. In case you feel unsure regarding the
speed you should hold on to the handle bars, lift your feet from the treadmill, and position yourself on the side platforms next
to the running surface. These side platforms are an appropriate position to relax before starting the training again. For your
own safety and comfort, always start your training sessions at low speed.
CONSULT A PHYSICIAN IMMEDIATELY
Warning: before starting any exercise program consult your physician. This is especially
important for individuals over the age of 35 or persons with preexisting health problems. Read all instructions
before using any fitness equipment. We assume no responsibility for personal injury damage sustained by or
through the use of this treadmill.
How often you exercise:
You should exercise three to four times a week to improve your cardiovascular and muscle fitness.
How hard you exercise:
Intensity of exercise is reflected in your heart rate. Exercise must be sufficiently rigorous to strengthen your heart muscle
and condition your cardiovascular system. Only your doctor can prescribe the target training heart range for you. Before
starting any exercise program consult your physician.
How long you exercise:
Sustained exercise conditions your heart, lungs and muscles. The longer you are able to sustain exercise within your target
heart range, the greater the aerobic benefits. To begin maintain 2~3 minutes of steady, rhythmic exercise, then check your
heart rate.
www.GreenSeriesFitness.com ©April 2017 all Toll free at 800-269-7130
CIR-TM8000-G Revision 1.2

6
John C. Jensen
SAFETY PRECAUTIONS
EMERGENCY DISMOUNT:
In case you must leave the equipment in an EMERGENCY SITUATION, grab the handrail and set both feet on the right and
left foot platform beside the running belt. Now you pull out the SAFETY KEY from the console to slow down and stop the
equipment.
The function of the immobilization method:
If you would like to stop the equipment, then you can stop it either with the STOP switch on the console or pull out the
SAFETY KEY from the console. If you pull the SAFETY KEY from the console, this case the computer shut down
all functions automatically and the running belt slow down
and come to a stop immediately.
SAFETY KEY
Check if the SAFETY KEY at the treadmill and the clip at your clothes are secured. The SAFETY KEY is intended for
interrupting the mains connection in case you should fall. Thus, it was developed
to bring the treadmill to an immediate stop. For higher speeds this can be unpleasant and somewhat dangerous as well.
Please only use the SAFETY KEY for an emergency stop. In order to stop the treadmill during training under normal
circumstances in a safe, comfortable and complete manner, use the STOP button.
ENTER AND LEAVE THE TREADMILL
Be careful when entering and leaving the treadmill. Use the handle bars. Do not position yourself on the treadmill when
preparing the use. Spread your feet and put them on the two side platforms next to the running surface. Put your feet on the
treadmill only if it has started moving at constant speed. For your own safety, only enter the treadmill if it is not running faster
than 2 km/h. Always look to the front during the training sessions. Never try to turn around on the treadmill as long as the
treadmill is activated. After having finished your training session, you can stop the treadmill by pressing the STOP button.
Wait until the treadmill has stopped completely before trying to leave the treadmill. In case you feel unsure regarding the
speed you should hold on to the handle bars, lift your feet from the treadmill, and position yourself on the side platforms next
to the running surface. These side platforms are an appropriate position to relax before starting the training again. For your
own safety and comfort, always start your training sessions at low speed.
www.GreenSeriesFitness.com ©April 2017 all Toll free at 800-269-7130
CIR-TM8000-G Revision 1.2
7
John C. Jensen
SAFETY PRECAUTIONS
CONSULT A PHYSICIAN IMMEDIATELY
Warning: before starting any exercise program consult your physician. This is especially
important for individuals over the age of 35 or persons with preexisting health problems. Read all instructions
before using any fitness equipment. We assume no responsibility for personal injury damage sustained by or
through the use of this treadmill.
How often you exercise:
You should exercise three to four times a week to improve your cardiovascular and muscle fitness.
How hard you exercise:
Intensity of exercise is reflected in your heart rate. Exercise must be sufficiently rigorous to strengthen your heart muscle
and condition your cardiovascular system. Only your doctor can prescribe the target training heart range for you. Before
starting any exercise program consult your physician.
How long you exercise:
Sustained exercise conditions your heart, lungs and muscles. The longer you are able to sustain exercise within your target
heart range, the greater the aerobic benefits. To begin maintain 2~3 minutes of steady, rhythmic exercise, then check your
heart rate.
Emergency Stop switch
The function of the EMERGENCY STOP is to help the user to get off the treadmill safely in case of an emergency. In case
of emergency, press the STOP key, hold the handrails and get off when the belt stops.
www.GreenSeriesFitness.com ©April 2017 all Toll free at 800-269-7130
CIR-TM8000-G Revision 1.2
8
John C. Jensen
SAFETY PRECAUTIONS
EXERT6BSAFETY ION LEVEL
DURATION
WEEK 1
Easy
6~12 minutes
WEEK 2
Easy
10~16 minutes
WEEK 3
Moderate
14~20 minutes
WEEK 4
Moderate
18~24 minutes
WEEK 5
Moderate
22~28 minutes
WEEK 6
Slightly higher or slightly lower
20 minutes
WEEK 7
Add interval training
3 minutes at moderate exertion with 3 minutes at higher
exertion for 24 minutes
You do not want to workout at your maximum heart rate.
The recommended Heart Rate Zone is a percentage of
your maximum heart rate. Between 65% and 85% of your
maximum heart rate.
* Lower limit of Target Heart Rate Zone =maximum heart
rate X 0.6
* Upper limit of Target Heart Rate Zone =Maximum heart
rate X 0.75
(This is recommended by American Heart Association.
Before starting exercise program, please consult your
physician to understand your physical situation)
BEGINNER TREADMILL PROGRAM
UTARGET HEART RATE ZONE
220-your age = maximum heart zone
1* Advantage of using the treadmill is consumers can strengthen the cardiopulmonary function and physical fitness.
*This appliance is not intended for use by persons (including children) with reduced physical sensory or mental capabilities,
or lack of experience and knowledge, unless they have been given supervision or instruction concerning use of the
appliance by a person responsible for their safety.
*The noise value list below is when it is at top speed with unloading status : LpAeq(dB) < 70dB
www.GreenSeriesFitness.com ©April 2017 all Toll free at 800-269-7130
CIR-TM8000-G Revision 1.2
9
John C. Jensen
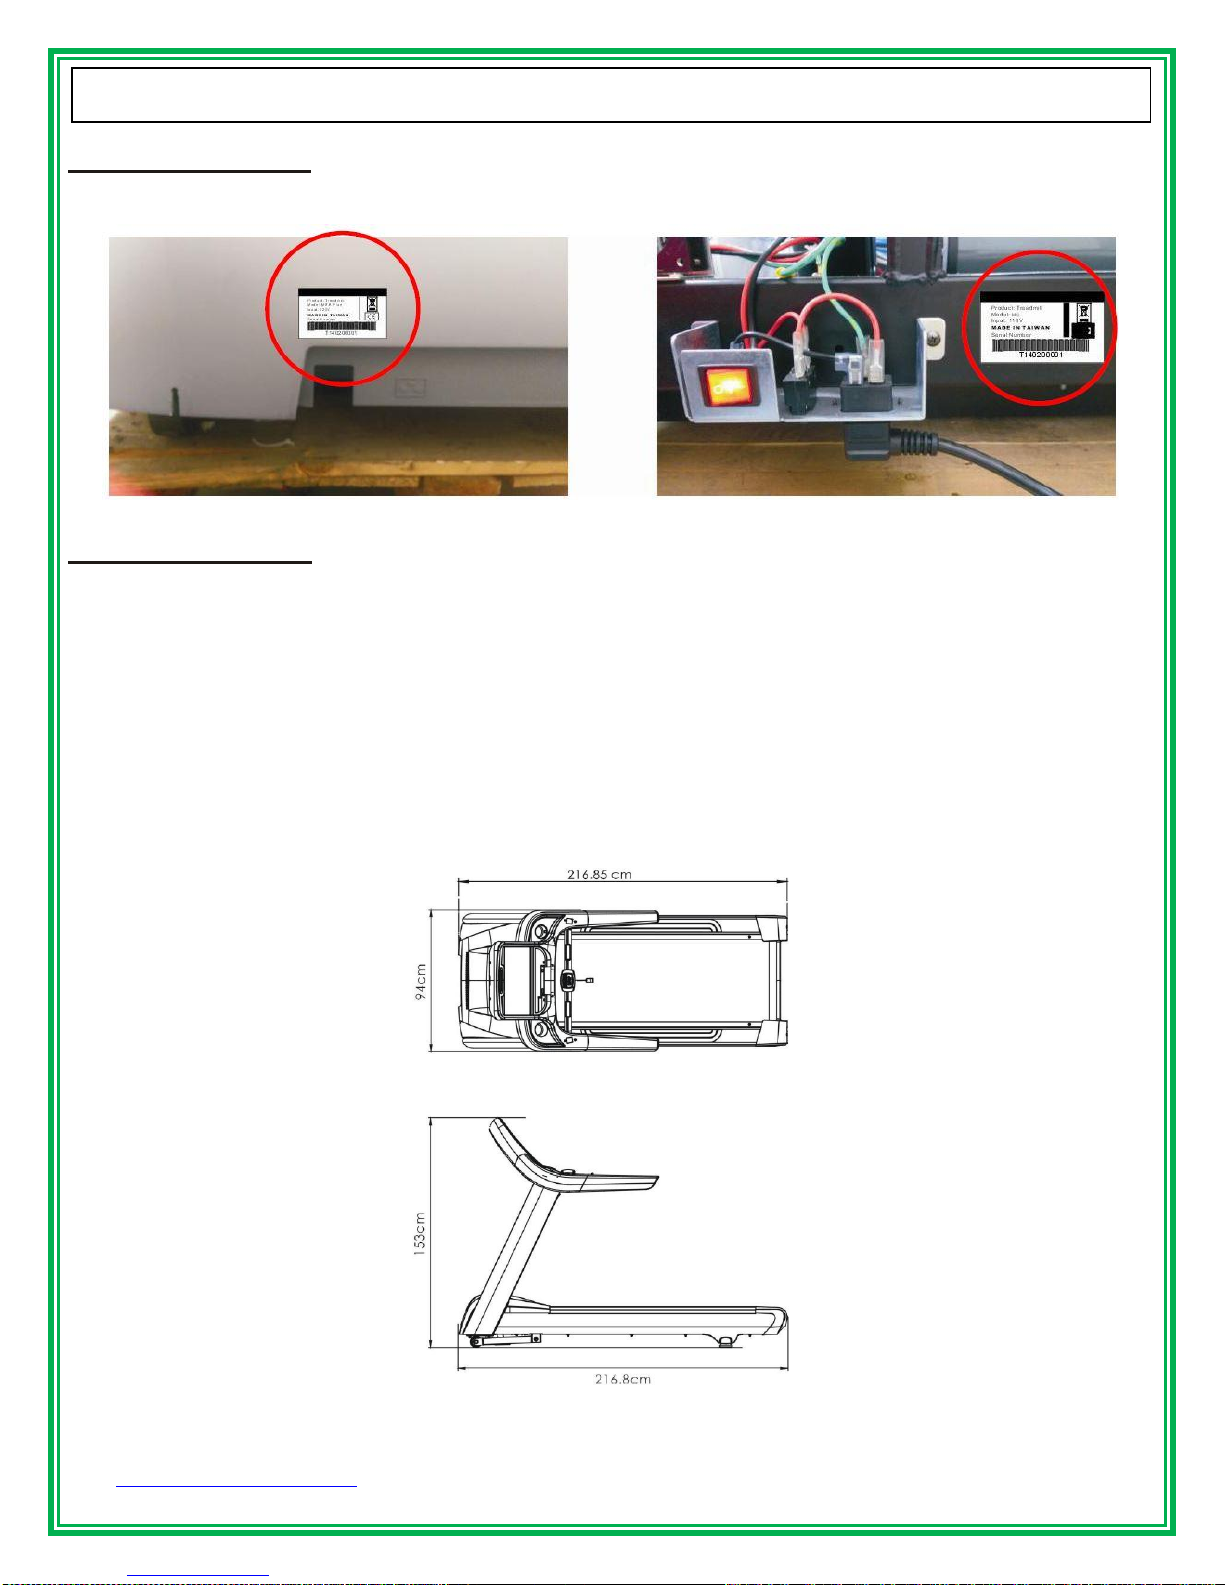
TECHNICAL SPECIFICATIONS
SERIAL NUMBER:
The serial number contains ten values. The location of the serial number is shown below.
SPECIFICATIONS:
Length: 83” (212 cm)
Width: 36” (92 cm)
HEIGHT: 57” (145 cm)
Running area: 22” x 60” (55cm x 153cm)
Weight of product: 462 lbs (210 kg)
User Weight Capacity: 500lbs (227 kg)
Speed Range: 0.2 to 17.2 mph (0.48 to 25 km)
Power elevation: 0~20% motorized (front incline)
Emergency stop: Pull the safety key, press emergency stop switch.
Programs: Over 20 including 5 courses, 3 goals, 8 tests (including Gerkin and Military), 4HRC.
Manual mode: Yes
Standard features: Total used time, distance, heart rate, calories, speed, incline, hand pulse, fan, quick speed / incline
button, Wireless HR receiver, Blue Tooth.
www.GreenSeriesFitness.com ©April 2017 all Toll free at 800-269-7130
CIR-TM8000-G Revision 1.2

10
John C. Jensen
Left handlebar
Right handlebar
Adjustable pad cover
Right console
mast
Left console mast
(Left console mast with
transparent bag)
Console
Main body
#3-1
#3-2
#3-3
#3-4
#3-5
#3-6
#1-22
#1-23
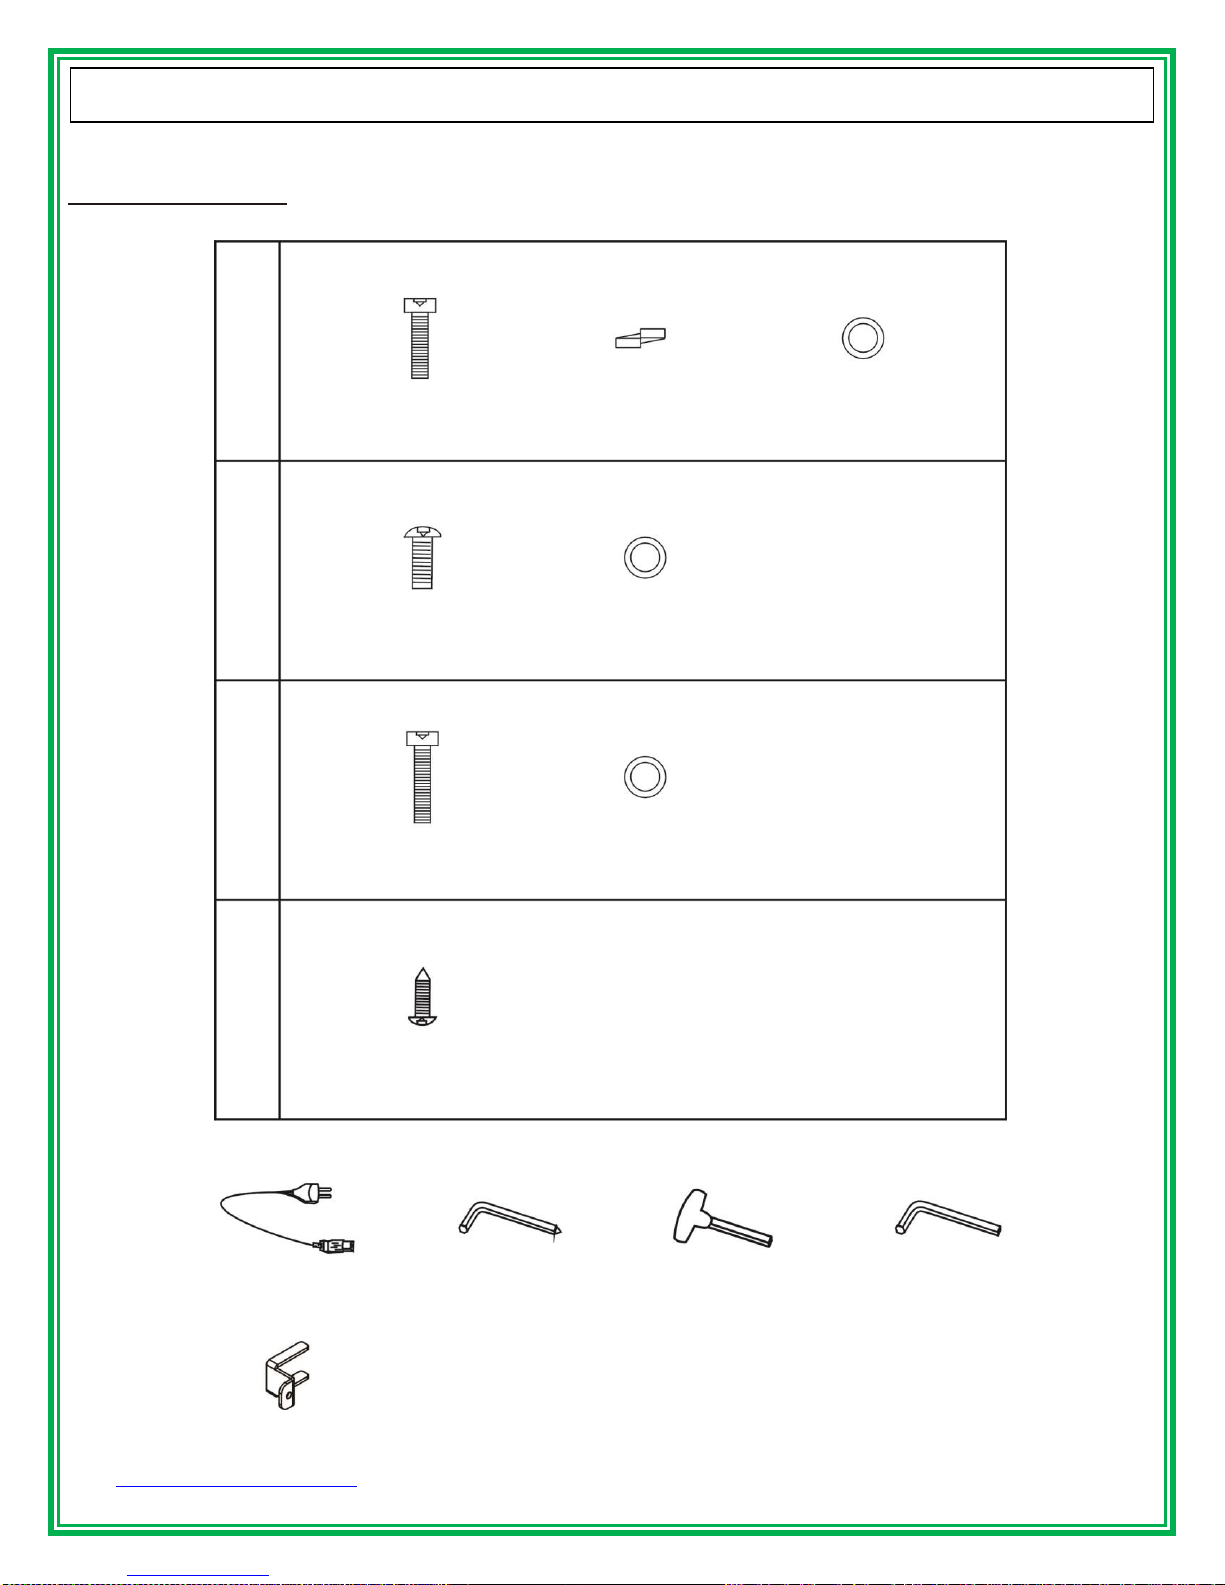
PARTS
UNPACKING & ASSEMBLY
www.GreenSeriesFitness.com ©April 2017 all Toll free at 800-269-7130
CIR-TM8000-G Revision 1.2
11
John C. Jensen
M8x20mm / 8pcs
(Console mast set)
M8 S washer / 8pcs
(Console mast set)
M8 washer / 8pcs
(Console mast set)
Step2
Step3
Step6
Step7
M3x12mm / 1pc
M8x25mm / 4pcs
(Console /
Handlebar set)
M8 washer / 4pcs
(Console /
Handlebar set)
M8x15mm / 6pcs
(Console mast set)
M8 washer / 6pcs
(Console mast set)
#3-8
#3-9
#3-11
#3-10
#3-11
#3-7
#3-11
#3-14
Power cord /1pcs
Allen wrench /
1pcs (5mm)
Allen wrench /
1pcs (6mm)
Allen wrench /
1pcs (6mm)
Power cord locker
/ 1pc (Power cord)
#3-13
HARDWARE KIT
UNPACKING & ASSEMBLY
www.GreenSeriesFitness.com ©April 2017 all Toll free at 800-269-7130
CIR-TM8000-G Revision 1.2
12
John C. Jensen
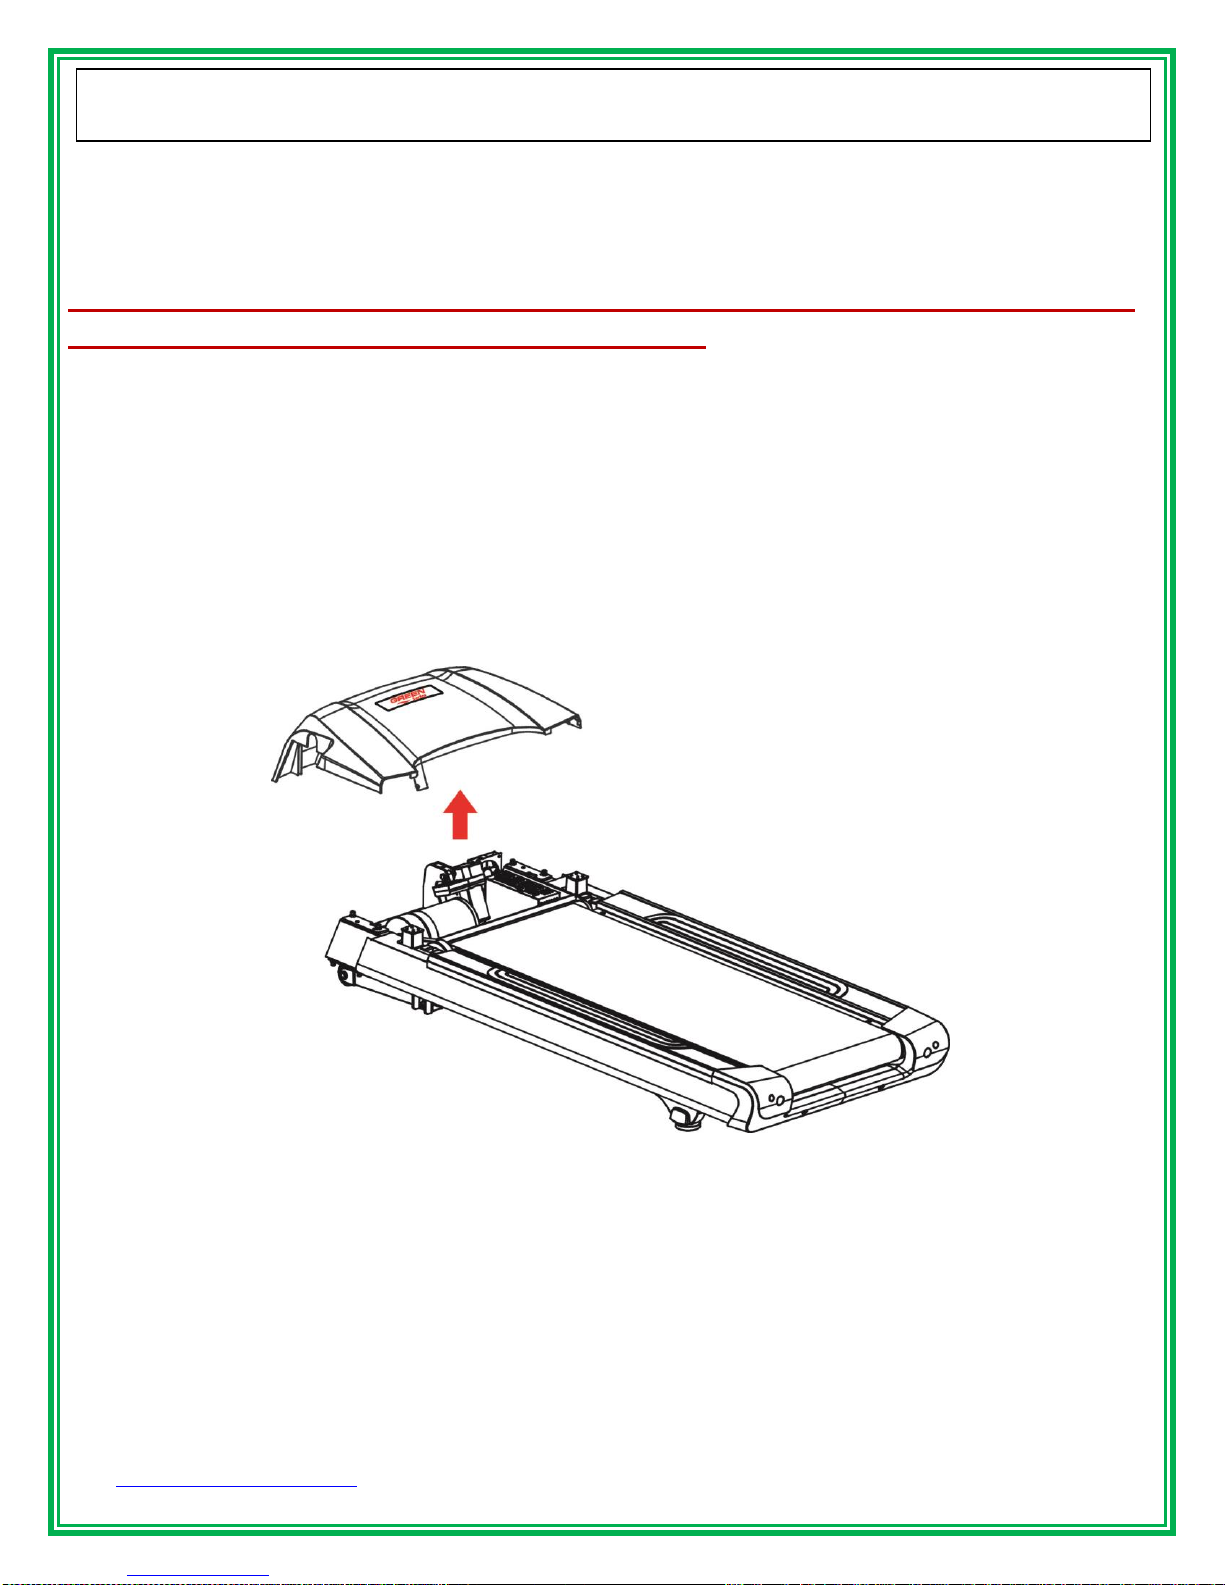
UNPACKING & ASSEMBLY
IMPORTANT: Read all instructions and warnings before assembly and operation.
This unit has been 100% assembled, tested for all functions including
vibration sensors and then disassembled. Any misalignments
causing stripped out threads is not coved by warranty due to installer
not reinstalling correctly per the following steps #1 thru #8.
Unpacking your treadmill where will be using it. Being careful not to damage. Place your treadmill on a level flat surface. It is
recommended that you place a protective covering on your floor.
*Notice: Because of heavy weight, please assemble this treadmill more than two people.
Step1: Loosen the motor cover screws, lift up and then set the motor cover aside.
www.GreenSeriesFitness.com ©April 2017 all Toll free at 800-269-7130
CIR-TM8000-G Revision 1.2
13
John C. Jensen
UNPACKING & ASSEMBLY
M8x20mm
M8
#3-8
X8
#3-9
M8 S washer
X8
#3-11
X8
Allen wrench /
1pcs (6mm)
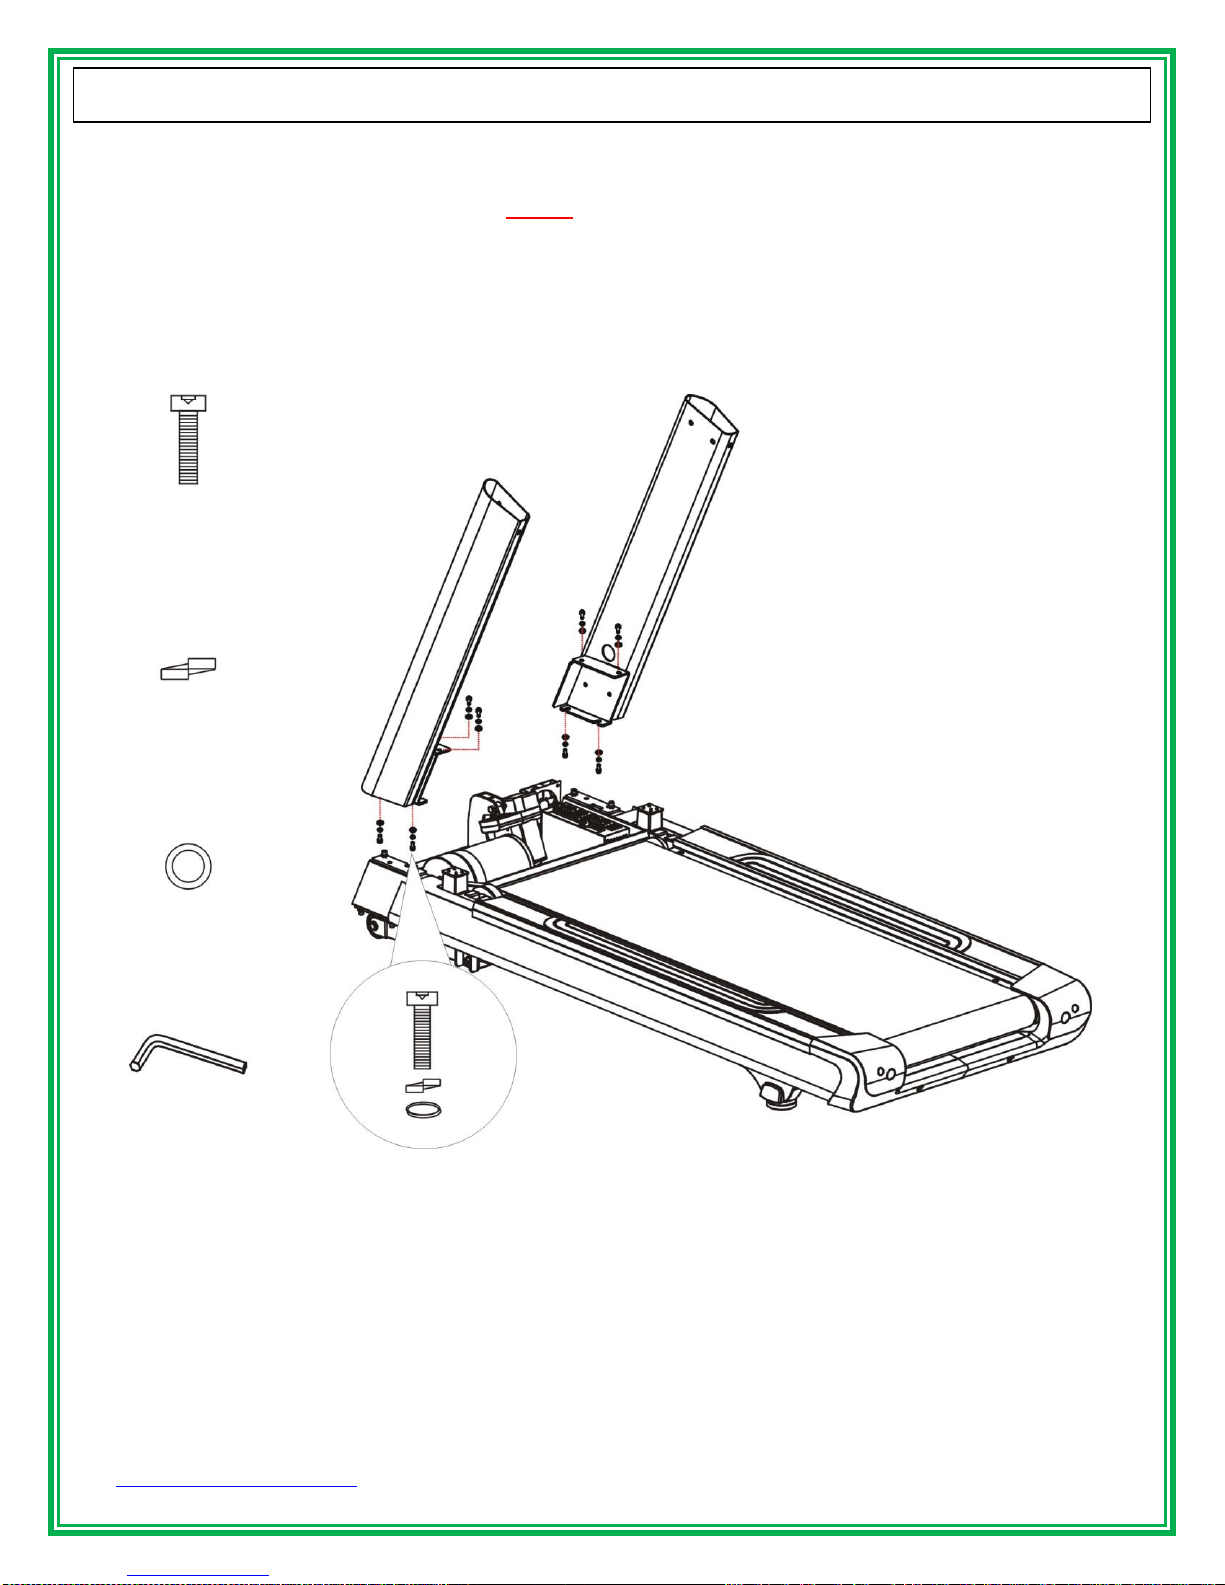
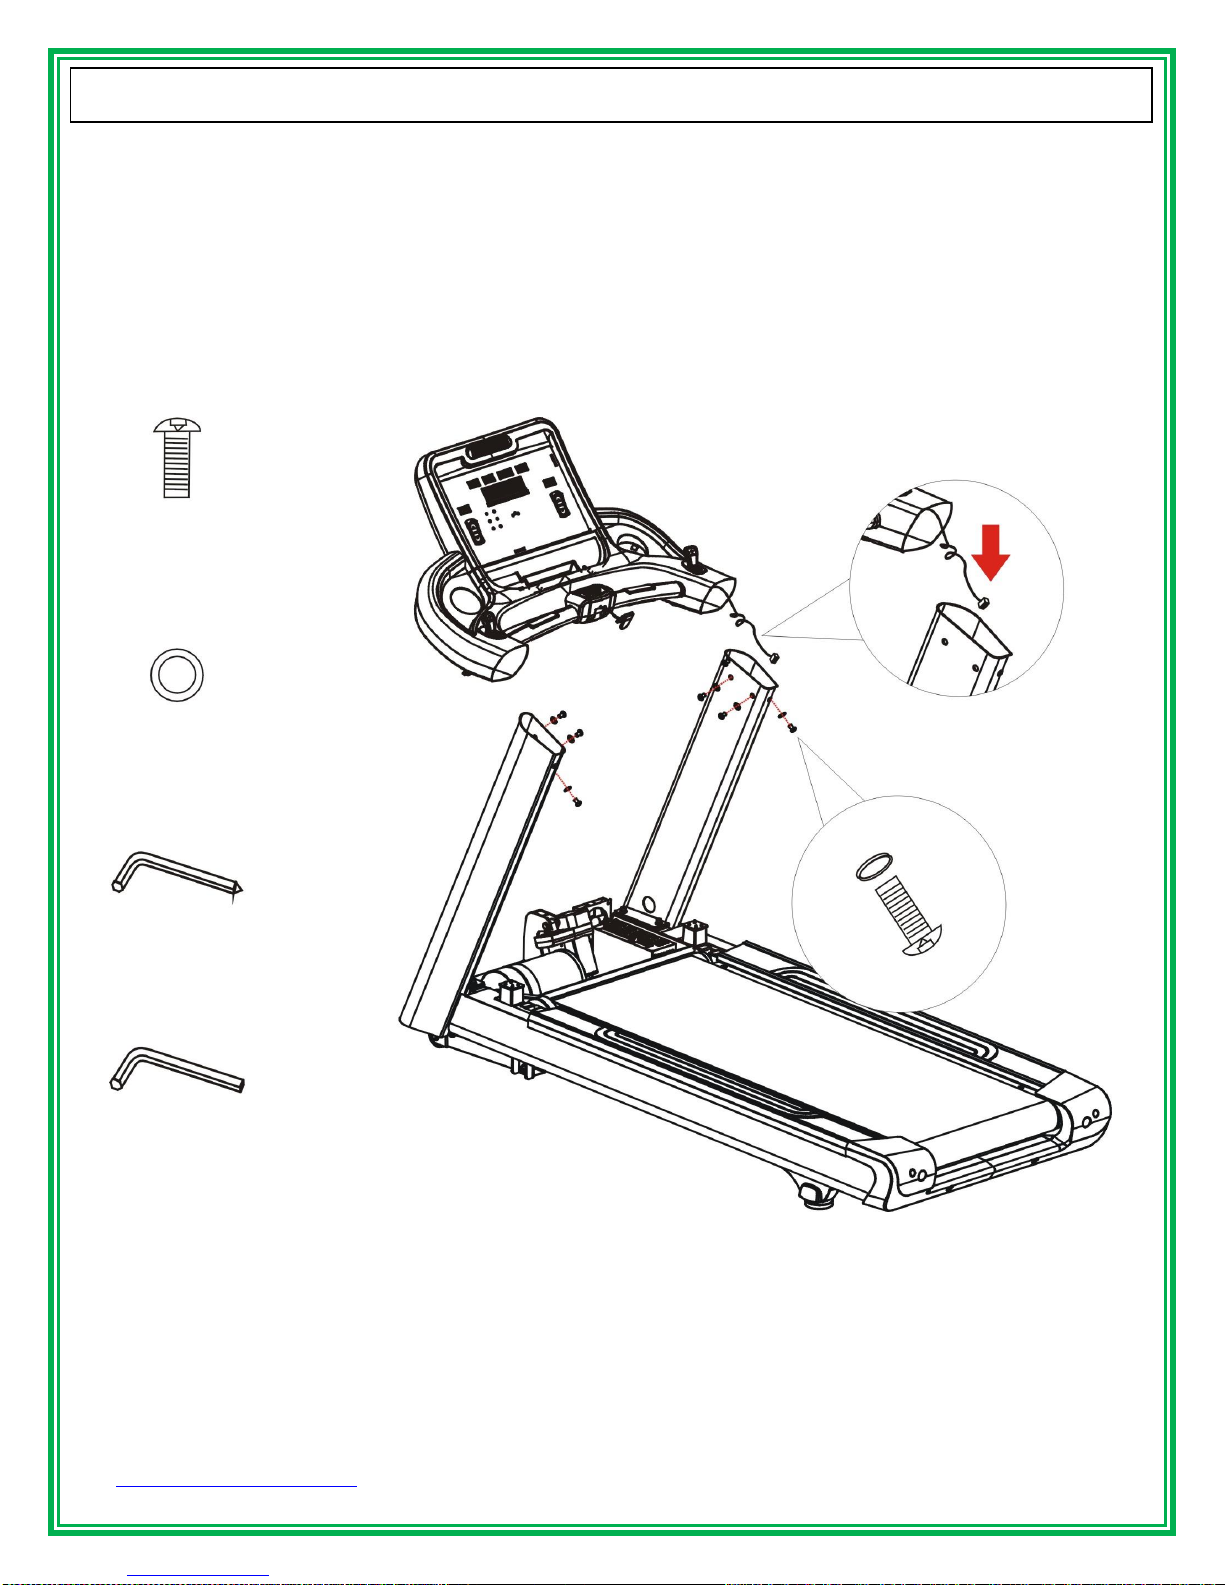
Step 2: Assemble the Console Mast on the Main Body
WARNING: The tightening sequence MUST be adhered to when performing assembly.
1) Place the Right Console Mast and the Left Console Mast on the Main Body.
2) Using a 6mm Hex wrench, fit (8) M8x20mm bolts, (8) M8 Lock Washers and (8) M8 Flat Washers into the Right and
Left Console Masts to Main Body. (Do not tighten until Step 3).
www.GreenSeriesFitness.com ©April 2017 all Toll free at 800-269-7130
CIR-TM8000-G Revision 1.2
14
John C. Jensen
UNPACKING & ASSEMBLY
Allen wrench /
1pcs (5mm)
#3-10
X6
M8x15mm
#3-11
M8
X6
Allen wrench /
1pcs(6mm)
Step 3: Assemble Console to Console Mast.
1). Place the Network Cable into the right Console Mast.
2). Place the console on top of the two Console Masts.
3). Using a 5mm Hex wrench, tighten the (6) M8x15mm Bolts and (6) Flat Washers.
4). Using a 6mm Hex wrench, tighten the Console Mast to the Main Body.
www.GreenSeriesFitness.com ©April 2017 all Toll free at 800-269-7130
CIR-TM8000-G Revision 1.2
15
John C. Jensen
UNPACKING & ASSEMBLY
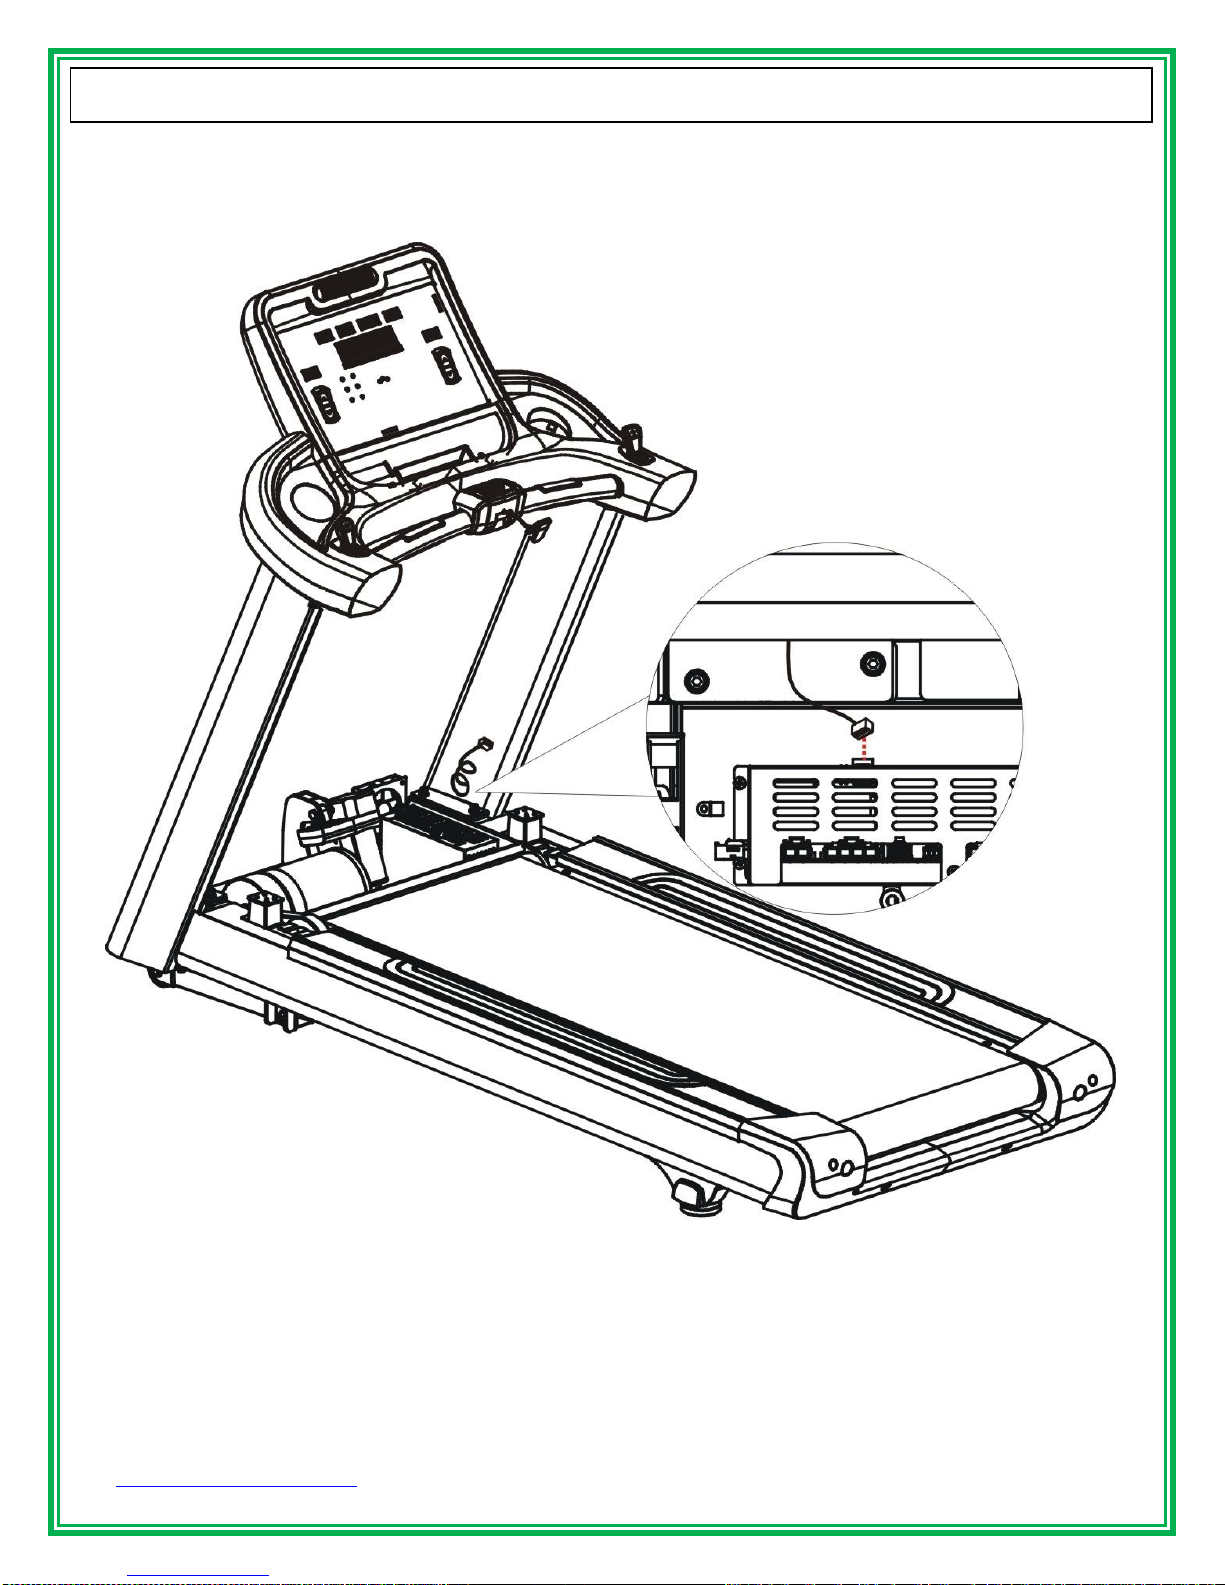
Step 4: Connect the Network Cable.
1). Pull the Network Cable through the bottom of the Right Mast and connect to the Inverter.
www.GreenSeriesFitness.com ©April 2017 all Toll free at 800-269-7130
CIR-TM8000-G Revision 1.2
16
John C. Jensen
UNPACKING & ASSEMBLY
Allen wrench /
1pcs (5mm)
M5x50mm
X2
#1-34
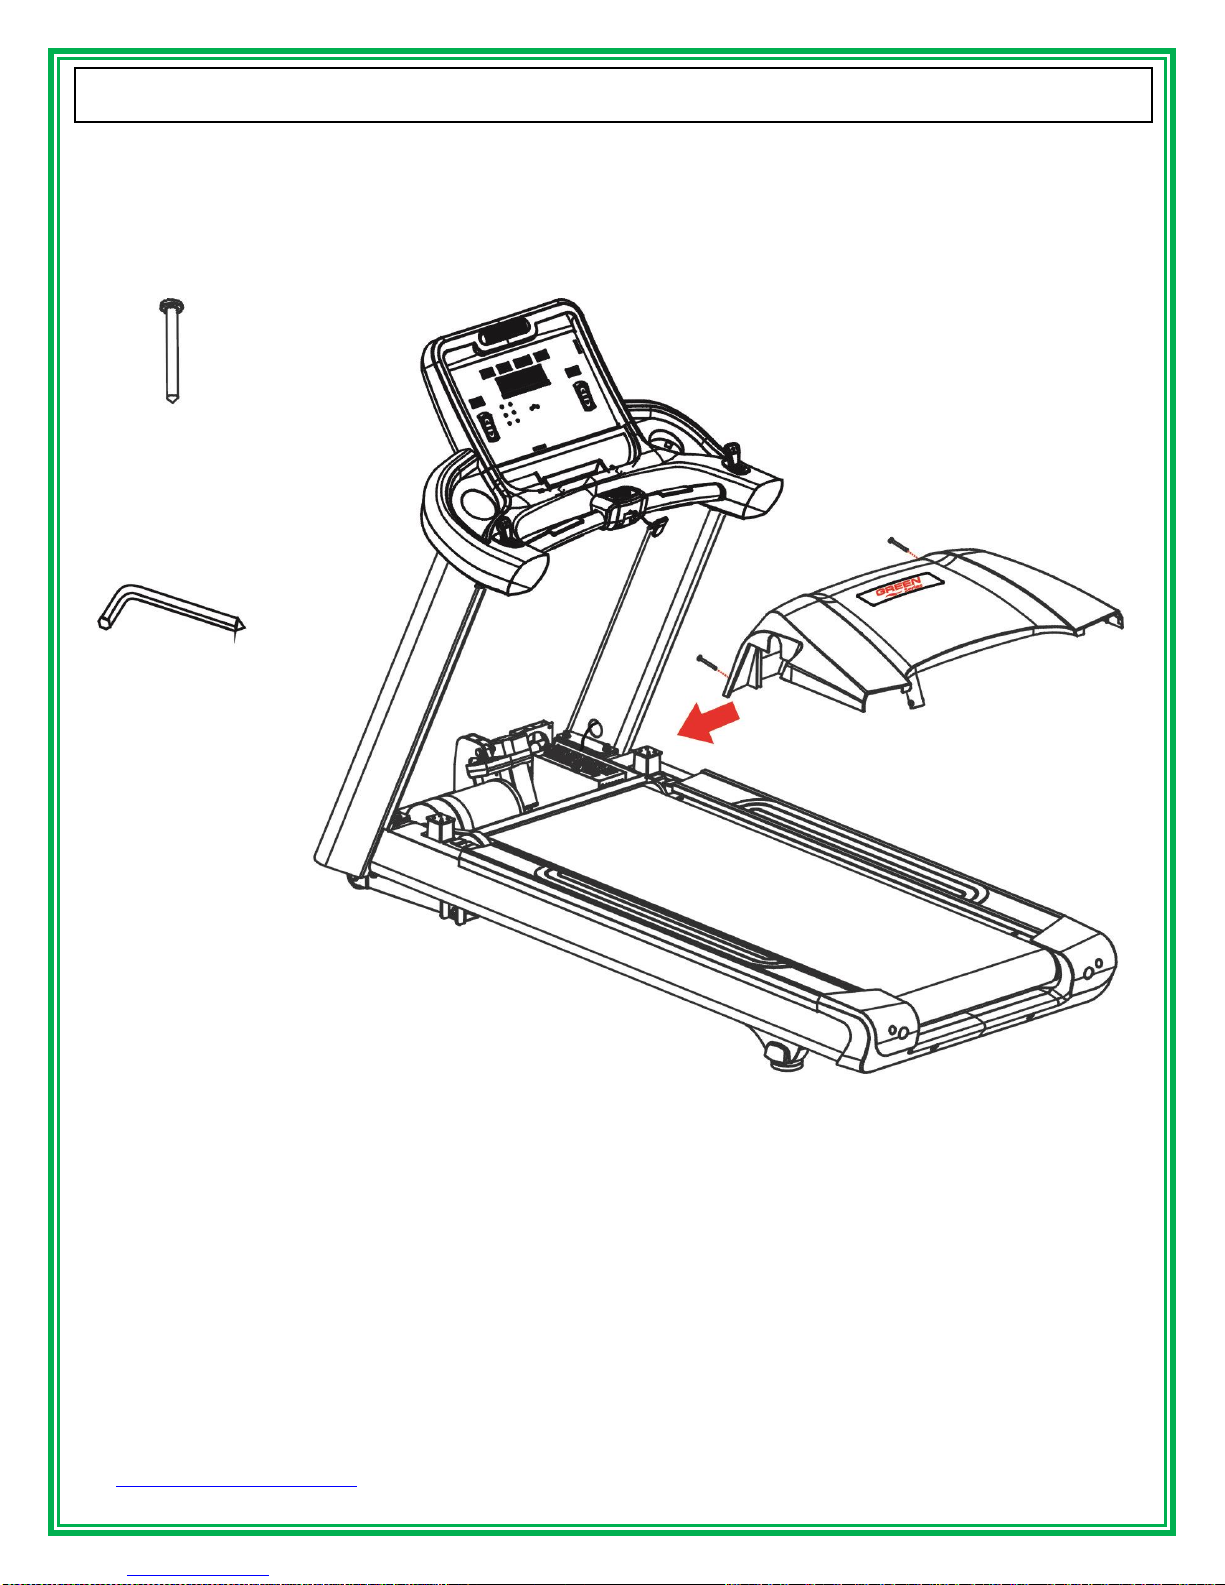
Step 5: Installing Motor Cover.
1). Using a Phillips head screw driver, tighten the (2) M5x50mm Bolts.
www.GreenSeriesFitness.com ©April 2017 all Toll free at 800-269-7130
CIR-TM8000-G Revision 1.2

17
John C. Jensen
UNPACKING & ASSEMBLY
M8x25mm
M8 washer
Allen wrench /
1pcs (6mm)
#3-7
X4
#3-11
X4
Step 6: Assemble the Handle Bars to the Console.
1). Using a 6mm Hex wrench, tighten the Console to Handle Bar with (4) M8x25mm Bolts and (4) M8
flat Washers. (Torque value should be between 210 – 230 Kgf-cm while locking up)
www.GreenSeriesFitness.com ©April 2017 all Toll free at 800-269-7130
CIR-TM8000-G Revision 1.2
18
John C. Jensen
UNPACKING & ASSEMBLY
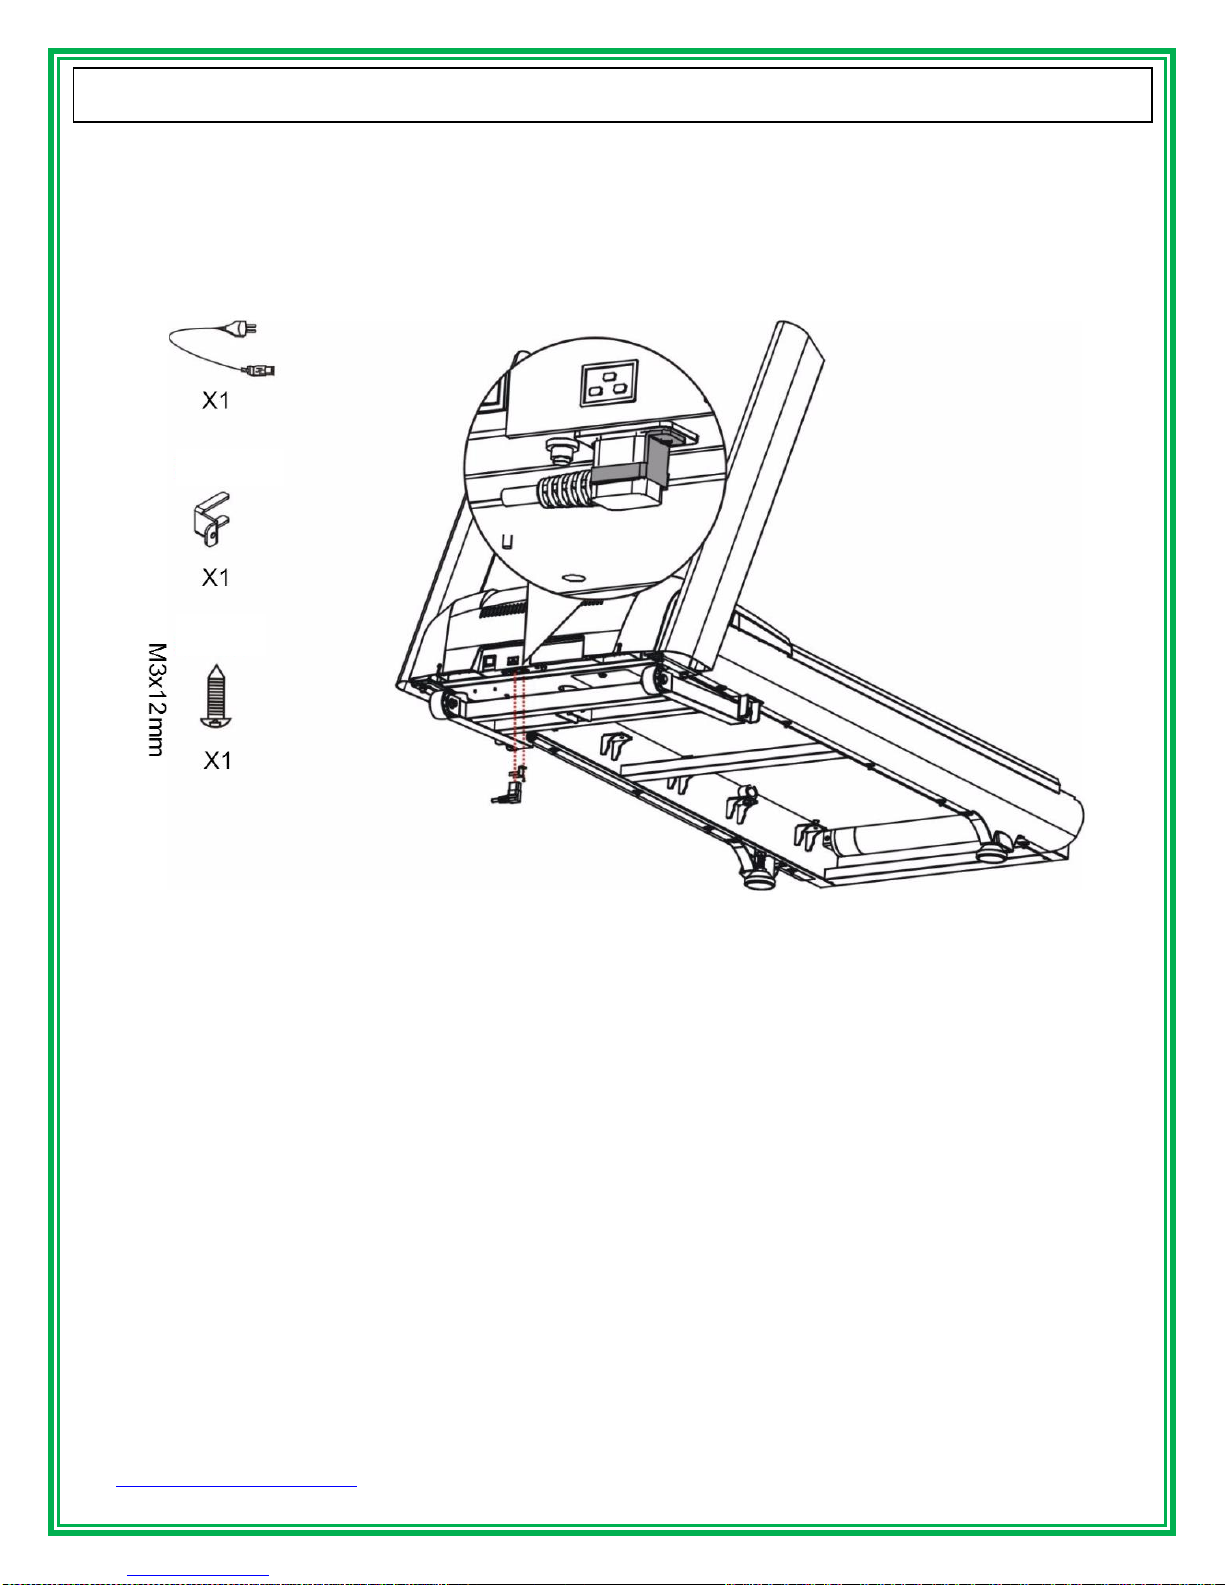
#3-13
#3-14
Step 7: Assembling power cord locker to power cord.
1). Plug in the power cord.
2). Fasten power cord and the power cord locker using the Hex wrench and (1) M3x12mm screw.
www.GreenSeriesFitness.com ©April 2017 all Toll free at 800-269-7130
CIR-TM8000-G Revision 1.2
19
John C. Jensen
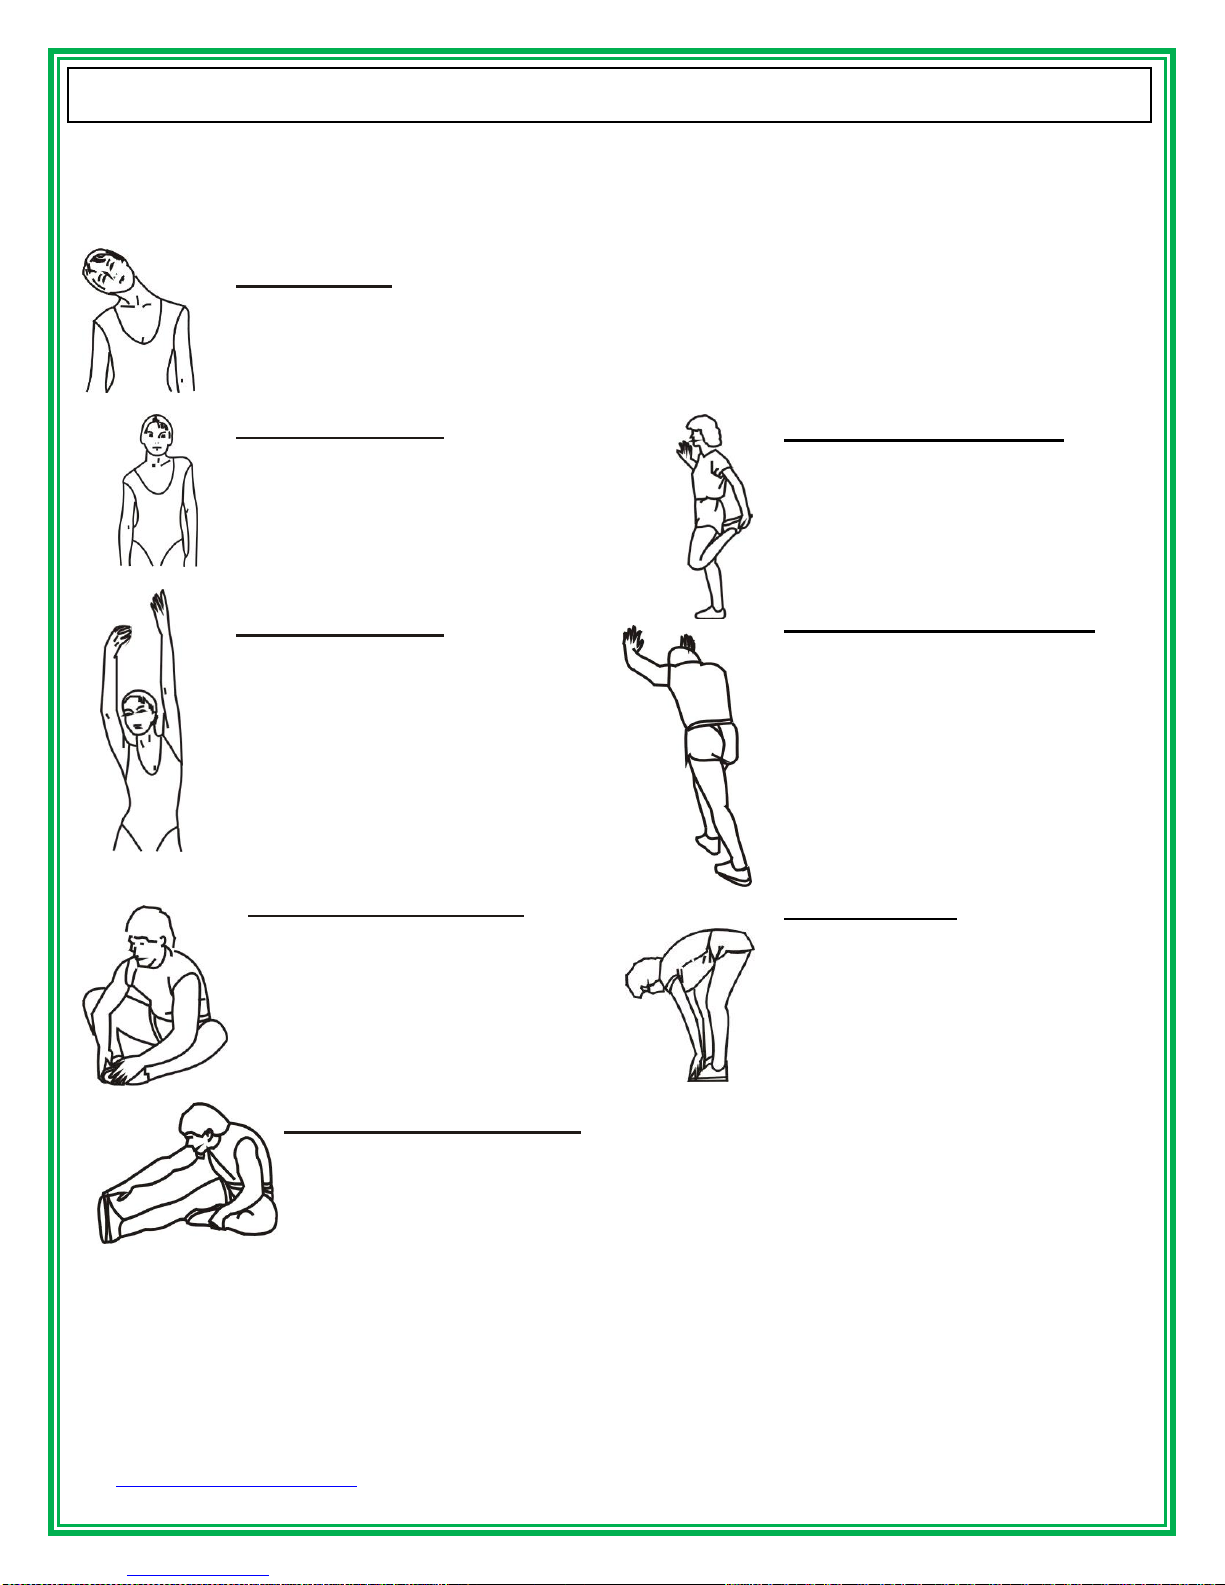
WARM UP & COOL DOWN
QUADRICEPS STRETCH
With one hand against a wall for
balance, reach behind you and pull
your right foot up. Bring your heel as
close to your buttocks as possible.
Hold for 15 seconds and repeat with
left foot up.
CALF/ACHILLES STRETCH
Step your right foot in front of your
body. Lean against a wall with your
arms and stretch your left foot
backward your body. Bend
forwards your right foot, and slightly
push your buttock toward to the
wall for 15 seconds.
Repeat the action with front left foot
and rear right foot for another 15
seconds.
TOE TOUCHES
Slowly bend forward from
your waist, letting your back
and shoulder relax as you
stretch toward your toes.
Reach down as far as you
can and hold for 15 seconds.
A successful exercise program consists of a warm up, aerobic exercise and a cool down. Warming up is an important part
of your workout, and should begin every session. It prepares your body for more strenuous exercise by heating up and
stretching out your muscles. At the end of your workout, repeat these exercises to reduce sore muscle problems. We
suggest the following warm-up and cool-down exercises:
HEAD ROLLS
Rotate your head to the right for one count, feeling the stretch up the left side of your neck. Next rotate
your head back for one count, stretching your chin to the ceiling and letting your mouth open. Rotate
your head to the left for one count, and finally, drop your head to your chest for one count.
Repeat this action for several times.
SHOULDER LIFTS
Lift your right shoulder up toward your
ear for one count. Then lift your left
shoulder up for one count as you lower
your right shoulder. Repeat this action
for several times.
SIDE STRETCHES
Open your arms to the side and
continue lifting them until they
are over your head. Reach your
right arm as far upward toward
the ceiling as you can for one
count. Feel the stretch up your
right side. Repeat this action with
your left arm.
INNER THIGH STRETCH
Sit with the soles of your feet
together with your knees pointing
outward. Pull your feet as close
into your groin as possible. Gently
push your knees toward the floor.
Hold for 15 seconds.
Repeat this action 3-5 times.
HAMSTRING STRETCHES
Keep your right leg straight and the left foot on the floor; try to stretch your right hand toward the toe,
hold this posture for 15 seconds. Relax, and then repeat the action for left leg.
www.GreenSeriesFitness.com ©April 2017 all Toll free at 800-269-7130
CIR-TM8000-G Revision 1.2
20
John C. Jensen
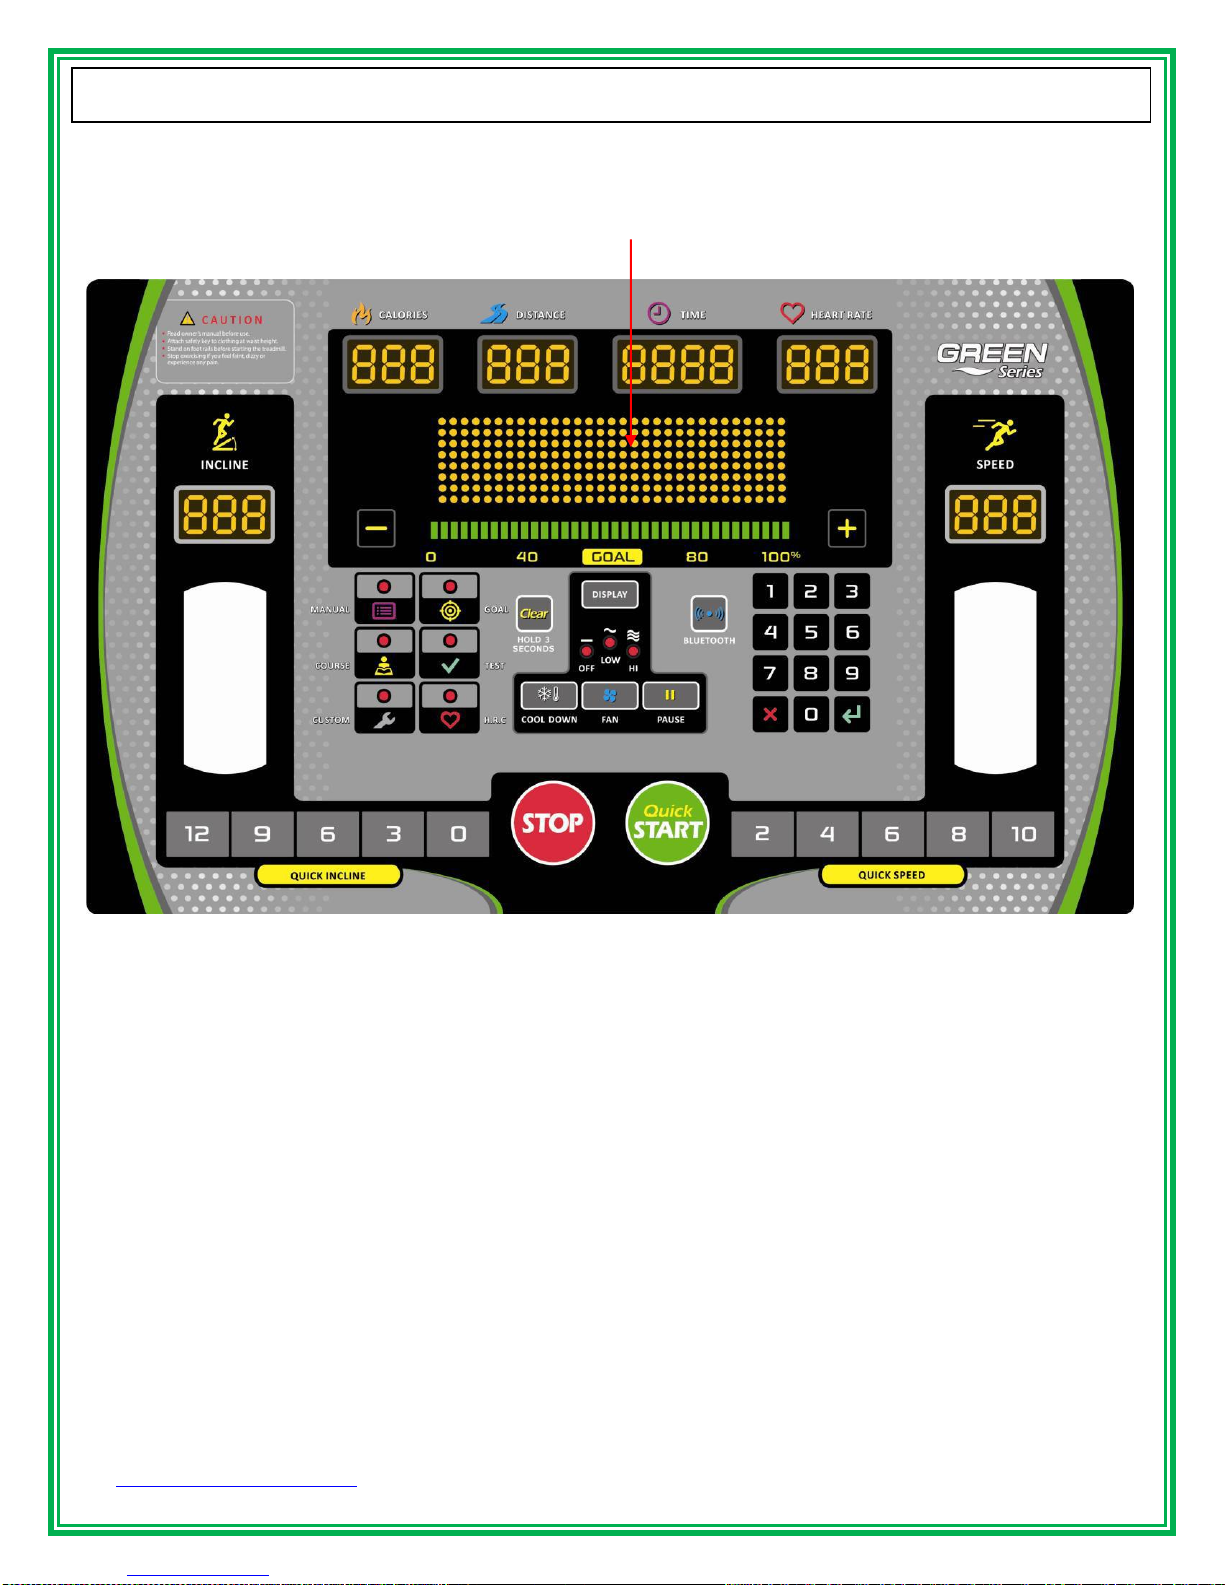
Message window, display program profiles and messages
Display and Keys
PANEL CONTROL
www.GreenSeriesFitness.com ©April 2017 all Toll free at 800-269-7130
CIR-TM8000-G Revision 1.2

21
John C. Jensen
Display
Definition
Time
Displays time remaining or total time.
Calories
Displays calories burned.
Incline
Displays current incline level.
Heart Rate
Displays hand grip and wireless Heart Rate reading.
Distance
Displays total distance KM/Mi.
Speed
Displays the running speed.
Key
Function
Start
Quick start or program start.
Stop
Press to pause when in use.
Incline▲
Adjusts the incline while in use.
Adjusts program types and program values.
Incline▼
Adjusts the incline while in use.
Adjusts program types and program values.
Keypad 0-9
Set the running speed while in use.
Set program values.
Rest / Clear
Clear the setting value while setting.
Enter
Confirm value entered.
Speed┼
Adjusts the speed while in use.
Adjusts program types and program values.
Speed ─
Adjusts the speed while in use.
Adjusts program types and program values.
Quick Speed
Adjusts speed to a predetermined value.
There are 4 speed quick keys.
Quick Incline
Adjusts incline to a predetermined value.
There are 4 incline quick keys.
Cool Down
Program will gradually lower the speed.
Program keys
Select program directly.
Bluetooth
Turn on the Bluetooth function and search for the device to connect
with App.
Clear
Hold 3 second to Clear
Display Function
Key function
PANEL CONTROL
Bluetooth Connect with FitGoal
1. Download and install the application FitGoal via Google Play.
2. Press BLUETOOTH button on the console, it will show the module name which is S/N: T-XXXX-XXXX.
3. Turn ON Bluetooth and FitGoal on your mobile phone, press the START button on FitGoal, it will display the Bluetooth
devices which have been searched. Select the name which is a match to the module name on console (S/N:
T-XXXX-XXXX).
4. It will show BT CONNECTED on the console if connecting successfully. Press the START button once again on FitGoal
and it will show “please press the button on the treadmill to start”. You may select the programs or directly press the
GO button on console to start.
5. The records will automatically be saved in Fit Goal when you press the STOP button on console.
www.GreenSeriesFitness.com ©April 2017 all Toll free at 800-269-7130
CIR-TM8000-G Revision 1.2
22
John C. Jensen
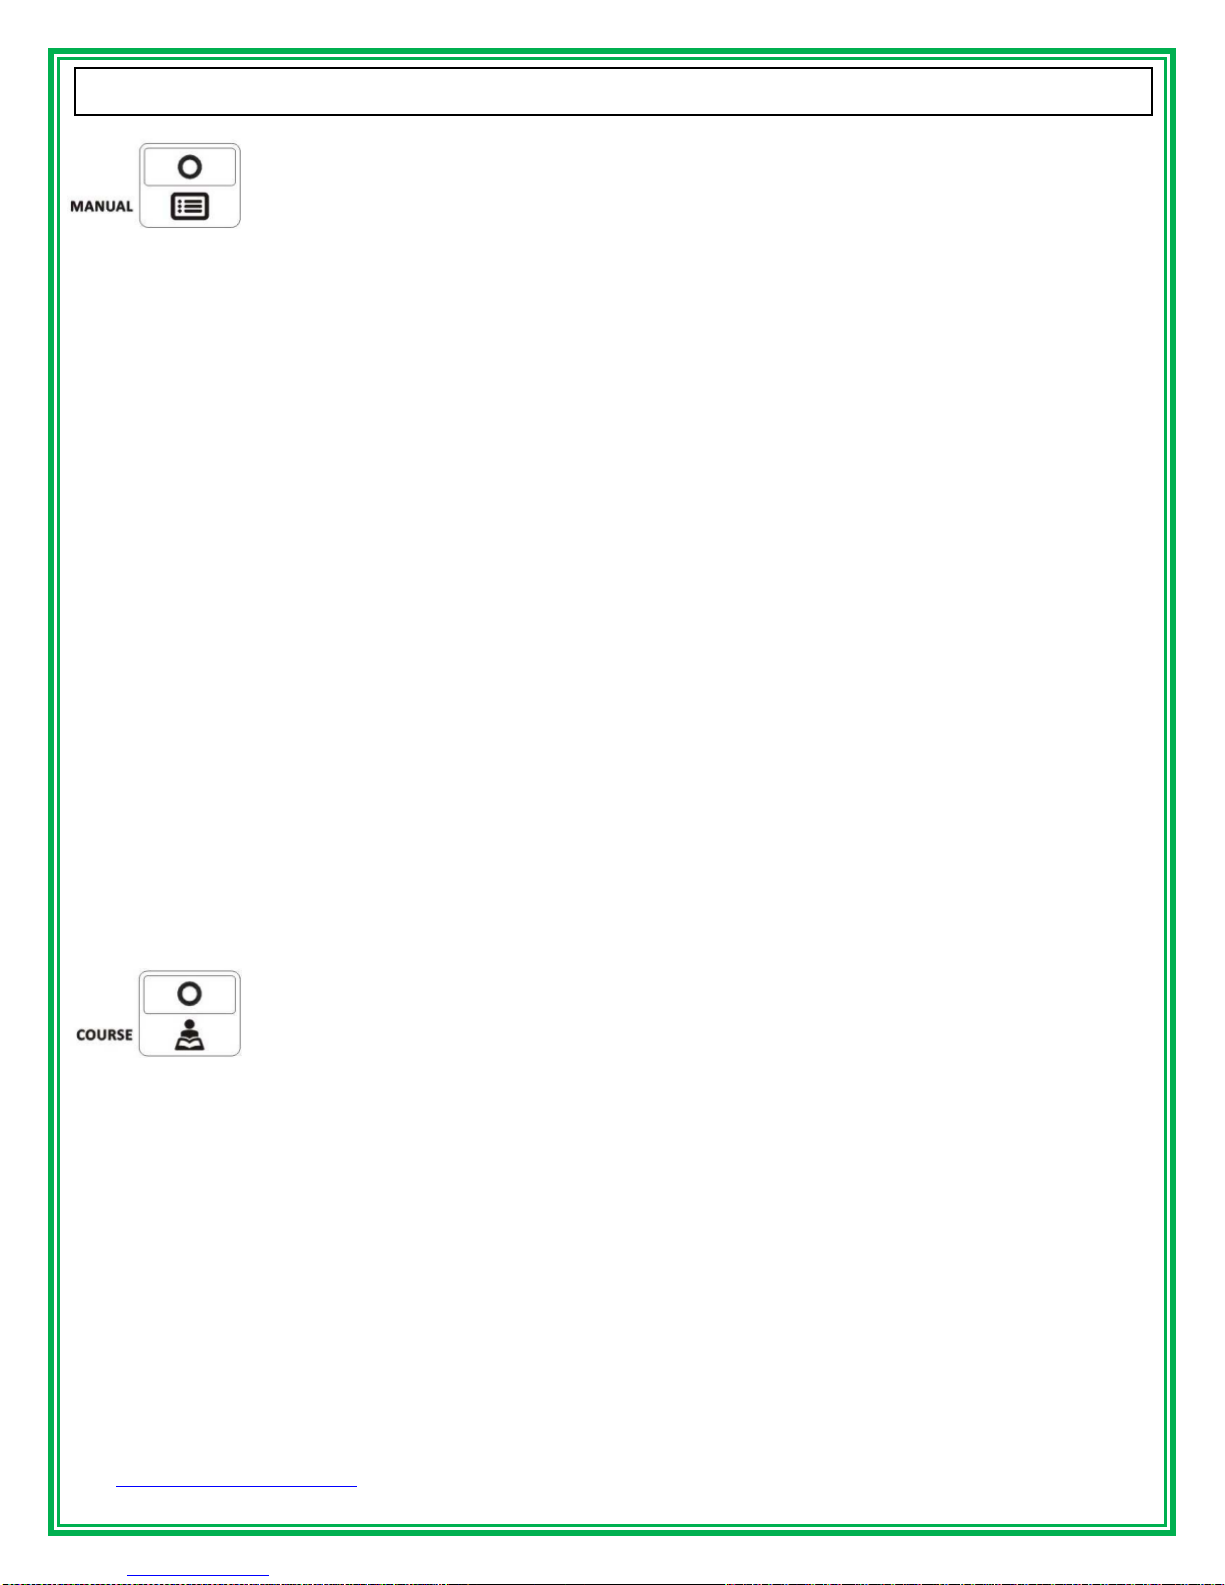
PROGRAMS
1.1. Press Manual to enter Setting mode. Time will display as “’0:00”, Distance as “0.0”, Speed as “0.0”, Incline
as “0.0”, and Calories as “0”. Heartrate, if entered, will display “- - -“, while the manual indicator will be lit up
and the Goal Bar indicator will be off.
1.2. Set Time: The Time display will display “0:00” flashing. Press once to interrupt flashing. The window will
then display SET TIME 16:00-99:00 THEN PRESS ENTER.
1.3. The time can be set using the key pad. The setting ranges are 0:00 - 16: 00 and 17: 00 - 99: 00. The
minimum set time is 16:00, the maximum set time is 99:00. When finished, press ENTER to proceed to
the next setting.
1.4. When using the "Speed Fast", "Speed Slow", "Incline Up," "Incline Down" functions, their values will
change by increments of 1:00. All minimum set values are 0:00, except the minimum set time value which
is 16:00. The maximum set time value is 99:00. When finished, press ENTER to proceed to the next
setting.
1.5. Set User Weight: Time window will display Set Weight flashing. Press the button to interrupt flashing. The
window will display SET WEIGHT THEN PRESS ENTER. Use key pad to input settings directly, or use
"Speed Fast", "Speed Slow", "Incline Up", "Incline Down" to change settings by increments of 0.1kg /
1Lb. When finished, press ENTER. The window will display PRESS GO TO BEGIN OR ENTER TO
RESET. Press ENTER again to return to 1.2 or press RUN to start your program.
1.6 Press RUN. The window will display 3 → 2 → 1 → GO and the buzzer will beep three times. All values
will start accumulating in the Execution Mode. The preset Speed is 0.8 KPH / 0.5 MPH, Incline is preset as
0.
1.7. The window is preset at Program Profile Mode. Each Bar displays at its minimum value. The graphics will
change along with the changes in the incline. Your position is displayed once every half second. You can
use any interface to adjust Speed and Incline.
1.8. When setting the time, Time / 32 will change the Bar, and the incline value will change. The Bar behind it
will change. Previous Bars will be saved, up to a maximum of 32.
1.9. When there is no set time, the program will change after every minute. When the incline changes, the bar
behind it will change. Previous Bars will be saved. When more than 32 Bars have been saved, only
the last one will be executed, and all Bars will move forward by one Bar each time.
1.10. When the time count-down is completed, the buzzer beeps three times to indicate that the program is
finished. Press END OFF WORKOUT to exit.
2.1. Press COURSE to access program selection. The window will display 1. HILL, 2. FATBURN, 3.CARDIO,
4. STRENGTH, 5. INTERVAL streaming. This is the Setting Mode.
2.2. Select Program: Use key pad to select Program 1 - 5 (No need to press enter. Input out of the 1-5 range
will be ignored.)
2.3. Set Level: the window will display SET LEVEL 1 TO 7 THEN PRESS ENTER once, after which it will
display the Profile L3 graphics. The Time window will display L3. Use the key pad to input settings directly
(if setting is out of range, the setting will return to the preset value, the window will again display SET
LEVEL 1 TO 7 THEN PRESS ENTER and display the Profile L3 graphics). Alternatively, to set Speed
Fast, Speed Slow, Incline Up, Incline Down, select a level from L1 - L7. The Level value will change,
and the Profile graphics will change. When finished, press ENTER to proceed to the next setting.
2.4. Set Time: Time window displays 32:00 flashing. Press the button to interrupt flashing. The window will
display SET TIME 16: 00 - 99: 00 THEN PRESS ENTER. Use key pad to input settings directly, or use
Speed Fast, Speed Slow, Incline Up, Incline Down. The minimum set time is 16:00, the maximum set
time is 99:00. When finished, press ENTER to proceed to the next setting.
www.GreenSeriesFitness.com ©April 2017 all Toll free at 800-269-7130
CIR-TM8000-G Revision 1.2

23
John C. Jensen
PROGRAMS
2.5 Set User Weight: Time window displays Preset Weight flashing. Press the button to interrupt flashing. The
window will display SET WEIGHT THEN PRESS ENTER. Use the key pad to input settings directly (if
setting is out of range, the setting will return to the preset value). Alternatively, set Speed Fast, Speed
Slow, Incline Up, Incline Down by increments of 0.1kg / 1Lb. When finished, press ENTER. The
window will display PRESS GO TO BEGIN OR ENTER TO RESET. Press ENTER again to return to 2.1
or press RUN to start your program.
2.6. Press RUN. The window will display 3 → 2 → 1 → GO and the buzzer will beep three times. All values
will start accumulating in the Execution Mode.
2.7. The program is executed according to SPEED and INCLINE as defined in the following table.
2.8. The window display Profile graphics. The execution values will flash every half second. On all devices
SPEED and INCLINE can be adjusted, and the Profile graphics and bar will not change.
2.9 When count-down is completed, the buzzer beeps three times to indicate the program is finished. Press
END OFF WORKOUT Mode to exit.
www.GreenSeriesFitness.com ©April 2017 all Toll free at 800-269-7130
CIR-TM8000-G Revision 1.2

24
John C. Jensen
PROGRAMS
L1
L2
L3
L4
L5
L6
L7
SEG
Speed
Incline
Incline
Incline
Incline
Incline
Incline
Incline
1
100 0 0 0 0 1 1
1 2 100 0 0 1 1 2 2
2 3 95 1 1 2 2 3 3
3 4 95 1 1 2 3 3 4
4 5 90 2 2 3 3 4 4
4 6 90 2 2 3 3 4 4
5
7
90 2 2 3 4 4 5
5
8
85 3 3 4 4 5 5
5 9 85 3 3 4 4 5 5
6
10
80 3 4 5 5 6 6
6
11
80 3 4 5 5 6 6
7
12
80 4 4 5 6 6 6
7
13
75 4 5 6 6 7 7
7
14
75 4 5 6 7 7 7
8
15
75 5 5 6 7 8 8
9
16
70 5 6 7 7 8 9
10
17
70 5 6 7 7 8 9
9
18
75 5 5 6 7 8 8
8
19
75 4 5 6 7 7 7
7
20
75 4 5 6 6 7 7
7
21
80 4 4 5 6 6 6 7 22
80 3 4 5 5 6 6 6 23
80 3 4 5 5 6 6 6 24
85 3 3 4 4 5 5 6 25
85 3 3 4 4 5 5 5 26
90 2 2 3 3 4 5
5
27
90 2 2 3 3 4 4 5 28
90 2 2 3 3 4 4 4 29
95 1 1 2 2 3 4 4 30
95 1 1 2 2 3 3
3
31
90 0 0 1 1 2 2
2
32
90 0 0 0 0 1 1
1
Hill Program Profile(SPEED in %)
100% SpeedL1=6kph/3.7mph, L2=7kph/4.3mph, L3=7kph/4.3mph, L4=8kph/5mph, L5=8kph/5mph, L6=9kph/5.6mph,
L7=10kph/6.2mph
www.GreenSeriesFitness.com ©April 2017 all Toll free at 800-269-7130
CIR-TM8000-G Revision 1.2

25
John C. Jensen
L1
L2
L3
L4
L5
L6
L7
SEG
Speed
Incline
Incline
Incline
Incline
Incline
Incline
Incline
1
100 0 0 0 1 1 1
1
2
95 1 1 1 2 2 2
2
3
90 1 1 2 3 3 3
3
4
85 1 2 3 3 4 4
4
5
85 2 2 3 4 4 4
5
6
75 2 3 3 4 4 4
5
7
75 3 3 4 4 4 5
6
8
75 3 3 4 4 4 5
6
9
75 3 3 4 4 5 5
6
10
75 3 4 4 5 5 5
6
11
75 4 4 5 6 6 6
7
12
70 4 4 5 6 6 6
7
13
70 4 5 5 6 6 7
7
14
70 4 5 5 6 7 7
7
15
70 4 5 6 7 7 8
8
16
70 4 5 6 7 7 8
8
17
70 4 5 6 7 8 8
8
18
70 4 5 6 7 8 8
8
19
70 4 5 6 7 8 8
8
20
70 4 5 6 7 8 8
8
21
70 4 5 6 7 8 8
8
22
70 4 5 6 7 8 9
9
23
70 4 5 6 7 8 9
10
24
70 4 5 6 7 8 9
10
25
70 4 5 6 7 8 9
10
26
70 4 5 6 7 8 9
10
27
70 4 5 6 6 7 8
8
28
75 3 4 5 5 6 7
7
29
80 3 3 4 4 4 5
5
30
80 2 2 3 3 3 4
1
31
85 1 1 2 2 2 2
1
32
85 0 0 1 1 1 1
0
PROGRAMS
Fat Burn Program Profile(SPEED in %)
SpeedL1=6kph/3.7mph, L2=7kph/4.3mph, L3=7kph/4.3mph, L4=8kph/5mph, L5=8kph/5mph, L6=9kph/5.6mph,
L7=10kph/6.2mph
www.GreenSeriesFitness.com ©April 2017 all Toll free at 800-269-7130
CIR-TM8000-G Revision 1.2
 Loading...