

Green Packet Berhad UT235 GP User Manual
Device Indication
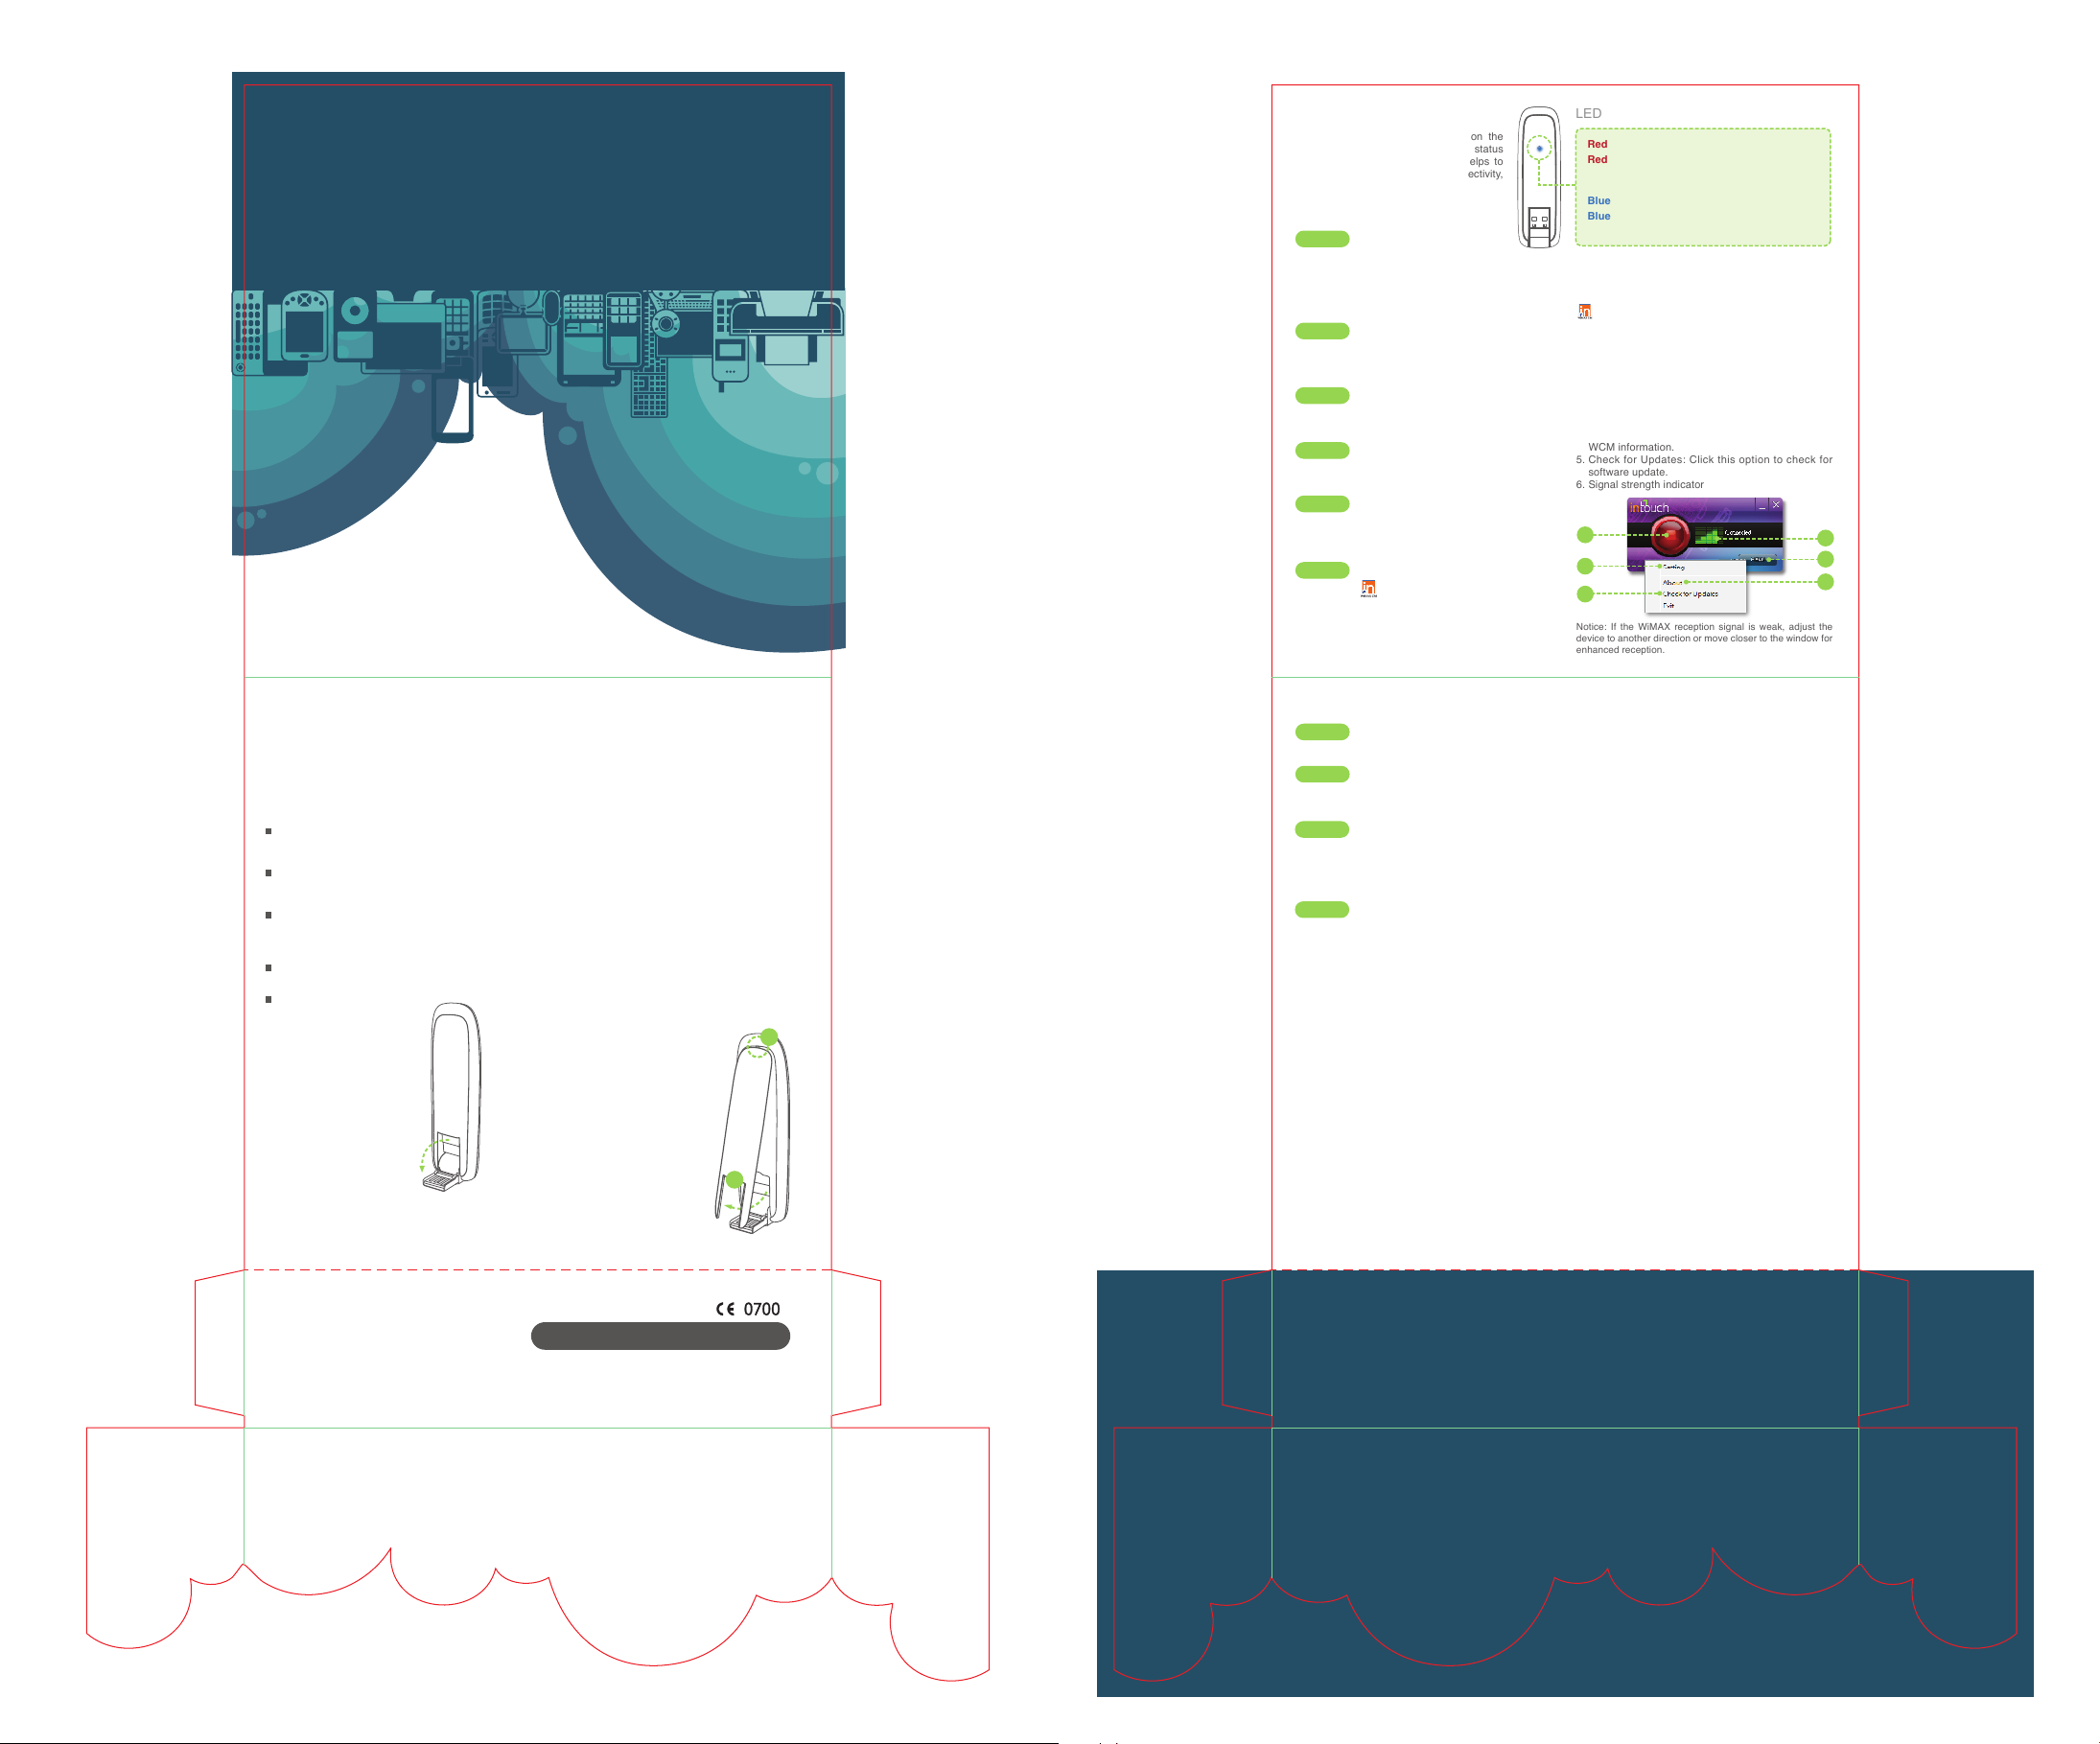
The device has a two-color LED, on the
front side, to indicati ng the oper ating status
of the device. The LED indicator helps to
determine the power statu s, connectiv ity,
and operation s of the dev ice.
Software Installation
Step 1
Once the devi ce is connec ted to the l aptop
/PC, the Auto-Inst allation pro gram will sta rt running.
If user s are operating o n Windo ws 7, plea se select
the “Run SetupLoad er.exe” to proceed when being
prompted with the AutoPlay dia log box.
Step 2
When seeing the Software License Agreement, please
select “I accept the terms in the license agree ment.”
Then, click “ Next” to con tinue.
Step 3
Select the setup type you need and click “Next” to
begin install ation.
Step 4
It may take a few of minutes to the installation proce ss
to complete.
Step 5
When the installation wizard is displayed indicating
the inst allation has successfully comple ted, se lect
“Finish” to c omplete.
Step 6
Now, a WCM icon will be displayed on the desktop.
Users can dou ble click th e icon to ge t started.
Notice: The Auto-Connect opt ion is enabled by default;
users are able to connect to the Internet automatically when
the system sta rts.
LED Status Description
Red / On
Red / Blinkin g
Blue / On
Blue / Blinki ng
If you r WiMA X Con nectio n Man age r does laun ched
aut omatic ally, g o to
Start > AII Programs > WiMAX Conn ection Manage r >
WiMA X or dou ble- clic k th e Wi MAX Conn ecti on M anag er
icon on the desktop.
If the WCM has b een minimized t o the system tr ay, click on
the icon to re store it.
- Power ON
- Detecting s ignal/whethe r the
device is o ut of WiMAX service
coverage
- WiMAX detec ted
- Connected t o WiMAX /
Transmitting or receiving da ta
WiMAX Connection Manager
User Interface
1. Connect / Disconnect
2. Click the Menu to disp lay the WCM functions
3. Setting: C lick this op tion to see configuration s
4. Abou t: C lic k t his opt ion to see the inf orm ati on o n
WCM infor mation.
5. Che ck for Up date s: Clic k t his op tio n t o ch eck fo r
software update.
6. Signal str ength indica tor
1
3
5
Notice: If the WiMAX reception si gnal is weak, adjust the
device to another dire ction or move closer to th e window for
enhanced recep tion.
6
2
4
Declaration of Conformity
We, Green Packet Berhad, Taiwan,
Addres s: 6F., No. 2 1, Lane 5 83, Rueig uang Rd., Neihu Dis trict,
Taipei City, Taiwan (R.O.C.)
Declare under our own responsibility that the product:
Model: UT-350
Intended use: WiMAX USB Dongle
Complies with the essential requirements of Article 3 of the R&TTE
1999/5/EC Directive, if used for its intended use and that the following
standards have been applied:
1.Health (Article 3.1(a) of the R&TTE Directive)
EN 62311: 2008 AND IN ACCORDANCE WITH THE PROCEDURE
GIVEN IN STANDARD EN 62209-2:2010.
2.Safety (Article 3.1(a) of the R&TTE Directive)
Applied Standard(s):
EN 60950-1: 2006+A11: 2009
3.Electromagnetic compatibility
(Article 3.1 (b) of the R&TTE Directive)
Applied Standard(s):
EN 301 489-1 V1.8.1 (2008-04),
AND EN 301 489-17 V2.1.1 (2009-05).
4.Radio frequency spectrum usage
(Article 3.2 of the R&TTE Directive)
Applied Standard(s):
EN 302 623 V1.1.1
5.EMC Directive (2004/108 /EC)
Applied Standard(s):
EN 55024: 1998/A1: 2001/A2:2003.
All the re ports of the appli ed sta ndards
have the Positive Opinion of Notified Body:
PHO NEIX TEST LAB, Köni gswin kel 10
D-32825 Blomberg, Germany
Identification mark: 0700 (Notified Body) CE
The technical documentation relevant to the
above equipment will be held at:
Green Packet Berhad, Taiwan 6F., No. 21,
Lane 583, Rueiguang Rd. , Neihu Distri ct,
Taipei City, Taiwan (R.O.C.)
Flip out
USB Connector
Flip out the USB connector and insert your
USB dongle into the computer via the USB
port as shown above.
FCC Regulations:
15.19(a)(3):
This device complies with part 15 of the FCC Rules. Operation is subject
to the followi ng two conditions: (1) Th is device may not cause harmful
interference, and (2) this device must accept any inter ference received,
including interference that may cause undesired operation.
15.105(b):
NOTE: This equipment has bee n tested and fou nd to comply wit h the
limits for a Class B digital device, pursuant to part 15 of the FCC Rules.
These limits are designed to provide reasonable protection against harmful
interference in a residential installation.
This equipment generates, uses and can radiate radio frequency energy
and, if not in stalled and used in acc ordance with the instruc tions, may
cause harmful interference t o radio communications. However, there is
no guarantee that interference will not occur in a particular installation.
If this equipment does c ause harmful interference to radio or te levision
reception, which can be determined by turning the equipment off and on,
the user is encouraged to try to correct t he interference by one or more
of the following measures:
—Reorient or relocate the receiving antenna.
—Increase the separation between the equipment and receiver.
—Connect the equipment into an outlet on a circuit different from that to
which the receiver is connected.
—Consult the dealer or an experienced radio/ TV technician for help.
How to Change the Front Panel
Step 1
With the USB connector flipped out,
remove the fr ont pa nel fr om Spo t 2.
Step 2
Place another front panel at Spot 1,
and gently press the panel until the
click is heard.
Step 3
Make sure the front panel is tightly
fastened onto the device body before
proceeding.
Notice : 1) Plea se consult local se rvice
provid ers or operators for extra front
panel availabilit y. 2) With the n ature of
being frag ile, pleas e handle the front
panel with cautio n.
1
2
Software Upgrade
Step 1
From the “Men u,” select “ Check for Up dates.”
Step 2
Click “Yes,” and then clic k “Next” to star t software
updating.
Step 3
When “Set up-My Pr ogram” d ialogue i s displa yed,
users may choose a different to in stall the software
upgrade. Othe rwise, the d efault direc tory will be used.
Then, click “ Next” to pro ceed.
5
Step 4
Users can click “Finish” when “Completing My Program
Setup Wizard” is displaye d.
Notice: Green Packet will be launching over-the-air device
software service in near future. Please consult local distributors
or service operators or visit Green Packet website frequently to
receive the update-to-date information.
Troubleshooting
LED does not light up when the device is connected
Q1:
to the Laptop /PC.
- Check th e USB por t to make sure the USB dongl e is
securely connect ed to the laptop. Or, use another USB
port and try again.
LED does not blink when the device is connected
Q2:
to the Intouc h Connection Manager.
- When the device is connected to the laptop/PC for the
first time, the Into uch Connect ion Manage r will be
installed. B y then, th e LED shou ld blink i n RED; if not,
please cont act lo cal d istri butors or s ervic e oper ators .
Auto-installat ion does not work when the dev ice is
Q3:
connected to the laptop/P C for the fi rst time.
- Make sur e th e au to-run feature is not disabled from
the laptop/PC . Alternatively, locate t he WiMAX
installation file at ''WiMAX CD" from "My Computer."
Double-click the file to proceed with the installation
process.
Unable to co nnect to the W iMAX net work or
Q4:
Internet with th e device being se curely connected to
the laptop/PC .
- Check the signal strengt h to make sure it is still within
the WiMAX service cover age. Also, ensure the Intouch
Connection Manage r is properly started. If the problem
still persists , please contact local distribu tors or
service opera tors.
Device Safety Notice
- The operating temp erature is 0℃~40 ℃; do not store
the device in ex tremely high or cold temperatu re. High
temperatures can shorten the life of electronic devices,
damage batteries, and warp or mel t certain plastics
parts. When the device has been warmed up to its
normal temperat ure from code tempe ratures, moistu re
can form inside s the devices and damage elec tronic
circuit board s.
- Always keep th e device dry. Precipitati on, humidity,
and all types of liquids or moisture contain the minerals
that corrode electronic c ircuits.
- The device and any of it s accessories sh ould be kept
away from chi ldren.
- Do not use or store the device in dusty, dirty areas. Its
moving parts and ele ctronic components can be
damaged.
- Do not attempt to open the device other than as
instructed in this guide.
- Do not drop, knock, or shake the device . Rough
handing can break in ternal circ uit boards and fine
mechanics.
- Do not use an y chemicals, cleaning sol vents, or
strong detergents to cl ean the device. Only use soft,
clean and dry cloth to cl ean the devi ce surface.
- Be sure to update the device software at regular
basis for opt imized perfo rmance.
Note:Users have to use the connection to USB interfaces
with USB 2.0 version or hig her.
Changes or modifications not expressly approved by the party
responsible for compl iance could void the user's auth ority to
operate the equipment.
XXX.XXXXX.XXX
RF Exposure Information (SAR)
This device me ets the government’s re quirements for exposure to
radio waves. This device is designed and manufactured not to exceed
the emission limits for exposure to radio frequency (RF) energy set
by the Federal Communications Commission of the U.S. Government.
The exposure standard for wireless mobile devices employs a unit of
measurement known as the Specific Absorption Rate, or SAR. The
SAR limit set by the FCC is 1.6W/kg. *Tests for SAR are conducted
using stan dard operating positions accept ed by the FCC w ith the
device tran smitting at its h ighest certified p ower level in all tested
frequency bands. Although the SAR is determin ed at the highes t
certified power level, the actual SAR level of the device while operating
can be well below the maximum value.
This is because the device is designed to operate at multiple power
levels so as to use only the poser required to reach the network.
In general, the closer you are to a wireless base station antenna, the
lower the power output.
The highest SAR value for the device as reported to the FCC when
tested for use when worn on the body, as described in this user guide,
is 0.915 W/kg. (Body-worn measurements differ among device models,
depending upon available accessories and FCC requirements.)
While there may be di fferences between the SAR levels of v arious
devic es and a t variou s positi ons, the y all me et the g overnmen t
requirement.
The FCC has granted an Equipment Authorization for this device with
all reported SAR levels evaluated as in compliance with the FCC RF
exposure guidelines . SAR information on this devi ce is on file with
the FCC an d can be fo und un der th e Disp lay G rant s ection of
www.fcc.gov/oet/ea/fccid/ after searching on FCC ID: W9V-UT235-GP.
This device is compliance with SAR for general population /uncontrolled
exposure limits in ANSI/IEE E C95.1-1999 a nd had been tes ted in
accordance with the measurement methods and procedures specified
in OET Bulletin 65 Supplement C.
For body worn operation, this device has been tested and meets the
FCC RF exposure guidelines for use with an accessory that contains
no metal an d the positions t he handset a minim um of 0.5 cm from
the body. Use of other accessories may not ensure compliance with
FCC RF exposure guidelines.
 Loading...