

Green Mountain Audio Calypso Owners manual

Calypso
Happy Ears for Life™ Ownership Guide
UNPACKING & CONNECTING
M
Receiving, inspecting,
unpacking, connecting
Initial receipt. You'll receive two shipping cartons.
Take the time to inspect each for damage, looking
specifically for signs of impacts and punctures. If none
are present, proceed while alert for damage as you
begin to unpack them. Look and listen for any rattles,
cracks, and chips. If damage is discovered, first contact
the shipper and then either your Retailer or the Factory.
The shipping-label side of each carton is the front of the
speaker. Mark each piece of packing material in terms
of 'front,' 'back,’ ‘top,’ or ‘bottom.’ The custom-made
shipping materials may be stored in a dry place. The
cartons may be flattened. Plan to keep the custom
packaging -- it’ll be very expensive to replace. It’s also a
good idea to buy ‘replacement cost’ insurance to
protect your speaker investment.
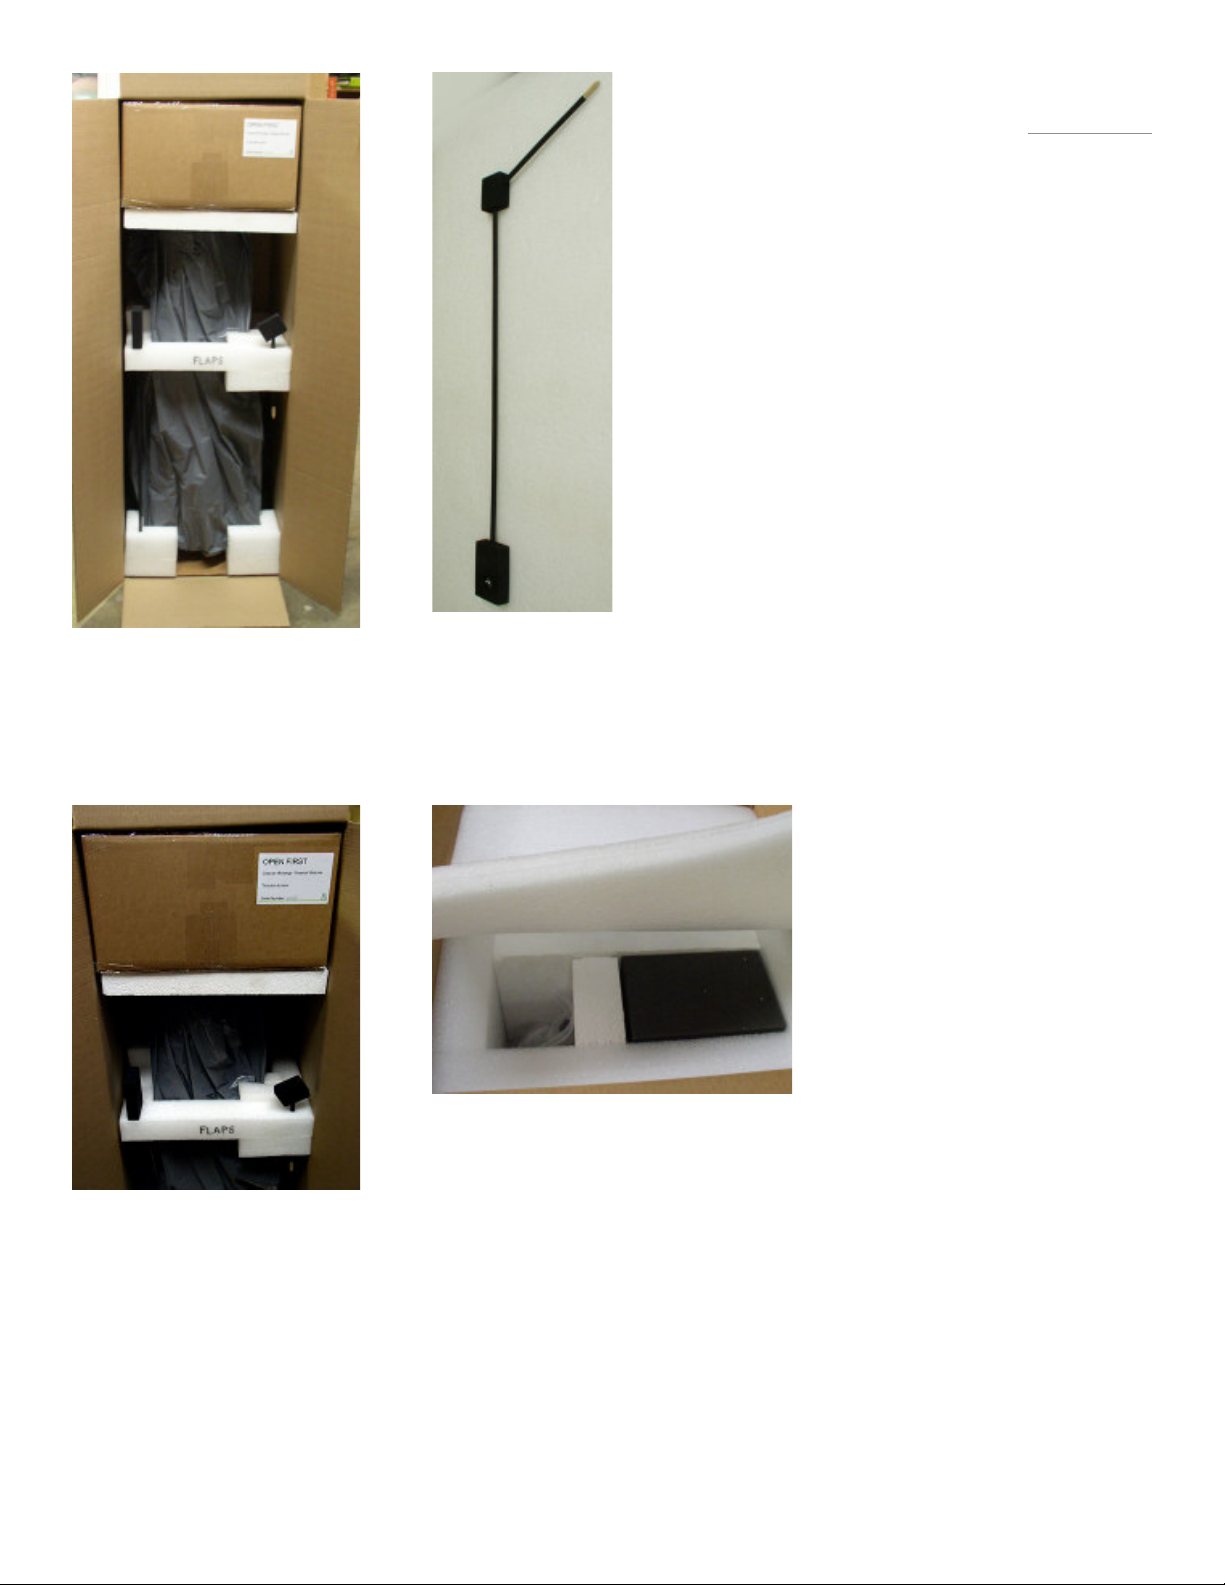
Photo #1
Although the shipping carton is upright
in this photo, you’ll want to lay it on its
back during the unpacking stage. This is
what you’ll see when you open the
carton flaps.
Photo #3
Remove this internal box from the
shipping carton. It contains the
midrange and tweeter modules.
Photo #2
Next, remove the
Earsticks. You may
connect them and set
them aside for now.
Photo #4
Open its flaps. Remove the large piece of
foam. Set aside the accessory pouch.
Process overview. While you can perform these
steps alone, it would be helpful to have a partner. You’ll
first unpack and place the ‘master’ woofer cabinet and
then lay it on its side to install the cone feet and wires
from your amplifier. At that point we hope you’ve
positioned the cabinet in the general area -- if not the
final location -- of where you want it
within your listening environment.
For this reason, we’ve included our
“Equal-Legged T” guidelines up
front because it’ll be easier to install
the midrange and tweeter modules
with the cabinet in place. (Those
same guidelines also appear later
on.) Once the first speaker is
finished, you’ll repeat this process
for its mate.
1) The Calypso will have a higher
center of gravity once the midrange
and tweeter are installed; and 2)
NEVER grab either the midrange or
tweeter to move the speaker.
Remember two rules:
Unpacking the Calypso. Lay the carton marked ‘Open First’ on its back,
label-side up. Open it. You’ll see the woofer cabinet and another carton on top
(Photo #1). First remove the Earsticks at the middle of the carton (Photo #2).
Then remove the midrange / tweeter carton (Photo #3) -- open its top flaps and
remove the large rectangle of foam as well as the accessory pouch (Photo #4).
FOLLOW EXACTLY -- NO SHORTCUTS:
Preparing the woofer cabinet. Stand the carton upright and slide out the
woofer cabinet with one hand around the mid-section and the other at the base
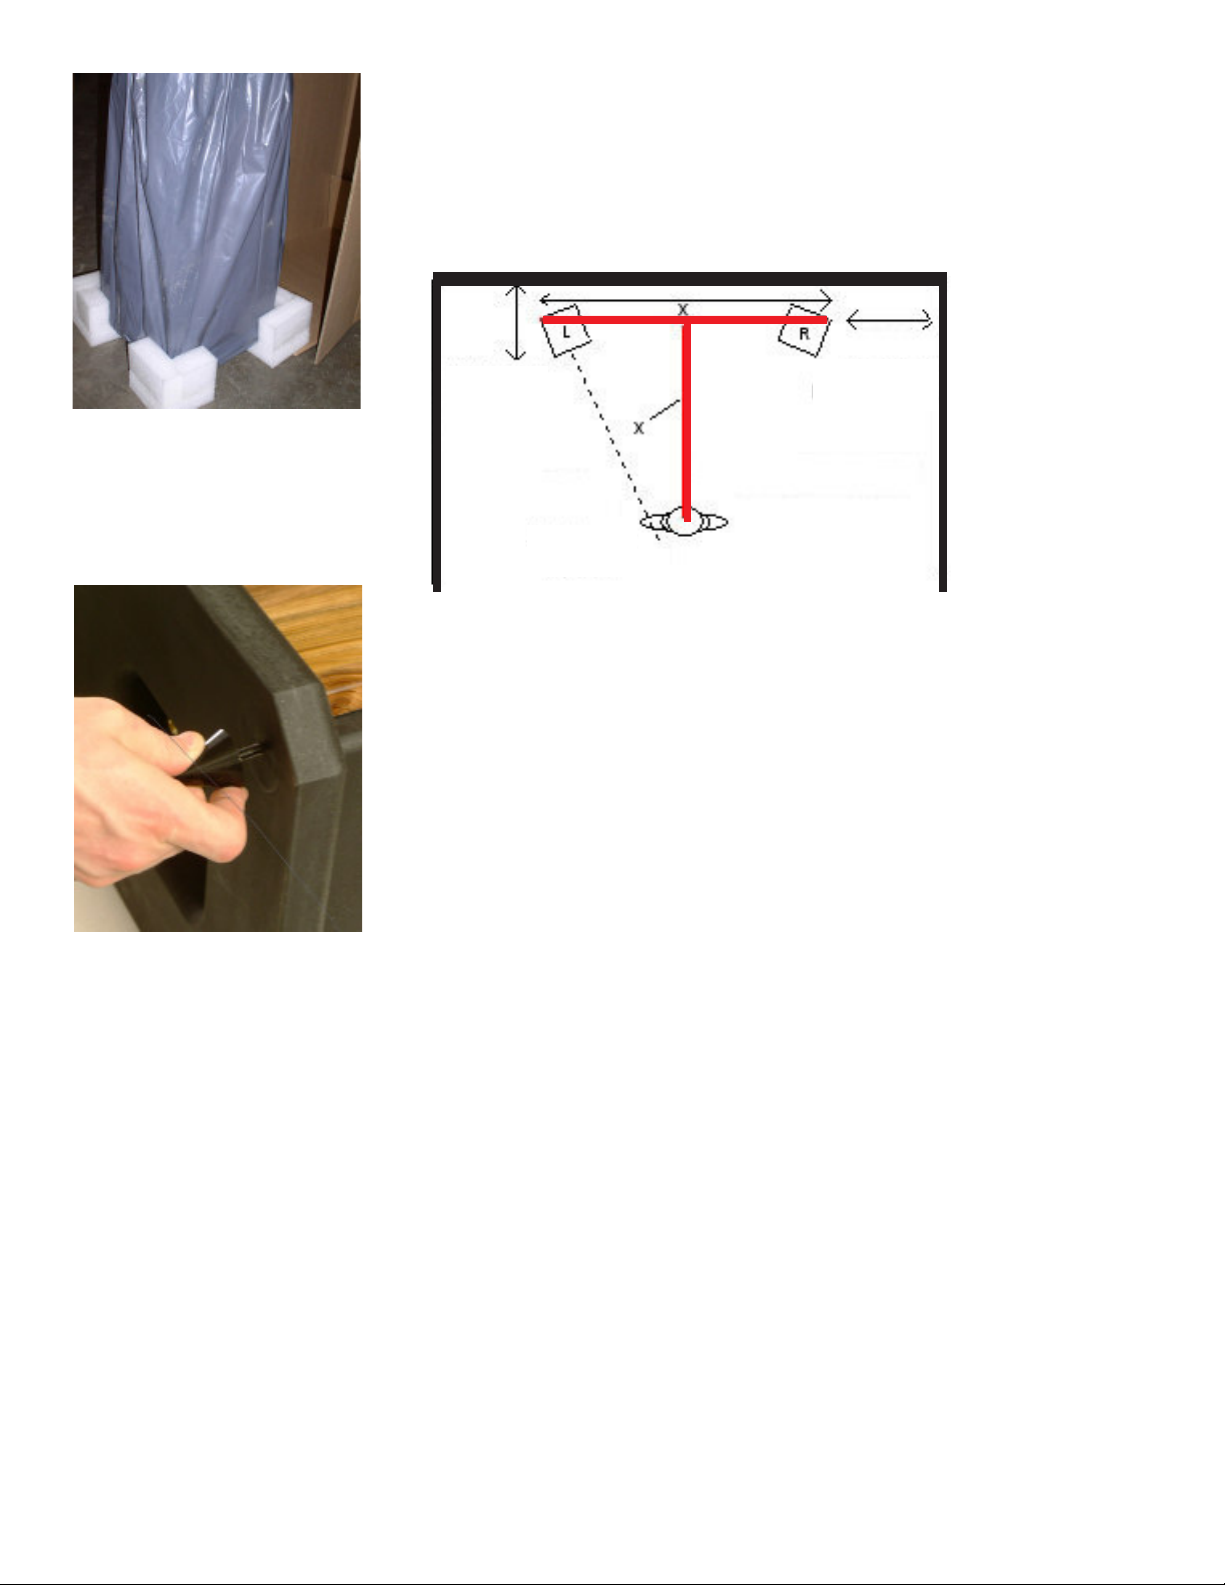
Photo #5
Stand the carton upright. Slide out the
woofer cabinet with one hand around
the mid-section and the other at the
base. It may be easier to have a partner’s
assistance from this point forward.
(Photo #5). Remove the protective bag along with any personal items (rings,
belt buckles, etc.) that may mar the wood finish.
The “Equal-Legged T.” We believe there’s a link between the point at
which our peripheral vision “falls off” and our keenest sense of hearing begins.
Visual acuity for the fixed eye “falls off” at the 53-degree span. By placing
speakers in a 53-degree spread, you’ll create a convincing soundstage that
most clearly reveals
and separates the
musicians. Separate
the outboard rear
24” to 52”
Toe-in over shoulder
18” minimum.
More is better.
ports “inboard” (to the center). In rooms larger than 900 sq. feet or 100 sq.
meters, point them “outboard.” On your left, the dotted line indicates how the
speaker’s sound axis must be directed over your shoulder, not into your ear.
You’ll see approximately one inch of the speakers’ sides when sitting in a
listening chair. Modify this layout somewhat if the loudness of any center
reflections is a factor (the television or walls). However, this is as wide apart as
you’d ever want to place the speakers (including home theater). All of this
applies no matter how close you are to them.
corners of the
speakers by a
distance, “X.” Your
chair will be the
same distance “X”
from the mid-point of
that line between the
speakers. Point the
Calypso’s large bass
Photo #6
At this point we suggest placing the
speaker using the “Equal-Legged T”
before attaching the cone feet. On a
carpeted floor or towel, lay the speaker
on its bass-port side and screw the feet
until flush and tight to the cabinet. Then
attach the cone tips. If you have hard-
wood floors, place a black, dimpled disc
underneath each of the sharp cone tips.
Attaching the feet. Lay the woofer cabinet down on its bass-port side on a
carpeted floor (or towel). Screw in each cone foot until it’s flush with the base
(Photo #6). Make sure they’re flush and tight and remain that way if you ever
want to ‘walk’ the cabinet across the floor. Screw on the pointed tips to pierce
any carpet and padding underneath. You may eventually want to adjust one or
more of those cone-tipped feet to guarantee that the cabinet is solid and won’t
rock back-and-forth. Any instability will produce a poor bass response and
vague stereo image. If you have hardwood floors, place a black, dimpled disc
underneath each of the cone tips.
Connecting the amplifier wire. While the cabinet is on its side, attach the
wires from your amplifier using a 7/16-inch nut driver to tighten the gold binding
posts. ‘Finger-tight’ isn’t good enough. There are holes for bare wire. We don't
recommend using banana plugs -- while they’re used for a 'quick-change'
among speakers, they don’t make the best connection. Positive (+) and
negative (-) are marked on the speaker’s label and also on the black plastic
surrounding the binding posts. These are 4 Ohm speakers, which makes a
difference with some amplifiers. Stand the cabinet upright and point the woofer
towards your listening position. You’re ready to attach the midrange and tweeter.
Unpacking the midrange / tweeter modules. The midrange and
tweeter are matched to their respective woofer. It’s important to keep them
together. Under the gray foam lies the tweeter module, already wired to the
midrange module. Remove this foam and the white Styrofoam divider.
Photo #7
For the tweeter module, thread the bolts
until just even with the inside edge.
(IMPORTANT: You can damage the midrange’s cone with your fingers. Both
the midrange and tweeter have been packed on their sides, with the midrange’s
cone and tweeter’s dome both pointed to the OUTER SIDES of their carton.
The plastic bag covering the midrange was pulled tight so it did not touch that
driver’s cone.) Since they’re wired together, lift out the midrange and tweeter
modules all at once (ask a partner to help with this step). Lay them on their
sides on carpet or a soft towel -- and then unwrap them. The tweeter’s dome is
protected by cardboard. Remove it now.
Mounting the modules. Thread the two, 1-inch long Allen bolts gently by
hand into the base of the tweeter module, until they’re just even with the inside
edge of the marble (Photo #7). Stand the midrange module upright and set the
tweeter into the slot on top of it. Guide its two wires up and out the back so
they’re not pinched. Later, the excess wire behind the tweeter can be pushed
up inside the tweeter’s module. Tighten the two bolts to “moderately snug” with
the red-handled wrench. Don’t allow these two bolts to tighten against the black
marble -- they must stay always inside the aluminum channel. Gently lay the
assembly on its side again. Hand-thread the two 1.25-inch Allen bolts into the
lower side of the midrange module, until they’re just flush with the inside edge
of the marble (Photo #8). Now place this assembly on top of the woofer cabinet.
It’ll be a snug fit. Tighten the two bolts to “moderately snug” (Photo #9). These
bolts must always stay inside the aluminum channel.
Photo #8
Lay the assembly on its side. For the
midrange module, thread the two 1.25”
bolts into the lower side until they’re just
flush with the inside edge of the marble.
Photo #9
Place the assembly on top of the woofer
cabinet -- it will be a tight fit -- and
tighten the bolts to “moderately snug.”
Connecting the wires. Connect the wires from the top of the woofer cabinet
to the matching wires at the bottom of the midrange module -- solid-red
connects to the other solid-red wire, white to white, clear/copper to clear/copper,
and the red-tagged clear/copper to red-tagged clear/copper (Photo #10). Keep
them parallel (not twisted together), to more easily tuck under the midrange and
tweeter modules (Photos #11 and #12).
Photos #10 (lower left), #11 and #12
Match like wires with like wires and connect without twisting (left). The photos above
show that excess wires can be tucked into the midrange and tweeter modules, respectively.
Now repeat all of these steps for the other speaker.
Copyright 2006, Green Mountain Audio.
 Loading...