

Page 1
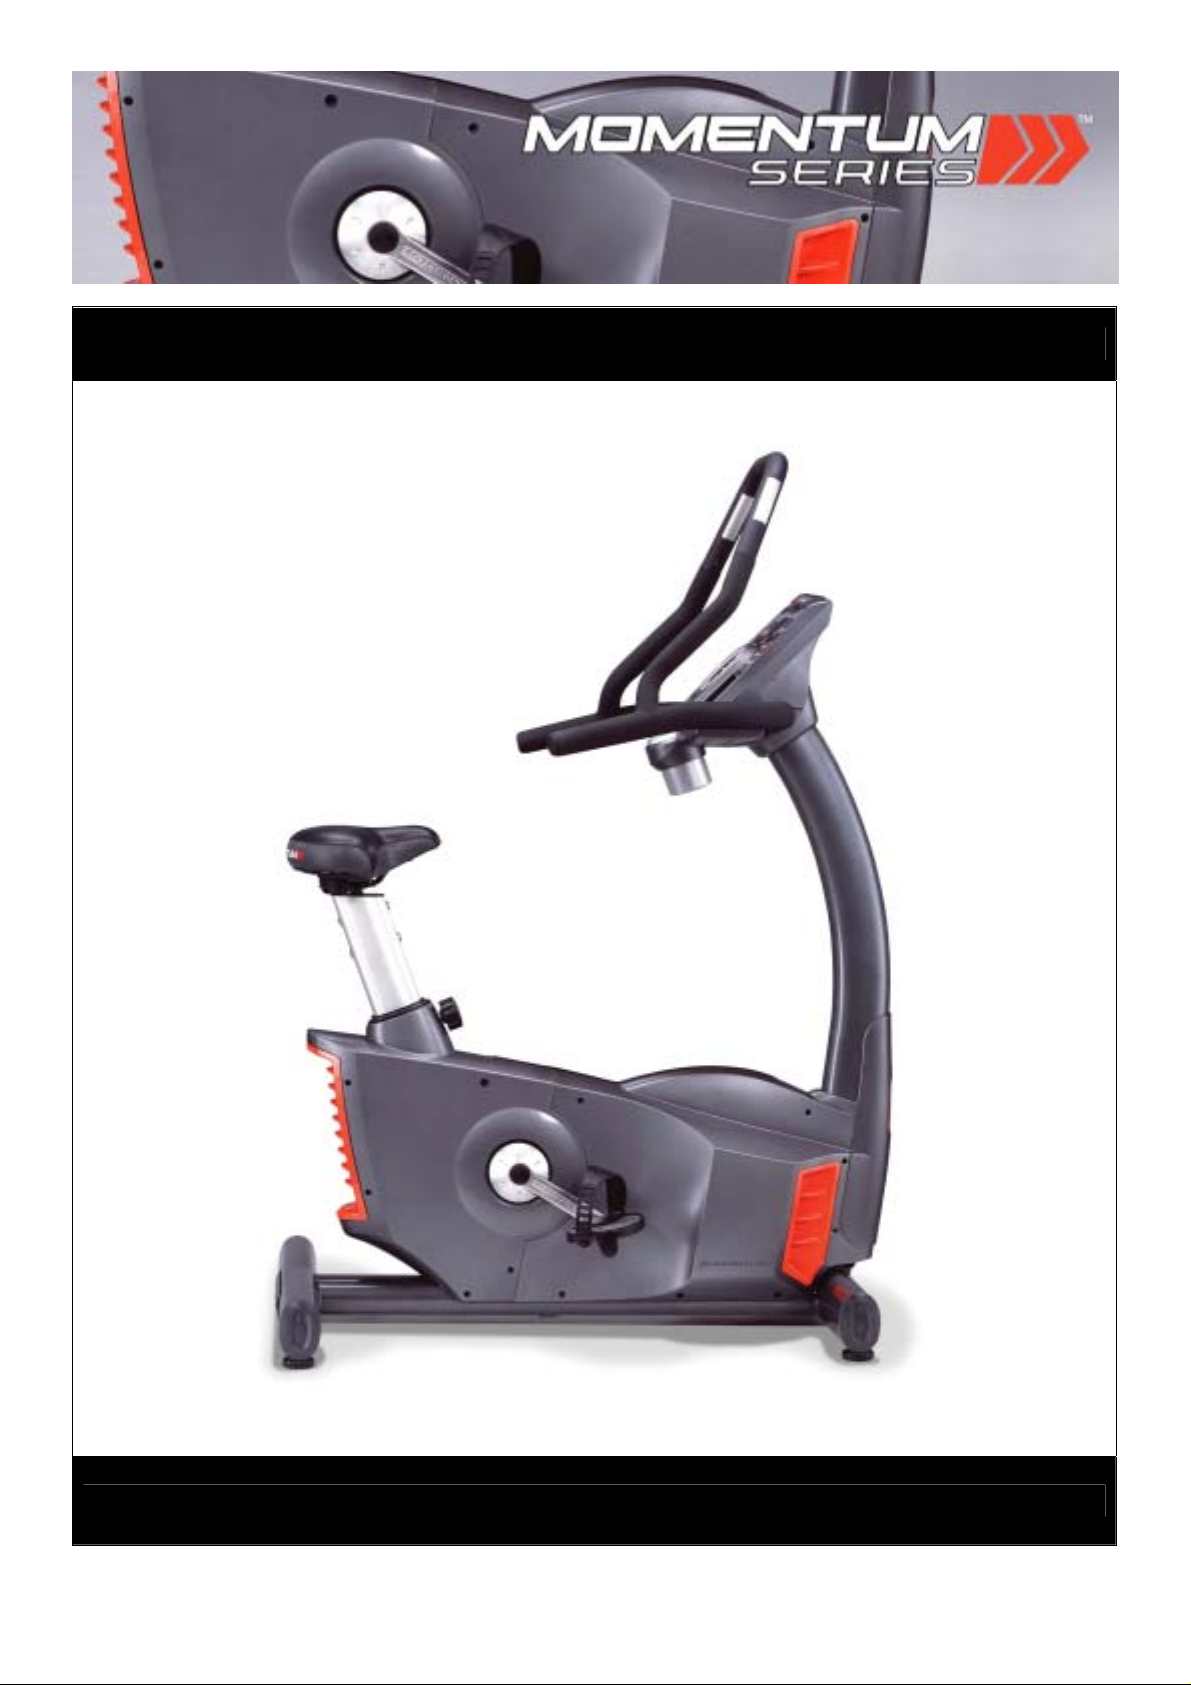
MOMENTUM UB5 UPRIGHT BIKE
USER MANUAL
Page 2

2 MOMENTUM UB5 UPRIGHT BIKE
Open the boxes:
You are now ready to open the boxes of your new equipment. Make sure to inventory all of the parts that are included in the boxes.
Check the Parts List for a full count of the number of parts included for this product to be assembled properly. If you are missing
any parts or have any assembly questions call your local dealer.
Gather your tools:
Before starting the assembly of your unit, make sure that you have gathered all the necessary tools you may require to assemble
the unit properly. Having all of the necessary equipment at hand will save time and make the assembly quick and hassle-free.
Clear your work area:
Make sure that you have cleared away a large enough space to properly assemble the unit. Make sure the space is free from
anything that may cause injury during assembly. After the unit is fully assembled, make sure there is a comfortable amount of free
area around the unit for unobstructed operation.
Invite a friend:
Some of the assembly steps may require heavy lifting. It is recommended that you obtain the assistance of another person when
assembling this product.
User Weight Limitation:
Please note that there is a weight limitation for this product. If you weigh more than 160 kg. it is not recommended that you use this
product. Serious injury may occur if the user’s weight exceeds the limit shown here. This product is not intended to support users
whose weight exceeds t his lim it.
PREASSEMBLY
Page 3
www.greenmasterfitness.com.tw
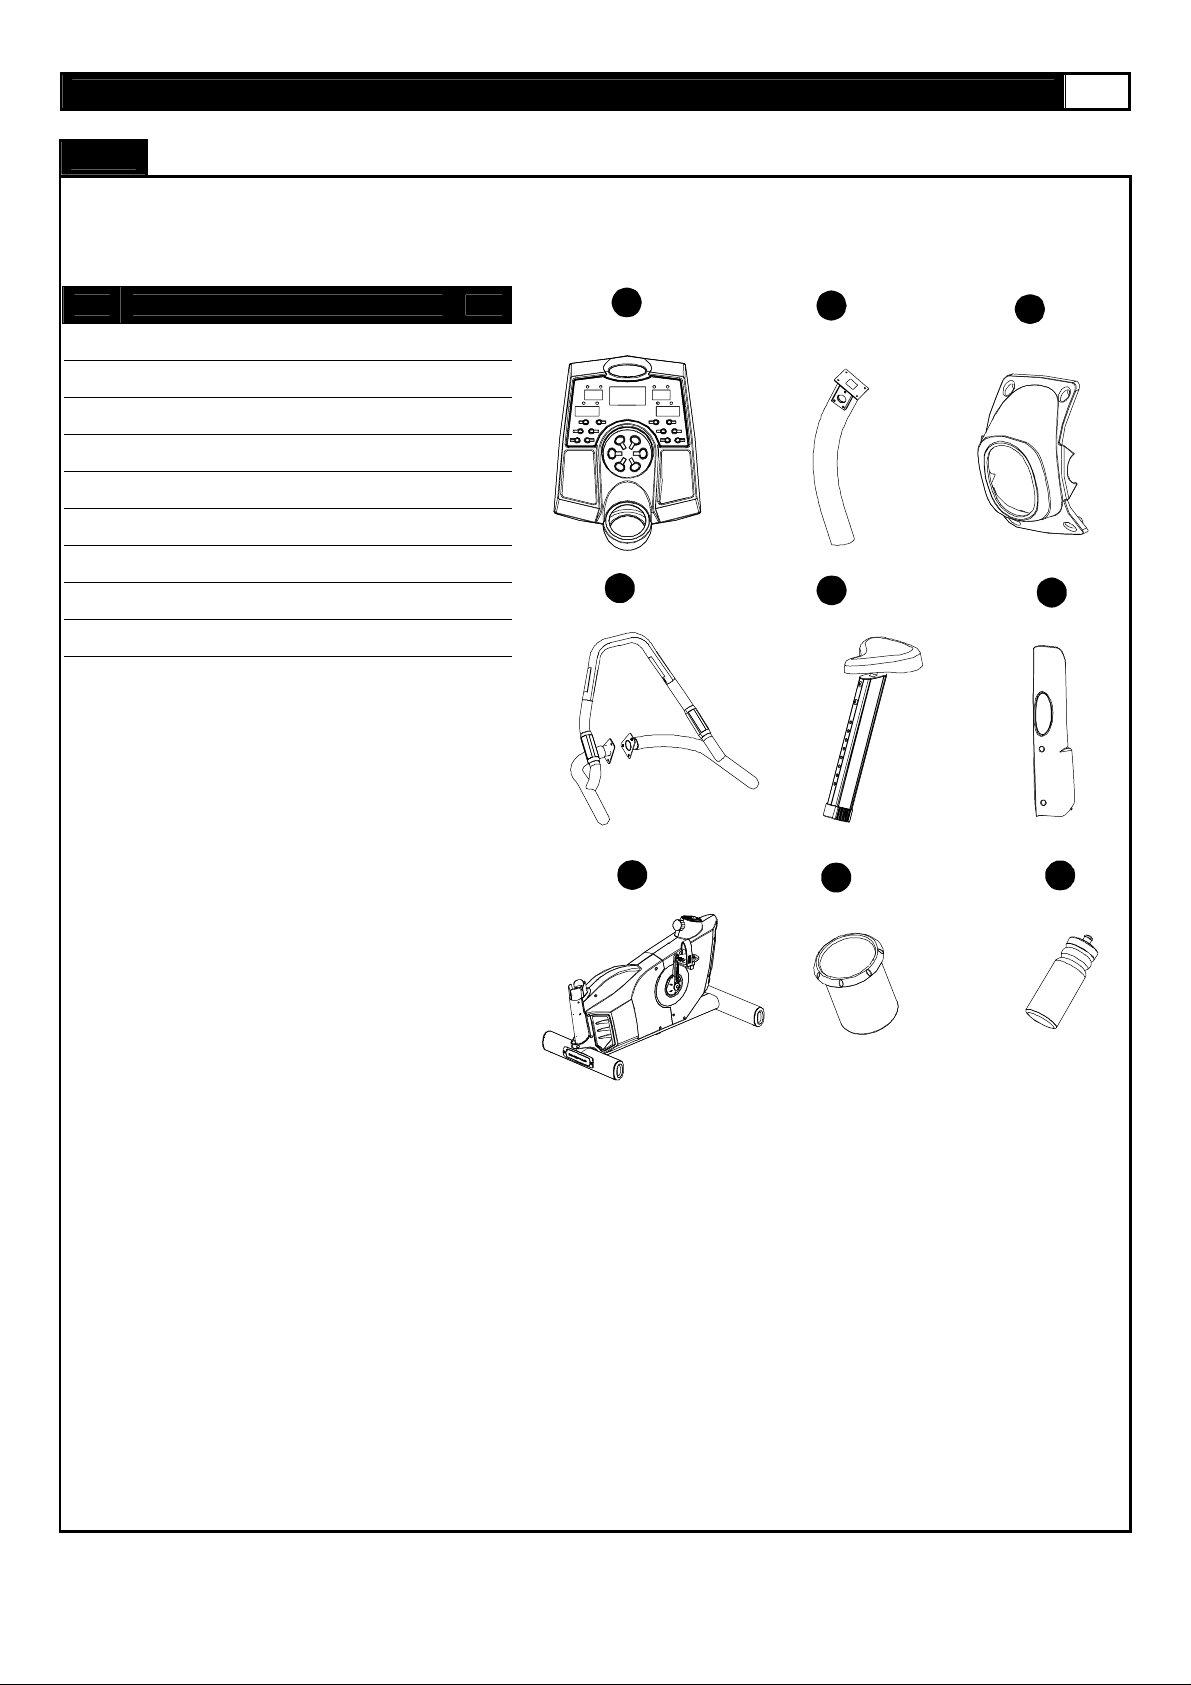
Carton chart:
For your convenien ce, we have iden t ifi ed the c onten ts of the sh ipping carton . Pleas e check to make sure you have al l of th e
components before assembly. This chart is provided to help you identify the components used in the assembly of this product.
CONTENTS CHECKLIST
3
No. Description Qty.
42 Computer 1
43 Console Upright Tube 1
45 Computer Protect Cover 1
48
Handlebar Post
55 Seat Post 1
62 Front Upright Cover 1
81 Main Frame 1
83 Bottle Holder 1
84 Water Bottle 1
1
42
48
81
43
55
83
45
62
84
Page 4
4 MOMENTUM UB5 UPRIGHT BIKE
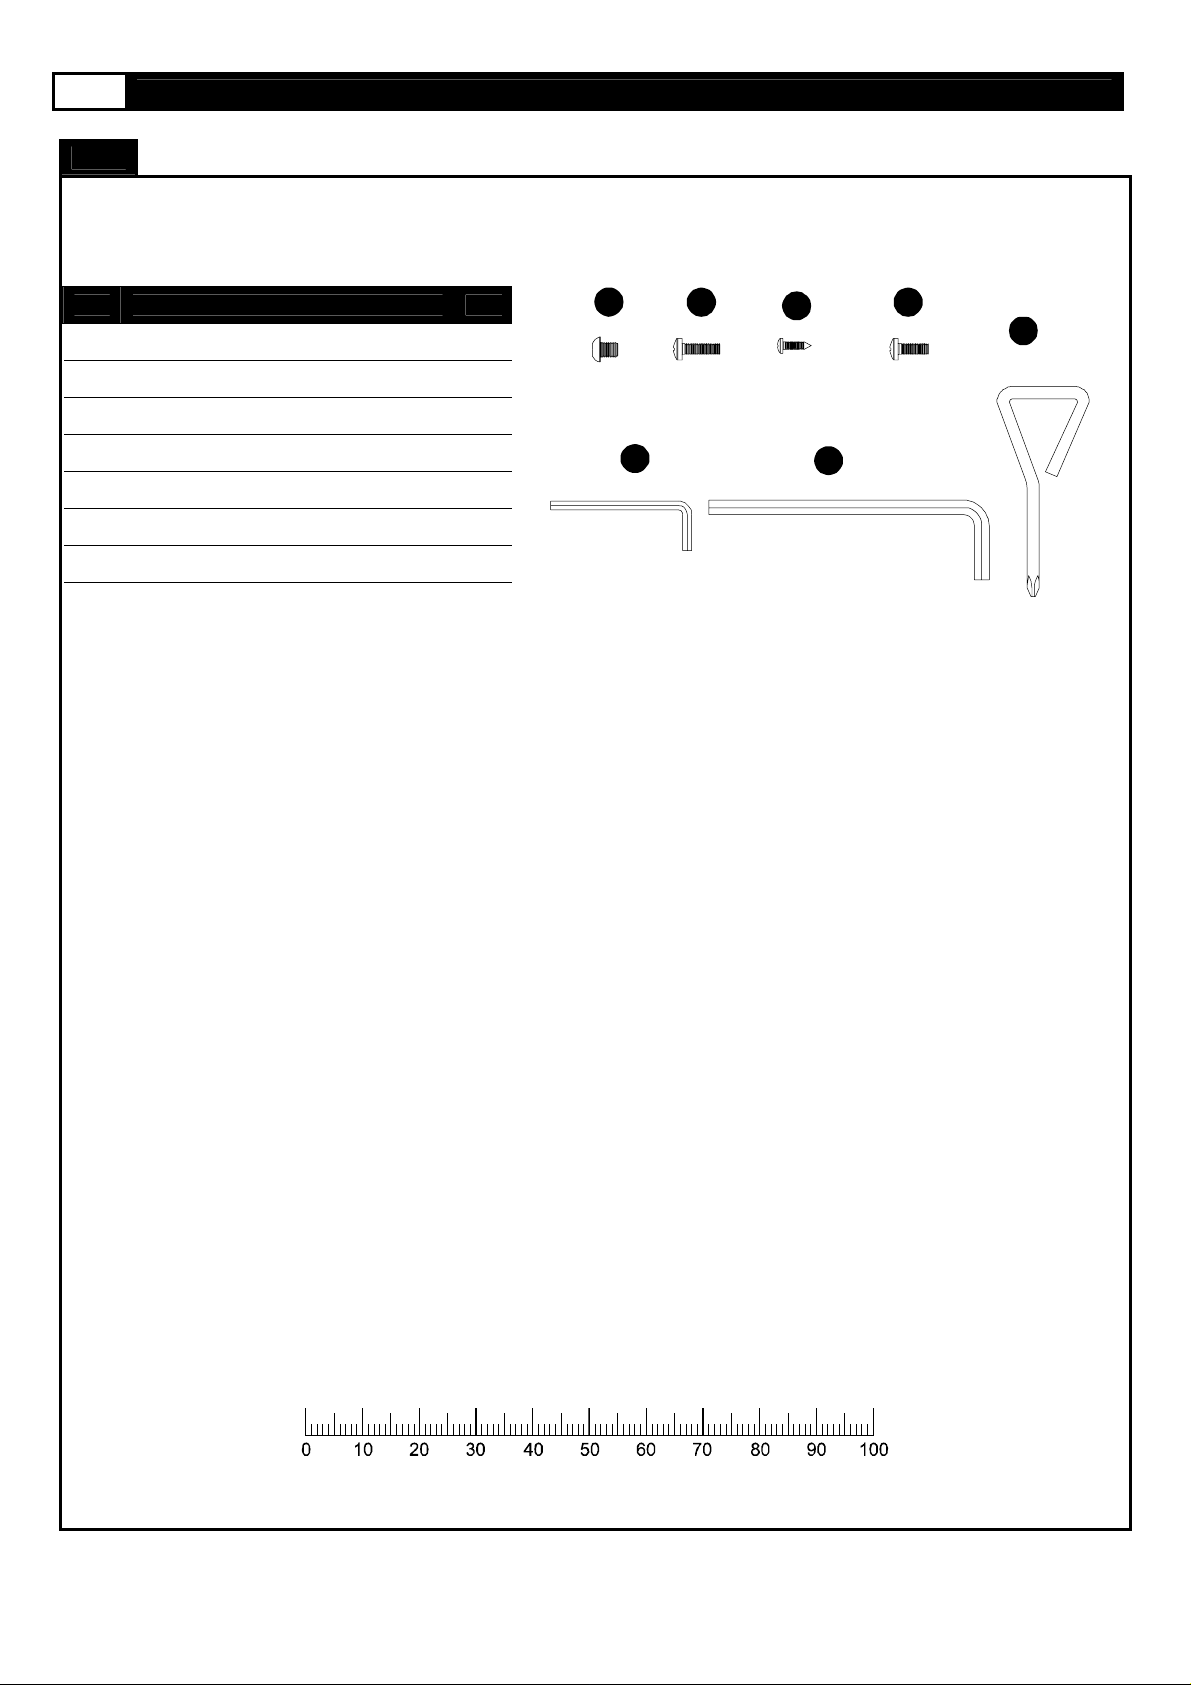
Hardware chart:
For your convenience, we have identified the hardware used in the assembly of this product. This chart is provided to help you
identify those items that may be unfamiliar to you.
HARDWARE COMPARISON CHART
No. Description Qty.
27
M8 x 10mm Bolt
44 M6 x 15mm Screw 4
46 4 x 19mm Bolt 4
85 4 x 9mm Screw 4
A Screw Driver 1
B 5mm Wrench 1
C 8mm Wrench 1
6
27 44
B
46
85
A
C
MILLIMETERS
Page 5
www.greenmasterfitness.com.tw
5
No. Description Qty. Order No. No. Description Qty. Order No.
1 M6 x 10mm Bolt 14 UB5-001 35 Crank Disk 1 UB5-035
2 Flywheel Shock Absorber 2 UB5-002 36 20 x 30 x T2 Washer 1 UB5-036
3 12 x 22 x T0.5 Plastic Washer 2 UB5-003 37 3/4" Nut 2 UB5-037
4 6901ZZ Bearing 1 UB5-004 38 Crank - Right 1 UB5-038
5 Flywheel Pulley 1 UB5-005 39 V Type Hand Pulse Sensor - Upper 1 UB5-039
6 20 x 32 x T1Plastic Washer 1 UB5-006 40 V Type Hand Pulse Sensor - Lower 1 UB5-040
7 6004ZZ Bearing 4 UB5-007 41 3 x 12mm Screws 7 UB5-041
8 One Way Bearing 1 UB5-008 42 Computer 1 UB5-042
9 Flywheel 1 UB5-009 43 Console Upright Tube 1 UB5-043
10 Bearing Bracket 1 UB5-010 44 M6 x 15mm Bolt 4 UB5-044
11 6201ZZ Bearing 1 UB5-011 45 Computer protect Cover 1 UB5-045
12 Flywheel Fan 4 UB5-012 46 4 x 19mm Screws 15 UB5-046
PARTS LIST
13 Bushing 1 UB5-013 47 Hand Pulse Sensor 2 UB5-047
14 M6 x 25mm Bolt 4 UB5-014 48 Handlebar - Left 1 UB5-048
15 Generator System 1 UB5-015 49 Handlebar Casing 1 UB5-049
16 Flywheel Axle 1 UB5-016 50 Handlebar - Right 1 UB5-050
17 M6 Nylon Nut 4 UB5-017 51 Saddle 1 UB5-051
18 Flywheel Axle Fixing Plate 1 UB5-018 52 Saddle Prop Tube 1 UB5-052
19 4 x 19mm Screws 20 UB5-019 53 Saddle Plastic Sleeve 1 UB5-053
20 Control Board 1 UB5-020 54 M8 x 15mm Bolt 4 UB5-054
21 M6 x 100mm Bolt 2 UB5-021 55 Seat Post 1 UB5-055
22 Battery Upper 1 UB5-022 56 Aluminum Sleeve 1 UB5-056
23 Battery Lower 1 UB5-023 57 Loop for Seat Post 1 UB5-057
24 Sensor 1 UB5-024 58 Pedal - Left 1 UB5-058
25 Battery 1 UB5-025 59 Height Adjustment Knob 1 UB5-059
26 Resistor 1 UB5-026 60 Chain Cover - Front Left 1 UB5-060
27 M8 x 10mm Bolt 8 UB5-027 61 Vent Cover - Left 1 UB5-061
28 Stabilizer Tube Cap 4 UB5-028 62 Fr ont Upright Cover 1 UB5-062
29 Crank Cap 2 UB5-029 63 Iron Plate Nut 8 UB5-063
30 3/8" Nut 2 UB5-030 64 Chai n Cover - Front Right 1 UB5-064
31 Crank - Left 1 UB5-031 65 Vent Cover - Right 1 UB5-065
32 M6 x 12mm Bolt 4 UB5-032 66 Chain Cover - Rear Left 1 UB5-066
33 Crank Shaft 1 UB5-033 67 Vent Cover - Rear 1 UB5-067
34 Drive Belt 1 UB5-034 68 Pedal - Right 1 UB5-068
Page 6
6 MOMENTUM UB5 UPRIGHT BIKE
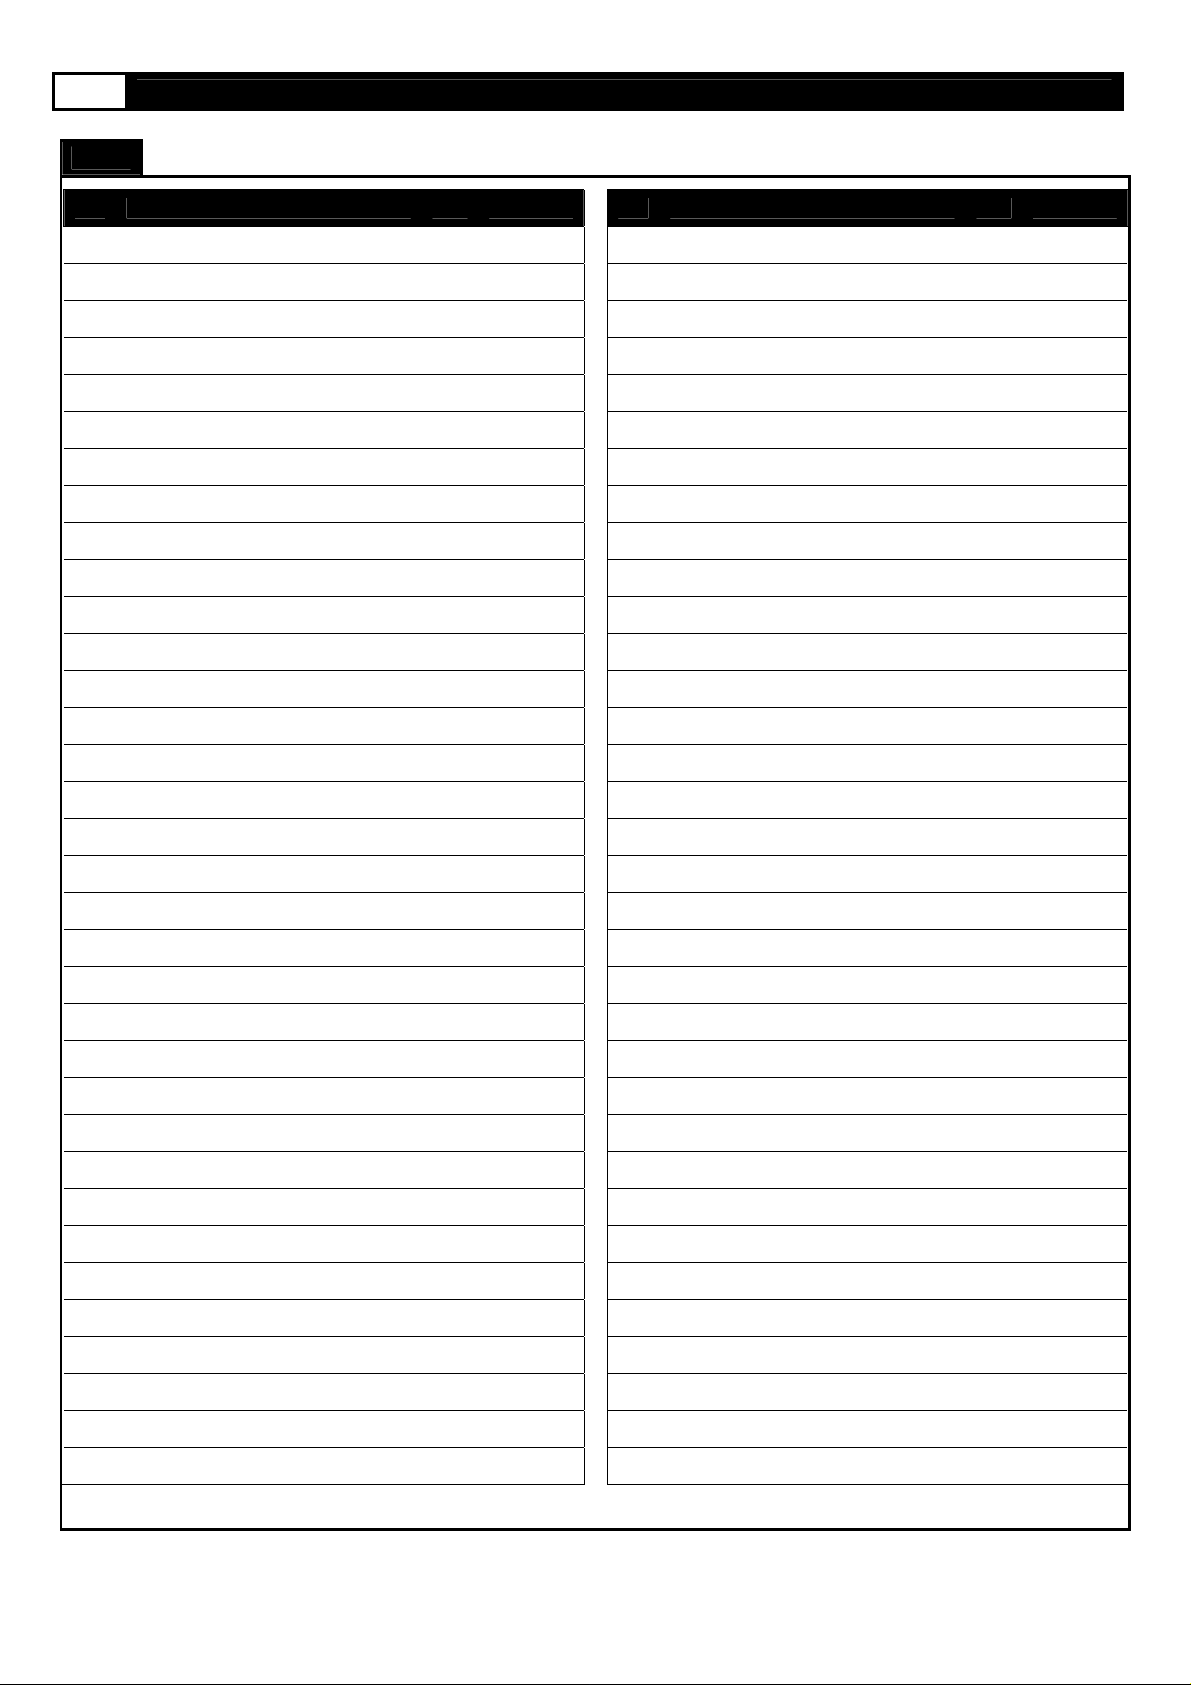
No. Description Qty. Order No. No. Description Qty. Order No.
69 Chain Cover - Rear Right 1 UB5-069
70 Computer Wire Lower 1 UB5-070
71 Hand Pulse Wire - Upper Left 1 UB5-071
72 Computer Wire Upper 1 UB5-072
73 Hand Pulse Wire - Upper Right 1 UB5-073
74 Computer Wire Middle 1 UB5-074
75 Hand Pulse Wire - Lower Left 1 UB5-075
76 Hand Pulse Wire - Lower Right 1 UB5-076
77 M8 x 25mm Bolt 2 UB5-077
78 Spring Steel Piece 1 UB5-078
79 Tension Pulley 1 UB5-079
80 Fixing Set for Console Upright 1 UB5-080
PARTS LIST
81 Main Frame 1 UB5-081
82 M5 x 8mm Bolt 2 UB5-082
83 Bottle Holder 1 UB5-083
84 Water Bottle 1 UB5-084
85 4 x 9mm Screw 4 UB5-085
86 Level Adjusters 4 UB5-086
87 Sensor Magnet 1 UB5-087
88 M5 x 10mm Bolt 2 UB5-088
Page 7
www.greenmasterfitness.com.tw
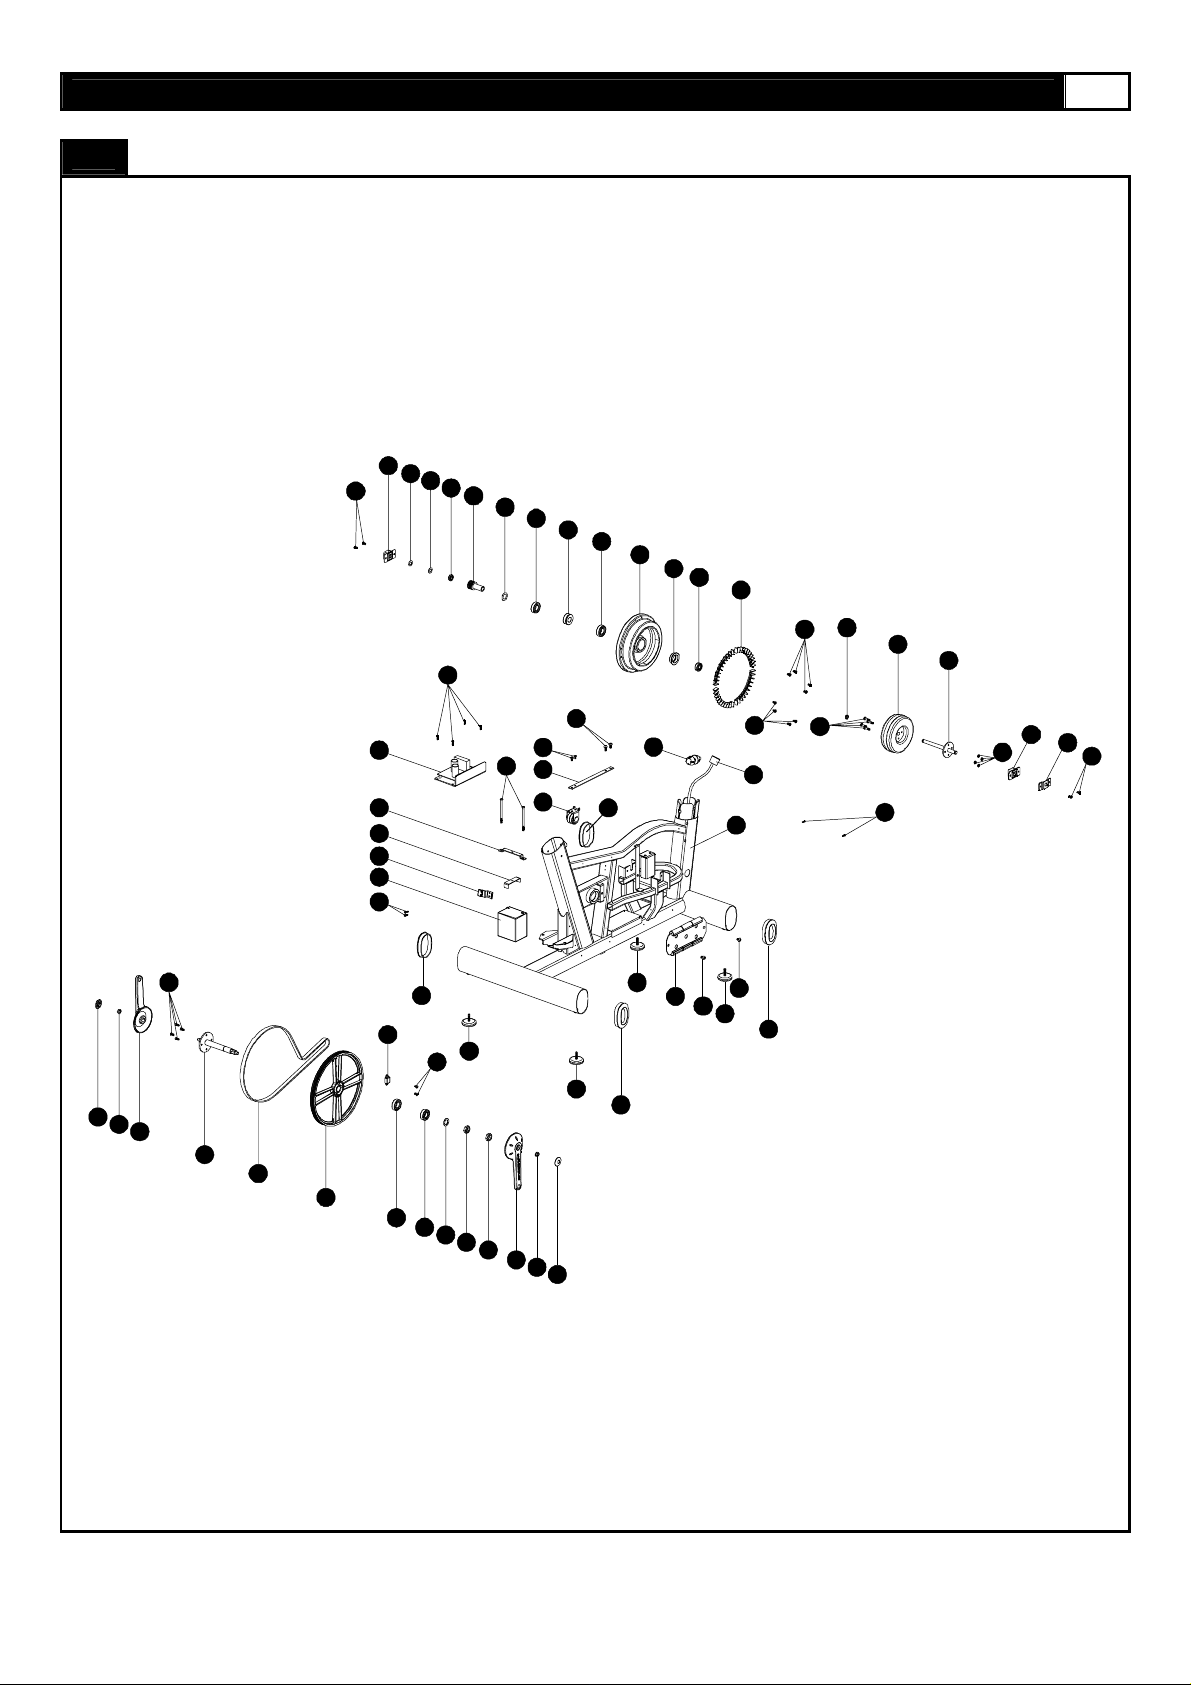
A MAJORITY OF THE PARTS SHOWN HERE HAVE BEEN PREASSEMBLED AT THE FACTORY.
PARTS DIAGRAM
2
3
3
19
4
5
6
7
8
7
9
10
11
12
13
1
1
7
15
16
29
30
31
32
33
34
35
20
22
23
24
25
19
87
77
28
28
86
80
26
1
21
78
79
28
86
88
86
7
7
36
37
37
38
30
29
27
86
81
27
70
1
28
14
82
17
2
18
1
Page 8
8 MOMENTUM UB5 UPRIGHT BIKE
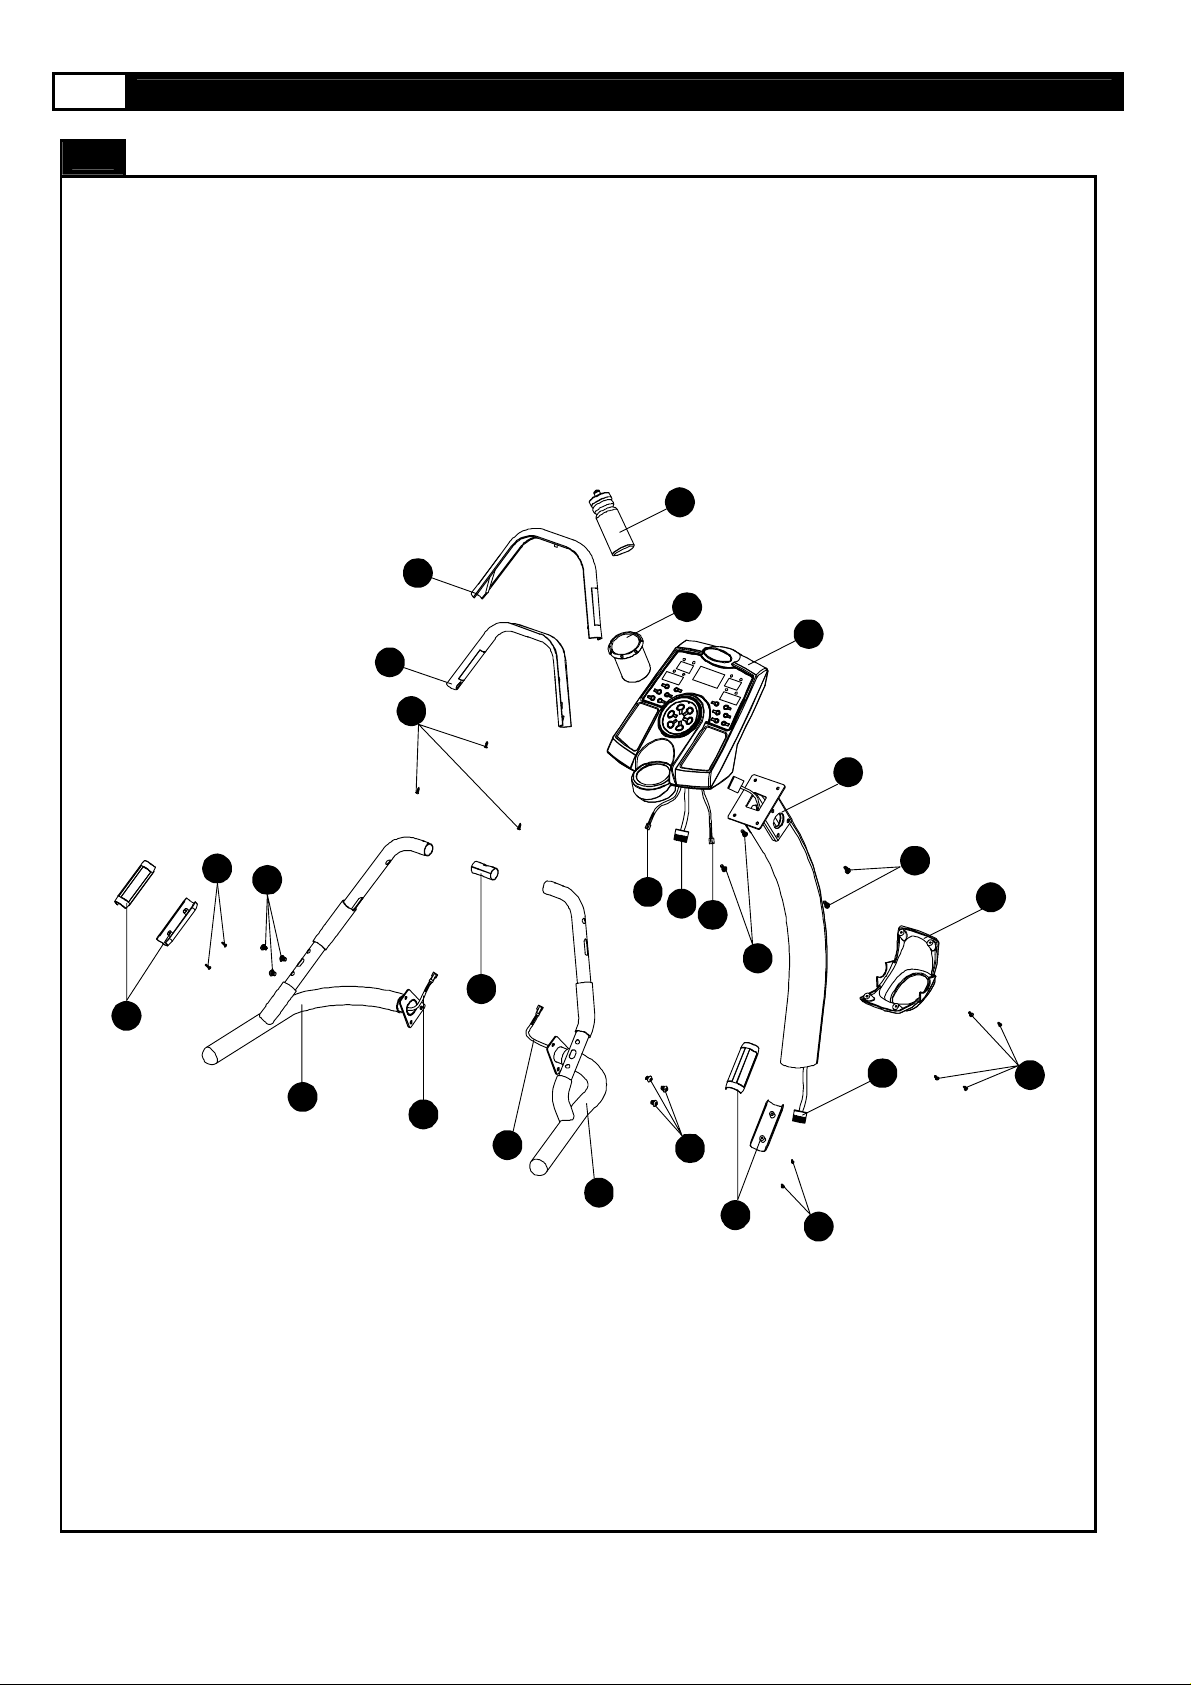
A MAJORITY OF THE PARTS SHOWN HERE HAVE BEEN PREASSEMBLED AT THE FACTORY.
PARTS DIAGRAM
84
39
83
42
40
47
41
27
48
41
75
49
76
50
71
72
27
73
47
44
41
43
74
44
45
46
Page 9
www.greenmasterfitness.com.tw
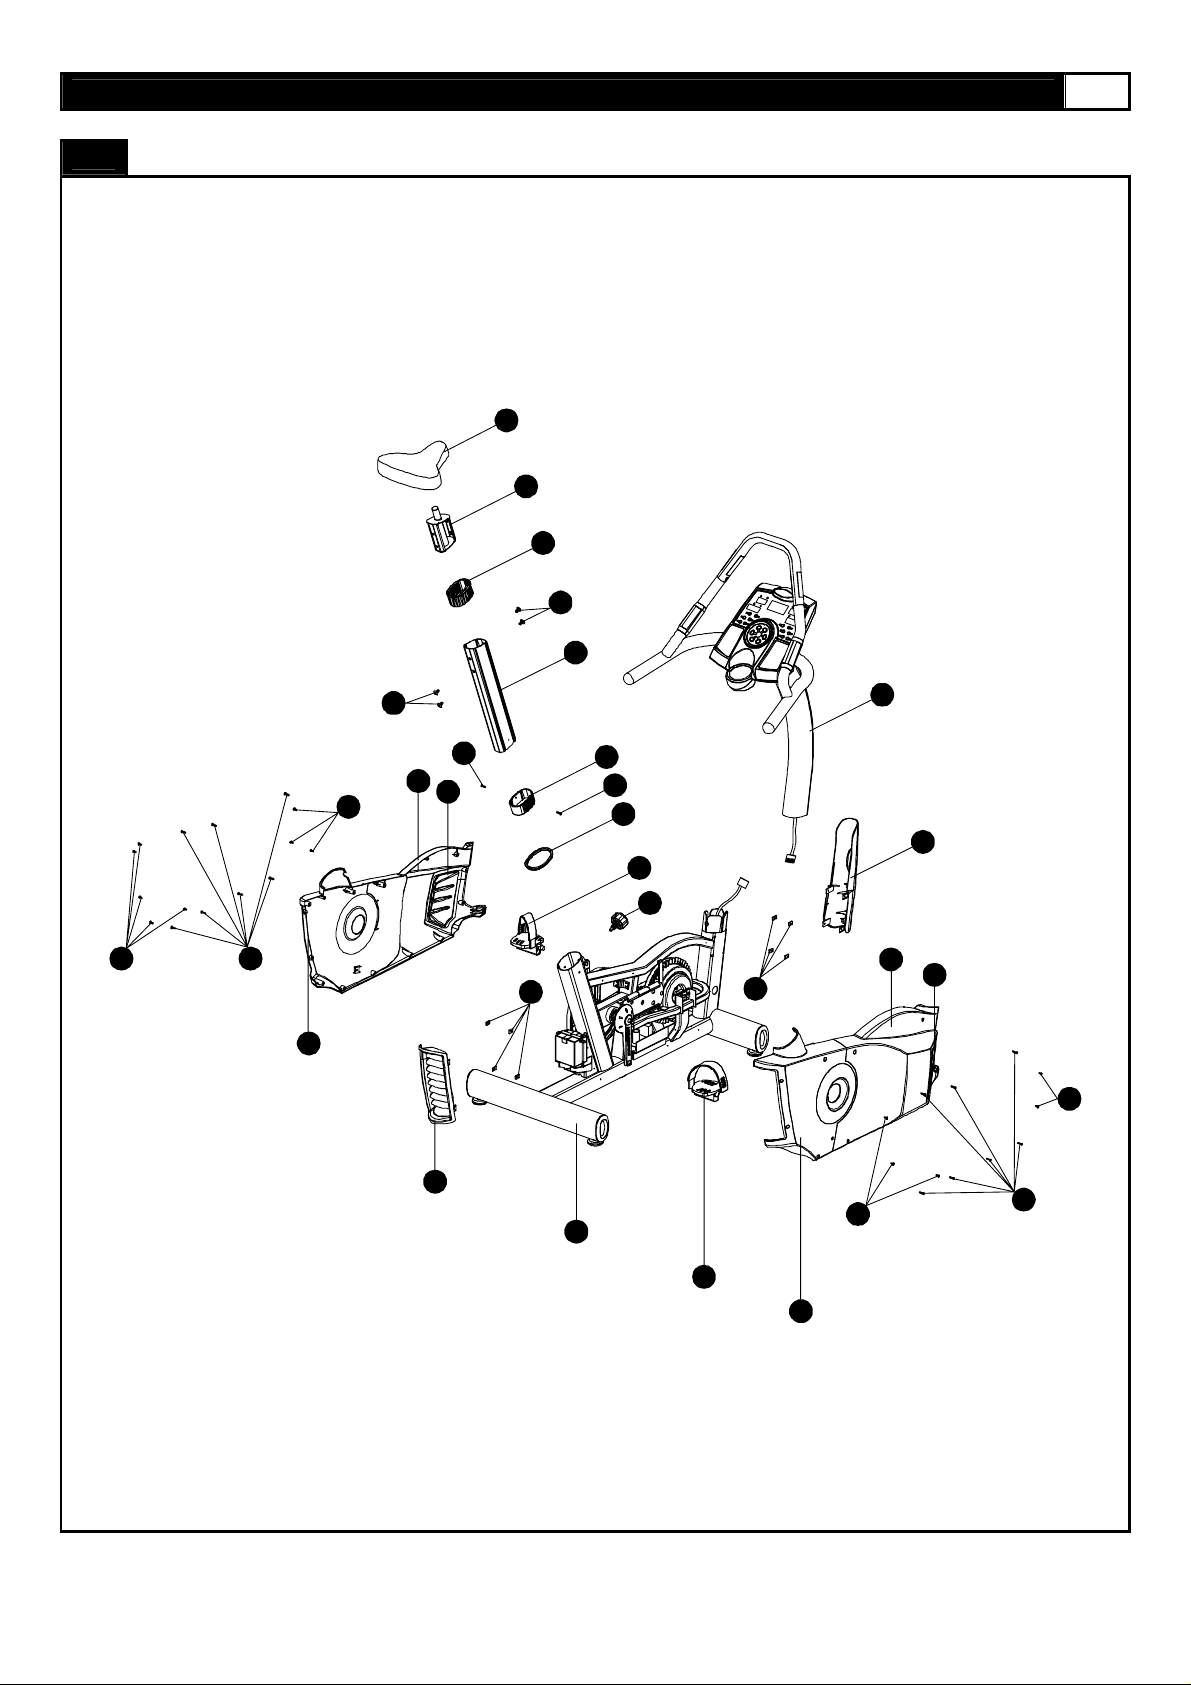
A MAJORITY OF THE PARTS SHOWN HERE HAVE BEEN PREASSEMBLED AT THE FACTORY.
PARTS DIAGRAM
51
52
53
54
55
9
46 19
66
46
54
60
67
61
85
63
81
56
85
57
58
59
63
46
43
64
62
65
85
19
68
69
Page 10
10 MOMENTUM UB5 UPRIGHT BIKE
ASSEMBLY
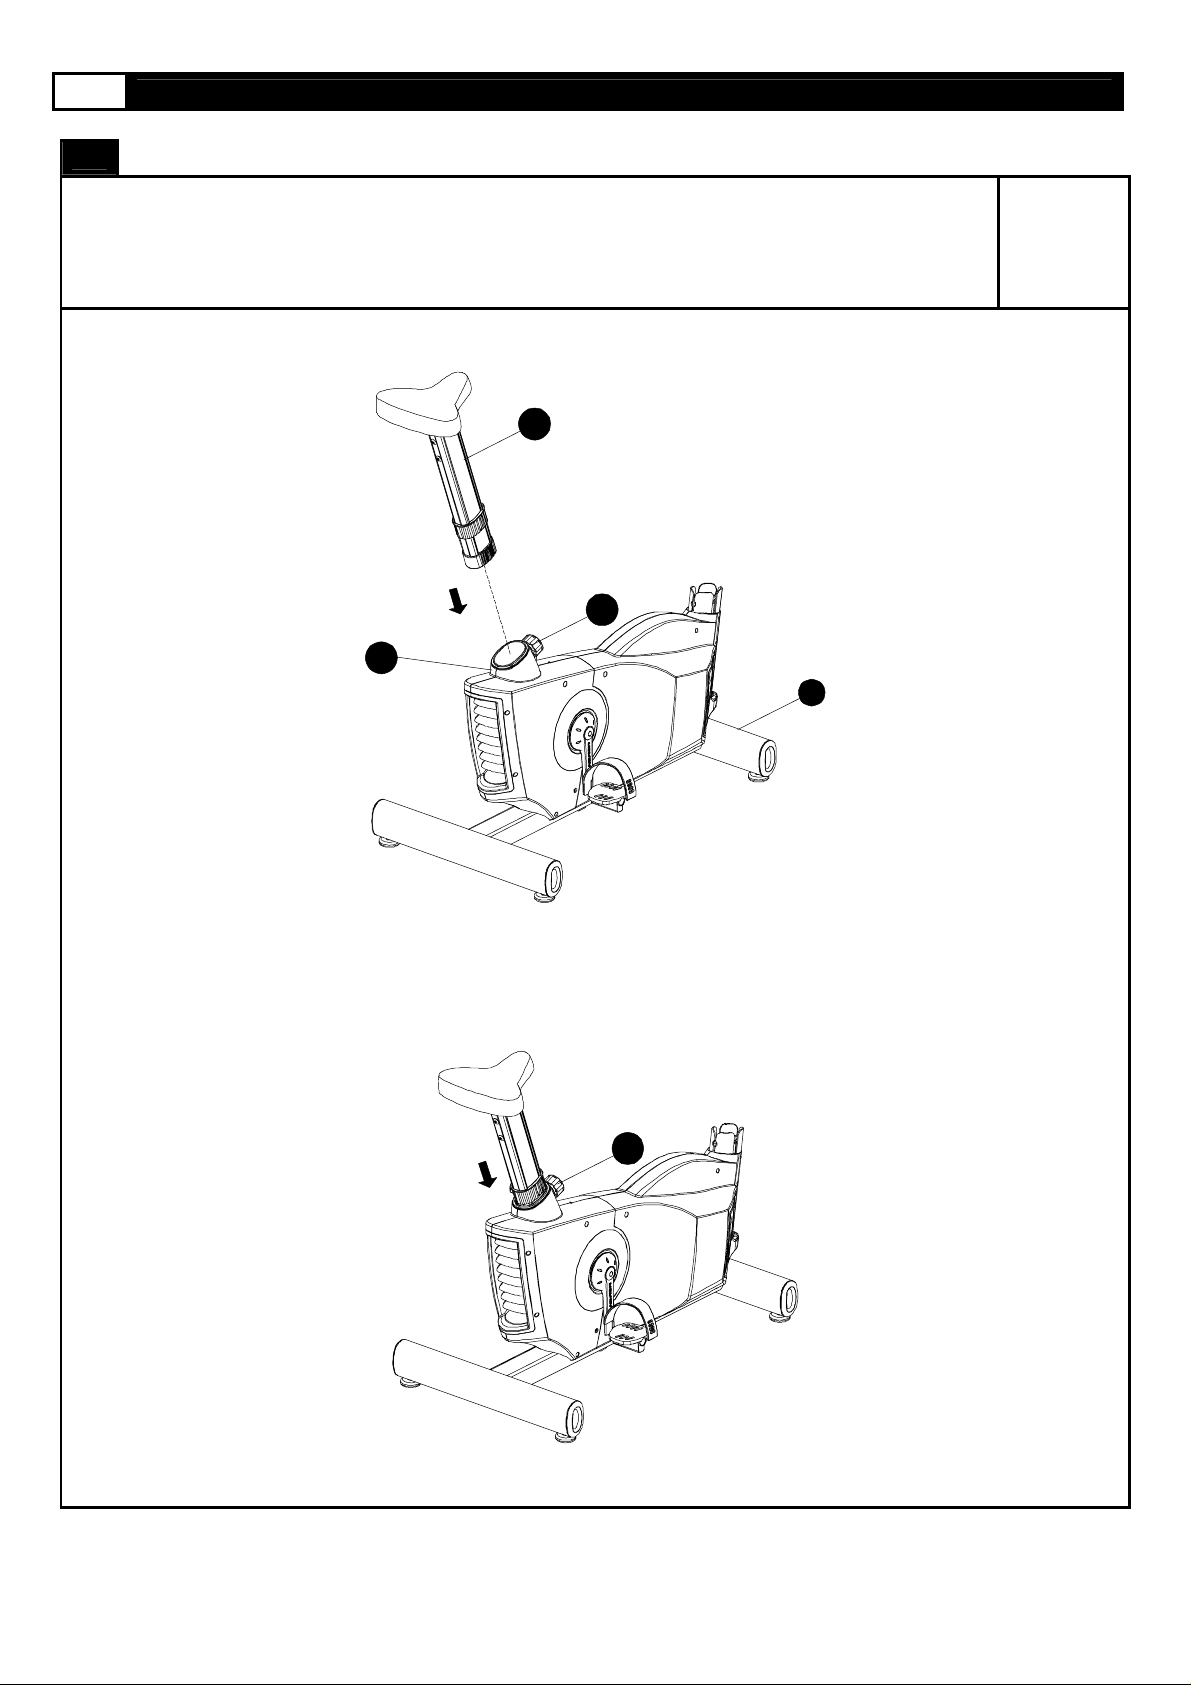
STEP 1:
Loosen the Height Adjustment Knob (59). Insert the Seat Post (55) into the Main Frame (81).
Choose the desired position and retighten the Height Adjustment Knob (59). Ensure that the knob is always firmly
tightened before use.
55
59
81
59
81
Page 11
www.greenmasterfitness.com.tw
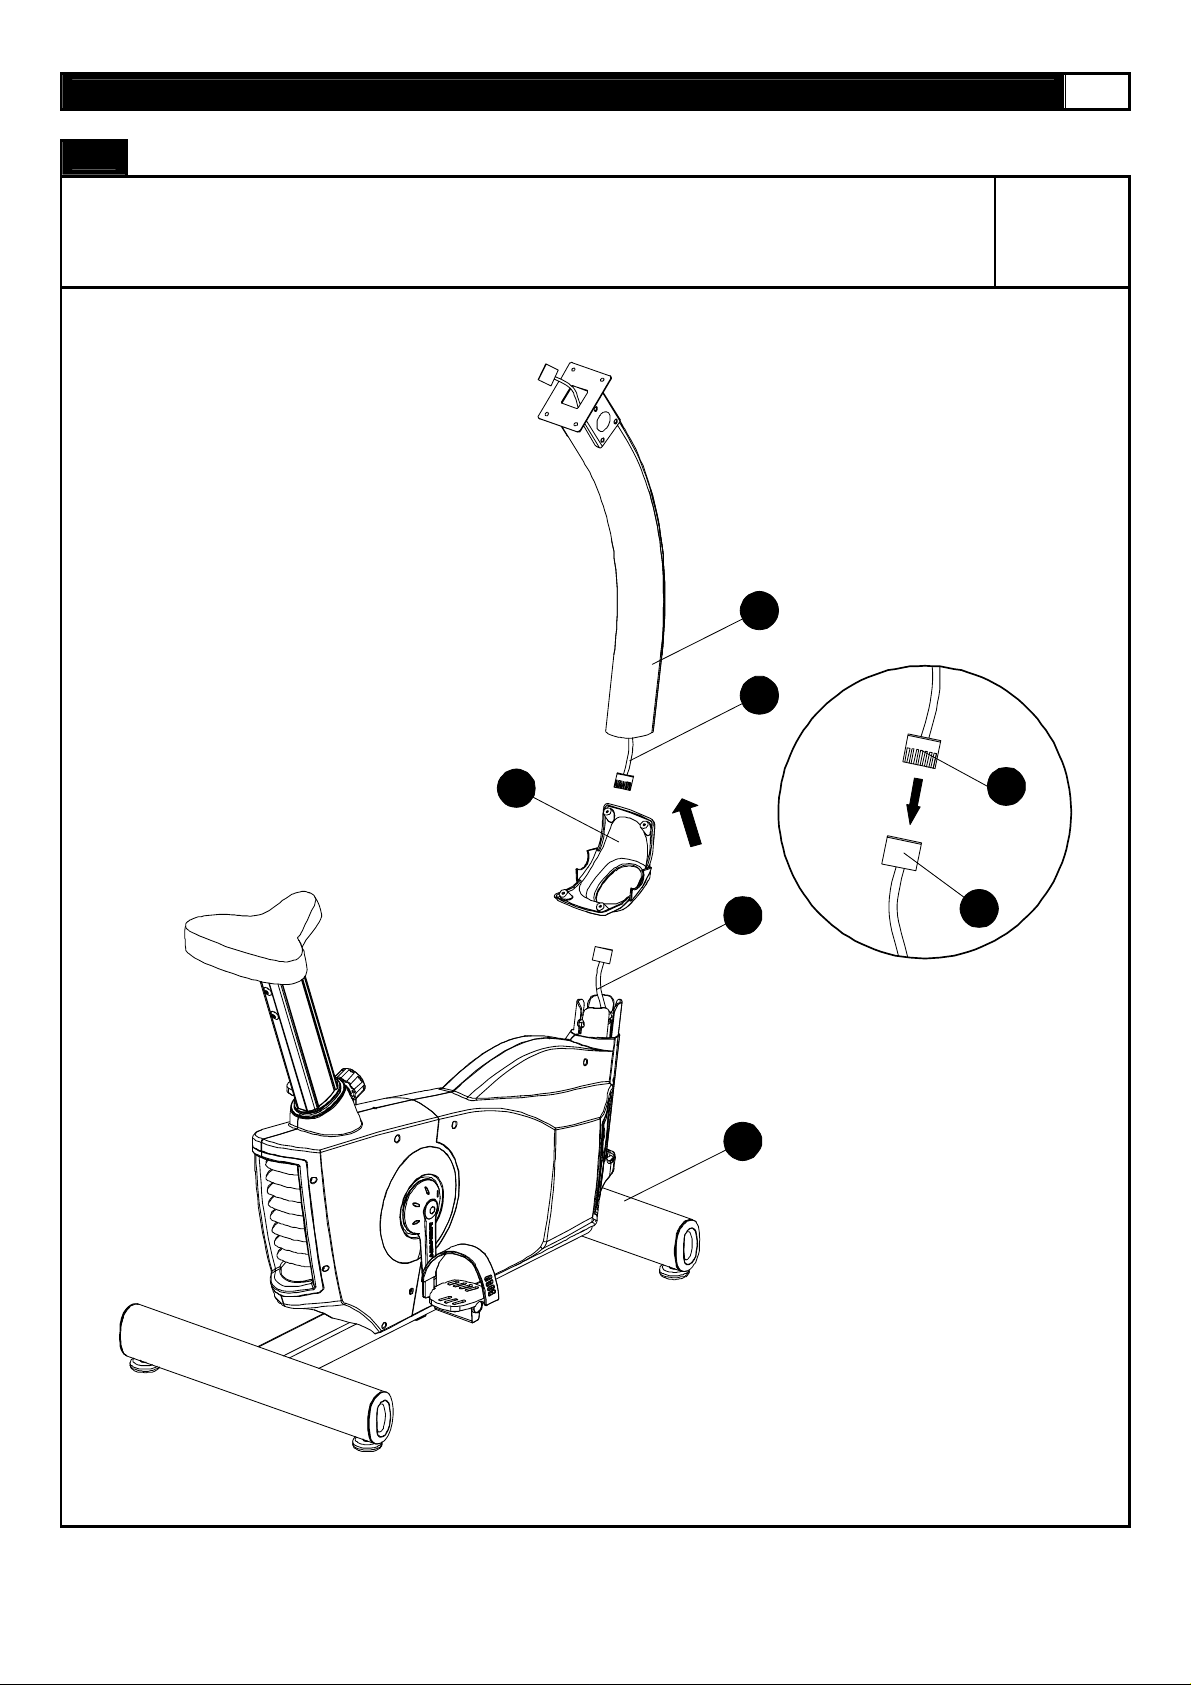
STEP 2:
Slide the Computer Protect Cover (45) onto the Console Upright Tube (43) and connect the Computer Wire –
Mid dle (74) to the Comput er Wire – Lo w er (70). Slide the Cons ole Upright Tu be (43) onto t he Main Frame (81).
ASSEMBLY
43
11
45
74
70
81
74
70
Page 12
12 MOMENTUM UB5 UPRIGHT BIKE
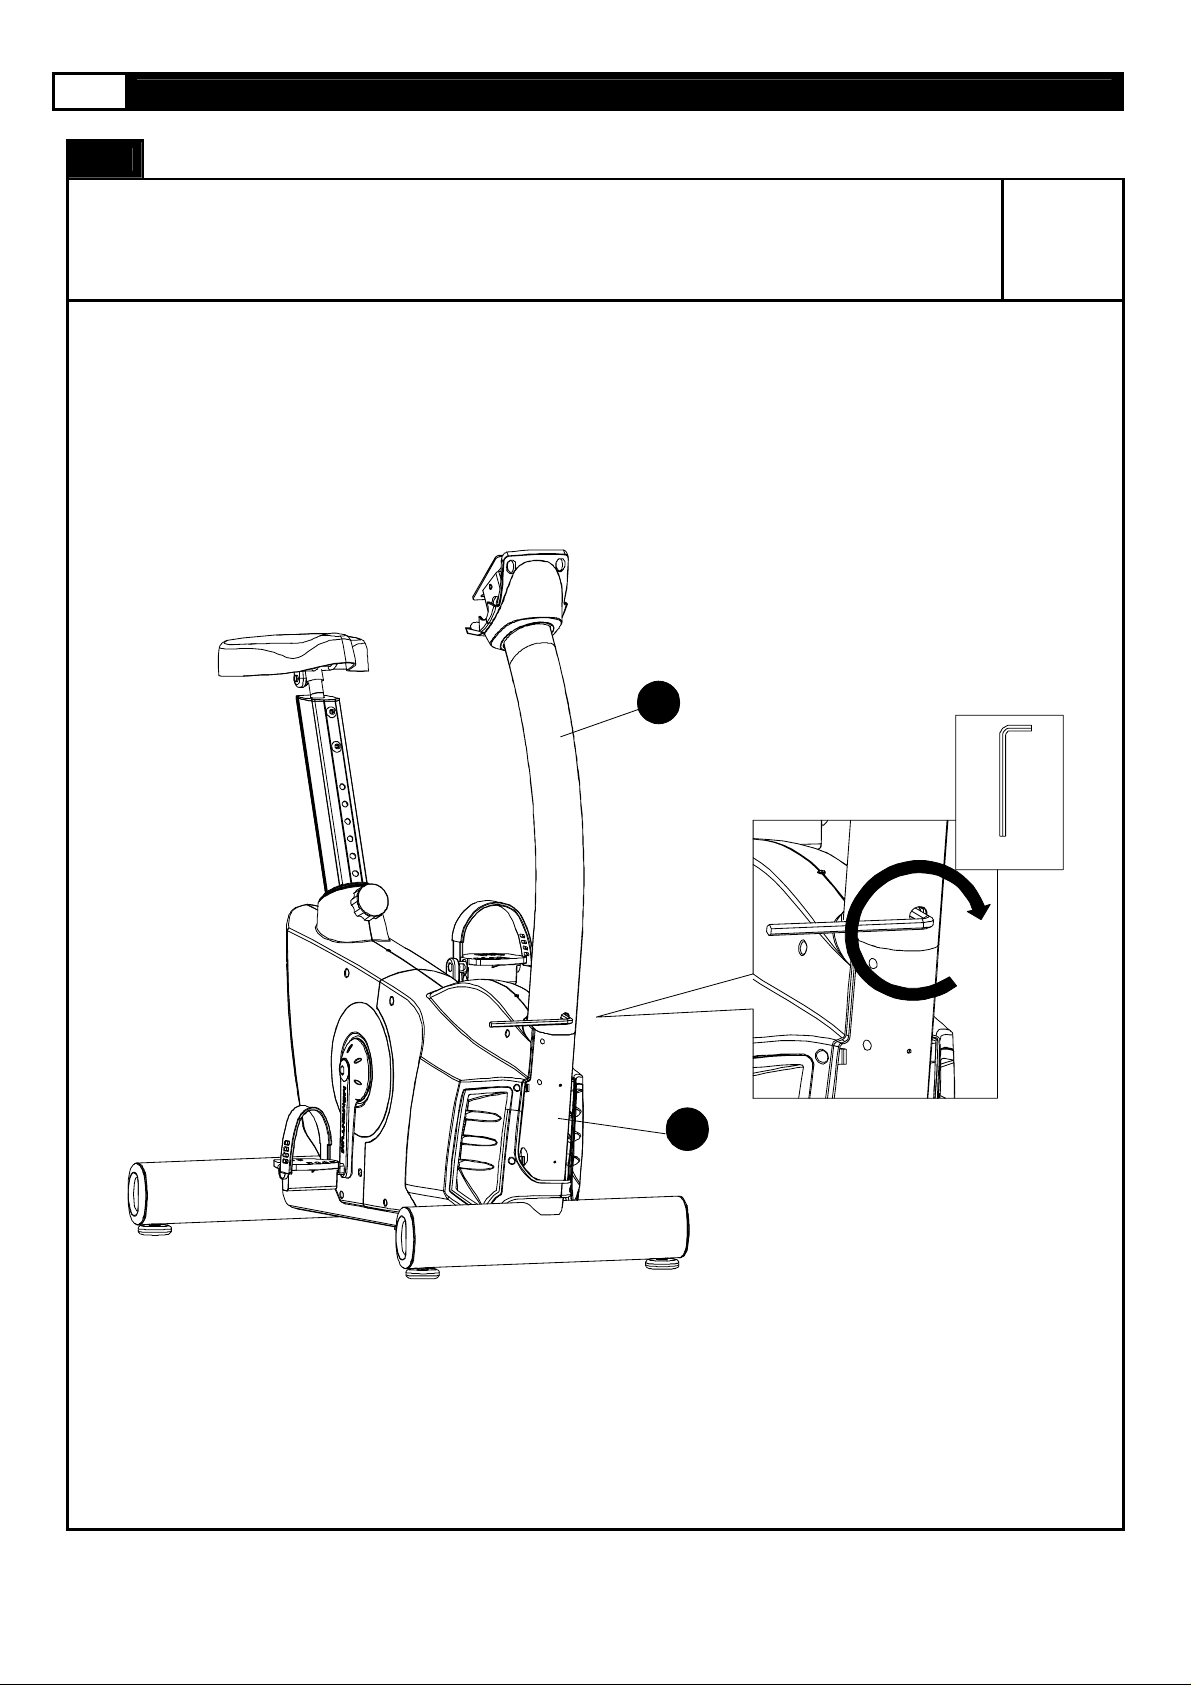
STEP 3:
Secure the Console Upright Tube (43) to the Main Frame (81) by tightening the Bolt as shown.
ASSEMBLY
43
8mm Wrench
81
Page 13
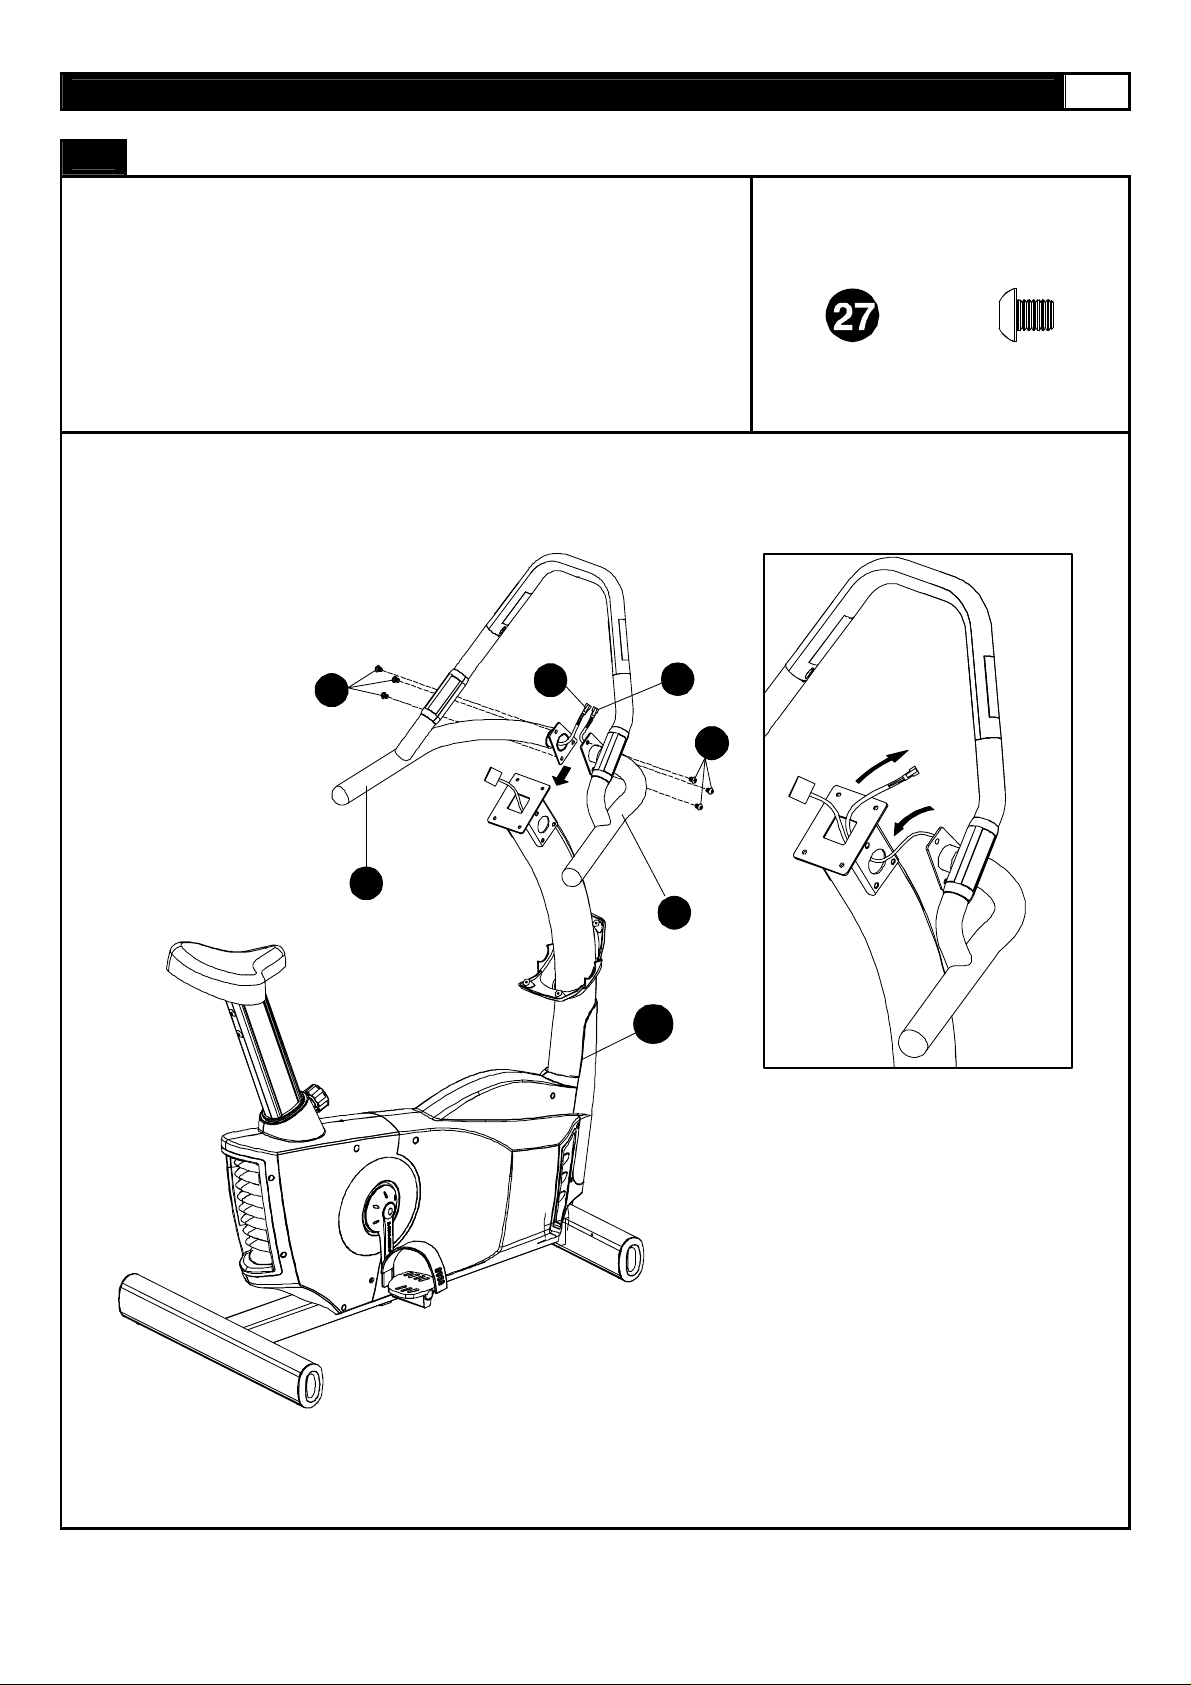
STEP 4:
First insert the Hand Pulse Wire – Lower Left (75) and Lower Right (76) into the
hol es on t he sid es of th e Consol e Upri ght T ube (4 3). Th en feed b oth th roug h and
out the top of the Console Upright Tube (43) as shown.
Attach the Handlebar Left (48) and Handlebar Right (50) to the Console Upright
Tube (43) then secure using six M8 x 10mm Bolts (27).
NOTE: Make sure all wires are recessed into the Console Upright Tube (43), do not
trap or pinch any of the wires.
ASSEMBLY
www.greenmasterfitness.com.tw
x6
13
27
48
75
76
27
50
43
Page 14
14 MOMENTUM UB5 UPRIGHT BIKE
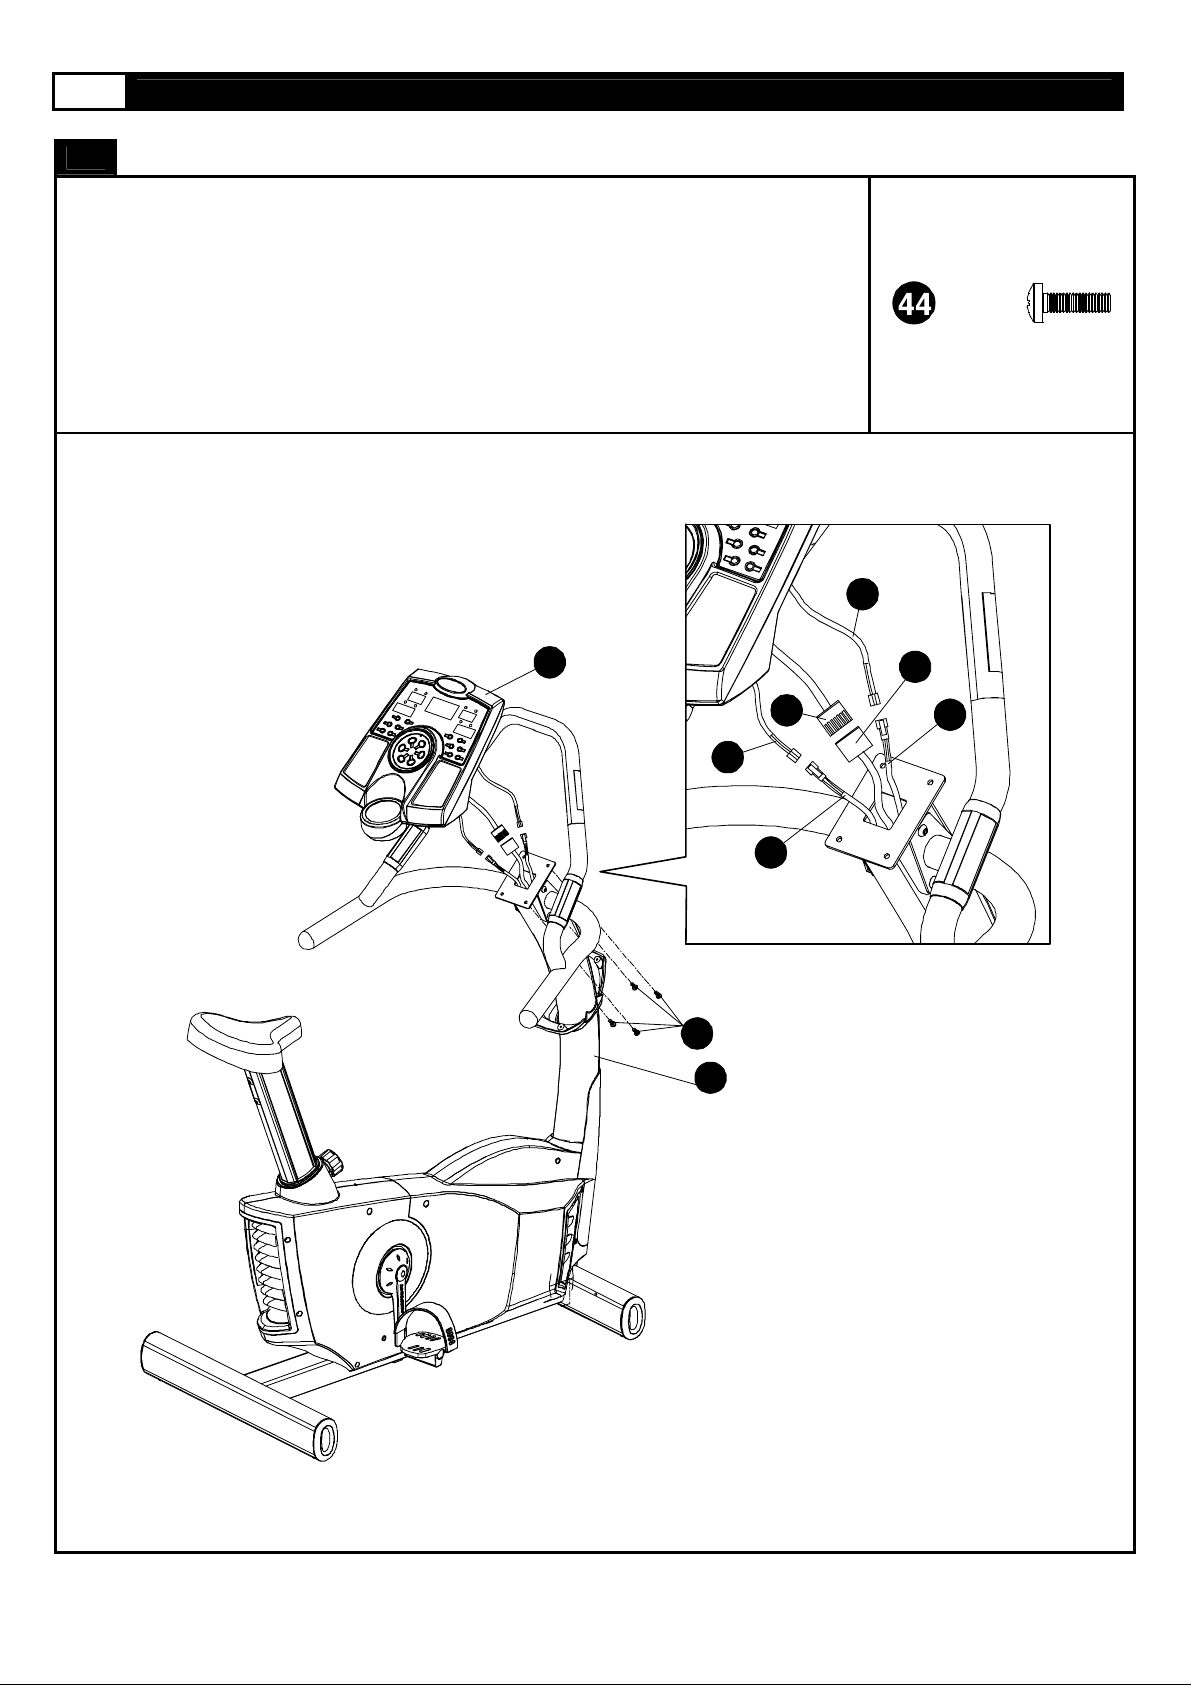
STEP 5:
Connect the Computer Wire – Upper (72) to the Computer Wire – Middle (74).
Connect the Hand Pulse Wire – Upper Left (71) to the Hand Pulse Wire – Lower Left (75) and the
Hand Pulse Wire – Upper Right (73) to the Hand Pulse Wire – Lower Right (76).
Attach the Computer (42) to the Console Upright Tube (43) and secure using four M6 x 15mm
Bolts (44).
NOTE: Make sure the wires are recessed into the Console Upright Tube, do not trap or pinch the
wires.
ASSEMBLY
73
x4
42
44
43
71
75
72
74
76
Page 15
www.greenmasterfitness.com.tw
ASSEMBLY
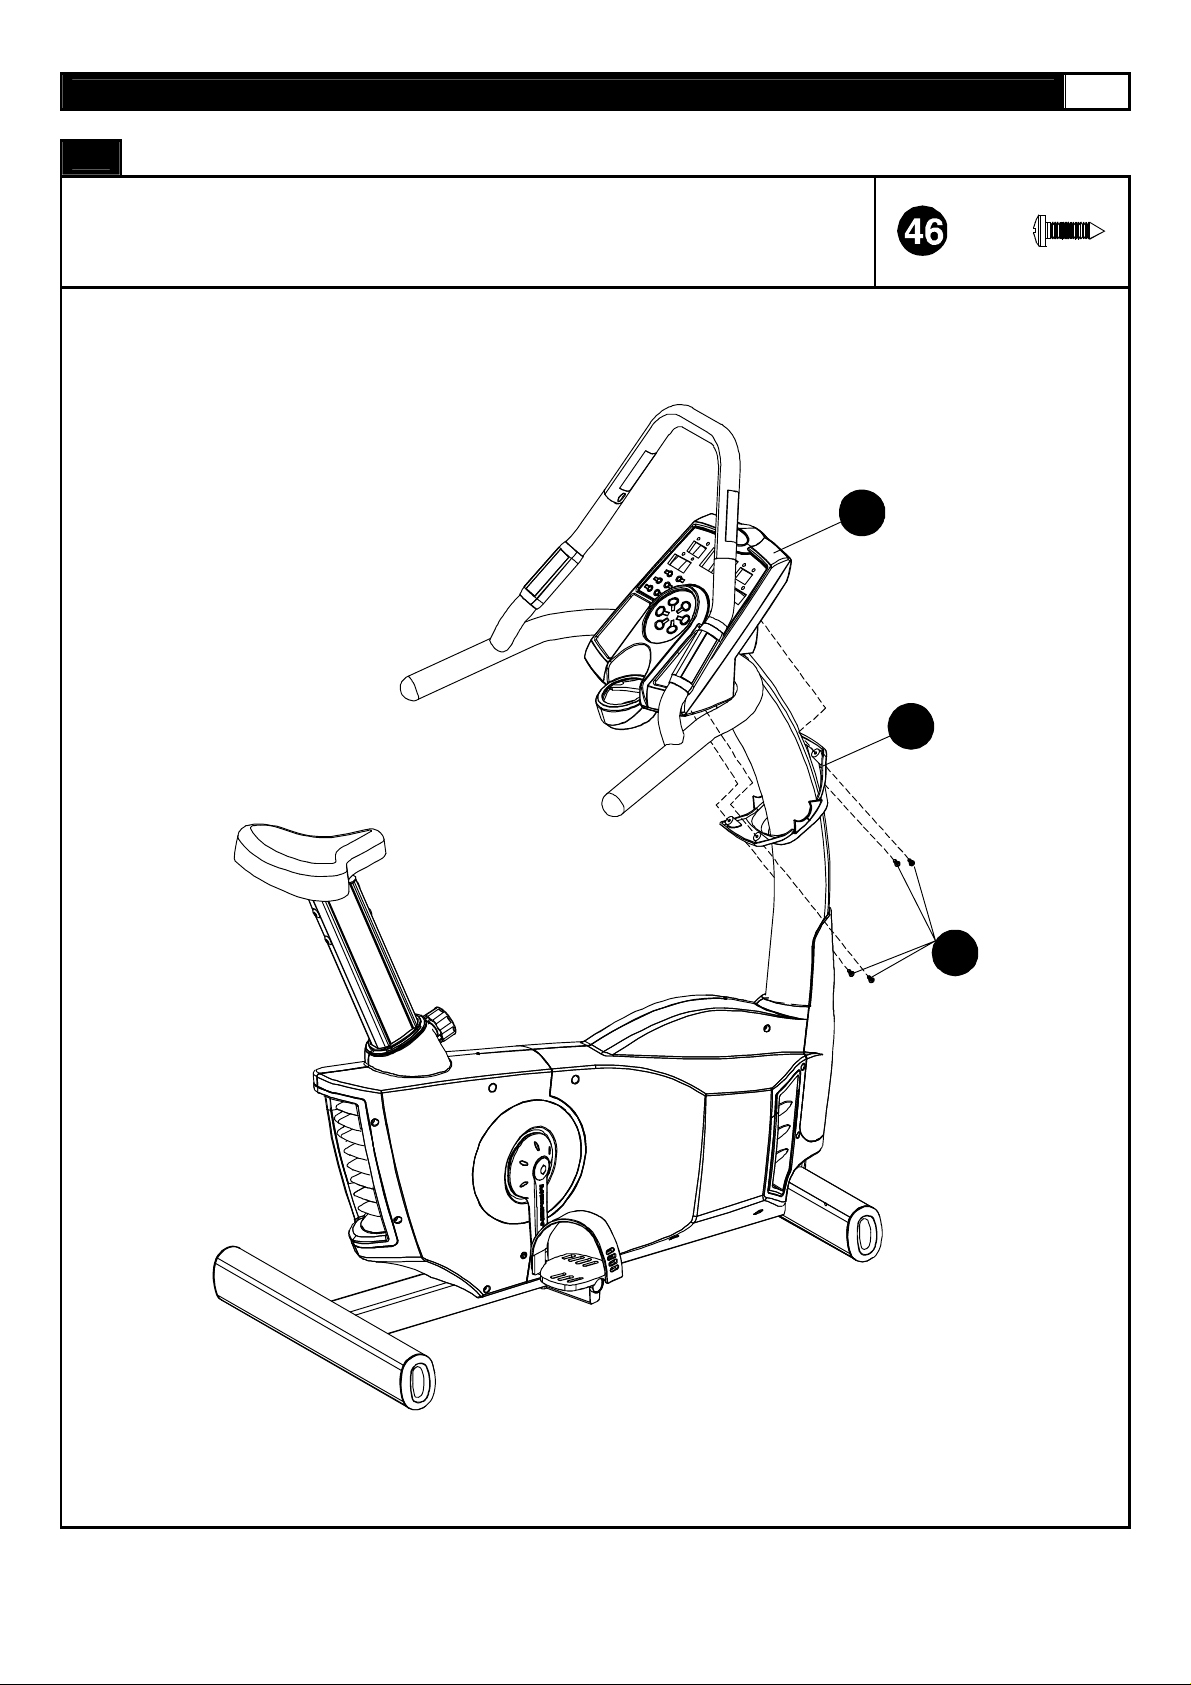
STEP 6:
Attach the Computer Protect Cover (45) to the Computer Bott o m (42) and secure using four 4 x
19mm Screws (46).
42
15
x4
45
46
Page 16
16 MOMENTUM UB5 UPRIGHT BIKE
ASSEMBLY
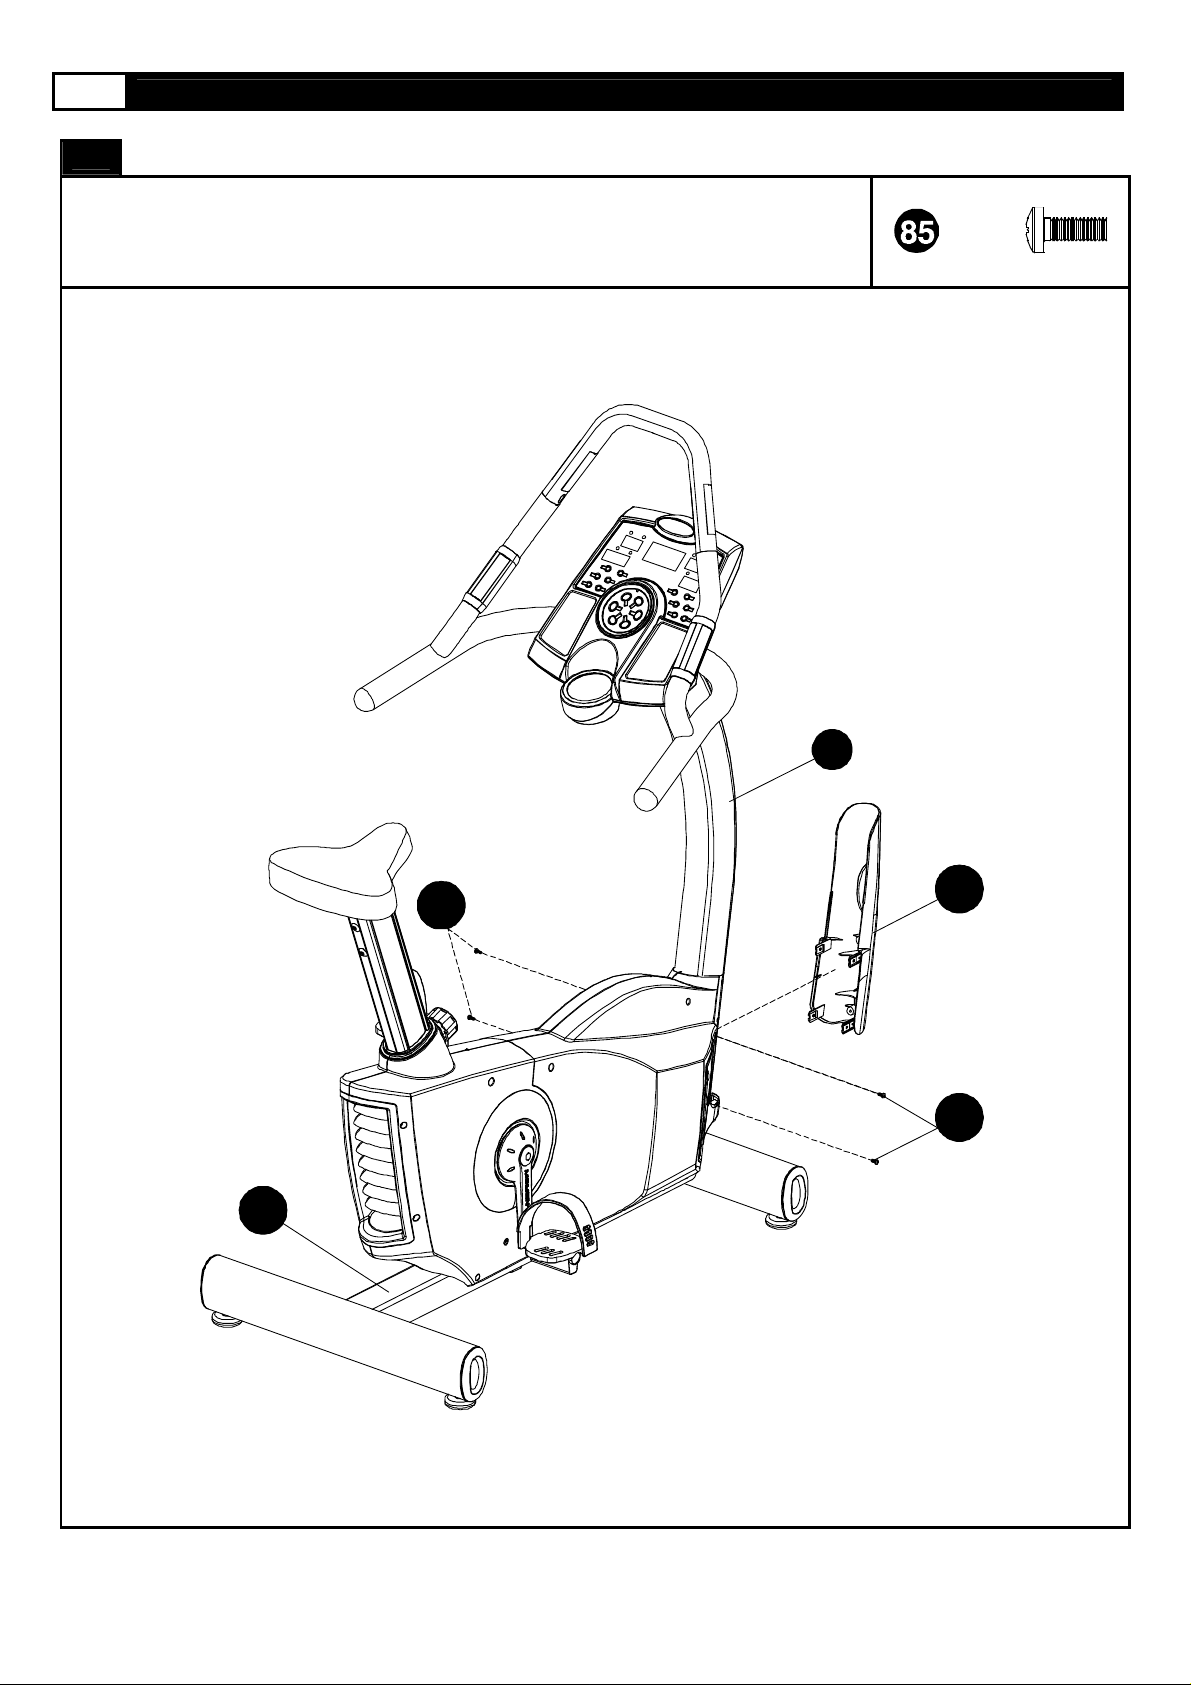
STEP 7:
Attach the Front Upright Cover (62) to the Main Frame (81) and secure using four 4 x 9mm Screws
(85).
x4
81
43
62
85
85
Page 17
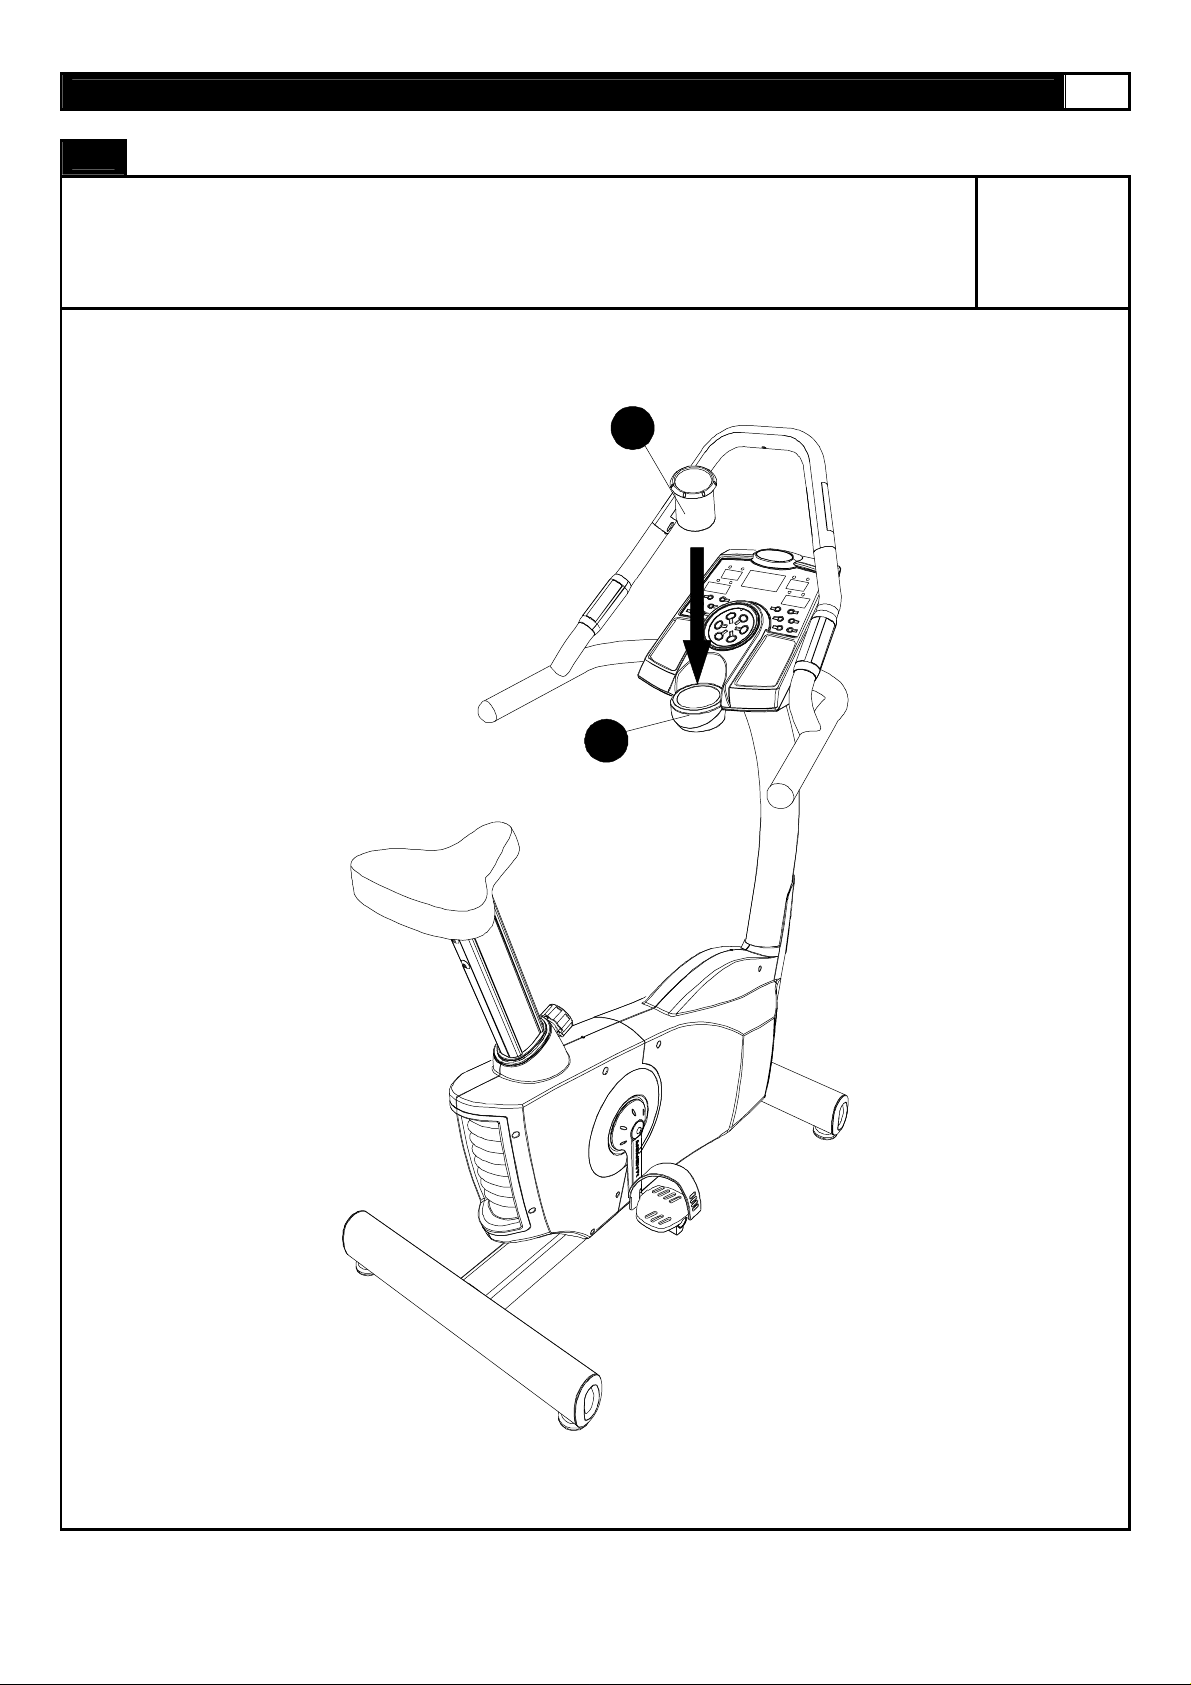
STEP 8:
Attach the Bo t t le Holder (83) to the Computer (42).
Congratulations your UB5 Upright Bike has been fully assembled.
ASSEMBLY
83
www.greenmasterfitness.com.tw
17
42
Page 18
18 MOMENTUM UB5 UPRIGHT BIKE
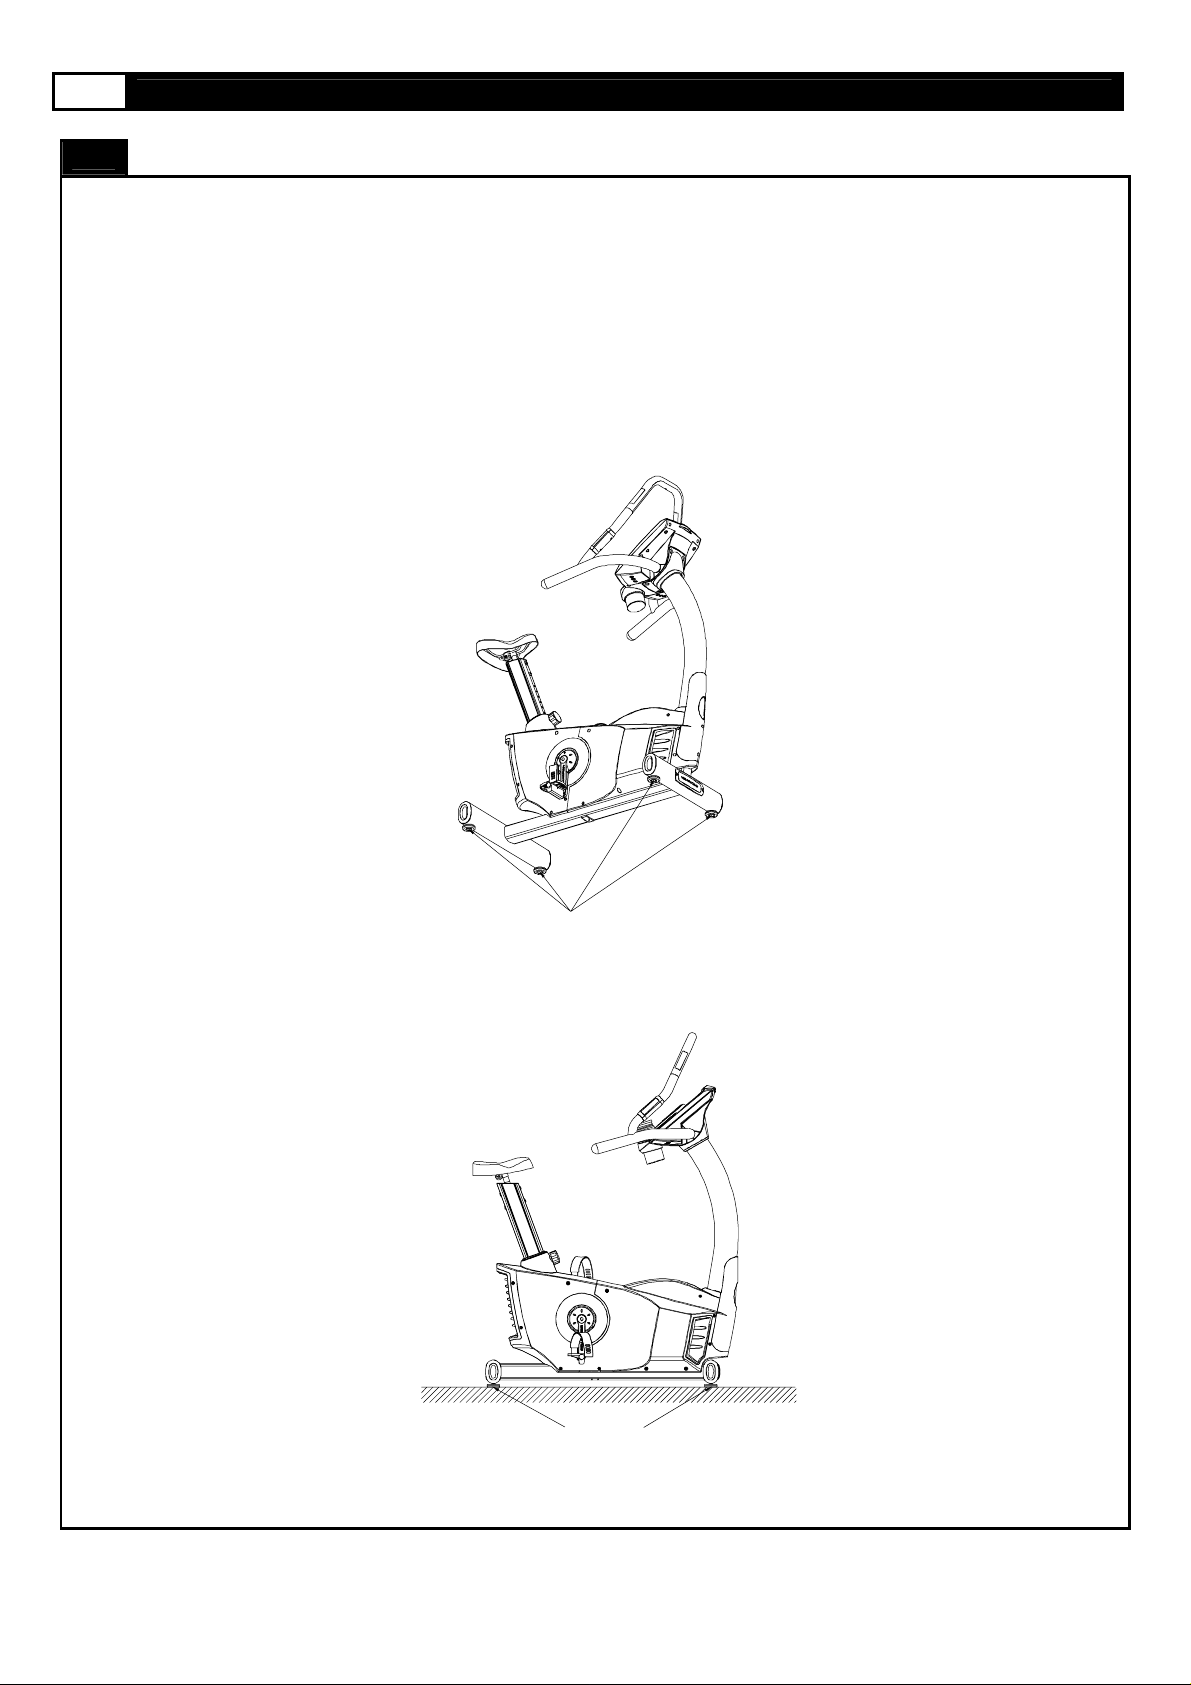
LEVEL ADJUSTMENT:
To adju st the le v elers follow th ese instructions:
You will need someone to hel p yo u with this pr o c edure, as you will need to tip the bike on its side.
Tip the bike to the left/ri ght. You will then see the LEVEL ADJUSTERS. These will need to be screwed either in or out to level the
bike. Repeat for the other side. It may help to use a spirit level when adjusting the level on your bike.
LEVEL ADJUSTMENT
Please find 4 adjustable stabilizers and 4
installed casters underneath the base frame
Floor
stabilizer
Page 19
www.greenmasterfitness.com.tw
19
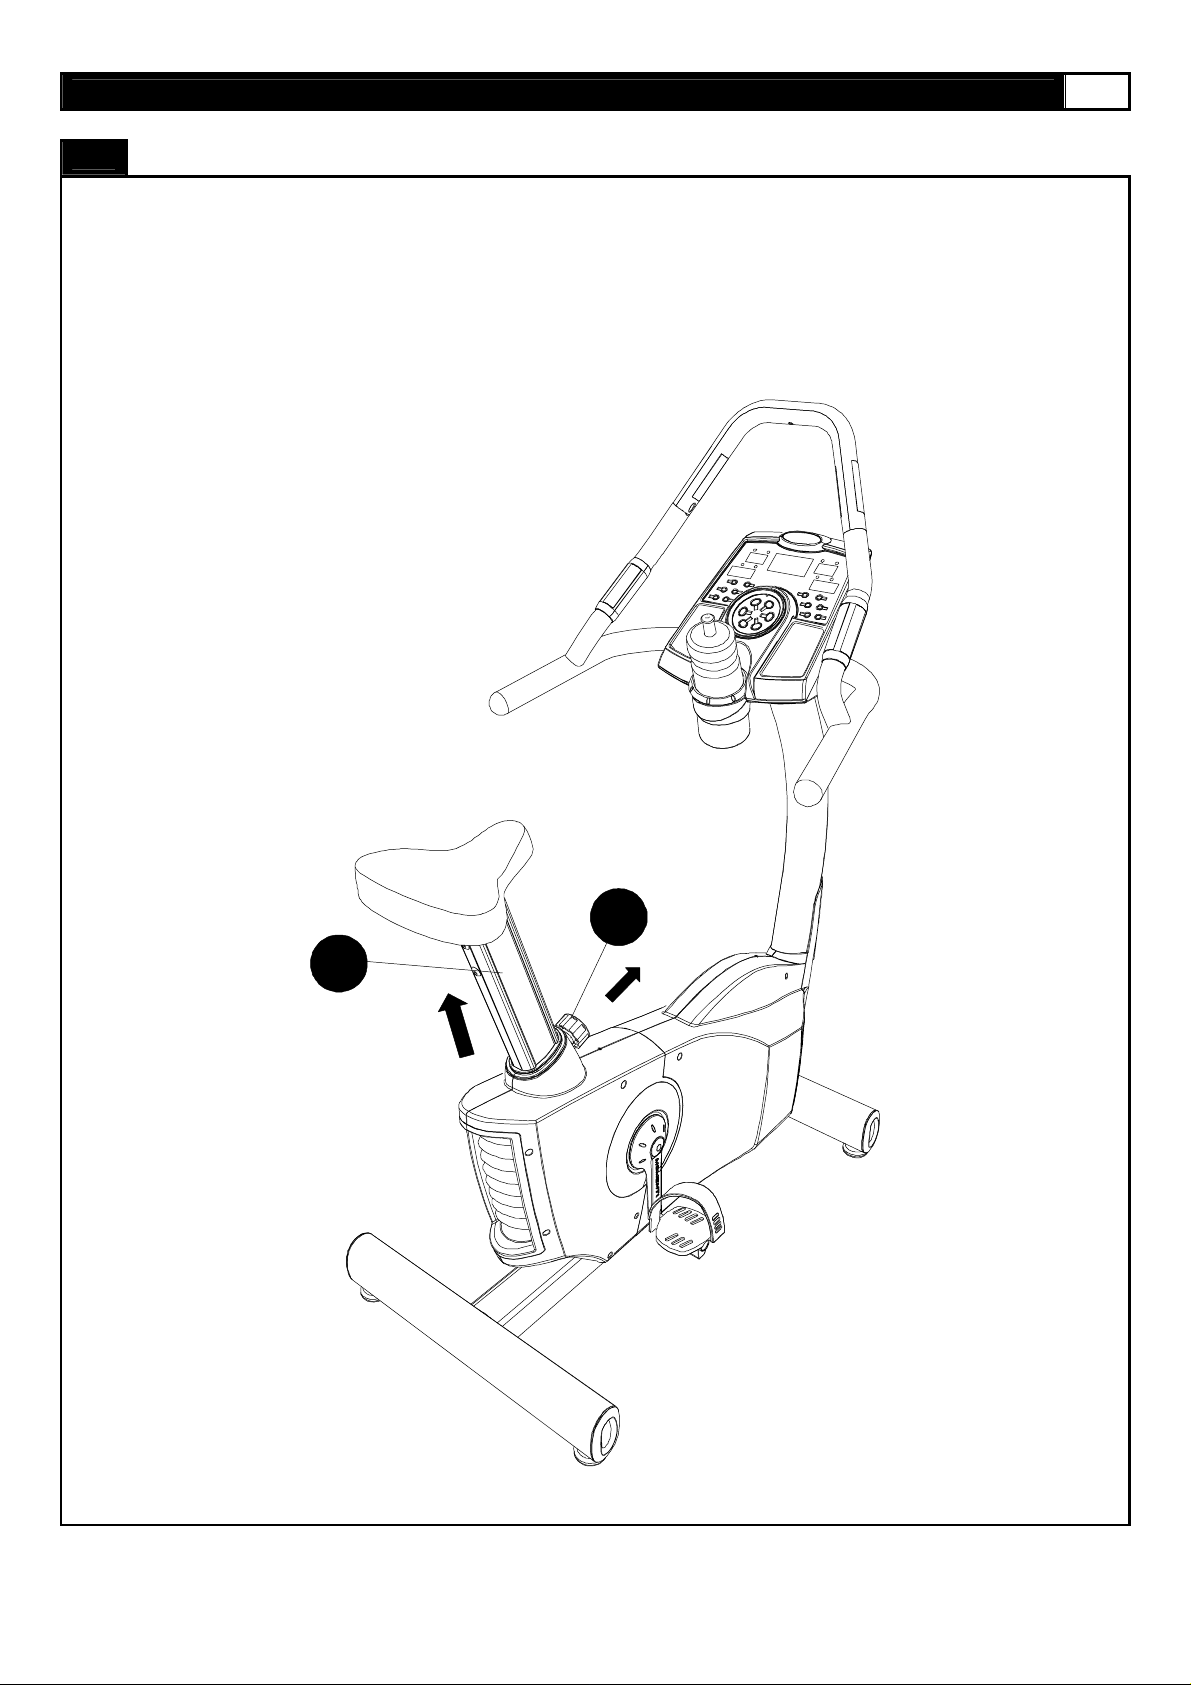
SEAT HEIGHT ADJUSTMENT:
Unscrew the Height Adjustment Knob (59) and pull. Please note you don’t have to fully remove the knob in order to release the
Seat Post (55). Once you have done this you can alter the height of the Saddle. When you have selected the correct height, screw
the knob back in.
SEAT HEIGHT ADJUSTMENT
55
59
Page 20
20 MOMENTUM UB5 UPRIGHT BIKE
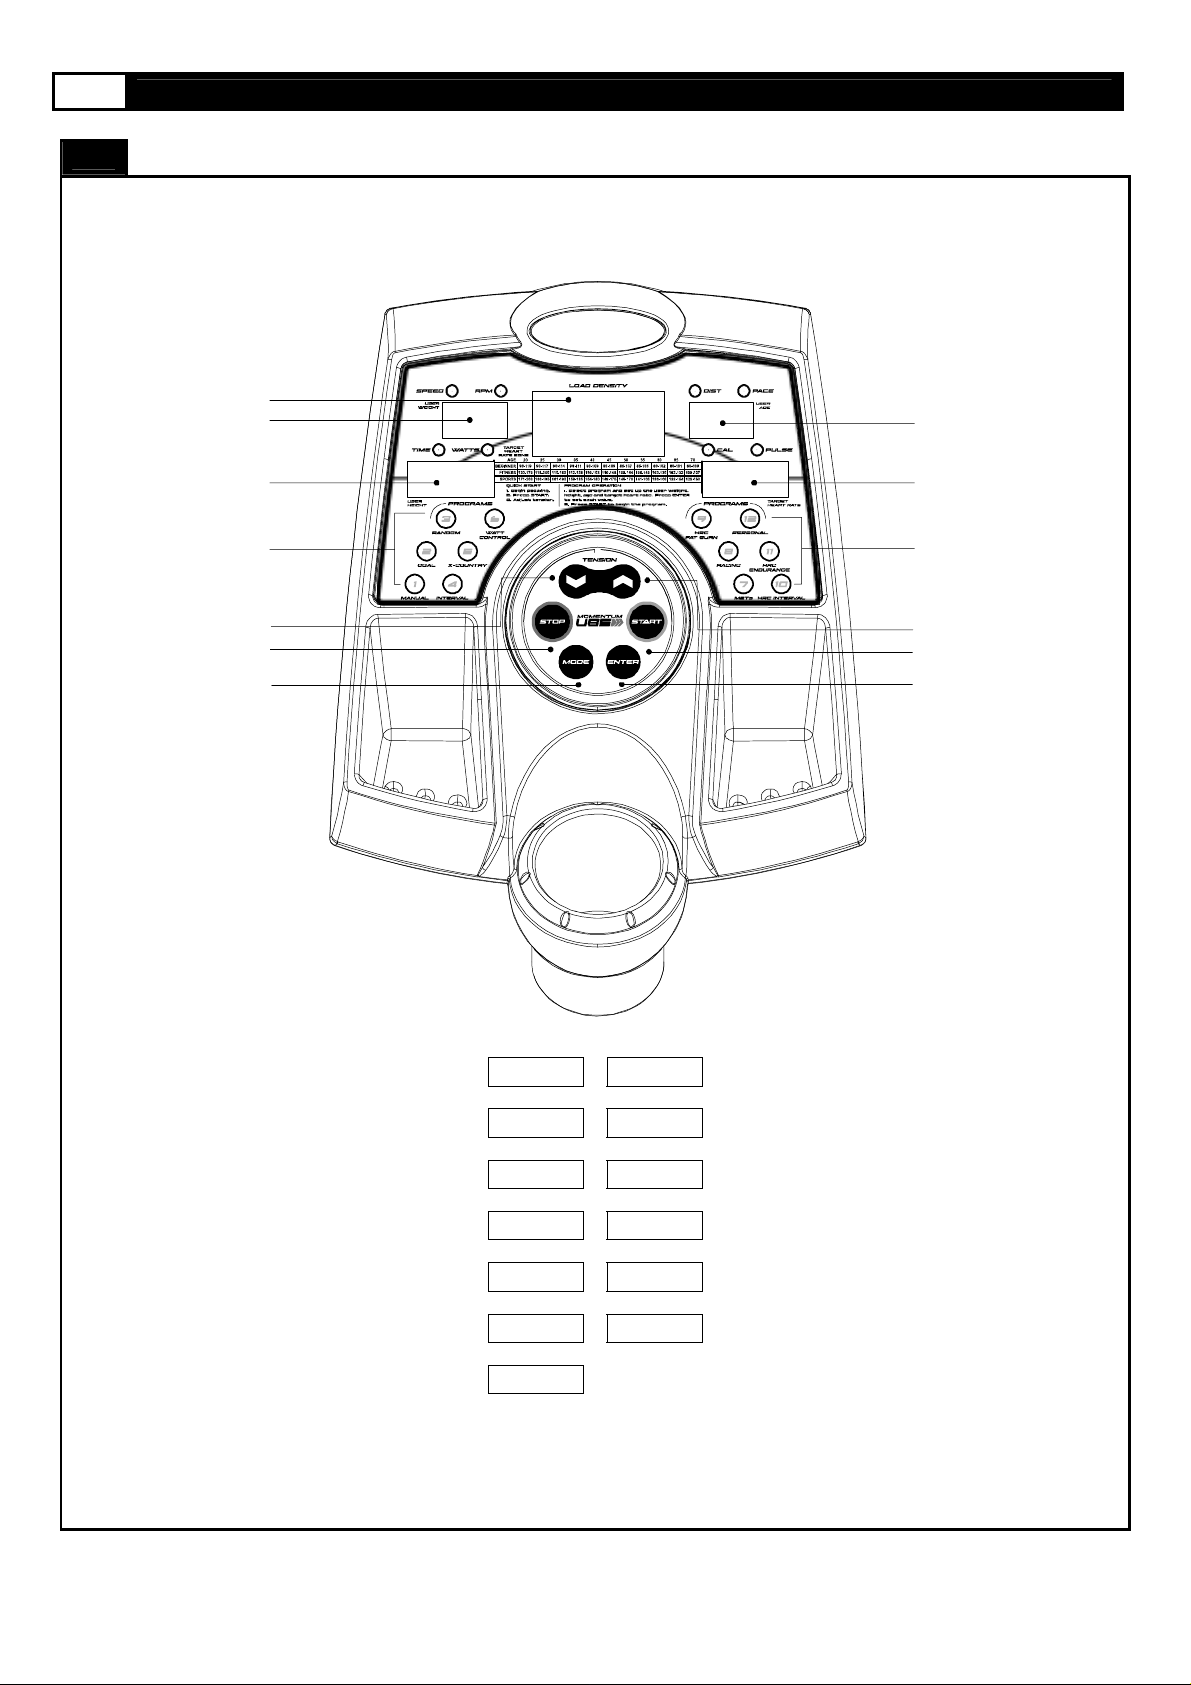
COMPUTER OPERATION
A
B
H
C
D
E
F
G
I
J
K
L
M
LOAD DENSITY A B SPEED/RPM
TIME/WATTS C D PRESET PROGRAMS
UP E F STOP
MODE G H DISTANCE/PACE
CALORIES/PULSE
I J PRESET PROGRAMS
DOWN K L START
ENTER M
Page 21

www.greenmasterfitness.com.tw
21
BUTTONS AND FUNCTIONS
STOP:
Press STOP to pause the functions during your exercise program. All the data on the display will freeze. Press START to resume
the program and all the data displayed will continue until the program has finished. If the STOP button is pressed twice, all the data
will re tu rn to 0 and th e computer will retur n to P OWER ON status.
START:
Press ST A RT to begin y our exer cise.
ENTER:
Press ENTER to confirm the set t ing of pro gram.
MODE:
Switches the LED window display informati on between SPEED/TI ME/DI STANCE/CALORIES and RPM/WATTS/PACE/PULSE.
SPEED:
Displays current exercise speed.
LEVEL:
Displays the current level of intensity of your exercise program.
CALORIES:
Count up: this measures total calories burned during exercise.
Count down: if you have set the number of calories, the computer will count down from that preset number down to zero. This data
is a guide and should not be used for medical assessment. Please note when setting a target this is in blocks of 10 from 0 to 990.
TENSION (RESISTANCE):
Displays the current resistance le vel from 1 to 20.
DISTANCE:
Count up: this measures the total distance from 0 to 99.9 Km / Mile.
Count down: if you have set the target distance, the computer will count down from that preset distance down to zero as soon as
you start exerc ising.
WATT:
This displays your current wattage output.
TIME:
Count up: the computer measures total exercise time from 16:00 up to 99:00.
Count down: if you have set the target time, the computer will count down from that pr eset time down to 0:00.
QUICK START:
When the bike is in th e P OWER ON status, press the START button to ac t ivate th e Q UICK S TART progr am. The TIME,
DISTANCE and CALORIES will count up when you start exerci si n g.
COMPUTER INSTRUCTIONS
PROGRAM:
To select one of the User pr ogr am s, you will n eed to set u p a user profi le. To input new information, please f ollow the procedure
below:
WEIGHT set up – After the User Code has been confirmed the TIME display will show 68kg/150lbs or the previous setting and
begin flashing. Press the UP/DOWN button to adjust the user weight information then press ENTER to confirm.
HEIGHT set up – After the WEIGHT has been confirmed the DISTANCE display will show 170cm/67 inches or the previous setting
and begin flashing. Press the UP/DOWN button to adjust the user height information then press ENTER to confirm.
Page 22

22 MOMENTUM UB5 UPRIGHT BIKE
AGE set up – After the HEIGHT has been confirmed the CALORIES display will show 35 or the previou s setting and begin flashing.
Press the UP/DOWN button to adjust the user age information then press ENTER to confirm.
SEX set up – After the AGE has been confirmed the LOAD DENSITY display will show M (Male) and begin flashing. Press the
UP/ DOWN butto n to adjust the us er sex to M (Male) or F (Femal e) then pres s ENTER to confirm.
ENGLISH to METRIC conversion:
The bike computer display can show both ENGLISH and METRIC information. If you want to change from ENGLISH to METRIC,
please follow the procedure below:
P1 TO P12 PROGRAMS SELECTION PROCEDURE
P1: MANUAL
After you have pr essed the P1 MANUAL pro gr am butt o n, the dis pla y will sho w the defa ul t u s er profi le. Input the user profile then
the TIME display will show 30:00. Press the UP/DOWN button to adjust the target time then press ENTER to confirm. Press
START to begin the exercise program. The TIME will start to count down to 0:00 then the program will stop automatically. To
increas e or decrease th e resistance whi le exerci sing, press t he UP/D OWN b ut ton.
To p ause the pro gram wh ile ex ercising, press th e STOP b utton. To res ume exercising , press th e S TART button.
COMPUTER INSTRUCTIONS
1. W hen the bike is in the power on status, press and hold both the ENTER and STOP buttons for 3 seconds. The
LOAD DENSITY display will show a blinking ML.
2. Press the UP or DOWN buttons to switch between ENGLISH (ML) and METRIC (KM) then press the ENTER
button to confirm the selection and return to PO WER ON status.
P2: GOA L
After you have pressed the P2 GOAL program button, the display will show the default user profile. Input the user profile then the
TIME display will show a blinking 0:00. Press the UP/DOW N button to adju st th e tar get time then press ENTER to confirm. Repeat
the same procedure to set up your goal on DISTANCE, CALORIES and TARGET HEART RATE. Press START to begin the
exercise program. To increase or decrease the resistance while exercising, press the UP/DOWN button.
To p ause the pro gram wh ile ex ercising, press th e STOP b utton. To res ume exercising , press th e S TART button.
P3: RANDOM
After yo u have pres sed the P3 RANDOM, the displ ay will show the defaul t user p rofi le. In put the user profile t hen t he TIME d i splay
will show a blinking 30:00. Press the UP/DOWN button to adjust workout time then press ENTER to confirm. Press START to
begin the exercise program.
The RANDOM program has 50 different RESISTANCE based programs. If while exercising, you find the level of RESISTANCE too
intens e you can pres s the UP/DOWN but ton to decrease the resis t ance.
To p ause the pro gram wh ile ex ercising, press th e STOP b utton. To res ume exercising , press th e S TART button.
Page 23
www.greenmasterfitness.com.tw
23
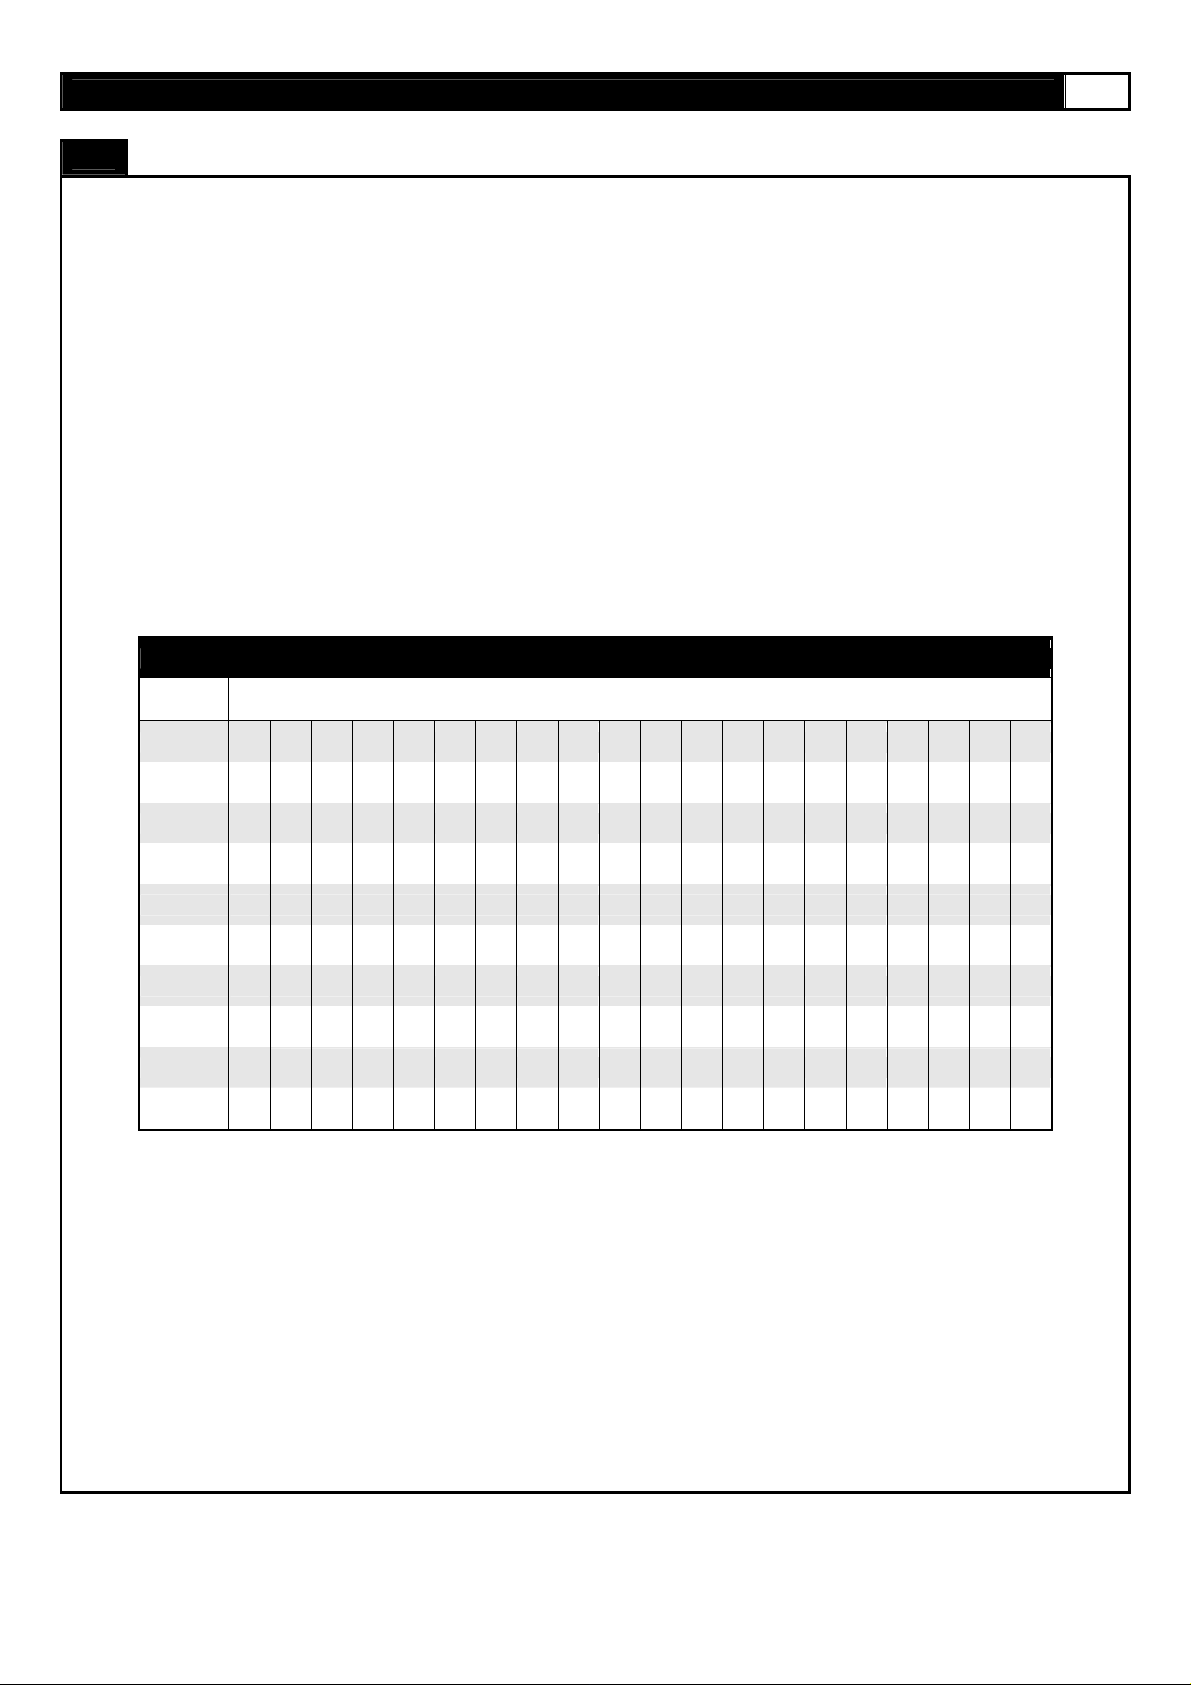
P4: INTERVAL
After you have pr ess ed P4 INTERVAL, t h e displ a y will sho w the default user profile. Input th e user pr ofi le then the TIME display
will show a blinking 30:00. Press the UP/DOWN button to adjust the workout time then press ENTER to confirm.
The RPM display will show a blinking L1. Press the UP/DOWN button to select the workout intensity level from L1 to L10 then
press ENTER to confirm. Press START to begin the exercise program.
The aim of an INTERVAL program is to exercise at levels of LOW and HIGH intensity for short periods of time. There is one profile
with 10 different level s of in tensity. The resistanc e will be changed aut om atic a lly while exercisin g according to the following profile.
To increase or decrease the resistance while exercising, press the UP/DOWN button.
To p ause the pro gram wh ile ex ercising, press th e STOP b utton. To res ume exercising , press th e S TART button.
INTERVAL Profile: If the user sets the workout time for more than 20 minutes the computer will average the workout time into 20
COMPUTER INSTRUCTIONS
sections as the following Resistance Profile table shows, i.e. input 40 minutes and the computer will operate in
2 minute intervals for each section displayed. If the user sets the workout time for less than 20 minutes,
the computer will opera te in 1 minute intervals for each s ection displayed until the time runs out, i.e. input
12 minutes and the progr am will ru n for 12 sections at 1 minute per section.
RESISTANCE PROFILE
Intensity
Level
L1 1 11 11 1 1 11 11 1 1 11 11 1 1 11 11 1 1 11 11 1
Resistance Level per Section (20 total)
L 2 2 12 12 2 2 12 12 2 2 12 12 2 2 12 12 2 2 12 12 2
L 3 3 13 13 3 3 13 13 3 3 13 13 3 3 13 13 3 3 13 13 3
L 4 4 14 14 4 4 14 14 4 4 14 14 4 4 14 14 4 4 14 14 4
L 5 5 15 15 5 5 15 15 5 5 15 15 5 5 15 15 5 5 15 15 5
L 6 6 16 16 6 6 16 16 6 6 16 16 6 6 16 16 6 6 16 16 6
L 7 7 17 17 7 7 17 17 7 7 17 17 7 7 17 17 7 7 17 17 7
L 8 8 18 18 8 8 18 18 8 8 18 18 8 8 18 18 8 8 18 18 8
L 9 9 19 19 9 9 19 19 9 9 19 19 9 9 19 19 9 9 19 19 9
L 10 10 20 20 10 10 20 20 10 10 20 20 10 10 20 20 10 10 20 20 10
P5: X-COUNTRY
After you hav e pres sed P5 X -COUNTRY, t he dis play will show the default us er profile. I nput t he user profile t hen the TIME d isplay
will show a blinking 30:00. Press the UP/DOWN button to adjust the workout time then press ENTER to confirm.
The RPM display will show a blinking L1. Press the UP/DOWN button to select the workout intensity level from L1 to L18 then
press ENTER to confirm. Press START to begin the exercise program.
To increase or decrease the resistance while exercising, press the UP/DOWN button.
To p ause the pro gram wh ile ex ercising, press th e STOP b utton. To res ume exercising , press th e S TART button.
Page 24
24 MOMENTUM UB5 UPRIGHT BIKE
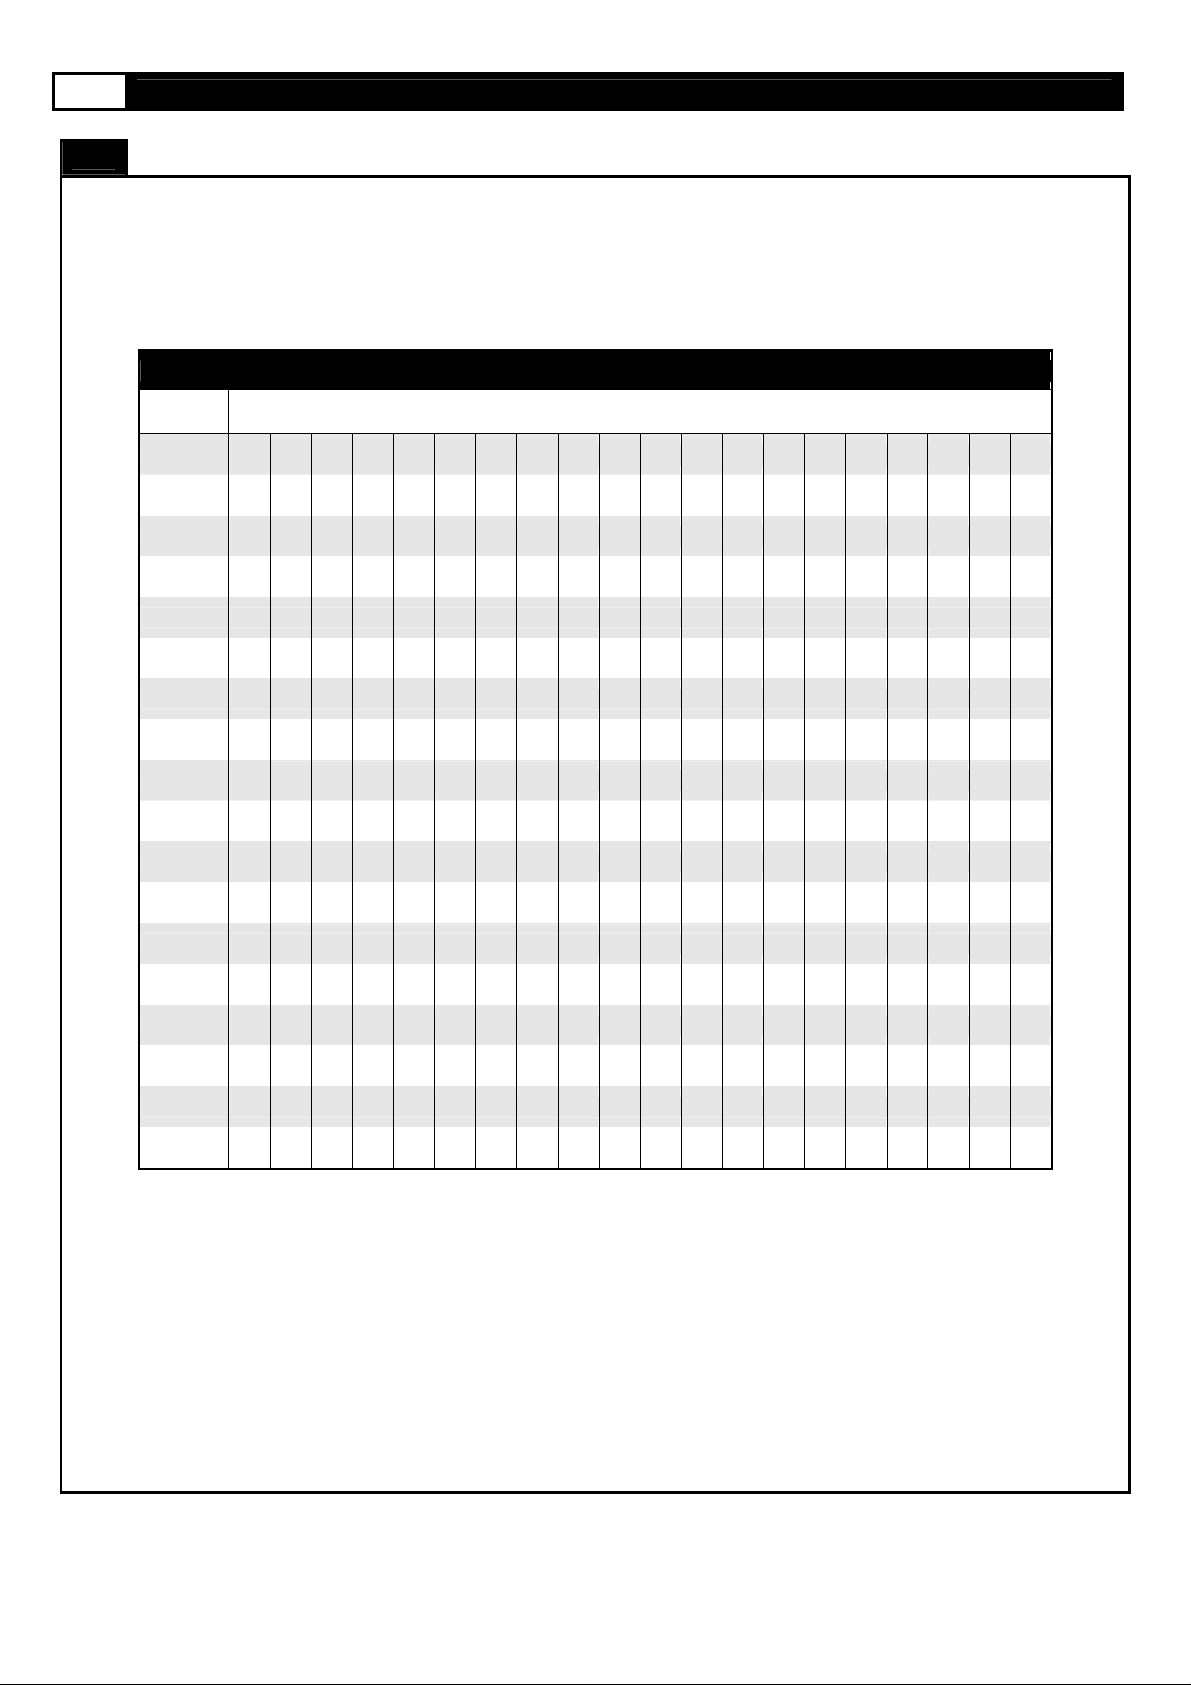
X-COUNTRY Profile: If the user sets the workout time for more than 20 minutes, the computer will average the workout time
COMPUTER INSTRUCTIONS
into 20 sections as the following Resistance Profile table shows, i.e. input 40 minutes and the computer will
operate in 2 minute intervals for each section displayed. If the user sets the workout time for less than 20
minutes the computer will operate in 1 minute inte rvals for each sect ion until the time runs out, i.e. input 12
minutes and the program will run for 12 sections at 1 minute per section.
RESISTANCE PROFILE
Intensity
Level
L1 1 3 1 3 1 3 1 3 1 3 1 3 1 3 1 3 1 3 1 3
L2 2 4 2 4 2 4 2 4 2 4 2 4 2 4 2 4 2 4 2 4
L 3 3 5 3 5 3 5 3 5 3 5 3 5 3 5 3 5 3 5 3 5
L 4 4 6 4 6 4 6 4 6 4 6 4 6 4 6 4 6 4 6 4 6
L 5 5 7 5 7 5 7 5 7 5 7 5 7 5 7 5 7 5 7 5 7
L 6 6 8 6 8 6 8 6 8 6 8 6 8 6 8 6 8 6 8 6 8
Resistance Level per Section (20 total)
L 7 7 9 7 9 7 9 7 9 7 9 7 9 7 9 7 9 7 9 7 9
L 8 8 10 8 10 8 10 8 10 8 10 8 10 8 10 8 10 8 10 8 10
L 9 9 11 9 11 9 11 9 11 9 11 9 11 9 11 9 11 9 11 9 11
L 10 10 12 10 12 10 12 10 12 10 12 10 12 10 12 10 12 10 12 10 12
L 11 11 13 11 13 11 13 11 13 11 13 11 13 11 13 11 13 11 13 11 13
L 12 12 14 12 14 12 14 12 14 12 14 12 14 12 14 12 14 12 14 12 14
L 13 13 15 13 15 13 15 13 15 13 15 13 15 13 15 13 15 13 15 13 15
L 14 14 16 14 16 14 16 14 16 14 16 14 16 14 16 14 16 14 16 14 16
L 15 15 17 15 17 15 17 15 17 15 17 15 17 15 17 15 17 15 17 15 17
L 16 16 18 16 18 16 18 16 18 16 18 16 18 16 18 16 18 16 18 16 18
L 17 17 19 17 19 17 19 17 19 17 19 17 19 17 19 17 19 17 19 17 19
L 18 18 20 18 20 18 20 18 20 18 20 18 20 18 20 18 20 18 20 18 20
P6: WATT CONTROL
After you have pr essed the P6 WATT CONTROL button, the display will show th e defa ult u s er pr ofi le. Input the user profile then
the TIME display will show a blinking 30:00. Press the UP/DOWN button to adjust the workout time then press ENTER to confirm.
The RPM display will show the default workout watt setting of 110W. Press the UP/DOWN button to adjust the workout watts then
press ENTER to confirm. Press START to begin the exercise program.
The resistance will be changed automatically while exercising. The program will change the resistance automatically to match the
user watts set t ing.
Page 25

www.greenmasterfitness.com.tw
25
To increase or decrease the resistance while exercising, press the UP/DOWN button.
To p ause the pro gram wh ile ex ercising, press th e STOP b utton. To res ume exercising , press th e S TART button.
P7: METs (Metabolic Equivalents)
Press the P7 METs button, t he dis pl a y will show th e defa ult user p rofile. Input the user profile then the TIME display will show a
blinking 30: 00. Press the UP/ DOW N button to adju st th e worko ut time then press ENTER to confirm. The RPM display will show a
blinkin g 2. 0. Press the UP/DOWN button to select th e METs level o f th e workout from 1.0 – 16.0 then press ENTER to confirm.
Press ST A RT to begin the exercis e pro gram.
To increase or decrease the resistance while exercising, press the UP/DOWN button.
To p ause the pro gram wh ile ex ercising, press th e STOP b utton. To res ume exercising , press th e S TART button.
COMPUTER INSTRUCTIONS
P8: RACING
After you have pressed the P8 RACING button, the display will show the default user profile. Input the user profile then the
DISTANCE display will show 20 Km (12.5 Mile). Thi s is the target dist a n c e in the RACING program . Press the START butto n to
begin the exercise program.
During the program the target distance will count down to zero. The first row from top of the LOAD DENSITY LED display shows
the distance completed by the c omputer. The seco nd row f rom top of LOAD DENSITY L ED display shows t he distance completed
by the user. Th e user c an rac e against the computer to see who completes t he total distance fir st.
To increase or decrease the resistance while exercising, press the UP/DOWN button.
To p ause the pro gram wh ile ex ercising, press th e STOP b utton. To res ume exercising , press th e S TART button.
P9: HRC FAT BURN
After you have pressed the P9 HRC FAT BURN button, the display will show the default user profile. Input the user profile then the
TIME display will show a blinki n g 30:0 0. Press th e UP/DOWN butto n to adj ust t h e workout time then press ENTER to confirm.
The PULSE display will show the default target heart rate of 157. Press the UP/DOWN button to adjust the target heart rate.
Press ST A RT to begin the exercis e pro gram.
The resista nce will start from 1 when you begin thi s program. If the actual user h eart ra te does not reach the targ et hear t ra te, the
resistance will increase by one level every 30 seconds until the actual user heart rate reaches the target heart rate. If the actual
heart rate is higher than target heart rate, then the resistance will be reduced by one level every 30 seconds until the actual heart
rate meets the target heart rate.
To increase or decrease the resistance while exercising, press the UP/DOWN button.
To p ause the pro gram wh ile ex ercising, press th e STOP b utton. To res ume exercising , press th e S TART button.
P10: HRC INTERVAL
After you have press ed the P10 HRC INT ERVAL button , th e di s pl a y will show th e defa ult u s er pr ofi le. Input the user profile then
the TIME display will show a blinking 30:00. Press the UP/DOWN button to adjust the workout time then press ENTER to confirm.
The PULSE display will show the default target heart rate of 157. Press the UP/DOWN button to adjust the target heart rate.
Press ST A RT to begin the exercis e pro gram.
The resistance will start from 1 when you begin this program. If the actual user heart rate does not reach the target heart rate, the
resistance will increase by one level every 30 seconds until the actual user heart rate reaches the target heart rate. The resistance
will be reduced by one level every 30 seconds when actual user heart rate reaches the target heart rate. Then the resistance starts
to increase again when the actual user heart rate decreases to 85% of the target heart rate.
Page 26

26 MOMENTUM UB5 UPRIGHT BIKE
To increase or decrease the resistance while exercising, press the UP/DOWN button.
To p ause the pro gram wh ile ex ercising, press th e STOP b utton. To res ume exercising , press th e S TART button.
P11: HRC ENDURANCE
After you have press ed the P11 HRC ENDURANCE butt on, the di s pl a y will show th e defa ult u s er profile. Input the user profile th en
the TIME display will show a blinking 30:00. Press the UP/DOWN button to adjust the workout time then press ENTER to confirm.
The PULSE display will show the default target heart rate of 157. Please note the users TARGET HEART RATE will be adjusted
with the user AGE according to the factory setting. The factory TARGET HEART RATE setting is based on 85% of the maximum
heart ra te. The maximum h eart rate is calc ulated as 220 minus the user age. Example: For a 35-year old user the maximum user
heart rate should be 185 (220 – 35 = 185) and 85% of the maximum user heart rate is 157. The user cannot adjust the target heart
rate in this pro g ram. Pre s s S T ART to begin the exerc is e prog ram.
The resistan ce will start from level 1 when yo u begin this program. If the actual u s er hear t rate does not reach the targ et heart rate,
the resistance will increase by one level every 30 seconds until the actual user heart rate reaches the target heart rate. If the a ctu al
user heart rate is under the target heart rate, the resistance will increase by one more level every 30 seconds.
The aim of this program is to keep the actual user heart at or above the target heart rate.
To increase or decrease the resistance while exercising, press the UP/DOWN button.
To p ause the pro gram wh ile ex ercising, press th e STOP b utton. To res ume exercising , press th e S TART button.
P12: PERSONAL
The PERSO NAL pr ogram allows users to desi gn and store t heir own preset workout pr ograms in the computer . The maximum
time duration is 60 min utes.
After you hav e pres sed th e P 12 PE RSONAL button, the di splay will show the def ault user profi le. In put the user profile t hen press
the MODE button to start set ting up the new program. The first line of the LOAD DENSITY displa y will light u p and blink. Press the
UP/DOWN button to set the resistance level in first minute. After completing the set up for the first minute of resistance, press the
MODE button. The second line of the LOAD DENSITY display will start blinking. Follow the same procedure to set up the entire
program. When the program set up is complete, press the START button to run the program. The program will automatically be
saved in the computer for future use.
To increase or decrease the resistance while exercising, press the UP/DOWN button.
To p ause the pro gram wh ile ex ercising, press th e STOP b utton. To res ume exercising , press th e S TART button.
COMPUTER INSTRUCTIONS
Page 27
www.greenmasterfitness.com.tw
27
Warning:
Before using this product, please consult your personal physician for a complete physical examination. Frequent and strenuous
exercise should be approved by your doctor first. If any discomfort should result from your use of this product, stop exercising and
consult your doctor. Proper usage of this product is essential. Please read your manual carefully before exercising.
Please keep all children away from the equipment during use and when equipment is unattended.
Always wear appropriate clothing, including athletic shoes, when exercising. Do not wear loose clothing that could become caught
during exercising.
Make sure that all bolts and nuts are tightened when equipment is in use. Periodic maintenance is required on all exercise
equipment to keep it in good condition.
Before beginning:
How you begin your exercise program depends on your physical condition. If you have been inactive for several years, or are
severely overweight, you must start slowly and increase your time gradually, a few minutes per week.
Initially you may be able to exercise only for a few minutes in your target zone. However, your aerobic fitness will improve over the
next six to eight weeks. Don’t be discouraged if it takes longer. It’s important to work at your own pace. Ultimately, you’ll be ab le
to exercise continuously for 30 minutes. And the better your aerobic fitness, the harder you will have to work to stay in your target
zone. But remember these es sent ials:
IMPORTANT STEPS
• Contact your physician before starting a workout or training program. Have your doctor review your training and diet
programs to advise you of a workout routine you should adopt.
• Begin your training program slowly with realistic goals that have been set by you and your doctor.
• Supplement your program with some type of aerobic exercise such as walking, jogging, swimming, dancing and/or
bicycling. Monitor your pulse frequently. If you do not have an electronic heart rate monitor, have your physician show
you the proper way to manually check your pulse by using your wrist or neck. Establish your target heart rate based on
your age and condition.
• Dr ink plent y of fl uids d uring t he course of your routi ne. You m ust rep lac e the water content lost from exces siv e exercising
to avoid dehydration. Avoid drink ing large amoun t s of cold liquid s. Fluids sh ould b e at room temperature w hen
consumed.
Page 28
28 MOMENTUM UB5 UPRIGHT BIKE
Finding your pulse:
To make sure your heart is beating in its target zone, you’ll need to know how to monitor your heart rate. The easiest way is to feel
the pulse in the carotid artery on either side of your neck, between the windpipe and the large neck muscles. Count the number of
beats in ten seconds, and then multiply that number by six. This gives you the number of beats per minute.
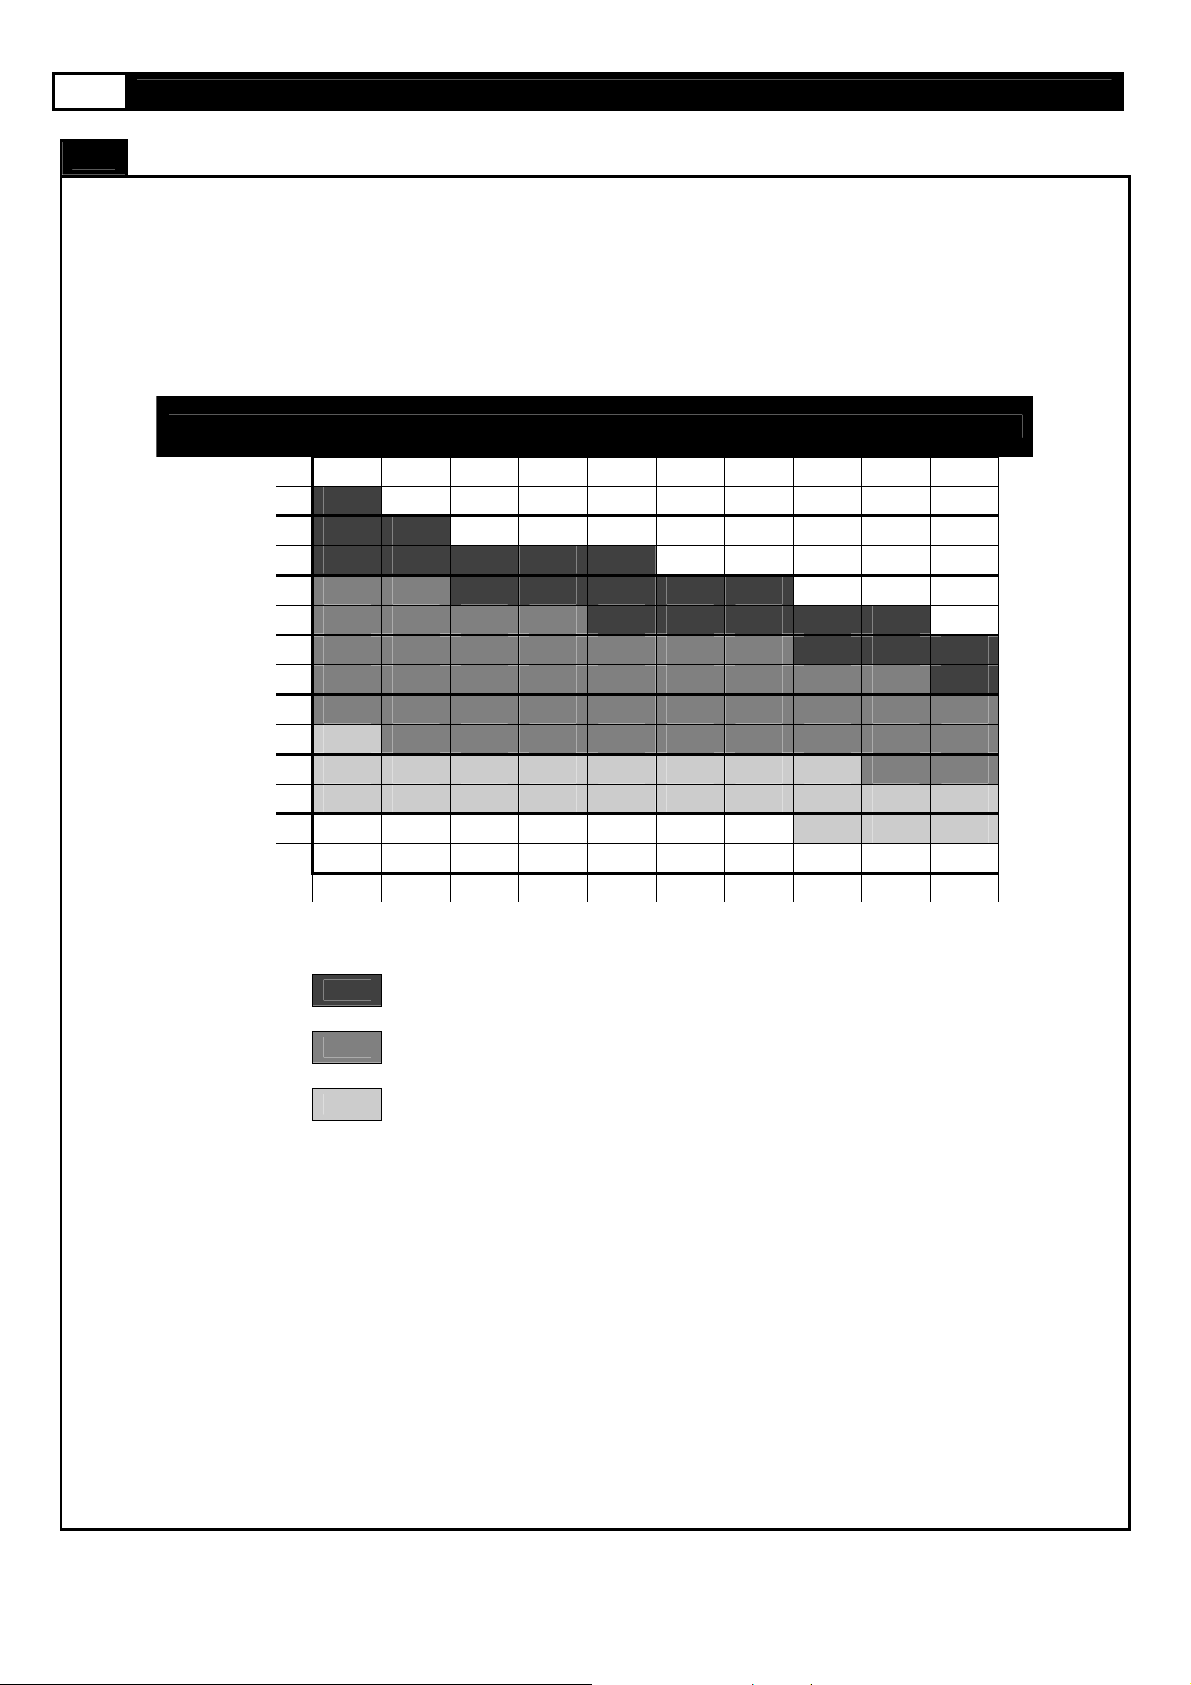
How fast should your heart beat during aerobic exercise? Fast enough to reach and stay in its “target zone,” a range of beats per
minute that is largely determined by your age and physical condition. To determine your target zone, consult the chart we have
provided.
TARGET HEART RATE
FIND YOUR TARGET HEART RATE
200
180
160
140
120
100
HEART RATE in beats per minute
80
20 25 30 35 40 45 50 55 60 65 70
FITNESS: Optimal training, aerobic or cardiovascular
HEALTH: Beginner, low intensity with long duration produces fat burning
Aerobic exercise:
Is any sustained activity that sends oxygen to your muscles via your heart and lungs. It will improve the fitness of your lungs and
heart: your body’s most important muscle . Aerobic fitness is pro moted by any act ivity tha t use s your large musc le groups - arms,
legs or buttocks, for example. Your heart beats quickly and you breathe deeply. An aerobic exercise should be part of your entire
exercise routine.
ADVANCED: Sports, athletic conditioning or interval training
AGE IN YEARS
Page 29
www.greenmasterfitness.com.tw
29
Targeted muscle groups:
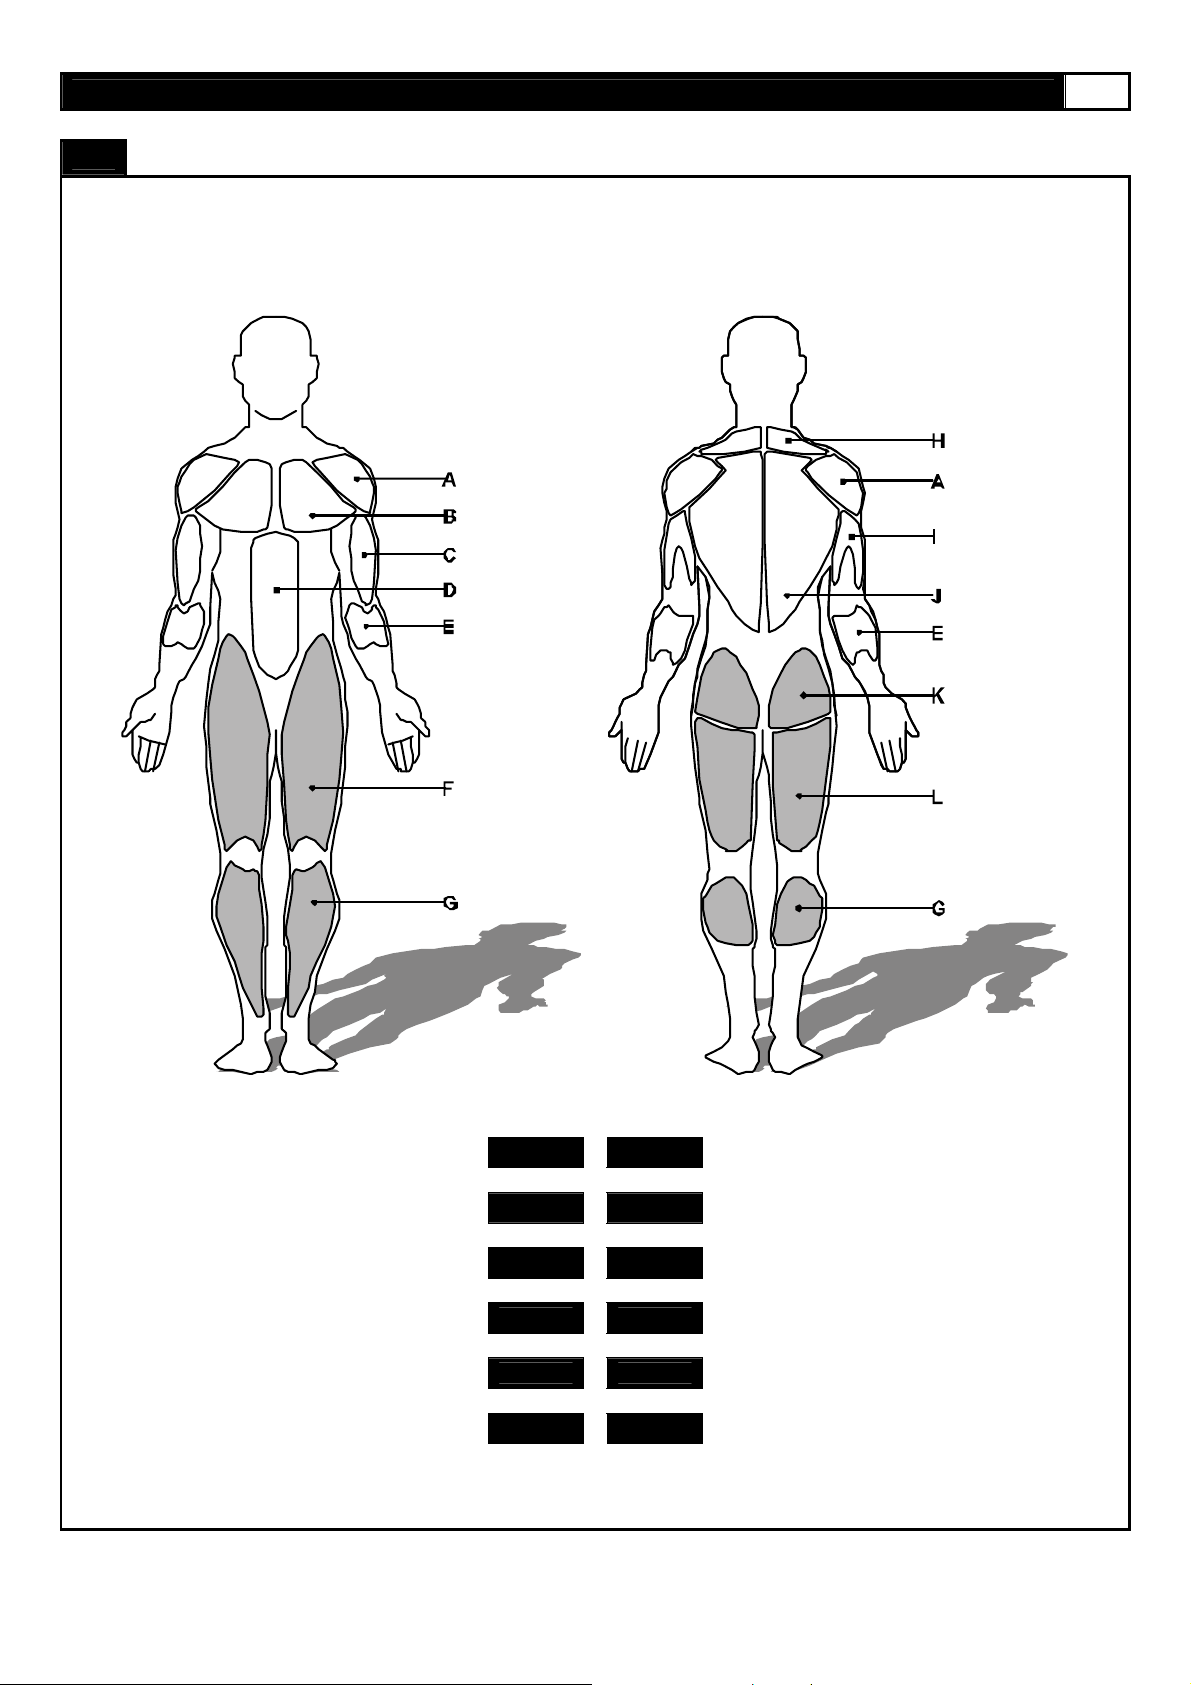
The exercise routine that is performed on this product will develop the upper and lower body muscle groups. These muscle groups
are shown in gray color on the chart below.
MUSCLE CHART
Shoulder muscles
Bicep muscle C D Abdominal muscles
Forearm muscles E F Quadricep muscles
Calf muscles G H Trapezius muscles
Tricep muscles I J Back muscles
Gluteal mus c le s K L Hamstring muscles
A B Pectoral muscles
Page 30
30 MOMENTUM UB5 UPRIGHT BIKE
Warm up and cool down:
A successful exercise program consists of a warm-up, aerobic exercise, and a cool-down. Do the entire program at least two and
preferably three times a week, resting for a day between workouts. After several months, you can increase your workouts to four or
five times per week.
Warming up is an important part of your workout, and should begin every session. It prepares your body for more strenuous
exercise by heating up and stretching out your muscles, increasing your circulation and pulse rate, and delivering more oxygen to
your muscles. At the end of your workout, repeat these exercises to reduce sore muscle problems. We suggest the warm-up and
cool-down exercises on the following pages:
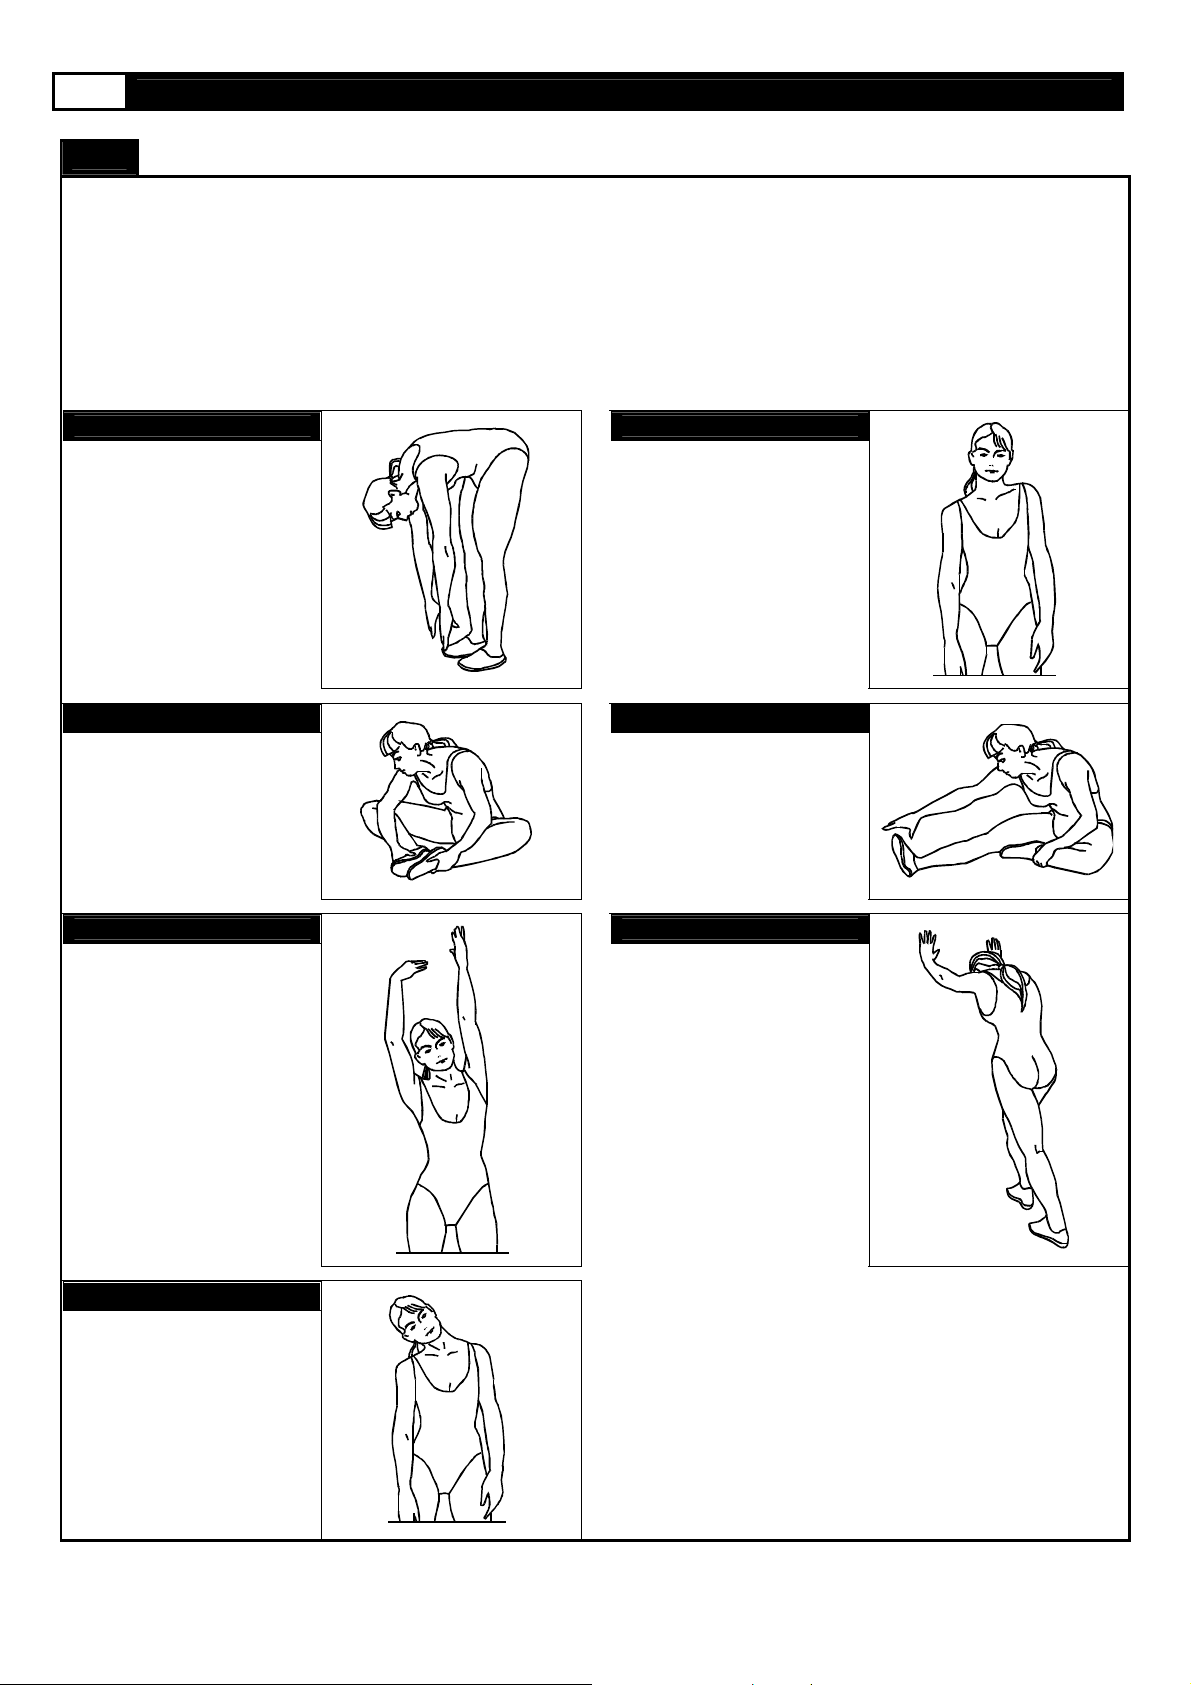
STRETCHING ROUTINE
Toe Touch:
Slowly bend forward from
your waist, letting your back
and shoulders relax as you
stretch toward your toes.
Reach down as far as you
can and hold for 15 counts.
Inner Thigh Stretch:
Sit with the soles of your f eet
together with your knees
pointing outward. Pull your
feet as close into your groin
as possible. Gently push
your kn ees tow a rds the flo or.
Hold for 15 counts.
Side Stretch:
Open your arms to the side
and continue lifting them until
they ar e over y our head.
Reach your right arm as far
upward toward the ceiling as
you can for one count. Feel
the stretch up your right side.
Repeat this action with your
left arm.
Shoulder Lift:
Lift your right shoulder up
toward your ear for one
count. Then lift your left
shoulder up for one count as
you lower your right
shoulder.
Hamstring Stretch:
Sit with your right leg
extended. Rest the sole of
your left foot against your
right inner thigh. Stretch
toward your toe as far as
possible. Hold for 15 counts.
Relax and then repeat with
left leg extended.
Calf-Achilles Stretch:
Lean against a wall with your
left leg in front of the right
and your arms forward. Keep
your right leg straight and the
left foot on the floor; then
bend the left leg and lean
forward by moving your hips
toward the wall . Hold, and
then repeat on the other side
for 15 counts.
Head Roll:
Rotate your head to the right
for one count, feeling the
stretch up the left side of your
neck. Next, rotate your head
back for one count, stretching
your chin to the ceiling and
lettin g your m outh o pen.
Rotate your head to the left
for one count, and finally,
drop your head to your chest
for one count.
Page 31
www.greenmasterfitness.com.tw
31
NOTES
Page 32

MOMENTUM SERIES products are manufactured by:
GREENMASTER INDUSTRIAL CORP.
No. 1, Lane 233, Sec. 2, Charng Long Road
Taiping City, Taichung Hsien Taiwan, R.O.C.
Websit e: www.gr eenmasterfitness .com.tw
Copyright 2006 Gree nmaster Industria l Corp. Al l rights reserved.
 Loading...