

Page 1
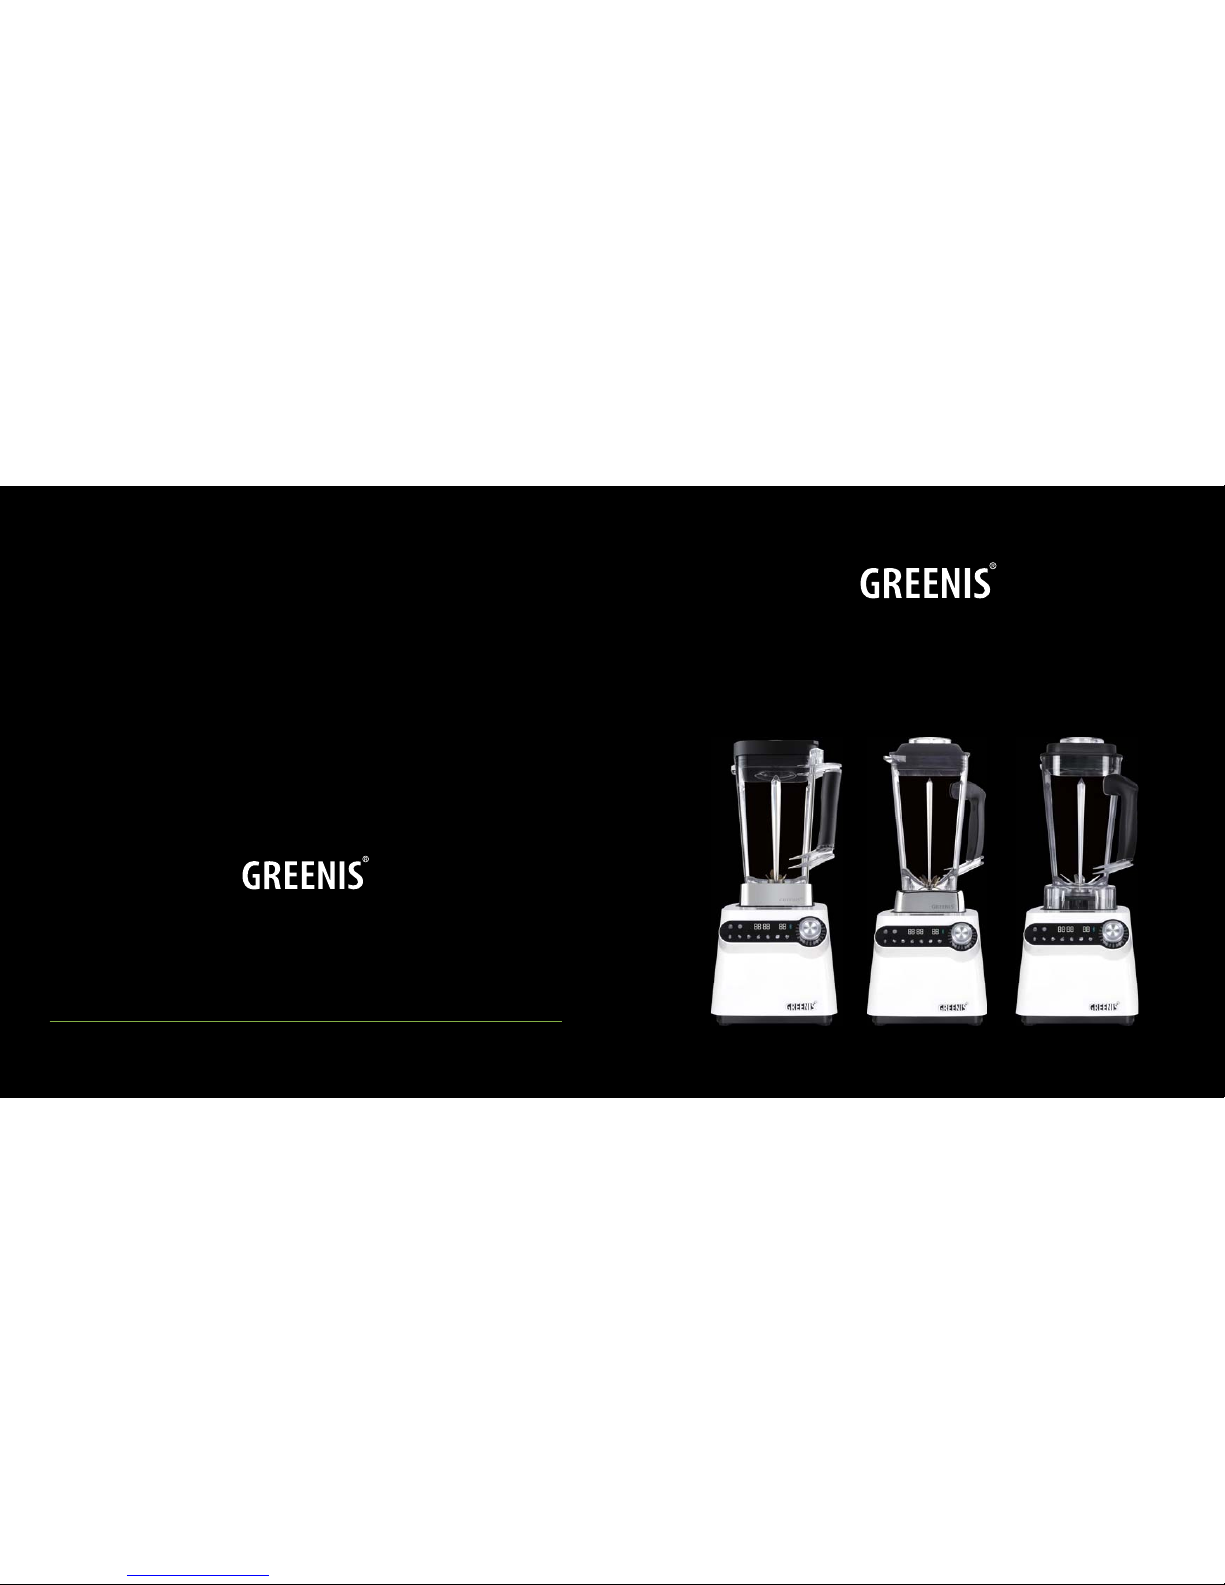
POWER BLENDER
FGR-8840-1/-2/-4
www.greenishome.com
FGR-8840-1 FGR-8840-2 FGR-8840-4Ningbo Greenis Home Appliances Co., Ltd.
Page 2
01 GREENIS POWER BLENDER
How to Use It
11
12-13
01
02-04
05-06
07-08
09
10
12
Welcome
Important Safeguards
Product Components
How to Use It
Definitions Of Buttons Under DIY Editing Mode
How To Self-program A DIY Recipe
Precautions On Programmingsteps Of Recipe
Criteria On Ingredients For DIY Recip
USE Precautions
16
Troubleshooting
17
Troubleshooting / What’s In The Box
Cleaning & Maintenance
15
14
Product Safety Instructions
GREENIS POWER BLENDER 02
TABLE OF CONTENTS
WELCOME
To ensure that Greenis blender is in proper condition and you can make the most out of it in years ahead,
please take the time to read through the user manual for proper use and better maintenance.
All content in this manual is for reference only and if you find any information unspecified please inform
us for supplementing purpose in next edition. Its design and workings are subject to change without
warning due to continual product development.
We hope you enjoy the experience with Greenis as it helps you embark on a journey to richer nutrition
and better health!
IMPORTANT SAFEGUARDS
Read all instructions.
Please ensure the current, voltage and frequency are in accordance with the standard
in your country.
1. The appliance is not to be used by persons (including children) with reduced
physical, sensory or mental capabilities, or lack of experience and knowledge, unless
they have been given supervision or instruction.
2. Close supervision is necessary when any appliance is used by or near children.
To avoid danger of electric shock, please DO NOT immerse the motor base in water
(or any other liquid) or pour water onto the machine.
Please unplug the machine if it is to be in long-time disuse. Unplug from outlet when
not in use, before putting on or taking o parts and before cleaning.
Do not operate any appliance with a damaged cord or plug or after the appliance
malfunctions, or is dropped or damaged in any manner. Contact customer service for
information on examination, repair, or adjustment.
It may cause fire, electric shock or human injury if using unauthorized parts & accessories or refitting machine without authorization.
DO NOT leave the machine unattended when it is in use.
When using the machine please ensure water or any other liquid in the jar does not
exceed maximum scale marked on the jar surface.
DO NOT operate the machine with no ingredient or water inside the jar.
Please keep the machine away from intense heat. DO NOT place it on a cloth in case of
damage to parts.
To ensure safety please read through the manual before using and keep the
manual where it is easily accessible. This product is intended for household
use only and please follow instructions of use and assembly in the manual.
Page 3
03 GREENIS POWER BLENDER GREENIS POWER BLENDER 04
SAVE THESE INSTRUCTIONS
Warning!
Electric Shock !
DO NOT use plug adapter or extension cord.
Attention: Failure to follow safety and use instructions shall void the product warranty and
may cause severe damages or injuries.
This product is intended for indoor use only. Do not use outdoors.
DO NOT use the appliance for more than 30 minutes continuously as the motor may
burn out; use it again until the appliance has cooled down.(To prolong the service
life of the product, please pause for 45 minutes to let the motor cool down after the use.)
To reduce the risk of injury, never place cutter-assembly blades on base without jar
properly attached.
Blades must be assembled, disassembled and changed by the manufacturer, it's
service agent or similarly qualified persons in order to avoid a hazard.
The use of attachments, including canning jars, not recommended by the manufacturer may cause a risk of injury to persons.
Do not let cord hang over edge of table or counter.
Keep hands and utensils out of container while blending to reduce the risk of severe
injury to persons or damage to the blender. A scraper may be used but must be used
only when the blender is not running.
Be careful when handing the sharp cutting blades, emptying the jar and during cleaning.
Be careful if hot liquid is poured into or blender as it can be ejected out of the appliance due to a sudden steaming.
Switch o the appliance and disconnect from supply before changing accessories or
approaching parts that move in use.
Please secure the lid and measuring cup in place before use. Always operate blender
with cover in place. Do secure the lid when making hot drinks (soups) and start with
low speed as otherwise high speed may lead to liquids splashing to cause injuries.
The motor will automatically stop when encountering work overload as the interior
temperature detection system is activated to protect the machine from risk of burning
out. It can only get back to work after cooling o for 45 minutes.
Blades are sharp. Handle carefully. Please be careful when cleaning.
Do avoid contact with any moving part.
The product is fitted with tamper and please ensure you use the tamper when the lid is
secured on the jar.
DO NOT place any other implement like spoons, forks and knives into the jar as they
may cause damage to blades and other parts.
Flashing light indicates ready to operate. Avoid inadvertent contact with the touch
screen.
Page 4
05 GREENIS POWER BLENDER GREENIS POWER BLENDER 06
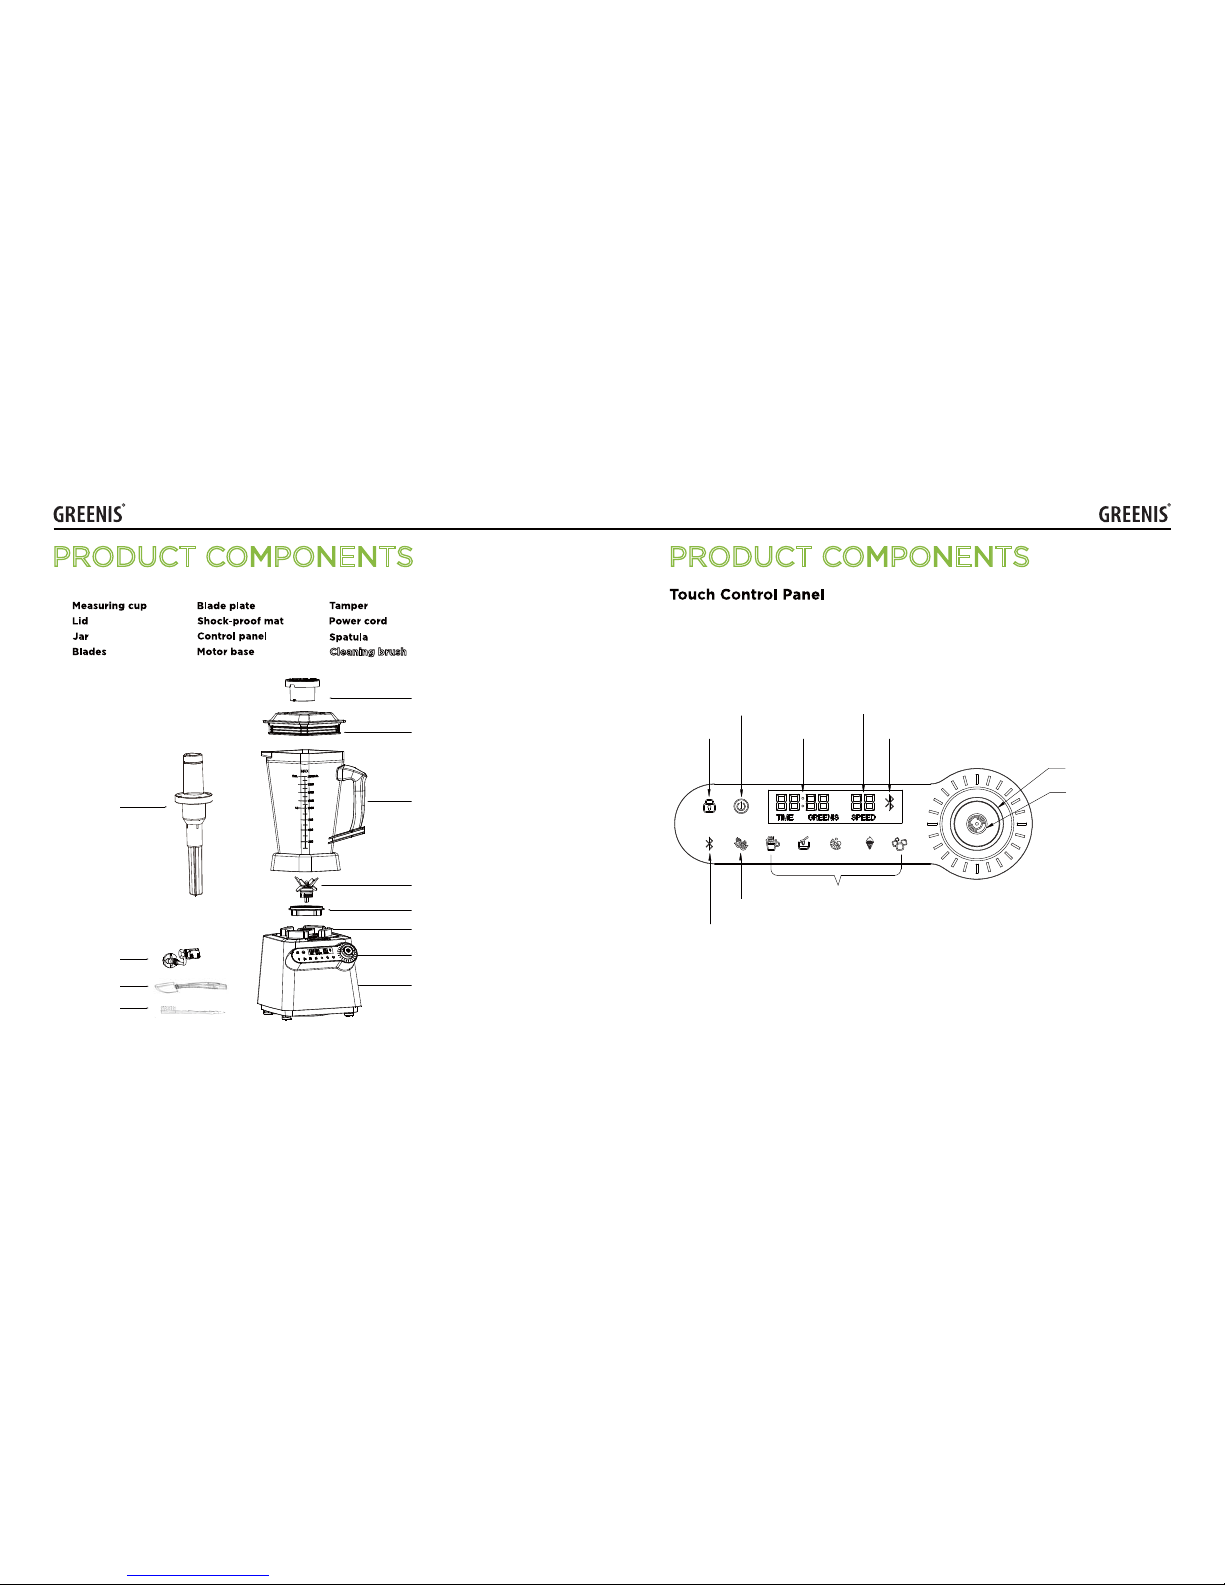
Cleaning brush
PRODUCT COMPONENTS
Child lock
On/O
Time display
Speed display
Bluetooth status
Rotary dial (speed control)
Pulse button(press to initiate)
DIY programming
Pre-programmed cycles
Bluetooth on/o
PRODUCT COMPONENTS
Page 5
07 GREENIS POWER BLENDER GREENIS POWER BLENDER 08
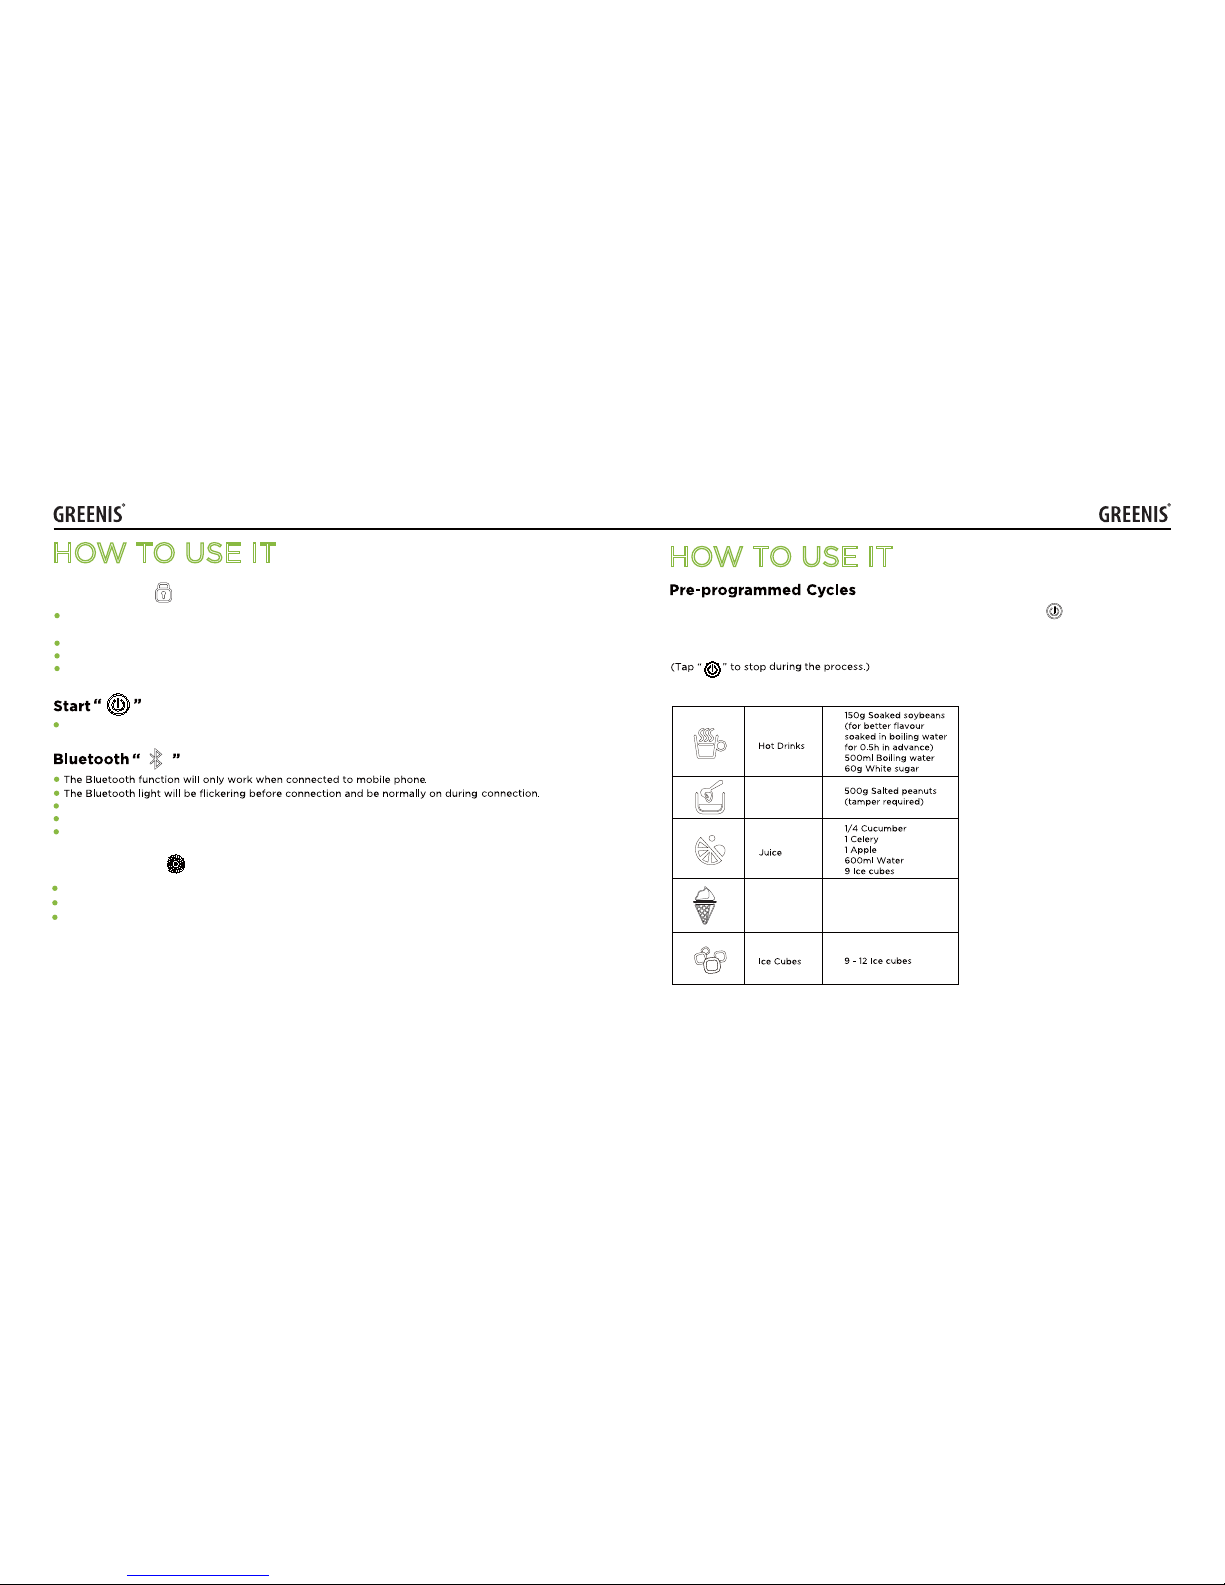
Please refer to separate Bluetooth instruction card for detailed user information.
Hold "Bluetooth" button for 3 seconds to turn o Bluetooth function.
Then hold "Bluetooth" button for 3 seconds to turn on Bluetooth function.
Child Lock
Rotary Dial “ ”
“ ”
Tap Start/Stop button to start or stop cycles.
This dial is used as both speed control and pulse function.
Rotate rotary dial clockwise to speed up, anticlockwise to slow down. It has 24 variable speeds.
Press and hold the dial to initiate Pulse function. The machine will run at maximum speed
24 under Pulse mode. Release the dial to stop.
HOW TO USE IT
The “Child Lock” light will be flickering when the touch control panel is locked to
prevent unintended operations.
Hold “Child Lock” button for 3 seconds to unlock the touch control panel.
Then hold "Child lock" button for 3 seconds to lock touch control panel.
The control panel will get automatically locked if without being operated for 1 minute.
/IUT )_IRK 8KIOVK
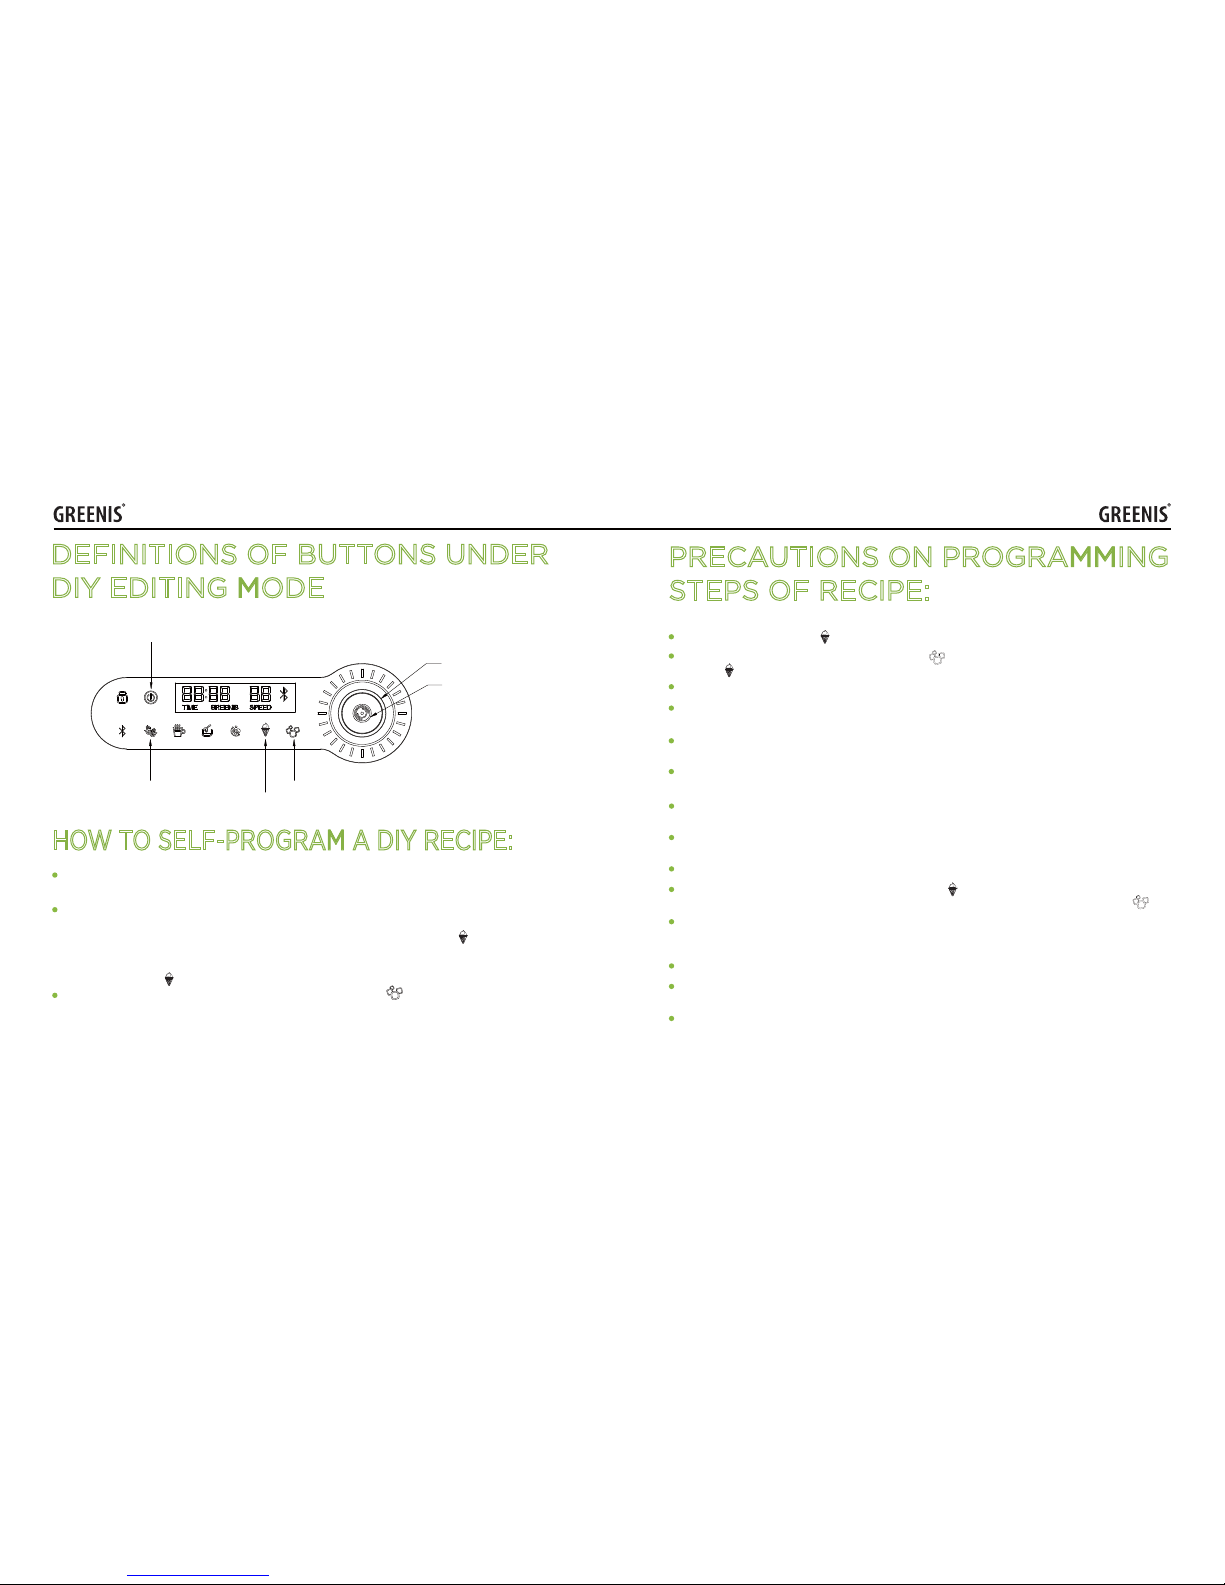
Sauce
HOW TO USE IT
Unlock “Child Lock” and select desired pre-programmed cycle. Tapping “ ” the unit will start
working as per selectes cycle and the time display on touch control panel will show count-down
time. The machine will automatically stop once the count-down time ticks to zero and the cycle
is completed.
Ice cream
3 tbsp granulated sugar
350g frozen blueberries
Page 6
09 GREENIS POWER BLENDER GREENIS POWER BLENDER 10
It is essential to tap SAVE “ ” button to save current step when programming each step.
If a program is merely 1 step,tapping COMPLETE “ ” will save the program eliminating the use of
SAVE” ” button.
A recipe that has been validly programmed will replace previous DIY program.
The machine may beep to indicate failure if any programming goes wrong. Such failure does not aect
or replace existing recipe program.
To ensure its long service life, the machine is preset at the workload of no more than 30 minutes working
continuously.
The machine will verify the duration of new program is no longer than 15 minutes. Otherwise programming fails whilst the machine beeps twice to indicate failure.
A recipe program is composed of 18 steps at most. The display will show “FULL” to indicate the full limit
for steps.(The 18th step is still programmable but adding extra step is impossible)
For easier use,the 1st step is forbidden to be at speed “0”. (A failure to set speed other than “0” will
disable 1st step to be saved.)
Default recipe for DIY button is ICE CRUSH
If the last step fails to be saved without tapping SAVE “ ” button when programming multiple steps,
the program will only include previous steps excluding the last step after tapping COMPLETE “ ”.
Under DIY editing mode a continuous no-operation for 30 seconds will dim the display. A continuous
no-operation for 3 minutes will exit DIY editing mode. The steps that have been programmed will not be
saved.
Under DIY editing mode removing the jar will turn o the machine meanwhile exiting editing mode.
A valid DIY program will be stored into memory of the machine and last for 20 years whether machine
is connected to power or not.
Repeatable read-write cycles for DIY programming are 100,000 times.
PRECAUTIONS ON PROGRAMMING
STEPS OF RECIPE:
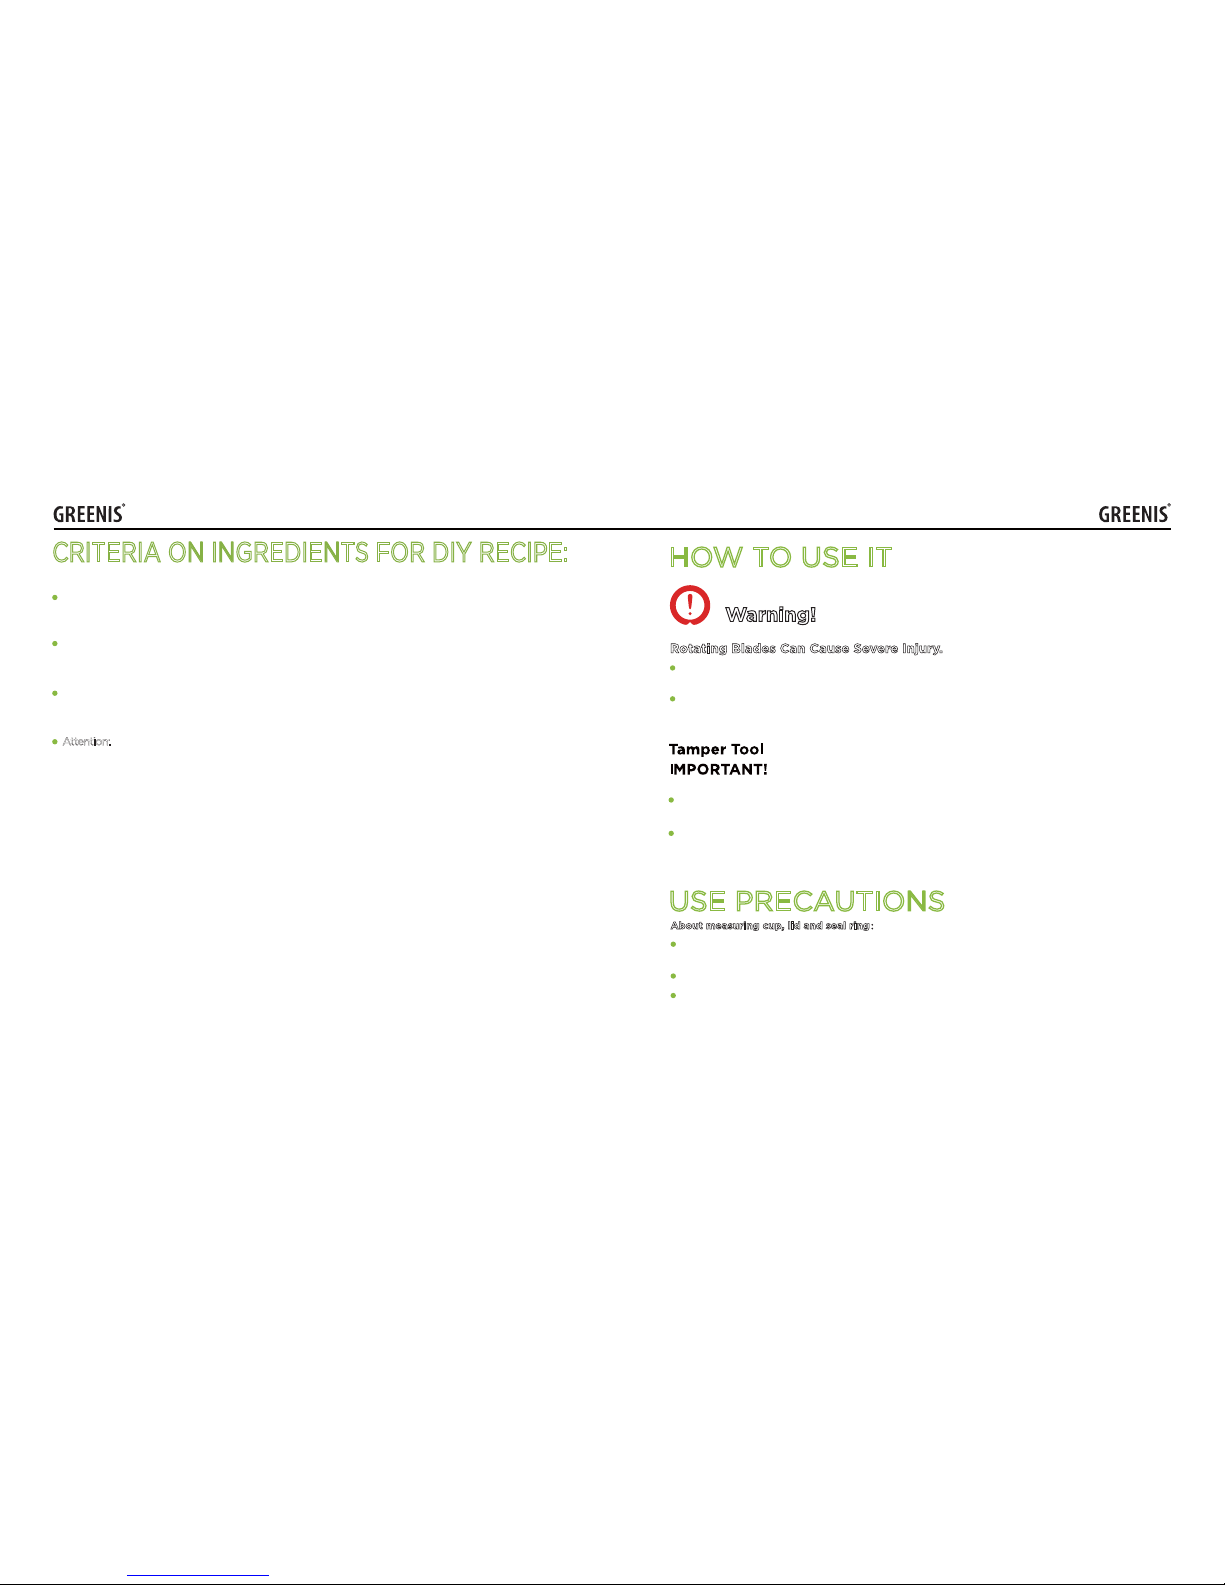
Start (tap to run DIY program cycle)
Cancel (exit DIY editing mode)
Rotate to set speed
Press dial to switch
to time setting
Press and hold to enter editing mode
Save entire program
DEFINITIONS OF BUTTONS UNDER
DIY EDITING MODE
HOW TO SELF-PROGRAM A DIY RECIPE:
A recipe program is normally composed of several steps to which individual speed and time is corresponded.
Tap and hold DIY button for 3 seconds to enter editing mode whilst the display shows “ DIY ” . To edit
1st step ( while display shows “ S1 ” ), rotate the speed control dial to select desired speed.Press the dial
once to switch to time setting mode. And rotate the dial to set desired time. Tap “ ” button to save
the 1st step whilst display shows “ S. 01 ” to indicate success of step 1 being programmed. Moving to the
following steps, such operation method applies to every step of the way. Each step ( S1,S2,S3... ) must be
saved by tapping “ ” button. The recipe program is composed of no more than 18 steps.
After all steps are programmed into DIY button, tap COMPLETE “ ” to save the entire program.
Then the machine will stand by with DIY cycle automatically selected. Tap power button to run the cycle
which has been programmed.
Ice cream
Page 7
11 GREENIS POWER BLENDER GREENIS POWER BLENDER 12
CRITERIA ON INGREDIENTS FOR DIY RECIPE:
(1) For speed 1-12 applicable ingredients are roots and leaves of vegetables, fruits and the like. The
adequate proportion for ingredients and water is 2:3. Ensure that the volume does not exceed maximum
scale 2000 ml of the jar.
(2) For speed 13-24 applicable ingredients are ice cubes no more than 200 ml (individual ice cube size no
larger than 20*20 mm) or nuts no more than 250 g. Water should not be added into the jar when
grinding nuts.
Tips: DIY program is suitable for fruit and vegetables only. It does not apply to overly thick ingredients.
The DIY program is composed of no more than 18 steps.The continuous working time for DIY program is
no longer than 15 minutes.
Attention:
above criteria apply for ingredients added into the jar under Pulse mode or when rotating dial
to operate the machine.
Warning!
HOW TO USE IT
USE PRECAUTIONS
About measuring cup, lid and seal ring:
Rotating Blades Can Cause Severe Injury.
DO NOT put hands, spatulas, utensils, etc. into the container while the blender is running or while the
container is on the base.
Dierent tampers and lids match with dierent container styles, types and sizes. Use the tamper that is
supplied with your jar and blender.
Make sure the lid is securely placed on the jar if tamper is to be used. Shut down the blender before
placing tamper through the hole of lid, in case of food splashing to cause injures.
DO NOT use other implements to replace the tamper if it is missing, which may otherwise cause injuries.
Please contact local dealer to purchase replacement part.
Place the measuring cup onto the lid (place measuring cup through the central opening of lid and twist
clockwise to fasten) and place the lid onto the jar securely.
Make sure that the machine is not running before putting the tamper.
The seal ring around the lid is detachable. When cleaning remove seal ring from the lid to thoroughly
clean away residues stuck inside the seal ring and the lid.
Page 8
13 GREENIS POWER BLENDER GREENIS POWER BLENDER 14
Other important precautions
USE PRECAUTIONS
Pleasepulloutrotarydial(speedcontrol),tearoscreenprotectorandthenassemble
rotarydial(speedcontrol)properlybeforeusing.
Stirring ingredient that is fermentative or dry (little water content) for a long time may cause over-heating and thus trigger overheating protection mechanism built inside the motor. Therefore please start
with low speed and change to high speed if the ingredients are thick or rather dry. If it's still dicult to
stir, please shut down the power, reduce amount of ingredients or add liquid to decrease viscosity.
The motor will stop working when overheated. Unplug the blender and cool down the motor for 45
minutes in a drafty place or in front of a fan.
During the operation, make sure the lid and measuring cup are fastened tightly, in case the food inside
would splash out and cause injuries.
During the operation, DO NOT put hand, any tool (like spoon), or other hard object into the blender jar,
in case of any danger or damage.
When making hot drinks (like soybean milk, rice paste, pottage, etc.), make sure the lid and measuring
cup are fastened tightly, and set the speed from low speed to high speed.
When making sauces (like almond paste, jam, peanut butter or sesame paste, etc.), stung, or shell
grains, the volume of ingredients must be among 3 cups to 5 cups; DO NOT operate continuously for
a long time, in case there will be scorched flavor because of overheating. Too many ingredients may
also cause overload, triggering motor’s over-temperature protection.
Please place liquid and soft ingredients first before hard ones like ice cubes.
DO NOT remove the jar until the blades come to a full stop. Otherwise it may cause damages to drive
socket.
Please stop the machine once smelling any scorching smell. It may be caused by overload of ingredients or the fact blades and drive socket are not fully engaged.
It is recommended to operate the machine no more than 10 minutes at a time.
DO NOT immerse motor base or power cords into water or any other liquid.
Use soft cloth or sponge to wipe clean the surface of jar. Remove the measuring cup and seal ring
before proceeding to cleaning.
Rinse the jar with clean water after each use. Or you can add 2 cups of clean water (1 L) into the
jar, secure the lid and press rotary dial without release “ ” to clean.
Lay down the jar horizontally in a drafty place or place it upside down to let it dry naturally. Do not
immerse it entirely in water.
DO NOT rinse motor base with clean water. Use soft cloth to clean instead.
CLEANING & MAINTENANCE
Please ensure the blender is unplugged before cleaning or maintenance.
Attention:
Warm Prompts:
Simple cleaning:
Attention: DO NOT immerse jar into water
1. Add 750 ml clean water and 1-2 lemon slices, tap button “ ” (running for 1 min 56s).
2. Pour away dirty water and repeat step no.1.
3. Pour away dirty water and wipe it clean with cloth. Dry the jar in a drafty place.
When drying the machine by placing it in an upside-down position, please wipe away
leftover water at the bottom of the jar. Keep it away from the sink in case of any water
dripping into the bottom of the jar and potentially rusting interior key components like
metal bearing.
To thoroughly clean the inside of the jar and leftover dirt on the blades and ensure durability of jar and blades, it is recommended to add some clean water and lemon into jar, secure
the lid and press button “PULSE” to quick clean for 2-3 times. Pour away water and repeat
the step.
Page 9
15 GREENIS POWER BLENDER GREENIS POWER BLENDER 16
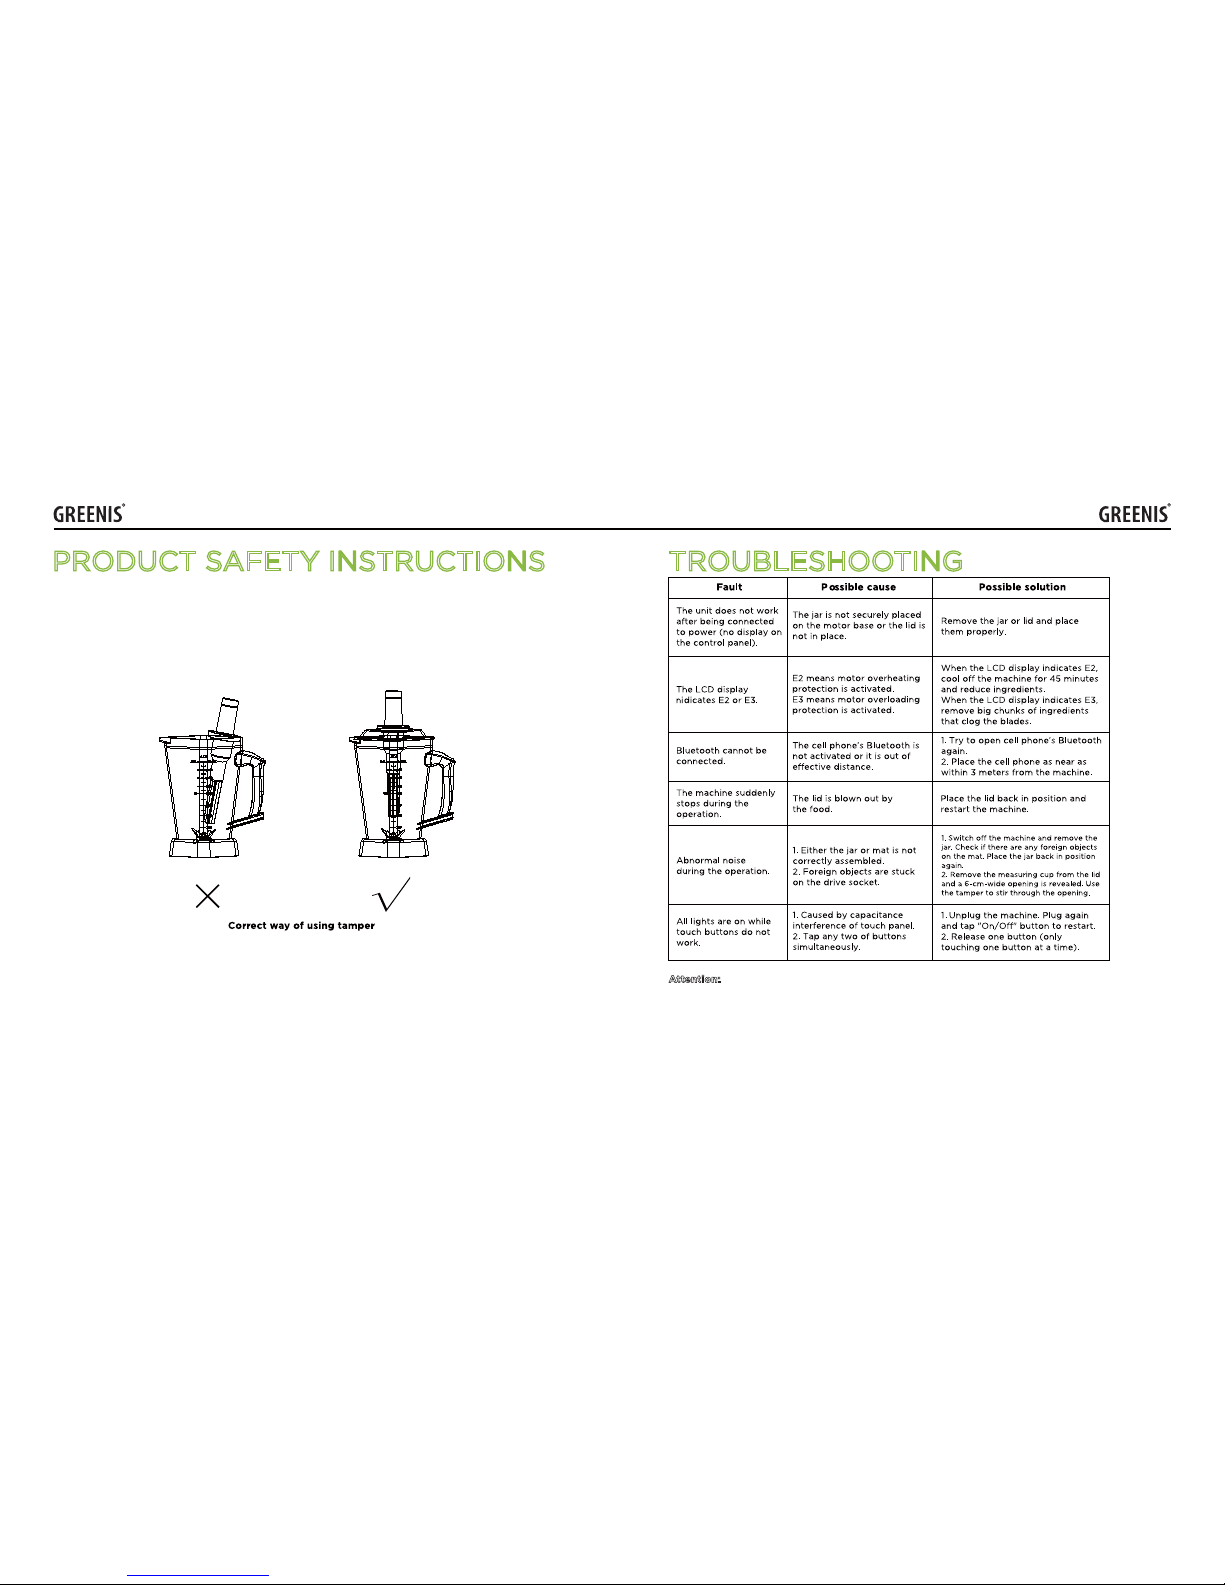
Attention:
Above are general problems users may encounter and possible solutions they can adopt. For other
problems with the machine, please contact local after-sales for repair purpose. DO NOT open the
machine and repair by yourself.
TROUBLESHOOTINGPRODUCT SAFETY INSTRUCTIONS
Page 10
17 GREENIS POWER BLENDER GREENIS POWER BLENDER 18
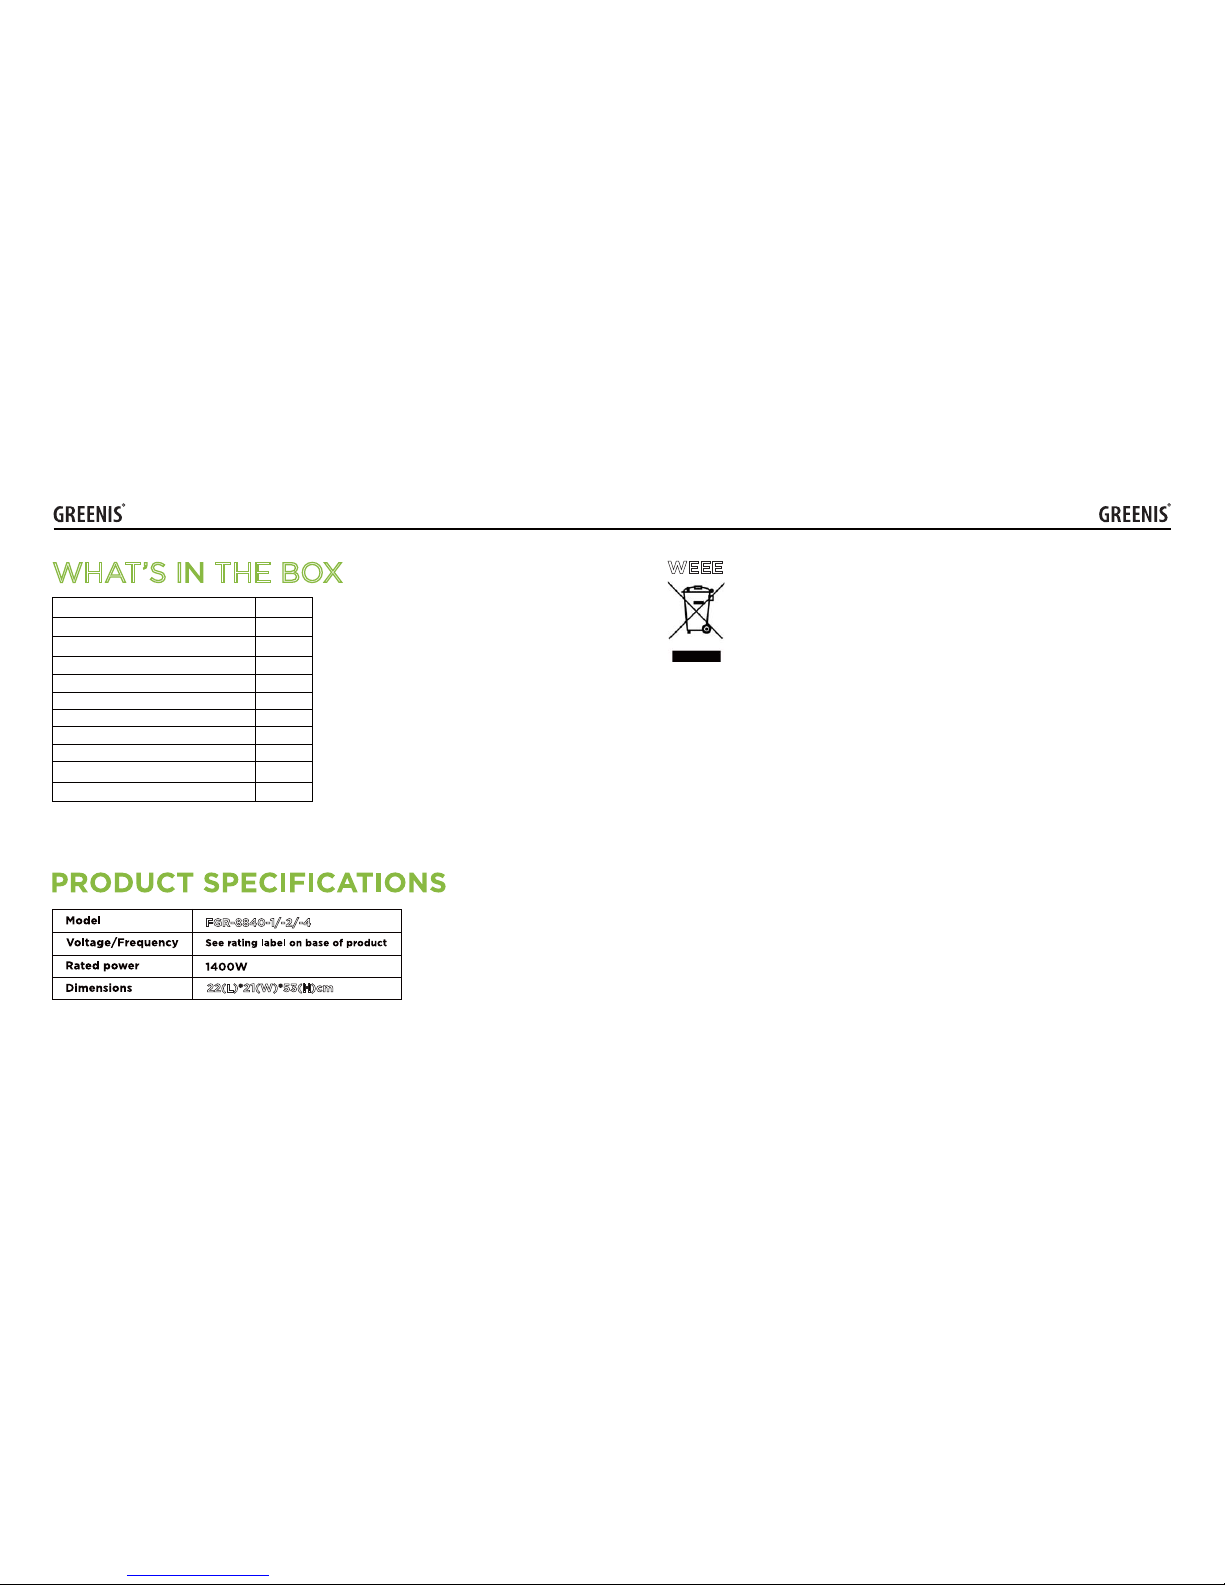
WHAT’S IN THE BOX
Motor base
Jar
Lid
Measuring cup
Tamper
Spatula
Cleaning brush
Drive socket (spare)
Seal ring for lid (spare)
User manual
1 unit
1 unit
1 unit
1 unit
1 unit
1 unit
1 unit
1 unit
1 unit
1 unit
Recipe Book 1 unit
FGR-8840-1/-2/-4
22(L)*21(W)*53(H)cm
WEEE
Correct Disposal of this product This marking indicates that this product should not be
disposed with other household wastes throughout the EU. To prevent possible harm to the
environment or human health rom uncontrolled waste disposal, recycle it responsibly to
promote the sustainable reuse of material resources. To return your used device, please use
the return and collection system or contact the retailer where the product was purchased,
They can take this product for environment safe recycling.
Warning: Changes or modifications to this unit not expressly approved by the party responsible for compliance
could void the user’s authority to operate the equipment.
Note: This equipment has been tested and found to comply with the limits for a Class B digital device, pursuant
to Part 15 of the FCC Rules.
These limits are designed to provide reasonable protection against harmful interference in a residential installation.
This equipment generates, uses and can radiate radio frequency energy and, if not installed and used in
accordance with the instructions, may cause harmful interference to radio communications. However, there is no
guarantee that interference will not occur in a particular installation. If this equipment does cause harmful
interference to radio or television reception, which can be determined by turning the equipment o and on, the
user is encouraged to try to correct the interference by one or more of the following measures:
● Reorient or relocate the receiving antenna.
● Increase the separation between the equipment and receiver.
● Connect the equipment into an outlet on a circuit dierent from that to which the receiver is connected.
● Consult the dealer or an experienced radio/TV technician for help.
“This equipment complies with FCC RF radiation exposure limits set forth for an uncontrolled environment.
This equipment should be installed and operated with a minimum distance of 20 centimeters between the
radiator and your body.”
 Loading...