

green-i MRT16-WP Product Manual
The MRT16 series of time delay switches are designed to provide timed
control of lighting, heating or ventilation loads. Using touch (light press
required) activation the user can switch on a load for a preset time period and
have the load turn off automatically after the time period has elapsed.
Multiple timing ranges come as standard to allow the time out period to be set
accurately. Time setting is achieved using switches and a thumbwheel at the
rear of the unit.
Several modes of operation are selectable using switches:
On/off: triggering the timer will turn on the load and start the timing.
Triggering the timer again during timing will immediately turn off the load
and stop the timing.
Resetting: triggering the timer will turn on the load and start the timing.
Triggering the timer again during timing will re-start the timing period from
scratch. When using an external trigger In this mode, the timer will not start
until the trigger is removed making it ideal for pump or fan overrun
applications.
Non-resetting: triggering the timer will turn on the load and start the timing.
Triggering the timer again during timing will have no affect.
Optional neon indicators provide permanent illumination or illumination during
the timing period.
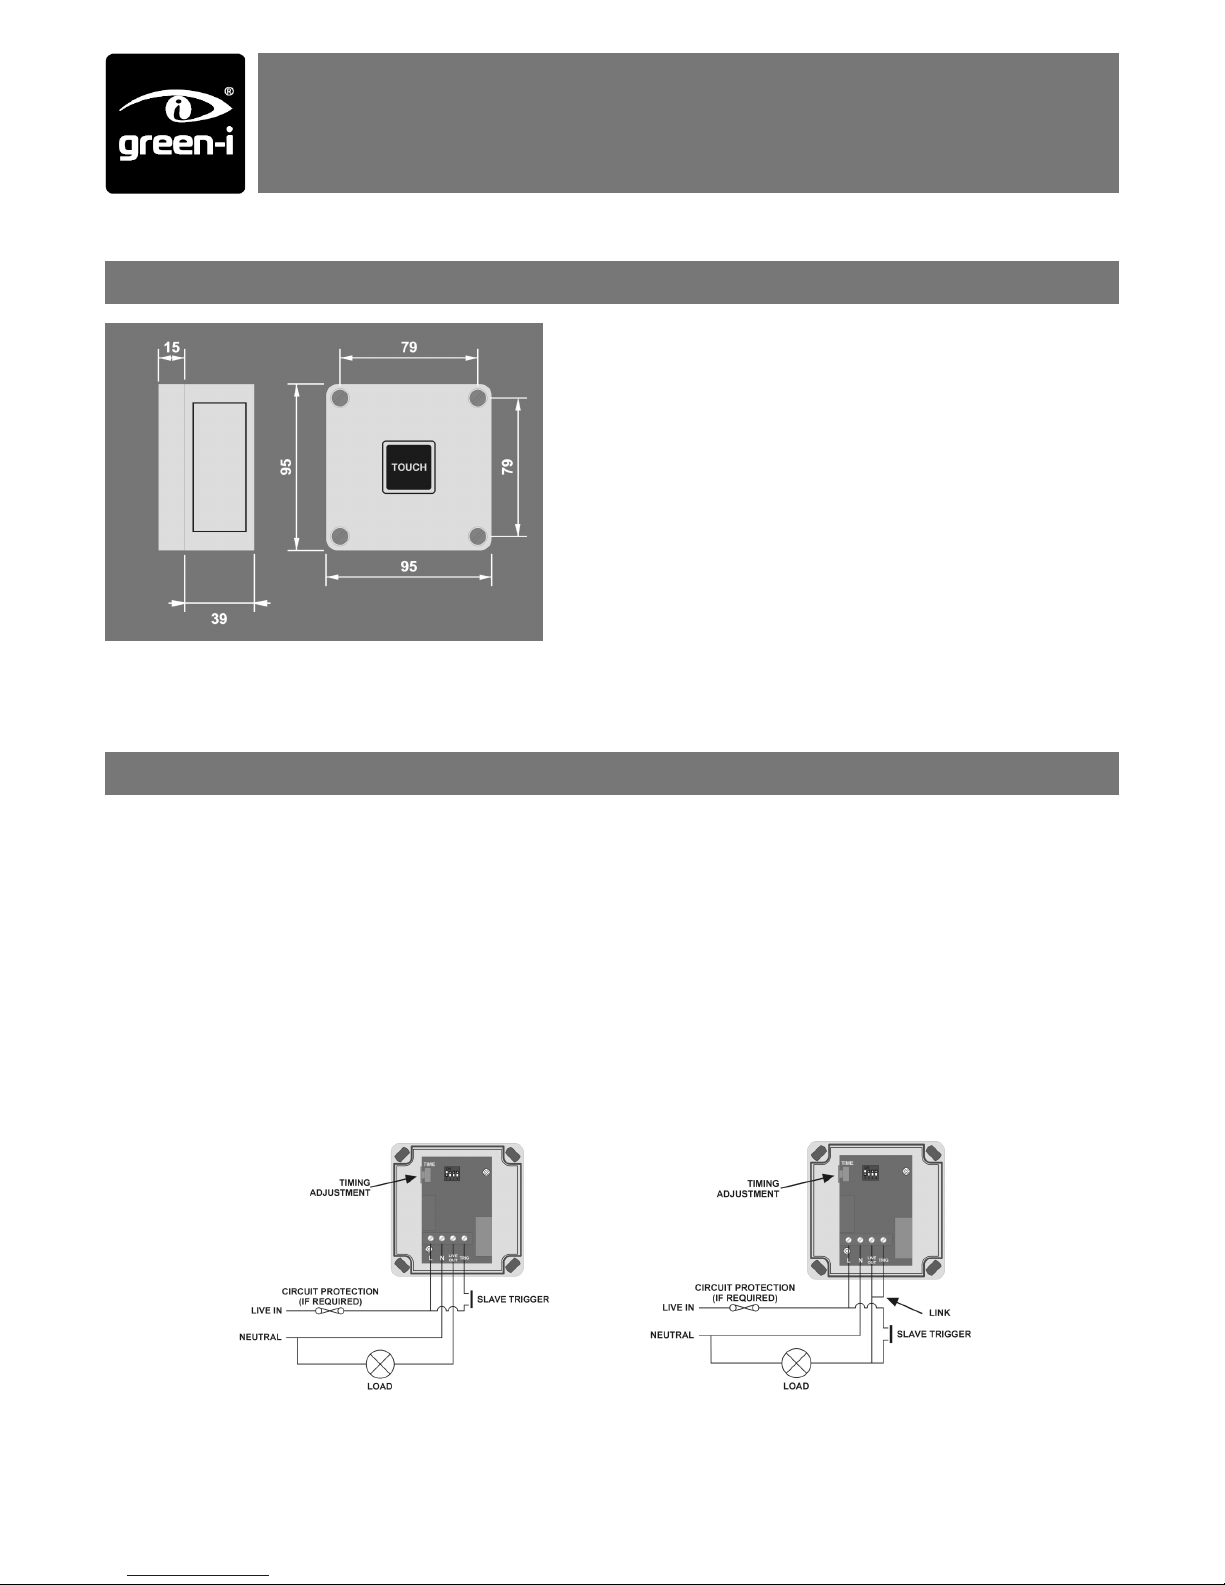
Wiring
Wire the MRT16 timers as in diagram 1. Connection to the TRIG terminal is optional.
Applying a live to the trigger terminal will start the timer running. A momentary switch can be used, for example, in corridor lighting applications. A
permanent input can be used, for example, in pump overrun applications.
To switch from more than one position simply wire two or more units in parallel to achieve two way and intermediate switching.
For lighting applications that call for the replacement of a three wire switching system follow diagram 2.
When installing touch switches do not fix to a vibrating or uneven surface.
Ensure that all cable entry to the enclosure is via suitable cable glands and seal with silicone sealant where appropriate.
If it is necessary to screw through the rear of the enclosure, ensure that any holes are covered with the caps provided and sealed with
silicone sealant where appropriate.
Diagram 1 Standard Wiring Diagram 2 Wiring for three wire switching circuits
Weatherproof Multi-range Time Delay Switch
MRT16-WP
Product Guide
Overview

LOAD
16 Amp resistive load
10 Amp incandescent lighting
6 Amp fluorescent lighting
3 Amp compact fluorescent lighting
3 Amp low energy lighting
3 Amp low voltage lighting (switch primary of transformer)
Fluorescent lighting (max 6 fittings recommended)
For fluorescent lighting total power factor correction capacitance must not exceed 40μF
3 Amp fans and ventilation equipment
Switch SON lighting loads via a contactor
SUPPLY VOLTAGE 220-240 Volts AC 50 Hz
TIMING PERIOD Adjustable 1 second to 2 hours in ranges
TERMINAL CAPACITY 4.0mm
2
IP RATING IP 66
MATERIAL Polystyrene
TYPE Class 2
TEMPERATURE -10°C to 35°C
CONFORMITY EMC-2004/108/EC
LVD-2006/95/EC
LOAD DOES NOT COME ON
Check to see if the live supply to the circuit is
good. Strap across the L and LIVE OUT terminal to check.
LOAD DOES NOT GO OFF
Check that the time setting is correct.
When using external triggers, ensure that live is
removed from the trigger terminal to enable the
timer to start (for resetting mode only).
Part Numbers
Fault Finding
Specification
MRT16-WP Weatherproof multi-range timer
/PN Permanently illuminated neon
/TN Temporarily illuminated neon (only illuminates during timing)
Warning. This device works at mains potential. Be sure to take care when working with electricity.
1. Make sure the load is connected and in working order.
2. Isolate the mains supply to the circuit at the main consumer unit.
3. Connect the controller via the terminal block. Live supply to the L terminal, Neutral to the N terminal and the load to the LIVE OUT terminal.
Where required connect the external trigger to the TRIG terminal.
4. Set the timing range according to the diagram below. Set the thumbwheel to the time setting (anticlockwise is minimum, clockwise is maximum).
5. Set the function according to the diagram below (see above for description).
6. Screw the unit to the wall and switch the mains supply back on at the distribution board.
Installation
Due to our policy of continual product improvement CP Electronics reserves the right to alter the specification of this product without prior notice.
FM 45789 EMS 534520
C.P. Electronics Ltd
Brent Crescent
London
NW10 7XR
United Kingdom
Tel: + 44 (0) 333 900 0671
Fax: + 44 (0) 333 900 0674
www.green-iswitches.co.uk
enquiry@green-iswitches.co.uk
Ref: #WD129 Issue 3
IMPORTANT NOTICE!
This device should be installed by a qualified electrician in
accordance with the latest edition of the IEE Wiring
Regulations and any applicable Building Regulations.
 Loading...