

Page 1
Part #474681
®
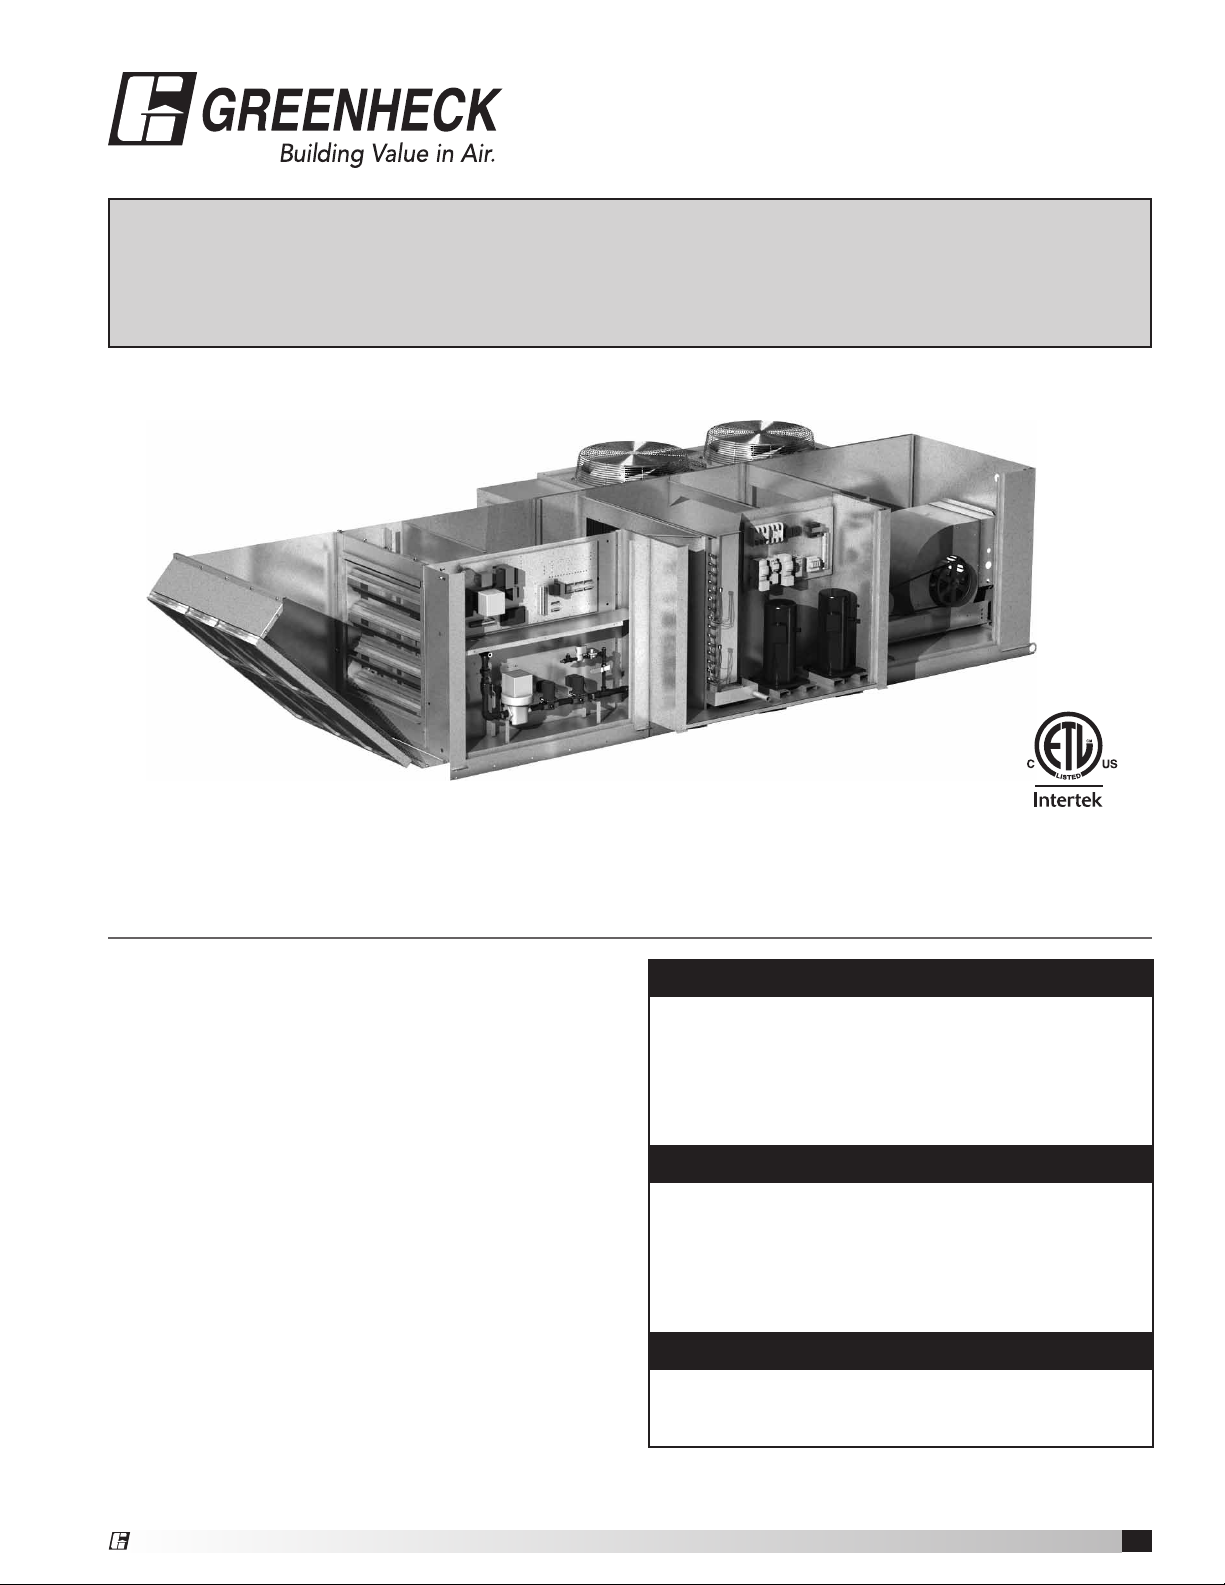
Packaged DX Module
Installation, Operation and Maintenance Manual
Please read and save these instructions for future reference. Read carefully before attempting to assemble,
install, operate or maintain the product described. Protect yourself and others by observing all safety
information. Failure to comply with instructions could result in personal injury and/or property damage!
As used in Greenheck models
•DGX
•IGX
•MSX
Recognized Component
General Safety Information
Only qualified personnel should install and maintain this
system. Personnel should have a clear understanding of
these instructions and should be aware of general safety
precautions. Improper installation can result in electric
shock, possible injury due to coming in contact with
moving parts, as well as other potential hazards. Other
considerations may be required if high winds or seismic
activity are present. If more information is needed,
contact a licensed professional engineer before moving
forward.
1. Follow all local electrical and safety codes, as well
as the National Electrical Code (NEC), the National
Fire Protection Agency (NFPA), where applicable.
Follow the Canadian Electric Code (CEC) in
Canada.
2. Unit must be securely and adequately grounded.
3. Verify that the power source is compatible with
the equipment.
4. Never open access doors to the unit while it is
running.
DANGER
• Always disconnect power before working on or
near this equipment. Lock and tag the disconnect
switch or breaker to prevent accidental power up.
• If this unit is equipped with optional gas
accessories, turn off gas supply whenever power
is disconnected.
CAUTION
This unit is equipped with a compressed refrigerant
system. If a leak in the system should occur,
immediately evacuate and ventilate the area. An
EPA Certified Technician must be engaged to make
repairs or corrections. Refrigerant leaks may also
cause bodily harm.
CAUTION
When servicing the unit, the internal components
may be hot enough to cause pain or injury. Allow
time for cooling before servicing.
®
Packaged DX Module for Make-Up Air
1
Page 2

Receiving
This module is installed as a component of a makeup air unit and does not require any special handling.
Refer to the Receiving portion of the unit Installation,
Operation and Maintenance (IOM) Manual for complete
instructions on receiving, unpacking and handling.
Unpacking
The unit is shipped as a complete installed unit.
Protective coverings have been installed on the face
of the condenser coil that should be left in place until
installation of the unit is complete. The only item
that was shipped loose with the unit is the P Trap kit.
Verify that the P Trap kit has been received. Refer to
Unpacking instructions in unit IOM.
Handling
Units are to be rigged and moved by the lifting brackets
provided. Do not forklift. Refer to the Handling portion of
the unit IOM for complete instructions on handling.
Storage
Units are protected against damage during shipment. If
the unit cannot be installed and operated immediately,
precautions need to be taken to prevent deterioration of
the unit during storage. The user assumes responsibility
of the unit and accessories during storage. The
manufacturer will not be responsible for damage during
storage. The following suggestions are provided solely
as a convenience to the user.
Inspection and Maintenance During
Storage
While in storage, inspect units once per month. Keep
a record of inspection and maintenance performed. If
moisture or dirt accumulations are found on the parts,
the source should be located and eliminated. At each
inspection, rotate all moving parts by hand ten to
fifteen revolutions to distribute lubricant on motor and
bearings. If paint deterioration begins, consideration
should be given to touch-up or repainting. Units with
special coatings may require special techniques for
touch-up or repair.
Machined parts coated with rust preventative should
be restored to good condition promptly if signs of rust
occur. Immediately remove the original rust preventative
coating with petroleum solvent and clean with lint-free
cloths. Polish any remaining rust from the surface with
crocus cloth or fine emery paper and oil. Do not destroy
the continuity of the surfaces. Wipe clean thoroughly
with Tectyl® 506 (Ashland, Inc.) or the equivalent. For
hard to reach internal surfaces or for occasional use,
consider using Tectyl® 511M Rust Preventative or
WD-40® or the equivalent.
Table of Contents
General Safety Information ...................1
Receiving, Handling, Storage .................2
Product Overview ...........................2
Subassemblies ..............................3
Coils .....................................3
Dampers ..................................3
DX System ................................3
Installation
Service Clearances ..........................4
Additional Clearances for Packaged DX Units ....4
Lifting ....................................4
Condensate Drain (P Trap) ....................4
Switch S4 .................................4
Component Operation
Compressor Components ....................5
Electrical Components .......................5
Refrigerant Components .....................5
Additional Control Components ...............5
Factory Installed Refrigeration System
Components ...............................6
Sequence of Operation
Control Sequence ...........................7
Optional Variable Air Volume ..................7
Start-Up Unit
Model and Serial Number ....................8
Pre-Start-Up Checklist .......................9
Special Tools Required ......................9
Voltage Imbalance ..........................9
Start-Up Checklist .........................10
Troubleshooting
Refrigeration Circuit .....................11-14
Routine Maintenance
Monthly ..................................15
Annually .................................15
Maintenance Procedures ....................15
Reference
Component Location .......................15
Maintenance Log ....................Backcover
Warranty ...........................Backcover
Packaged DX Module for Make-Up Air Unit
2
®
Page 3
Product Overview
Subassemblies:
The Packaged DX Module for make-up air is a
horizontally configured unit that is installed as a
package in make-up air units and is designed for
outdoor installations. The Packaged DX Module is used
to temper the air that is supplied to the building. The
make-up air unit is designed to provide sufficient air to
replace air that is exhausted from the building and this
module is designed to provide necessary cooling.
The DX system comes fully charged with R-410A
refrigerant from the factory and is ready for operation
upon arrival.
Units may be supplied with one or two compressors
based on required cooling capacity. All units with
multiple compressors allow for staging of compressors
to meet a wider range of outdoor air loads while
reducing the number of cycles per compressor.
Compressed Refrigerant
All packaged DX modules are charged with
environmentally friendly R-410A compressed refrigerant.
Do not use tools or parts designed for other refrigerants
on this unit.
Safety Listing
Make-up air units are listed per ANSI/UL 1995, Heating
and Cooling Equipment and are ETL Certified.
Supplemental Installation, Operation and
Maintenance Manuals
Refer to the Installation, Operation and Maintenance
manual for the Make-Up Air unit for additional
information.
Coils
Every module is supplied with a single DX evaporator
coil. If there is only one cooling circuit, then the DX coil
is not divided. If two cooling circuits are specified, then
the DX coil will be a split-face. A single condenser coil is
attached to the exterior of the module. If more than one
cooling circuit is present, that condenser coil will be of
split-face configuration.
Dampers
Only an inlet damper may be installed in a PDX module
and it will only be found when the module is installed in
either model IGX or MSX that was not ordered with an
inlet damper module.
DX System
The DX system in the module is a complete, sealed unit
with compressed R-410A refrigerant. It consists of one
or two compressors, evaporator and condenser coils
and the following integral components:
• expansion valves
• liquid line lter-drier
• service / charging valves
• moisture indicating sight glass
• crankcase heater on each compressor
Each DX system incorporates the following:
• high pressure manual reset cutout
• low pressure auto-reset cutout
Models and Capacities
The Packaged DX Module for Make-Up Air Units is
manufactured in three different platform sizes, each
of which has several
different output tonnage
options. Examine
shipping documents to
verify correct model of
the module as received.
Platform Tonnage
H12 3, 5, 6, 8
H22 7, 9, 10
H32 10, 12, 16
Model Number
A metal plate is located on the fixed panel access to the
control center. The plate is marked with the Platform
Type and Tonnage (for example, H12-6). Record the
model number here:
®
Packaged DX Module for Make-Up Air Unit
3
Page 4
Installation
Service Clearances
All make-up air units require minimum clearances on all
sides for routine maintenance. Filter replacement, drain
pan inspection and cleaning, fan bearing lubrication and
belt adjustment are all examples of routine maintenance
that must be performed. Blower and motor assemblies
and coil and filter sections are always provided with a
service door or panel for proper component access.
Clearances for component removal may be greater than
the service clearances. Refer to submittal drawings for
these clearance dimensions. See also Page 4 of this
manual.
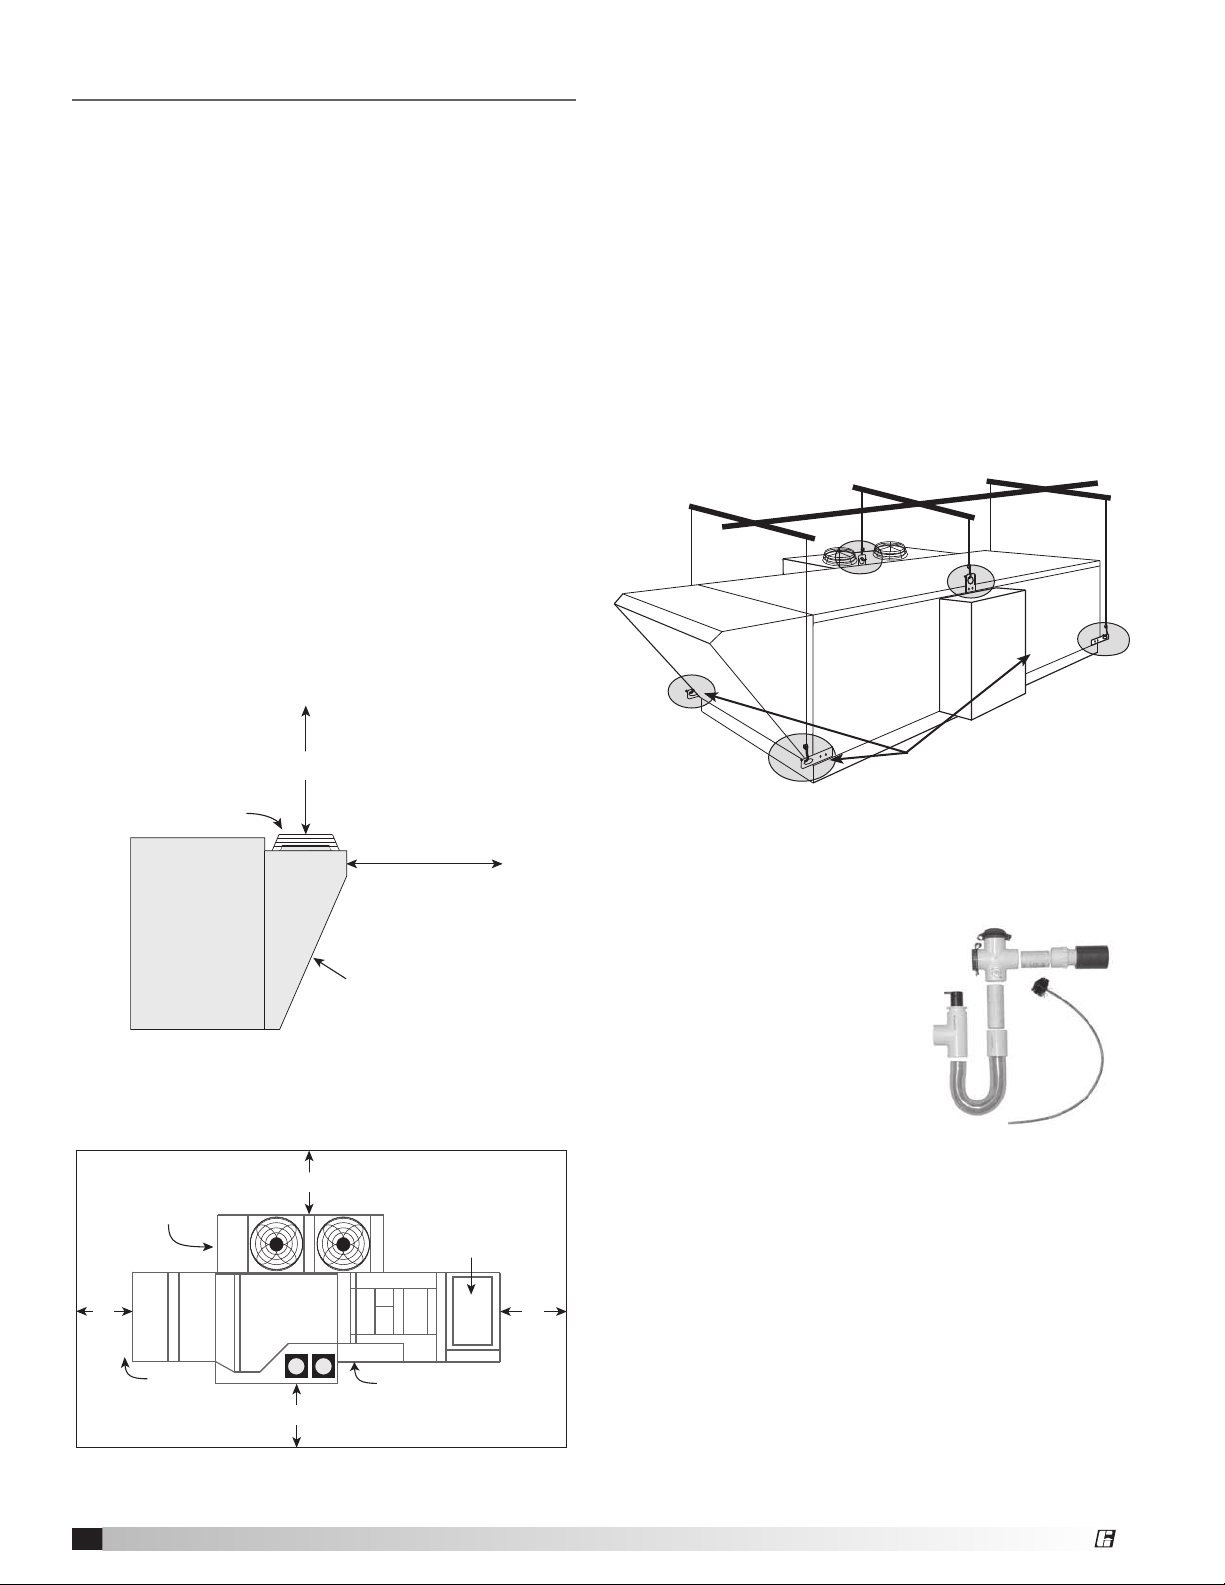
Additional Clearances for Packaged DX
Units
Packaged DX units require additional service clearance
because they must have unrestricted air movement
around the condenser coil and condenser fans. Hot air
is being discharged from the condenser fans during
operation and the more clearance available, the better
the chance of avoiding recirculation or coil starvation.
This unit should never be placed under an overhang or
inside a building. A minimum of 48 inches above the
condenser fans is recommended.
Lifting
All units equipped with this module are provided with
either four or six lifting lugs. When the unit is being
hoisted, all of the provided lugs must be used for
support. Four lifting lugs are on the four corners of
the unit, located at the base. In addition, there may be
two more lifting lugs located at the top of the unit. The
locations of those two top lugs varies somewhat from
unit to unit.
Use spreader bars as shown to prevent damage to the
cabinet. If top-mounted lifting lugs are present, they
must be used in conjunction with the bottom-mounted
lifting lugs when hoisting the unit.
Minimum 48 inches clearance
Condenser Fans
End view of make-up air unit
with Packaged DX
Condenser Fans
and
Condenser Coil
Outdoor
48 inches clearance
Air Intake
42 inches clearance
42 inches clearance
Minimum 42 inches
clearance
Condenser Coil
Indirect Gas-Fired
Furnace
Unit Control Center
Use lifting lugs on
all four corners.
Lifting Details
Install Condensate Drain (P Trap)
The only installation step that
is specific to the DX module is
installation and priming of the
engineered P trap. Locate the
P trap kit that was shipped with
the unit and install the kit in
accordance with the enclosed
instructions.
Provide and Install Switch S4
Each Packaged DX unit requires an On/Off switch to
enable the unit to run. This is a user-supplied switch
that may be a toggle switch mounted in a 2 x 4 inch
electric box (mounted in a position chosen by the user),
or it may be a simple jumper or even a control switch
installed in a remote control panel supplied by the
factory. See also “Additional Control Components” on
page 5 of this manual.
36 inches clearance
Packaged DX Module for Make-Up Air Unit
4
®
Page 5
Component Operation
Compressor Components
Each Packaged DX module has a complete set of
compressor contactors, condenser fan contactors,
relays and certain integral safety controls located in the
module.
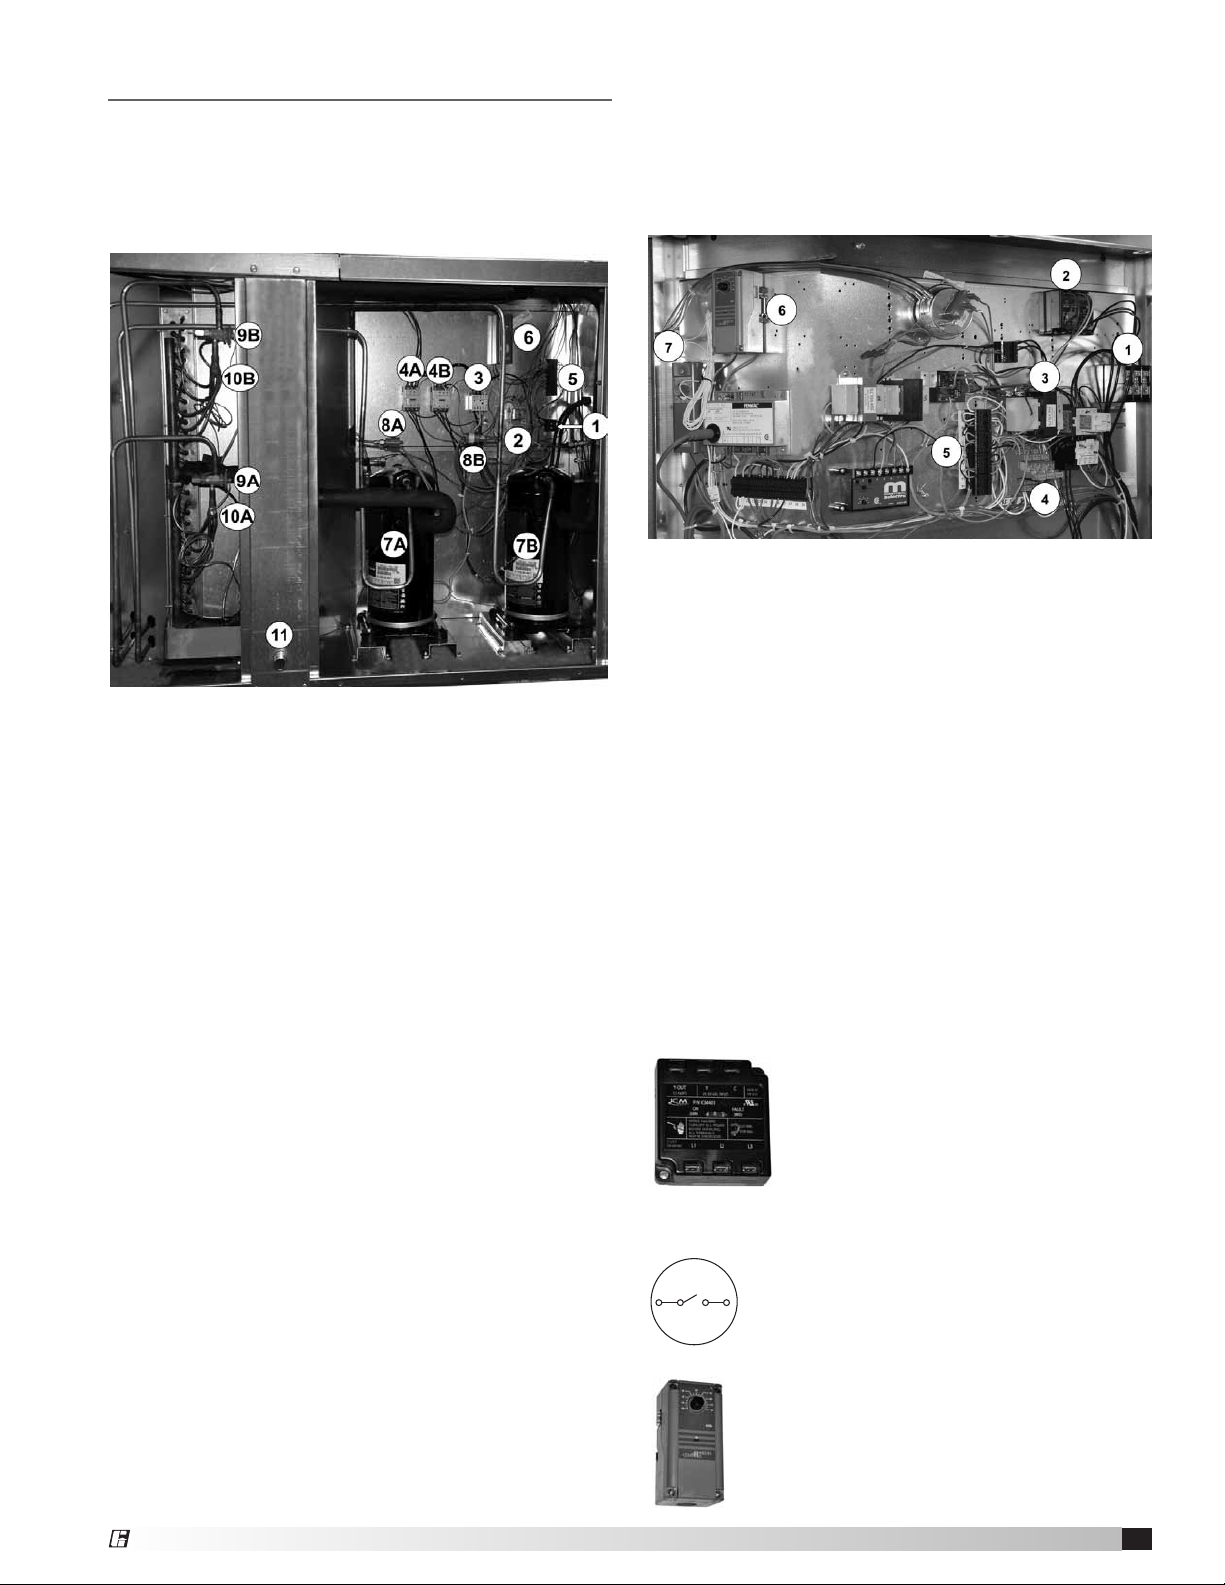
Typical Packaged DX Compressor Compartment
Electrical Components
1. High Voltage Terminal Strip
2. Compressor Relays
3. Condenser Fan Contactor
4A. Compressor Contactor (Circuit A)
4B. Compressor Contactor (Circuit B)
5. Low Voltage Terminal Strip
6. High Limit Safety Control – Direct Gas-Fired units
only
Refrigeration Components
7A. Compressor (Circuit A)
7B. Compressor (Circuit B)
8A. High Pressure Sensor (Circuit A, Manual Reset)
8B. High Pressure Sensor (Circuit B, Manual Reset)
9A. Thermostatic Expansion Valve (TXV) (Circuit A)
9B. Thermostatic Expansion Valve (TXV) (Circuit B)
10A. Refrigerant Distributor (Circuit A)
10B. Refrigerant Distributor (Circuit B)
11. Condensate Drain (P trap here)
Additional Control Components
In addition to the control components located in the
PDX module, various high- and low-voltage circuits are
found in the Make-Up Air Unit control center. See the
unit-specific wiring diagram (found in the unit control
center) for complete information.
Typical Unit Control Center
1. Power Distribution Block - field-supplied power
from main disconnect switch is terminated here.
2. Phase Monitor has jumpers going to power
distribution block)
3. Transformer provides 24 VAC to various low voltage
devices including the Phase Monitor and to Low
Voltage Terminal Strip in compressor compartment.
4. Relays RC1 and RC2 are wired to the control
center in the compressor compartment.
5. Low Voltage Terminal Strip - Switch S4 terminates
here.
6. Thermostat TS5 monitors outdoor air temperature
and turns the DX unit on or off.
7. Inlet Air Sensor monitors the incoming air
temperature and will disable the DX unit if ambient
temperatures are too low.
Phase Monitor constantly checks for
loss of a phase, phase unbalance or
phase reversal. It requires 24 VAC to
operate. When a fault is detected, it cuts
off the power supply to the low voltage
terminal strip, disabling all motors. It has
two LED indicator lights, showing “on”
and “fault”.
Switch S4 (not shown) is terminated on
Low Voltage Terminal Strip 5 above. S4
is field-supplied and field-installed unless
ordered from the factory. See the unit
specific wiring diagram.
Thermostat TS5 monitors outdoor
air temperature. It is field-adjustable. If
there is more than one cooling circuit, an
additional controller for the second stage
will be provided.
®
Packaged DX Module for Make-Up Air Unit
5
Page 6

Factory Installed Refrigeration System Components
Circuit A
Condenser Coil
Service Valve for Subcooling Gauge/
High Side Pressure Drop
13
9
1. Thermostatic Expansion Valve (TXV)
Each unit is equipped with a Thermal Expansion
Valve on each refrigerant circuit. The valve
controls the flow of liquid refrigerant entering the
evaporator coil by maintaining a constant, factory
set superheat of 10°F. The valve is adjustable and is
located on the side of the evaporator coil and can
be accessed through the coil panel access door.
2. Refrigerant Distributor
Attached to the TXV is a refrigerant distributor.
The refrigerant distributor evenly distributes the
refrigerant to each circuit of the evaporator coil to
provide optimum performance.
3. Evaporator Coil
The coil is located in the supply airstream. In the
DX system, the liquid refrigerant is expanded in
the TXV and it then flows through the evaporator
coil. The refrigerant enters the coil as a low
temperature liquid/gas where it eventually boils into
a low temperature, low pressure gas prior to going
into the compressor. As the refrigerant passes
through the evaporator coil, it absorbs heat from
the airstream. To ensure proper operation, the coil
surface must be cleaned so that air movement over
the coil provides the necessary heat transfer.
7
6
Evaporator Coil
3
2
10
1
Pressure Port for
Troubleshooting
Reheat Valves
High Side
Pressure Drop
Service Valve for
Superheat and Low
Side Pressure
11
4
12
8
5
4. Low Limit Pressure Switch
The switch is installed in the suction line and
disables the DX system with the suction pressure
drops below the set point. The switch will auto-reset
when the pressure rises above the auto-reset set
point.
5. Compressors
6. Condensing Coil
7. Condenser Fans
8. High Limit Pressure Switch
The switch opens when refrigerant pressure
increases above the set point in the liquid line and it
then requires a manual reset.
9. Liquid Line Filter-Drier
The liquid line filter-drier prevents moisture and
foreign matter from entering the expansion valve.
10. Moisture Indicating Sight Glass
During normal operating conditions, the sight glass
should typically be liquid. Some gas is acceptable,
but excessive bubbles may indicate improper
charge or a leak in the system. A green dot indicates
the moisture level in the refrigerant, while a yellow
dot indicates moisture in the system and needs to
be dealt with.
11-13. Access Ports
Packaged DX Module for Make-Up Air Unit
6
®
Page 7

Sequence of Operation
The compressors are energized by an outdoor air
thermostat TS5, located in the unit control center. The
thermostat sensor is located in the intake airstream
upstream of the DX coil. The thermostat can be a single
or dual stage thermostat depending on the number of
compressors. The first stage of cooling will energize
when the outdoor air temperature rises above the
thermostat set point plus the differential. The thermostat
is factory set at 80°F with a differential of 5°F but can
be field adjusted. The second stage of cooling will
energize when the outdoor air temperature rises above
the second stage offset plus the differential. The second
stage offset is factory set at 10°F and the second
stage differential is set at 5°F. See the chart below for a
graphical representation of the control operation.
To summarize the
ON
cooling controls,
the first stage of
Adjustable
cooling will turn
on at 85°F and the
(+10° F)
Differential
OFF
second stage of
cooling will turn
on at 95°F. The
second stage of
cooling will turn
off at 90°F and
the first stage of
cooling will turn
off at 80°F.
(+5° F)
Setpoint
Temperature
(factory set at 80° F)
ON
Adjustable
Differential
OFF
FIRST
STAGE
COOLING
OFFSET
(factory set
at 10° F)
SECOND
STAGE
COOLING
Control Sequence
1. Fan switch needs to be closed (S3) between
terminals R and G.
2. Heating/Cooling switch (S4) is closed between
terminal R and Y1.
3. N.O. contact on fan relay (RF) is energized and
closed.
4. When the outdoor air temperature is above the set
point plus the differential power passes through
N.O. contacts on outdoor air thermostat (TS5) and
energizes the cooling relay (RC1).
5. When the pressure switches LPS (refrigerant
low pressure switch) and HPS (refrigerant high
pressure switch) are in their normal state relay R10
will energize. Starting the first stage compressor
contactor.
6. When the outdoor air temperature is above the
second stage offset plus the differential power
passes through N.O. contacts on outdoor air
thermostat (TS5) and energizes the cooling relay
(RC2).
7. When the pressure switches LPS and HPS
(refrigerant high pressure switch) are in their normal
state relay R11 will energize, starting the second
stage compressor contactor.
Control Sequence - Variable Air Volume
(optional)
1. Fan switch needs to be closed (S3) between
terminals R and G.
2. Heating/Cooling switch (S4) is closed between
terminal R and Y1.
3. N.O. contact on fan relay (RF) is energized and
closed.
4. When the outdoor air temperature is above the set
point plus the differential power passes through
N.O. contacts on outdoor air thermostat (TS5) and
energizes the cooling relay (RC1).
5. When the pressure switches LPS (refrigerant
low pressure switch) and HPS (refrigerant high
pressure switch) are in their normal state relay R10
will energize. Starting the first stage compressor
contactor.
6. When the outdoor air temperature is above the
second stage offset plus the differential power
passes through N.O. contacts on outdoor air
thermostat (TS5) and energizes the cooling relay
(RC2).
7. When the pressure switches LPS and HPS
(refrigerant high pressure switch) are in their normal
state relay R11 will energize, starting the second
stage compressor contactor.
8. When the discharge air temperature drops below
the low temperature set point (TS9) factory set
at 55°F, the second stage compressor contactor
will de-energize, turning off the second stage
compressor.
9. The second stage compressor will re-energize when
the discharge air temperature rises above 75°F.
®
Packaged DX Module for Make-Up Air Unit
7
Page 8

Start-Up Unit
DANGER
Electric shock hazard. Can cause injury or death.
Before attempting to perform any service or
maintenance, turn the electrical power to unit to OFF
at disconnect switch(es). Unit may have multiple
power supplies.
CAUTION
Use caution when removing access panels or other
unit components, especially while standing on a
ladder or other potentially unsteady base. Access
panels and unit components can be heavy and
serious injury may occur.
CAUTION
Do not operate without the filters and birdscreens
installed. They prevent the entry of foreign objects
such as leaves, birds, etc.
CAUTION
Do not run unit during construction phase. Damage
to internal components may result and void
warranty.
WARNING
• Unit was factory tested. All blowers, fans,
and compressors are set-up to run correctly
when supplied power. If any one fan is running
backwards or the compressor is making loud
noises, immediately turn off the power. Switch two
leads on the incoming power to the disconnect.
This will ensure proper operation of the unit.
Failure to comply may damage the compressors
and void the warranty.
• Do not jumper any safety devices when operating
the unit. This may damage components within or
cause serious injury or death.
• Do not operate compressor when the outdoor
temperature is below 40ºF.
• Do not short-cycle the compressor. Allow
5 minutes between “on” cycles to prevent
compressor damage.
• DX system is charged with refrigerant. Start-up
must be performed by EPA Certied Technician.
WARNING
Prior to starting up the unit, power must be
energized for 24 hours without a call for cool to
allow the compressor crankcase heaters time to boil
off any liquid refrigerant present in the compressor.
Every installation requires a comprehensive start-up
to ensure proper operation of the unit. As part of that
process, the following checklist must be completed and
information recorded. Starting up the unit in accordance
with this checklist will not only ensure proper operation,
but will also provide valuable information to personnel
performing future maintenance. Should an issue arise
which requires factory assistance, this completed
document will allow unit experts to provide quicker
resolve. Qualified personnel should perform start-up to
ensure safe and proper practices are followed.
Unit Model No. ___________________________________
Unit Serial No. ____________________________________
Compressor 1 Model No. __________________________
Compressor 2 Model No. __________________________
Start-Up Date _____________________________________
Start-Up Personnel Name __________________________
Start-Up Company ________________________________
Phone Number ___________________________________
Packaged DX Module for Make-Up Air Unit
8
®
Page 9

Pre-Start-Up Checklist
oDisconnect and lock-out all power switches.
o Remove any foreign objects that are located in the
unit.
o Check all fasteners, set-screws, and locking collars
on the fans, bearings, drives, motor bases and
accessories for tightness.
o Rotate the fan wheels by hand and ensure no parts
are rubbing.
o Filters can load up with dirt during building
construction. Replace any dirty pleated filters and
clean the aluminum mesh filters in the intake hood.
o Verify that non-motorized dampers open and close
properly.
o Check the tightness of all factory wiring
connections.
o Verify control wire gauge.
o Verify proper drain trap installation.
o Check condensing fans for any damage or
misalignment. Spin the blades and make sure they
don’t contact any parts and are free turning without
any resistance.
o Look over the piping system.
o Inspect all coils within the unit. Fins may get
damaged in transit or during construction. Carefully
straighten fins with a fin comb.
o If there is an indirect gas-fired furnace in this unit,
refer to the manual provided with this unit for PreStart-Up information.
o This unit contains a crankcase heater for each
compressor which needs power supplied to it
24hours prior to start-up. If start-up is scheduled in
24 hours, unlock the disconnect power and energize
unit.
SPECIAL TOOLS REQUIRED
• Voltage Meter (with wire probes)
• Amperage Meter
• Pressure Gauges – (refrigerant)
• Tachometer
• Thermometer
• Incline manometer or equivalent
Start- Up Procedure
The unit will be in operational mode during start-up. Use
necessary precautions to avoid injury. All data must be
collected while the unit is running.
o Make sure Pre-Start-Up checklist is complete.
o Jumper R to G, R to Y1, and R to Y2 (if applicable)
on the control board.
o Turn the disconnect on. After 3 minutes
compressors will come on. Make sure all fans and
compressors are rotating the correct direction.
o Allow the unit to run until the refrigerant system
stabilizes. Approximately 5-10 minutes.
Voltage Imbalance
In a 3-phase system, excessive voltage imbalance
between phases will cause motors to overheat and
eventually fail. Maximum allowable imbalance is 2%.
To determine voltage imbalance, use recorded voltage
measurements in this formula.
Key: V1, V2, V3 = line voltages as measured
VA (average) = (V1 + V2 + V3) / 3
VD = Line voltage (V1, V2 or V3) that
deviates farthest from average (VA)
Formula: % Voltage Imbalance = [100 x (VA-VD)] /VA
®
Packaged DX Module for Make-Up Air Unit
9
Page 10

Start-Up Checklist
Line Voltage. Check at unit disconnect.
L1-L2 Volts L2-L3 Volts L1-L3 Volts
Condensing Fans
Condensing Fan 1 L1 Amps L2 Amps L3 Amps
Condensing Fan 2 L1 Amps L2 Amps L3 Amps
Condensing Fan 3 L1 Amps L2 Amps L3 Amps
Compressors
Outdoor Air Temperature Deg F Outdoor Air Relative Humidity % RH
Return Air Temperature Deg F Return Air Relative Humidity % RH
oCompressor 1:
________ L1 amps
________ L2 amps
________ L3 amps
________ Crankcase Heater
Superheat ________ Deg. F.
Should be between 8º and 12ºF.
Subcooling ________ Deg. F.
Should be between 12º and 17ºF.
Discharge Pressure __________ PSIG
Should be between 300 and 500 PSIG
Suction Line Pressure __________ PSIG
Should be between 100 and 135 PSIG
Liquid Line Temperature ________ Deg. F.
Suction Line Temperature ________ Deg. F.
Moisture Indicating Sight Glass
Liquid Visible Yes / No
Color of Center Dot Green / Yellow
Hot Gas Bypass Operational Yes / No
oCompressor 2:
________ L1 amps
________ L2 amps
________ L3 amps
________ Crankcase Heater
Superheat ________ Deg. F.
Should be between 8º and 12ºF.
Subcooling ________ Deg. F.
Should be between 12º and 17ºF.
Discharge Pressure __________ PSIG
Should be between 300 and 500 PSIG
Suction Line Pressure __________ PSIG
Should be between 100 and 135 PSIG
Liquid Line Temperature ________ Deg. F.
Suction Line Temperature ________ Deg. F.
Moisture Indicating Sight Glass
Liquid Visible Yes / No
Color of Center Dot Green / Yellow
Hot Gas Bypass Operational Yes / No
Packaged DX Module for Make-Up Air Unit
10
®
Page 11

Troubleshooting – Refrigeration Circuit
TROUBLESHOOTING NOTE
IMPORTANT
Do not release refrigerant to the atmosphere! If
Before any components are changed on the
refrigeration system, the cause of the failure must be
determined. Further problems will exist unless the
true cause or problem is identified and corrected.
required service procedures include the adding or
removing of refrigerant, the service technician must
comply with all federal, state and local laws. The
procedures discussed in this manual should only be
performed by a qualified EPA Certified Technician.
NOTE: Unit is equipped with a phase loss/phase reversal control. If system does not start, check phase of electrical
supply.
The first step is to check airflow conditions. (e.g. improper ductwork, atypical wet bulb / dry bulb, etc.) After these
steps have been eliminated, proceed with troubleshooting by following this guide:
Symptom Possible Cause Corrective Action
Open disconnect switch or circuit
breaker.
Compressor contactor not closing.
Blown fuse or tripped breaker.
Low line voltage.
Close switch and/or breaker.
Check voltage to contactor coil, transformer, slave relay,
system. Replace parts as necessary.
Check for shorted wire or motor. Replace fuse after
correcting problem.
Check line voltage. If more than 10% from compressor
marking, correcting is necessary.
Compressor
will not run
or does not
start
Compressor
starts but
cuts out on
low pressure
Motor thermal protector automatically resets. Allow time
Compressor motor protector open.
(2 hours) for compressor to cool down so protector will
reset. Restart and check for reason overheat occurred.
Check motor for open circuit, short circuit, grounded
Compressor defective.
windings, or burn out. Compressor may be seized; check
refrigerant. If necessary, replace compressor.
If manual reset (high pressure), reset switch. (Switch
High pressure switch open
or defective.
Low pressure switch open
or defective.
Open room thermostat or control.
(No cooling required).
opens at 600 psi and will not reset above 420 psi for
R-410A). Replace if defective.
Switch will open at 50 psi and auto-close at 90 psi.
Replace if defective.
Check room temperature. If temperature is proper, wait
for thermostat to close.
Loose wiring. Check all wire terminals and tighten as necessary.
Low or loss of refrigerant charge.
Check refrigerant pressures and temperatures
(subcooling.)
Check for dirty evaporator coil, dirty filters, dampers
Airflow restricted.
closed, iced evaporator coil, improper belt, check motor
amps, check duct design.
Low pressure
switch
activates at
50 PSIG
Restriction in refrigerant line.
Check refrigerant pressures, look for frosted tubing and
components indicating a restriction. Check pressure drop
across the filter drier.
Defective low pressure switch. Replace.
Always have a completed Pre-Start-Up Checklist and Start-Up Checklist prior to requesting parts or service
information.
®
Packaged DX Module for Make-Up Air Unit
11
Page 12

Troubleshooting – Refrigeration Circuit (continued)
Symptom Possible Cause Corrective Action
Refrigerant overcharge. Check pressures, charge by subcooling.
Compressor
starts but
cuts out
on high
pressure
switch
High pressure
activates at
600 PSIG
Condenser fan motor defective. Check fan motor.
Condenser coil inlet obstructed or dirty. Check coil and clearances. Clean coil if necessary.
Air or non-condensables in system.
Check high side equalized pressures, check thermal
expansion valves.
Defective high pressure switch. Replace.
Restriction in discharge or liquid line.
Check refrigerant line pressures, check thermal
expansion valves, replace any defective component.
Condensing fan relay not pulling in. Replace.
Low voltage. Check voltage.
Compressor
cuts out
on thermal
overload
Compressor
hums, but
will not start
Sustained high discharge pressure.
High suction and discharge pressures.
Defective compressor overload.
Check running amperage and conditions described under
“low suction pressure” symptoms.
Check thermal expansion valve setting, check for air in
system. Check air conditions and cfm.
If compressor is hot, allow compressor to cool for two
hours. Recheck for open circuit.
Improper refrigerant charge. Check subcooling.
Improperly wired. Review wiring schematics.
Loose wiring. Check all connections.
Defective start relay. Replace relay.
Motor windings damaged. Verify amp draw.
Improperly wired. Review wiring schematics.
Low line voltage. Check voltage.
Loose wiring. Check all connections.
Defective start relay. Replace relay.
Motor winding damaged. Verify amp draws. Replace compressor if necessary.
Internal compressor mechanical
damage.
Replace.
Refrigerant overcharge. Check pressures and subcooling.
Check thermal expansion valve setting. Check for
refrigerant overcharge.
Dampen tubing vibration by taping or clamping. Carefully
bend tubing away from contact where possible.
Compressor
Liquid floodback.
Tubing rattle.
noisy or
vibrating
Scroll compressor rotating in reverse.
(3-phase)
Check high and low side pressures during operation to
confirm. Rewire for opposite rotation.
Damaged compressor. Replace the compressor.
Improper mounting on unit base.
Check that compressor is properly isolated and mounting
bolts are tight.
Always have a completed Pre-Start-Up Checklist and Start-Up Checklist prior to requesting parts or service
information.
Packaged DX Module for Make-Up Air Unit
12
®
Page 13

Troubleshooting – Refrigeration Circuit (continued)
Symptom Possible Cause Corrective Action
High suction
pressure
High
discharge
pressure
Excessive load on evaporator coil.
Check for high entering wet bulb temperature, check for
excessive air flow.
Check the thermal expansion valve, ensure bulb is
insulated. Check superheat. If superheat is high, then
Expansion valve sensing bulb not
secured to suction line.
valve is choking refrigerant flow.
• Check bulb for contact.
• Adjust valve for superheat ~10°F.
• Replace valve power head or valve.
Thermostatic expansion valve.
Overfeeding.
Check bulb location and clamping. Adjust superheat.
Replace expansion valve power head.
Overcharged. Check pressures and subcooling.
Thermal expansion valve setting.
Air inlet to condenser dirty or
obstructed.
Check thermal expansion setting and calibrate
superheat/subcooling.
Check for proper clearances and possible air
recirculating. Clean coil.
Condenser fan motor defective. Check condenser fan motor.
Too much refrigerant. Check subcooling. Remove excess refrigerant.
Non-condensable in system. Remove non-condensable from system.
Dirty condenser coil. Clean condenser coil.
Condenser fan not running or running
backwards.
Check electrical circuit and fuse. Check fan cycling
controls.
High load conditions. Add more equipment or reduce load.
Refrigerant undercharge/loss of
refrigerant charge.
Blower running backward.
Check pressures and subcooling.
Confirm blower rotation. If reversed, interchange any two
wires from 3-phase disconnect.
Loose blower, pulley or belts. Check drive pulley alignment, belt tension.
Low suction
Low entering air temperature.
(Low load conditions).
Refrigerant leak. Check system for leaks. Repair leaks and add refrigerant.
Check entering air wet bulb conditions.
pressure
Evaporator dirty or iced-up, or airflow
restricted.
Clean the coil. Check fan operation. Check airflow.
Plugged liquid line filter-drier. Replace filter-drier, check psi across filter.
Improper hot gas bypass setting. Check setting and correct as required.
Expansion valve defective, superheat
too high or valve too small.
Adjust valve for proper superheat or replace the
expansion valve if too small or defective.
Moisture in system, check sight glass. Reclaim refrigerant, check for leaks, recharge.
Always have a completed Pre-Start-Up Checklist and Start-Up Checklist prior to requesting parts or service
information.
®
Packaged DX Module for Make-Up Air Unit
13
Page 14

Symptom Possible Cause Corrective Action
Check subcooling, check for leak. Repair leak and add
refrigerant.
Check superheating and adjust thermal expansion valve.
Check condenser controls and reset to obtain desired
condensing temperature.
Check thermostat, check heat anticipator setting.
Check thermal expansion valve setting. Check for
refrigerant overcharge. Check crankcase heater
operation.
Check equalized high side pressure with equivalent
outdoor temperature.
Check airflow, check filters, check drive for loose parts or
belts. Check VFD control signal for proper operation.
Check bulb of thermal expansion valve.
Check valve. If defective, replace.
Low
discharge
pressure
Compressor
short cycles
Compressor
loses oil
Not enough
cooling
or lack of
cooling
Liquid line
is frosted
or wet
Suction line
is frosting
Frost on
evaporator
coil
Insufficient refrigerant charge.
Defective or improperly adjusted
expansion valve.
Low suction pressure. See “low suction pressure”.
Faulty condenser temperature controls.
(Condensing fan cycle switch).
Thermostat location or controls
malfunction.
Improper refrigerant charge. Check subcooling, verify superheat.
Defective high or low pressure control. Check high or low pressure switch.
Poor air distribution. Check ductwork for recirculating.
High discharge pressure. See “high discharge pressure”.
Low airflow at evaporator(s). Check blower operation and airstream restrictions.
Incorrect unit selection (oversized). Contact factory.
Refrigerant leak. Check system for leaks. Repair leaks and add refrigerant.
Short cycling. Check low pressure control settings.
Refrigerant flood back.
Reheat flush cycle inadequate. Contact factory.
Refrigeration undercharged. Check subcooling. Adjust charge, if necessary.
Dirty filter or evaporator coil. Check filter, coil and airflow.
Dirty or clogged condenser coil. Check coil and airflow.
Air or other non-condensables in
system.
Restriction in suction and liquid line. Check for restrictions in refrigerant circuit.
Control contacts stuck. Check wiring.
Excessive load. Add more equipment or reduce room load.
Restriction in liquid line. Clear restriction upstream of point of frosting.
Insufficient evaporator airflow.
Malfunctioning or defective expansion
valve.
Hot gas bypass valve not functioning
properly.
Manual hot gas bypass valve closed. Open valve.
Low load or airflow. Increase airflow, check filters.
Always have a completed Pre-Start-Up Checklist and Start-Up Checklist prior to requesting parts or service
information.
Packaged DX Module for Make-Up Air Unit
14
®
Page 15

Routine Maintenance
DANGER
Electric shock hazard. Can cause injury or death.
Before attempting to perform any service or
maintenance, turn the electrical power to the unit
to OFF at disconnect switch(es). Unit may have
multiple power supplies.
CAUTION
Use caution when removing access panels or other
unit components, especially while standing on a
ladder or other potentially unsteady base. Access
panels and unit components can be heavy and
serious injury may occur.
This unit requires minimal maintenance to operate
properly. To ensure proper operation and longevity, the
following maintenance schedule should be followed.
The items in this list assume a relatively clean air
environment and may require attention more frequently
in a dusty or dirty area. If this unit contains an indirect
gas-fired heater, refer to the Installation, Operation
and Maintenance manual provided with the unit for
maintenance purposes. An EPA Certified Technician
should complete all refrigeration systems checks.
Maintenance Frequency:
Monthly
1. Condensate Drain
Inspect and clean. Refill with water or glycol.
Annually
It is recommended that the annual inspection and
maintenance occur at the start of the cooling season.
After completing the checklist, follow the unit start-up
checklist provided in the manual to ensure the
refrigeration system operates in the intended manner.
1. Door Seal
Check if intact and pliable.
2. Wiring Connections
Check all connections for tightness.
3. Cabinet
Check entire cabinet, inside and out, for dirt
build-up or corrosion. Remove accumulated
dirt, remove any surface corrosion and coat the
area with appropriate finish.
4. Evaporator Coil Maintenance
Check for cleanliness. Clean if required.
5. Condenser Coil Maintenance
Check for cleanliness. Clean if required.
6. Condensate Drain
Inspect and clean. Refill with water.
7. Condensing Fan Blades and Motors
Check for cleanliness.
Check all fasteners for tightness.
Check for fatigue, corrosion and wear.
Maintenance Procedures:
Lubrication
Check all moving components for proper lubrication.
Apply lubricant where required. Any components
showing excessive wear should be replaced to maintain
the integrity of the unit and ensure proper operation.
Dampers
Check damper (if present) to ensure it opens and closes
properly and without binding. Apply power to motorized
dampers to ensure the actuator opens and closes the
damper as designed.
Reference - component location
Condenser Fans
Condenser Fans
and Condenser Coil
and Condenser Coil
Evaporator Coil
Evaporator Coil
Direct Gas-Fired Burner
Direct Gas-Fired Burner
Outdoor
Outdoor
Air Intake
Air Intake
Unit Control Center
Unit Control Center
Model DGX Make-Up Air Unit
Condenser Fans
Condenser Fans
and Condenser Coil
Outdoor
Outdoor
Air Intake
Air Intake
Evaporator Coil
Evaporator Coil
Outdoor
Outdoor
Air Intake
Air Intake
and Condenser Coil
Model IGX Make-Up Air Unit
Condenser Fans
Condenser Fans
and Condenser Coil
and Condenser Coil
Evaporator Coil
Evaporator Coil
Model MSX Make-Up Air Unit
with Electric Heat
Indirect Gas-Fired
Indirect Gas-Fired
Furnace
Furnace
Unit Control Center
Unit Control Center
Unit Control
Unit Control
Center
Center
®
Packaged DX Module for Make-Up Air Unit
15
Page 16

Maintenance Log
Date __________________ Time _____________ AM/PM
Notes:___________________________________________
_________________________________________________
_________________________________________________
_________________________________________________
_________________________________________________
Date __________________ Time _____________ AM/PM
Notes:___________________________________________
_________________________________________________
_________________________________________________
_________________________________________________
_________________________________________________
Date __________________ Time _____________ AM/PM
Notes:___________________________________________
_________________________________________________
_________________________________________________
_________________________________________________
_________________________________________________
Date __________________ Time _____________ AM/PM
Notes:___________________________________________
_________________________________________________
_________________________________________________
_________________________________________________
_________________________________________________
Date __________________ Time _____________ AM/PM
Notes:___________________________________________
_________________________________________________
_________________________________________________
_________________________________________________
_________________________________________________
Date __________________ Time _____________ AM/PM
Notes:___________________________________________
_________________________________________________
_________________________________________________
_________________________________________________
_________________________________________________
Date __________________ Time _____________ AM/PM
Notes:___________________________________________
_________________________________________________
_________________________________________________
_________________________________________________
_________________________________________________
Date __________________ Time _____________ AM/PM
Notes:___________________________________________
_________________________________________________
_________________________________________________
_________________________________________________
_________________________________________________
Warranty
Greenheck warrants this equipment to be free from defects in material and workmanship for a period of one year from the
shipment date. Any units or parts which prove to be defective during the warranty period will be replaced at our option when
returned to our factory, transportation prepaid. Motors are warranted by the motor manufacturer for a period of one year. Should
motors furnished by Greenheck prove defective during this period, they should be returned to the nearest authorized motor
service station. Greenheck will not be responsible for any removal or installation costs.
As a result of our commitment to continuous improvement, Greenheck reserves the right to change specifications without notice.
AMCA Publication 410-96, Safety Practices for Users and Installers of Industrial and Commercial Fans, provides additional safety
information. This publication can be obtained from AMCA International, Inc. at www.amca.org.
®
Phone: (715) 359-6171 • Fax: (715) 355-2399 • E-mail: gfcinfo@greenheck.com • Website: www.greenheck.com
474681 • Packaged DX for Make-Up Air Units, Rev. 2, May 2012 Copyright 2012 © Greenheck Fan Corporation
16
 Loading...