


GreenGuard Residential Building Wraps User Manual
GREENGUARD® MOISTURE MANAGEMENT
Residential and
Light Commercial
Installation Guide
For GreenGuard® Building Wraps
DEFLECTION/DRAINAGE/DRYING
1-800-241-4402
www.TrustGreenGuard.com
BUILDING WRAP AND FLASHING INSTALLATION
BUILDING WRAP INSTALLATION
1. General
GreenGuard® Building Wraps are polyolen building wraps intended to perform
as water-resistive barriers when installed in accordance with the information
provided in this Guide. They are intended to reduce the risk of air and bulk water
inltration when installed under exterior coverings such as brick, stucco, clay
tile, etc., and various siding materials like wood, vinyl, ber cement, etc. Some
building wraps are recognized as air barrier materials having a higher level of
performance and require additional installation steps as indicated in this Guide.
GreenGuard® Building Wraps meet the compliance requirements of all applicable
building codes and industry standards. Go to www.TrustGreenGuard.com for the
most current compliance information.
2. Description
This Guide provides information for installation of GreenGuard® Building Wraps
in residential and light commercial applications in which a water-resistive barrier
and/or air barrier material may be required.
The information provided represents guidelines and is not intended to address
all potential combinations of building materials. GreenGuard® Building Wraps
are polyolen products that are designed specically for the applications in this
Guide.
3. Usage and Limitations
GreenGuard® Building Wraps are intended to perform as water-resistive barriers
(WRB’s) in residential and light commercial construction applications when
installed in accordance with the guidelines provided in this Guide and the
following guidelines:
•GreenGuard®BuildingWrapsareexcellentwater-resistivebarriersthat
help deect water and wind-driven rain, yet are designed to breathe
to assist trapped moisture vapor to escape, helping walls dry faster.
GreenGuard® Building Wraps are made of synthetic materials that
are generally recognized as not providing a food source for insects,
fungus, mold, or mildew. GreenGuard® Building Wraps should always
be properly installed and stored.
•GreenGuard®BuildingWrapsshallbeinstalledwiththeprintedsidefacingthe
outdoor environment. Refer to the specic product literature for outdoor
exposure limitations.
4. General Installation Guidelines
4.A. Building Wrap Installed Over Sheathing (Applies to All
GreenGuard® Building Wraps)
Note: Alternative installation details may be used if approved in
writing by Pactiv Building Products prior to installation.
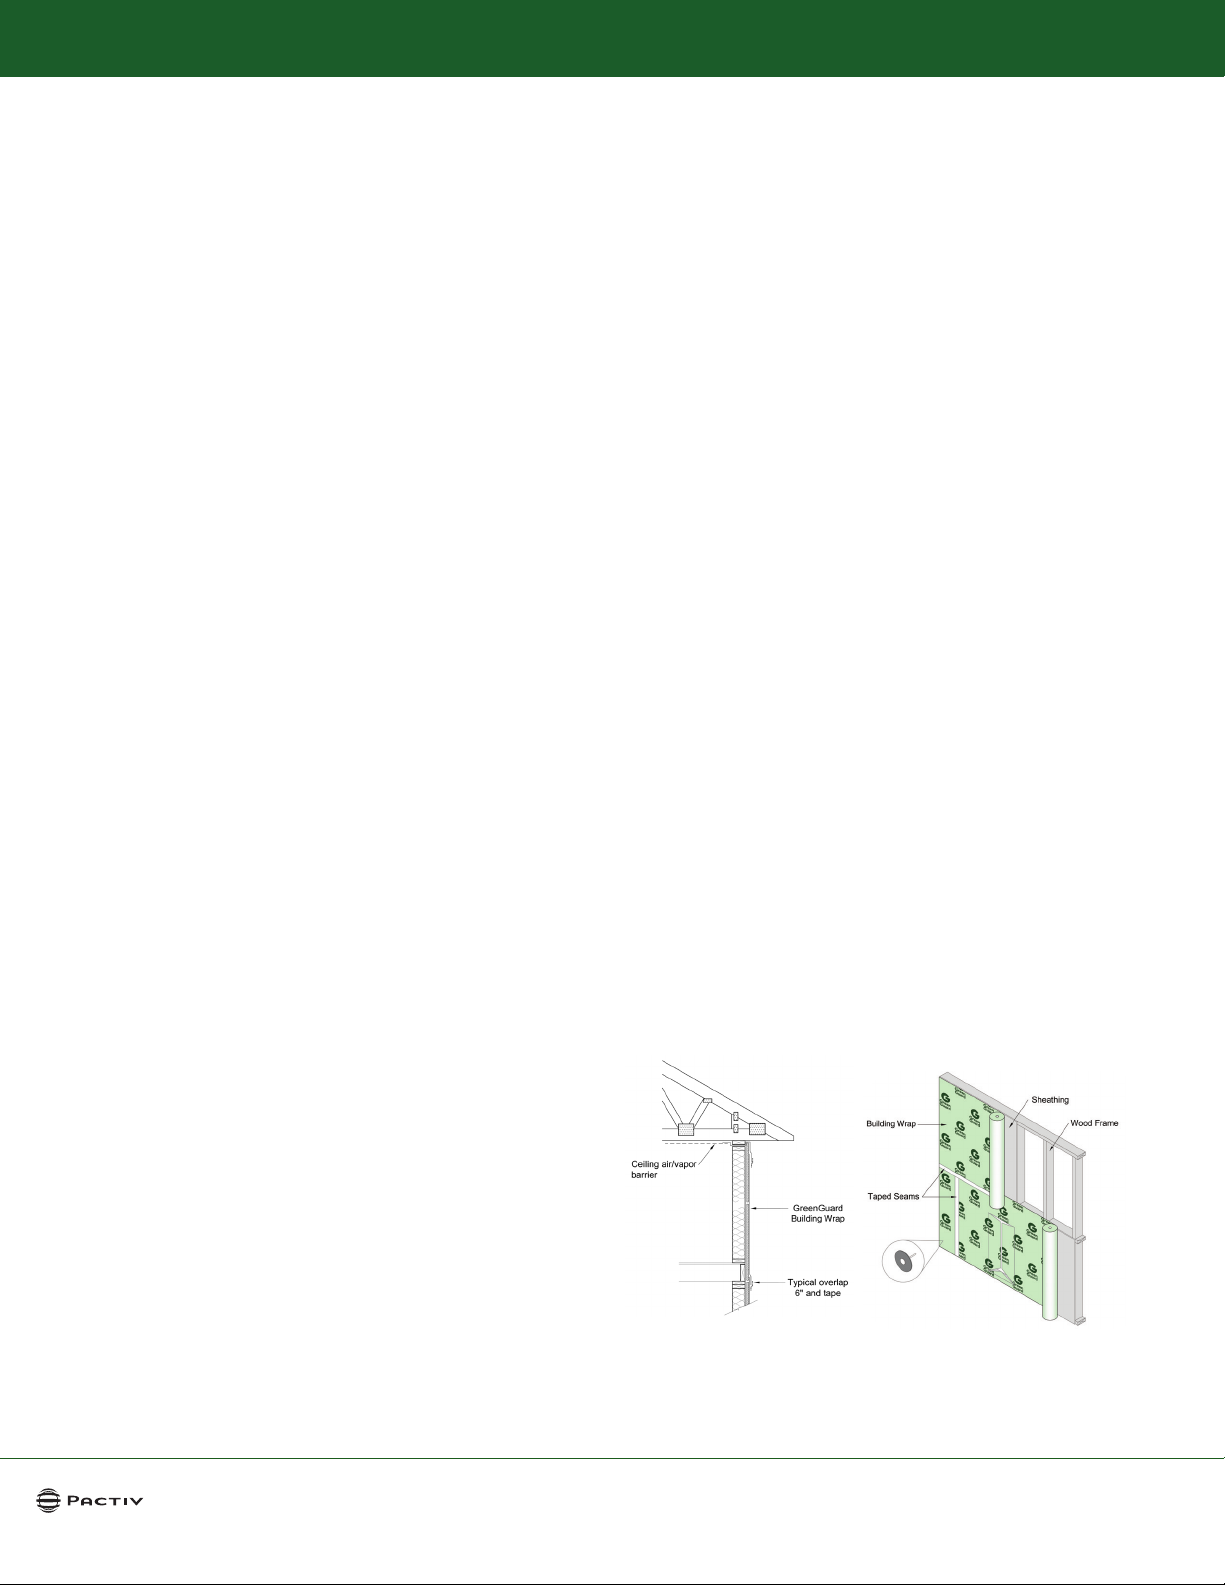
1. Install building wrap over structural sheathing board, over insulation
board (see Figures 1 and 2), or directly to framing members.
2. Begin by aligning the bottom edge of the roll with the base of the
wall, approximately 2 feet around a corner, fastening securely to a structural
sheathing, through insulation boards to studs or directly to the studs.
3. Unroll the building wrap with the printed side facing out, wrapping the entire
building, including door and window rough openings. Acceptable fasteners
include: common galvanized roong nails, plastic cap nails, 1-inch crown
staples and 3/8-inch non-corrosive staples. The following applicable fastener
spacing shall be used:
· In applications in which the building wrap is intended to perform as a water resistive barrier only, the fastener spacing shall be 36 inches to 48 inches along
every other stud location.
· In applications in which the building wrap is intended to perform as the primary
air barrier material in the wall assembly, only minimum 1 inch long fasteners
with plastic or metal caps can be uded and the spacing shall be 16 to 18
inches along every other stud location.
· In applications in which the siding or cladding installation will immediately
follow installation of the building wrap, then the building wrap can be installed
using fewer fasteners in order to provide adequate attachment necessary to hold
the building wrap in place. However, environmental conditions must be taken
into consideration so that the building wrap is not damaged by wind or becomes
detached, allowing moisture penetration. The installer assumes responsibility
when fewer fasteners are used.
At the bottom of a wall in which through-wall ashing will be installed, the bottom
12 inches of building wrap may remain unfastened in order to integrate the
through-wall ashing, but must be sealed prior to installation of the siding or
cladding if the building wrap is the primary air barrier material in the wall
assembly.
•GreenGuard®BuildingWrapsarenotintendedtobeusedasroong
paper.
•GreenGuard®BuildingWrapsarenotintendedtobeusedasa
vapor retarder.
• WARNING: GreenGuard® Building Wraps will ignite if exposed to re of
sufcient heat and intensity. Protect building wraps from exposure
to open ame or other ignition sources during shipping, storage,
and installation.
•BuildiingcodesrequiretheuseoftwolayersofGradeDbuildingpaperover
wood sheathing when a cementitious covering (conventional stucco) is used. As
an alternative, one layer of Grade D building paper can be used in conjunction
with one layer of foam plastic insulation. Check with a local building code
ofcial to verify requirements.
1-800-241-4402 www.TrustGreenGuard.com
FIGURE 1: EXTERIOR WALL
CROSS-SECTION
1
FIGURE 2: EXTERIOR WALL WITH GREEN-
GUARD BUILDING WRAP
GUIDE FOR RESIDENTIAL APPLICATIONS
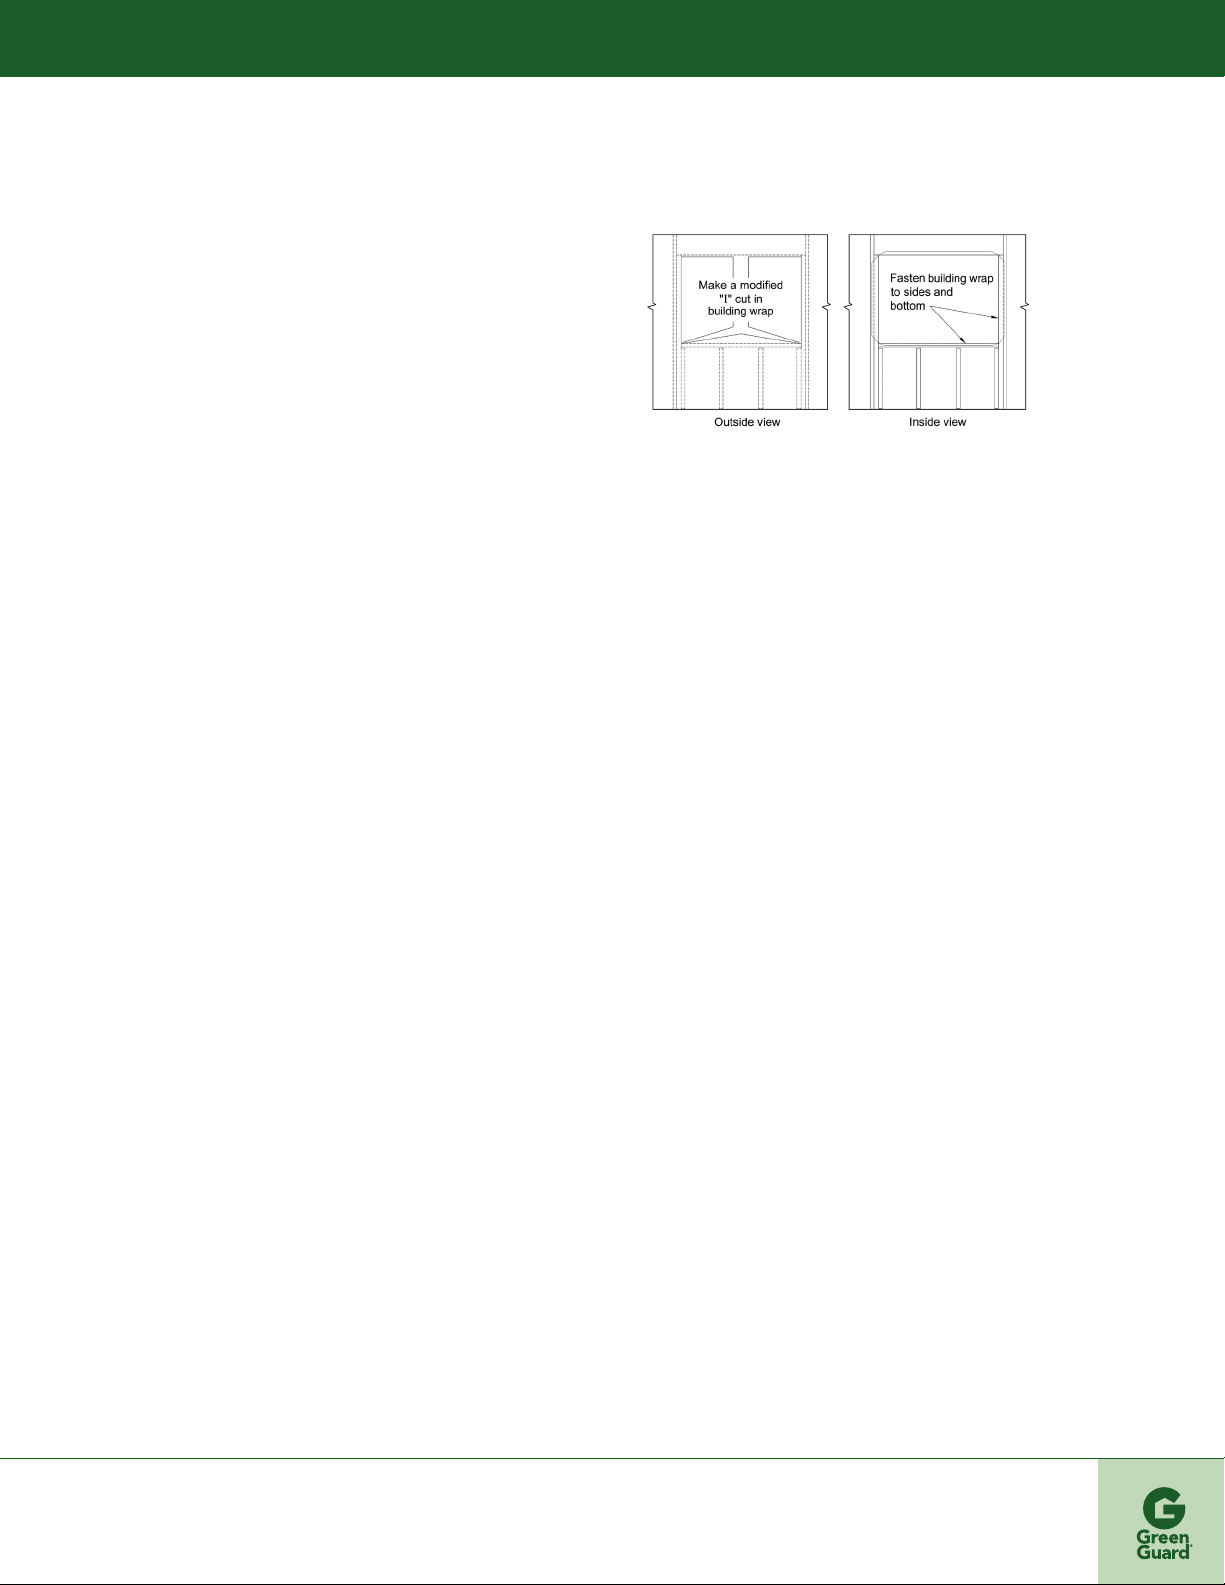
4. At window rough openings, cut the building wrap using a modied “I”
pattern, folding excess material to the inside of the opening and fasten to
studs (see Figure 3). Alternative details for installing building wrap at rough
openings are shown in sections 5A and 5B of this Guide. Use of GreenGuard
Flashing Products is optional unless the building wrap is intended to perform
as the primary air barrier material in the wall assembly. In this case,
GreenGuard® Butyl Flashings or other butyl self-adhering ashing approved by
Pactiv Building Products must be used.
5. When the end of a roll is reached, rmly attach the loose end of the building
wrap to a stud or structural sheathing. Seams must be overlapped a minimum
of 6 inches for vertical seams and 2 inches for horizontal seams. The upper
courses of building wrap must overlap the lower courses in shingle fashion.
Sealing of building wrap seams using GreenGuard® Seam Tape (Standard or
Custom) or other sealing method approved by Pactiv Building Products is
optional unless the building wrap is intended to perform as the primary air
barrier. In this case, the seams must be sealed using 3 inch wide
GreenGuard® Seam Tape (Custom) or other tape approved by Pactiv.
GreenGuard® Building Wraps that are recognized as air barrier materials may be
installed as the primary air barrier material in a wall assembly by sealing around all
windows, doors and wall penetrations. Other air barrier applications may include
knee wall backing, exterior walls of chimney structures, exterior walls of tub/shower
enclosures, etc.
®
FIGURE 3: EXAMPLE OF MODIFIED “I” CUT AT A WINDOW OPENING
6. Many common adhesives and sealants are compatible with GreenGuard®
Building Wrap and GreenGuard® Flashing products. For more information
regarding adhesives, sealants+ and primers for use with GreenGuard® Building
Wrap and GreenGuard® Flashing products, go to www.TrustGreenGuard.com and
look for the applicable Technical Bulletin under “Product Literature.”
2
BUILDING WRAP AND FLASHING INSTALLATION
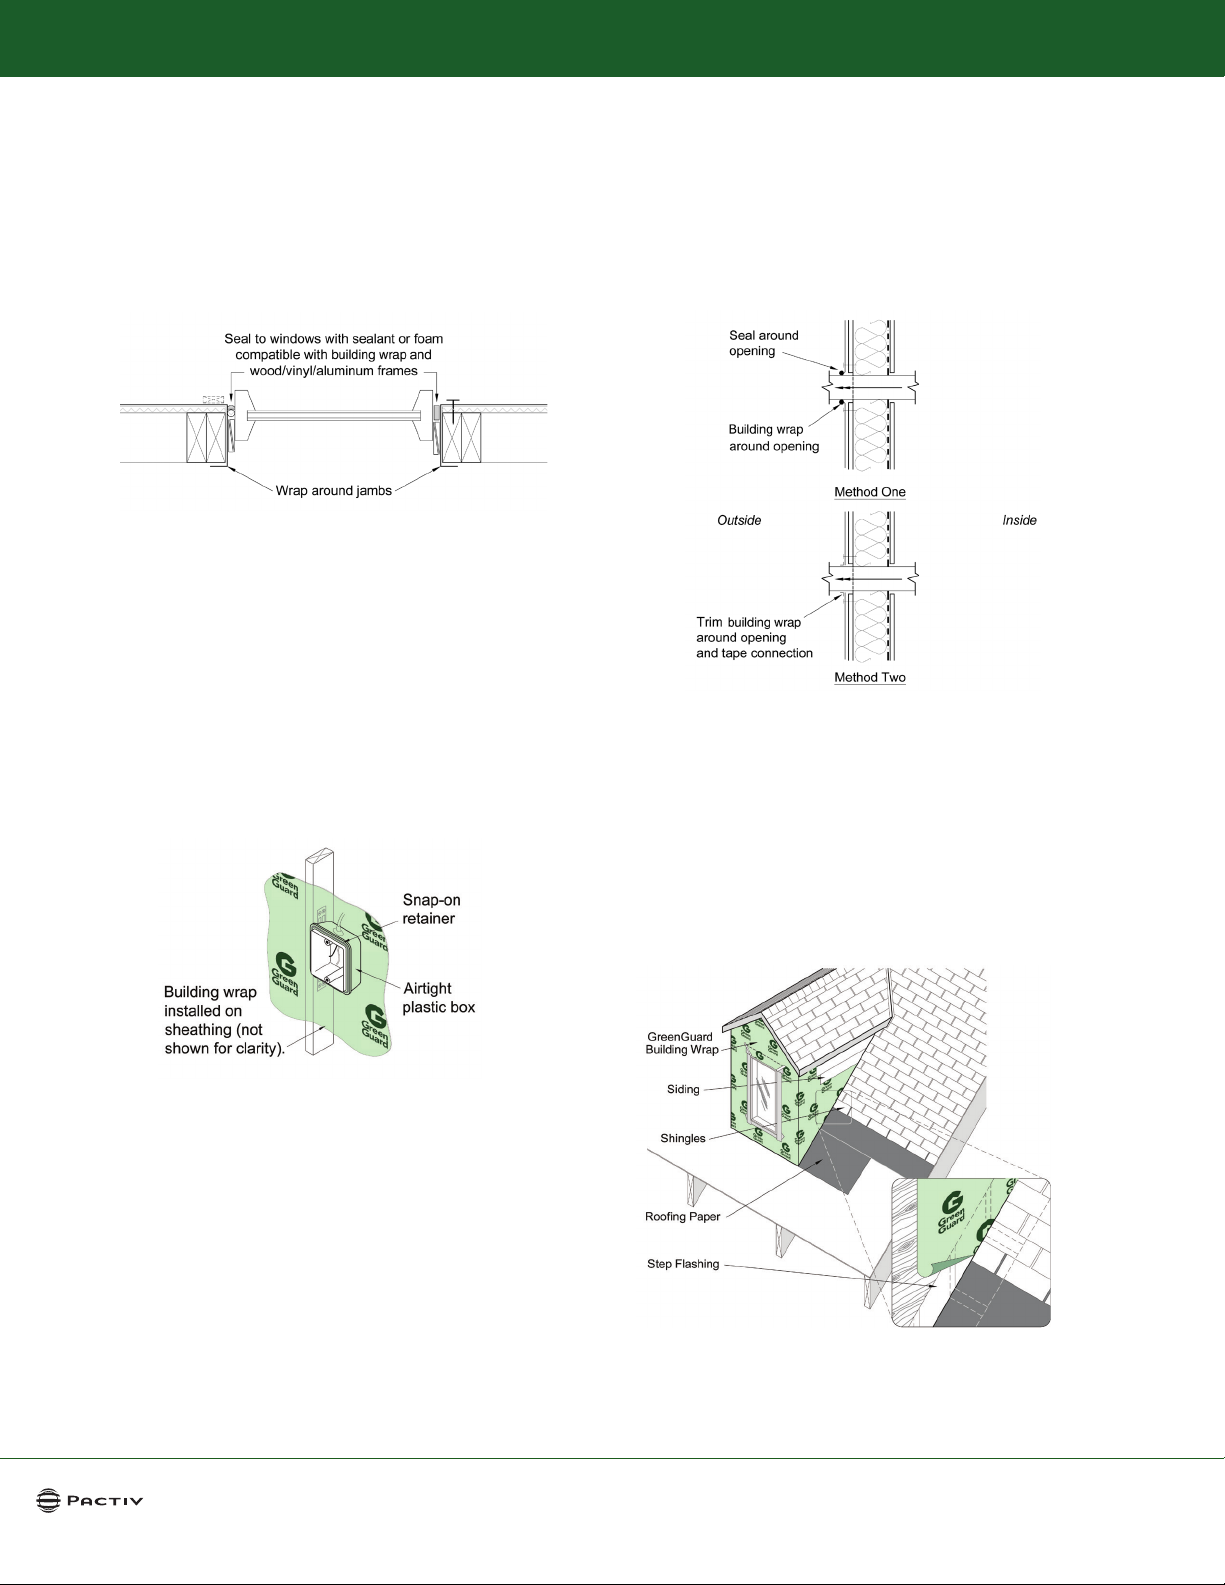
4.B. Installation of Building Wrap at Window Frame Detail
Figure 4 shows an example of a window frame detail where the building wrap
is installed over the sheathing and is wrapped around the window jambs to the
interior of the wall. Windows should be sealed in accordance with the window
manufacturer’s installation instructions.
FIGURE 4: WINDOW FRAME CROSS-SECTION
4.C. Installation of Building Wrap at Exterior Electrical Boxes
All exterior electrical boxes and other penetrations through the building wrap
should be sealed to prevent air and moisture intrusion at the openings. The
building wrap must be taped to the electrical box in order to provide an adequate
seal (see Figure 5).
4.D. Installation of Building Wrap at Wall Penetrations
When penetrations, such as those for pipes and ducts, breach the building wrap,
they must be sealed to the building wrap using a sealant that is compatible with
both the building wrap and the pipe or duct material (see Figure 6).
FIGURE 6: INSTALLATION OF BUILDING WRAP
AT WALL PENETRATIONS
4.E. Installation of Building Wrap (Roof/Roof and Roof/
Wall Intersections)
FIGURE 5: INSTALLATION OF BUILDING WRAP
AT EXTERIOR ELECTRICAL BOXES
GreenGuard® Building Wrap should overlap the step ashing at the
roof to wall intersection (see Figure 7).
FIGURE 7: INSTALLATION OF BUILDING WRAP/WALL INTERSECTION
1-800-241-4402 www.TrustGreenGuard.com
3