

Green-Go GGO-WBP, GGO-WAA Quick Start Manual
g"
"
Thank you for choosing the Green-GO Wireless Intercom system.
The Green-GO Wireless Intercom system consists of the following hardware:
- GGO-WBP: Wireless Belt-pack
- GGO-WAA: Active Antenna (Sold Separately)
What’s in the box:
• 1 x Green-GO Wireless Unit
• 1 x Battery Pack
• 1 x USB Charge Cable
• 1 x USB Wall Outlet
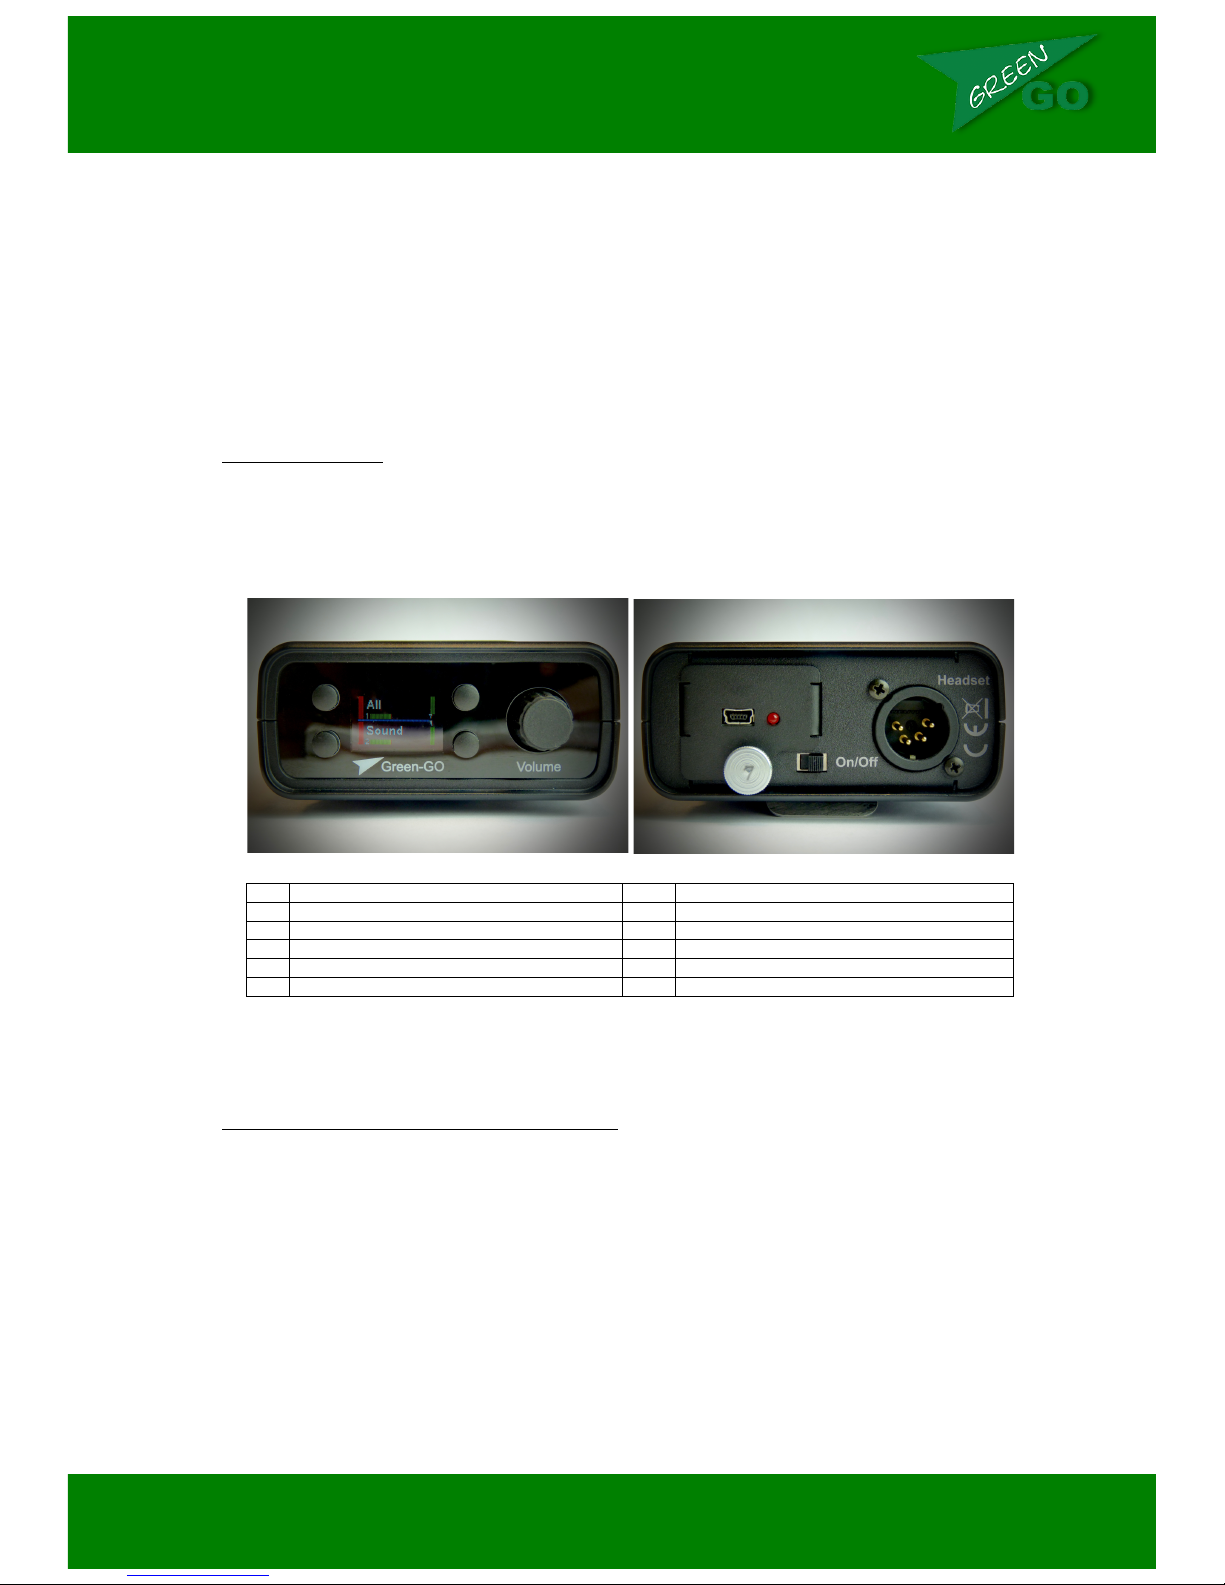
1
RGB Display
4
Battery Compartment
2
Selection Button
5
USB Charge Port
3
Clickable Rotary Encoder
6
LED Indicator
7
Retaining Screw
8
Power On/Off Switch
9
4-Pin XLR Headset Socket
Setting up the Green-GO Wireless Belt-pack
o The battery should be charged and ready to go, however due to the time the unit may have
spent in storage, we recommend that you charge the battery for approximately 4 hours via the
included USB cable and USB Power Adapter
o We advise use of a wall outlet to avoid power surge occurring from use with a USB port.
o Once the battery is charged, take the battery off charge.
o Insert the battery into the Green-GO wireless belt-pack unit by sliding it into the main section.
When doing so, ensure that the pack is inserted so that the screw hole of the battery pack
matches the screw hole of the main Green-GO unit. Push the battery fully into the slot, and
secure with the retainer screw. The battery can be charged inside the Green-GO belt-pack,
and does not need to be removed.
o Connect your microphone headset to the unit, ensuring that you are using a headset with a 4-
Pin XLR Female Connection.
1"
2"3"4"5"6"
7"
8"
9"

g"
"
o To power up the unit, slide the power switch on the base of the unit towards the battery
retaining screw, and hold for 2 seconds. The same process is repeated to power down the
unit.
o The unit will display the Green-GO Logo whilst loading, before showing the belt-pack home-
screen display.
o The belt-pack home-screen will display whichever users or groups have been assigned to
channels 1 and 2, and additionally channels 3 and 4 if Four Channel Display Mode has been
enabled. (Please note that if this setting is changed in the menu, that the unit must be
powered off and on for this change to be completed.
o The Setup Menu can be accessed by holding down the rotary encoder, and whilst still
depressing this, selecting the button that is located next to “Setup” on the screen. To scroll
through menu options, rotate the rotary encoder, and press the encoder to select an option.
You can always return to the previous menu level by using the rotary encoder to select “Exit”
on the menu.
o 1 Antenna can serve 4 belt-packs, and 1 belt-pack can receive signals from 4 antennas. The
belt-pack will automatically connect to the antenna from which it receives the clearest signal
level.
Preparing the Antenna:
The antenna is powered by POE (Power over Ethernet), and is designed to be integrated into an
existing Green-GO network.
The antenna features only one button, and an LED indicator. The LED indicator will display as follows,
depending on the system status:
Pairing the Antenna with a Belt-pack
o To pair a belt-pack to the antenna, press and hold the red button for two seconds. The LED
will begin to blink red.
o On Belt-pack go to the antenna menu, and select any of the four slots to assign that antenna
to that slot. Press the rotary encoder and the display will display “Registering”. Once
completed it will display “registered”.
LED Status:
Indication:
Red/Green Blink
There is no other device on the system with the
same configuration. If you are using the wireless
system as a stand-alone system, then the LED
will continue to blink red and green.
Green Blink
Another device with the same configuration is on
the system
Red Slow Blink
The antenna is ready to be paired with a belt-pack
Red Fast Blink
The antenna is clearing any previously paired
devices
 Loading...