

Page 1
1
www.bikefriday.com800-777-0258 • +1-541-687-0487
Using Your Bike Friday®
Hinge Forward
Green Gear Cycling, Inc.
3364 W 11th Ave. Eugene, OR 97402
800-777-0258 USA & Canada
+1-541-687-0487 Int’l • +1-541-687-0403 Fax
www.bikefriday.com • [email protected]
version 3/3/2015
Additional instructions
not found in Pocket
Manual
Page 2
2
www.bikefriday.com 800-777-0258 • +1-541-687-0487
Table of Contents
Getting Started: Accessories 3
Tools 4
Removing Bike from TravelCase 4
Unfolding Frame 5
Latching and securing frame 6
Installing wheels 7
Quick Folding: Pedal Position 8
Grabbing the frame 9
Position wheels 10
Open stem riser 10
Position seat mast 11
Unfolding 11
Packing in a TravelCase: Remove rear wheel 12
Fold the frame 12
Position seat mast 12
Install foam blocks 13
Add accessories 13
Remove air from rear tire 14
Install rear dropout protector 14
Position seat mast 15
Position Trailer 15
Position racks 16
Position front wheel 16
Position handlebars 17
Final check 17
Page 3
3
www.bikefriday.com800-777-0258 • +1-541-687-0487
Getting Started
These steps demonstrate how to set up a Hinge Forward
Bike Friday out of a TravelCase. If you did not order your
bike with a TravelCase, most of these steps will not be
necessary to set up out of the box. Please refer to the
standard Bike Friday Pocket Manual for additional information on safety, accessories, and maintenance.
Common tools needed include 4mm, 5mm, and 6mm Hexdrivers, and a 15mm pedal wrench.
You will also nd a combination 5/6mm “S” wrench
attached to your water bottle cage, which is useful for the
most common setup and tting adjustments.
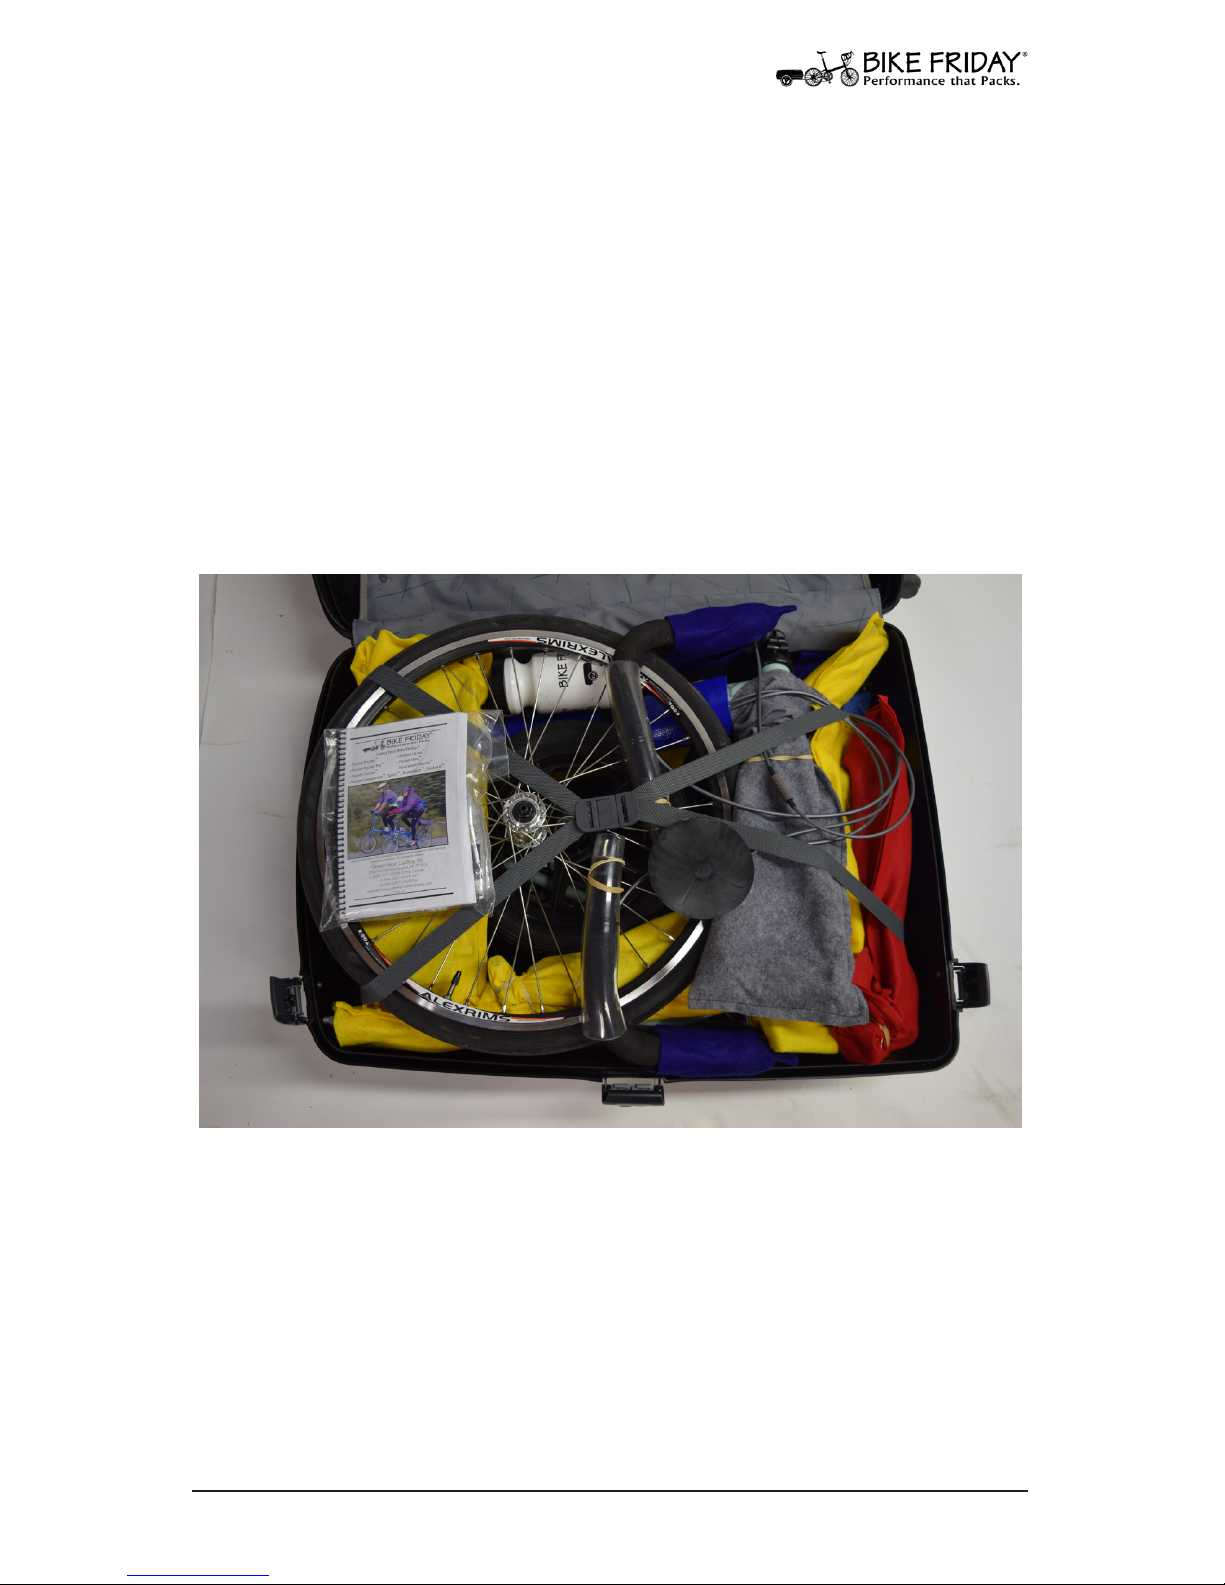
Fig. 1 Hinge Forward Bike Friday in TravelCase with a full complement
of accessories.
Remove small items, accessories, and wheels.
Start by removing some of the obviously loose items
from the case. These items would include water bottle,
accessible felt pouches, etc.
Also remove any larger accessories, and the front and rear
wheels.
Page 4
4
www.bikefriday.com 800-777-0258 • +1-541-687-0487
Getting Started
Set the loose items aside.
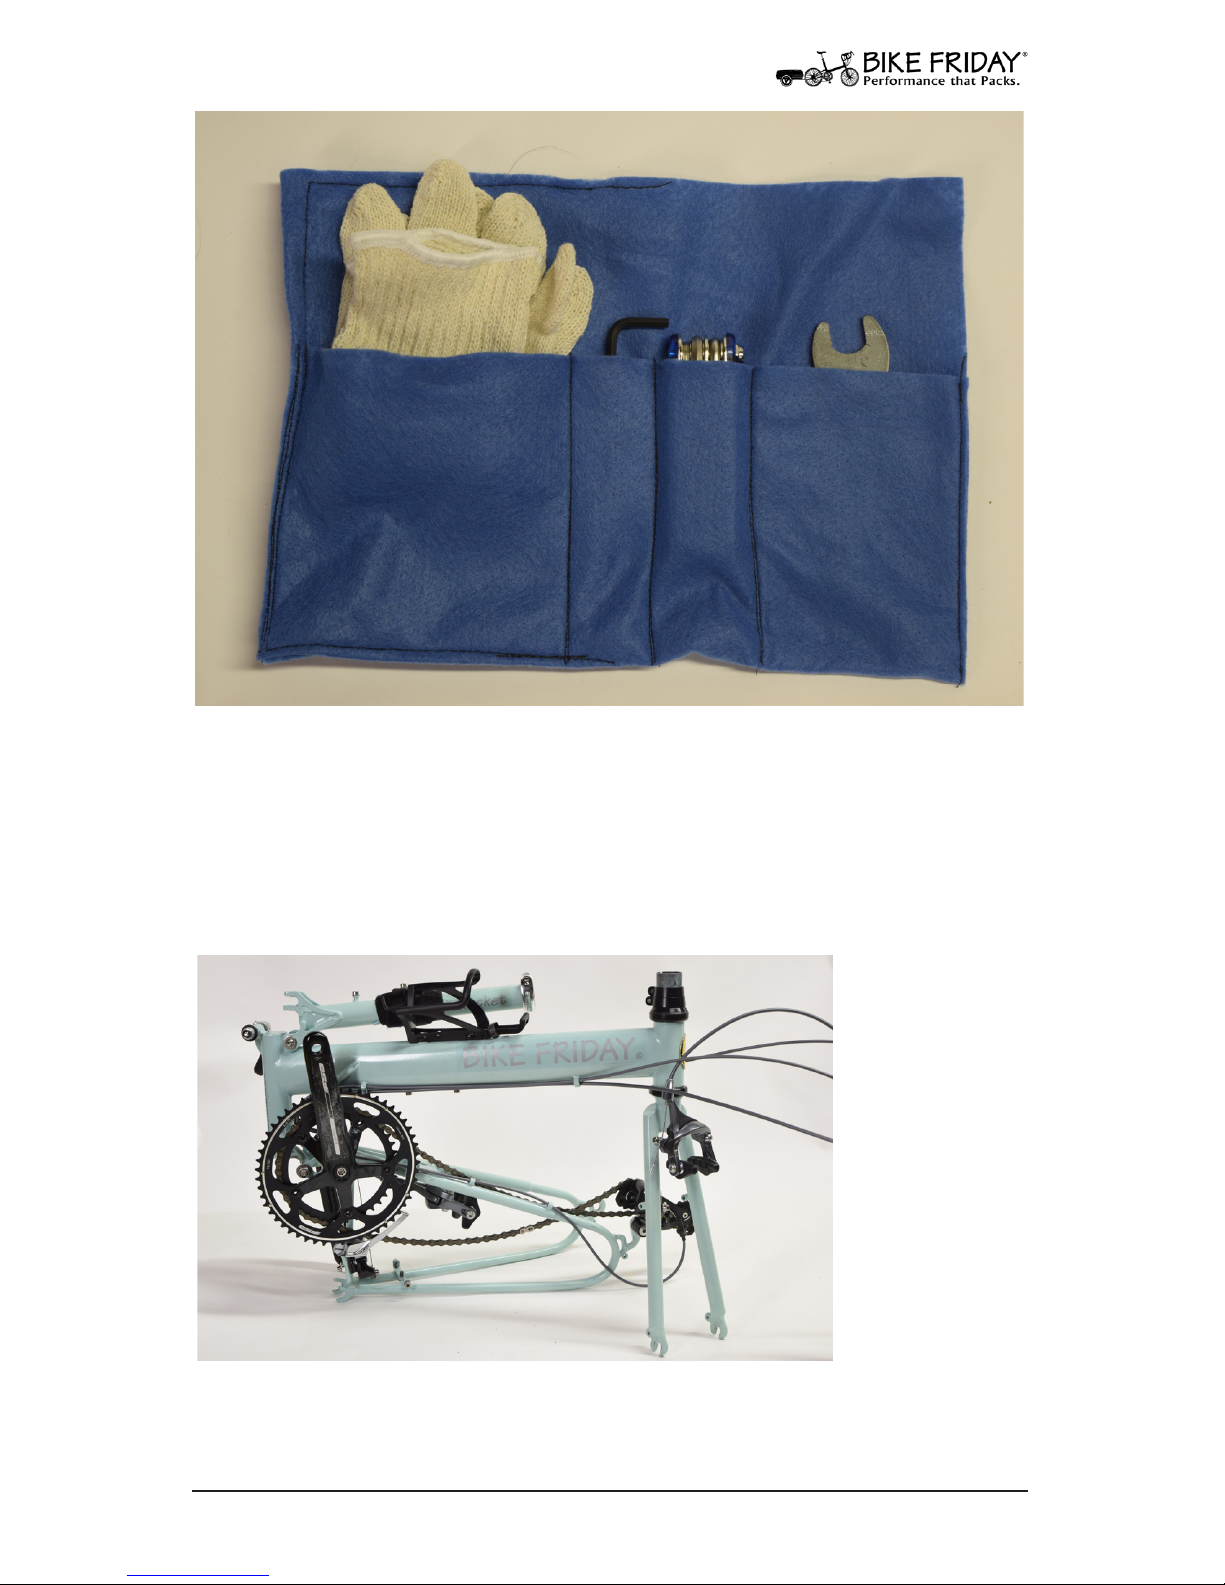
Find the light-blue felt tool bag, which contains the most
commonly-needed tools for setting your bike up.
Fig. 2 Your tool bag has most of the common tools needed for setup
including a pedal wrench.
Fig. 3 Folded bike standing up.
Page 5
5
www.bikefriday.com800-777-0258 • +1-541-687-0487
Getting Started
Stand up the frame.
At this point you should be able to stand up the still folded
bicycle frame in the case. Remove additional packing
materials and gently remove the frame from the case.
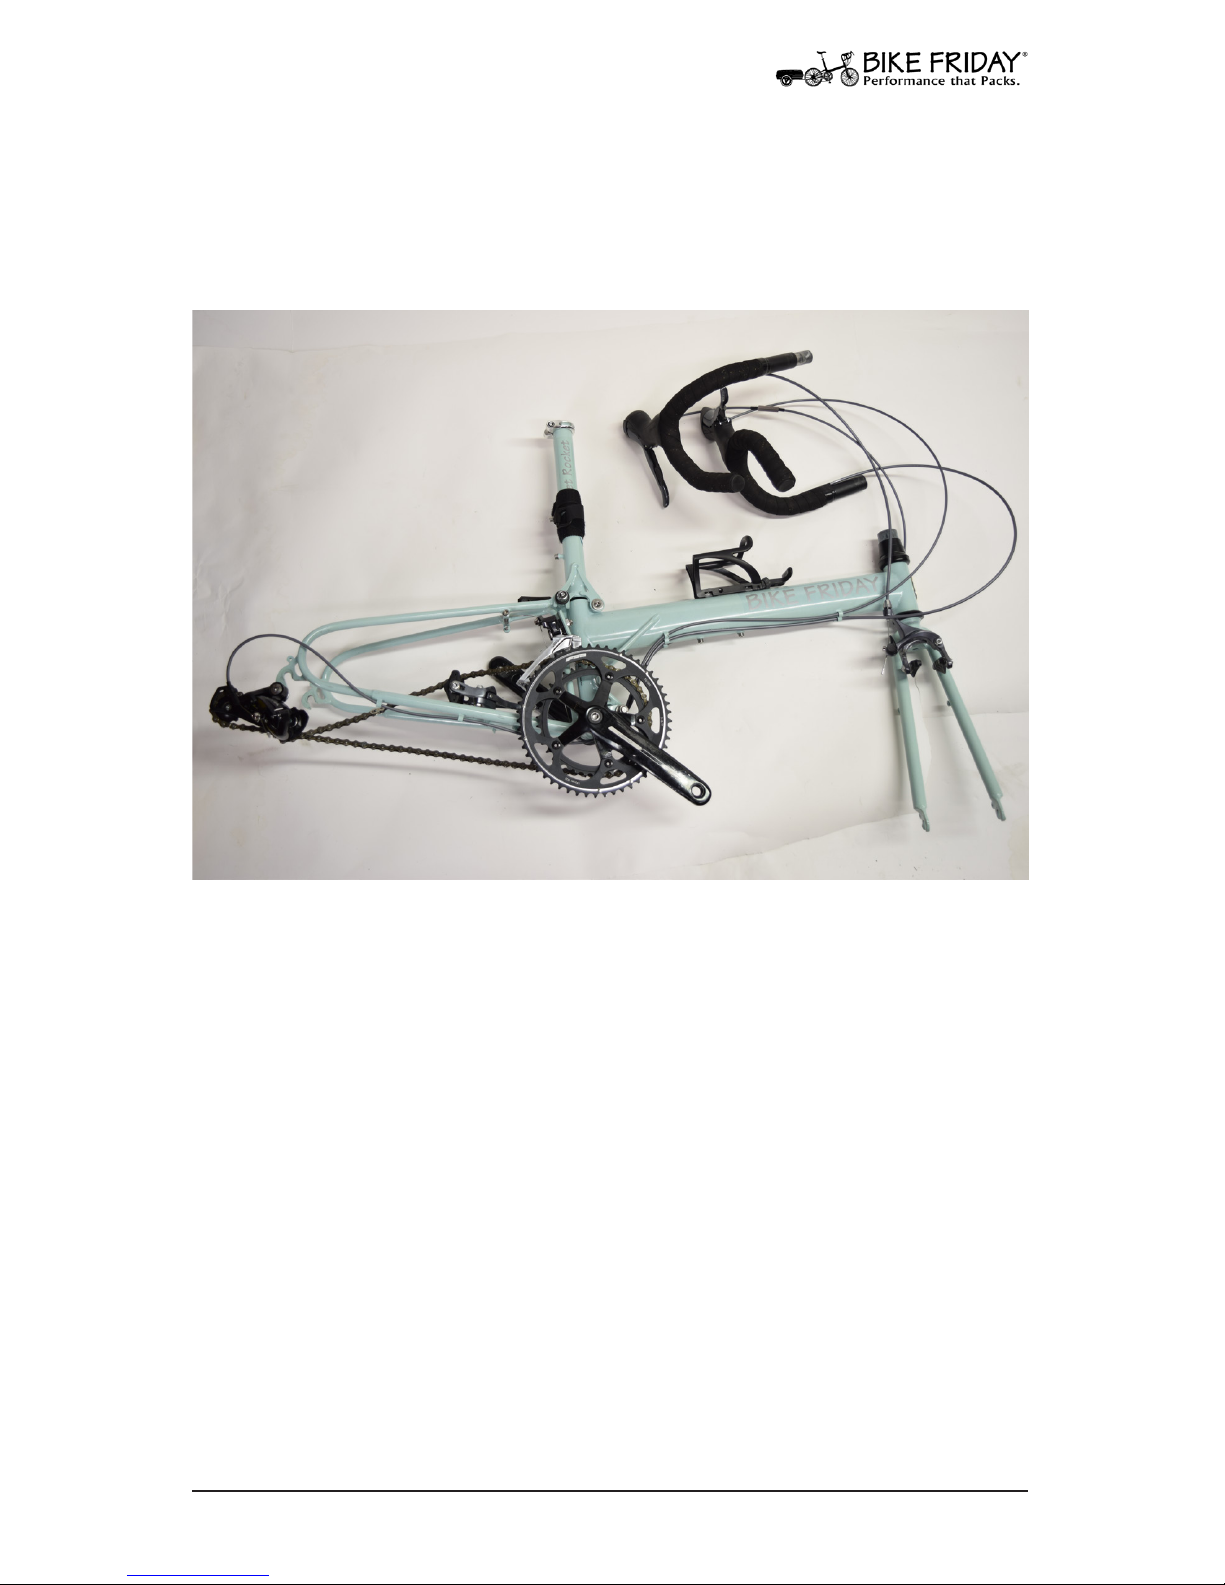
Unfold the frame.
Lift your bicycle frame out of the TravelCase and allow it
to unfold. The rear end of the bike will swing out until the
rear end fork tips engage the rear quick-release latch.
Make sure the quick-release lever is in the open position.
As you are unfolding the bicycle, be aware of the cable
housing -- you want to avoid it getting hung up on the
crank-arms or fork.
Fig. 4 Unfolded Bike Friday.
Page 6
6
www.bikefriday.com 800-777-0258 • +1-541-687-0487
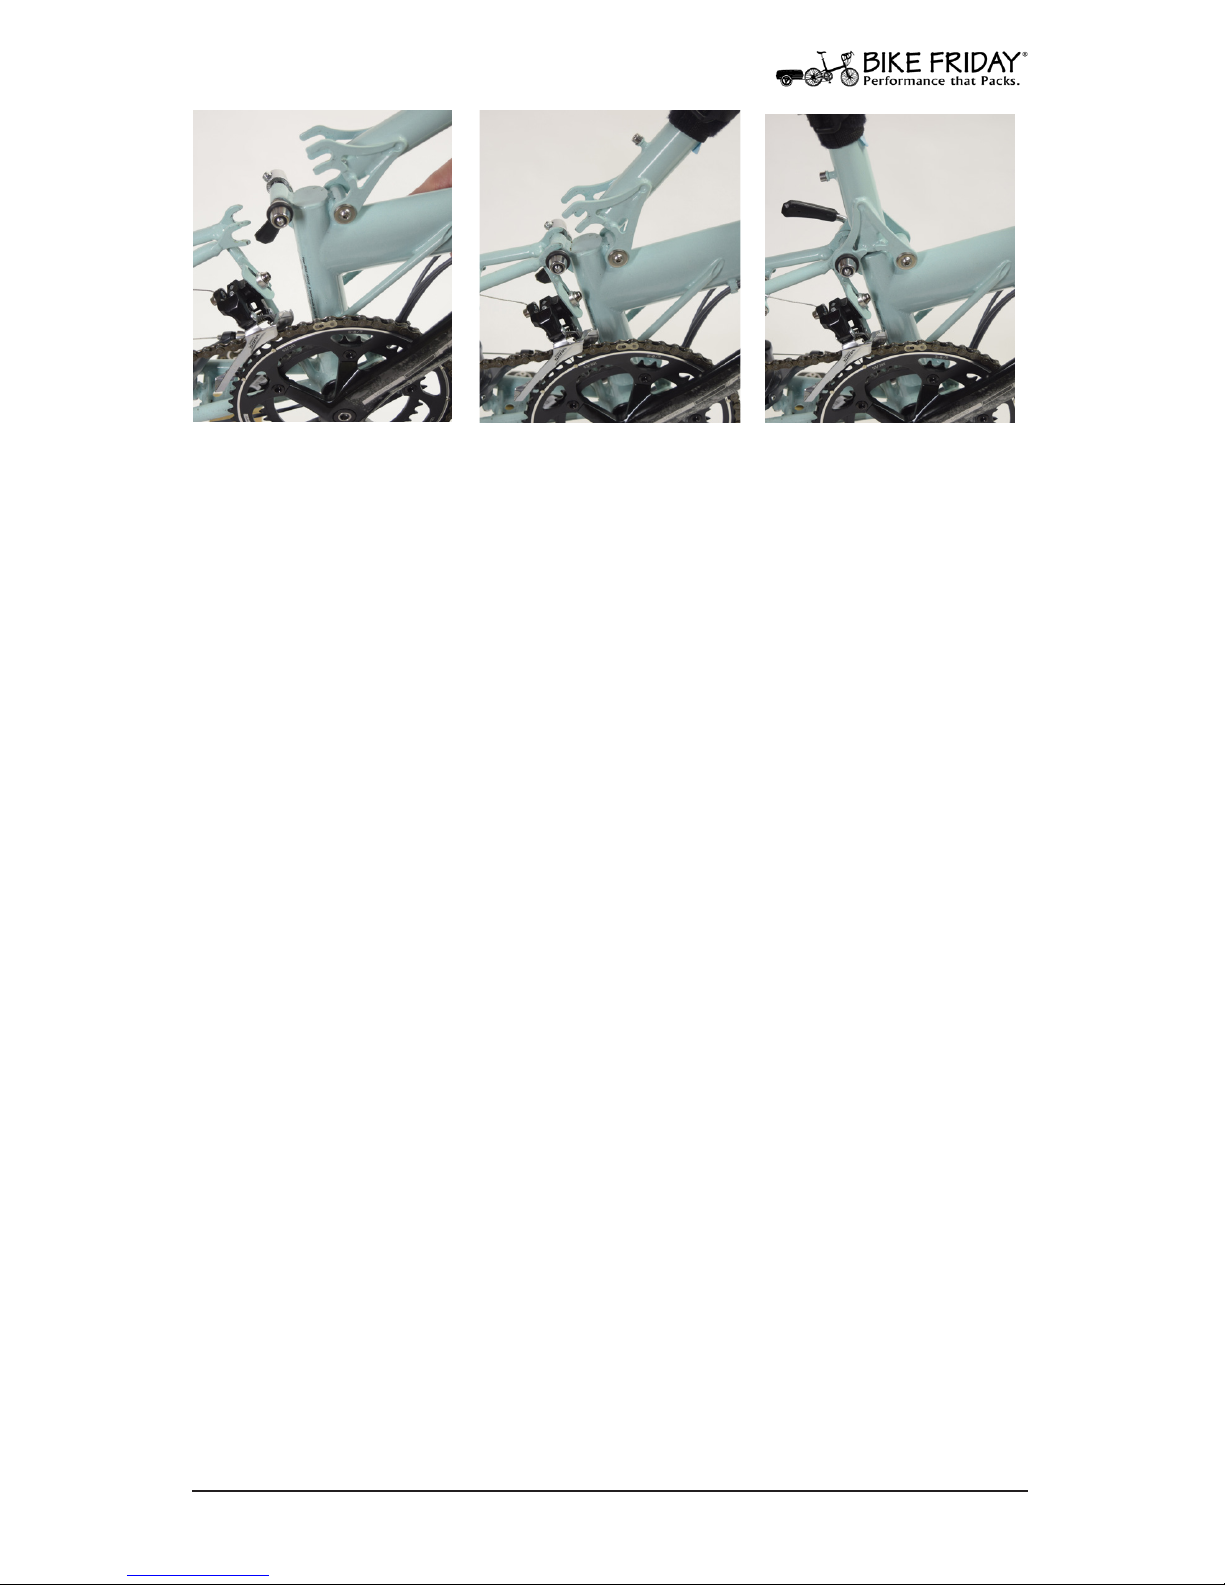
Latch and secure the rear frame and seat mast
(Folding Mast)
With the rear fork tips in place, lift the seat mast from its
folded position and pull it fully upright. The fork tips on the
seat mast will overlap the rear end fork tips.
Make sure the quick-release lever is in the open position
until all the fork tips are fully seated at the latch.
Then close the quick-release lever to secure the frame into
the riding position.
Secure the seat mast
(Easy Pack, telescoping)
The Easy Pack seat mast option has a tube that telescopes
into the frame’s lower seat tube (rather than the hinged
seat mast of the Folding Mast). In this case the lower quickrelease only clamps the rear frame section’s fork tips. A
separate seatpost collar with its own bolt or quick-release
lever is provided on the seat tube. The Easy Pack seat mast
must be inserted at least to the minimum-insertion hash
marks knurled into the lower section of the mast (approx. 4
inches of insert into the lower seat-mast).
Secure the Easy Pack mast by tightening the clamp bolt or
closing the quick-release lever (depending on which option
you have).
Getting Started
Fig. 4-7 Latching and securing the rear frame and seat mast.
Page 7
7
www.bikefriday.com800-777-0258 • +1-541-687-0487
Getting Started
Install wheels
First, install the quick release from the dropout protectors
into the front and rear wheels (if applicable; this step does
not apply to wheels with a nutted axle). Make certain that
there is only one spring per side and that the small end of
the spring is pointing to the center of the hub on each side.
Loosely thread the knurled nut onto the skewer for now.
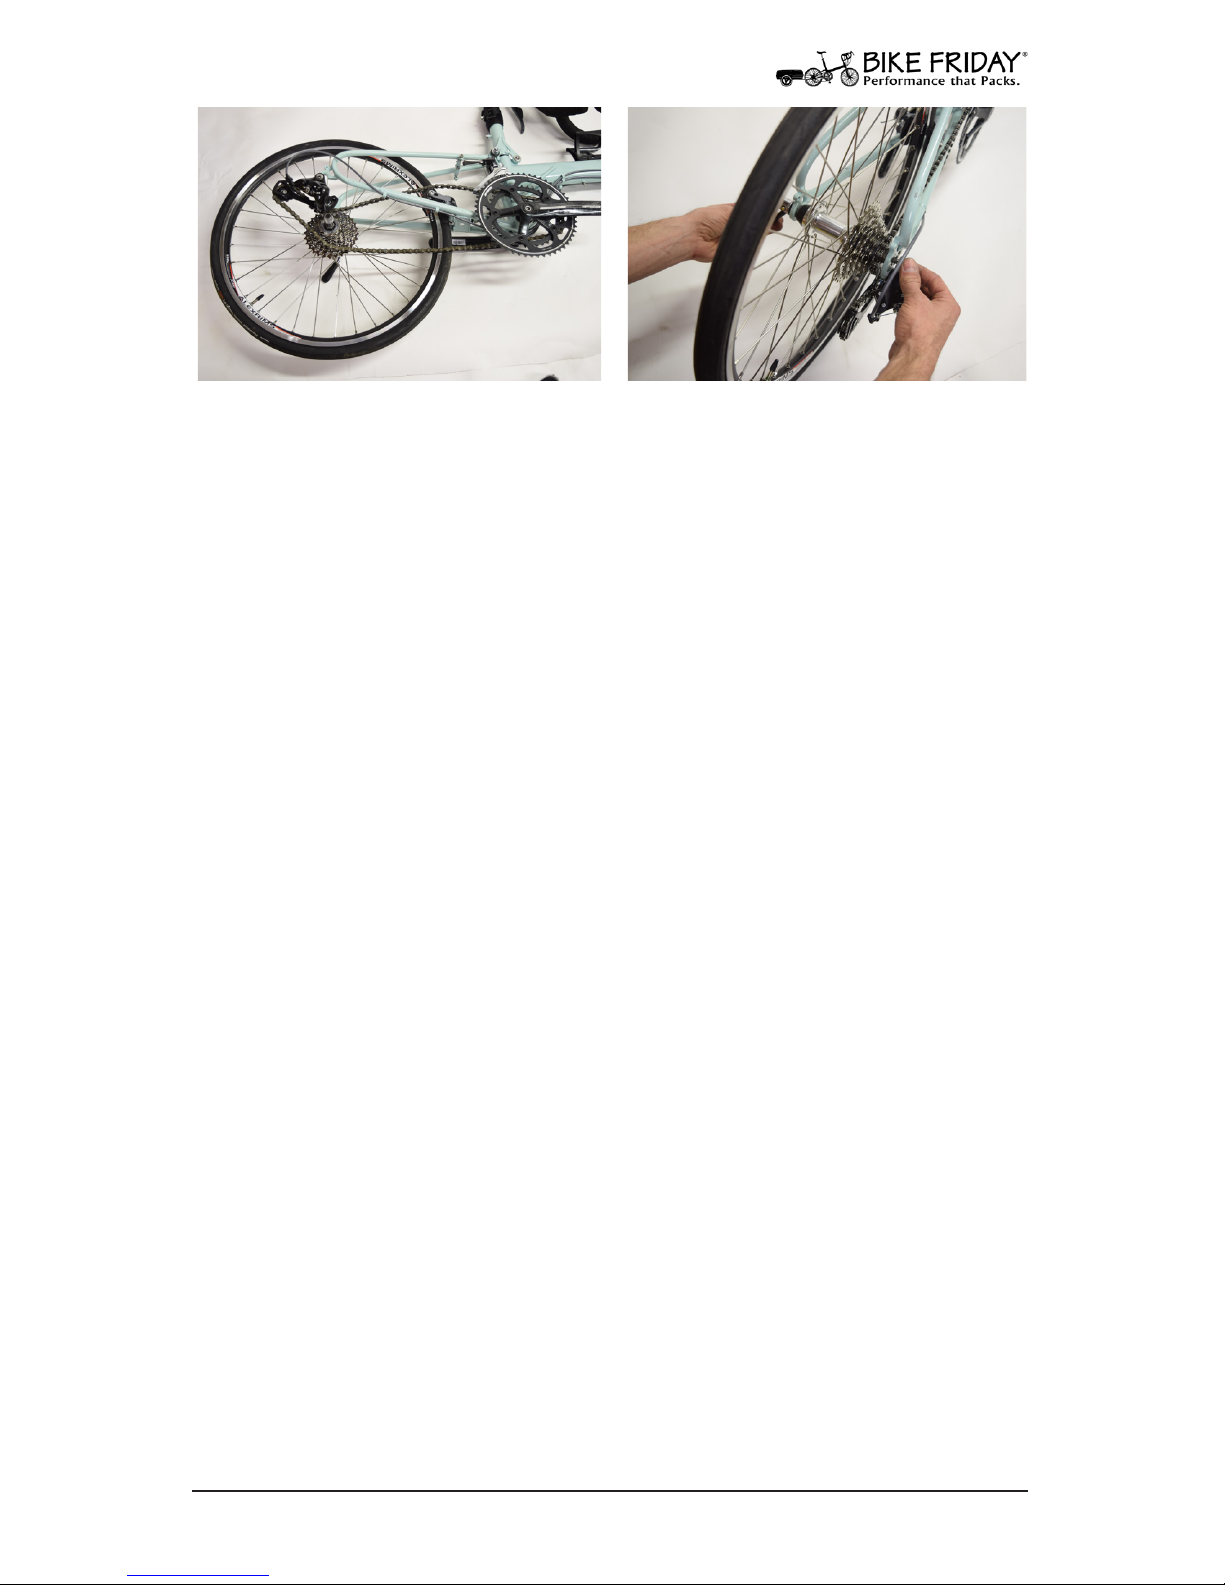
Next, install the rear wheel.
Guide the rear wheel into the frame’s dropouts. Make sure
the axle is fully seated into the dropout on each side of the
frame, then close the quick-release skewer or tighten the
axle nuts to secure the wheel.
Fig. 8-9 Installing rear wheel.
NOTES:
If your bicycle has a chain, guide the chain onto the smallest
cog on the wheel as you move the wheel into the dropouts.
If your bicycle has a belt, position the belt onto both the
wheel’s cog and the crankset cog while keeping light tension
on the belt and moving the wheel into the dropouts.
Connect the shift mechanism. For Internally Geared Hubs
refer to the hub manufacturer’s instructions included in the
Goodie Bag for detailed instructions on attaching and removing your hub’s shifting system.
Install the Front Wheel. Make certain the wheel is fully
seated in the fork dropouts, and securely close the quickrelease lever.
Continue on Page 16 of the Bike Friday Pocket Bike manual
for assembly of handlebars, seatpost, pedals, etc.
Page 8
8
www.bikefriday.com 800-777-0258 • +1-541-687-0487
Quick Folding Hinge Forward
Quick-Folding your Hinge Forward Bike Friday
Your Bike Friday can be put into the “Quick Fold” position, ideal for stashing the bike in a trunk of your car,
back of your SUV or corner of a room.
Position pedals
Rotate cranks/pedals to a vertical position.
NOTE: Depending on your crankset option either the left
or right crank-arm might need to be positioned up for the
smoothest possible fold. Try both ways and pay attention
to where the crank-arms move throughout the process.
Next, open or release the rear-end quick release.
Fig. 10 Preparing for Quick Folding.
Page 9
9
www.bikefriday.com800-777-0258 • +1-541-687-0487
Quick Folding Hinge Forward
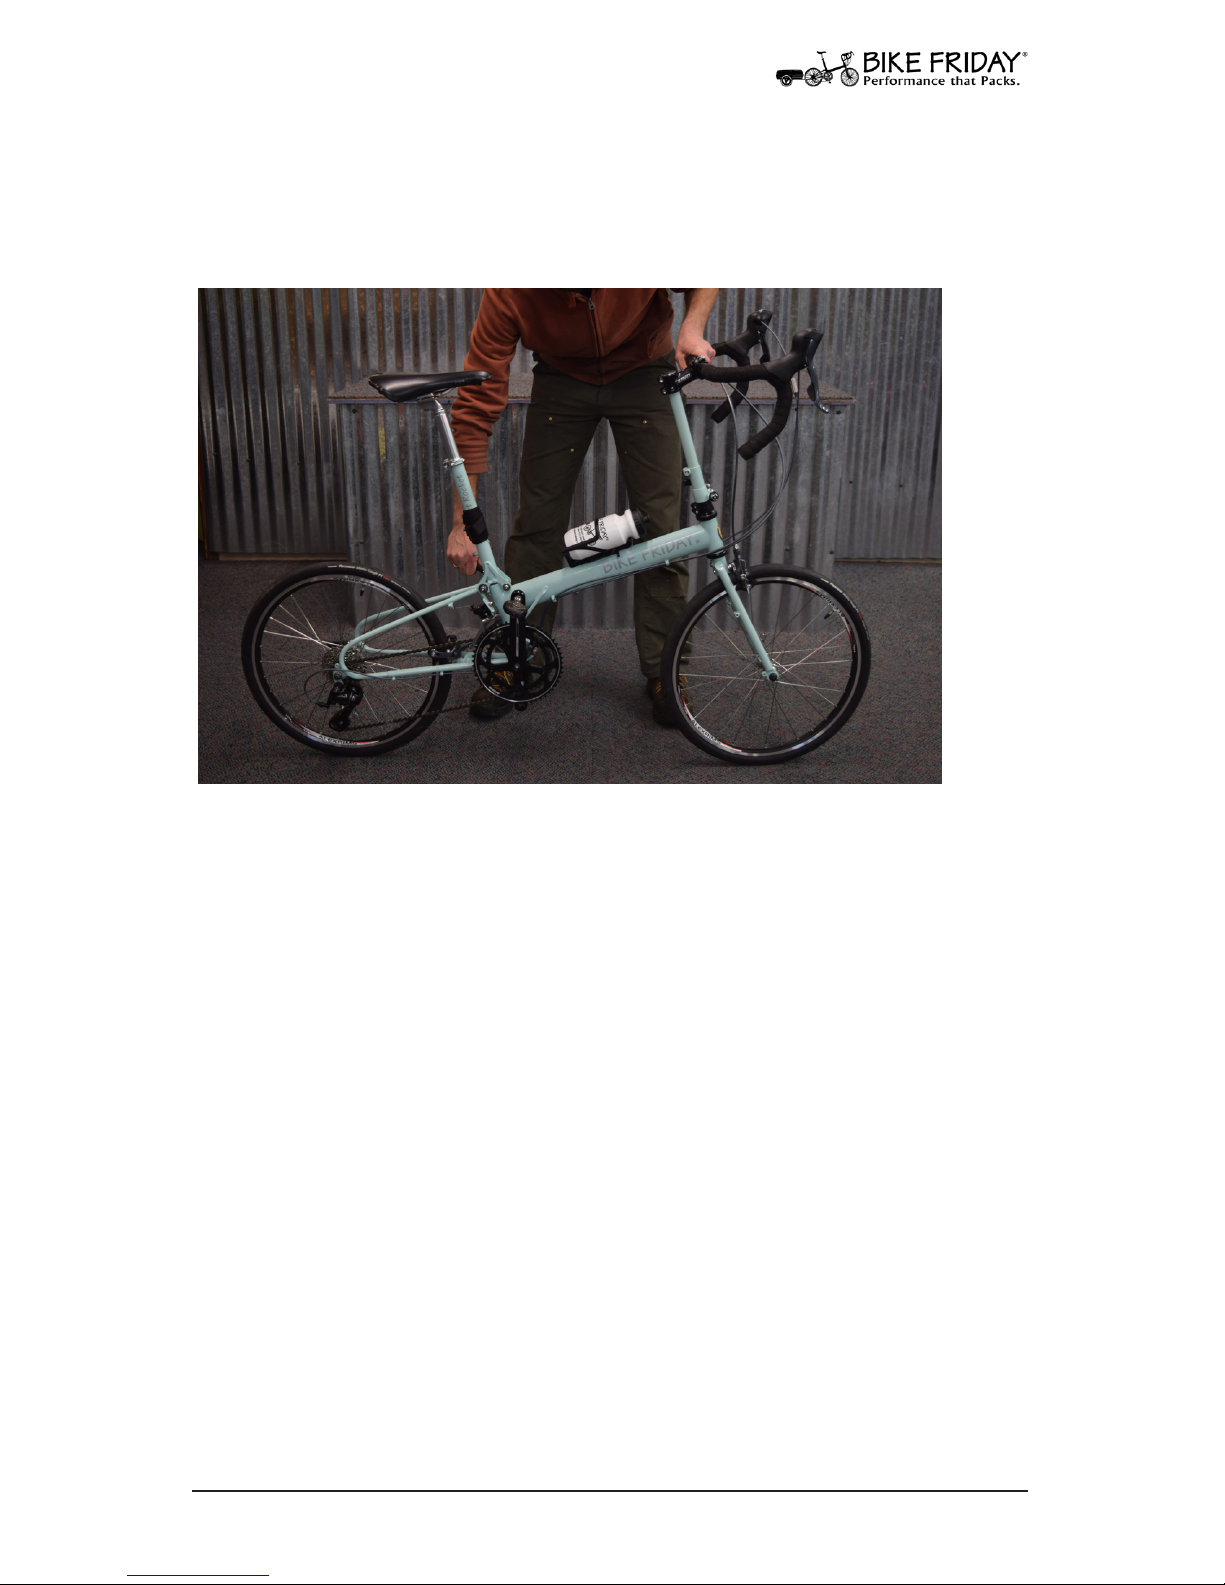
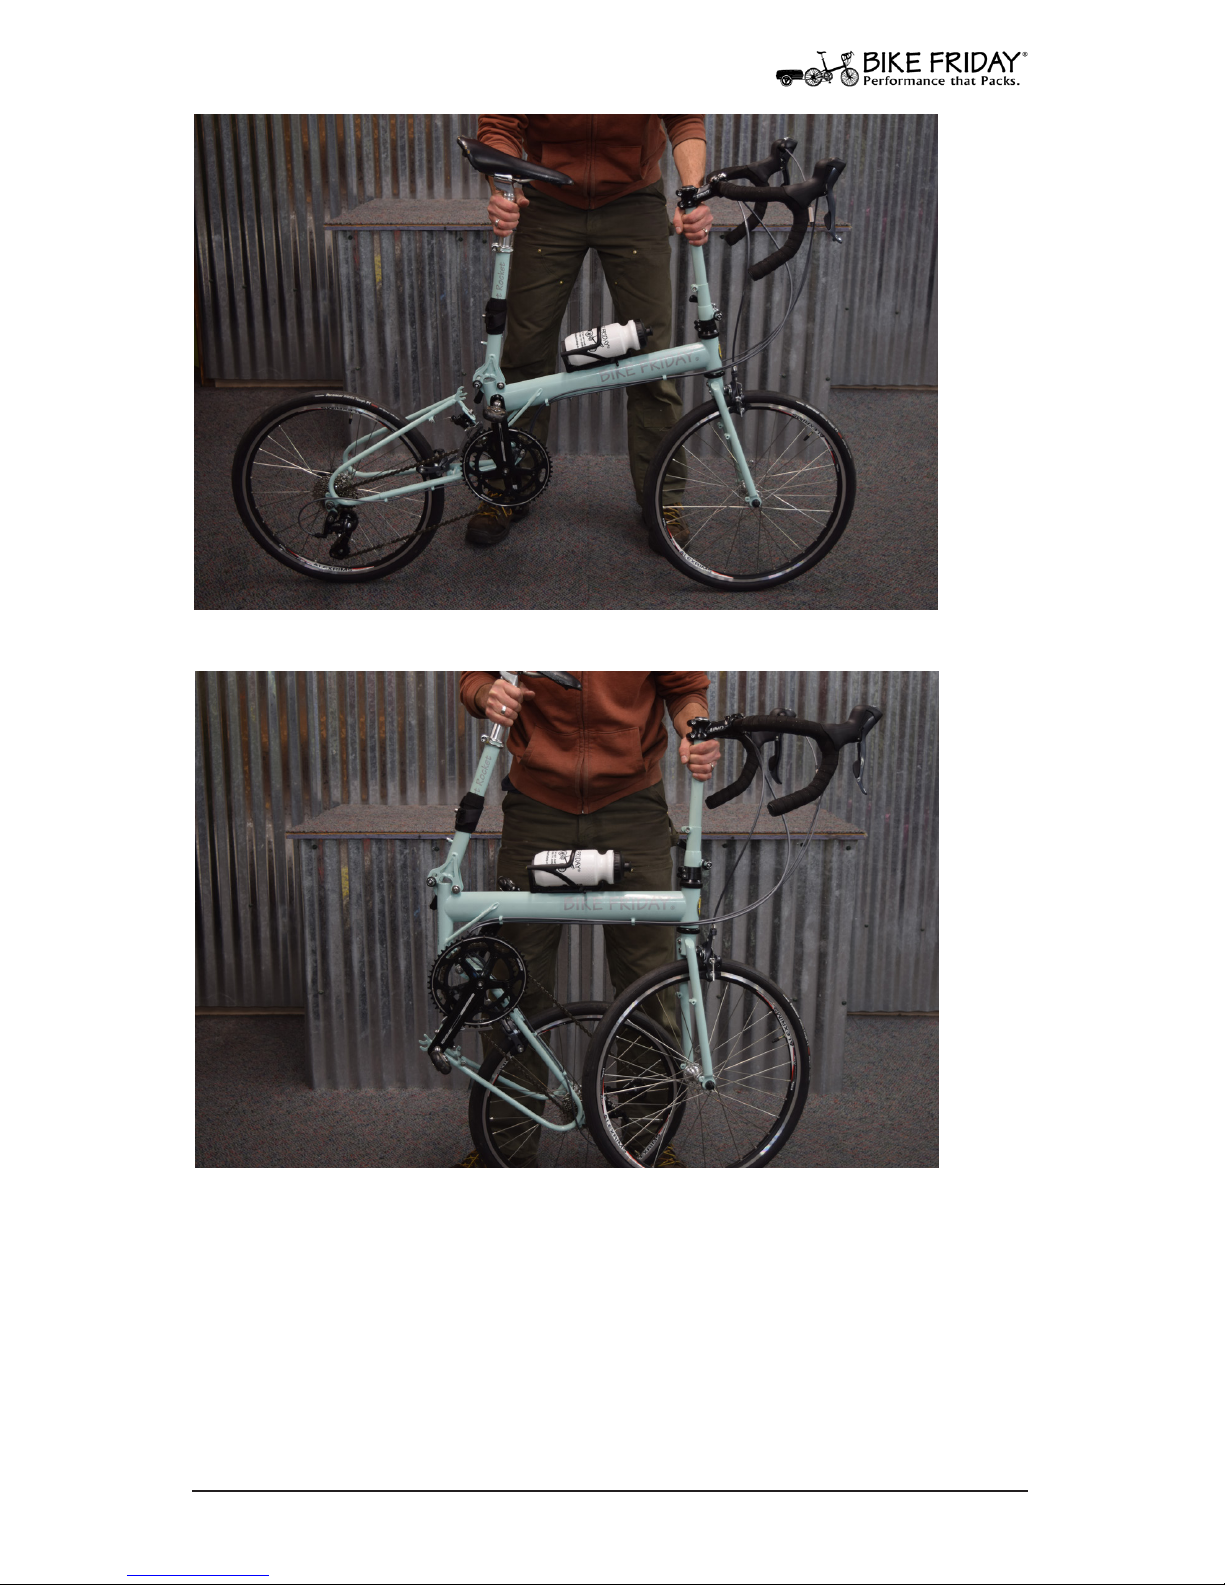
Fig. 11 Grasp the bike by the stem and seatpost.
Fig. 11 Grasp the bike by the stem and seatpost.
Fig. 12 Lift the bicycle straight up to swing the rear wheel
down and forward.
Note:
The rst few attempts might be stiff; the latches will
loosen over time.
Page 10
10
www.bikefriday.com 800-777-0258 • +1-541-687-0487
Quick Folding Hinge Forward
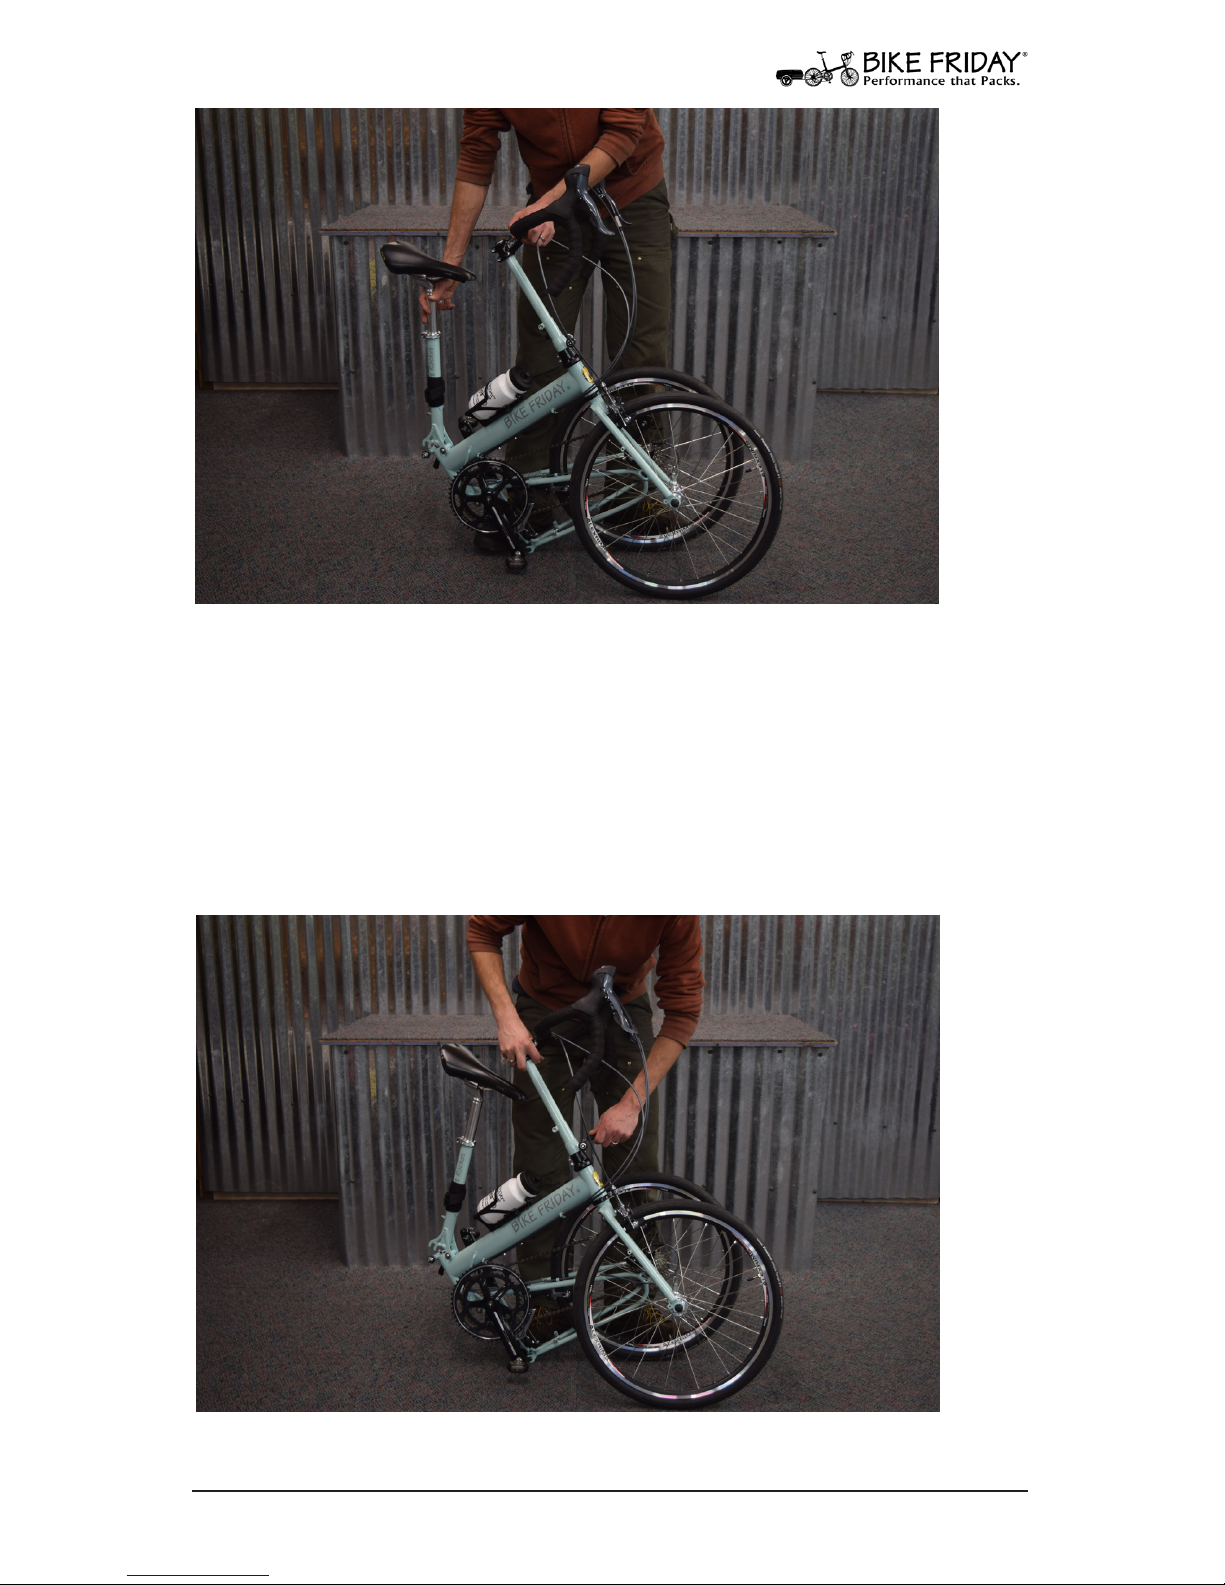
Position the rear wheel next to the front wheel
Use your foot to assist the rear wheel’s motion as the rear
of the frame folds toward the front of the frame. Be gentle
and never force the folding action. Note the position of the
position of the crank arms/pedals while folding, and reposition them if necessary.
Fig. 13 Position the rear wheel.
Fig. 14 Open (release) the stem riser clamp (bolt or quick-release) .
Page 11
11
www.bikefriday.com800-777-0258 • +1-541-687-0487
Quick Folding Hinge Forward
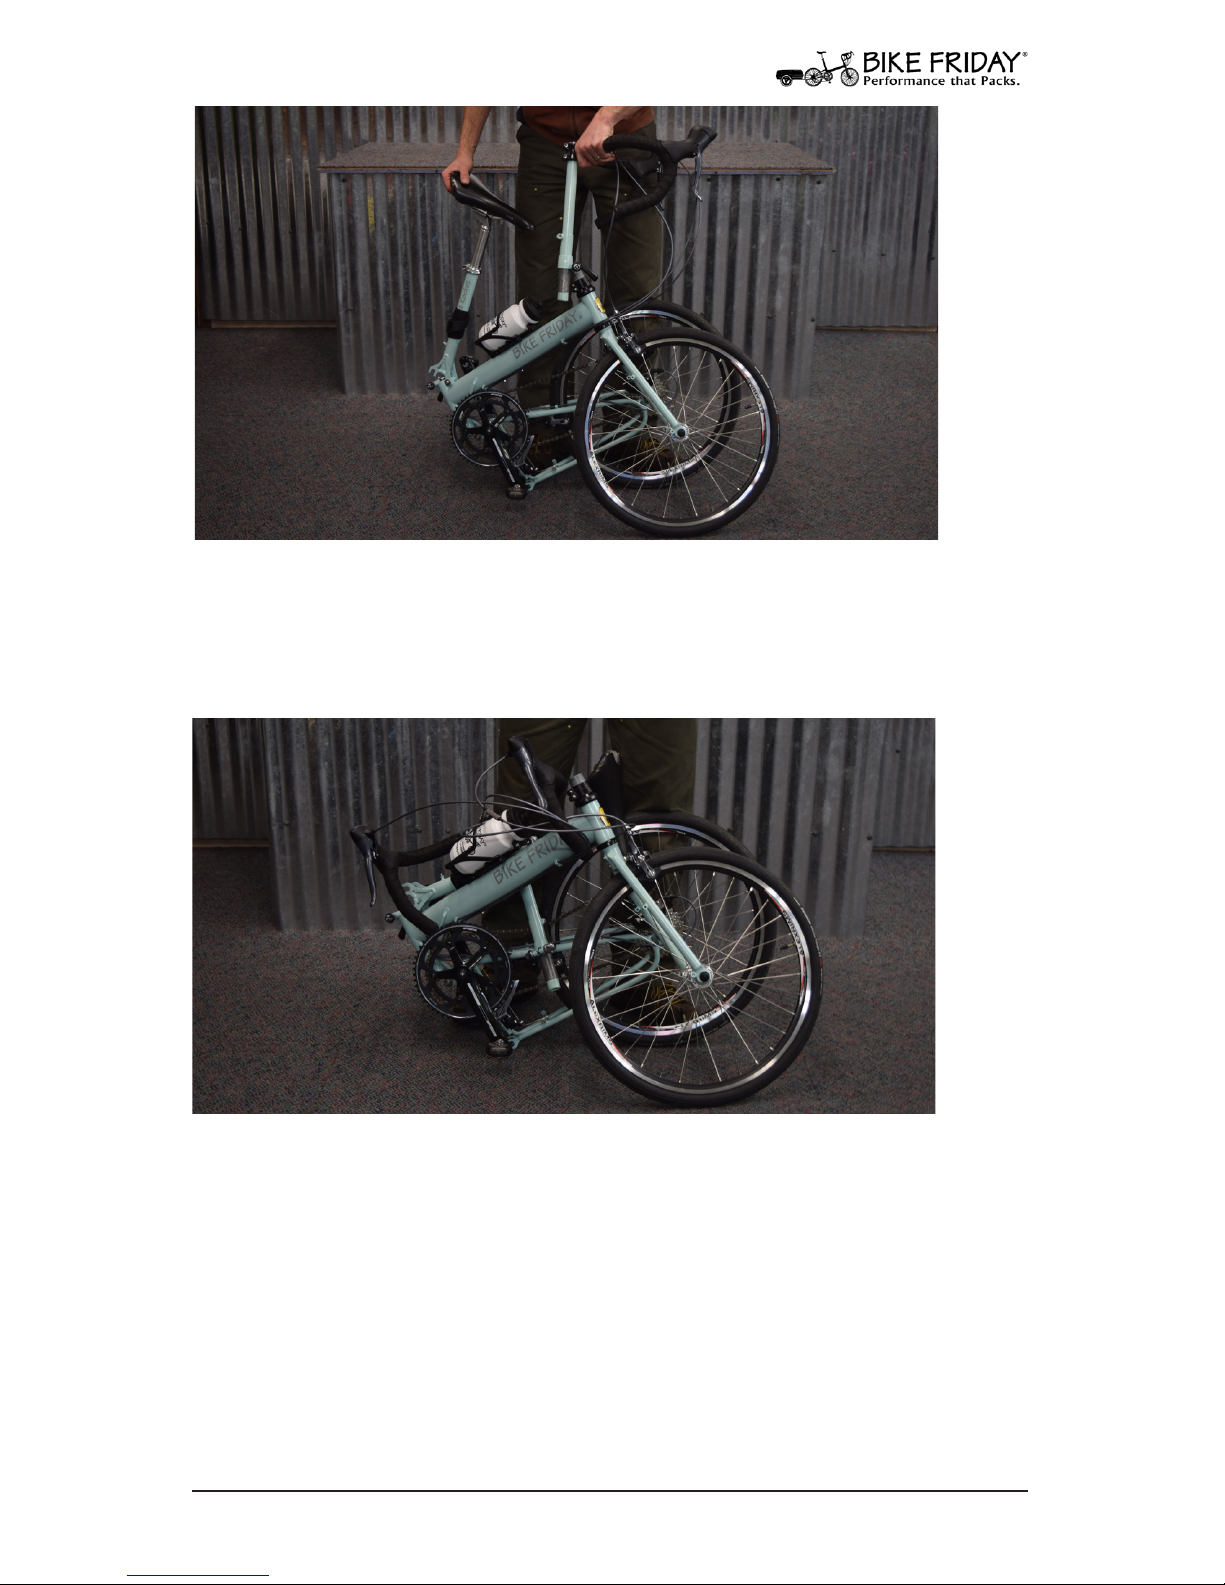
Position the seat mast and handlebars
Fold the seat mast downward, gently pushing the water
bottle cage to the side. Place the handlebars on top and
parallel to the frame. Use a velcro strap to secure.
Unfolding from the Quick Fold position
Reverse the operations of Quick Folding the bike. Pay attention to the orientation of the pedals and crank-arms, and
never force the frame if something is out of position.
Remove stem riser from fork steerer tube
Keep the handlebars in your hand. The bars will remain
loosely connected to the frame by the cables.
Fig. 15 Remove stem riser.
Fig. 16 Position seat mast.
Page 12
12
www.bikefriday.com 800-777-0258 • +1-541-687-0487
Packing in a TravelCase
Packing a Hinge Forward Bike Friday into a TravelCase
Refer to Page 22 of the Bike Friday Manual for initial steps,
including removing accessories, pedals, seatpost, front
wheel, bars, and stem riser. The following steps are unique
to the Hinge Forward frame option:
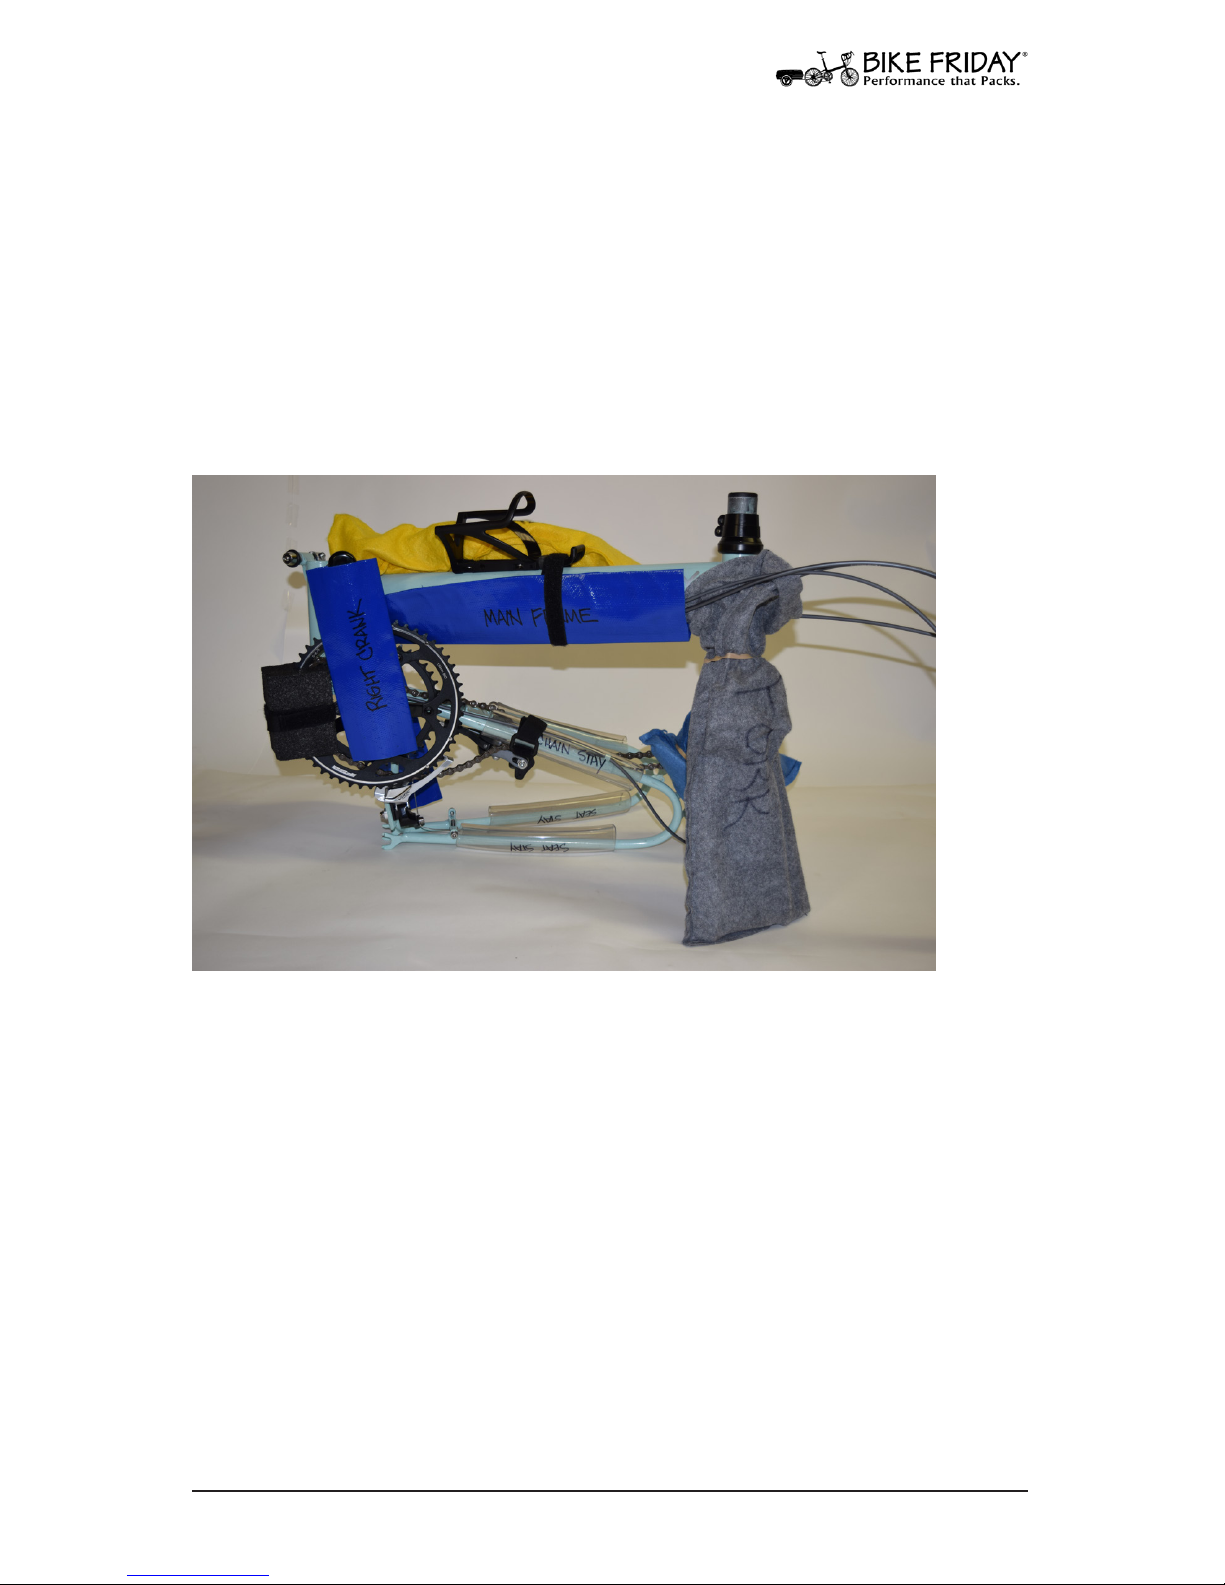
Fold the frame
To fold your Hinge Forward frame, pick up the frame by the
mono-tube.
Fold the rear frame section downward and forward as far as it
will go.
Turn the fork 90 degrees so that the front of the fork faces toward
the folded rear section.
Align the crank-arms
Once the bike is folded, the non-drive-side crank should be at 6
o’clock and the drive side crank should be set at the 12 o’clock
position.
Remove the rear wheel
If applicable, remove the rear hub’s shift mechanism prior
to removing the rear wheel from the frame.
Fig. 17 Fold the frame.
Page 13
13
www.bikefriday.com800-777-0258 • +1-541-687-0487
Packing in a TravelCase
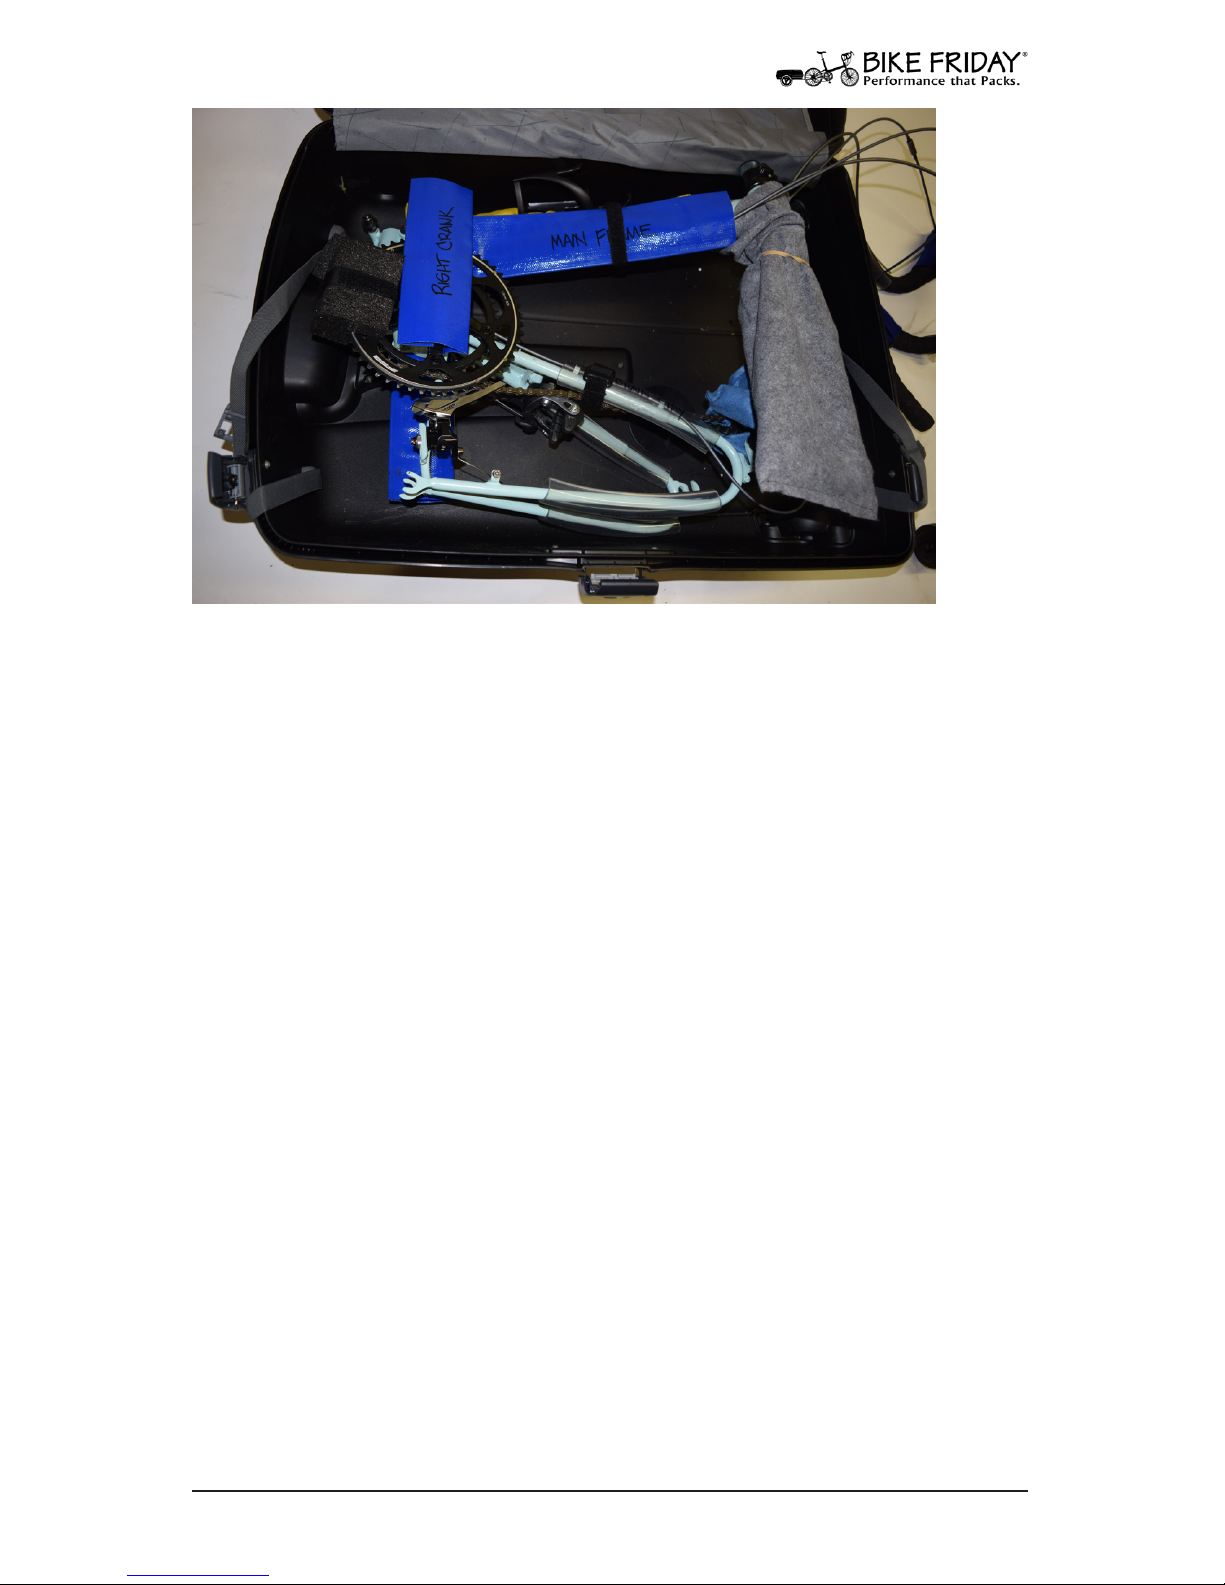
Place the frame in the TravelCase
The fork should be on the right side of the case, with the
drive crank on the left. Lay the frame down so that the
drive crank sits above the case’s handle well.
Install foam blocks to frame in TravelCase
An important foam block prevents the chainring and other
vulnerable frame parts from contacting the edge of the
case. Make sure the foam block is positioned as shown in
order to serve this function. We provide a velcro strap to
secure the foam block around the chainring.
Add components and accessories to TravelCase
See Fig. 1 for the basic position of the frame and a full
complement of accessories. These images show accessories
that may commonly travel with your bicycle, but were not
necessarily included with your bicycle.
Fig. 18 Position seat mast.
Page 14
14
www.bikefriday.com 800-777-0258 • +1-541-687-0487
Packing in a TravelCase
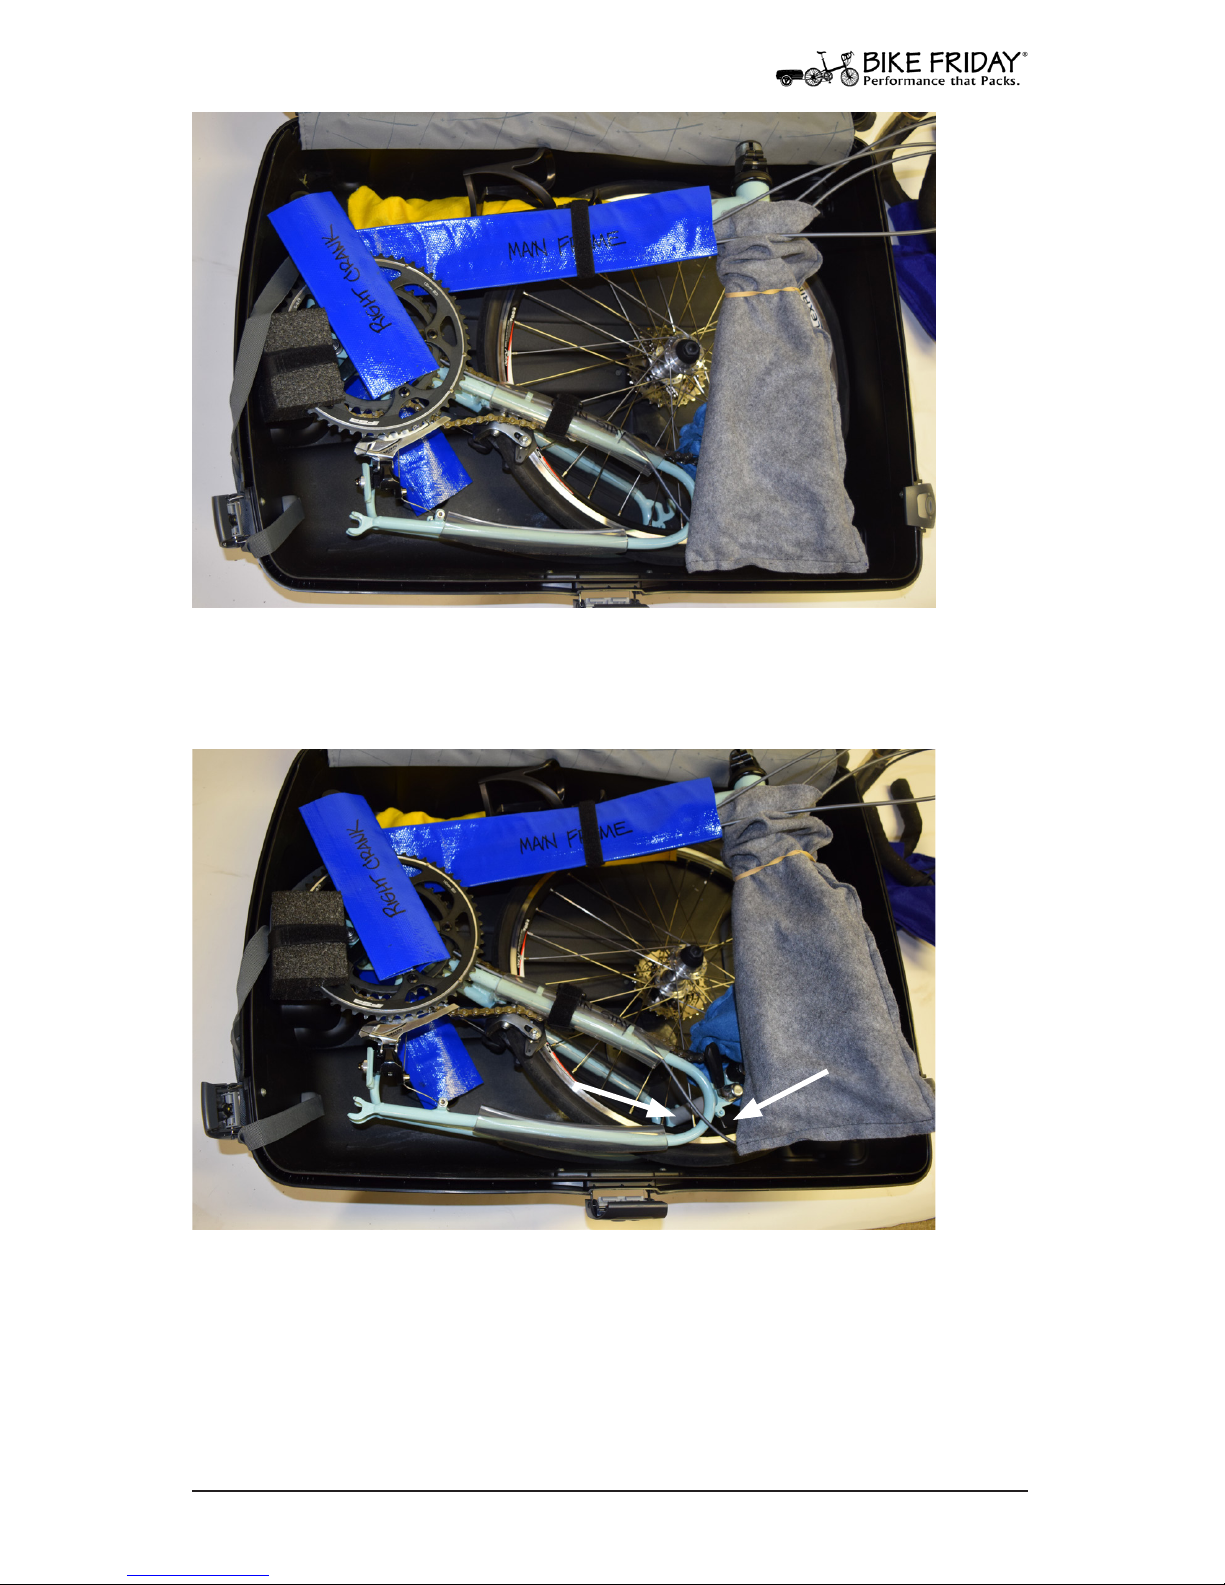
Fig. 19 Rear wheel.
Fig. 20 Install rear dropout protector.
Remove air from rear tire until the wheel ts within rear
triangle of the frame as shown.
Install rear dropout protector
Slide between spokes on rear wheel and secure frame pro-
tector into dropouts. This is either a drop-in insert that ts
by friction or a PVC tubing section secured by your wheel’s
QR skewer.
Page 15
15
www.bikefriday.com800-777-0258 • +1-541-687-0487
Packing in a TravelCase
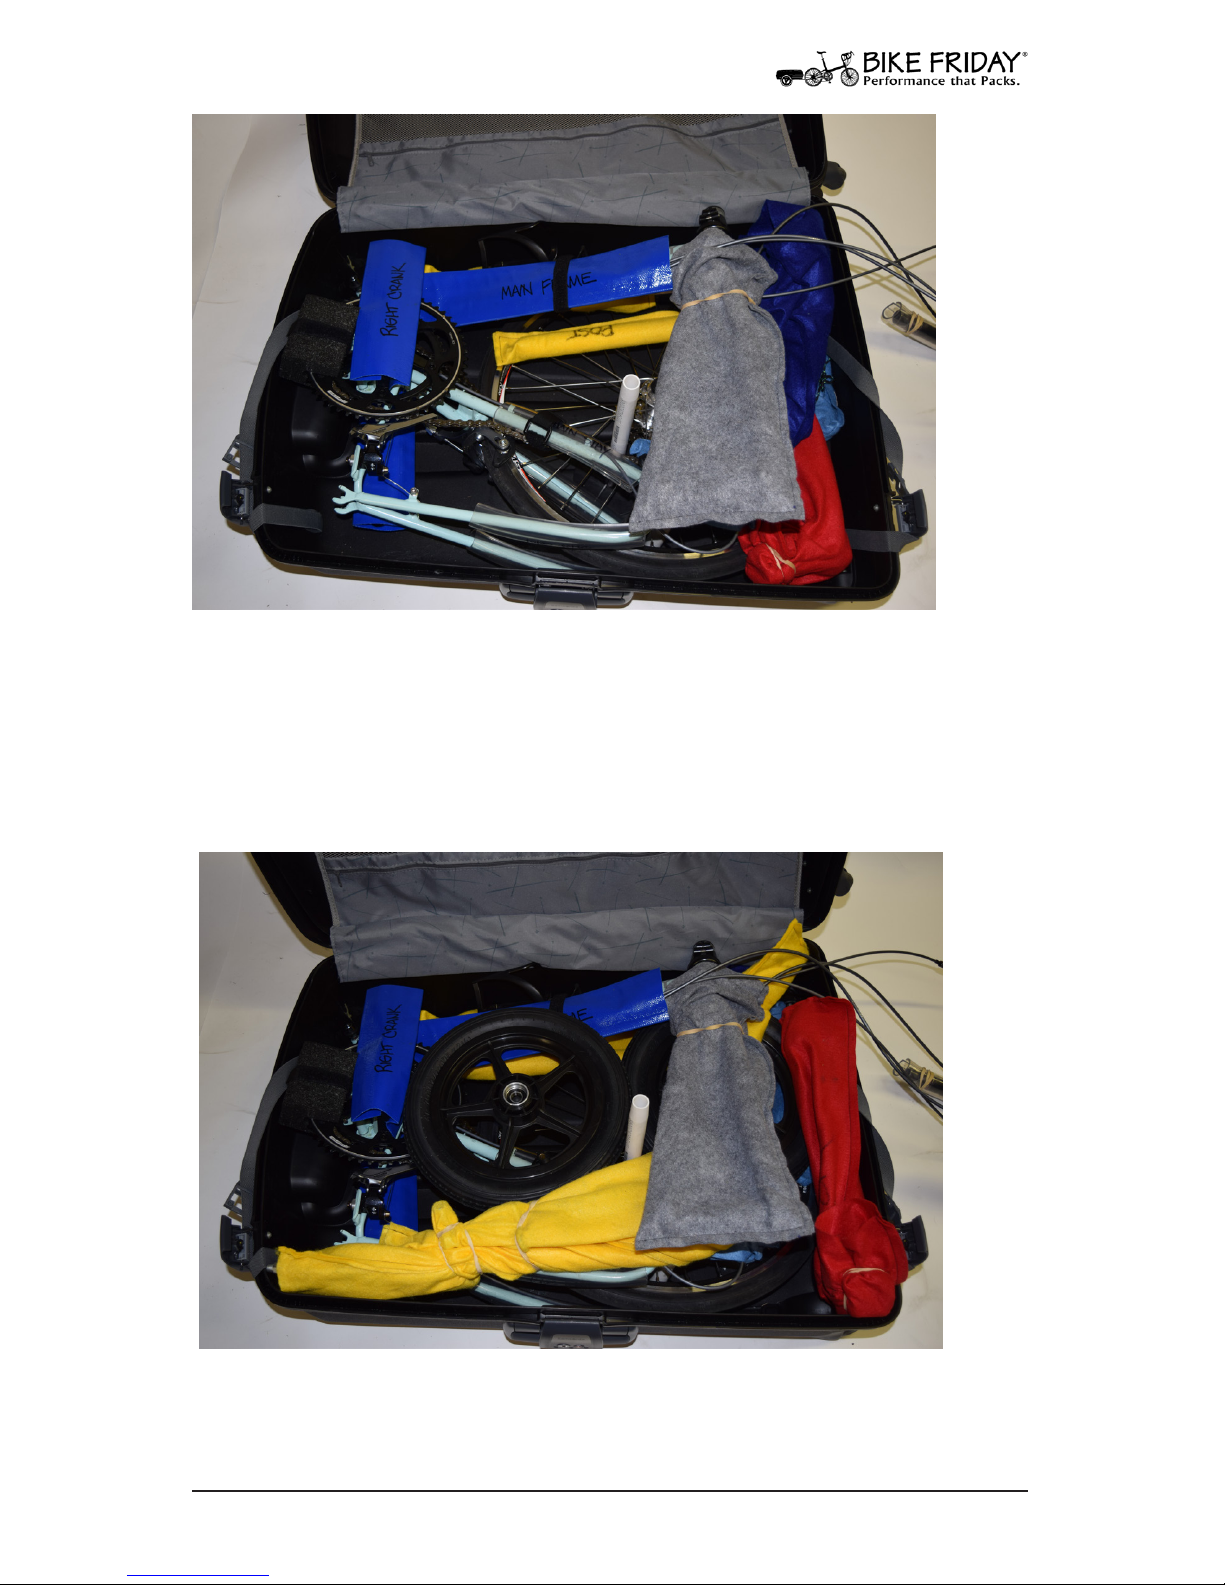
Fig. 21 Position seat mast.
Position saddle, stem riser, pedals, and other small items
Note: The longer PVC crush protector positioned as a guide
for total allowable height of items to be packed into the
case.
Fig. 22 Position Travel Trailer frame and wheels.
Page 16
16
www.bikefriday.com 800-777-0258 • +1-541-687-0487
Packing in a TravelCase
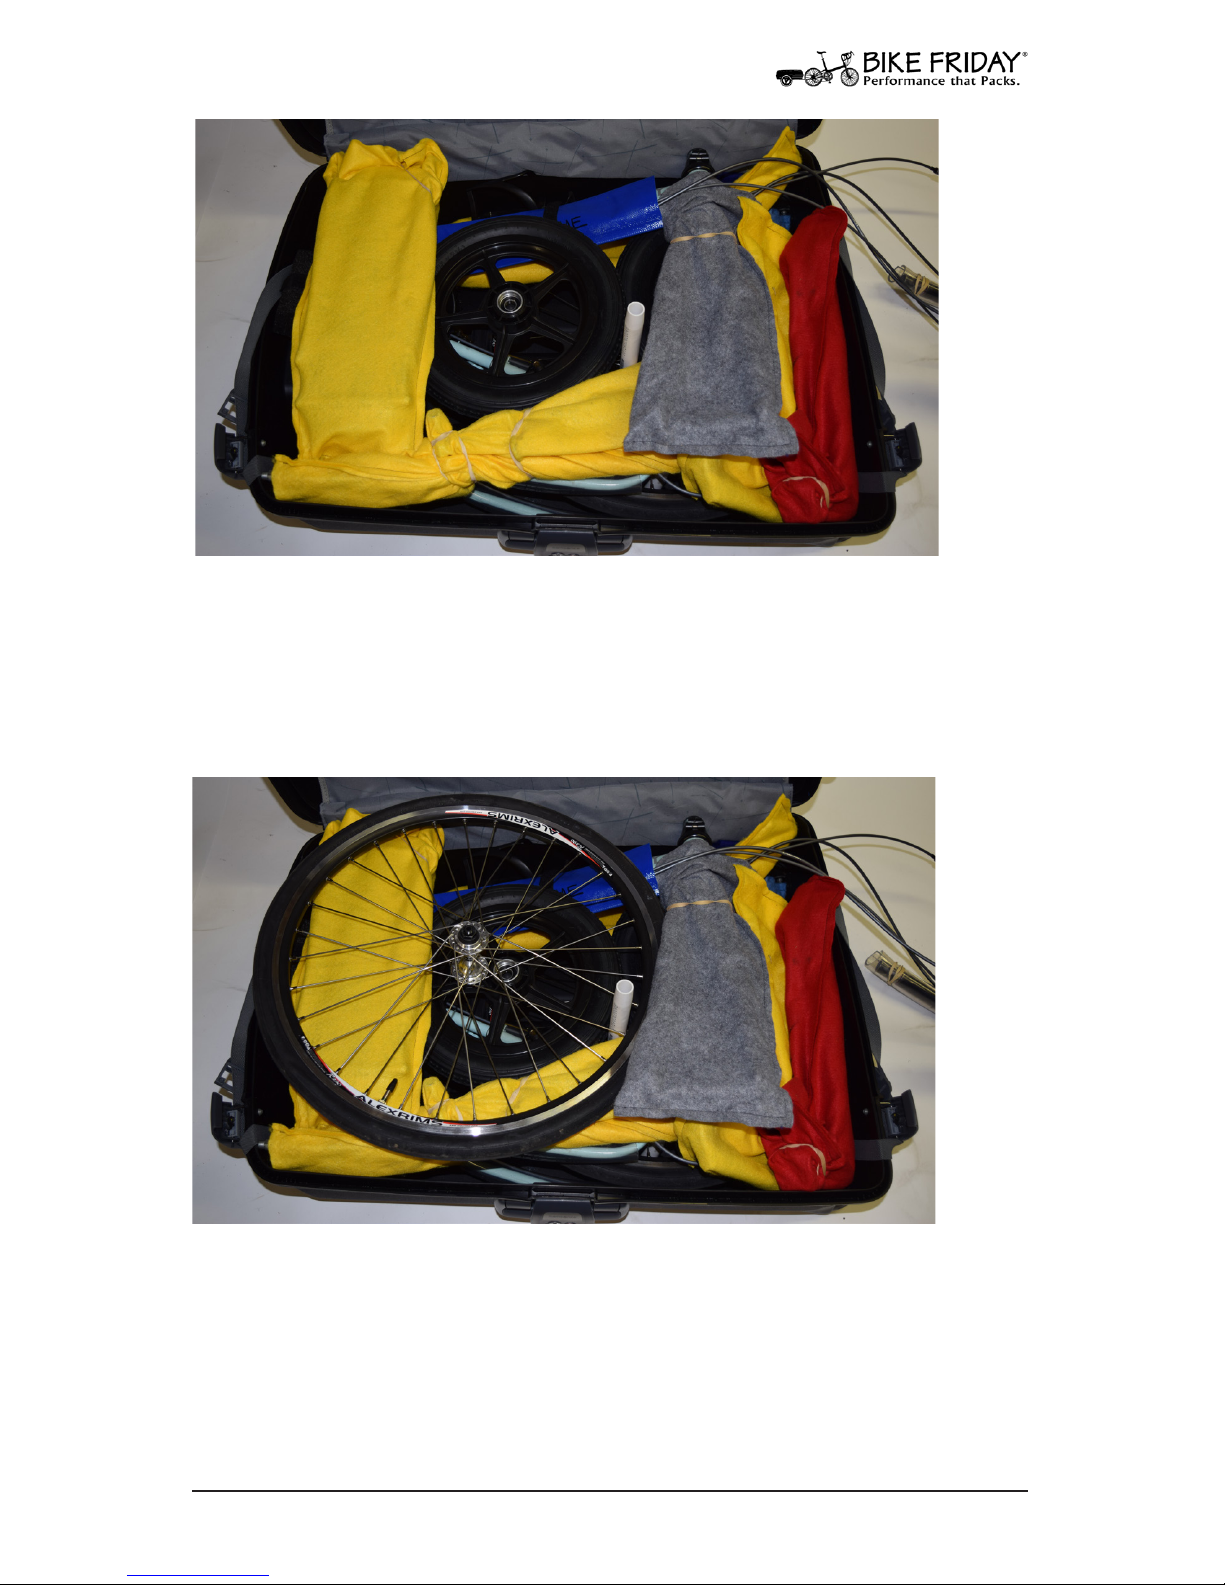
Fig. 23 Position racks.
Fig. 24 Position front wheel.
Position rack(s)
Note: The front rack is placed under the fork, while the
rear rack is placed above the crankset on the far left of the
case.
Position front wheel
On left side of case. Remove air from tires if necessary to
allow wheel to t between fork and edge of case. Note the
case crush protector positioned through spokes of both the
front wheel and the rear wheel.
Page 17
17
www.bikefriday.com800-777-0258 • +1-541-687-0487
Packing in a TravelCase
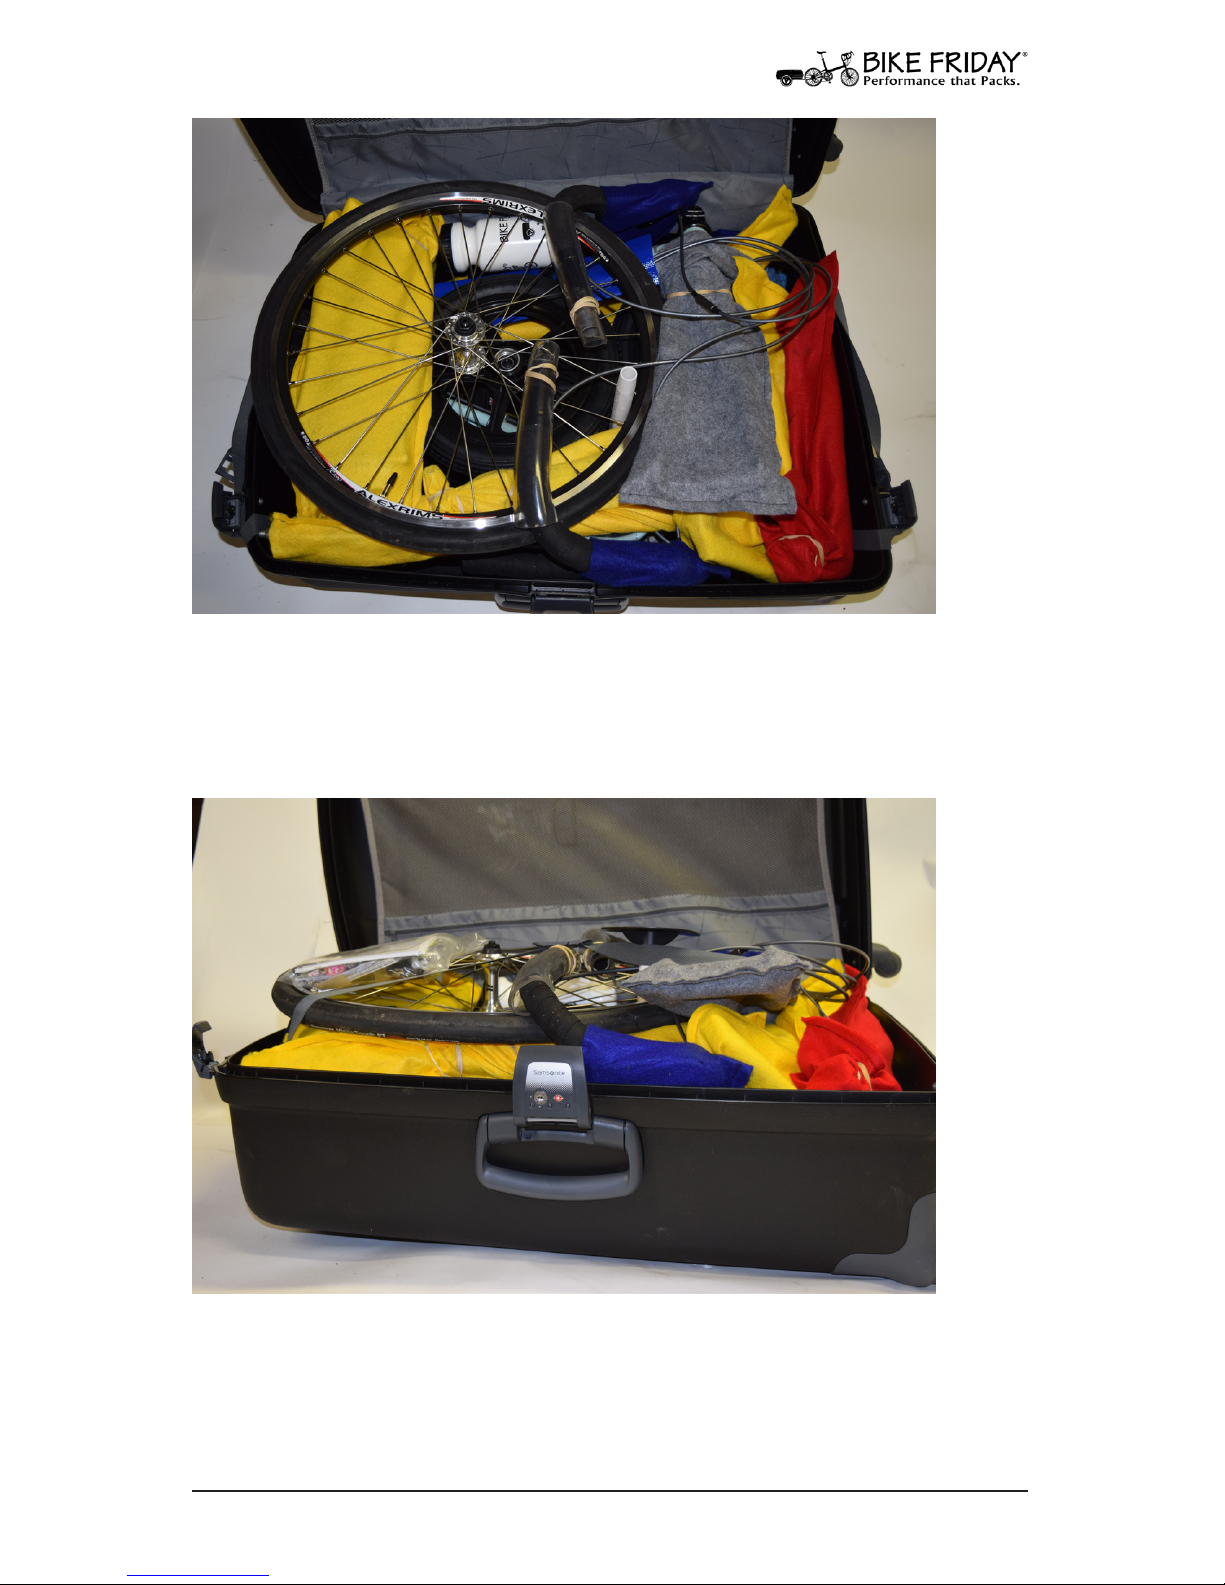
Fig. 26 Final check.
Fig. 25 Position handlebars.
Position handlebars
Different bar congurations will vary in the best position. Ensure
that the cables are secured inside the case before closing the lid.
Double-check that everything in the case is below the plane of
the Crush Protector’s ange. The ange should be the highest
thing in the case.
 Loading...