

Page 1

Bird Box Camera Kit
Quick Start Guide
Page 2

2
Page 3

3
Congratulations! You are now the proud owner of a Green Feathers
Bird Box Camera. For years we have been a leading provider of
wildlife cameras and our bird box cameras have been a number one
choice for those wanting to watch wildlife in their very own garden
from the comfort of the sofa. We are based in Bristol where our team
have taken our edgling cameras to new heights.
In no time we’ll get you up and running so you can be enjoying the
company of your feathered friends. Please take a couple of minutes to
have a read through this booklet before you get started. Not only are
there some helpful hints and tips, but we also have some guidelines
to help you plan the installation of your camera.
Everything has been designed with ease in mind and no special tools
or skills are required; just a bit of time, a cup of tea and a friend is
always helpful to have around. We hope you enjoy your camera!
Page 4

4
WHERE TO PLACE YOUR BIRD BOX
Diff erent birds have diff erent needs when it comes to choosing where to place your bird
box. Generally you should look to place your box in a quiet spot in the garden amongst
other plants or trees, making sure to leave a clear path in for your birds to make their
landing.
Unless there is a tree or building providing shade, it is generally a good idea to face the box
between north and east to avoid direct sunlight and strong winds. Tilting the box slightly
forward will also help to prevent rain from coming straight into the nesting area.
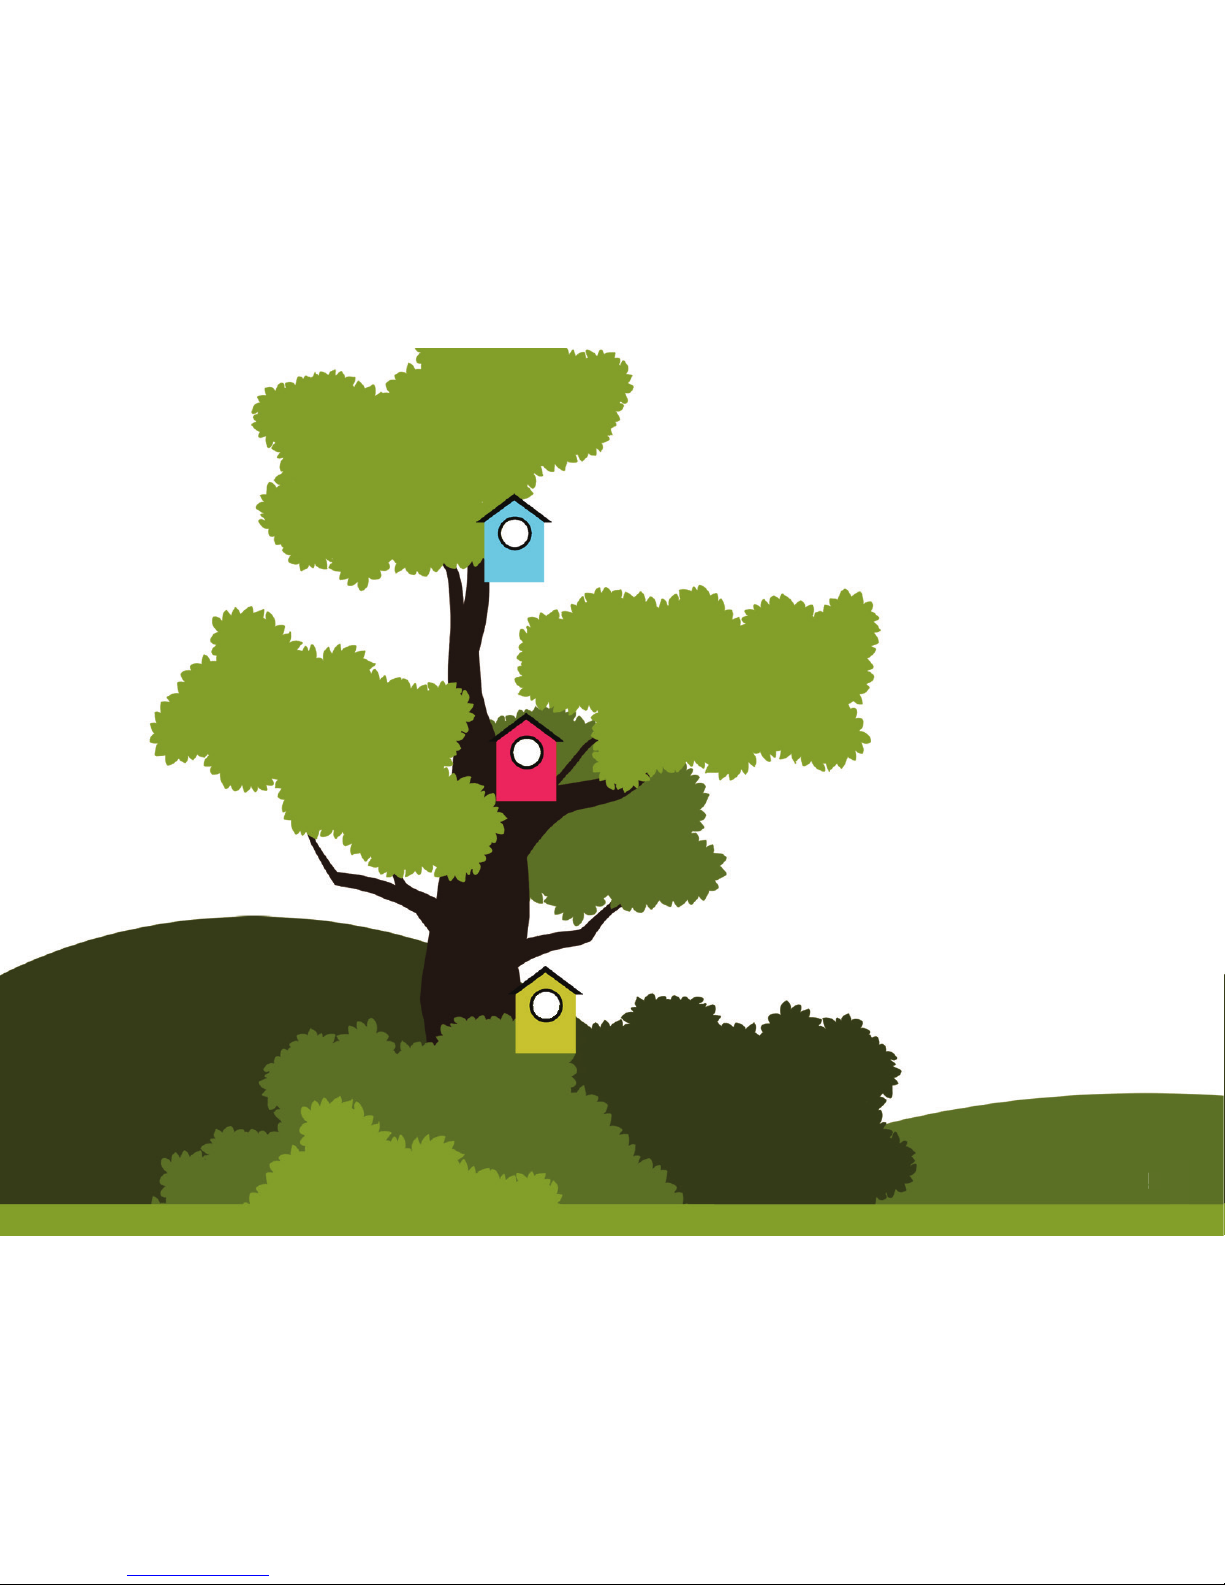
For blackbirds, robins and wrens you should place your bird box 1.5 to 2 metres high, well
surrounded by planting.
For sparrows, starlings, tits and spotted ycatchers you should place your bird box 2 to 4
metres high and slightly covered with a clear entrance.
For woodpeckers, owls and kestrels you should place your bird box between 3 to 5 metres
high in a nice open space.
If there are cats and other bird predators in the area then you should look to place
your bird box a minimum of 2 metres above ground level.
Page 5
5
2m - Robins, Wrens
3m - Sparrows, Tits, Starlings
5m - Woodpeckers, Owls
Page 6

6
GETTING THE MOST FROM YOUR CAMERA
Focussing your camera lens
The easiest way to improve your video feed is to set the focus of your camera lens.
All of our bird box cameras have a screw t lens to make focus adjustment easy but
this may require the assistance of a family member or friend. For simplicity’s sake, it
is strongly recommended that you do this before mounting the box.
To do this place a small bird-sized object, such as a gurine, inside your bird box. With your
bird box camera connected to a TV or monitor gently twist the lens to adjust the
focal distance of the camera: clockwise to focus on objects that are further away or
anti-clockwise to focus on closer objects.
Check Distances
If you have a wireless camera we suggest that you check the distances between the camera
and the receiver before you install the camera into the bird box. Take the camera to the
location where you want to place it and plug it in. Make sure that you are receiving a good
signal to the receiver by monitoring on your TV.
Page 7
7
Improving the lighting
The small LEDs around the lens of your camera helps to improve your picture in low light
levels and at night, but they can reduce the vibrancy of colour during the day. There are
two ways to improve the colour images from your camera.
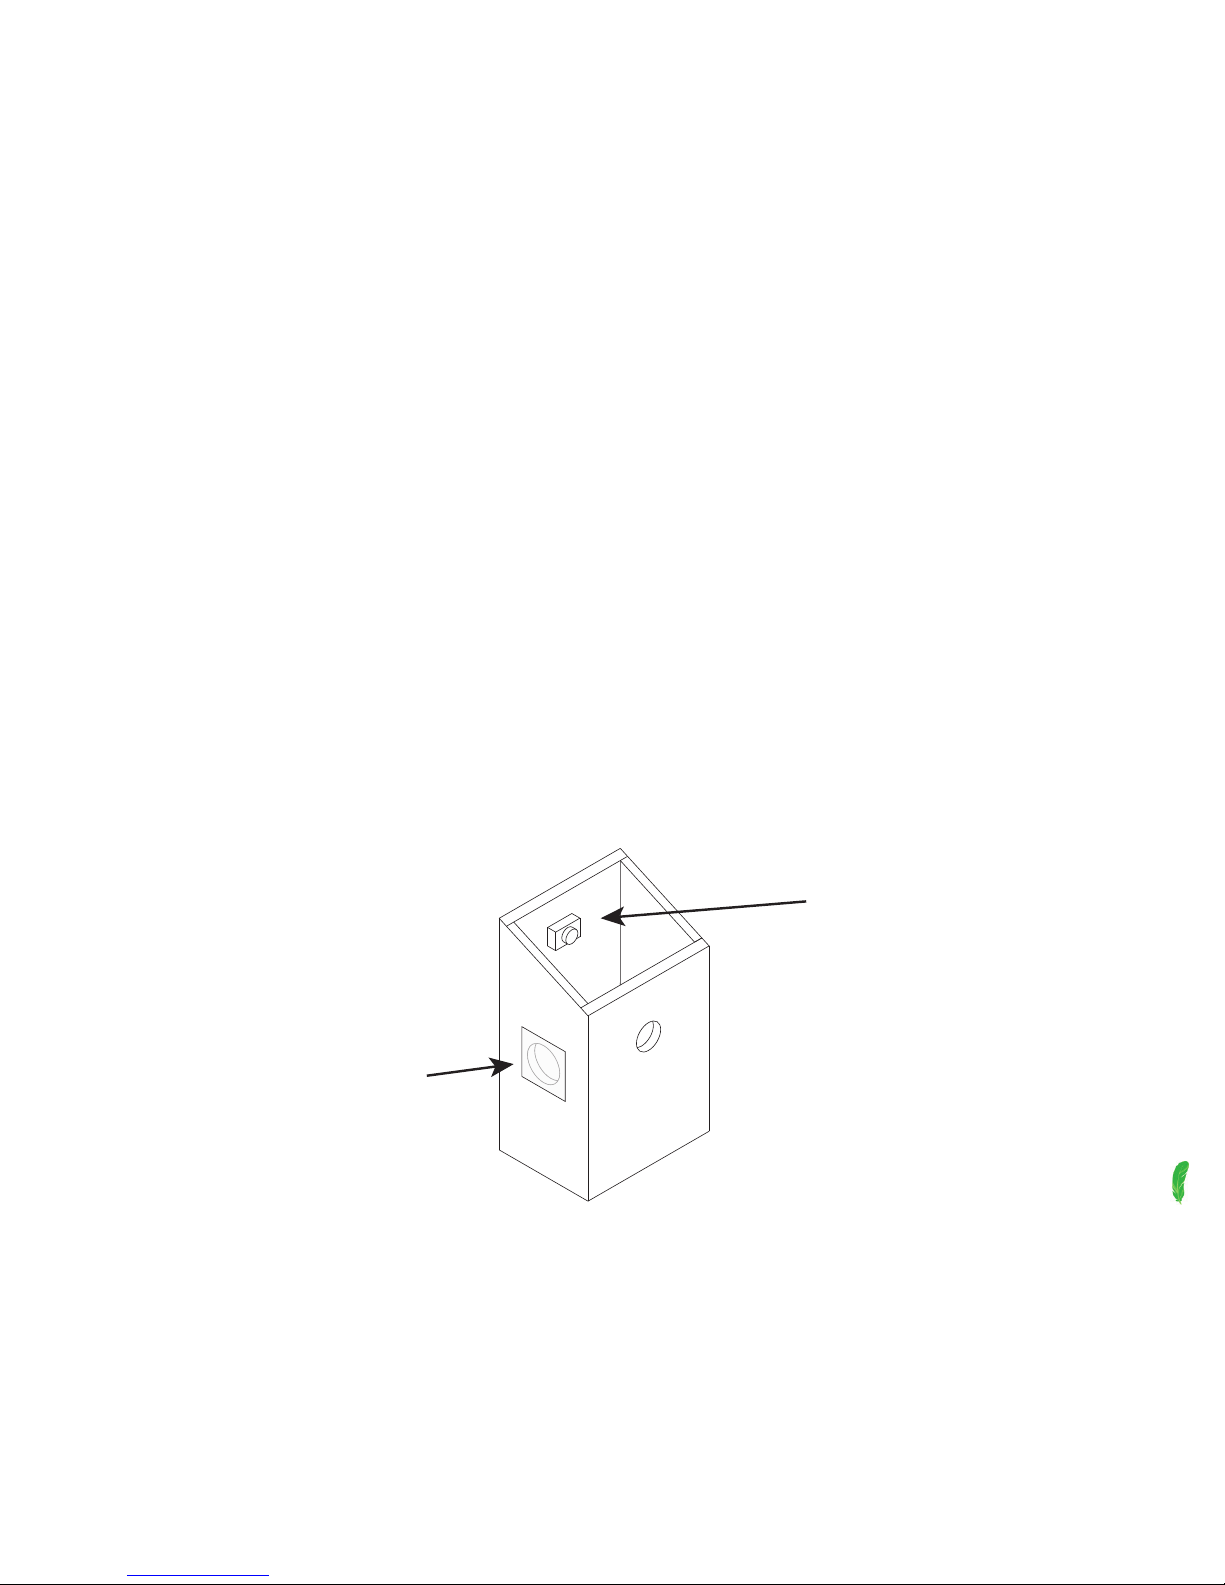
1. White Light Box: acquire a white light box from us to assist light levels during the day.
2. Perpex Window: add a small perspex window to your bird box to introduce more light
into the box without disturbing the residents. Simply drill a hole mid-way down the
side of your box, below your camera and cover with a small pieces of 2–3mm thick
sanded perspex xed into place with a couple of screws. Sanding the perspex helps to
soften the sunlight and reduce glare.
Camera mounted at the
top rear of the box
Sun hole drilled half-way
between the entrance
and bottom of the box
Page 8
8
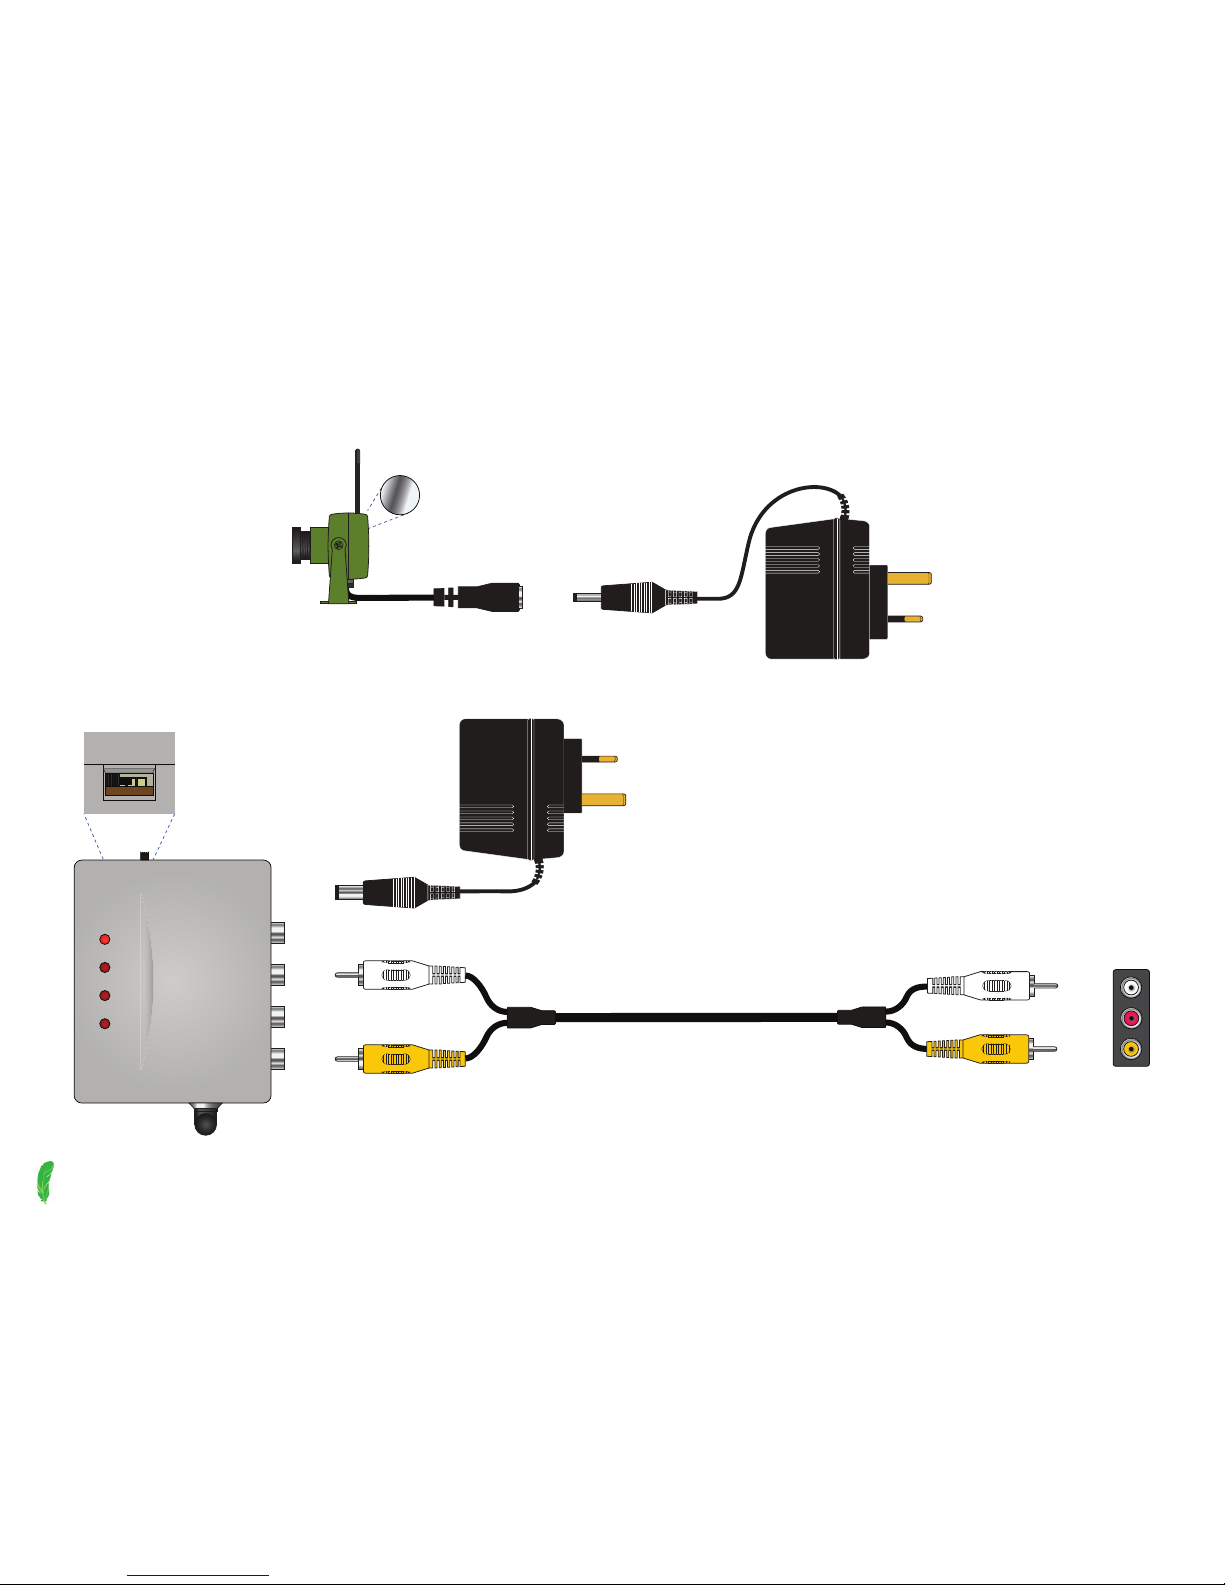
WIRELESS CAMERA CONNECTION GUIDE
1
Wireless Channel Sticker
1 2 3 4
Television/Recorder
1 2 3 4
Channel Selector Switch
Page 9

9
WIRELESS TROUBLESHOOTING
Try to keep your wireless receiver away from any other wireless device such as an
internet router or wireless telephone or electrical multi-sockets. This will help to minimise
interference.
To reduce the amount of obstacles your wireless signal needs to navigate, imagine looking
‘straight through’ to your camera from your receiver. How many walls, oors and/or large
objects is your signal going through? Can this be improved by moving your receiver or
camera’s location?
Are you receiving interference on your picture, such as black horizontal lines or a
herringbone pattern? This is typical of Wi-Fi interference – turn to the next page to read
how to change the wireless channel of your camera.
FIND MORE HELP ONLINE
Learn more about getting the best range from your wireless
camera on our help site.
green-feathers.co.uk/help
Page 10
10
CHANGING THE WIRELESS CHANNEL OF YOUR CAMERA
Changing the wireless broadcast channel of your camera can be really useful when adding
additional cameras to your system or as part of troubleshooting wireless interference. It’s
only a 2 minute job, but you’ll need to be careful and may need a pin or small screwdriver
to make the adjustments.
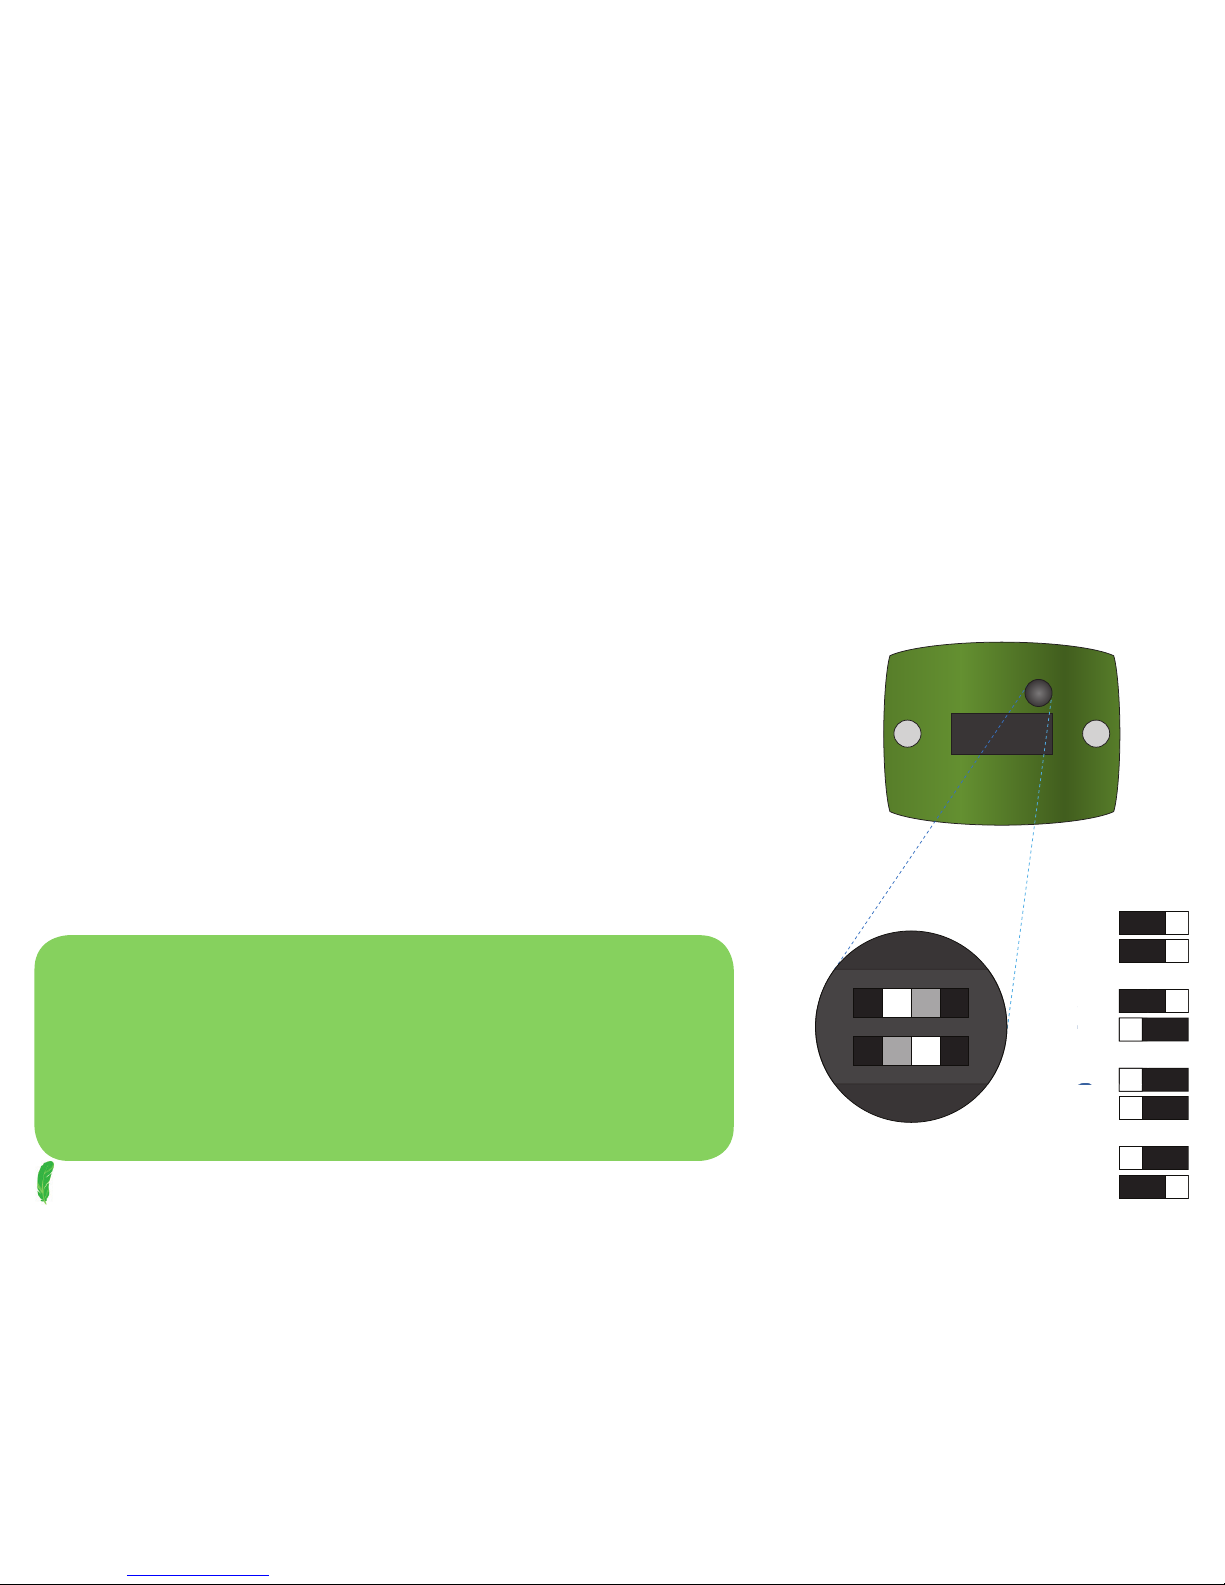
Locate and remove the black rubber bung on the back
of your camera as shown to the right. Inside are two
white switches which change the camera’s channel.
Flick the switches to the arrangements on the right to
set the camera to use channel 1, 2, 3 or 4. You should
see the change immediately on your TV or screen but
don’t forget to change the channel of your receiver too!
1
2
3
4
FIND MORE HELP ONLINE
How to change the channel on your
wireless camera
green-feathers.co.uk/help
Page 11

11
WIRED CONNECTION TIPS
Plan beforehand where you plan to lay your cable from your bird box to your viewing
device. Are you going to bury your cable and where is the entry point to your house going
to be? Generally it is best to drill a single hole through your outer wall (20mm diameter) but
if you have wooden window frames a small hole through the corner of the frame may be a
better idea.
If you’re burying the cable running through your garden then it is a good idea to protect it
from the weather and burrowing animals. A simple way to do this is with some spare hose
pipe. Simply run your cable through the hose, tape over the ends and bury. Some extra
electrical tape over cable joints also helps keep water out.
If drilling a hole through the side of your house isn’t an option then you can bury a
shorter cable in the garden up to a window and keep a coiled cable inside that can
be connected up when you want to view your nestbox. Taping a plastic bag over
the connector of the outdoor cable should help to keep the rain off .
Page 12
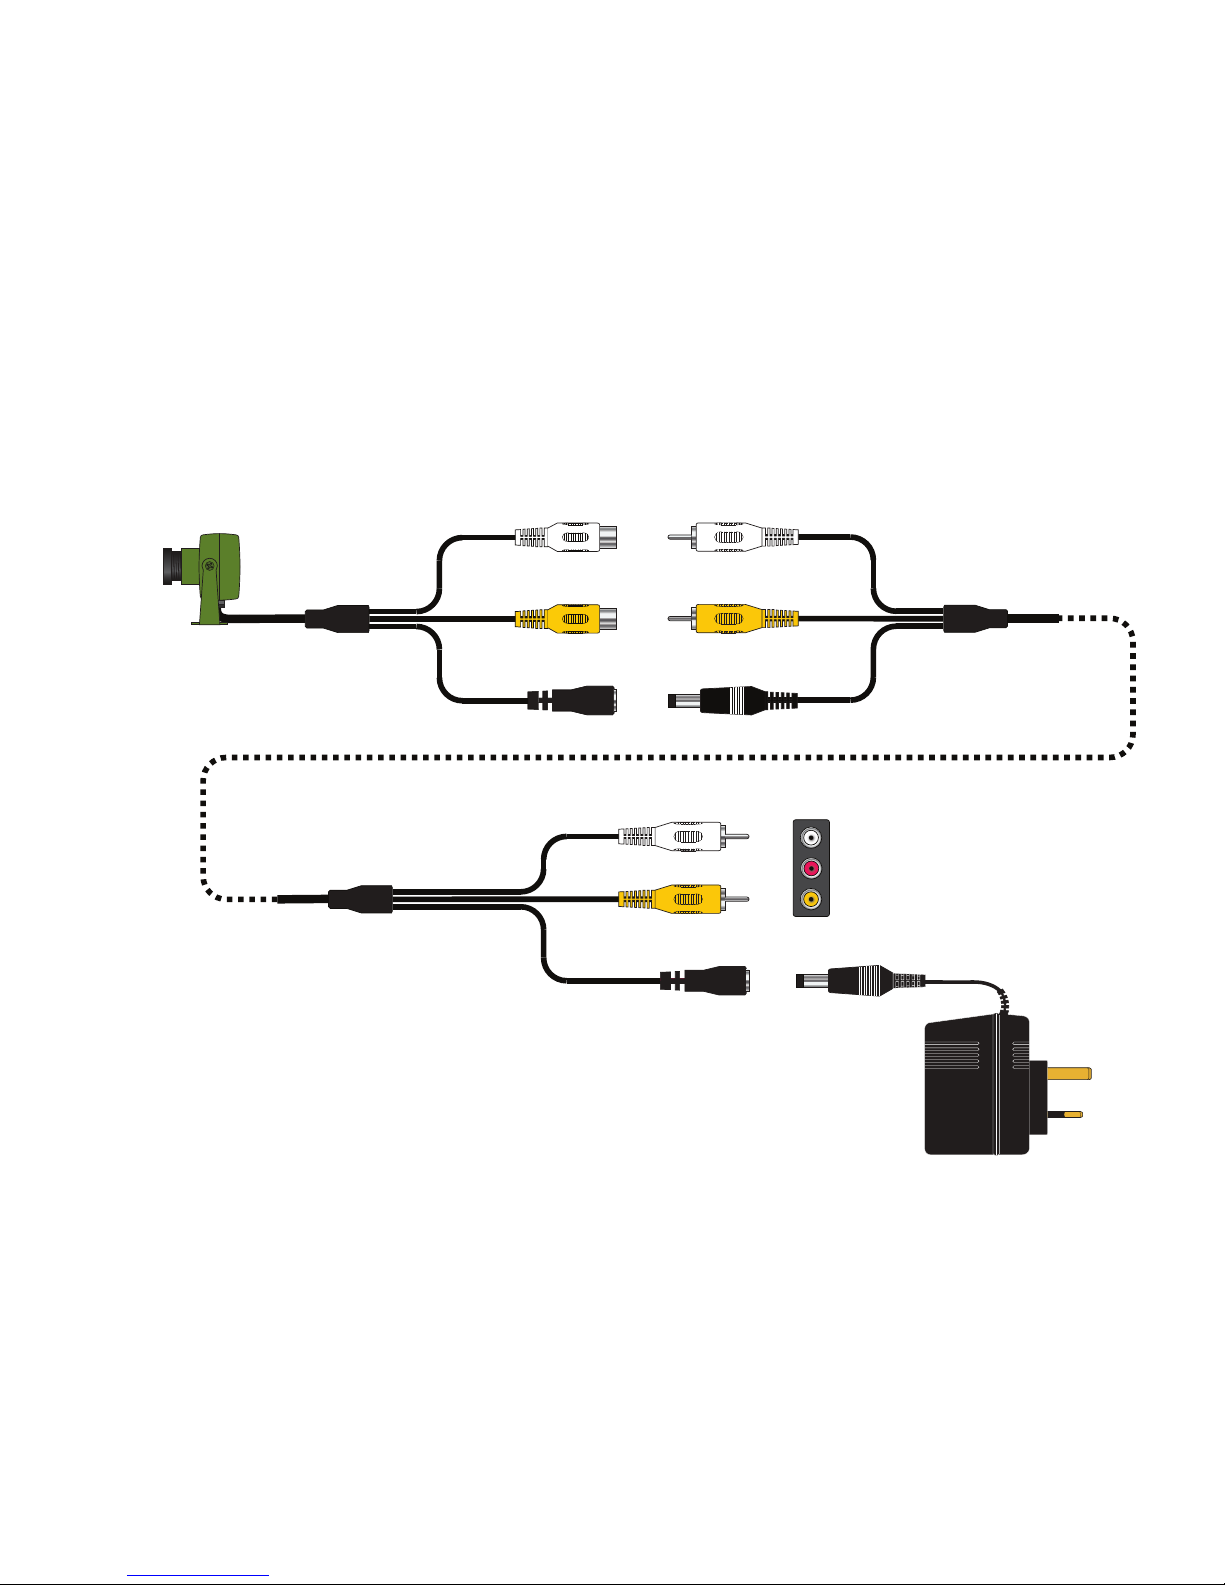
WIRED CAMERA CONNECTION GUIDE
For product codes that begin with CMOSNC:
WIRED CAMERA CONNECTION GUIDE 1
Television/Recorder
10m/20m/30m/40m/50m cables available
SCART adaptors available
Page 13
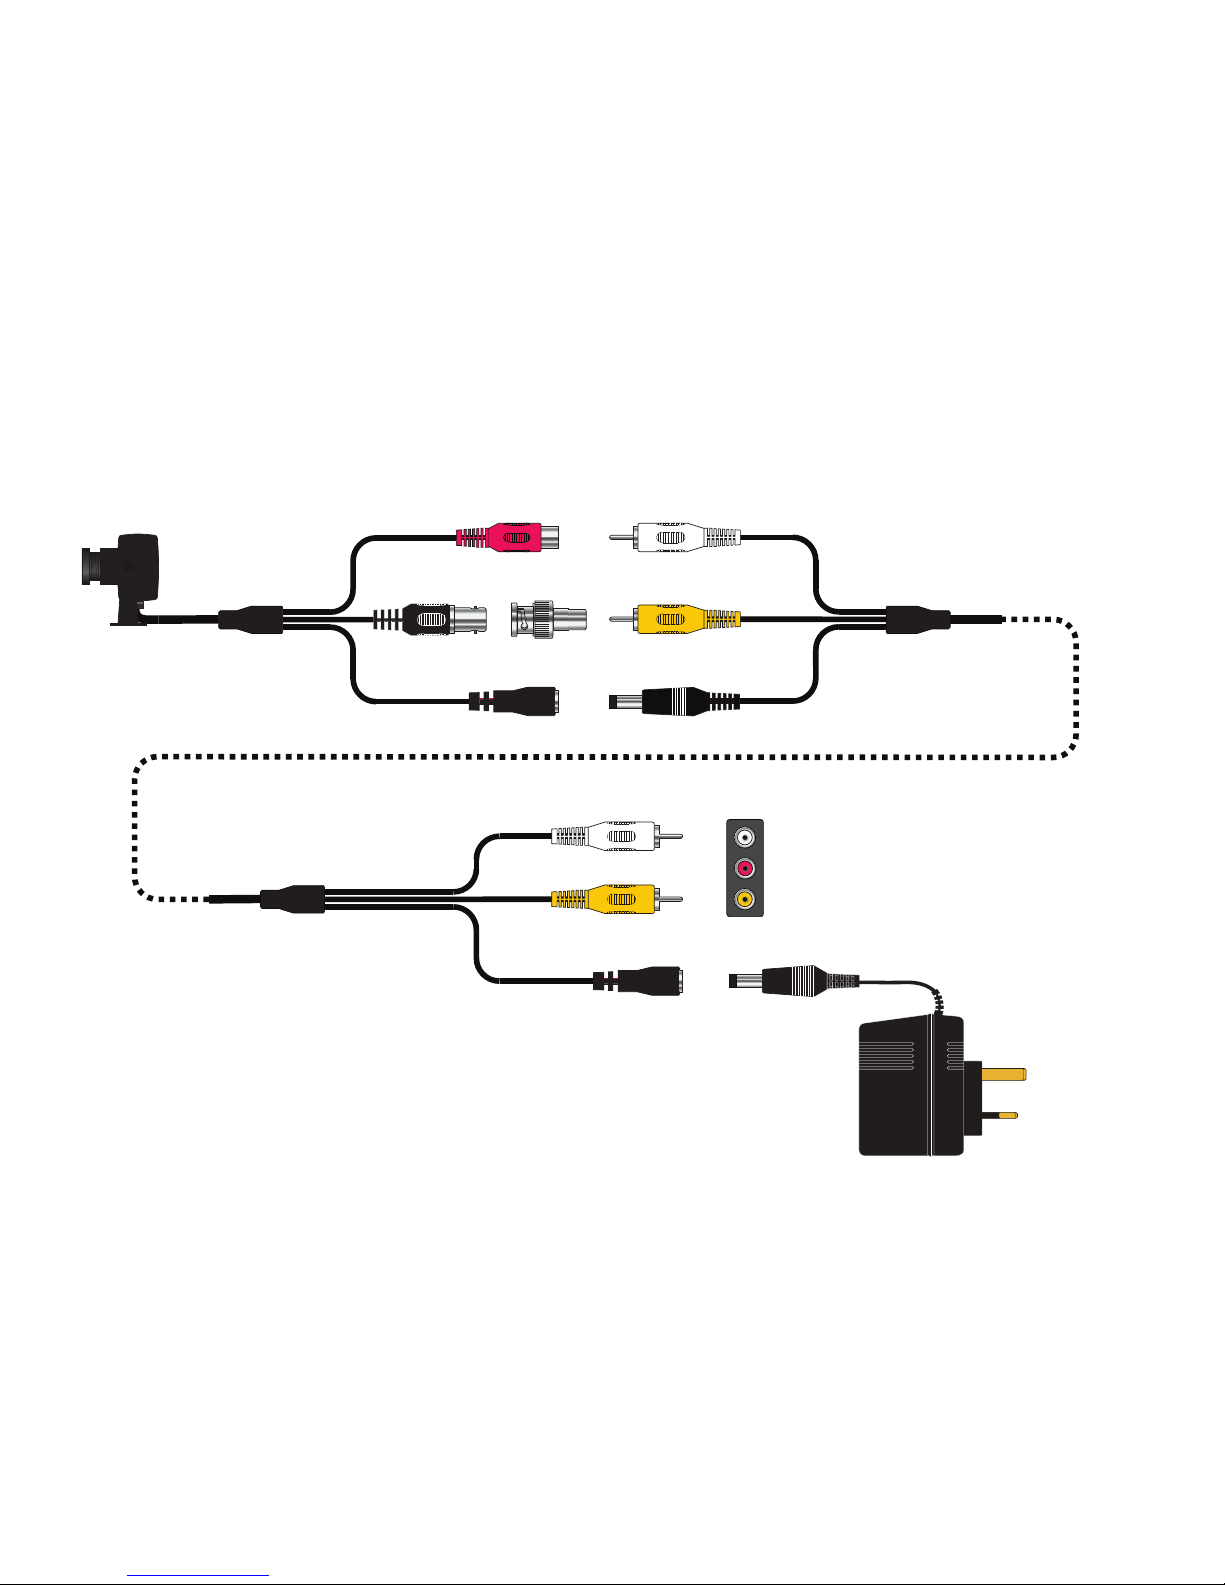
For product codes that begin with NCF15:
WIRED CAMERA CONNECTION GUIDE 2
Television/Recorder
10m/20m/30m/40m/50m cables available
SCART adaptors available
Page 14
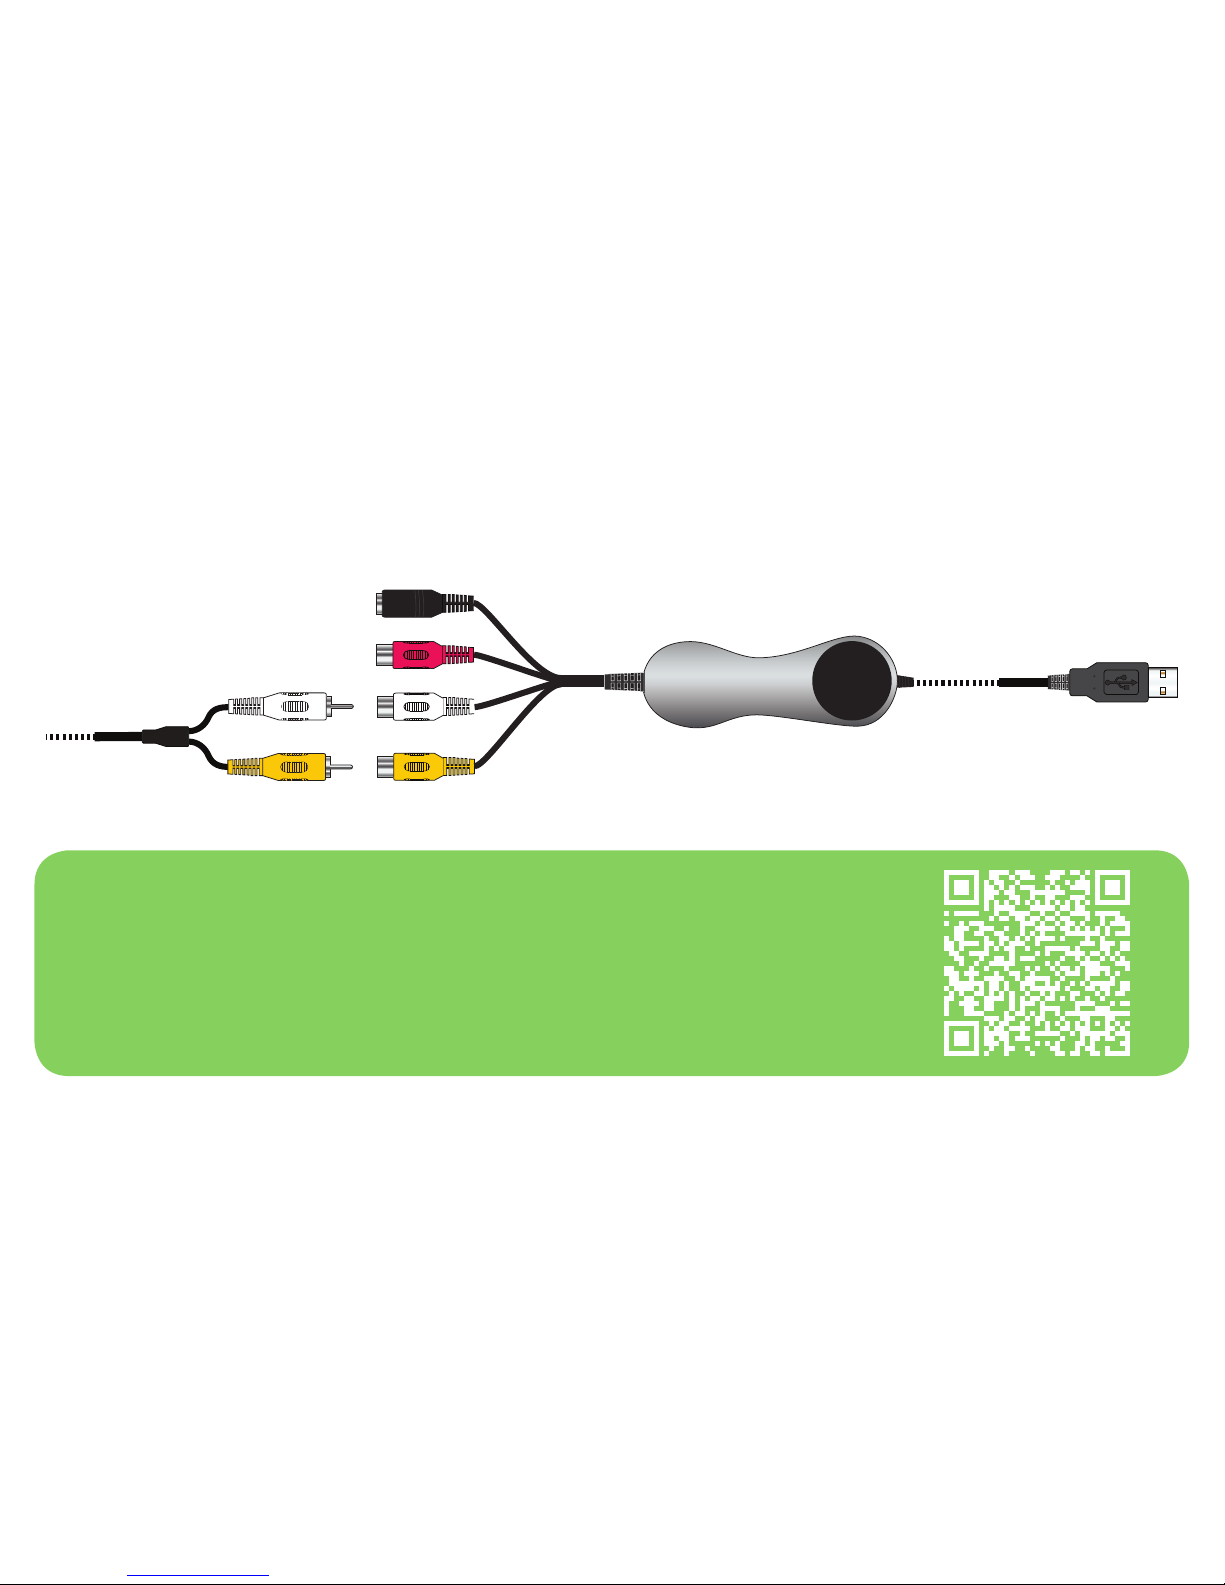
HOW TO CONNECT TO YOUR PC OR MAC
If you’re using one of our USB Capture Devices to view and record your camera on your
computer, you will need to install the Driver and Software. The installation will prompt you
to connect your USB device when it is ready.
To learn more about using your USB Capture Device, please visit our help article online.
HOW DO I INSTALL THE SOFTWARE?
Find out how to download and install the software.
https://goo.gl/3rF2Uw
If you haven’t purchased a USB enabled bird box camera bundle but would like to be able
to record to your PC or Mac then visit our website.
Page 15

15
NEED MORE HELP?
If you require more help setting up your bird box camera then head to our help site where
you’ll be able to nd all the latest help guides.
Visit our help site
green-feathers.co.uk/help
Page 16

16
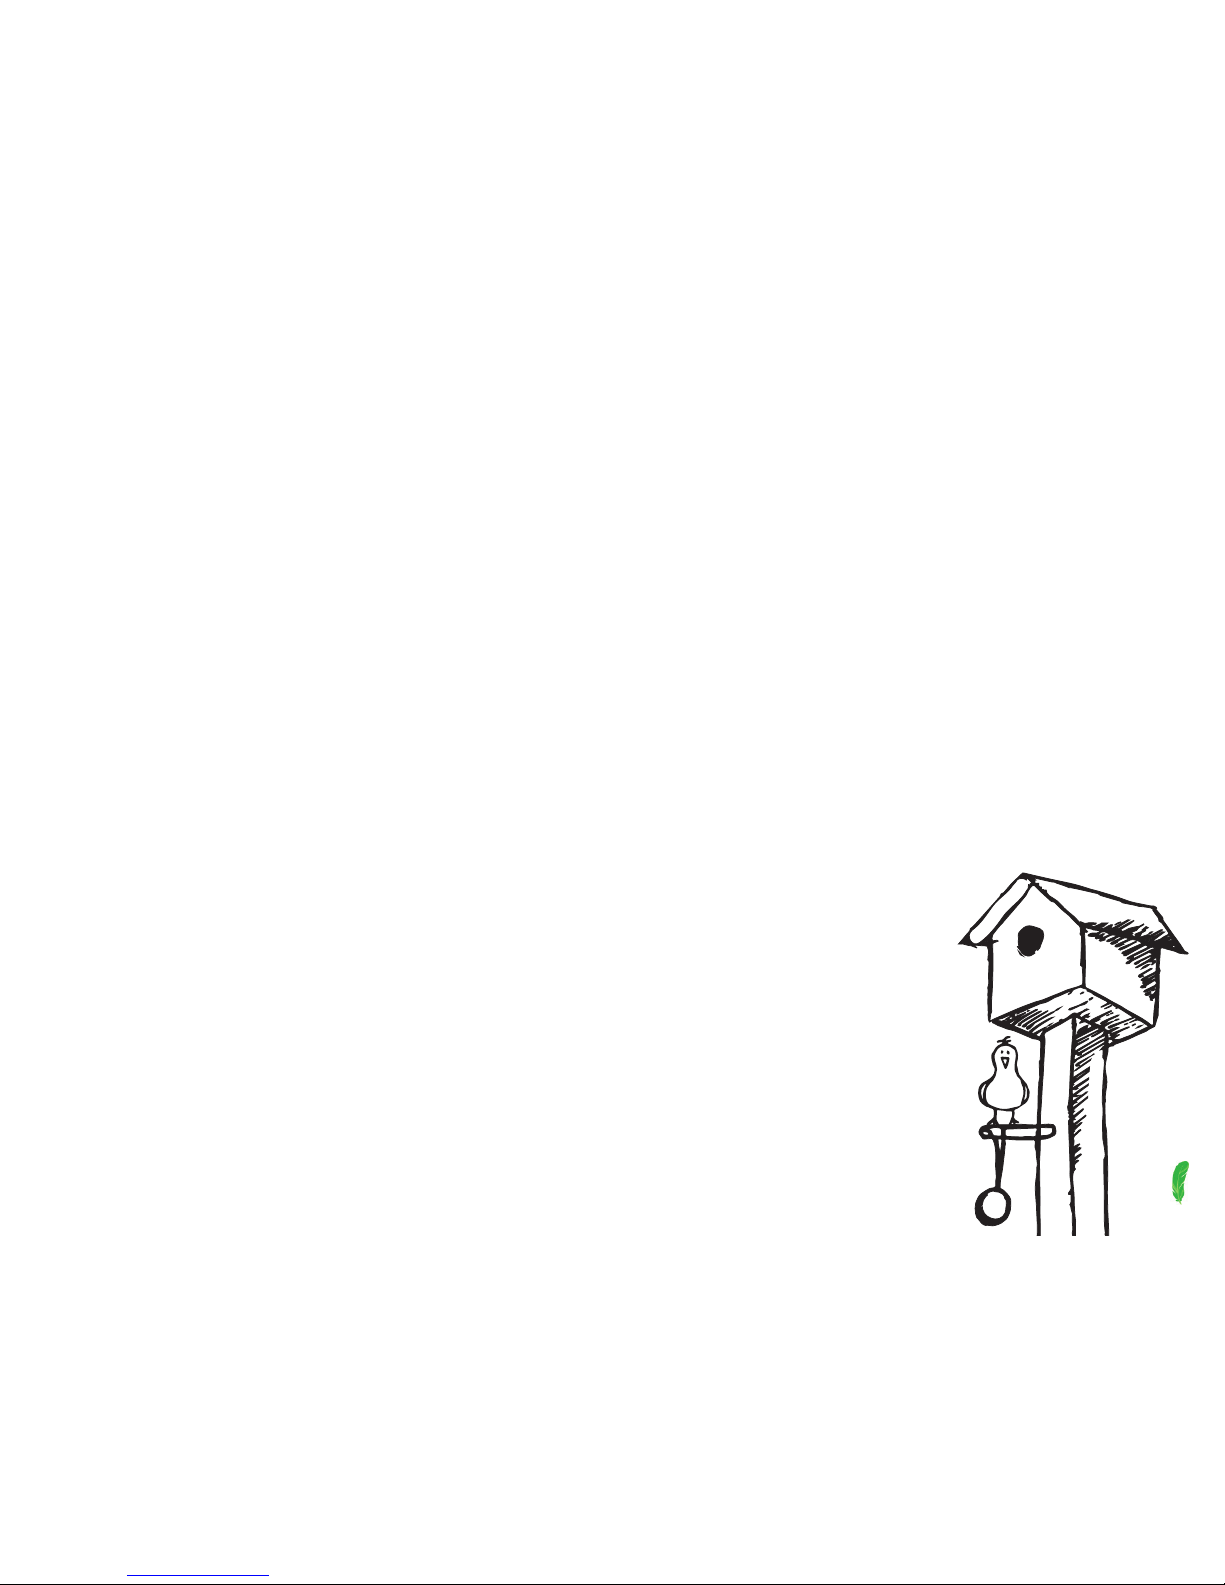
Something fun for a Saturday afternoon
to attract wildlife into your garden. Great
in winter when food is scarce. Productive,
enjoyable and most of all cheap!
Types of Container
Yoghurt pots
Coconut shells
Small plant pots
String
Lollipop sticks or twigs
Ingredients
Lard or suet
Bird seed
Porridge oats
Peanuts (suitable for birds)
Raisins
Kitchen scraps
Equipment
Mixing bowl
Saucepan
Mixing spoon
Cling lm
Bowl of cold water
Rubber gloves (optional)
Page 17
17
Method
1. Melt the lard/suet into the saucepan, don’t let it burn
2. Once melted, put all dry ingredients into a mixing bowl and then add the lard/suet. If
you are going to mix everything together using your hands then make sure that the fat
has cooled down enough before you get your hands stuck in!
3. Preparing the containers. Now you have the mixture ready, get a piece of string and
loop it and tie a knot in the end of it. Remember not to make the loop too small such
that it won’t t over the branch/hook etc.
4. Press the soft mixture into the yoghurt pot/chosen container and around the string,
making it as compact as possible so that the string doesn’t escape.
5. Once lled to the top of the yoghurt pot, leave the mixture to cool.
Storing in a cold shed or garage would be ideal, you could just as
easily store them in the fridge.
6. After the mixture is chilled, you need to remove it from the
container. The best way to do this is to partially ll a bowl with warm
water and place the container in. This way the water will warm the
fast slightly in order to soften it allowing you to remove the fat balls.
Page 18

18
FURTHER RESOURCES
Find out more about wildlife in your garden.
Lots of helpful tips on attracting more wildlife to your garden:
www.rspb.org.uk/birds-and-wildlife/bird-and-wildlife-guides/
www.wildlifegardener.co.uk
www.wildaboutbritain.co.uk/forums
Plenty of tips and guides on living green:
www.thedailygreen.com
Page 19
19
DECLARATION OF CONFORMITY
We, Open 24 Seven Ltd., hereby declare that the product:
Green Feathers Wireless Bird Box Camera
Is in conformity with all the essential requirements of Directives R&TTE Directive 1999/5/
EC.
Assessment of compliance of the product with the requirements relating to the following
speci cations:
EMC
EN 300 328 V1.7.1 (2006-10)
EN 301 489-1 V1.8.1 (2008-04)
EN 301 489-17 V2.1.1 (2009-05)
EN 60950-1:2006+A11:2009+A1:2010
The Person Responsible for this declaration is:
Name: Chris Barrell
Position: Operations Director
Date: 10th February 2010
Page 20

green-feathers.co.uk
 Loading...