

Page 1

Page 2

Product Manual - Chainsaws
Index
Index ............................................................................................................................................................ 1
General Safety ............................................................................................................................................. 2
Chainsaw Safety........................................................................................................................................... 3
Parts Diagram .............................................................................................................................................. 6
Assembly ...................................................................................................................................................... 9
Before use ................................ ................................................................................................ .................. 10
Starting the Engine ..................................................................................................................................... 11
Stopping the Engine ................................................................................................ ................................... 12
Maintenance ............................................................................................................................................... 13
Transporting & Storage............................................................................................................................... 15
Troubleshooting .......................................................................................................................................... 16
Page 3
Product Manual - Chainsaws
10814082100
2
2
General Safety
It is important you read and
understand the instruction
manual before first use and keep
the manual in a safe place for
future reference.
Safety precautions must be
observed to reduce the risk of
personal injury when operating
this machine.
DANGER! Keep clear of power
lines, contact can cause death.
It is strongly recommended that
a comprehensive training course
on machine use, fuel handling
safety and engine operation be
completed before attempting to
use this machine.
Like all power equipment this unit must
be handled carefully.
Look for power wires before starting
work.
Ensure you /your saw/branches you are
cutting don’t go near power wires.
Do not expose yourself or others to danger. Do
not permit others to use this machine unless
they have read this manual and are trained in
its operation. Do not operate if the equipment is
damaged or in an excessively worn state. To
reduce fire hazards keep the engine and
silencer free of debris, leaves or excessive
lubricant. Do not use any attachments or
accessories with the equipment other than the
ones recommended by the supplier. Serious
injury to the operator or bystanders can result
as well as cause damage to the machine.
Always use proper handles and / or shoulder
strap when using the equipment. Do not use the
unit if it is damaged or poorly adjusted. Never
remove the machine’s guards. Serious injury to
the operator or bystanders could result as well
as damage to the machine. Never leave the
machine running and unattended. Do not use
this unit for any job other than those for which it
is intended as described in this manual. During
or after operation of the engine, never touch hot
parts such as the muffler, the high voltage wire
or the spark plug. Do not operate the machine
in the rain or under wet conditions. Always
ensure all handles and guards are fitted when
using the machine. Always keep the machine
away from naked flame or sparks. Always stop
the engine before cleaning / clearing a blockage
or checking, maintenance or working on the
machine.
Working at heights
Always use a scissor lift, never work on a ladder
or in a tree, never work on an insecure support
and never operate your unit with one hand.
Always be sure of a safe and secure operating
position especially when working at heights.
Clothing and Equipment
Dress properly. Do not wear loose clothing or
jewellery which can be caught in moving parts.
Use of sturdy gloves, non-skid footwear, and
safety glasses is recommended;
Always wear ear protection. Loud
noises for an extended period of
time may damage your hearing.
Total face and head protection must
be worn to reduce injury from falling
branches.
Wear no-slip heavy duty work
gloves to improve your grip on the
brush cutter handle. Gloves also
reduce the transmission of machine
vibration to your hands.
The dust, vapour and smoke
produced during operation may be
dangerous to health. If the work
area is very dusty or smoky, wear a
respirator.
Transporting the Machine
The engine should be turned off when the
machine is moved between areas and when
transporting or storing the machine. Always turn
off the engine. Always fit the blade covers
before carrying your tool. When transporting in
a vehicle: properly secure your machine to
prevent turnover, fuel spillage and damage.
Fuelling
Fuel is extremely flammable.
Keep clear of naked flames. Do
not spill any fuel. Do not smoke
near fuel or the machine. Always
shut off the engine before refuelling. Do not fuel
a hot engine – fuel may spill and cause a fire.
Open the fuel cap carefully to allow any
pressure build-up in the tank to release slowly
and avoid fuel spillage. Fuel your machine only
in well ventilated areas. If you spill fuel, wipe
the machine immediately – if fuel gets on your
clothing, change immediately. To reduce the
risk of serious or fatal burn injuries, check for
fuel leakage. If fuel leakage is found, do not
start or run the engine until leak is fixed.
During Operation
Make sure you always have good balance and
secure footing. Always be aware of your
surroundings and stay alert for possible
hazards that you may not hear due to the noise
of the machine.
Never allow children to access the
machine.
Avoid operating while people, especially
children are nearby. To reduce the risk of injury,
do not allow any other persons within a radius
of 25 meters of your own position. To reduce
the risk of damage to property, also maintain
this distance from other objects (vehicles,
windows).
After Finishing Work
Always clean dust and dirt off the machine – do
not use any grease solvents. Always keep the
machine clean, especially, the fuel tank, its
surroundings, and the air cleaner. After the
engine has stopped, the muffler will still be hot.
Never place the machine in any places where
there are flammable materials such as dry
grass, combustible gases or combustible liquids
etc. Replace cutting tool covers.
Maintenance and Repairs
Service the machine regularly. Do not attempt
any maintenance or repair work not described
in the instruction manual. Have all other work
performed by a servicing dealer. We
recommend that you have servicing and repair
work carried out exclusively by an authorised
service person. Before proceeding to adjust or
repair the machine, be sure to stop the engine
and detach the spark plug lead. Never attempt
to make engine adjustments while the unit is
running to the operator. Always make engine
adjustments with the unit resting on a flat, clear
surface.
Page 4

Product Manual - Chainsaws
10814082100
3
3
Chainsaw Safety
WARNING! Before attempting to do anything with the
chainsaw READ THE MANUAL.
WARNING! Chainsaws have the potential to inflict injuries
and/or create hazardous situations. The major causes of
accidents are ignorance of the hazards and operators'
apathy to common sense safety procedures.
WARNING! Do not rely exclusively on the safety devices
built into your saw. As chainsaw user, you should take
several steps to reduce chances of accident or injury. The
following list is not full or exhaustive - attend proper training
before using a chainsaw .PERSONAL PROTECTIVE
CLOTHING FOR CHAINSAW USERS
IMPORTANT! A chainsaw operator must not only ensure
that the machine is in safe operating condition but must also
wear protective clothing for optimum protection.
- Head Protection (hard hat). A hard hat should be worn at all times
as protection from failing material, and to reduce injuries from
kickback.
- Ear Protection (ear muffs/ear plugs). All operators and assistants
etc. should wear suitable ear protection. Chainsaws operate in the
region of 100-110 dB(A) at the operator's ear, therefore careful
consideration must be given to the attenuation of the ear protector.
- Eye Protection (goggles/glasses/mesh & perspex screens). The
chain on the saw rotates at more than 40 km/h, so chips and
material can be flung at the operator's eyes at very high speed.
- Leg Protection (trousers/chaps) leg protectors in a variety of Kevlar
and nylons are most effective in preventing cuts to the operators
legs – a common problem.
- Foot Protection (safety boots). These should have steel toe caps,,
non-slip deep tread soles or have metal sprigs or cleats to protect
toes from saw cuts and feet from failing material.
- Hand Protection (gloves/mittens). As well as protecting hands from
cuts, abrasions etc. and keeping them warm, they prevent
vibration induced problems such as Raynaud's Disease.
THE CHAINSAW
The chainsaw should have all safety mechanisms/guards installed
and working.
CHAINSAW KICKBACK
CRITICAL! Other than the obvious risk of physical contact with
a moving chain, the single most dangerous aspect of the saw
is 'kickback'.
This occurs when the bar nose contacts an object, resulting in an
instantaneous kick reaction which can launch the rotating chain toward
the users face/head. Severe injuries and sometimes death can result.
To prevent kickback:
- Avoid using the bar nose. Always be alert to anything coming in
contact with the bar nose.
- Ensure that safety chain is used, and that it is correctly sharpened
and tensioned.
- Always operate with two hands on the saw handles, with the
thumb of the left hand placed under the front handle.
- Avoid the use of the saw above the shoulders and always keep the
saw in front of the body.
CHAINSAW OPERATION
- Ensure that all safety features are fitted and operational before
starting to saw; that all nuts, covers, etc. are secure.
- To start, place saw on ground, with foot through rear handle/ hand
guard to steady the saw.
- When crosscutting or pruning, check if any branches are ‘under
tension’ before cutting.
- Seek advice and/or training in the use of the chainsaw. Many
accidents are the result of ignorance.
- Always wear the recommended personal protective clothing.
FELLING OF TREES
IMPORTANT! Tree felling should be carried out by trained and
experienced personnel only. Assistance and advice should be
sought if the operator is unsure how to fell a certain tree.
FIRE SAFETY
Chainsaws can easily start fires, for two reasons:
1. Poorly maintained and/or faulty exhaust systems.
2. Ignition of spilt fuels by internal sparks.
To avoid fires:
- Ensure muffler is in good condition and fitted with a spark arrester
screen.- Keep muffler clean of carbon build up and deposit.
- Ensure that saw is correctly tuned. Do not use on extreme fire
danger days. - Do not spill fuel over saw when refuelling.
Page 5

Product Manual - Chainsaws
10814082100
4
4
Page 6
Product Manual - Chainsaws
10814082100
5
5
Page 7
Page 8
Product Manual - Chainsaws
10814082100
7
7
Page 9

Page 10
Product Manual - Chainsaws
10814082100
9
9
Assembly
WARNING! The chainsaw has very sharp edges. Use thick protective gloves for safety.
Open the box and install the guide bar and the chainsaw on the power unit as follows:
1. Pull the chainbrake handle toward the rear of the saw (or pull in the direction that would be toward the rear of
the saw if the chainbrake was installed onto the saw).
2. Loosen the nuts and remove the chain brake cover assembly unit..
3. Install the “dog spikes” to the power unit (Models greater than 45cc only).
4. Gear the chain to the sprocket and, while fitting the chain around the guide bar, mount the guide bar to the
power unit. Adjust the position of the chain tensioner.
5. Fit the chain brake cover assembly unit to the power unit, ensuring that the pin for the chain tensioner goes
through the correct hole on the bar. Put the side bolts on “finger tight” only, do not tighten at this stage.
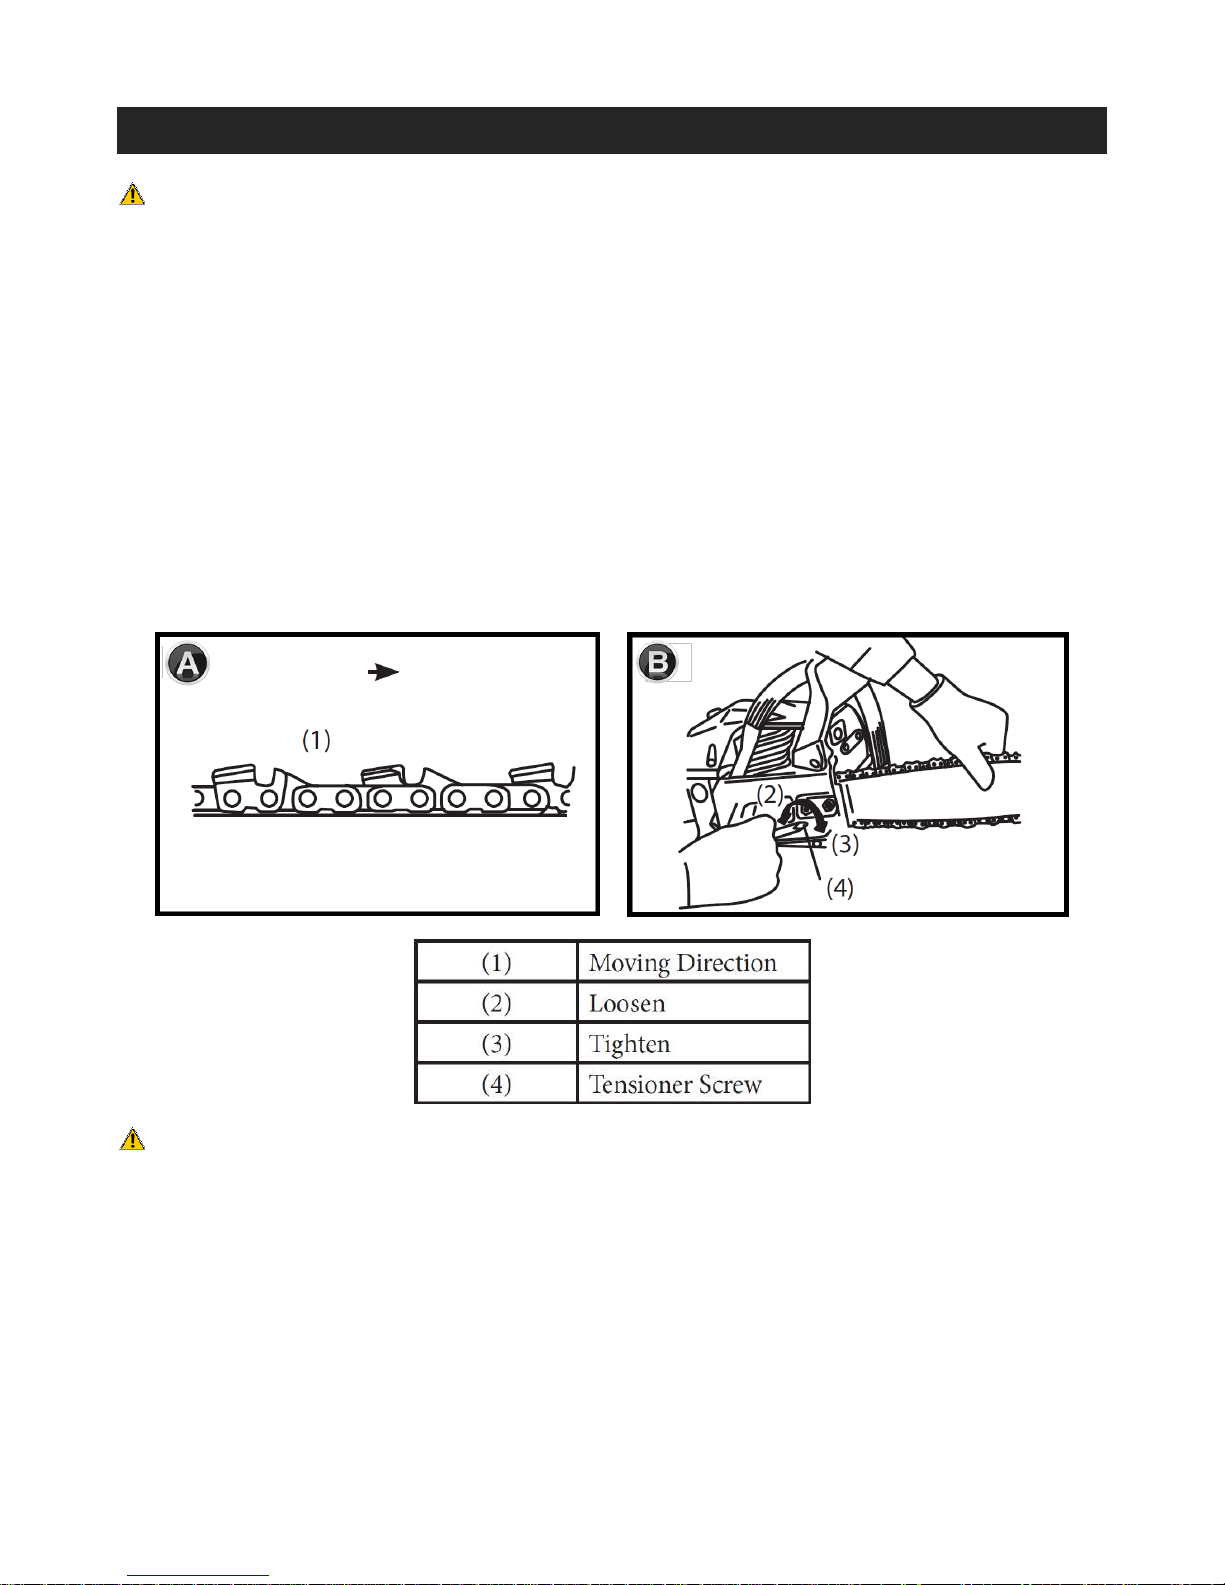
NOTE! Cutting chains are directional, ensure you have installed the chain right way round (A)
6. While holding up the tip of the bar, adjust the chain tension by turning the tensioner screw until the tie straps
just touch the bottom side of the bar rail (B).
7. Tighten the nuts securely with the bar tip held up (12-15 N.m.). Then check the chain for smooth rotation and
proper tension while moving it by hand. If necessary, readjust with the chain cover loose.
IMPORTANT! A new chain will stretch when first used. Check and readjust the
tension frequently as a loose chain can easily derail and cause rapid wear of
itself and the guide bar.
Page 11
Product Manual - Chainsaws
10814082100
10
10
Adjusting the chain using the chain tensioner
WARNING! Always use protective, non-cut gloves when touching the cutting chain.
DANGER! Always disconnect the “spark plug lead” before touching the cutting chain.
IMPORTANT! After running a new chain for 5min the tension must be re-checked. An old chain must be checked
every 15min of use.
1. Disconnect the “spark plug lead” before adjusting your chain.
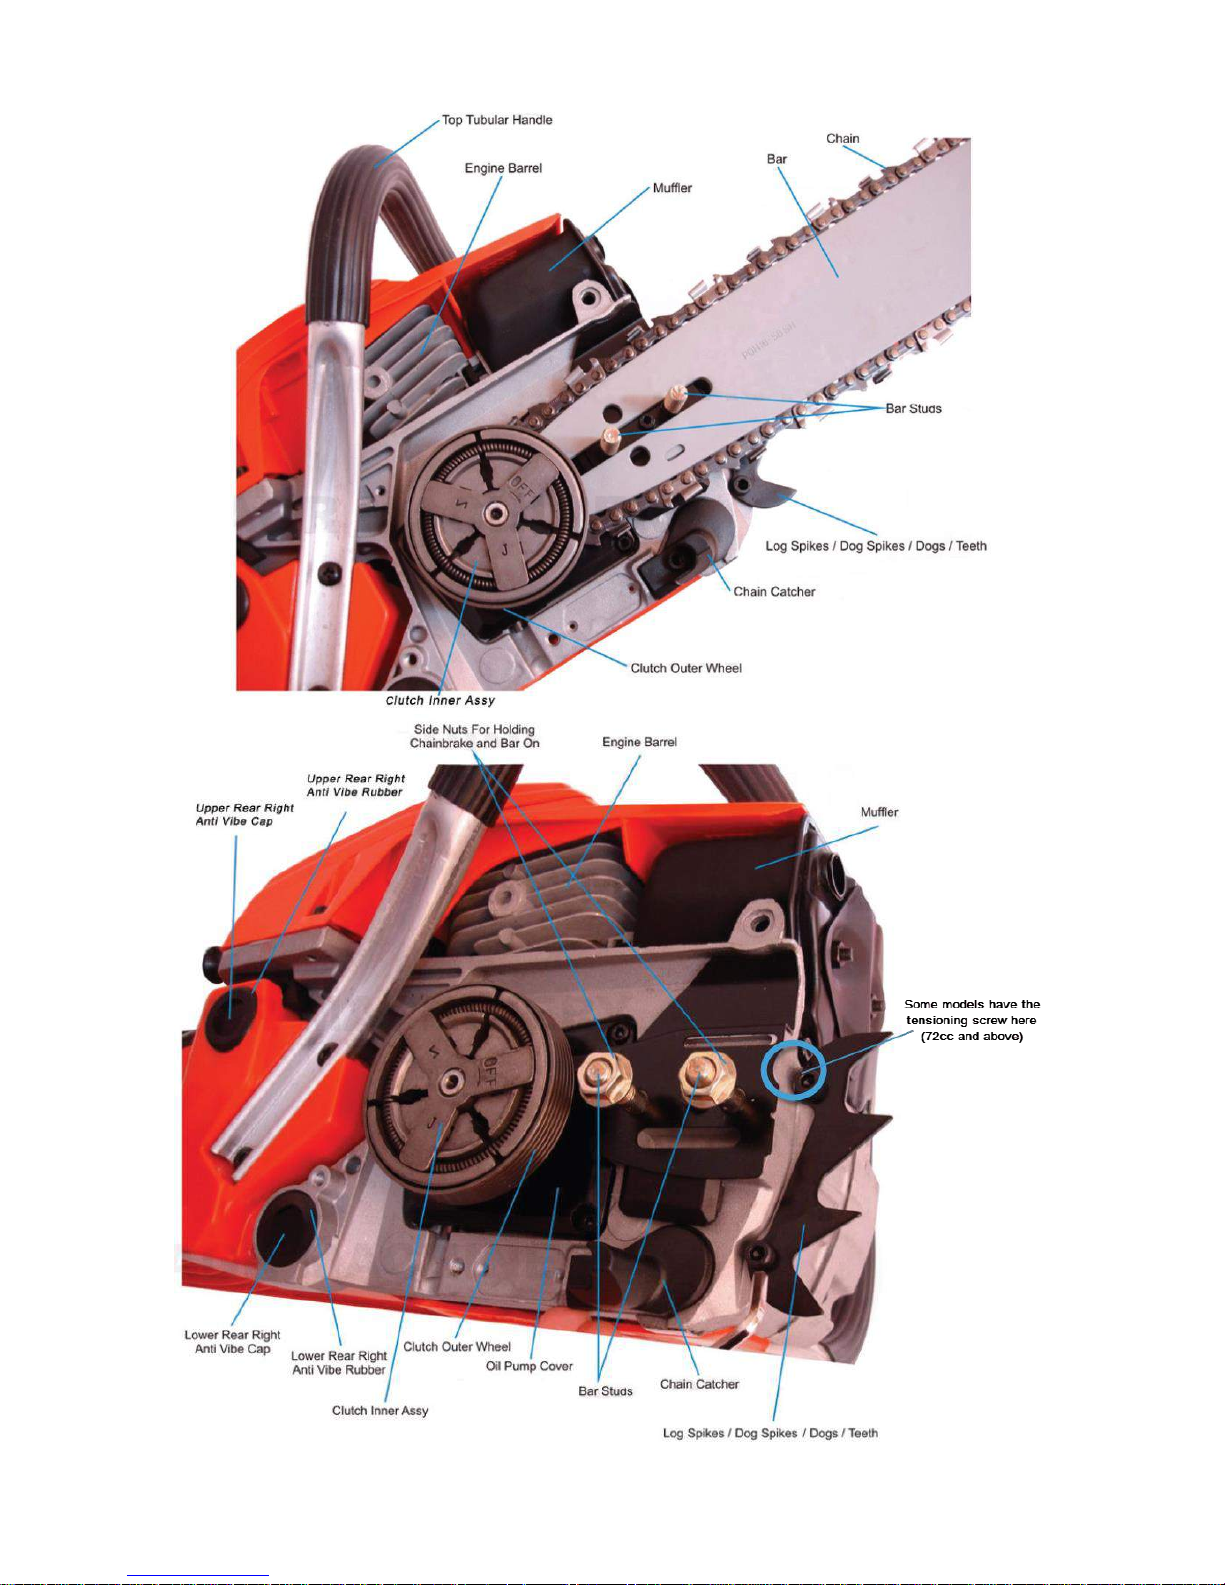
2. Slightly loosen the 13mm “main nuts” on the side of the chainsaw and tighten the chain tensioner with a flat
bladed screw driver until the chain is tight enough to not jump off the “guide bar”, the chain must have some
give or stress on the machine will result (Refer to parts diagrams for locations).
How to tension the cutting chain (use non-cut gloves)
Using a pair of protective gloves pull the chain around the bar by hand and loosen the adjustment if you feel tight
spots.
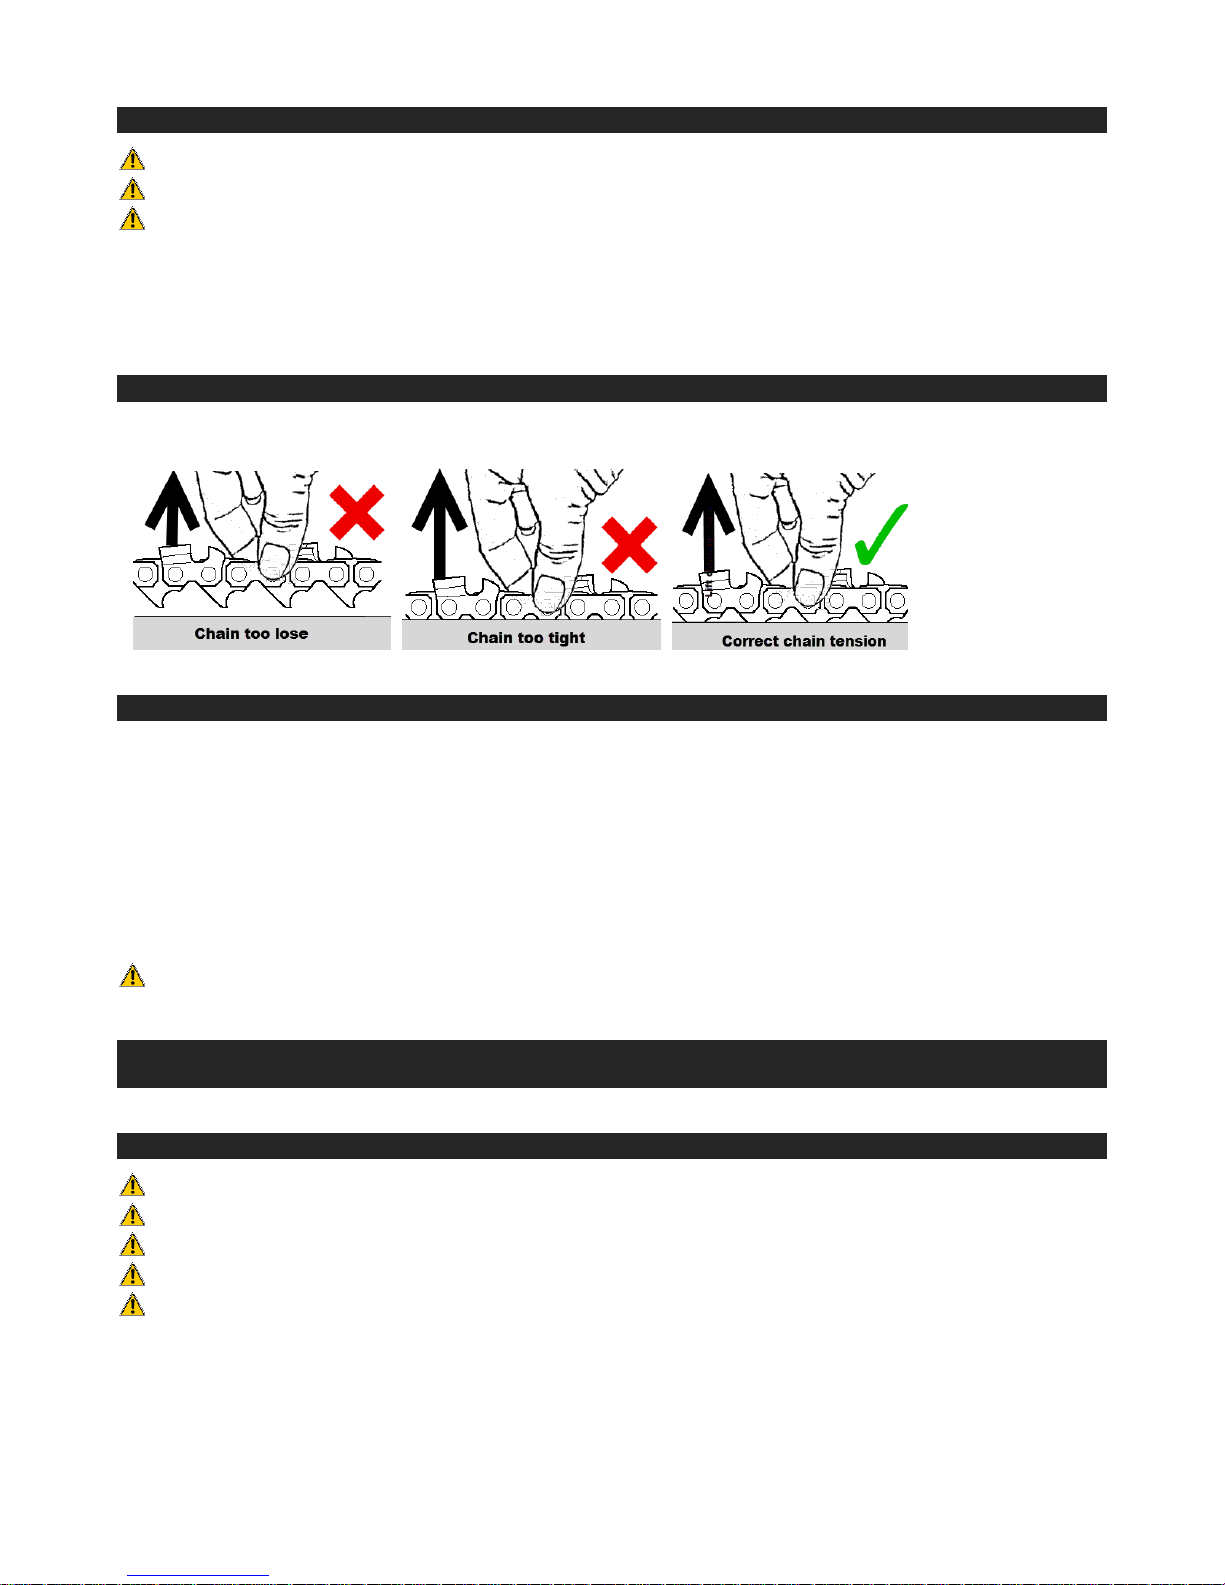
Perform a Snap Test
A quick way to measure the tension of a chainsaw chain is to perform what's known as a "snap test." A properly
tensioned chain will rapidly snap back into position around the top of the bar and show no signs of sagging along the
bottom of the bar.
1. Start by disconnecting the chainsaw's spark plug lead.
2. While holding the chainsaw in one hand, grasp the chain along the top centre of the chainsaw's bar with two
fingers of your other hand. (Always wear heavy gloves and protective eyewear when performing this test.)
3. Lift the chain away from the bar and then quickly release it.
NOTE! If the chain falls loosely into position along the top of the bar or sags along the bottom of the bar the
tension needs to be adjusted.
Before use
Adding Fuel
IMPORTANT! Use only clean, fresh non-ethanol 95+ unleaded with 2-Stroke oil (25:1)
IMPORTANT! Do not overfill the fuel tank.
IMPORTANT! Never use stale or contaminated fuel to mix with 2-stroke oil.
IMPORTANT! Do not let dirt and water into the fuel tank.
IMPORTANT! Tighten the fuel filler cap securely after adding fuel.
1. Clean surface around fuel cap to prevent contamination.
2. Loosen fuel cap slowly. Rest the cap on a clean surface.
3. Carefully pour fuel into the tank. Avoid spillage.
4. Prior to replacing the fuel cap, clean and inspect the gasket.
5. Immediately replace fuel cap and hand tighten. Wipe up any fuel spillage.
Page 12
Page 13

Product Manual - Chainsaws
10814082100
12
12
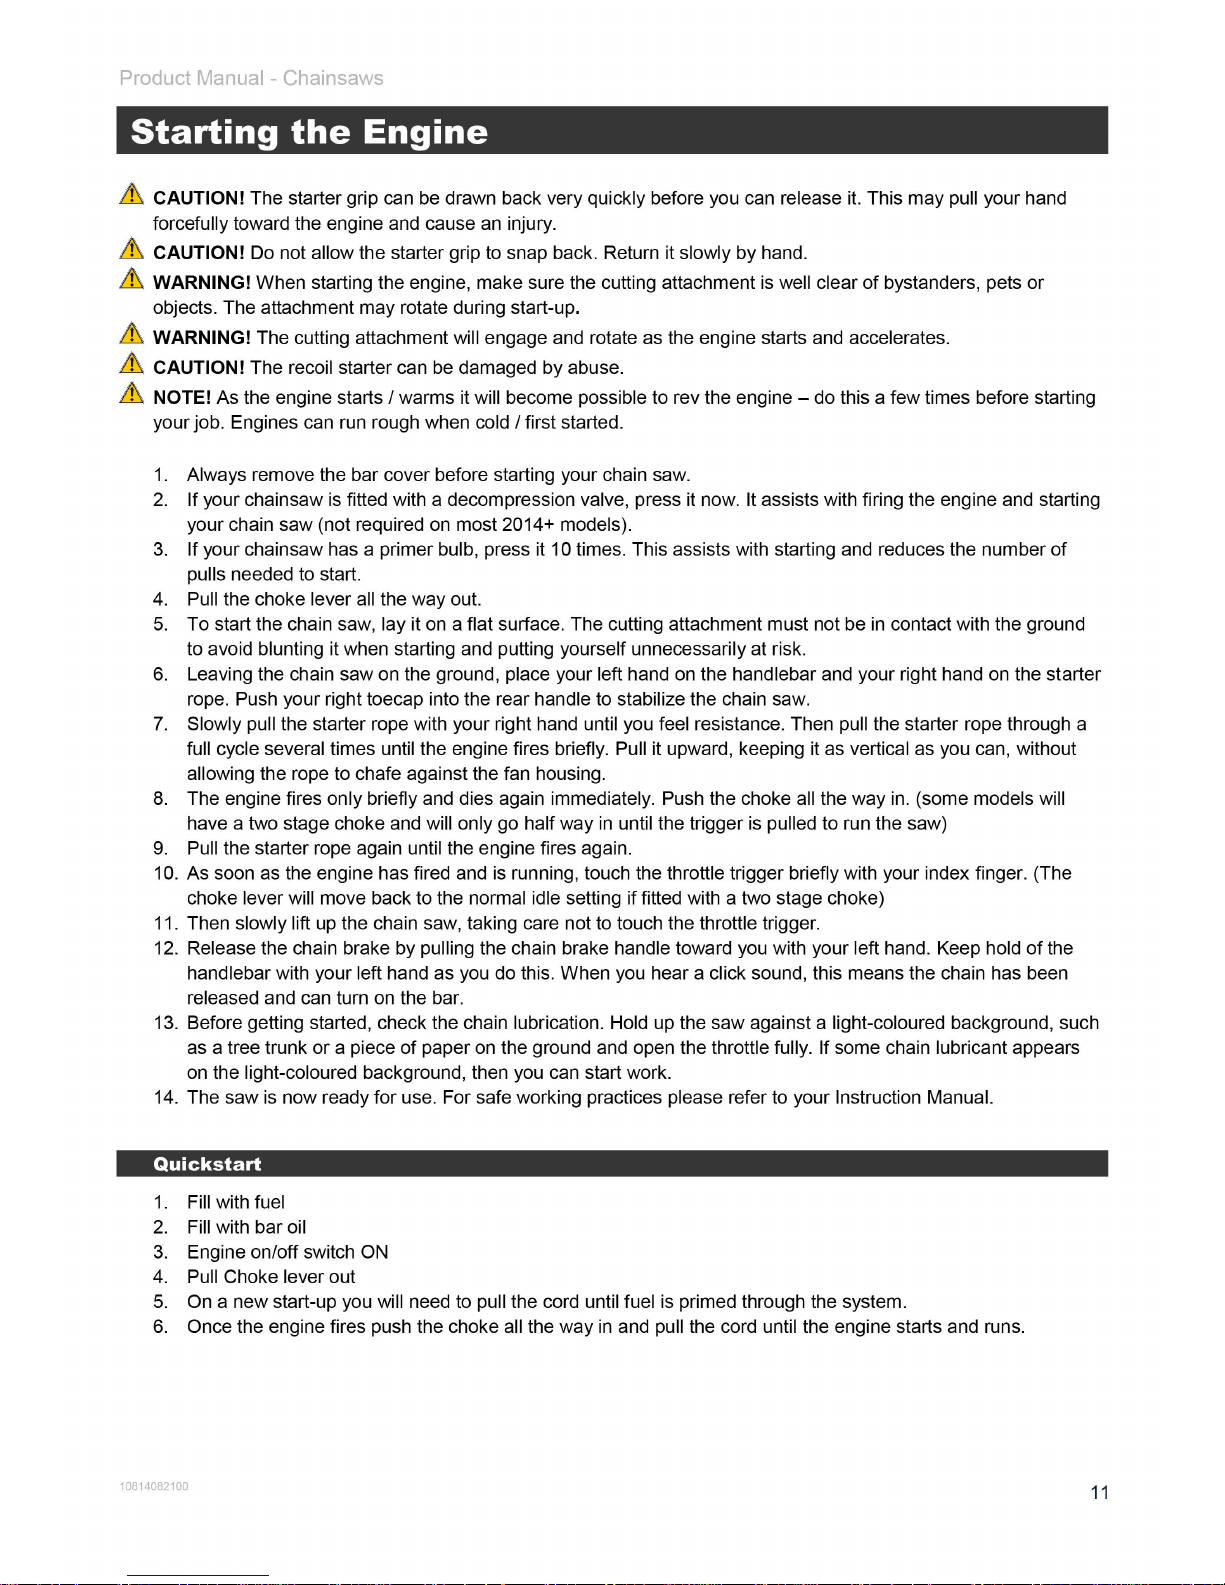
If the Engine Fails To Start
Repeat the appropriate starting procedure (warm or cold engine). If the engine fails to start after frequent attempts, the
engine may be flooded (too much fuel in engine) If you suspect your engine is flooded go to next section “Starting a
flooded engine”
Starting a Flooded Engine
CAUTION! Incorrect spark plug installation can result in serious engine damage.
1. Pull the “spark plug cap” off the “spark plug”.
2. Using a spark plug wrench; remove the “spark plug” (turn counter clockwise to remove).
3. Push the choke lever down.
4. Hold the throttle trigger all the way in (full throttle)
5. Pull the starter handle rapidly with your right hand to expel/clear the excess fuel from the combustion
chamber.
6. Clean the “spark plug” with a cloth to wipe away any excess fuel or oil deposits.
7. Reinstall a “spark plug” and tighten it firmly; hand tight plus 1/3 a turn with the spark plug wrench.
8. Repeat the WARM ENGINE starting procedure above.
9. If the engine still fails to start, see the troubleshooting section near the end of this manual.
Stopping the Engine
WARNING! The cutting bar continues to rotate for a short period after the throttle is released or the engine is
switched off (flywheel effect).
Stop the engine by setting the “STOP SWITCH” to “OFF” position.
Filling with Fuel
1. Clean surface around fuel cap to prevent contamination.
2. Loosen fuel cap slowly. Rest the cap on a clean surface.
3. Carefully pour fuel into the tank. Avoid spillage.
4. Prior to replacing the fuel cap, clean and inspect the gasket.
5. Immediately replace fuel cap and hand tighten. Wipe up any fuel spillage.
Check and Adjust Idle Speed
Start the engine and leave it idle, for two or three minutes, or until it warms up.
NOTE! The mixture screws are identified with the L (low speed), H (high speed) and the T (throttle) symbols
visible on the side of the chainsaw.
NOTE! Don’t touch the H and L screws.
1. If the cutting bar rotates rapidly while the engine is idle, reduce idle speed by turning the throttle screw counter
clockwise as necessary.
2. If the engine is stalling and won't idle, increase the idle speed by turning the throttle screw clockwise.
Adjusting the Carburettor
WARNING! The cutting bar may rotate when the engine is at an idle speed.
NOTE! The engine will return to idle speed after the throttle trigger is released.
NOTE! You may require moderate level of mechanical knowledge to service your machine, if in doubt please
contact a service centre.
NOTE! As a rule the engine idle should be turned down to a minimum so that the cutting bar is not spinning
rapidly and the engine is only “just” running.
Page 14

Product Manual - Chainsaws
10814082100
13
13
Return idle and mixture screws to factory setting
1. Turn the Idle screw clockwise until it just begins to tighten (do not tighten it)
2. Turn the Idle screw counter clockwise by 5 turns.
3. Turn the Mixture screw clockwise until it just begins to tighten (do not tighten it)
4. Turn the Mixture screw counter clockwise. Low (2.5 times) high (2 times)
NOTE! For high altitude it is recommended to use Low (3 times) and high (1.5 times)
5. Now start the engine.
6. Ensure the choke is down and the engine is warm.
7. Pull the throttle trigger in all the way (full throttle)
8. With the engine running at full throttle; turn the mixture screw clockwise until the engine is running at its
absolute fastest.
CRITICAL! Prevent Engine Damage Once The Engine Is Running At Its Fastest; Turn The Mixture Screw
Counter Clockwise By ¼ Of A Turn.
9. For fine tuning of idle speed, attach a cutting head and adjust the idle screw to minimise cutting tool
movement while keeping the engine fast enough to run smoothly.
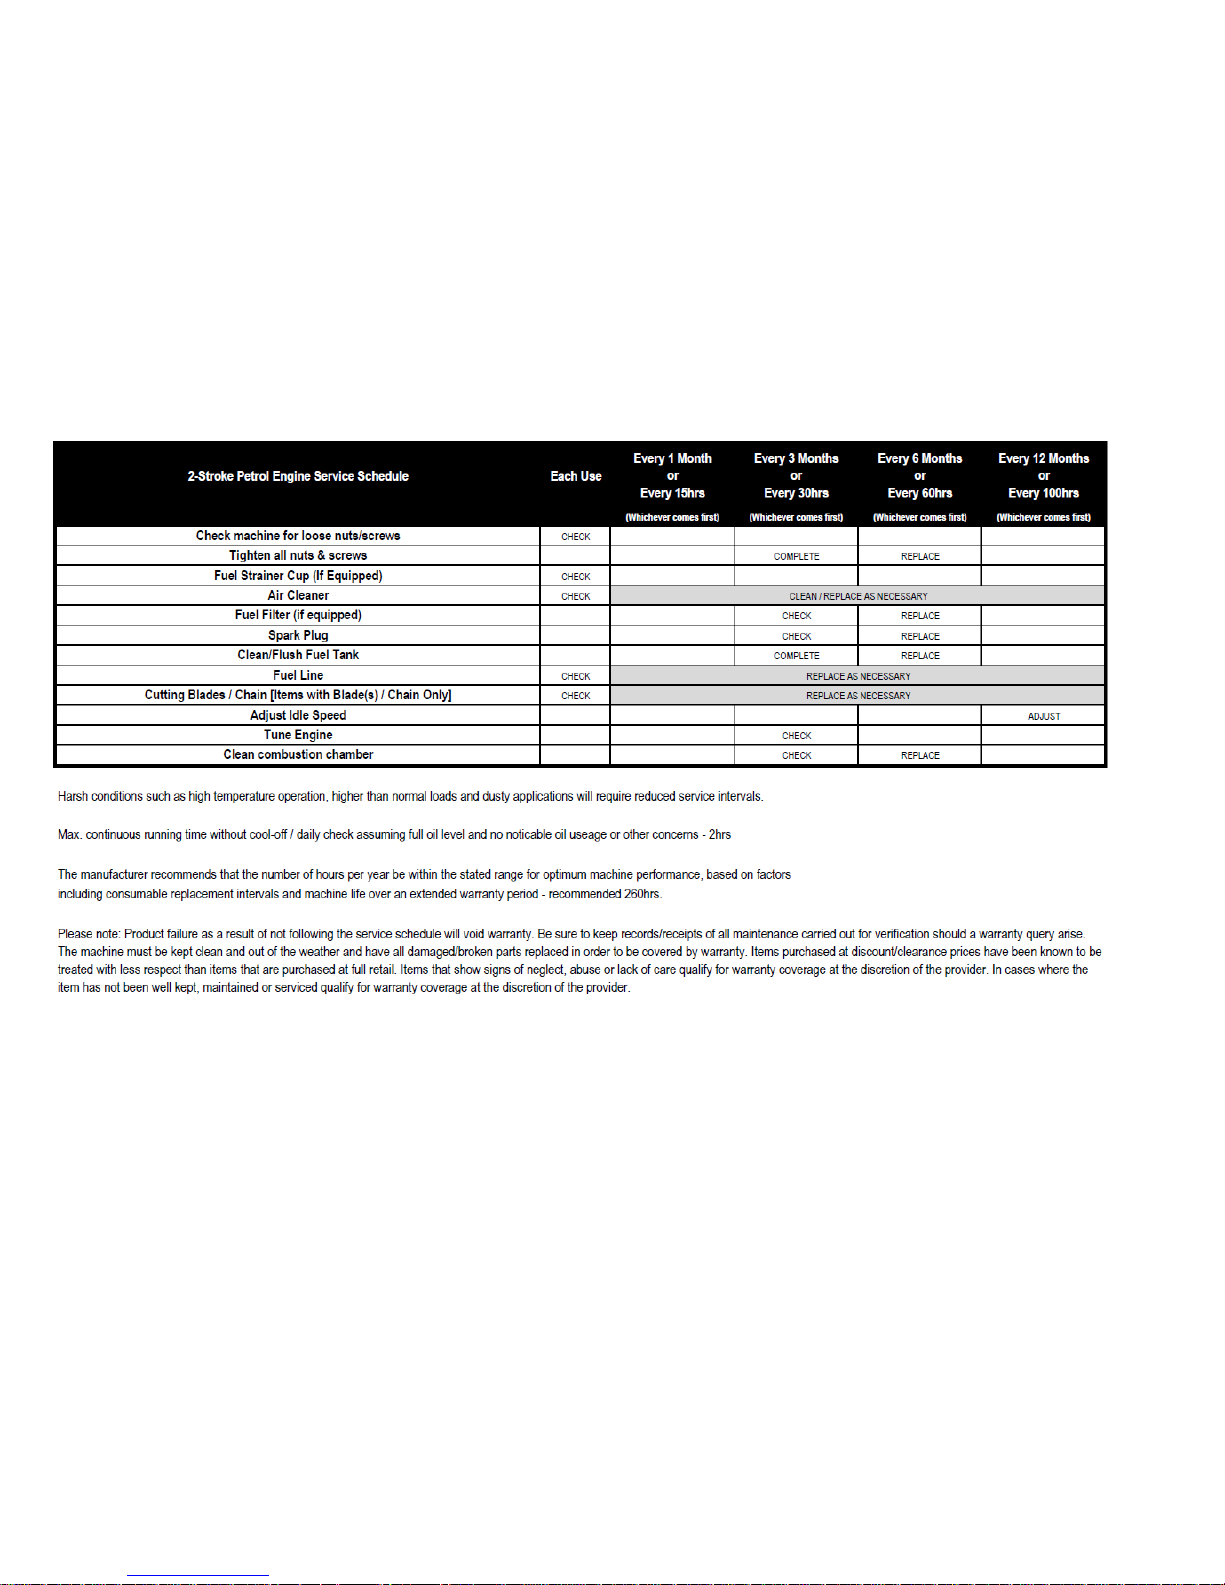
Maintenance
WARNING! Always wear gloves when working around the cutter assembly.
WARNING! Before performing any maintenance, repair, or cleaning work on the unit, make sure the engine and
cutting attachment are completely stopped. Disconnect the spark plug wire before performing service or
maintenance work.
WARNING! Non-standard parts may not operate properly with your unit and may cause damage and lead to
personal injury.
WARNING! Operating the engine without a muffler or with a damaged muffler installed can increase engine the
noise sufficiently and lead to hearing loss.
NOTE! This machine must never be operated with a defective or missing spark arrestor or muffler, Make sure the
muffler is well secured and in good condition. A damaged muffler is a fire hazard and may cause hearing loss.
1. Carefully remove any accumulating dirt or fragments from the muffler and fuel tank. Dirt build-up in these
areas can lead to engine overheating, fire, or premature wear.
2. Check for loose or missing screws or components.
3. Make sure the cutting attachment is free from dirt and securely fastened.
4. Check the entire machine for leaking fuel or grease.
5. Make sure nuts, bolts and screws (except carburettor adjusting screws) are tight.
6. Clean any fragments or dirt from the hedge trimmer cutter blades.
7. Lubricate the blades before use and after refuelling.
8. Check the cutters for damage or incorrect adjustment.
9. Make sure the cutter attachment is securely fastened.
10. Keep the spark plug and wire connections tight and clean.
11. Remove all dirt and debris from the engine, check the cooling fins and air cleaner for clogging, and clean as
necessary.
Page 15
Product Manual - Chainsaws
10814082100
14
14
Page 16

Product Manual - Chainsaws
10814082100
15
15
Transporting & Storage
CAUTION! Fuel stored in the carburettor for extended periods can cause hard starting, and could also lead to
increased service and maintenance costs.
IMPORTANT! Use only clean, fresh non-ethanol 95+ unleaded with 2-Stroke oil mix.
IMPORTANT! If the machine will not be used for 30 days or longer, use the following procedures to prepare it for
storage.
IMPORTANT! Before storing the machine, repair or replace any worn or damage parts. Make sure the protective
covers are in place.
1. Clean external parts thoroughly and apply a light coating of oil to all metal surfaces.
2. Remove the spark plug and poor about 3ml of oil into the cylinder through the spark plug hole. Slowly pull the
recoil starter 2 or 3 times so oil evenly coat the interior of the engine. Reinstall the spark plug.
3. Blow dust / debris out of the air cleaner element using compressed air if available.
4. Store the machine in a clean, dry, dust-free area.
5. Always ensure the chainsaw has the appropriate cover on the bar and chain assembly.
Page 17
Product Manual - Chainsaws
10814082100
16
16
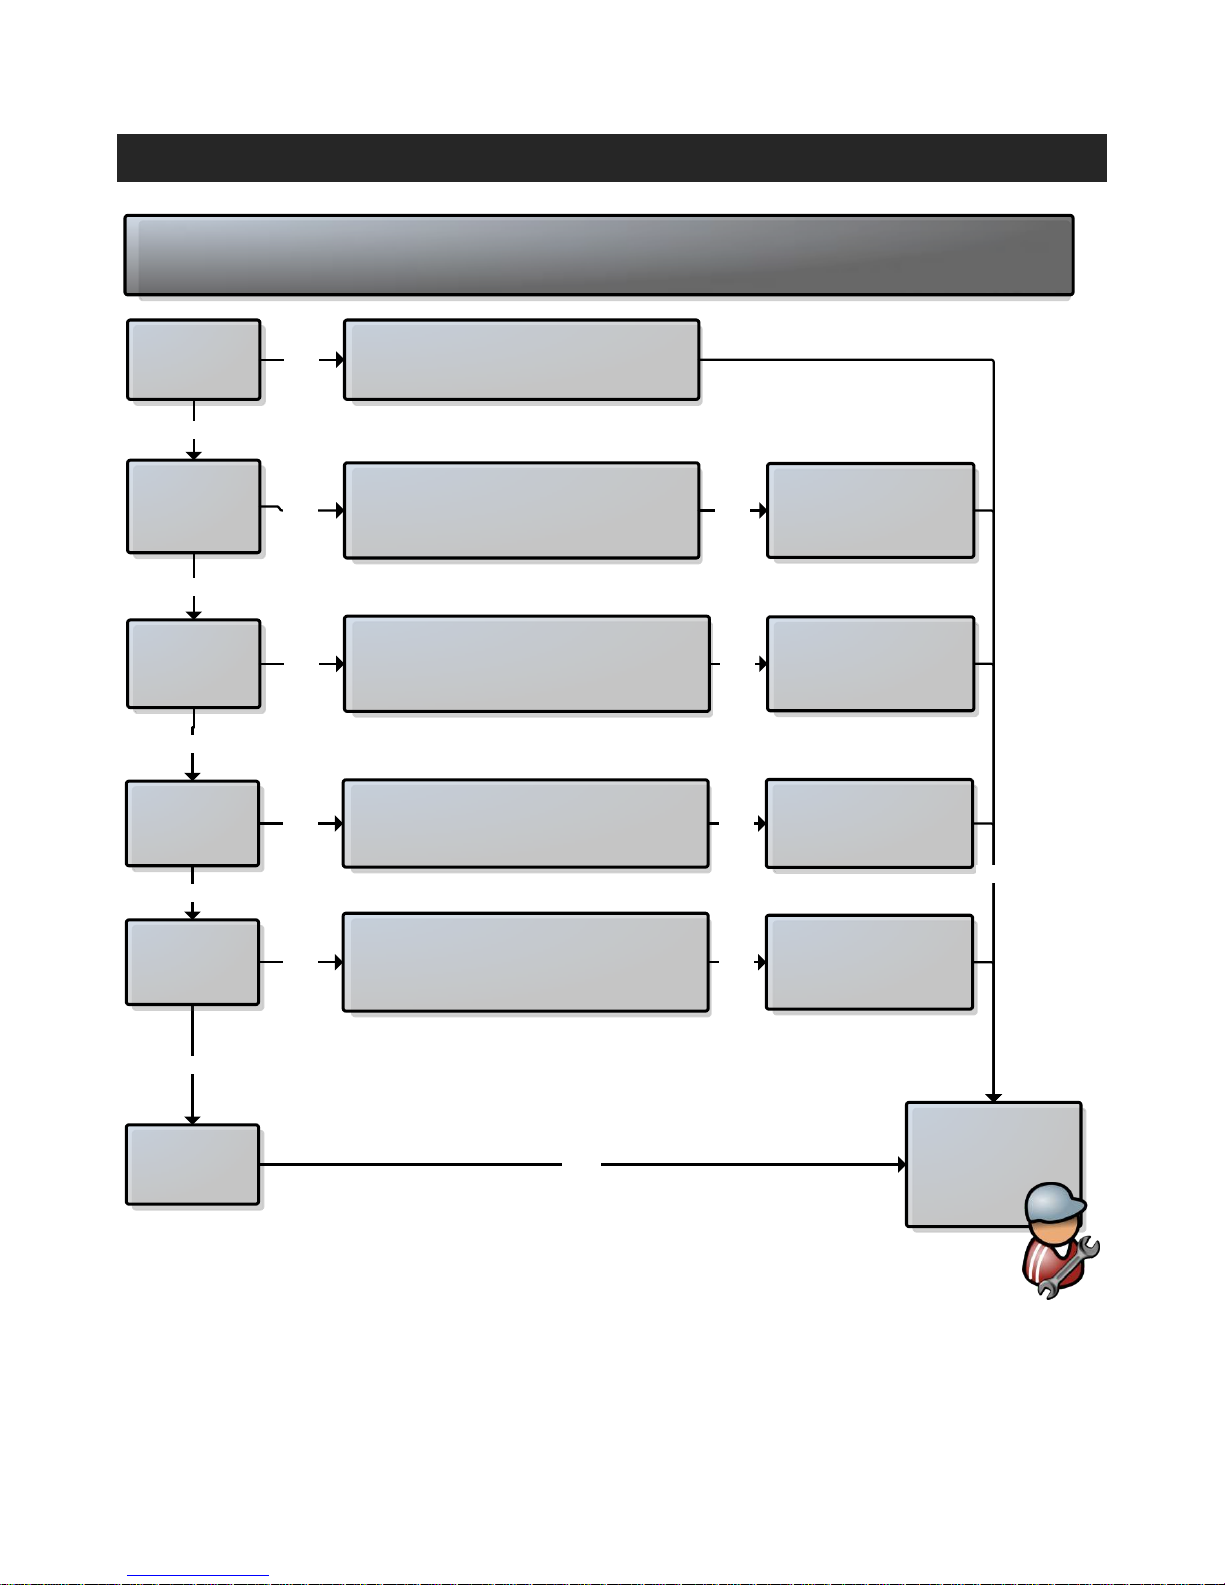
Troubleshooting
Does the engine
crank?
Good compression?
Engine still will not
start.
If ‘yes’
If ‘no’
If ‘yes’
Does the tank
contain fresh fuel
or the proper
grade?
Is there spark at the
plug wire terminal?
Check the spark
plug.
If ‘yes’
If ‘yes’
If ‘yes’
A) Faulty recoil starter.
B) Fluid in the crankcase.
C) Internal damage.
A) Loose spark plug.
B) Excess wear on cylinder, piston, rings.
Fuel incorrect, stale, or contaminated; mixture incorrect.
A) The ignition switch is in “OFF” position.
B) Shorted ignition ground.
C) Faulty ignition unit.
A) If the plug is wet, excess fuel may be in the cylinder.
B) The plug is fouled or improperly gapped.
C) The plug is damaged internally or the wrong size.
If ‘no’
If ‘no’
If ‘no’
If ‘no’
If the engine still does not
start, take the machine to
an authorised service
center.
Tighten and re-test.If ‘no’
Refill with fresh fuel/oil
mixture.
If ‘no’
Move switch to “ON” position
and restart.
If ‘no’
1) Crank engine with the plug
removed, reinstall the plug and
restart.
2) Clean and re-gap the plug to
0.6mm-0.7mm and restart.
If ‘no’
If ‘no’
If ‘yes’
Engine does not start
Page 18
Product Manual - Chainsaws
10814082100
17
17
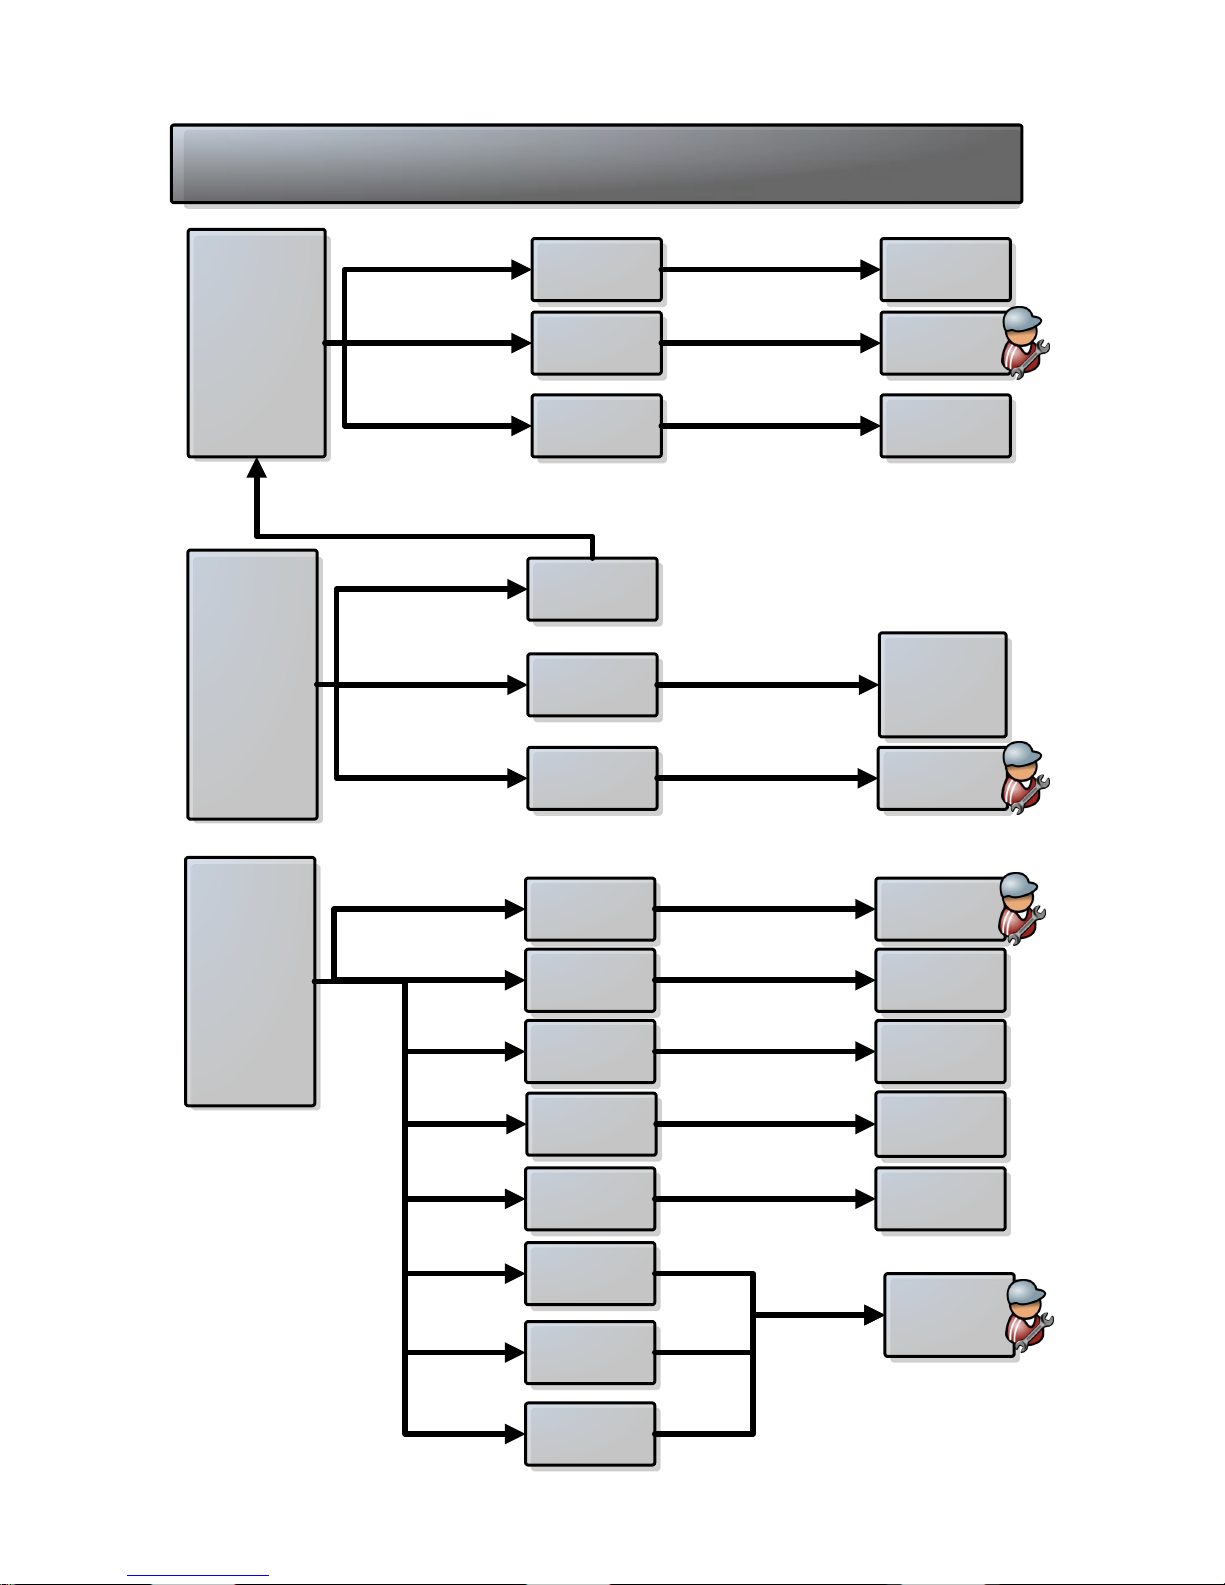
Is the engine
overheating?
Engine is rough at
all speeds. May also
have black smoke
and/or unburnt fuel
at the exhaust.
Engine is knocking.
Low Power
Operator is over
working the unit.
Carburettor
mixture is too lean.
Fan, fan cover,
cylinder fins dirty or
damaged.
Cut at slower rate.
Take the machine
to an authorised
service center.
Clean or replace as
necessary.
Carbon deposits on
the piston or in the
muffler.
Clogged air filter
element.
Loose or damaged
spark plug.
Take the machine
to an authorised
service center.
Clean or replace the
air filter.
Tighten or replace
the spark plug and
restart.
Air leakage or
clogged fuel line.
Water in fuel.
Piston Seizure.
Faulty carburettor
and/or diaphragm.
Repair or replace
fuel filter and/or
fuel line.
Refill with fresh
fuel/oil mixture.
Take the machine
to an authorised
service center.
Overheating
condition.
Improper fuel.
Carbon deposits in
the combustion
chamber.
Check fuel octane
rating; check for
presence of alcohol
in the fuel. Refuel
as necessary.
Take the machine
to an authorised
service center.
2-Stroke Fuel
mixture incorrect
 Loading...