


Installation/Operating
Instructions for Din Rail Mounting
Digital Compact Timer
Model - T80-C
PECIFICATIONS
S
No of channels 1
Contact rating 16A, 230V AC
Shortest switching 1 minute
time
Capacity 6 programme blocks
Voltage supply 230V
Mains frequency 50Hz
Possible settings Clock time, time on/
Display LCD figures 4mm high
Deviation 2.5 seconds per day
Reserve 100 hours
Manual Switch Yes
Mounting DIN rail mounted
Connections 2.5mm2max
Size Width 18mm
2A Inductive
volt free switching
time off, days of week,
block programme.
(1 module), projection
from DIN rail 55mm,
height 90mm
IMPORTANT
This unit should be installed by a
competent person in accordance with
the current IEE Wiring Regulations.
If in doubt consult a qualified electrician.
• Before connecting the timer to the
mains, check that the mains
voltage and frequency correspond to
the rating plate (on side of timer).
• Do not overload. Refer to the
Ampere rating (amps) on the
rating plate.
• Do not expose the timer to
extremely high or low
temperatures. Do not place the timer
in direct sunlight.
• Do not allow the timer to come
into contact with water.
• If the time switch is mounted near
equipment where heat produced raises
the local ambient temperature above
55°C, then a 1/2 module space should be
left between the time switch and the
equipment.
• If used to operate a contactor, then a 1
module space should be left between
timer and contactor.
INSTALLATION
• This timer is designed to be din rail
mounted.
• Ensure that the 230V AC supply is
connected to terminals 1 and 2.
• Terminals 3 and 4 are volt free
contacts. Live in goes to terminal 3
and Live out goes to Load.
There is no neutral switching with the
T80, ensure that maximum loading is
complied with.
HOW TO OPERATE
When the timer is new or when it has not
been used for some time it may need to
be “charged”.
To do this, connect to power.
The built-in rechargeable battery will
begin to charge.When symbols appear in
the display (after approx. 2 minutes),
press the “Reset” button (use a pencil or
pen).
aution: this will cancel all memory
C
including timer settings. The timer will be
‘clean’ for new commands. If a power
failure should occur (or should the timer
be disconnected from the power supply
for a short time), the built-in rechargeable
battery will then provide power to the
clock and guarantee that the time and
switching programmes are retained and
not disturbed or lost.
HOW TO SET
24 HOUR CLOCK
Present time and day
1) Keep button depressed during the
entire “present time and day” setting
procedure.
2) Set the present time using buttons
“h+” and “m+”.
If you keep buttons “h+” and “m+”
depressed for longer than a second the
figures in the display will scroll
continuously. Set the present day of the
week using button “Day”.
3) Release button . The clock is now
running. The flashing colon indicates
this. Use a reliable time signal
(e.g. telephone or radio) to set the
clock accurately to the minute.
Flashing colon
indicates 24hr
clock is running.
SWITCHING TIME(S)
You can set as many as six switching-on
commands and an equal number of
corresponding switching-off commands
in the following manner:
1) Depress “Timer” button
once. The actual time will
disappear from the display.
This Timer on indication
will be displayed instead,
denoting a vacant “on”
time on No. 1 programme.
NOTE: Setting hours and minutes: When
setting switch-on time and switch-off time be
sure to set minutes as well as hours.
E.g. if 08.00 is required set all
and
“.00”
2)Set the required switching-on time
using button “h+” and “m+”.
3)Set the day(s). See “Day” button
selection (over) on which the
switching-on command must be
executed.
4 digits: “08.”
4)Depress button “Timer” once.
Timer-off will be displayed.
5)Set the required switching-off time
using button “h+” and “m+”.
6)Set the day(s) on which the switchingoff command must be executed.
(Default setting is every day).
7)Pressing the “Timer” button will move
the timer to programme 2 ON.
When this 2 Timer on indication appears
ou can begin setting another switching-
y
on command, if you wish. Six such
programmes may be stored in this
manner, following 2) to 6) above.
After setting the required “on” and “off”
imes, press to revert to present time.
t
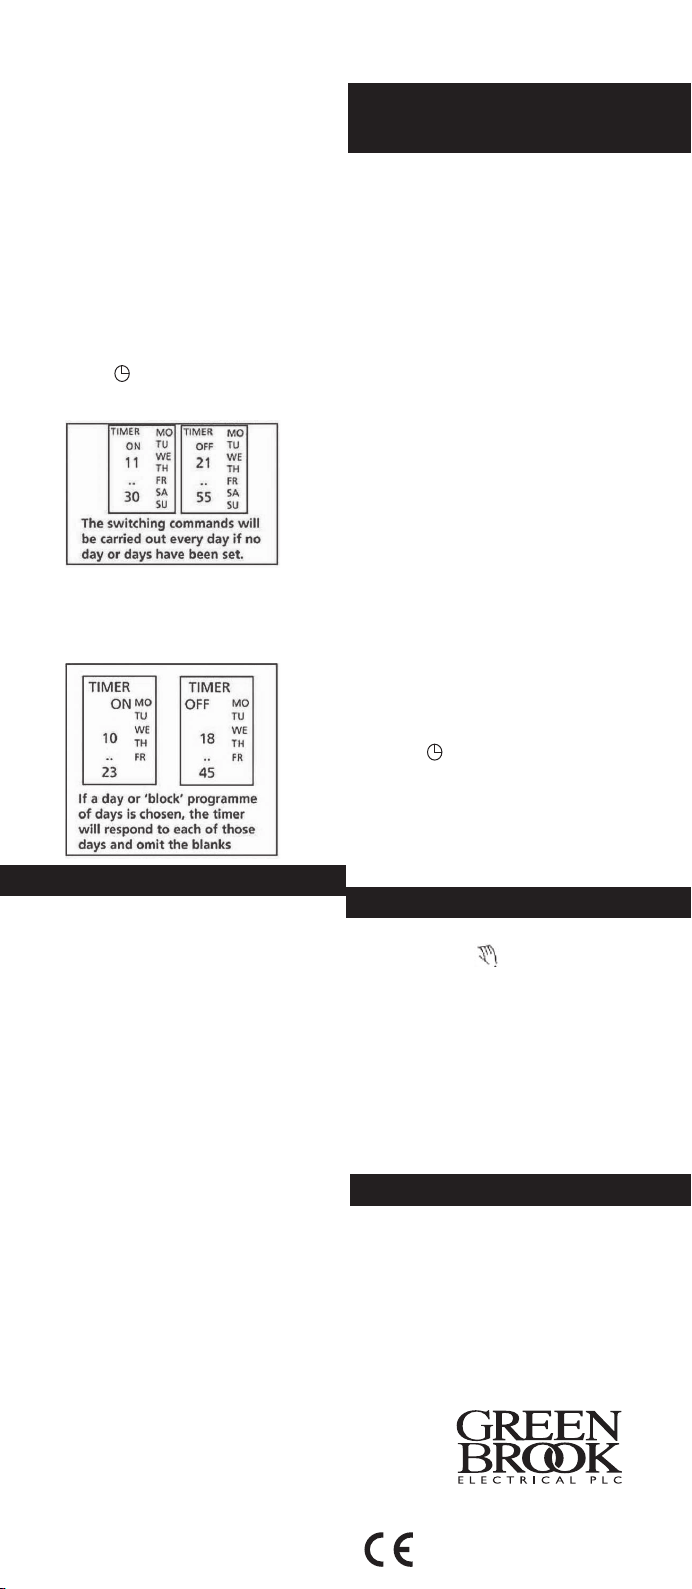
EXAMPLE
NOTE: Be sure that the desired day or
days are chosen on both the ‘on’ and the
‘off’ displays.
EXAMPLE
“DAY” BUTTON SELECTIONS
Every day of the week
If you do not enter the day when setting a
switching command, the switching will
be carried out at the set time on every
day of the week.
Only one day of the week
If you enter a particular day while setting
a switching command (using button
“Day”), the command will be carried out
at the set time only on that specific day of
the week.
Abbreviations
MO = Monday, TU = Tuesday,
WE = Wednesday, TH = Thursday,
FR = Friday, SA = Saturday,
SU = Sunday.
On a weekly combination (or ‘block’
programming) of days
When pressing button “Day” several
times, you will find by means of the
display that three combinations of days
are also possible:
MO TU WE TH FR = Monday to Friday
SA SU = Saturday and Sunday
MO TU WE TH FR SA = Monday to
Saturday
If you enter these combinations of days
instead of one individual day, the on/off
command will be carried out at the set
time on each of the corresponding days
of the week.
This programme will repeat itself week
after week until the programme is
changed or the timer is disconnected.
HOW TO CHECK, CHANGE
OR DELETE SWITCHING
COMMANDS
Checking
By pressing button “Timer” a number of
times you can make the switching-on and
switching-off commands visible in the
isplay: first the set commands are
d
presented and then the free spaces.
Changing
You can change a switching command by
aking it appear on the display and
m
pressing “day”, “hour” and “minute”
buttons accordingly.
Deleting
elete a timer command period (an ‘on’
D
and ‘off’ time) by pressing the “timer”
button until the required program
number on time is displayed in the
window and pressing h+ until -- is
displayed immediately after 23. Do the
same with m+ until -- appears after 59.
Repeat this sequence for the ‘off’ mode.
The deleted command then becomes
available for reprogramming. Press
button “Timer” after changing or deleting
a command to save the new command.
Switching back to present time
After setting the switching commands
you return to normal time reading by
pressing button.
Is power being supplied to connecting
load?
The word “ON” or “OFF” in the display,
above the time reading, informs you
about the actual switching condition.
OVERRIDE SWITCH
When in the “off” mode pressing the
button marked will switch “on” the
power to the load connected to the timer.
If the button is pressed again the power
will switch off. If the button is not
pressed again, power will remain on until
the completion of the next on/off
command when power will switch off.
If not pressed again the power will
remain off until the following ‘on’
command has been reached.
GUARANTEE
Your KingShield Din Rail Mounting
Digital Compact Timer is guaranteed for
12 months from the date of purchase.
This does not affect your statutory rights.
PLEASE KEEP THESE
INSTRUCTIONS SAFE FOR
FUTURE REFERENCE
WEST ROAD . HARLOW
ESSEX . CM20 2BG . UK
sales@g r e e n b r o o k . c o . u k
W W W . G R E E N B R O O K . C O . U K
Issue no: 703391
 Loading...