

Page 1

Cat-X DVI-D + Audio
Extender Family
DVIE-101T
DVS-DR
DVS-AR
www.green-box.com.tw
© 2008 by Green-Box
Green-Box Technology Co. Ltd. reserves the right to make changes in the
hardware, packaging, and any accompanying documentation without prior
written notice.
No part of this document may be reproduced or transm itted in any form or by
any means, electronic, mechanical, photocopying, recording, or otherwise,
without prior written permission of Green-Box Technology Co. Ltd.
User Manual
◄ V2.0 ►
www.data-av.com
Page 2
One-Port Transmitter: DVIE-101T
Short Range DVI-D Receiver: DVS-DR
Audio Tran smitter and Receiver: DVS- AR
1. Introduction
System includes one Transmitter (DVIE-101T) and One
Receiver (DVS-DR) to extend the DVI-D signal over Cat5/5e/6
cable, and uses a pair of Audio Transmitter and Receiver to
extend Audio over telephone cable.
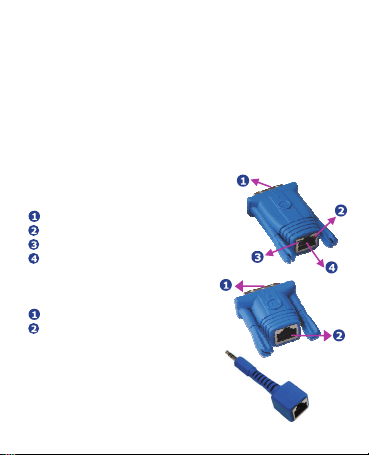
2. Panel Description
˙One-Port Transmitter: DVIE-10 1T
DVI-D Input (to PC’s DVI Port)
Power Indicator (Orange LED)
DDC2B Activity (Green LED)
RJ-45 DVI-D Output
˙Short Range DVI-D Receiver:
DVS-DR
DVI-D Output (to Monitor)
RJ-45 DVI-D Input
˙Audio Transmitter and Rec eiver:
DVS-AR
RJ-11 to Stereo Adapt er
Page 3

3. Installation and Op eration
˙Install Single-Port Transmitt er and Receiver:
(1) Basic Function Test: In the beginning, please connect your
DVI monitor to your PC or DVI player to confirm the basic
display function.
(2) Install Single-Port Transmitter: Please connect DVIE-101T
to your PC or DVI player’s DVI output port, as the PC or DVD
player turned on), the LEDs of DVIE-101T should all turn on,
the orange LED indicates the power on status and the green
LED indicates the EDID activation of DVI port. DVIE-101T
has preset an EDID with a maximum DVI supporting resolution
of 1920x1440 and can simulate the EDID function of DVI
monitor, so the PC’s DVI port will remain activate even when
you re-boot the PC without plug actual DVI monitor.
Connect DVIE-101T to PC
Connect Short Range Receiver DVS-DR to DVI Monitor
(3) Install Short Range Receiver: Please connect DVS-DR to
your DVI monitor’s DVI port directly. The supported DVI
resolution and distance will be similar to regular DVI cable.
Page 4

(4) Connect Cat5/5e/6 Cable: Plug two ends of cable to
Transmitter and Receiver’s RJ-45 “SYSTEM LINK” port, the
Receiver’s connected monitor should display now and the
green LED above DVIE-101R’s RJ-45 port should turn on to
reflect the DVI signal activation. The displayed DVI resolution
will also relate to the distance been extended, it will be better
to test prior actual installation.
Extended Connection of DVI-D with Aud io
(5) Extend Audio Signal: Uses a pair of DVS-AR to extend the
stereo audio and the cable using is 4-wire phone cable and two
ends of the cable should be made by straight RJ-11 connector.
4. Installation and Op eration
Order Details Model Name Remark
One-Port DVID-D Transmitter DVIE-101T One-Port DVID-D Short Rang Receiver D VS -D R Audio Transmitter and Receiver DVS-AR -
 Loading...