

Green Bike Electric Motion Legend HD HF 201-48N Instruction Manual

Customer Service: Green Bike – Electric Motion. Main Office:
7057 Reseda Blvd, Reseda CA 91335
Phone: (818) 578-3665 Email: office@GreenBikeElectric.com
Website: GreenBikeElectric.com
48N –HF 201 MODELFolding Electric Bicycles
Instruction Manual

Instruction Manual
Green Bike – Electric Motion Congratulations on you're newly purchased!
Joining Greenbike’s Go Green revolution will open your doors to a whole new
world of freedom! Green Bike – Electric Motion greatly values the quality of our
products, giving you value for your money, friendly and professional service, and
safety for the rider above all else.
Please uphold the product-customer-importer relationship to ensure a quality
experience over time. In this manual, you will find all the details required to
maintain product care.
To ensure safety during riding and to maintain long-term usage experience, please
read all instructions carefully before using the bike, and follow the specified
maintenance and usage instructions.
Thank you for choosing Green Bike – Electric Motion !
Approved by the European Standards Institute and the Israeli Ministry of Transport
T.U.V. RHAINLAND – EN15194. This electric bike is suitable to European
standards as well as American Standards (CPSC - 16CFR1512) and is intended
for urban cycling.
- Do not allow an additional rider on the bike. This bike is designed to carry one
person only.
Any damage to the bicycle resulting from an additional rider is not covered under
warranty
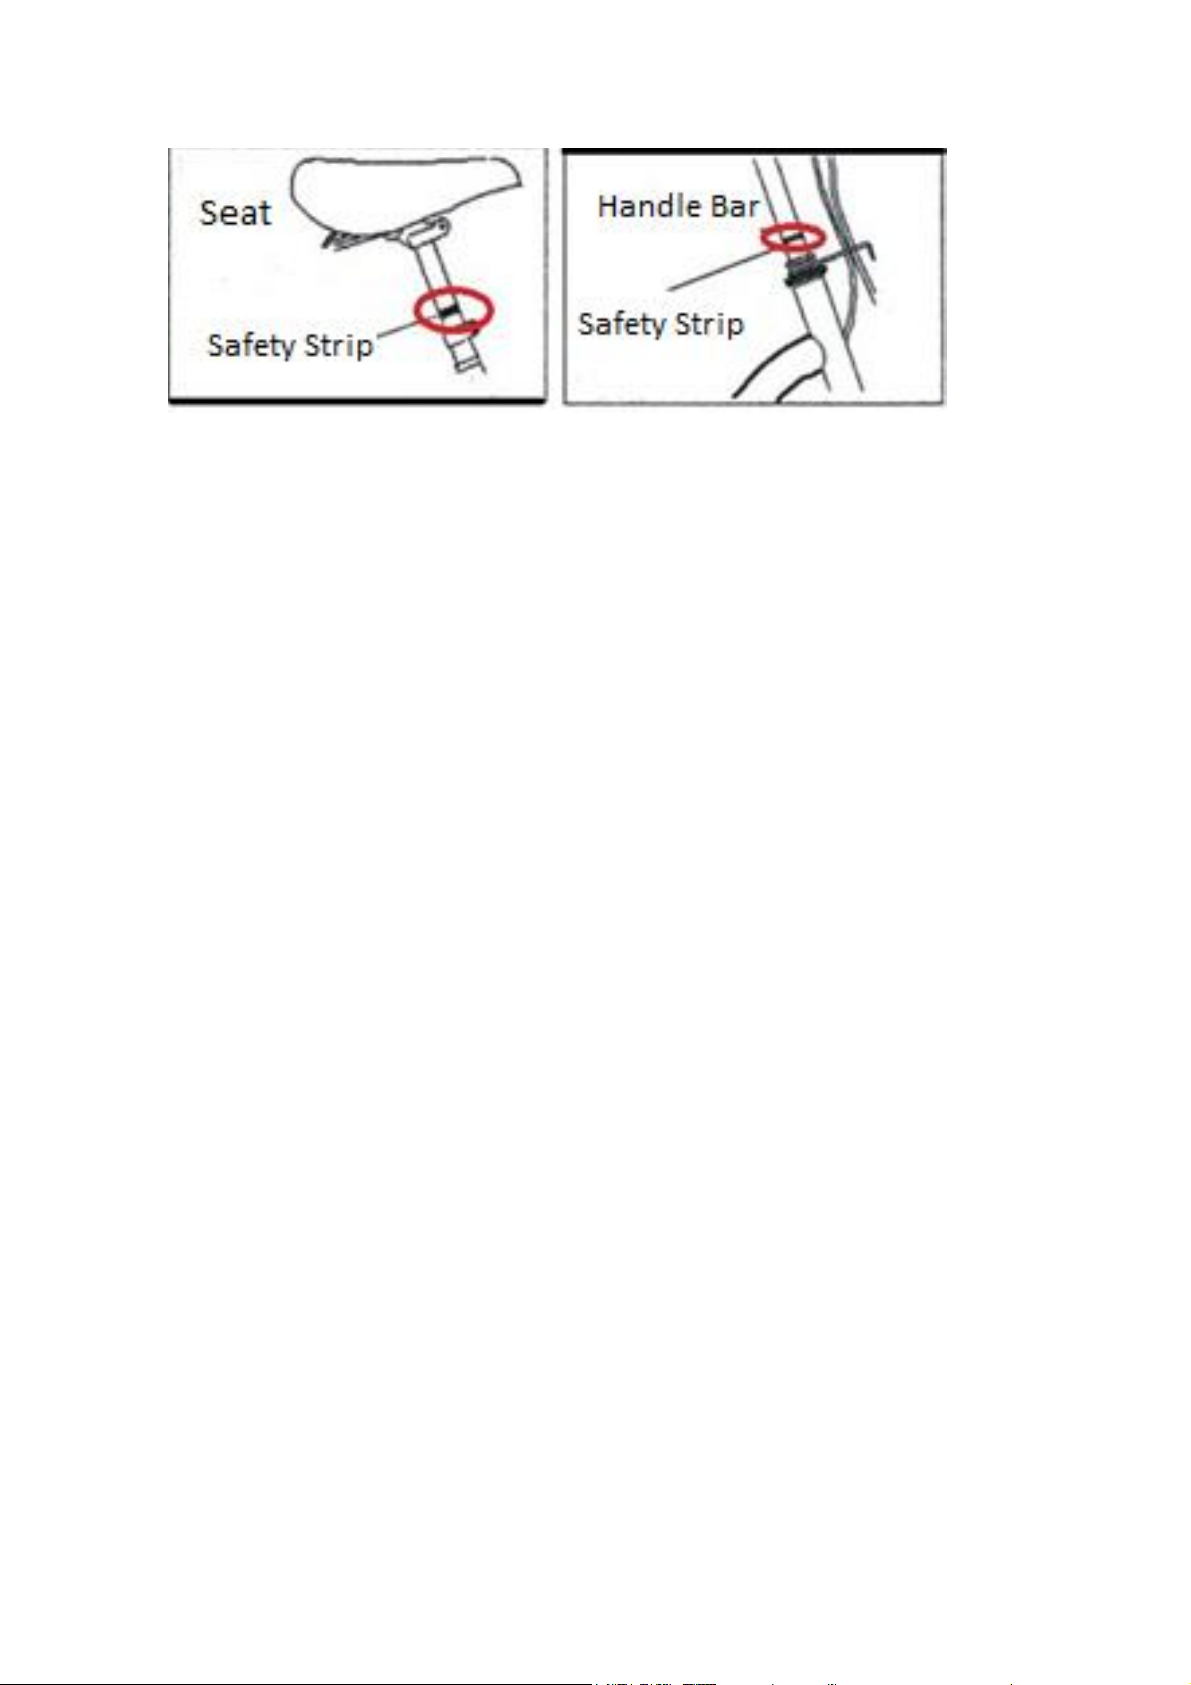
- The height of the seat and handlebars should be adjusted for maximum comfort
and control
- The seat post and handlebars have a safety strip. Be sure it is not visible when
adjusting. If the strip is not set correctly, excess pressure will be created and
damage the cables.
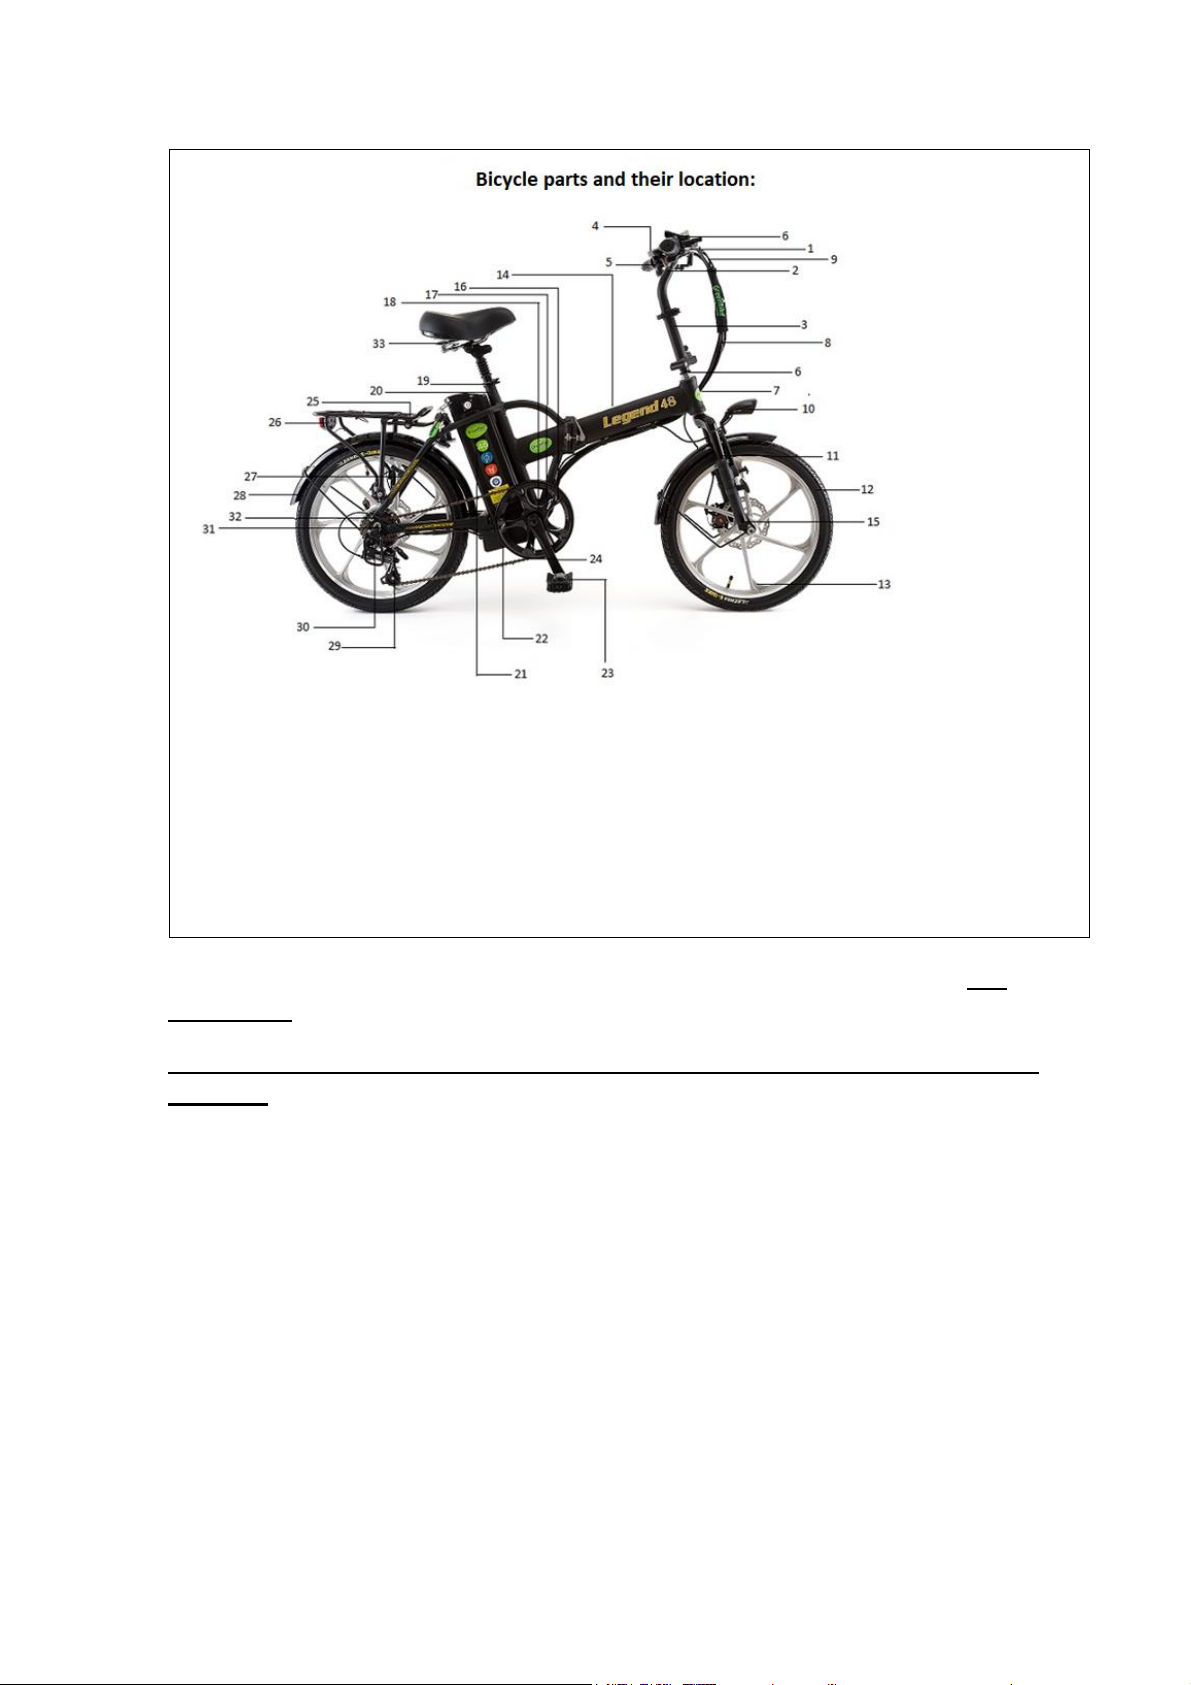
1. Brake Handles 2. Grips 3.Handlebars 4. Adjustable Stands 5. Display 6. Gear Shifter 7. Front
Brake Cable 8. Rear Brake Cable 9. Cable selector 10. Headlight and horn 11. Front mud-guard 12.
Tire and inner tube 13. Front Wheel. 14. Frame 15. Front fork 16. Front wheel chain (crank) 17.
Chain shield 18. Electric pedaling unit 19. Shock absorber for seat. 20. Seat clamp. 21. Lithium Ion
batteries. 22. Motor Controller .23 Pedal. 25. Rear rack 26. Rear light 27. Rear brake. 28. Rear
Mudguard. 29. Rear Derailleur 30. Mechanism protection 31. Gears 32. Motor 33. Seat
- Be sure that the locking hinges of the seat and handlebars are locked before
starting the trip.
- Check the condition of the brakes frequently and adjust when necessary. Braking
range on a dry road is 13 feet and on a wet road can reach 50 feet. Keep more
distance on a wet road.
- The chain is properly adjusted and should not be altered. The chain must be
lubricated to prevent accelerated weathering.
- At night, the headlight and backlight must be switched on by a switch on the
control display.
- Be sure to wear appropriate clothing and do not carry objects or bags in a way
that they can be caught in the wheels or chain. To keep the rider safe - do not bring
your legs together (too close to the chain) more than necessary.
- Do not ride in weather that does not allow safe riding such as rain, puddles,
strong winds, snow, etc.
- When stopping, use both brakes. Do not be content with one brake. Use both
brakes together in order to maintain stability and achieve greater control.
- Do not ride under the influence of alcohol, drugs or substances that affect the
rider's alertness.
- When riding, you must hold both handles, do not perform stunts and reckless
turns without examining the area from all sides before proceeding.
- Please follow local and state regulations.
- Do not drop the bike on the ground (due to the sensitivity of the battery, motor
and controller). The bike should be placed on the kickstand carefully.
- Do not jump or climb sidewalks on the road.
- Damage to either the spokes, wheel, or tires resulting from typical cycling injuries
and accelerated wear of the battery which may result from travel with a curved
wheel are not covered by the warranty.
Folding the Bike
- The bike can be folded for storage at home or in the trunk of the car.
- The folding time is only 10 seconds. You can get a demonstration at the point of
purchase or watch a tutorial video on our site GreenBikeElectric.com
Here are the pictures of the bike in a folded position and in an
average car trunk:
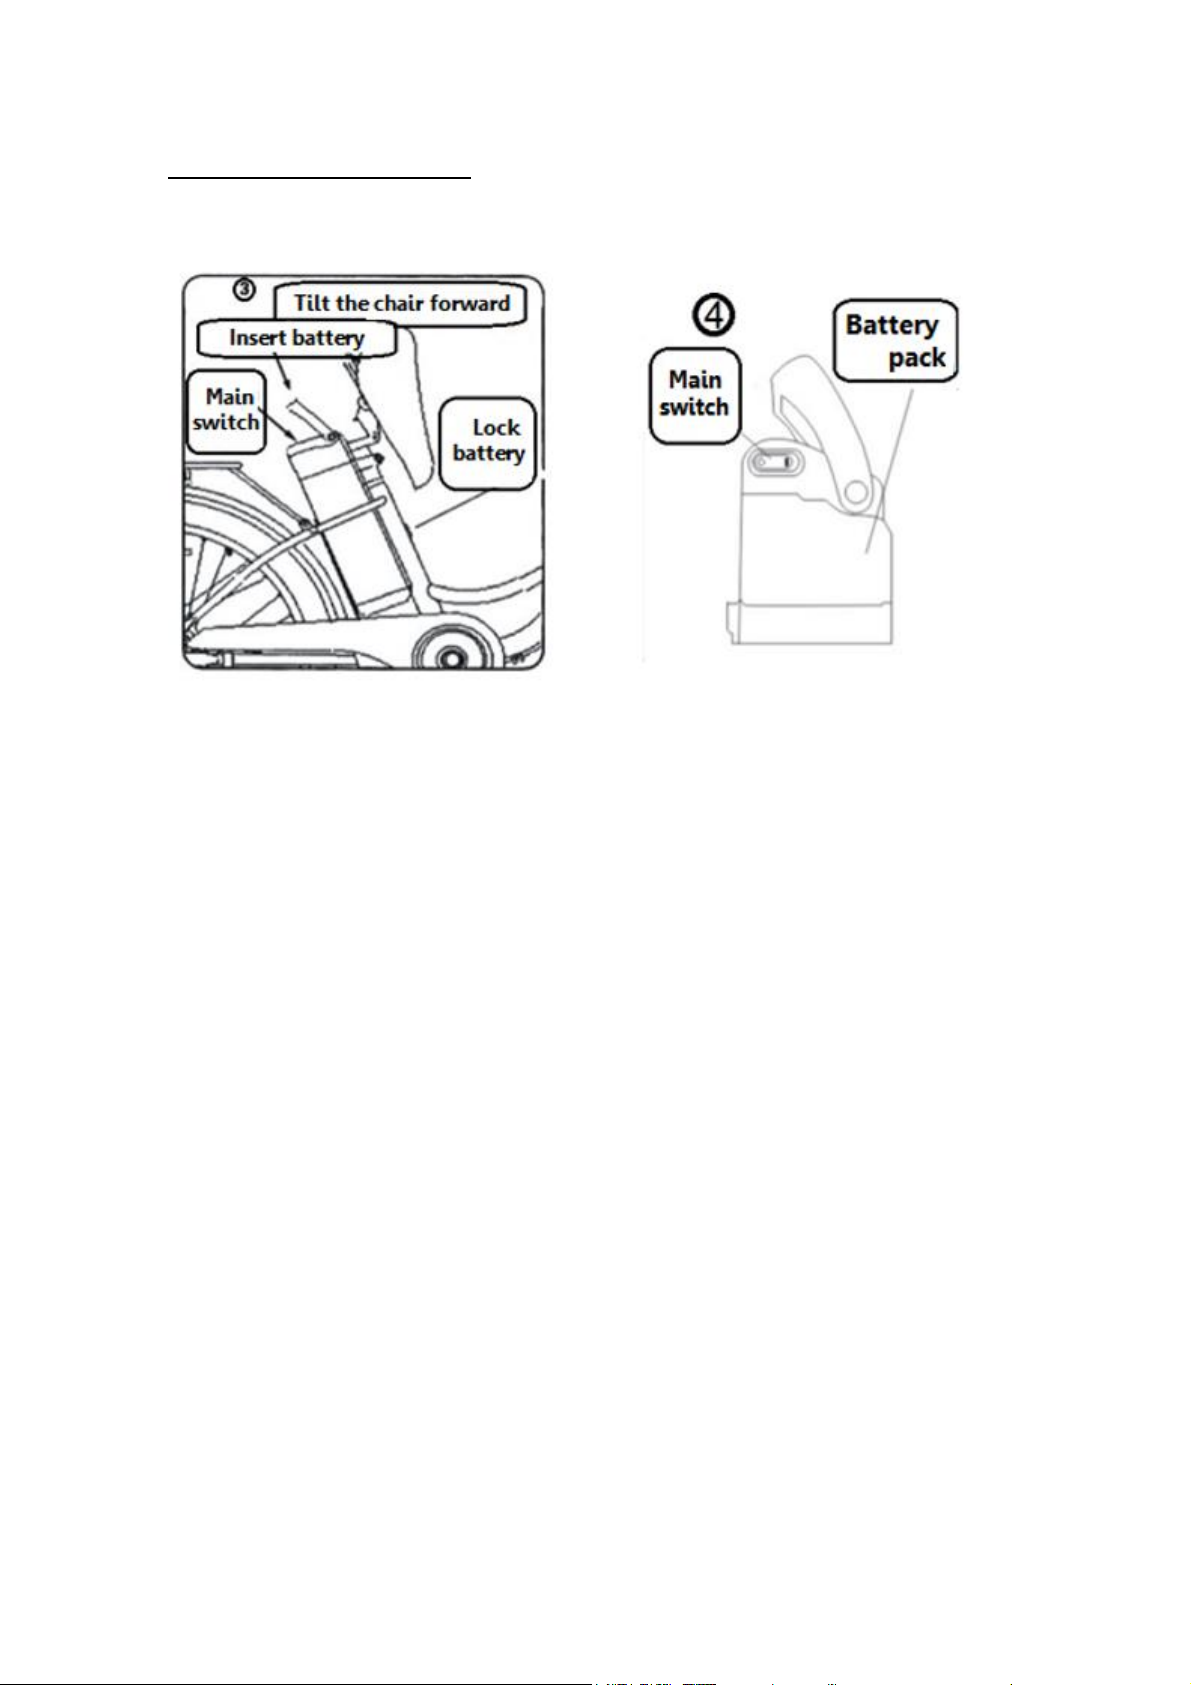
Before You Start to Ride
Raise the seat as shown in Figure 3 and insert the battery into place and lock it.
Picture 3 Picture 4
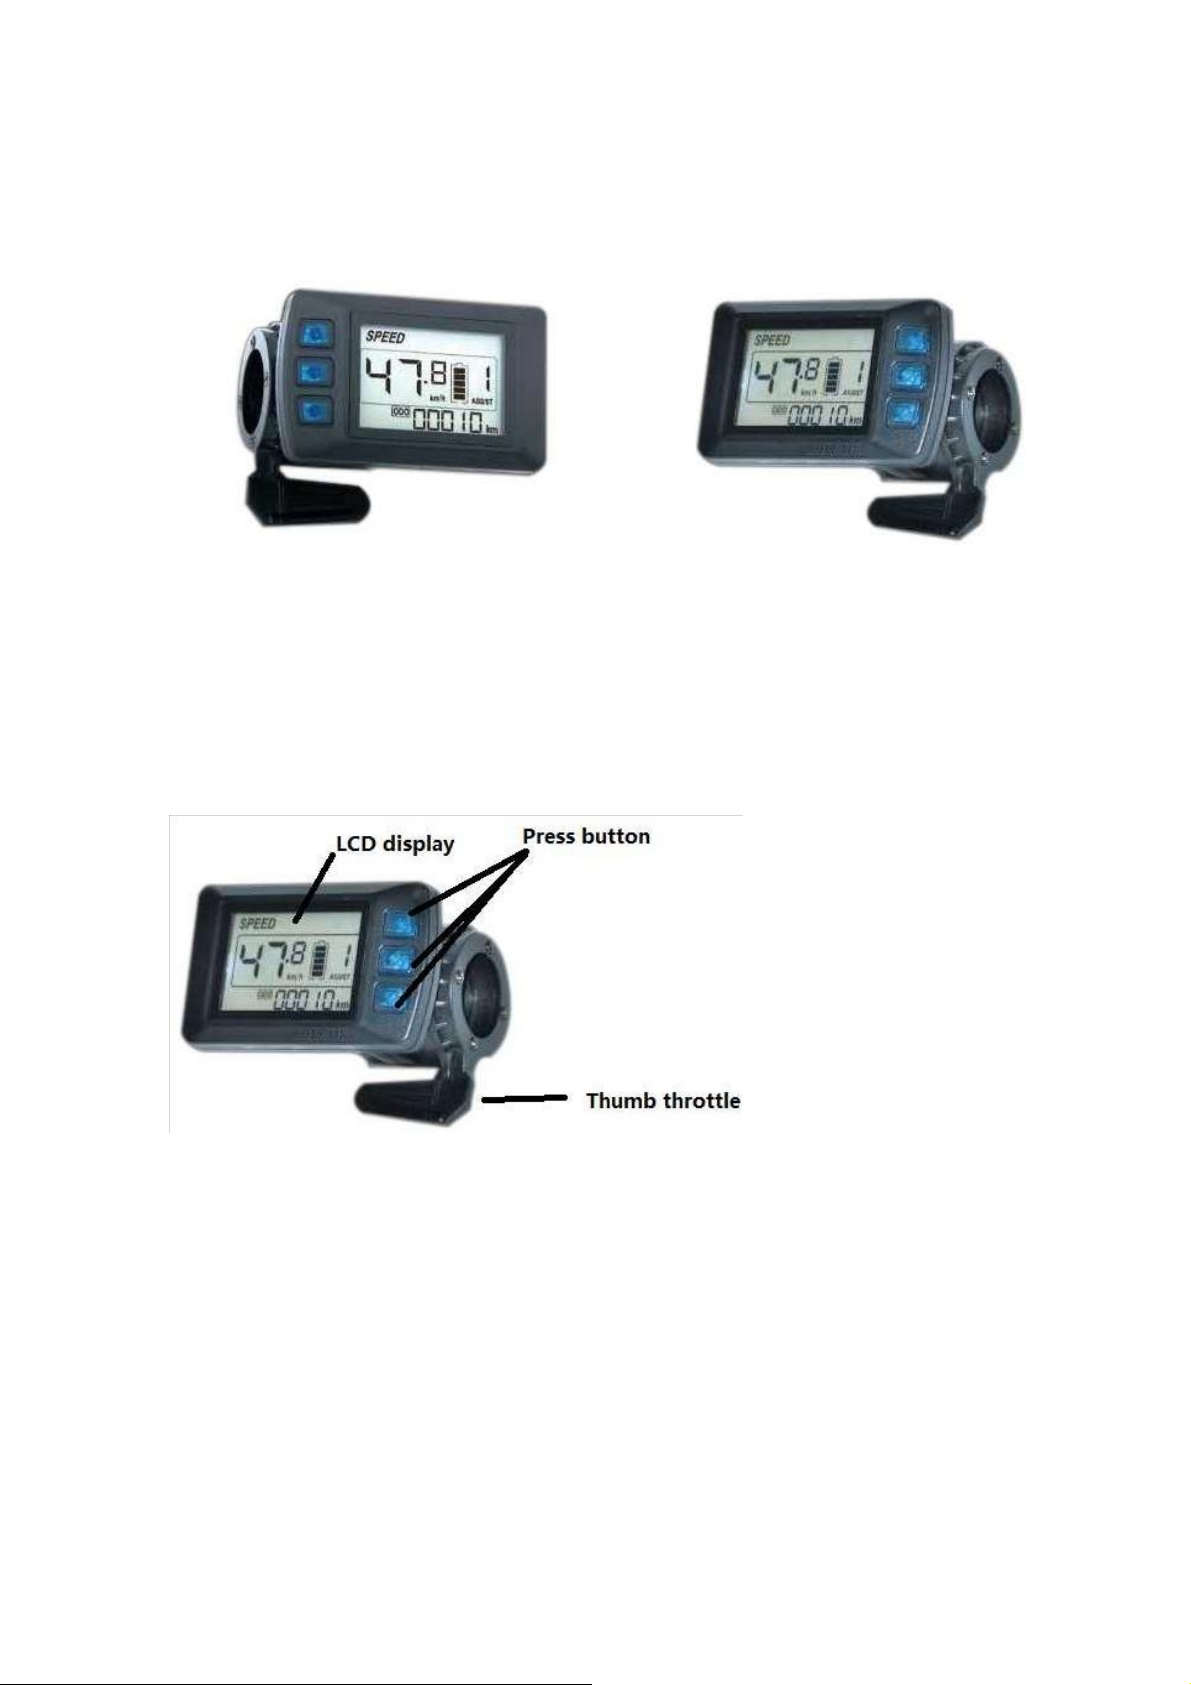
KH-DX-M1 : Ebike Display with thumb throttle
Material
Caser and Cover: ABS
LCD window: PMMA
Overview
1. Manipulation:
Integrated with one thumb throttle for speed regulation
Equipped with 3 press buttons
to switch display content and make
parameter settings
2. Protocol:
This display uses UART protocol, throttle signal is sent by UART to controller
3. Speed:
Real-time SPEED, MAX SPEED, Average SPEED
4. Battery level:
Indicates the battery level in real time
5. Light control:
ON/OFF : Press button for 3 seconds to switch on/off
6. Assist level:
From 1 to 3, press up or down button to change assist level (could be set to more
levels)
7. Distance:
ODO/Trip/Ride time
8. Error code:
Please refer to appendix table 1 for definition
9. 6km/h mode:
In this mode, it will display on the screen.
10. Parameters setting:
Set parameters, such as: wheel size, speed limit etc.
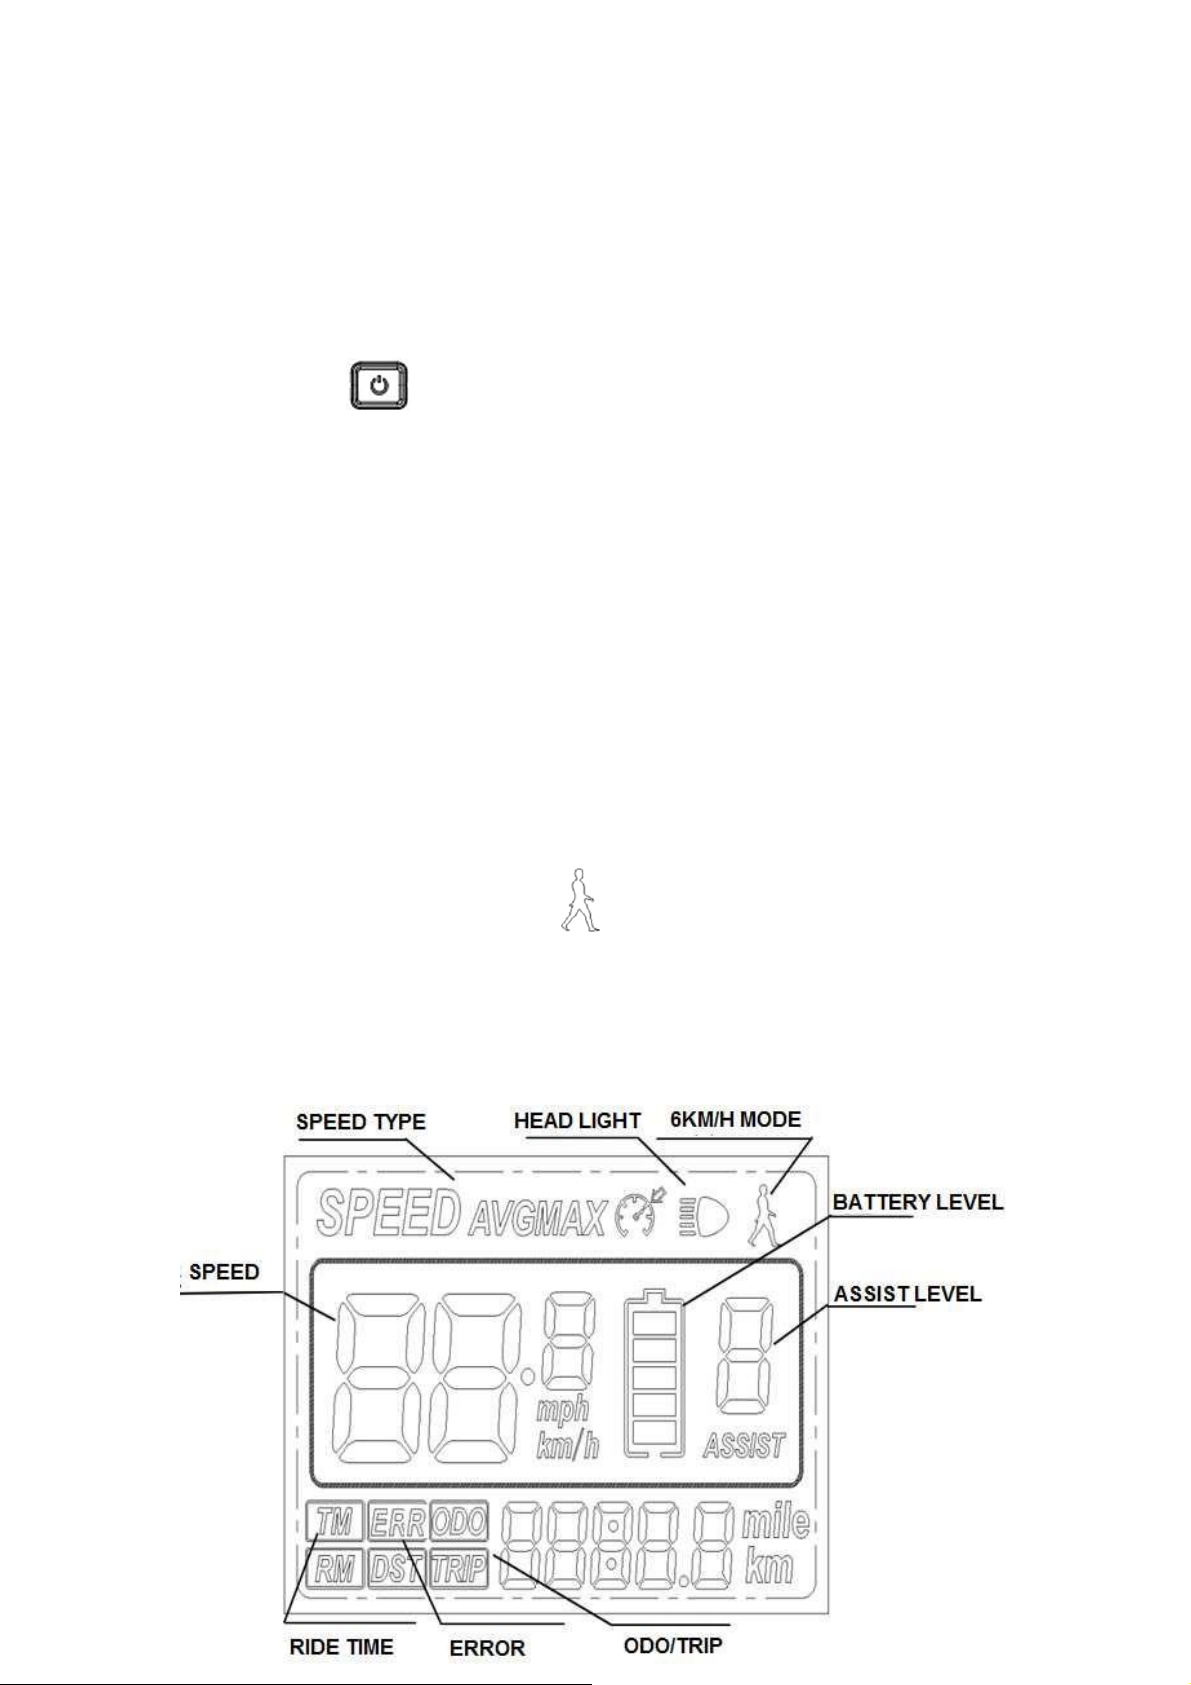
Presentation of screen
Battery level: 5 levels,
Speed: Average SPEED/MAX SPEED/Real-time SPEED
Speed unit: KMH/MPH
6km/h walk mode:
Assist level: assist level 1~3.
Head light icon: shows up when head light and back light are on.
Distance: Trip/ODO.
Error code: “ERR” and code show up when there is error.
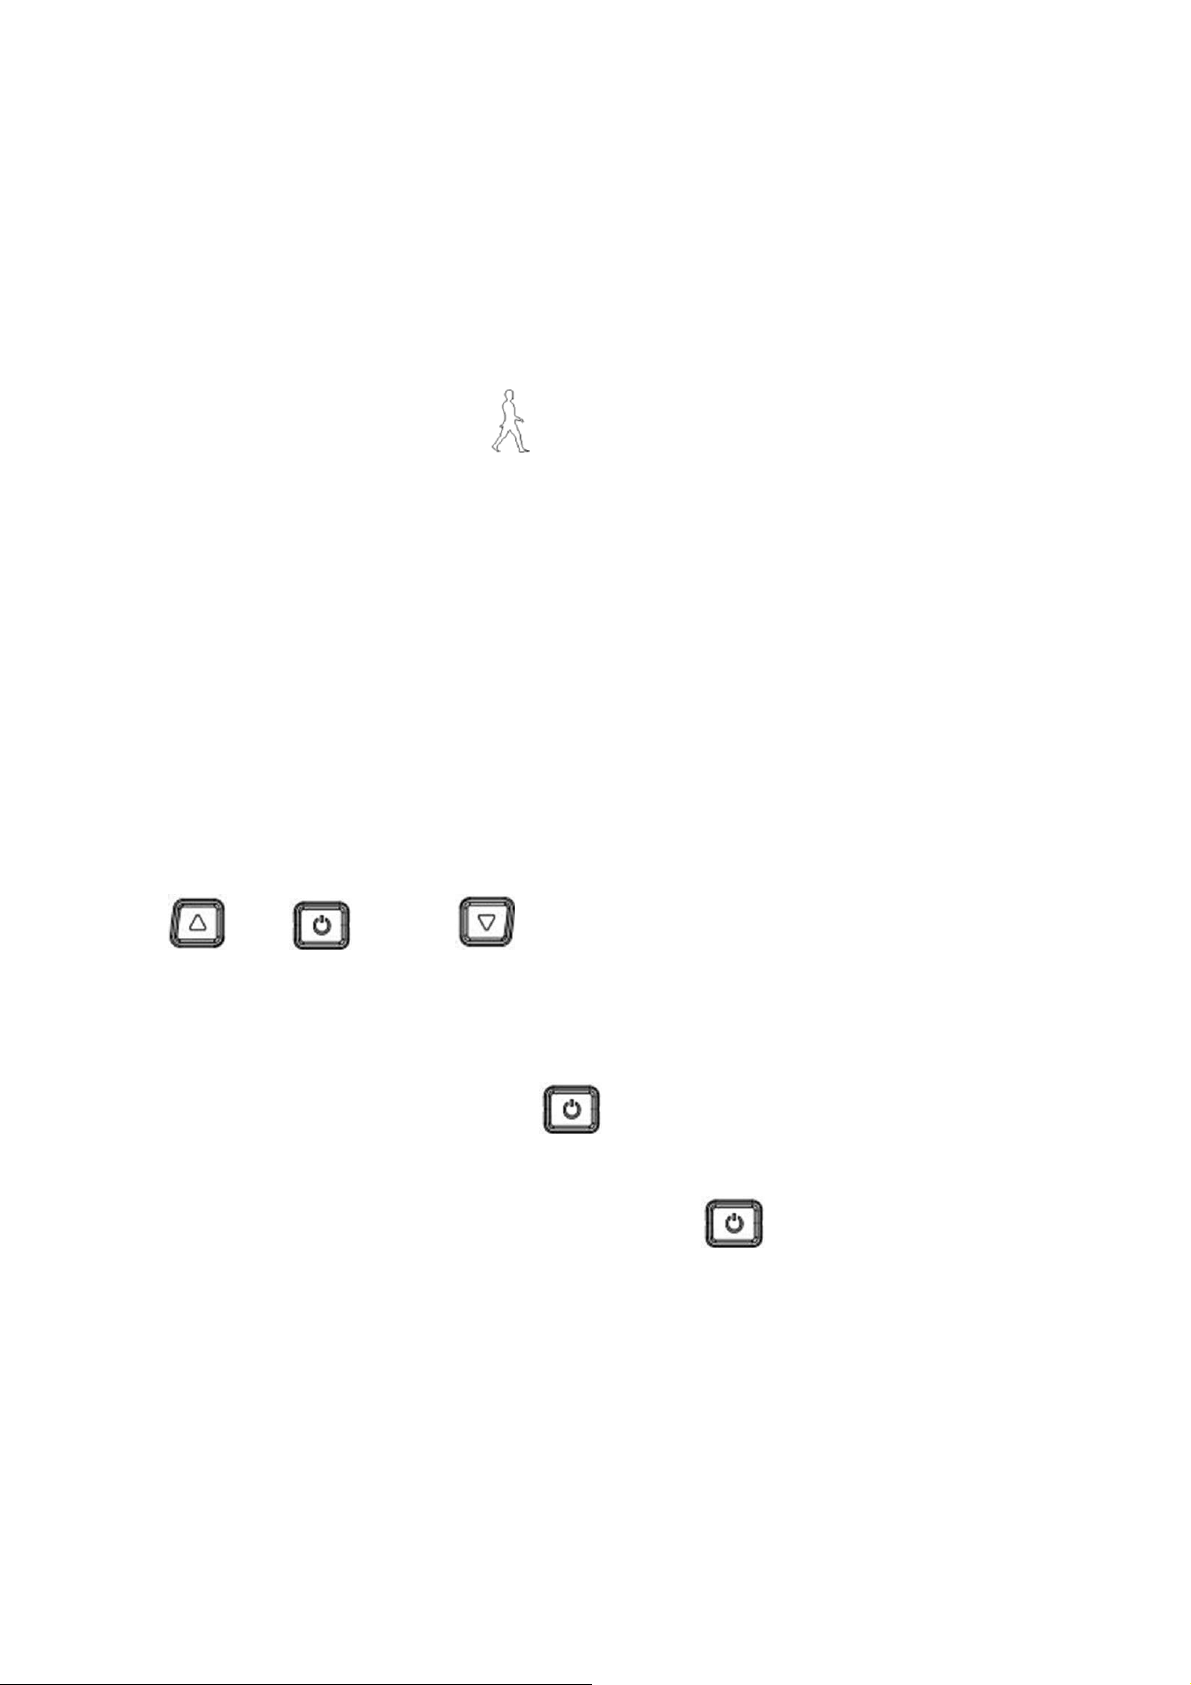
Operation instructions
It is equipped with 3 press buttons:
“UP” “Power” “DOWN”
1. Power ON/OFF
When the power is off, Long press ( Power) during 3 Seconds, screen
will display all contents and start to normal
working mode. When the power is on, Long press ( Power) during 3
seconds, screen will be powered off. If no any operation both on bike and display
during 10 minutes (time could be set), the display will turn off automatically, in this
case, no power consumption for both display and controller.
 Loading...