

Gree Versati II Series, Versati II Service Manual
AIR TO WATER HEAT PUMP SERVICE MANUAL
Versati
T1/R410A/50Hz
(GC201308- )
II

CONTENTS
PRODUCT ������������������������������������������������������������������������������������������������������ 2
1 MODELS LIST ������������������������������������������������������������������������������������������������������������ 2
1�1 Main Unit ���������������������������������������������������������������������������������������������������������������������������������������� 2
1�2 Water Tank ������������������������������������������������������������������������������������������������������������������������������������� 2
2 NOMENCLATURE ������������������������������������������������������������������������������������������������������� 2
2�1 Main Unit ���������������������������������������������������������������������������������������������������������������������������������������� 2
2�2 Water Tank ������������������������������������������������������������������������������������������������������������������������������������� 3
3 FUNCTION ����������������������������������������������������������������������������������������������������������������� 3
3�1 Cooling ������������������������������������������������������������������������������������������������������������������������������������������ 3
3�2 Heating ������������������������������������������������������������������������������������������������������������������������������������������ 3
3�3 Water Heating ��������������������������������������������������������������������������������������������������������������������������������3
3�4 Cooling +Water Heating ����������������������������������������������������������������������������������������������������������������3
3�5 Heating+ Water Heating ����������������������������������������������������������������������������������������������������������������3
3�6 Emergency Mode ��������������������������������������������������������������������������������������������������������������������������3
3�7 Quick Water Heating ���������������������������������������������������������������������������������������������������������������������4
3�8 Holiday Mode ��������������������������������������������������������������������������������������������������������������������������������� 4
3�9 Forced Operation Mode ��������������������������������������������������������������������������������������������������������������� 4
3�10 Silent Mode ���������������������������������������������������������������������������������������������������������������������������������� 4
3�11 Disinfection Mode �����������������������������������������������������������������������������������������������������������������������4
3�12 Weather-dependent Heating Mode ��������������������������������������������������������������������������������������������4
4 PRODUCT DATA ��������������������������������������������������������������������������������������������������������� 5
4�1 Product Data at Rated Condition ������������������������������������������������������������������������������������������������ 5
4�2 Operation Range ���������������������������������������������������������������������������������������������������������������������������7
4�3 Electrical Data ������������������������������������������������������������������������������������������������������������������������������8
5 PIPING DIAGRAM ������������������������������������������������������������������������������������������������������� 9
UNITS CONTROL ������������������������������������������������������������������������������������������11
1 OPERATION FLOWCHART �������������������������������������������������������������������������������������� 11
2 MAIN LOGIC ������������������������������������������������������������������������������������������������������������� 12
2�1 Defrosting Mode �������������������������������������������������������������������������������������������������������������������������� 12
2�2 Water-side Auto Anti-freezing in Winter �����������������������������������������������������������������������������������12
2�3 Control of Heating Tape on Chassis ������������������������������������������������������������������������������������������12
2�4 Control of Fan ������������������������������������������������������������������������������������������������������������������������������ 12
2�5 Control of Compressor ��������������������������������������������������������������������������������������������������������������� 12
2�6 Control of Electric Expansion Valve ����������������������������������������������������������������������������������������12
3 WIRED CONTROLLER ��������������������������������������������������������������������������������������������� 13
3�1 Dimension ������������������������������������������������������������������������������������������������������������������������������������ 13
3�2 Function ��������������������������������������������������������������������������������������������������������������������������������������� 13
3�3 Operation Instruction ������������������������������������������������������������������������������������������������������������������ 15
3�4 Precautions ���������������������������������������������������������������������������������������������������������������������������������� 33
4 CONTROL WIRING DESIGN ������������������������������������������������������������������������������������ 33
INSTALLATION ��������������������������������������������������������������������������������������������� 35
1 INSTALLATION OF UNITS ���������������������������������������������������������������������������������������35

1�1 Installation Positions ������������������������������������������������������������������������������������������������������������������ 35
1�2 Matters Need Attention ���������������������������������������������������������������������������������������������������������������35
1�3 Dimension Data and Installation Guide ������������������������������������������������������������������������������������36
1�4 Installation Clearance Data ��������������������������������������������������������������������������������������������������������42
1�5 The method of calculating the charging pressure of expansion vessel needed to be
adjusted is as follows� ���������������������������������������������������������������������������������������������������������������������� 43
1�6 Connection of Pipeline ��������������������������������������������������������������������������������������������������������������45
2 ELECTRIC WIRING WORK �������������������������������������������������������������������������������������� 47
2�1 Wiring Principle ��������������������������������������������������������������������������������������������������������������������������� 47
2�2 PCB Outline ���������������������������������������������������������������������������������������������������������������������������������48
2�3 Electric Wiring Design ���������������������������������������������������������������������������������������������������������������50
UNITS MAINTENANCE ������������������������������������������������������������������������������� 60
1 ERROR CODE LIST ������������������������������������������������������������������������������������������������� 60
2 FLOW CHART OF TROUBLESHOOTING �������������������������������������������������������������� 64
3 DIAGNOSIS OF DRIVING ����������������������������������������������������������������������������������������� 68
3�1 Diagnosis Flowchart of Driving of Single-phase Unit and Three-phase Unit ������������������������68
4 DISASSEMBLY AND ASSEMBLY PROCEDURE OF MAIN PARTS ���������������������� 72
5 EXPLODED VIEWS AND PART LIST ���������������������������������������������������������������������� 82
5�1 Outdoor Exploded View and Part List ��������������������������������������������������������������������������������������� 82
5�2 Indoor Exploded View and Part List ������������������������������������������������������������������������������������������ 84
5�3 Water Tank Exploded View and Part List ���������������������������������������������������������������������������������� 86

1
Air to Water Heat Pump
Service Manual- Versati II Series
PRODUCT
PRODUCT
2
Air to Water Heat Pump
Service Manual- Versati II Series
PRODUCT
PRODUCT
1 MODELS LIST
1�1 Main Unit
Model
Nominal
Capacity
Refrigerant
Power
Supply
Appearance
Model Name Product Code kW V,Ph,Hz Outdoor Unit Indoor Unit
GRS-CQ12Pd/
NaB-K
GRS-CQ12Pd/
NaB-K(I)
ER010N1130
12.5
R410A 230,1,50
GRS-CQ12Pd/
NaB-K(O)
ER010W1130
GRS-CQ14Pd/
NaB-K
GRS-CQ14Pd/
NaB-K(I)
ER010N1140
13.5
GRS-CQ14Pd/
NaB-K(O)
ER010W1140
GRS-CQ16Pd/
NaB-K
GRS-CQ16Pd/
NaB-K(I)
ER010N1150
15.5
GRS-CQ16Pd/
NaB-K(O)
ER010W1150
Note:1Ton =12000Btu/h = 3.517kW
1�2 Water Tank
Model Product Code Nominal Cubage(L) Appearance
SXVD200LCJ/A-K ER20000160 200
SXVD200LCJ/A-M ER20000240 200
SXVD300LCJ/A-K ER20000180 300
SXVD300LCJ/A-M ER20000250 300
SXVD200LCJ2/A-K ER20000170 200
SXVD200LCJ2/A-M ER20000260 200
SXVD300LCJ2/A-K ER20000190 300
SXVD300LCJ2/A-M ER20000270 300
2 NOMENCLATURE
2�1 Main Unit
G RS - C Q 16 Pd / Na B - K (I)
1 2 3 4 5 6 7 8 9 10
NO. Description Options
1 GREE Air to water heat pump -
2 Heat Pump Water Heater -
3 Heating Mode Circulating
4 Multi Heat pump -
5 Nominal Heating capacity 16=16 kW
6 DC Inverter -
7 Refrigerant Type Na-R410A
8 Design Serial Number A,B,C…...
9 Power Supply K=220-240V,~,50Hz; M=380-415V,3N~,50Hz; H=380V,3N~,60Hz
10 Indoor Unit I-Indoor unit, O-outdoor unit
3
Air to Water Heat Pump
Service Manual- Versati II Series
PRODUCT
2�2 Water Tank
SX V D 200 L C J2 / A - K
1 2 3 4 5 6 7 8 9
NO. Description Options
1 Tank Used in Heat Pump /
2 Heat Pump Water Tank for GMV Units /
3 Electric Heater /
4 Volume of Tank /
5 Stand /
6 Pressure-Resistant /
7 Static Heating with Dual Coiled Pipe J=Static Heating with single Coiled Pipe ; J2=Static Heating with Dual Coiled Pipe
8 Design Sequence Number
9 Power Supply K=220-240V,~,50Hz; M=380-415V,3N~,50Hz; H=380V,3N~,60Hz
3 FUNCTION
3�1 Cooling
In cooling mode: the refrigerant is condensed in the outdoor unit and evaporated in the indoor unit. Via the
heat exchange with water in the indoor unit, the temperature of water decreases and it releases heat while the
refrigerant absorbs heat and evaporates. With the help of wired controller, the outow temperature can meet
the user’s requirement. Through the control of valve, the low-temperature water in the system is connected with
indoor fan coil and underground pipe, and exchanges heat with the indoor air so that the indoor temperature
decreases to the required range.
3�2 Heating
In heating mode: the refrigerant evaporates in the outdoor unit and is condensed in the indoor unit. Via
the heat exchange with water in the indoor unit, the water absorbs heat and its temperature increases while
the refrigerant releases heat and is condensed. With the help of wired controller, the outflow temperature
can meet the user’s requirement. Through the control of valve, the high-temperature water in the system is
connected with indoor fan coil and underground pipe, and exchanges heat with the indoor air so that the indoor
temperature increases to the required range;
3�3 Water Heating
In water heating mode: the refrigerant evaporates in the outdoor unit and is condensed in the indoor unit.
Via the heat exchange with water in the indoor unit, the water absorbs heat and its temperature increases
while the refrigerant releases heat and is condensed. With the help of wired controller, the outow temperature
can meet the user’s requirement. Through the control of valve, the high-temperature water in the system is
connected with the coil pipe of bearing water tank, and exchanges heat with the water in the water tank so that
the temperature of water tank increases to the required range.
3�4 Cooling +Water Heating
When cooling mode exists together with the water heating mode, the user can set the priority of these two
modes based on the needs. The default priority is heat pump. That is under the default setting, if cooling mode
exists together with the water heating mode, the heat pump gives priority to cooling. In that case, water heating
can only realized with e-heater of the water tank. Inversely, the heat pump gives priority to water heating and
switches to cooling after nishing water heating.
3�5 Heating+ Water Heating
When heating mode exists together with the water heating mode, the user can set the priority of these two
modes based on the needs. The default priority is heat pump. That is under the default setting, if heating mode
exists together with the water heating mode, the heat pump gives priority to heating. In that case, water heating
can only realized with e-heater of the water tank. Inversely, the heat pump gives priority to water heating and
switches to heating after nishing water heating.
3�6 Emergency Mode
Emergency mode: this mode is only available for heating and water heating. When the outdoor unit stops
due to malfunction, it will enter the corresponding emergency mode; as to heating mode, after entering the
emergency mode, heating can only be realized through e-heater of the indoor unit. When the setting outow
temperature or indoor temperature is reached, the e-heater of indoor unit will stop running; as to water heating
mode, the e-heater of indoor unit stops while the e-heater of water tank runs. When the setting temperature or

4
Air to Water Heat Pump
Service Manual- Versati II Series
PRODUCT
water tank is reached, the e-heater will stop running.
3�7 Quick Water Heating
In quick water heating mode, the unit runs according to the water heating control of heat pump and the
e-heater of water tank runs at the same time.
3�8 Holiday Mode
This mode is only available for heating mode. This mode is set to keep indoor temperature or outflow
temperature in a certain range, so as to prevent water system of the unit from freezing or protect certain indoor
articles from freezing damage. (This mode requires installing indoor temperature sensor). When the outdoor
unit stops due to malfunction, the two e-heaters of the unit will run.
3�9 Forced Operation Mode
This mode is only used for refrigerant recovery and debugging of the unit.
3�10 Silent Mode
Silent mode is available in cooling, heating and water heating mode. In silent mode, the outdoor unit will
reduce the running noise via automatic control.
3�11 Disinfection Mode
In this mode, the water heating system can be disinfected. When starting up the disinfection function and
setting corresponding time to meet the requirement of disinfection mode, the function will start. After the setting
temperature is reached, this mode will terminate.
3�12 Weather-dependent Heating Mode
This mode is only available for space heating. In weather-dependent heating mode, the indoor temperature
is detected and controlled automatically.
3�13 Floor Commissioning
This function is intended to preheat the oor periodically for the initial use.
3�14 Air Removal of the Water System
This function is intended to replenish water and remove air in the water system to make the equipment run
at the stabilized water pressure.
5
Air to Water Heat Pump
Service Manual- Versati II Series
PRODUCT
4 PRODUCT DATA
4�1 Product Data at Rated Condition
Due to continues improvement on the products, the specifications listed above are subject to change
without notice, and the ones on the products nameplate should be referred to as nal.
4.1.1 Outdoor Unit
Model
GRS-CQ12Pd/NaB-K(O) GRS-CQ14Pd/NaB-K(O) GRS-CQ16Pd/NaB-K(O)
Product Code ER010W1130 ER010W1140 ER010W1150
Capacity*
1
Cooling(oor cooling) kW 12.5 13.5 14.5
Heating(oor heating) kW 12.5 13.5 15.5
Power
Input*
1
Cooling(oor cooling) kW 3.57 4.09 4.53
Heating(oor heating) kW 2.81 3.07 3.78
EER/COP*
1
W/W 3.5/4.45 3.3/4.4 3.2/4.1
Capacity*
2
Cooling(for Fan coil) kW 9.5 10 10.5
Heating(Fan coil or
Radiator)
kW 11 12 14
Power
Input*
2
Cooling(for Fan coil) kW 3.39 3.57 3.96
Heating(Fan coil or
Radiator)
kW 3.14 3.48 4
EER/COP*
2
W/W 2.8/3.5 2.8/3.45 2.65/3.5
Refrigerant charge volume kg 3.2 3.2 3.2
Sanitary water Temperature 40~80 40~80 40~80
Sound
Pressure
Level
cooling dB(A) 55 55 57
heating dB(A) 57 57 58
Connecting
pipe
Gas inch(mm)
φ
5/8(15.9)
φ
5/8(15.9)
φ
5/8(15.9)
Liquid inch(mm)
φ
3/8(9.52)
φ
3/8(9.52)
φ
3/8(9.52)
Dimensions
(W×D×H)
Outline mm 900×412×1345 900×412×1345 900×412×1345
Packaged mm 998×458×1515 998×458×1515 998×458×1515
Net weight/Gross weight kg 106/118 106/118 106/118
Notes:
1
Capacities and power inputs are based on the following conditions:
a. Cooling conditions
Indoor Water Temperature 23°C/18°C;
Outdoor Air Temperature 35°CDB/24°CWB
b. Heating conditions
Indoor Water Temperature 30°C/35°C;
Outdoor Air Temperature 7°CDB/6°CWB
c. Standard piping length 7.5m
2
Capacities and power inputs are based on the following conditions:
a. Cooling conditions
Indoor Water Temperature 12°C/7°C;
Outdoor Air Temperature 35°CDB/24°CWB
b. Heating conditions
Indoor Water Temperature 40°C/45°C;
Outdoor Air Temperature 7°CDB/6°CWB
c. Standard piping length 7.5m
6
Air to Water Heat Pump
Service Manual- Versati II Series
PRODUCT
4.1.2 Indoor Unit
Model GRS-CQ12Pd/NaB-K(I) GRS-CQ14Pd/NaB-KI) GRS-CQ16Pd/NaB-K(I)
Product Code ER010N1130 ER010N1140 ER010N1150
Power Supply V/Ph/Hz 1/220-240/50 1/220-240/50 1/220-240/50
Norminal input W 6200 6200 6200
Leaving
water
temperature
Cooling*
1
7~25 7~25 7~25
Cooling*
2
18~25 18~25 18~25
Heating*
1
25~55(High temperature cycle )
Heating*
2
25~45(Low temperature cycle )
Pump
Type - Water-cooled Water-cooled Water-cooled
Nr. of speed - 3 3 3
Power input W 200 200 200
Water flow limit LPM 7.5 7.5 7.5
Electric
Heater
Operation - Automatic Automatic Automatic
Steps - 2 2 2
Capacity kW 3 3 3
Combination kW 3+3 3+3 3+3
Power input Ph/V/Hz 1/230/50 1/230/50 1/230/50
Sound pressure level dB(A) 31 31 31
Connecting
pipe
Gas inch(mm)
φ
5/8(15.9)
φ
5/8(15.9)
φ
5/8(15.9)
Liquid inch(mm)
φ
3/8(9.52)
φ
3/8(9.52)
φ
3/8(9.52)
Dimensions
(W×D×H)
Outline mm 900x500x324 900x500x324 900x500x324
Packaged mm 1040×605×380 1040×605×380 1040×605×380
Net weight/Gross weight kg 57/66 57/66 57/66
7
Air to Water Heat Pump
Service Manual- Versati II Series
PRODUCT
4.1.3 Water Tank (optional)
Models SXVD200LCJ/A-K SXVD200LCJ2/A-K SXVD300LCJ/A-K SXVD300LCJ2/A-K
Product Code ER20000160
ER20000170
ER20000180
ER20000190
Models SXVD200LCJ/A-M SXVD200LCJ2/A-M SXVD300LCJ/A-M SXVD300LCJ2/A-M
Product Code ER20000240 ER20000260 ER20000250 ER20000270
Models SXVD200LCJ/A-H
SXVD200LCJ2/A-H
SXVD300LCJ/A-H
SXVD300LCJ2/A-H
Product Code ER20000280 ER20000290 ER20000300 ER20000310
Water Tank Volume L 200 300
Electric Heater Power W 3000
Cool Water
Inlet Pipe
Outer
diameter
mm DN15
inch 1/2
Screw thread spec 1/2″Female BSP
Hot Water
Outlet Pipe
Outer
diameter
mm DN15
inch 1/2
Screw thread spec 1/2″Female BSP
Circulation Water
Inlet/Outlet Pipe
Outer
diameter
mm / DN20 / DN20
inch / 3/4 / 3/4
Screw thread spec / 3/4″Female BSP / 3/4″Female BSP
Water Inlet/
Outlet(Heat
Pump) Pipe
Outer
diameter
mm DN20
inch 3/4
Screw thread spec 3/4″Female BSP
Outline Dimension(ΦD×H) mm Φ540×1595 Φ620×1620
Net Weight kg 68 71 82 87
Note :
Tank is optional part, and the specific model of tank shall be selected according to local weather and
professional suggestions.
4�2 Operation Range
Mode Range of Outdoor Temperature( )
Heating -20~35
Cooling 10~48
Water heating -20~45

8
Air to Water Heat Pump
Service Manual- Versati II Series
PRODUCT
4�3 Electrical Data
Model
Power Supply Leakage Switch
Minimum Sectional
Area of Earth Wire
Minimum Sectional Area
of Power Supply Wire
V,Ph,Hz (A) (mm2) (mm2)
GRS-CQ12Pd/NaB-K(I)
220-240V,~,50Hz
50 10 3×10
GRS-CQ14Pd/NaB-K(I) 50 10 3×10
GRS-CQ16Pd/NaB-K(I) 50 10 3×10
GRS-CQ12Pd/NaB-K(O) 32 4 3×4
GRS-CQ14Pd/NaB-K(O) 32 4 3×4
GRS-CQ16Pd/NaB-K(O) 32 4 3×4
Note:
①
Leakage Switch is necessary for additional installation. If circuit breakers with leakage protection are in
use, action response time must be less than 0.1 second, leakage circuit must be 30mA.
②
The above selected power cable diameters are determined based on assumption of distance from the
distribution cabinet to the unit less than 75m. If cables are laid out in a distance of 75m to 150m, diameter of
power cable must be increased to a further grade.
③
The power supply must be of rated voltage of the unit and special electrical line for air-conditioning.
④
All electrical installation shall be carried out by professional technicians in accordance with the local
laws and regulations.
⑤
Ensure safe grounding and the grounding wire shall be connected with the special grounding equipment
of the building and must be installed by professional technicians.
⑥
The specications of the breaker and power cable listed in the table above are determined based on the
maximum power (maximum amps) of the unit.
⑦
The specications of the power cable listed in the table above are applied to the conduit-guarded multi-
wire copper cable (like, YJV XLPE insulated power cable) used at 40℃ and resistible to 90℃(see IEC 60364-5-
52). If the working condition changes, they should be modied according to the related national standard.
⑧
The specications of the breaker listed in the table above are applied to the breaker with the working
temperature at 40℃. If the working condition changes, they should be modied according to the related national
standard.
9
Air to Water Heat Pump
Service Manual- Versati II Series
PRODUCT
5 PIPING DIAGRAM
R3T gas line temperature sensor
17
15
16
INDOOR UINTOUTDOOR UINT
M
M
M
M
1
2
3
4
5
6
7
8
10
11
20
19
5
18
12
1 compressor
2 four-way valve
3 finned coil exchanger
4 fan motor
5 filter
6 electronic expansion valve
7 plate heat exchanger
11 flow switch
10 electric heater
9 air-vent valve
8 pump
18 water tank
12 3-way valve
17 other thermal system
16 radiator
15 under-floor heating
R6T water tank temperature sensor 1
R4T returning water temperature sensor
R1T plate outlet temperature sensor
t
R1T
R3T
t
R5T
t
R4T
t
t
R6T
t
R2T
9
19 expansion tank
20 safety valve
R2T Liquid line temperature sensor
R5T leaving water temperature sensor
t
R7T
R7T water tank temperature sensor 2
13
14
13 2-way valve
14 by-pass valve

10
Air to Water Heat Pump
Service Manual- Versati II Series
CONTROL
CONTROL
11
Air to Water Heat Pump
Service Manual- Versati II Series
CONTROL
UNITS CONTROL
1 OPERATION FLOWCHART
Power Switch ON
Operation Mode
Judgment
Cooling Heating
YES
Cooling
Operation
Heating
Operation
Water
Heating
Water Pump
Control
Electric Expansion
Valve Control
Error Indication
Outdoor fan Motor
Control
Compressor
Control
Error Indication
Water Flow
Switch Control
YES
NO
Error Indication
NO
Error Indication
NO
YES
YES
YES
Water Pump
Control
Electric Expansion
Valve Control
Error Indication
Outdoor fan Motor
Control
Compressor
Control
Error Indication
Water Flow
Switch Control
YES
NO
NO
Error Indication
YES
YES
YES
Error Indication
4-Wa y Valve
Control
Error Indication
3-Way Valve and
2-Way Valve
Control
Water Heating
Operation
Water Pump
Control
Electric Expansion
Valve Control
Error Indication
Outdoor fan Motor
Control
Compressor
Control
Error Indication
Water Flow
Switch Control
YES
NO
NO
Error Indication
YES
YES
YES
Error Indication
4-Way Valve
Control
Error Indication
NO
YES
YES
YES
NO
NO
3-Wa y Valve and
2-Wa y Valve
Control
3-Way Valve and
2-Way Valve
Control
YES
NO
YES
NO

12
Air to Water Heat Pump
Service Manual- Versati II Series
CONTROL
2 MAIN LOGIC
2�1 Defrosting Mode
2.1.1 The condition of start defrosting mode:
Under heating mode or water heating mode, if the accumulative running time of compressor is over the
set interval time of defrosting(default 50min),and the defrosting temperature(outdoor unit heat exchanger
temperature) is lower than the set starting temperature(default -4 ),the unit will start running defrosting, and the
4-way valve will shut off and the outdoor fan will stop.
2.1.2 The condition of quit defrosting mode:
Under defrosting mode, if the continual defrosting time is over the set continual time of defrosting(default
10min) ,or the defrosting temperature is over the set stopping temperature(default 15 ) ,the unit will restart
running heating mode, and the 4-way valve will turn on and the outdoor fan will run.
2�2 Water-side Auto Anti-freezing in Winter
In low temperature, When the compressor stops (including normal or abnormal stop of the unit), if auxiliary
electric heater water-out temperature is lower than 5 , 30s later the water pump will automatically operate and
120s later the compressor operates.
When outlet water temperature is less than 20 ,the unit will operate while it will stop when the outlet water
temperature is more than 20 .
However, if there is malfunction of the unit, anti-freezing operation will be started by indoor electric heater
(two sets).
2�3 Control of Heating Tape on Chassis
When heating operation starts in low temperature, in order to prevent the condensation water generated
by defrosting from freezing in chassis, which will incur malfunction of drainage, the heating tape is installed
in chassis. If the ambient temperature is lower than 0 , when the compressor operates, electric heating will
operate; if the ambient temperature is higher than 2 or compressor stops, the electric heating will stop.
2�4 Control of Fan
In cooling, the outdoor fan will adjust fan speed according to pressure detected by high pressure sensor.
In heating or water heating, the fan will adjust fan speed according to ambient temp.
2�5 Control of Compressor
Output capacity of compressor is adjusted according to the comparison of current outlet water temperature
and setting outlet water temperature or the comparison of indoor ambient temperature and setting indoor
temperature;
The output capacity will not be adjusted within 6 min after the compressor operates; once compressor
stops, it can’t be started within at least 3 min.
2�6 Control of Electric Expansion Valve
In heating or water heating operation, electric expansion valve is adjusted according to superheat degree of
outdoor heat exchanger.
In cooling operation, electric expansion valve is adjusted according to superheat degree of plate-type heat
exchanger.
Electric expansion valve will not be adjusted within 3 min after the unit operates.
13
Air to Water Heat Pump
Service Manual- Versati II Series
CONTROL
3 WIRED CONTROLLER
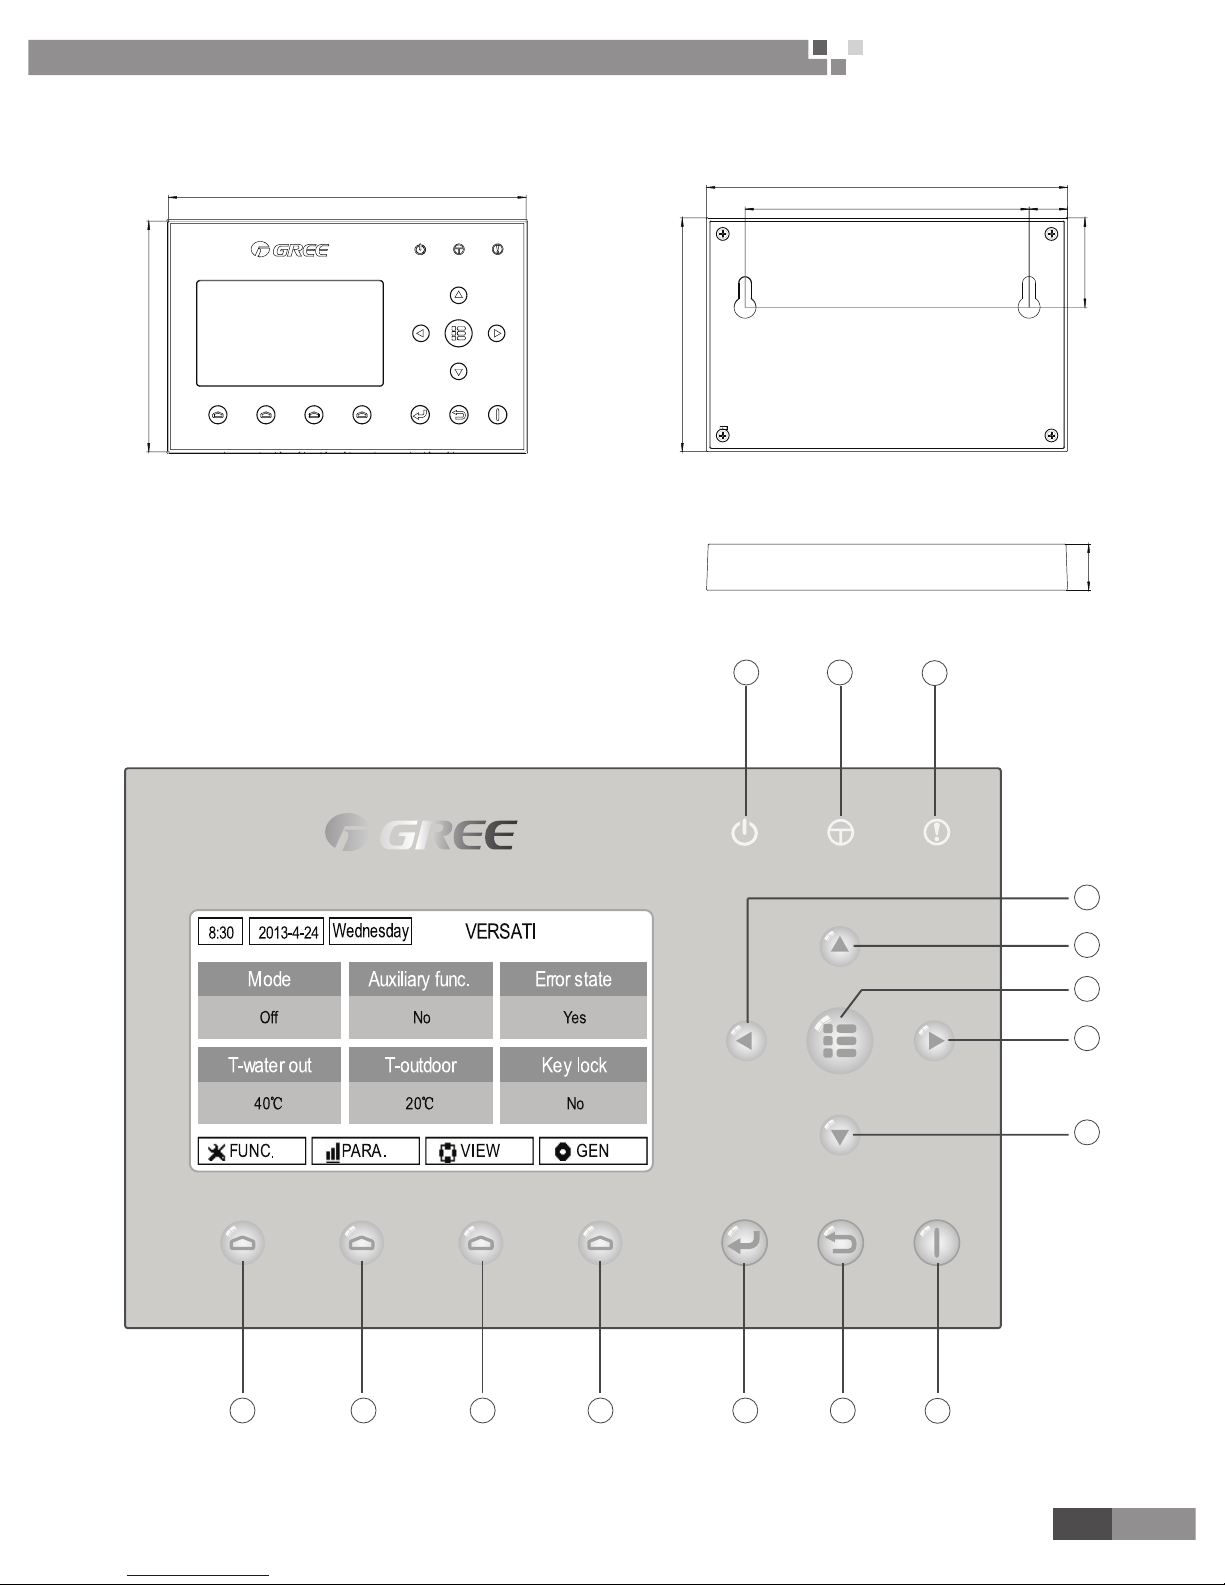
3�1 Dimension
163
164.4
129.4 17.5
105
106.4
40.7
21
3�2 Function
3.2.1 External View
1 2
3
101112131415
9
4
5
6
7
8
(This effect drawing is just for reference)
14
Air to Water Heat Pump
Service Manual- Versati II Series
CONTROL
No� Symbol Description No� Symbol Description
1
Running indicating LED
9
ON/OFFF
2
Power indicating LED
10
Cancel/Return key
3
Error indicating LED
11
OK key
4
Left key
12
Function key no. 4
5
Up key
13
Function key no. 3
6
Menu key
14
Function key no. 2
7
Right key
15
Function key no. 1
8
Down key
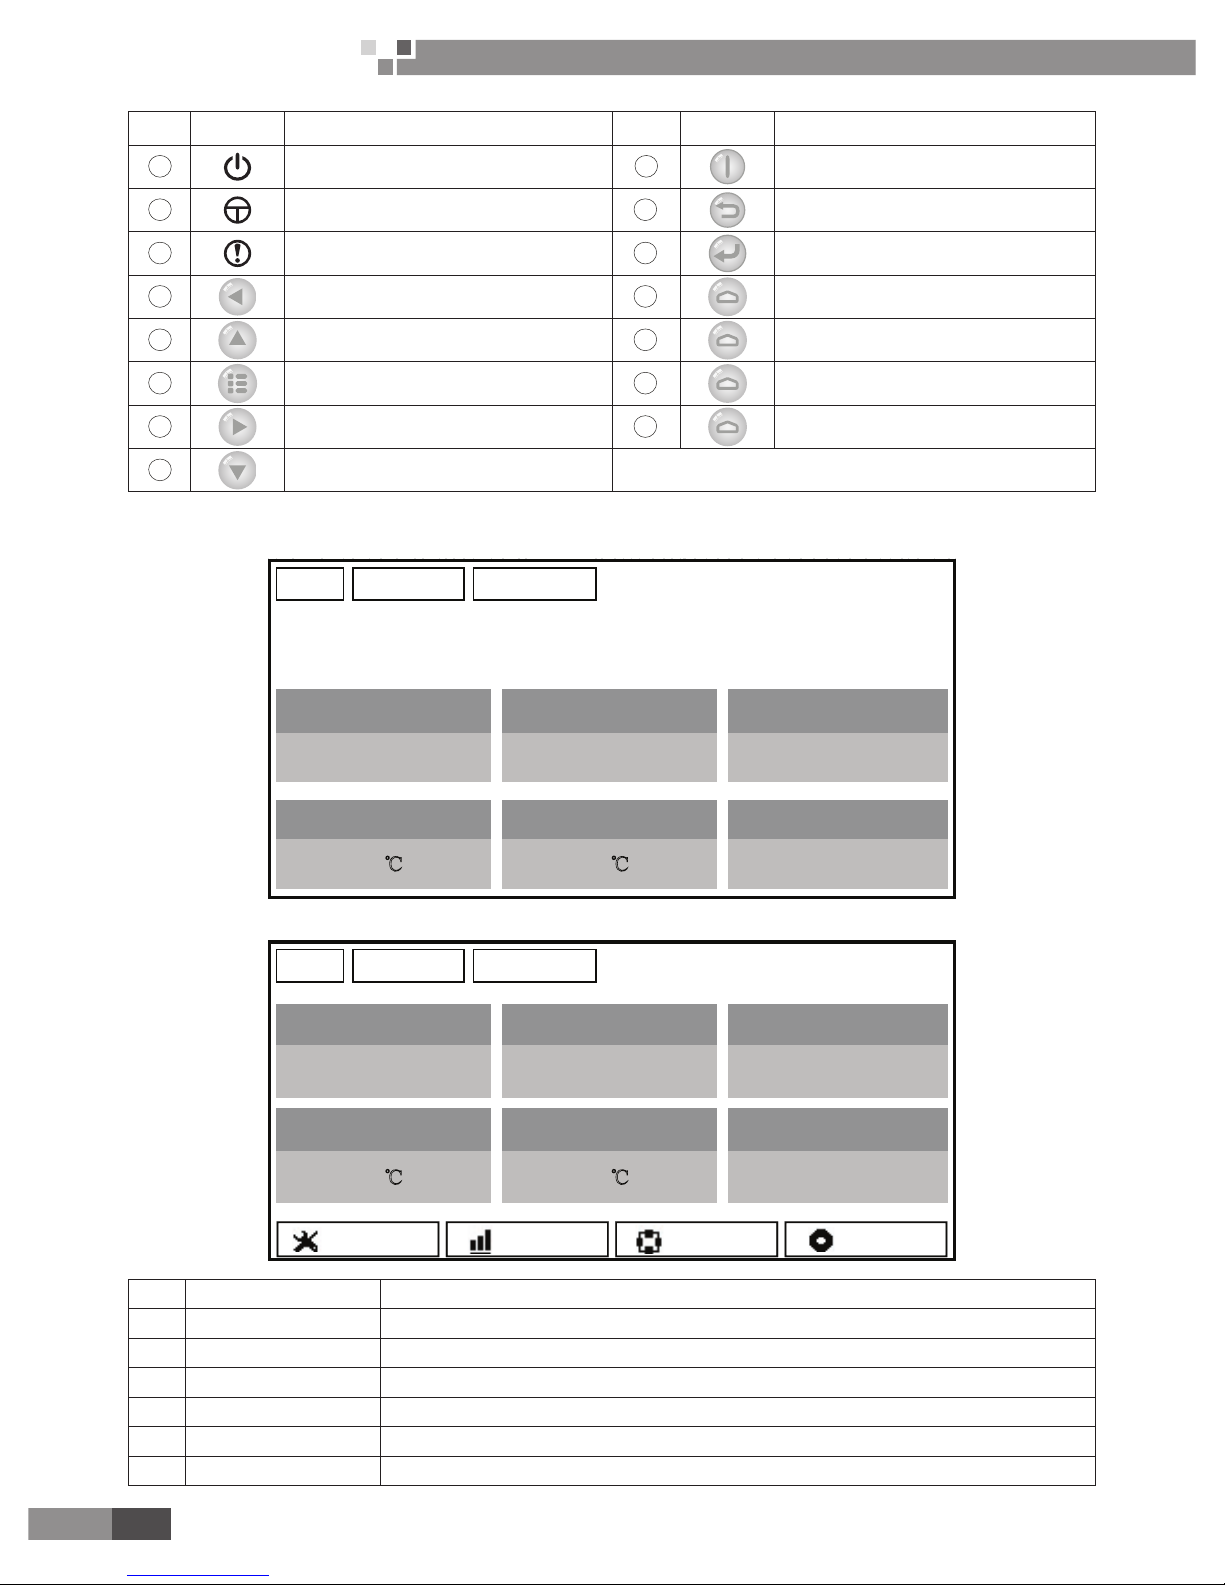
3.2.2 Standby Page and Homepage
Standby Page
T-outdoor Key lock
8:30
2013-4-24
Wednesday
VERSATI
Mode Auxiliary func.
Error state
40℃ 20℃ No
Off No Yes
T-water out
Home Page
Yes
T-water out T-outdoor Key lock
40℃ 20℃ No
Mode Auxiliary func.
Off No
Error state
8:30 2013-4-24
Wednesday
VERSATI
FUNC. PARA. VIEW GEN.
No� Item Functional Description
1 Mode It is intended to access to the actual running mode.
2 Auxiliary Func. It indicates the auxiliary function note 1.
3 Error state It indicates if there is any error.
4 T-water out It indicates the actual leaving water temperature.
5 T-outdoor It indicates the actual outdoor environment temperature.
6 Key lock It indicates if the key lock is activated or deactivated.
15
Air to Water Heat Pump
Service Manual- Versati II Series
CONTROL
Note:
it includes the “Sanitize mode”, “Quiet” mode, “Auto” mode, “Floor debug” mode, “Emergen�mode”,
“Holiday mode”, “Forced Cooling” mode, “Forced Heating” mode, and “Debug” mode.
3.2.3 Keys
No� Item Functional Description
1 ON/OFF key It is intended to turn on or off the unit.
2 OK key It is intended to save the setting or go to the submenu.
3 Cancel/Return key It is intended to go to the higher level menu.
4 Menu key It is intended to call out the main menu or back to the homepage.
5 Left/Right key It is intended to move the cursor Left/Right.
6 Up/Down key It is intended to modify the setting state or value of the selected parameter.
7 Function keys (4) It is intended to perform different functions at difference pages.
3.2.4 Indicating LEDs
No� Item Functional Description
1 On/Off indicating LED (green) It will light on/off when the unit is turned on/off.
2 Power indicating LED (yellow) It will light on/off when the unit is powered on/off.
3 Fault indicating LED (red) It will light on when some fault occurs.
3�3 Operation Instruction
3�3�1 On/Off
At the homepage, by pressing the ON/OFF key, the unit will be turned on/off.
When the unit is ON, the green indicating LED located at the upper right of the control will light on. When
the unit is OFF, the green indicating LED will light off.
[Notes]
①
The unit is defaulted to be OFF when energized for the rst time.
②
The ON/OFF key operation works only at the home page and the standby page.
③
When the “Holiday mode” or the “Emergen�mode” is activated, the ON/OFF key operation will become
ineffective.
④
When the “Forced Heating” or “Forced Cooling” is activated, it will be deactivated by pressing the “ON/
OFF” key, and then press the ON/OFF key again to start the unit.
⑤
ON/OFF operation will be memorized by setting “Memory” to be “On” at the “GEN.” setting page. That
is, in case of power failure the unit will resume running upon power recovery. Once “Memory” is set to be “Off”,
in case of power failure the unit will keep “Off” upon power recovery.
⑥
At the home page, the ON/OFF key is intended to turn on/off the unit if applicable. The Function keys
no.1 to no.4 are corresponding to “FUNC�”, “PAPA”, “VIEW” and “GEN�” setting pages respectively.
⑦
At the standby page, the Menu key is used to back to the homepage, the ON/OFF key is used to turn
on/off the unit if applicable, and all other key operations are ineffective.
⑧
The control will return automatically to the homepage where there is no any key operation in 10
consecutive minutes.
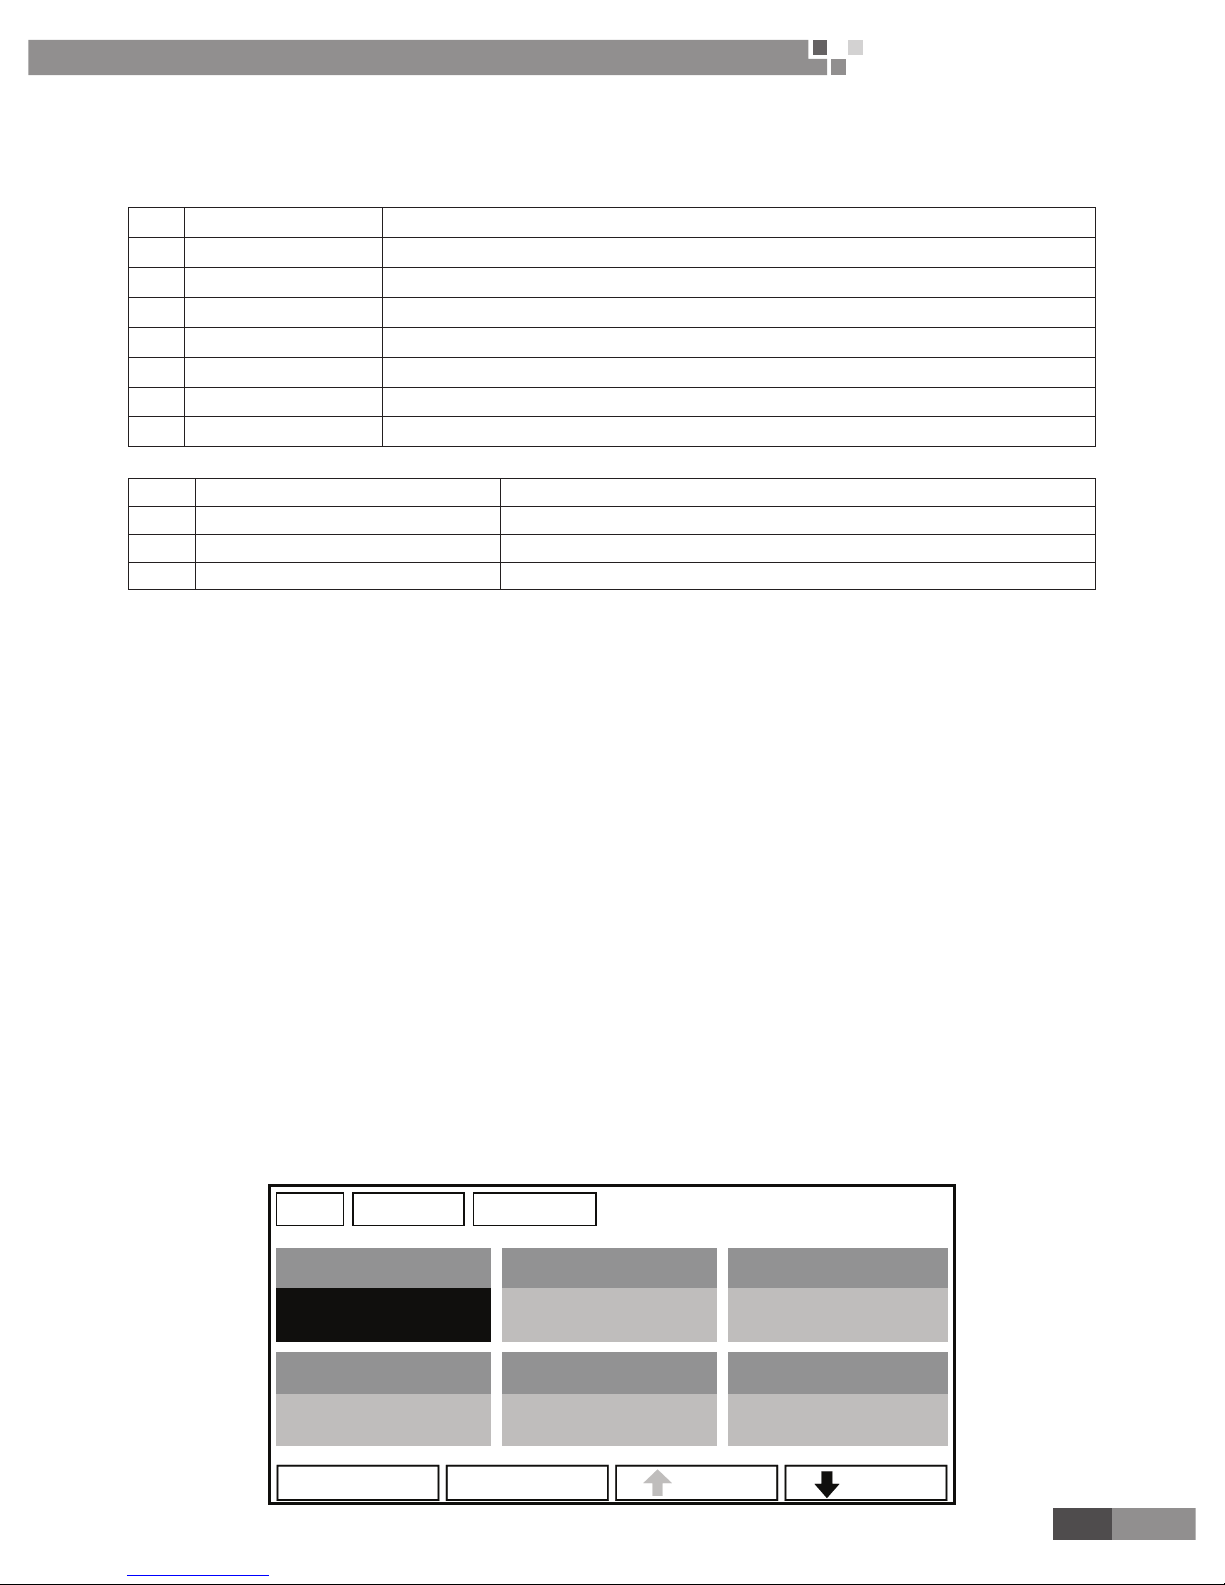
3�3�2 Function Setting
1) At the homepage, by pressing the Function key no. 1, the control will access to the FUNCTION page 1,
as shown in the gure below.
Last Next
Off
T-water ctrl. Cool+hot water Heat+hot water
Low temp. Cool Heat
Mode Ctrl. state
Heat T-room
Fast hot water
8:30 2013-4-24
Wednesday
FUNCTION
Last Ne xt
FUNCTION page 1
16
Air to Water Heat Pump
Service Manual- Versati II Series
CONTROL
2) At the FUNCTION page, by the Right/Left key, the desired function option can be selected, and by the
Up/Down key, the setting of the current function option can be modied. The function key no. 3 or no. 4 can
be used for switch pages. After the setting is nished, by pressing the Menu key, the control will back to the
homepage, or by pressing the Return key the control will back to the higher level menu.
[Notes]
Move the cursor to the desired option and “Enter” will be displayed at the lower left side of the LCD,
reminding you that you are allowed to access to the submenu by pressing the OK key.
At the FUNCTION page, when the setting of some function option is changed and needs to be memorized,
then in case of power failure it will be saved automatically and resume upon power recovery.
Function Settings
No� Full Name Displayed Name Range Default Remarks
1
Running mode
setting
Mode
Cool/Heat/
Hot water/
Cool+Hot water/
Heat+Hot water
Heat
When the water tank is unavailable,
then only “Cool” and “Heat” are
included in the range.
2 Control state Ctrl. state T-water out /T-room T-water out
“T-Room” is available only when
“Remote Sensor” is set to “With”.
3 Fast hot water Fast hot water On/Off Off
When the water tank is unavailable,
this function will be reserved, and the
LCD will display ‘Reserved’.
4
Water out
temperature control
T-water ctrl.
High temp.
/Low temp.
Low temp. /
5 Cool+hot water Cool+hot water Cool/Hot water Cool
6 Heat+hot water Heat+hot water Heat/Hot water Heat
When the water tank is unavailable,
this function will be reserved, and the
LCD will display ‘Reserved’.
7 Quiet mode Quiet mode On/Off Off /
8 Quiet timer Quiet timer On/Off Off /
9 Auto mode Auto mode On/Off Off /
10 Holidayrelease Holidayrelease On/Off Off /
11 Sanitize Sanitize On/Off Off
When the water tank is unavailable,
this function will be reserved, and the
LCD will display ‘Reserved’.
12 Weekly timer Weekly timer On/Off Off /
13 Clock timer Clock timer On/Off Off /
14 Temperature timer Temp. timer On/Off Off /
15 Floor debug Floor debug On/Off Off /
16 Emergency mode Emergen. mode On/Off Off /
17 Holiday mode Holiday mode On/Off Off /
18 Thermostat Thermostat With/Without Without /
19 IDU heater IDU heater 1/2/Off 1 /
20 Other heater Other heater With/Without Without /
21 Chassis heater Chassis heater On/Off On /
22 Water tank Water tank With/Without Without /
23 Tank sensor Tank sensor 1/2 2
When the water tank is unavailable,
this function will be reserved,and the
LCD will display ‘Reserved’ .
17
Air to Water Heat Pump
Service Manual- Versati II Series
CONTROL
24 Solar heater Solar heater With/Without Without /
25 FCU FCU With/Without Without /
26 Remote sensor Remote sensor With/Without Without
When it is set to “Without”, the “Control
state” will be automatically changed to
“T-water out”.
27 Air removal Air removal On/Off Off /
28 Address Address
[0~12]
[127~253]
0 /
29 Doorguard Doorguard On/Off Off /
3�3�2�1 Mode
At the equipment OFF state, access to the FUNCTION page and then move through the Left/Right key the
cursor to the “Mode” whose characters will be reversed, then press the Up/Down key to modify its setting.
[Notes]
①
The “Heat” mode is defaulted when the unit is energized for the rst time.
②
The running mode is allowed to be changed only when the unit is not in operation. If it is done with the
unit being on, a window will pop up, warning “please turn off the system rst”.
③
When the water tank is disabled, only the ‘Heat” or the “Cool” mode is allowed.
④
When the water tank is enabled, “Cool”, “Heat”, “Hot water”, “Cool+hot waterr”, “Heat+hot water” is
allowed.
⑤
For the heat pump, the “Cool” mode is allowed; for the heating only unit, “Cool+ Hot water” and “Cool”
are unallowable.
⑥
This setting can be memorized upon power failure.
3�3�2�2 Control State (Ctrl� state)
Go to the FUNCTION page and locate Ctrl� state, then, congure it through the Up/Down key.
[Notes]
①
If “Remote sensor” is set to “With”, “T-out water” and “T-room” are available. While if “Remote
Sensor” is set to “Without”, only “T-out water” is selectable.
②
This setting will be memorized upon power failure.
3�3�2�3 Fast Hot Water
Go to the FUNCTION page and locate “Fast hot water”, then, congure it through the Up/Down key, “On”
or “Off”.
[Notes]
①
It works only when “Water tank” is set to “With”.
②
This setting will be memorized upon power failure.
3�3�2�4 T-water Ctrl (Water Temperature Control for Heating)
Go to the FUNCTION page and locate “T-water ctrl�”, then, congure it through the Up/Down key, “High
temp�” or “Low temp�”.
[Notes]
①
When this setting is changed, the following parameters will return to the default values.
Water out temperature for heating WOT-Heat
45℃/113℉[High]
35℃/95℉[Low]
Upper limit water-out temperature at the auto mode for heating Upper WT-Heat
48℃/118℉[High]
35℃/95℉[Low]
Lower limit water-out temperature at the auto mode for heating Lower WT-Heat
40℃/104℉[High]
29℃/84℉[Low]
②
This setting will be memorized upon power failure.
3�3�2�5 Cool + Hot water
Go to the FUNCTION page and locate “Cool+hot water”, then, congure it through the Up/Down key, “Cool”
or “Hot water”.
[Notes]
①
“Hot water” will take precedence only when “Water tank” is available, other it will tell “Reserved”.
②
This setting will be memorized upon power failure.
3�3�2�6 Heat + Hot water
Go to the FUNCTION page and locate Heat+hot water, then, congure it through the Up/Down key, “Heat”
or “Hot water”.
18
Air to Water Heat Pump
Service Manual- Versati II Series
CONTROL
[Notes]
①
“Hot water” will take precedence only when “Water tank” is available, other it will tell “Reserved”.
②
This setting will be memorized upon power failure.
3�3�2�7 Quiet Mode
Go to the FUNCTION page and locate “Quiet mode”, then, congure it through the Up/Down key, “On” or
“Off”.
[Notes]
①
It can be set to “On” or “Off” no matter if the unit is in operation or not.
②
Once it is activated, it should be deactivated manually or by Quiet Timer.
③
It will not memorized and defaulted to be off upon power failure.
④
It will be deactivated when the unit is turned off.
3�3�2�8 Quiet Timer
1) Go to the FUNCTION page and locate Quiet timer, then, access to the QUIET TIMER setting page.
2) At the QUIET TIMER setting page, select “Start time” or “End time” through the Left/Right keys and then
congure the desired time through the Up/Down keys.
3) When the mode setting is nished, then by pressing “Save”, a pop-up window will pop up to remind if
you are determined to save this setting. If so, press the “OK” key. If not, press the “Cancel” key to not save this
setting.
4) When the setting is saved, the control then will back to the FUNCTION page and the cursor will be where
the “Quiet timer” option is, then by the Up/Down key, it can be set to be “On” or “Off”.
Start time End time
08:30 17:30
8:30 2013-4-24
Wednesday
QUIET TIMER
Minute Save
[Notes]
①
Once it is activated, it should be deactivated manually.
②
It will not be memorized and be defaulted to be off upon power failure.
③
The saved “Start time” and “End time” will be memorized upon power failure.
④
It is congurable no matter if the unit is in operation or not.
3�3�2�9 Auto Mode
Go to the FUNCTION page and locate Auto mode, then, congure it through the Up/Down key, “On” or “Off”.
[Notes]
①
Once it is activated, it should be deactivated manually.
②
It will be defaulted to be off upon power failure.
③
At the “Parameter View” page, it is able to check the set point at the Auto mode.
④
When it is activated, it is allowed to set the room temperature but the set point does not take effective.
However, when it is deactivated, the unit will run according to this set point.
⑤
It can be set to “On” or “Off” no matter if the unit is in operation or not, but be activated only when the
unit is in operation.
⑥
This mode works only for the air conditioning function.
3�3�2�10 Holiday Release
Go to the FUNCTION page and locate “Holiday release”, then, congure it through the Up/Down key, “On”
or “Off”.
[Notes]
①
When it is activated, at the WEEKLY TIMER page, it is able to set some week day to “Holiday
release”. In this case, the “Weekly timer” in this day is ineffective unless it is set to “Effective” manually.
②
This setting will be memorized upon power failure.
19
Air to Water Heat Pump
Service Manual- Versati II Series
CONTROL
3�3�2�11 Sanitize
1) At the FUNCTION page, locate “Sanitize”, and then access to the SANITIZE setting page by pressing
the OK key.
2) At the SANITIZE setting page, select “Set clock”, “Set week” or “Set temp” through the Left/Right key
and then modify the corresponding setting through the Up/Down key.
3) When the mode setting is nished, then by pressing “Save”, a pop-up window will pop up to remind if you
are determined to save this setting. If so, press the OK key. If not, press the Cancel key to not save this setting.
4) When the setting is saved, the control then will back to the FUNCTION page and the cursor will be where
the “Sanitize timer” is, then by the Up/Down key, it can be set to “On” or “Off”.
[Notes]
①
It can be activated only when the “Water tank” is set to “With”.
②
It can be set to “On” or “Off” no matter if the unit is in operation or not
③
When “Sanitize” is set to “On”, if you intend to set the “Emergen� mode”, “Holiday mode”, “Floor
Debug”, then a window will pop up, warning “Please disable the Sanitize Mode!”.
④
It can be set to “On” or “Off” no matter if the unit is in operation or not, and “Hot water” mode always
takes precedence.
⑤
When Sanitize is activated, “Sanitize” will show on the home page of the control until this operation is
nished. If this operation fails, “Sanitize fails” will show. In this case, by pressing any key, “Sanitize failure” will
be cleared or it will be always there.
⑥
When Sanitize is activated, it will quit upon “Communication error with the indoor unit” or “Water
tank heater error”.
3�3�2�12 Weekly Timer
1) At the homepage, by pressing the Function key access to the FUNCTION page, and then locate where
“Weekly timer” is by switching pages, after that, press OK key to go to the WEEKLY TIMER setting page.
2) At the WEEKLY TIMER setting page, by the Right/Left key it is able to select the desired week day and
then by the Up/Down key to set this day, “√”, “×” or “Holiday”, as shown in the gure below. When this setting is
nished, press OK key to go to this day’s setting page.
Thursday Friday Saturday
Holiday
Monday Tuesday
X
Wednesday
8:30 2013-4-24
Wednesday
WEEKLY TIMER
Save Last Next
3) At the week day’s setting page, it is allowed to set the running mode (Mode), temperature set point (WTHEAT), and water tank temperature (T-Water Tank). The running mode includes “Heat”, “Cool”, “Hot water”,
“Heat+ hot water”, “Cool+ hot water” (the last three ones are available only when “Water tank” is set to “With”.
There are totally ve periods for each day, and each period can be set to “√”or “×”. Besides, it is able to set the
20
Air to Water Heat Pump
Service Manual- Versati II Series
CONTROL
“Start time” and “End time” for each period, as shown in the gure below.
4) When above settings are nished, pressing the Return key and then pressing “Save”, a pop-up window
will pop up to remind if you are determined to save these settings. If so, press the OK key. If not, press the
Return key to not save these settings.
5) In this case, nally by pressing the Up key, “Weekly timer” will be activated.
[Notes]
①
Totally ve periods are allowed to be set for each time. For each period, “Start time” must be earlier
than “End time”. Similarly, the preceding period must be earlier than its following period.
②
When “Weekly timer” has been set successfully, by changing “FCU”, “Water tank”, “Ctrl state”, or
“T-water ctrl”, then the temperature set point for “Weekly timer” will be automatically changed to the set point
of last setting. For instance, if “Heat” is set for Monday of “Weekly timer”, “FCU” is set to “With” and the “T-water
out” is 20 , by resetting “FCU” to “Without”, then “T-water out” will be the value of last setting. In this case, if
FCU is disabled for last setting, then “T-water out” will be the default value (18 ).
③
At the “WEEKLY TIMER” setting page there are totally three setting types for each day
“√”: it indicates once the Week Timer is activated, the timer on this day is effective and will not be affected
by the “Holiday” mode.
21
Air to Water Heat Pump
Service Manual- Versati II Series
CONTROL
“×”: it indicates even if the Week Timer is activated, the timer on this day is ineffective.
“Holiday”: it indicates when the Week Timer is activated but “Holiday” is not activated, then the timer on
this day is effective; when “Holiday” is also activated, the timer on this day is ineffective.
④
When “Weekly timer” has already been set and the concerned modes include “Hot water”, if resetting
“Water tank” from “With” to “Without”, then “Hot water” mode will be automatically changed to “Heat”,
“Cool+hot water”/ “Heat+hot water” changed to “Cool”/ “Heat”.
⑤
Temperature Setpoint
The control is able to decide the temperature type and temperature range based on the current “Clock
Timer”, “FCU”, “T-water Ctrl�”, and “Ctrl� state” settings. See the followings for more details.
If the set mode is “Hot water”, the temperature set point shows nothing, indicating there is no need to set
“T-water out” and “T-room” but only “T- tank”. If the set mode “Cool” or “Heat”, then water tank temperature
box will show nothing, indicating there is no need to set “T-tank”.
Ctrl� state Set Mode Object Range Default Accuracy
T-water
out
Cool
Water out temperature
for cooling(WT-cool)
7-25
℃
(With FCU)
18-25
℃
(Without FCU)
7℃ (With FCU)
18℃ (Without FCU)
1
℃
Heat
Water out temperature
for heating(WT-heat)
High temp. 25-55
℃
45
℃
1
℃
Low temp. 25-45
℃
35
℃
1
℃
T-room
Cool
Room temperature
for cooling(RT-cool)
18-30
℃
20
℃
1
℃
Heat
Room temperature
for heating(RT-heat)
18-30
℃
26
℃
1
℃
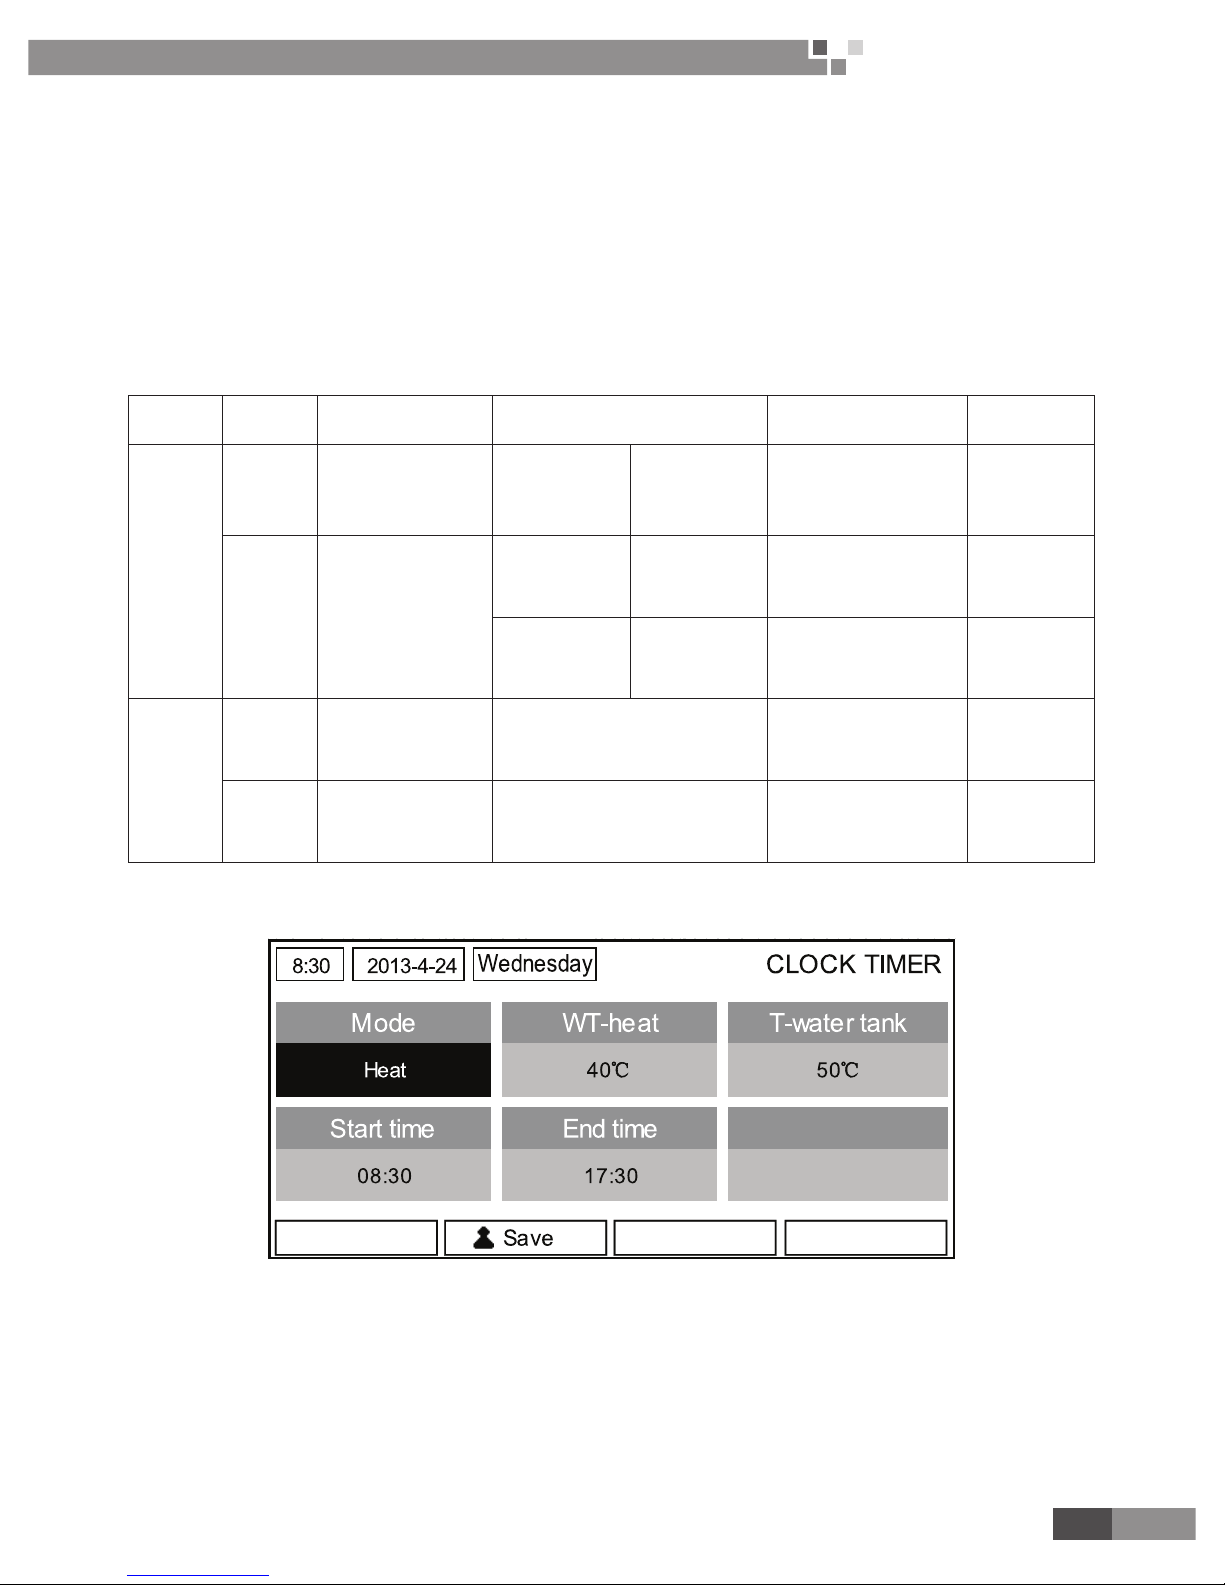
3�3�2�13 Clock Timer
1) At the homepage, by pressing the Function no.1 key access to the FUNCTION page, and then locate
where “Clock timer” is, after that, press OK key to go to the COLCK TIMER setting page.
2) At the CLOCK TIMER setting page, by the Left/Right key select the desired parameter and then by the
Up/Down key congure it.
3) When this setting is concerned about time value, by pressing the Function key no. 1 alternately set the
hour or minute values, and by pressing the Up/Down key increase or decrease the corresponding value which
will be continuously changed by pressing and holding the key.
(Unless otherwise specied, all timer settings follow the similar way.)
4) When the setting is finished, save it by pressing the Function key no. 2, or this setting without being
saved is ineffective.
5) When the setting has been saved, activate the “Clock Timer” at the FUNCTION page.
22
Air to Water Heat Pump
Service Manual- Versati II Series
CONTROL
[Notes]
①
When “Weekly timer” and “Clock timer” settings are performed at the same time, the latter takes
precedence.
②
When the water tank is available, the allowed running modes include “Heat”, “Cool”, “Heat+ hot water”,
“Cool+hot water”, and “Hot water”.
③
When the water tank is unavailable, the allowed running modes only include “Heat” and “Cool”.
④
When “Clock timer” has already been set and the concerned modes include “Hot water”, if resetting
“Water tank” from “With” to “Without”, then “Hot water” mode will be automatically changed to “Heat”,
“Cool+hot water”/ “Heat+hot water” changed to “Cool”/ “Heat”.
Full Name Displayed Name Range Default
Set Mode Mode
Cool/
Heat/
Hot water/
Cool+hot water/
Heat+hot water
Heat
Water out temperature for cooling /
Room temperature for cooling /
Water out temperature for heating /
Room temperature for heating
WT-heat/
RT-heat/
WT-cool/
RT-cool
Refer to the temperature
setting range of
“Weekly Timer”.
35
℃
Tank temperature T-water tank 40~80℃/104~176
℉
50℃/122
℉
Start time Start time 00:00-23:59 08:30
End time End time 00:00-23:59 17:30
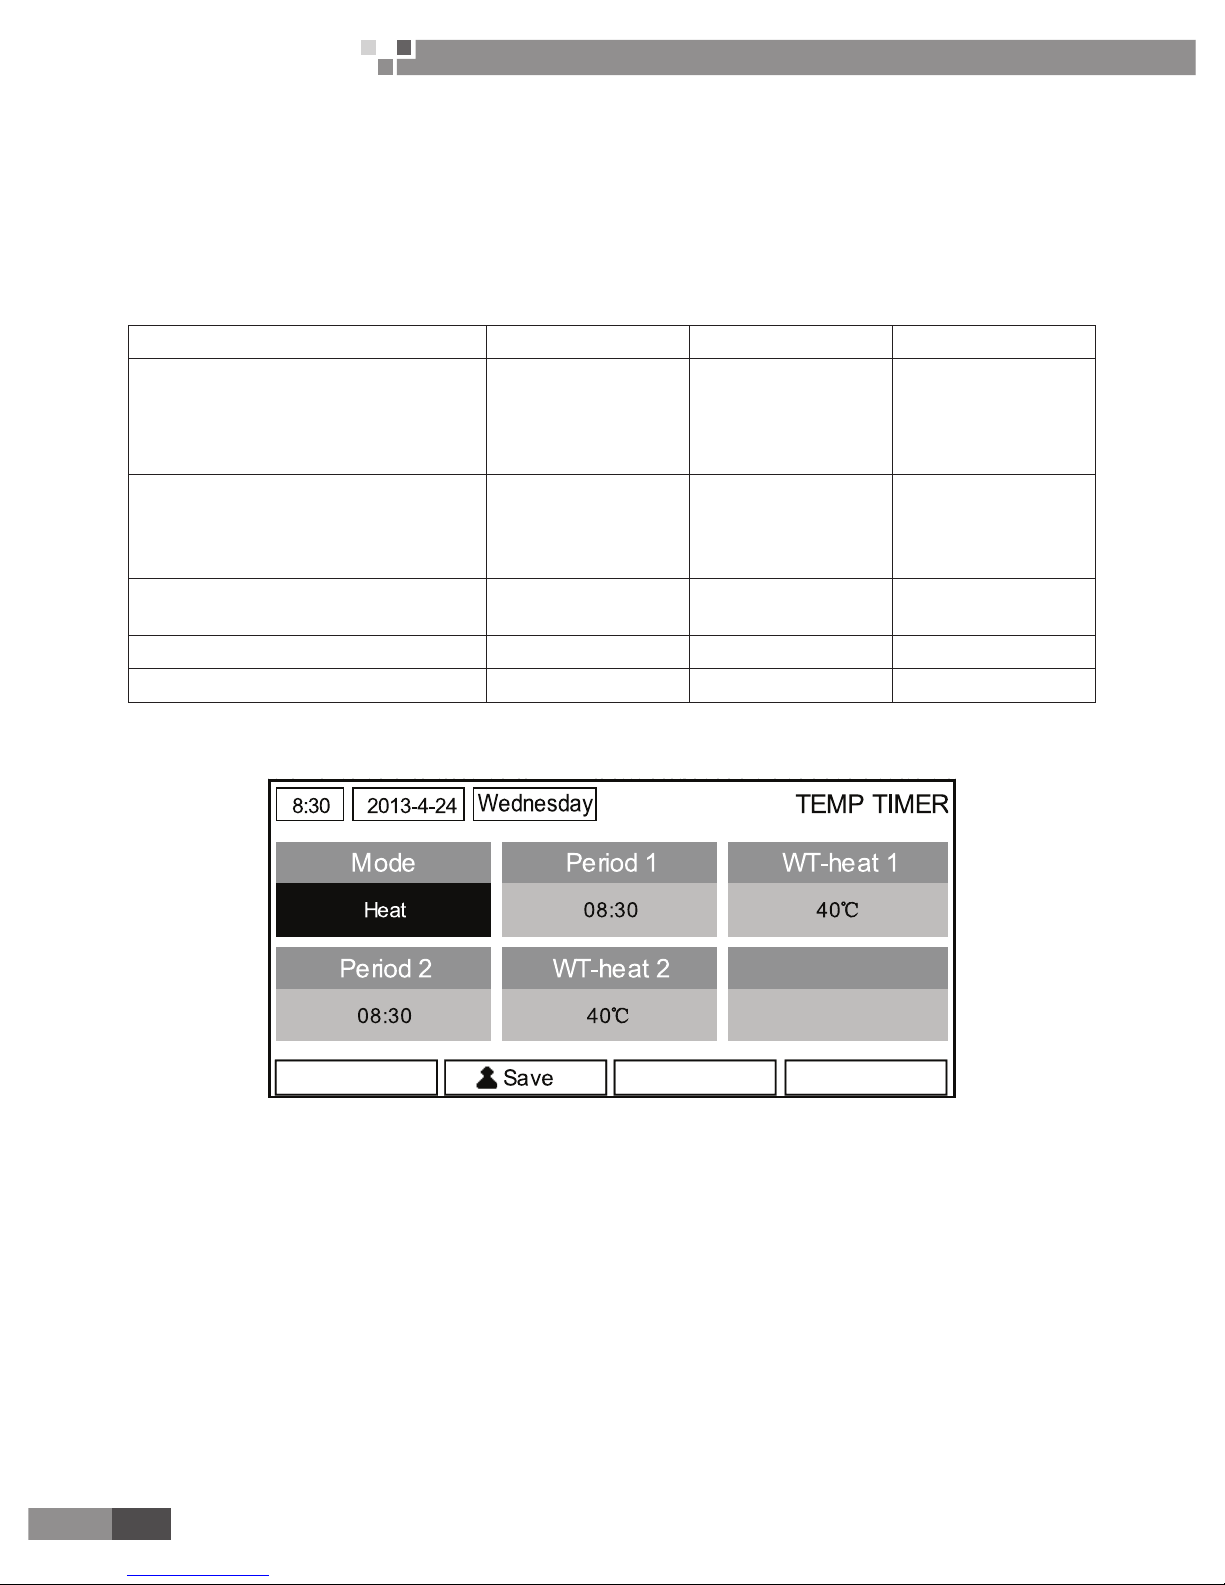
3�3�2�14 Temp� Timer
1) At the homepage, by pressing the Function key access to the FUNCTION page, and then locate where
“Temp timer” is, after that, press OK key to go to the TEMP TIMER setting page.
2) At the TEMP TIMER setting page, by the Left/Right key select the desired parameter and then by the Up/
Down key congure it. The congurable parameters include “Mode”, “Period 1”, “WT-HEAT 1”, “Period 2” and
“WT-HEAT 2”.
4) When the setting is finished, save it by pressing the Function key no. 2, or this setting without being
saved is ineffective.
5) When the setting has been saved, activate the “Temp� timer” at the FUNCTION page.
[Notes]
①
When “Weekly timer”, “Clock timer”, and “Temp� timer” settings are performed at the same time, the
last one takes precedence.
②
This function works only when the unit is in operation.
③
The allowed running modes include “Heat” and “Cool”
④
When the start time of “Period 2” is equal to that of “Period 1”, then the set point of “Period 2” takes
precedence.
⑤
TEMP� TIMER is judged by the timer value.
⑥
During the setting, the temperature set point which is set manually always takes precedence.
23
Air to Water Heat Pump
Service Manual- Versati II Series
CONTROL
Full Name Displayed Name Range Default
Set Mode Mode Cool/Heat Heat
Period 1 running time Period 1 00:00-23:59 08:30
Water out temperature for cooling /
Room temperature for cooling /
Water out temperature for heating /
Room temperature for heating
WT-heat 1/
RT-heat 1/
WT-cool 1/
RT-cool 1
Refer to the temperature
setting range of
“Weekly Timer”.
35℃/95
℉
Period 1 running time Period 2 00:00-23:59 17:30
Water out temperature for cooling /
Room temperature for cooling /
Water out temperature for heating /
Room temperature for heating
WT-heat 2/
RT-heat 2/
WT-cool 2/
RT-cool 2
Refer to the temperature
setting range of
“Weekly Timer”.
35℃/95
℉
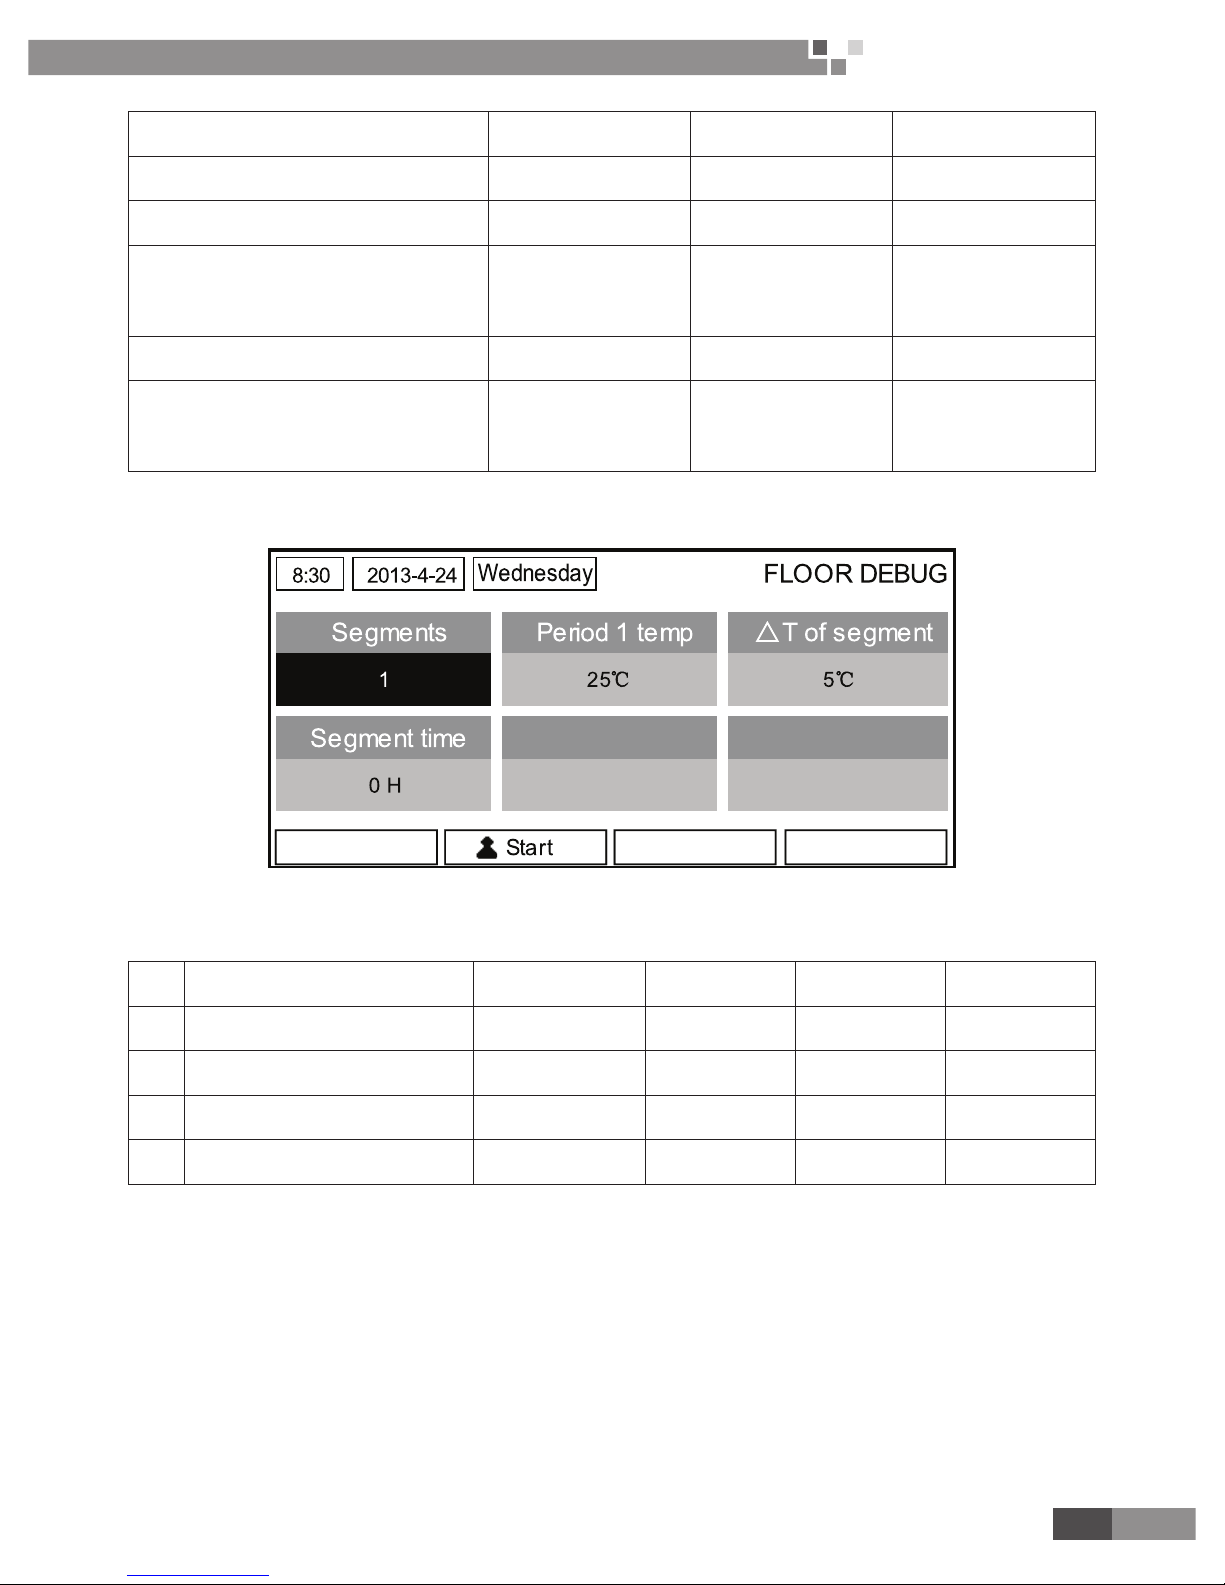
3�3�2�15 Floor Debug
1) At the homepage, by pressing the Function key access to the FUNCTION page, and then locate where
“Floor debug” is, after that, press OK key to go to the FLOOR DEBUG setting page.
2) At the FLOOR DEBUG setting page, by the Left/Right key select the desired parameter and then by
the Up/Down key configure it. The configurable parameters include “Segments”, “Period 1 temp”, “ΔT of
segment”, and “Segment time”, as listed in the following table..
No� Full Name Displayed Name Range Default Accuracy
1 Segments for oor debug Segments 1~10 1 1
2 First temperature for oor debug Period 1 temp
25~35℃/
77~95
℉
25℃/77
℉
1℃/1
℉
3
Segment temperature
difference for oor debug
ΔT of segment 0~72H 0 12H
4 Segments duration for oor debug Segment time
2~10℃/
36~50
℉
5℃/41
℉
1℃/1
℉
3) After the above setting is nished, by pressing the function key no. 2 activate this function and a dialog
box will pop up, reminding “Start the Floor Debug Mode now?”. If so, press the “OK” key. Once “Floor debug”
has been activated, by pressing the function key no. 2, a dialog box also will pop up, reminding “Stop the Floor
Debug Mode now?” If so, press the OK key; if not, press “Cancel” to go on.
[Notes]
①
This function can be activated only when the unit is OFF. When it is intended to activate this function
with the unit being ON, a dialog box will pop up, warning “Please turn off the system rst!”.
②
When this function has been activated, it is unable to turn on or off the unit. In this case, when pressing
the ON/OFF key, a dialog will pop up, warning “Please disable the Floor Debug Mode!”.
③
When this function has been set successfully, “Timer week”, “Clock timer” and “Temp timer” will be
deactivated.
④
“When “Floor debug” mode has been activated, “Emergen�mode”, “Sanitize”, “Holiday mode” is not

24
Air to Water Heat Pump
Service Manual- Versati II Series
CONTROL
allowed to be activated, or a dialog box will pop up, warning “Please disable the Floor Debug Mode!”.
⑤
Upon power failure, this function will be OFF and runtime will be cleared.
⑥
At the FlOOR DEBUG setting page, the control will remain at this page and never back to the
homepage unless pressing the Return key or Menu key.
⑦
When this function is activated, it is allowed to check the target temperature and runtime of “Floor
Debug” at the Parameter View page.
⑧
Before activating “Floor debug”, please make sure each period for “Floor debug” is not zero, or a
dialog box will pop up, warning “Wrong Floor Debug time!”. It will resume only by pressing “OK” and then
correcting the time.
3�3�2�16 Emergency Mode (Emergen� Mode)
1) Set “Mode” to “Heat” or “Hot water” at the Parameter Set page
2) Then, switch pages to go the page where “Emergen� mode”, locate it by the Left/Right key, and congure
it to “On” or “Off” by the Up/Down key.
3) When it is set to “On”, “Auxiliary func�” at the homepage will be replaced by “Emergen� Mode”.
4) When it is set to “On” but the running mode is not “Heat” or “Hot water”, a dialog will pop up, warning
“Wrong running mode!”. In this case, by pressing the OK key, the control will go to the Mode setting page, or
by pressing the Cancel key, the control will return to the “Emergen� Mode” page.
[Notes]
①
When the unit is performing “Heat” at the Emergency mode, if there is water ow switch protection, IDU
assistant heater welding protection, or leaving water temperature sensor error, the Emergency mode will quit
and will not be allowed to be activated.
②
When the unit is performing “Hot water” at the Emergency mode, if there is water tank heater welding
protection, or water tank temperature sensor error, the Emergency mode will quit and will not be allowed to be
activated.
③
At the Emergency mode, the ON/OFF key operation will be disabled; the running mode will not be
allowed to be changed; the Quiet and Auto modes cannot be deactivated; “Weekly timer”, “Clock timer” and
“Temp timer” also cannot be activated, or will be deactivated if being activated.
④
At the Emergency mode, commands from the Thermostat is ineffective.
⑤
At the Emergency mode, only one running mode between “Heat” and “Hot water” is allowed.
⑥
This function can be activated only when the unit is OFF, or a dialog box will pop up, warning “Please
turn off the system rst!”
⑦
Under the Emergency mode, “Floor debug”, “Sanitize”, “Holiday mode”, cannot be activated, or a
dialog box will pop up, warning “ Please disable the Emergency Mode!”.
⑧
Upon power failure, the “Emergen� mode” will be defaulted to be “Off”.
3�3�2�17 Holiday Mode
1) Locate where “Holiday mode” at the FUNCTION page
2) Set Holiday to “On” or “Off” by the Up/Down key.
[Notes]
①
At the holiday mode, “Mode” setting of the control and On/Off key operation both are disabled.
②
When it is activated, “Weekly timer”, “Clock timer” or “Temp timer” will be deactivated.
③
At the holiday mode, when “T-Room” is adopted, the temperature set point should be 15 ; when “T-Out
water” is adopted, then the temperature set point should be 30 .
④
It will quit when the thermostat effectively works (“Cool” or “OFF” operation).
⑤
When this setting is saved successfully, it will be memorized upon power failure.
⑥
This function can be activated only at the “Heat” mode and with the unit turned off. When it is done
with the unit turned on, a prompt dialog box will pop up, warning “Please turn off the system rst!”; or when
it is done at other modes except the “Heat” Mode with the unit turned off, also a prompt dialog box will pop up,
warning “Wrong running mode!”.
⑦
When it is activated, the ON/OFF key operation is disabled, or a dialog box will pop up, warning “Please
disable the Holiday Mode !”.
⑧
Under the Holiday mode, “Floor debug”, “Sanitize”, “Emergen� mode” cannot be activated, or a dialog
box will pop up, warning “Please disable the Holiday Mode !”.
3�3�2�18 Thermostat
1) Locate where “Thermostat” is at the FUNCTION page
2) By pressing the Up/Down key, Thermostat can be set to “On” or “Off”. When it is “On”, the control follows
the running mode of the thermostat and is not allowed to set the running mode; when it is “Off”, the control
follows the running mode set by itself.

25
Air to Water Heat Pump
Service Manual- Versati II Series
CONTROL
[Notes]
①
When “Floor debug” or “Emergen� Mode” is activated, then the control will not receive signals from the
thermostat.
②
If “Thermostat” is set to “On”, the control will automatically disable some functions concerning timer, and
run in accordance with the mode set by the thermostat. In this case, the running mode is unchangeable and the
ON/OFF key operation of the control is ineffective.
③
When this setting is saved successfully, it will be memorized upon power failure.
④
The state of the Thermostat can be changed when the unit is turned off.
3�3�2�19 IDU Heater
Go to the FUNCTION page and locate “IDU Heater”, then, congure it through the Up/Down key, “With” or
“Without”.
[Notes]
it will be memorized upon power failure.
3�3�2�20 Other Heater
Go to the FUNCTION page and locate Other heater, then, congure it through the Up/Down key, “With” or
“Without”.
[Notes]
it will be memorized upon power failure.
3�3�2�21 Underpan Heater
Go to the FUNCTION page and locate “Underpan Heater” then, congure it through the Up/Down key, “With”
or “Without”.
[Notes]
it will be memorized upon power failure.
3�3�2�22 Water Tank
Go to the FUNCTION page and locate “Water tank” then, congure it through the Up/Down key, “With” or
“Without”.
[Notes]
①
It will be memorized upon power failure.
②
This setting is allowed only when the unit is turned off.
3�3�2�23 Tank Sensor
Go to the FUNCTION page and locate “Water tank”, then, congure it through the Up/Down key, “1” or “2”.
When the water tank is unavailable, this option will be reserved.
[Notes]
it will be memorized upon power failure.
3�3�2�24 Solar Heater
Go to the FUNCTION page and locate “Solar heater”, then, congure it through the Up/Down key, “With” or
“Without”.
[Notes]
it will be memorized upon power failure.
3�3�2�25 FCU
Go to the FUNCTION page and locate “FCU”, then, configure it through the Up/Down key, “With” or
“Without”.
[Notes]
It will be memorized upon power failure.
3�3�2�26 Remote Sensor
Go to the FUNCTION page and locate “Remote sensor”, then, congure it through the Up/Down key, “With”
or “Without”.
[Notes]
It will be memorized upon power failure.
“T-room ctrl” can be selected only when the Remote Sensor is set to “With”.
3�3�2�27 Air removal
Go to the FUNCTION page and locate “Air removal”, then, congure it through the Up/Down key, “On” or
“Off”.
[Notes]
①
It will not be memorized upon power failure.
②
It can be set only when the unit is turned off.
26
Air to Water Heat Pump
Service Manual- Versati II Series
CONTROL
3�3�2�28 Address
Go to the FUNCTION page and locate “Address”, then, congure it through the Up/Down key to set the
address.
[Notes]
①
It indicates the address of the control and is intended for the group control.
②
It will not be memorized upon power failure.
③
The address range is [0,125] and [127,253]
④
The default address is 0 for the initial use.
3�3�2�29 Doorguard
Go to the FUNCTION page and locate “Doorguard”, then, congure it through the Up/Down key, “On” or
“Off”.
[Notes]
⑤
When it is activated, the control will check the card is inserted or not. If inserted, the control will run
normally; if not, the control will turn off the unit and back to the homepage. In this case, any key operation
is ineffective (except for the combined key operation), or a dialogue box will pop up, warning “Keycard
uninserted!”.
⑥
It will not be memorized upon power failure.
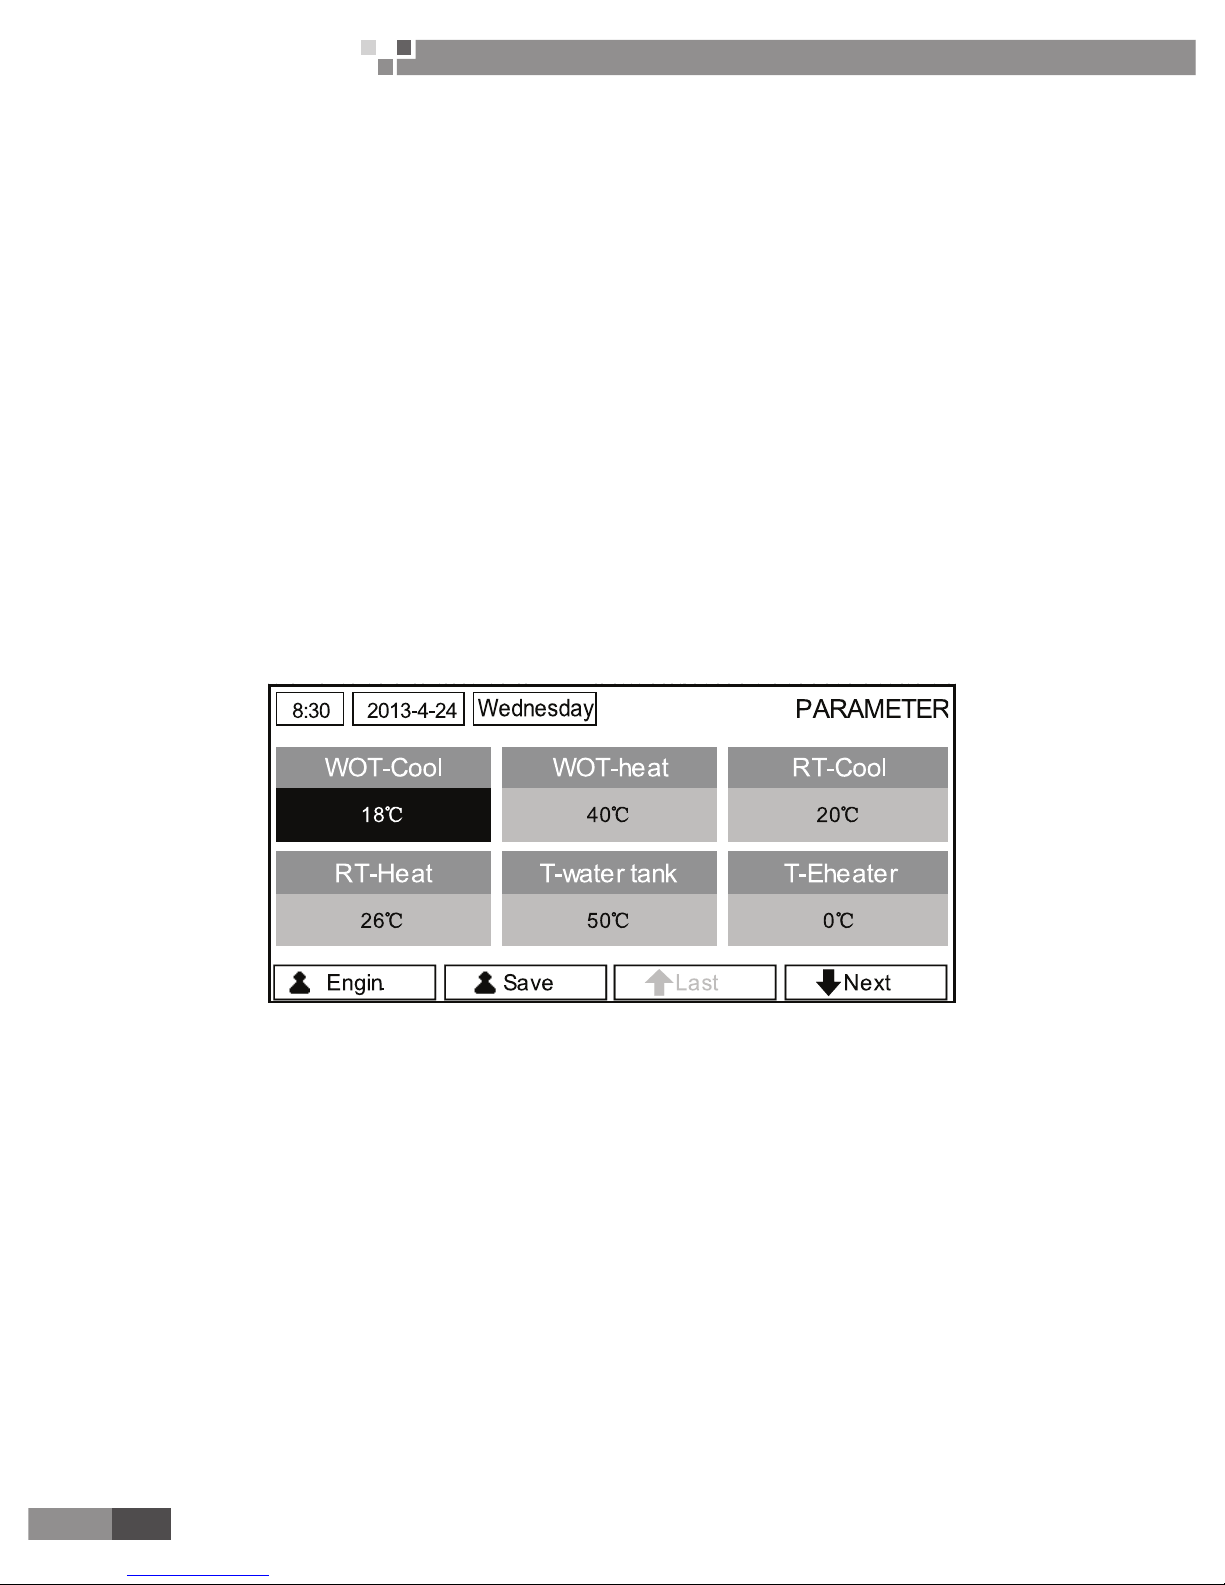
3�3�3 Parameter Setting (Parameter Set)
3�3�3�1 User Parameter Setting
1) At the homepage, it is able to go to the PARAMETER page by pressing the Function key no.2.
2) At the Parameter Set page, by the Left/Right key select the desired option and then by the Up/Down key
increase or decrease the setting value which will be continuously changed when pressing and holding the key.
3) When the setting is nished, press “Save” and a dialog box will pop up, reminding “Save settings?”. If
so, press the OK key; if not press the Cancel key to not save this setting.
User Setting
27
Air to Water Heat Pump
Service Manual- Versati II Series
CONTROL
No� Full Name
Displayed
Name
Range(℃) Range(℉) Default
1
Water out temperature
for cooling
WOT-Cool
7~25
℃
[With FCU]
18~25
℃
[Without FCU]
45~77
℉
[With FCU]
64~77
℉
[Without FCU]
7
℃
/45
℉
[With FCU]
18
℃
/64
℉
[Without FCU]
2
Water out temperature
for heating
WOT-Heat
25~55
℃
[High temp.]
25~45
℃
[Low temp.]
77~131
℉
[High temp.]
77~113
℉
[Low temp.]
45
℃
/113
℉
[High temp.]
35
℃
/95
℉
[Low temp.]
3
Room temperature for
cooling
RT-Cool 18~30
℃
64~86
℉
20
℃
/68
℉
4
Room temperature for
heating
RT-Heat 18~30
℃
64~86
℉
26
℃
/79
℉
5 Tank temperature T-water tank 40~80
℃
104~176
℉
50
℃
/122
℉
6
Eheater-on ambient
temperature
T-Eheater -20~18
℃
-4~64
℉
0
℃
/32
℉
7
Extra-heater-on
ambient temperature
T-Extraheater -20~18
℃
-4~64
℉
0
℃
/32
℉
8
Max heat pump
waterout temperature
(no eheater)
T-HP Max 40~50
℃
104~122
℉
50
℃
/122
℉
9
Lower limit ambient
temperature at the auto
mode for heating
Lower AT-Heat
-20~5
℃
-4~41
℉
-15
℃
/5
℉
10
Upper limit temperature
at the auto mode for
heating
Upper AT-Heat
10~20
℃
50~68
℉
15
℃
/59
℉
11
Upper limit room
temperature at the auto
mode for heating
Upper RT-Heat
22~30
℃
72~86
℉
24
℃
/75
℉
12
Lower limit room
temperature at the auto
mode for heating
Lower RT-Heat
18~21
℃
64~70
℉
20
℃
/68
℉
13
Upper limit water-out
temperature at the auto
mode for heating
Upper WT-Heat
46~55
℃
[High temp.]
30~35
℃
[Low temp.]
115~131
℉
[High temp.]
86~95
℉
[Low temp.]
48
℃
/118
℉
[High temp.]
35
℃
/95
℉
[Low temp.]
14
Lower limit water-out
temperature at the auto
mode for heating
Lower WT-Heat
36~45
℃
[High temp.]
25~29
℃
[Low temp.]
97~113
℉
[High temp.]
77~84
℉
[Low temp.]
40
℃
/104
℉
[High temp.]
29
℃
/84
℉
[Low temp.]
15
Lower limit ambient
temperature at the auto
mode for cooling
Lower AT-Cool
10~25
℃
50~77
℉
25
℃
/77
℉
16
Upper limit temperature
at the auto mode for
cooling
Upper AT-Cool
26~48
℃
79~118
℉
40
℃
/104
℉
17
Upper limit room
temperature at the auto
mode for cooling
Upper RT-Cool
24~30
℃
75~86
℉
27
℃
/81
℉
18
Lower limit room
temperature at the auto
mode for cooling
Lower RT-Cool
18~23
℃
64~73
℉
22
℃
/72
℉
19
Upper limit water-out
temperature at the auto
mode for cooling
Upper WT-Cool
15~25
℃
[With FCU]
22~25
℃
[Without FCU]
59~77
℉
[With FCU]
72~77
℉
[Without FCU]
15
℃
/59
℉
[With FCU]
23
℃
/73
℉
[Without FCU]
20
Lower limit water-out
temperature at the auto
mode for cooling
Lower WT-Cool
7~14
℃
[With FCU]
18~21
℃
[Without FCU]
45~57
℉
[With FCU]
64~70
℉
[Without FCU]
7
℃
/45
℉
[With FCU]
18
℃
/64
℉
[Without FCU]
21
Temperature deviation
for cooling
△
T-Cool 2~10
℃
36~50
℉
5
℃
/41
℉
22
Temperature deviation
for heatling
△
T-Heat 2~10
℃
36~50
℉
10
℃
/50
℉
23
Temperature deviation
for heating water
△
T-hot water 2~8
℃
36~46
℉
5
℃
/41
℉
 Loading...