


Local air conditioner
Thank you for choosing our product.
For proper operation, please read and keep this manual carefully .
Model: TS15-12PACHPEC-A
(G15-12PACHPEC)

For your own records, please attach a copy of your sales receipt to this manual. Also, write the store
name/location, date purchased, and serial number below:
Store Name: ____________________________________________________
Location: ______________________________________________________
Date Purchased: _________________________________________________
Serial Number (located on back of unit): ______________________________
IMPORT
ANT INSTRUCTIONS
Before instal
manual in a safe place for future reference.
1) Always place the unit on a level surface.
2) Never use or store gasoline or other flammable vapor or liquid near this unit unless instructed by this manual.
3) Maintain at least 12 inches (50 cm) clearance space around this unit. Do not block or cover air inlet or outlet grilles.
4) The unit must be connected to a correctly grounded power supply.
5) Do not start or stop the unit by inserting or pulling out the power plug.
6) Do not use an adapter plug or extension cord.
7) Do not use the unit in the immediate surroundings of a bath, a shower or a swimming pool.
8) Do not insert anything into the air outlet. Do not obstruct air inlet or outlet grills unless instructed by this manual.
ling and using your portable air conditioner, please read this owner’s manual carefully. Store this
9) Do not let children play near this unit.
10) Always inspect the cord for signs of damage before use. If the power cord is damaged, it must be replaced by the
manufacturer or a qualified service technician.
11) When cleaning the unit, always turn the unit off and unplug the power cord.
2
3
S
PECIFICATIONS
•
The cooling c
apacity is measured at an ambient temperature of DB 86 °F, WB 78 °F.
•
Noise level is
measured at a distance of 3.28 ft away from the front of the unit, when the unit is in cooling mode.
•
Power consum
ption is measured when the fan runs at the highest speed setting.
•
These specifi
cations are for reference only. For actual data, please refer to the rating label on the back of the unit.
•
If the environ
ment temperature is higher than the max operating temperature or lower than the minimum operating
temperature, the air conditioner may not work properly.
•
Dehu
midifier mode works when ambient temperatures are between 61°F - 86°F
•
Air Conditioner
mode operates up to an ambient temperature of 95°F.
P
ACKAGE CONTENTS
Portable Air Conditioner
Exhaust Hose (1)
Front Exhaust Hose Adapter (1)
Window Kit Adapter (1)
Rear Exhaust Hose Adapter (1)
Remote Control & AAA Batteries (2 batteries)
Window Kit - 3 Sliding Panels (1 single hose panel, 2 extension panels)
Owner’s Manual
Model
TS15-12PACHPEC-A
(with Heat)
Powe
r Supply (Ph/V/Hz) 1/115/60Hz
Deh
umidifying Capacity (Pints/Day) 81
Rated Cooling Capacity (BTU/h) 12,000
Rated
Heating Capacity (BTU/h) 10,500
Cooli
ng Power Input (Watts) 1465
Heatin
g Power Input (Watts) 1200
Rated
Current Cooling (Amperage) 13
Rated
Current Heating (Amperage) 10.6
Noi
se Level (dBA) - H/M/L 55/53/51
Air Flow -
H/M/L (CFM) 235/205/175
Produ
ct Dimensions (W” x H” x D”) 17.75 x 33.125 x 17.125
Produ
ct Weight (Lbs) 80
Refrig
erant Type R-410A
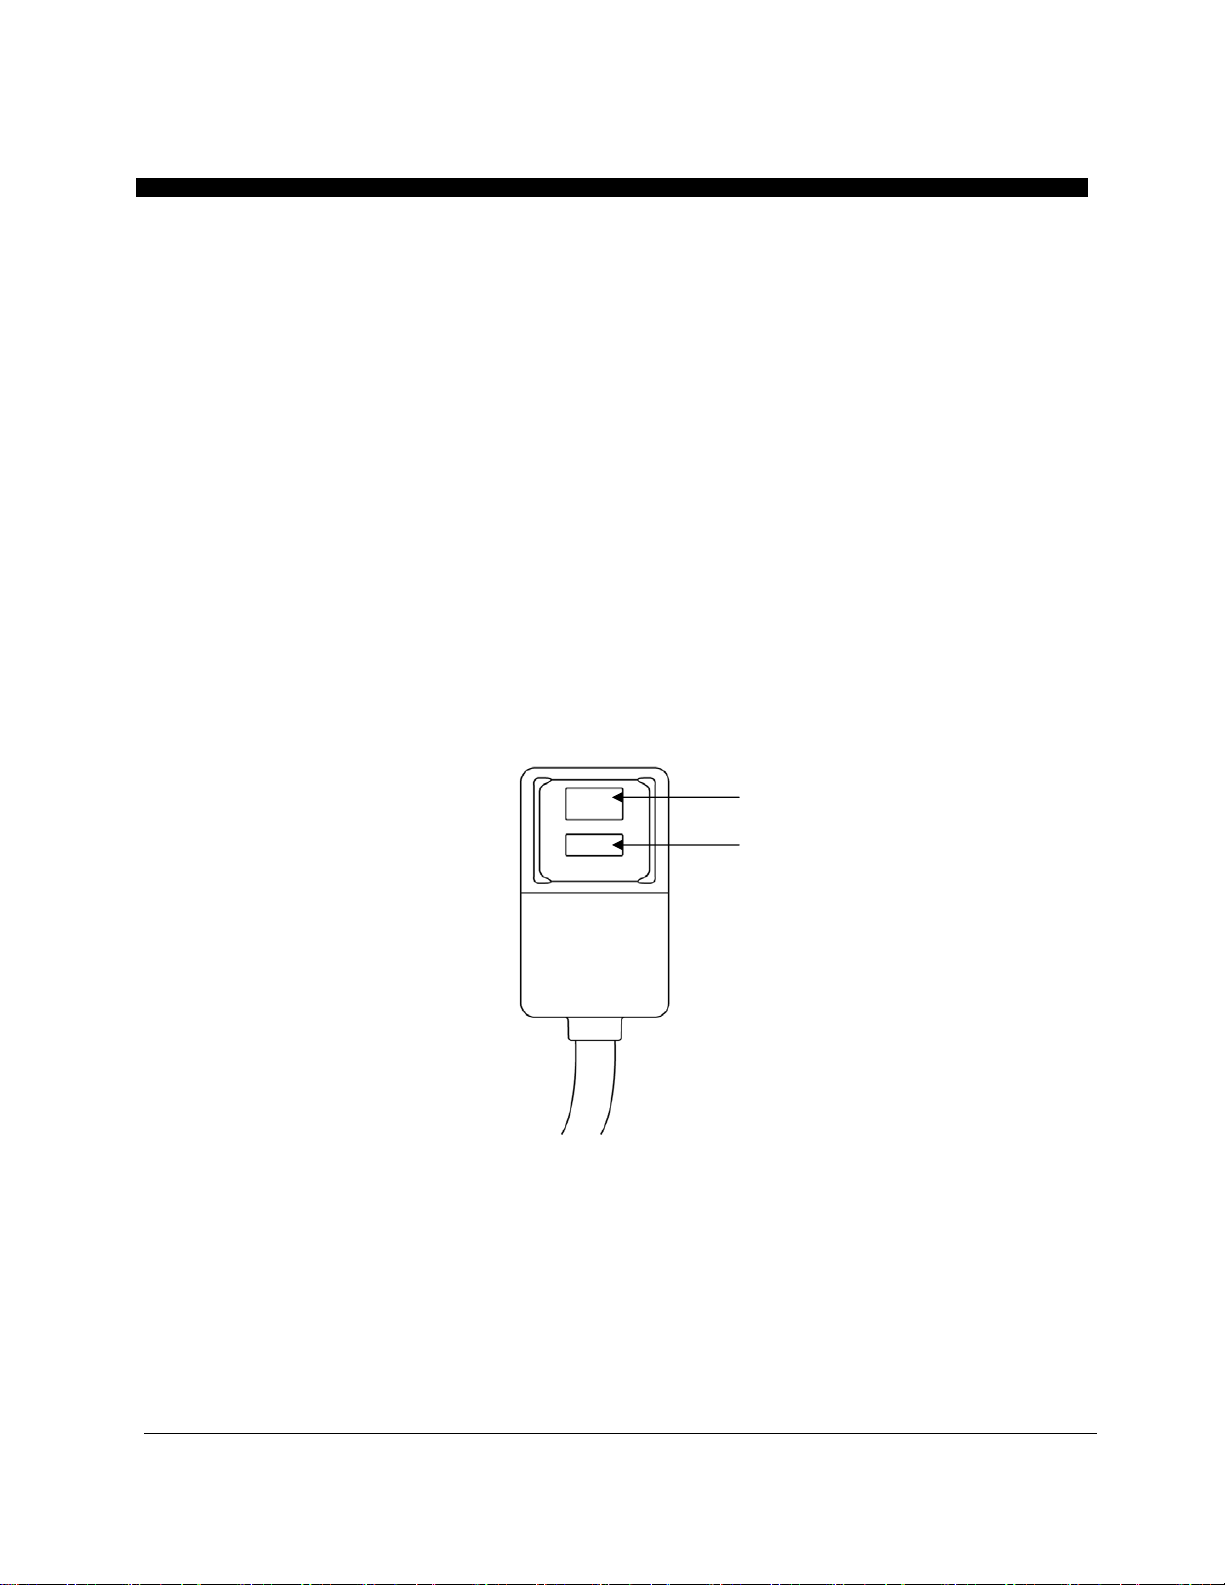
LCDI POWER CORD AND PLUG
This air conditioner is equipped with an LCDI (Leakage Current Detection and Interruption) power cord and
plug as required by US National Electric Code 440.65. This cord consists of a length of shielded flexible cord
with no termination on the load side and a LCDI attachment plug on the line side.
The LCDI power cord and plug will remove the supply source via electrical disconnect (circuit trip) if the
nominal current leakage between the cord shield and either load conductor exceeds a predetermined value.
The cord will remain de-energized until the devise has been manually reset. This is intended to reduce the risk
of a fire in the power cord or combustible materials nearby. The cord shields are not grounded and they must
be considered a shock hazards if exposed. The cord shield must not be connected to ground or to any exposed
metal.
The test and reset buttons on the LCDI Plug are used to check if the plug is functioning properly. To test:
1. Plug power cord into wall outlet
2. Press TEST Button, circuit should trip, cutting power to the air conditioner
3. Press RESET button for use
If a test is performed and the indicator light remains ON, current leakage has been detected. Do not use the air
conditioner or attempt to reset the LCDI Plug. Contact
MARSHALLASSOCIATESINTERNATIONAL
Customer Service for trou
bleshooting recommendations.
WARNING:
1. DO NOT press the TEST button while the air conditioner is operating.
2. The TEST and RESET buttons should not be used as “ON” and “OFF” switches.
3. The cord and plug are not intended to offer protection to externally connected loads or supply circuits.
4. The cord and plug are intended for indoor use only.
RESET
TEST
4
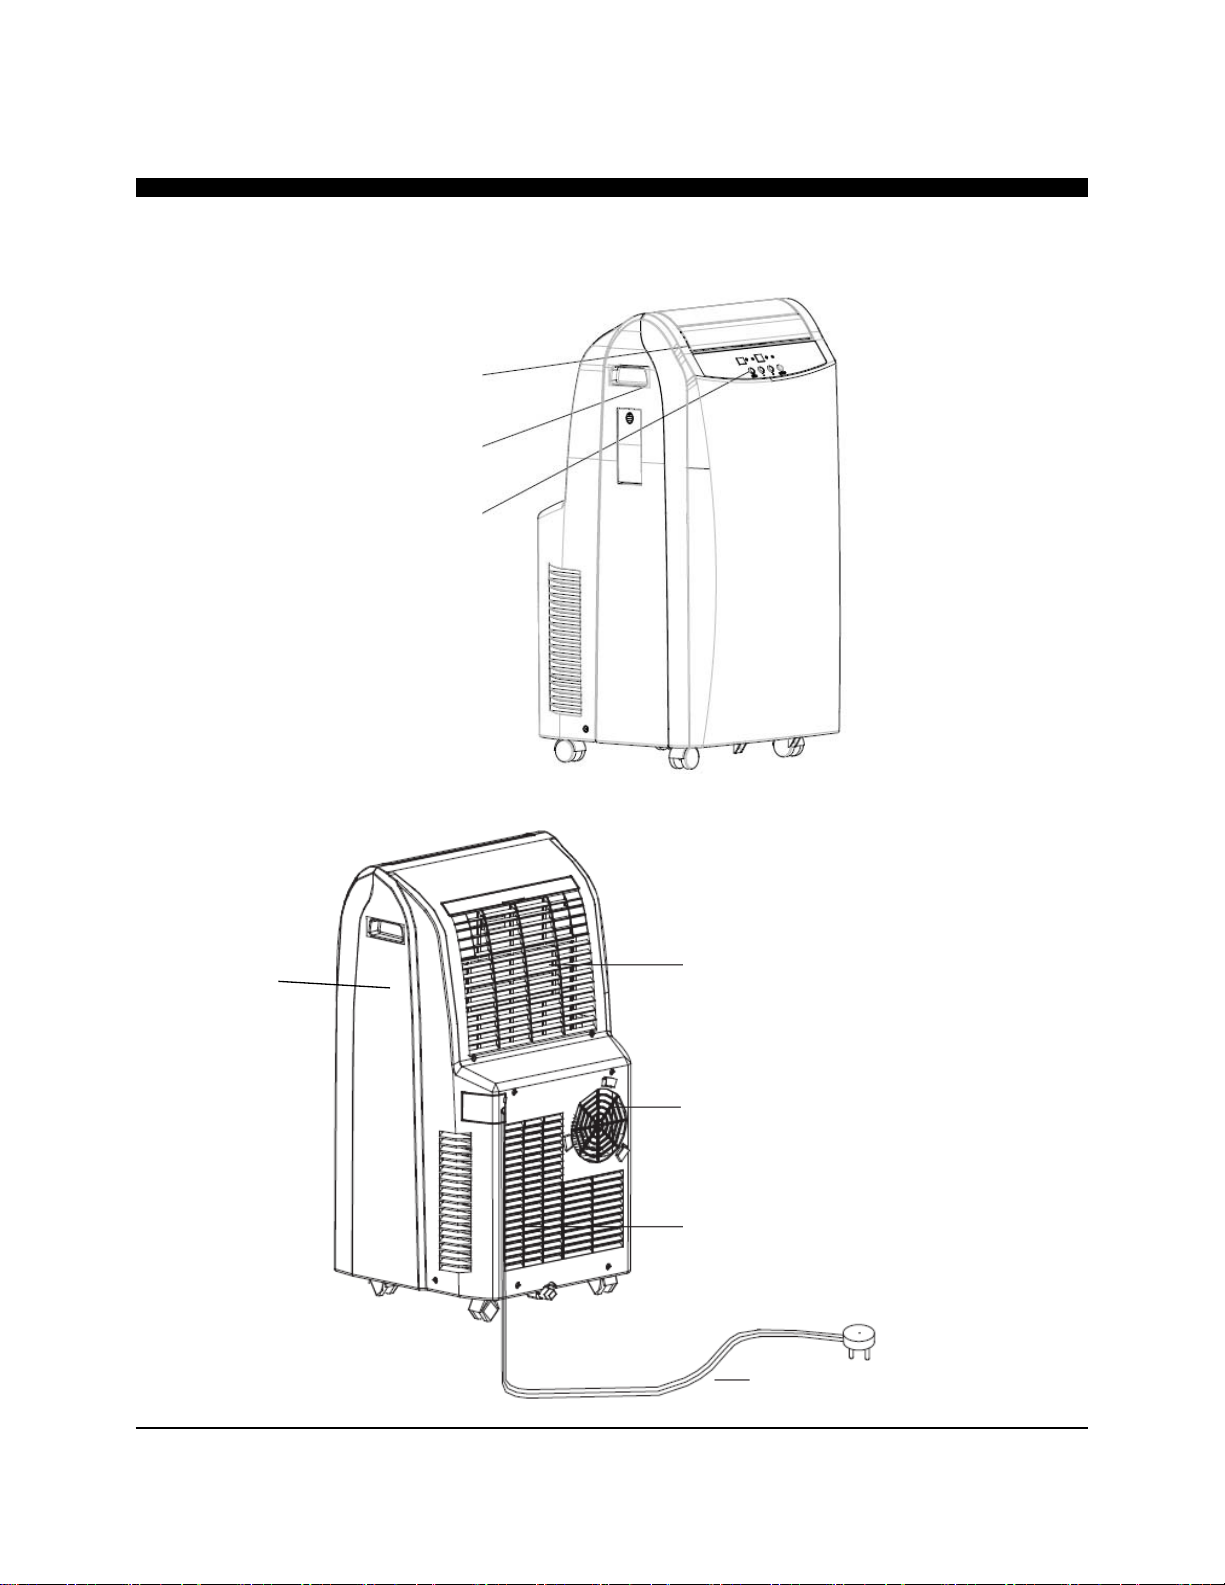
PRODUCT DIAGRAM
Control Panel
5
Carry Handle
Air Outlet &
Louvers
Power Cord
Upper Air Intake
Lower Air Intake
Air Exhaust Vent
Filter
Location
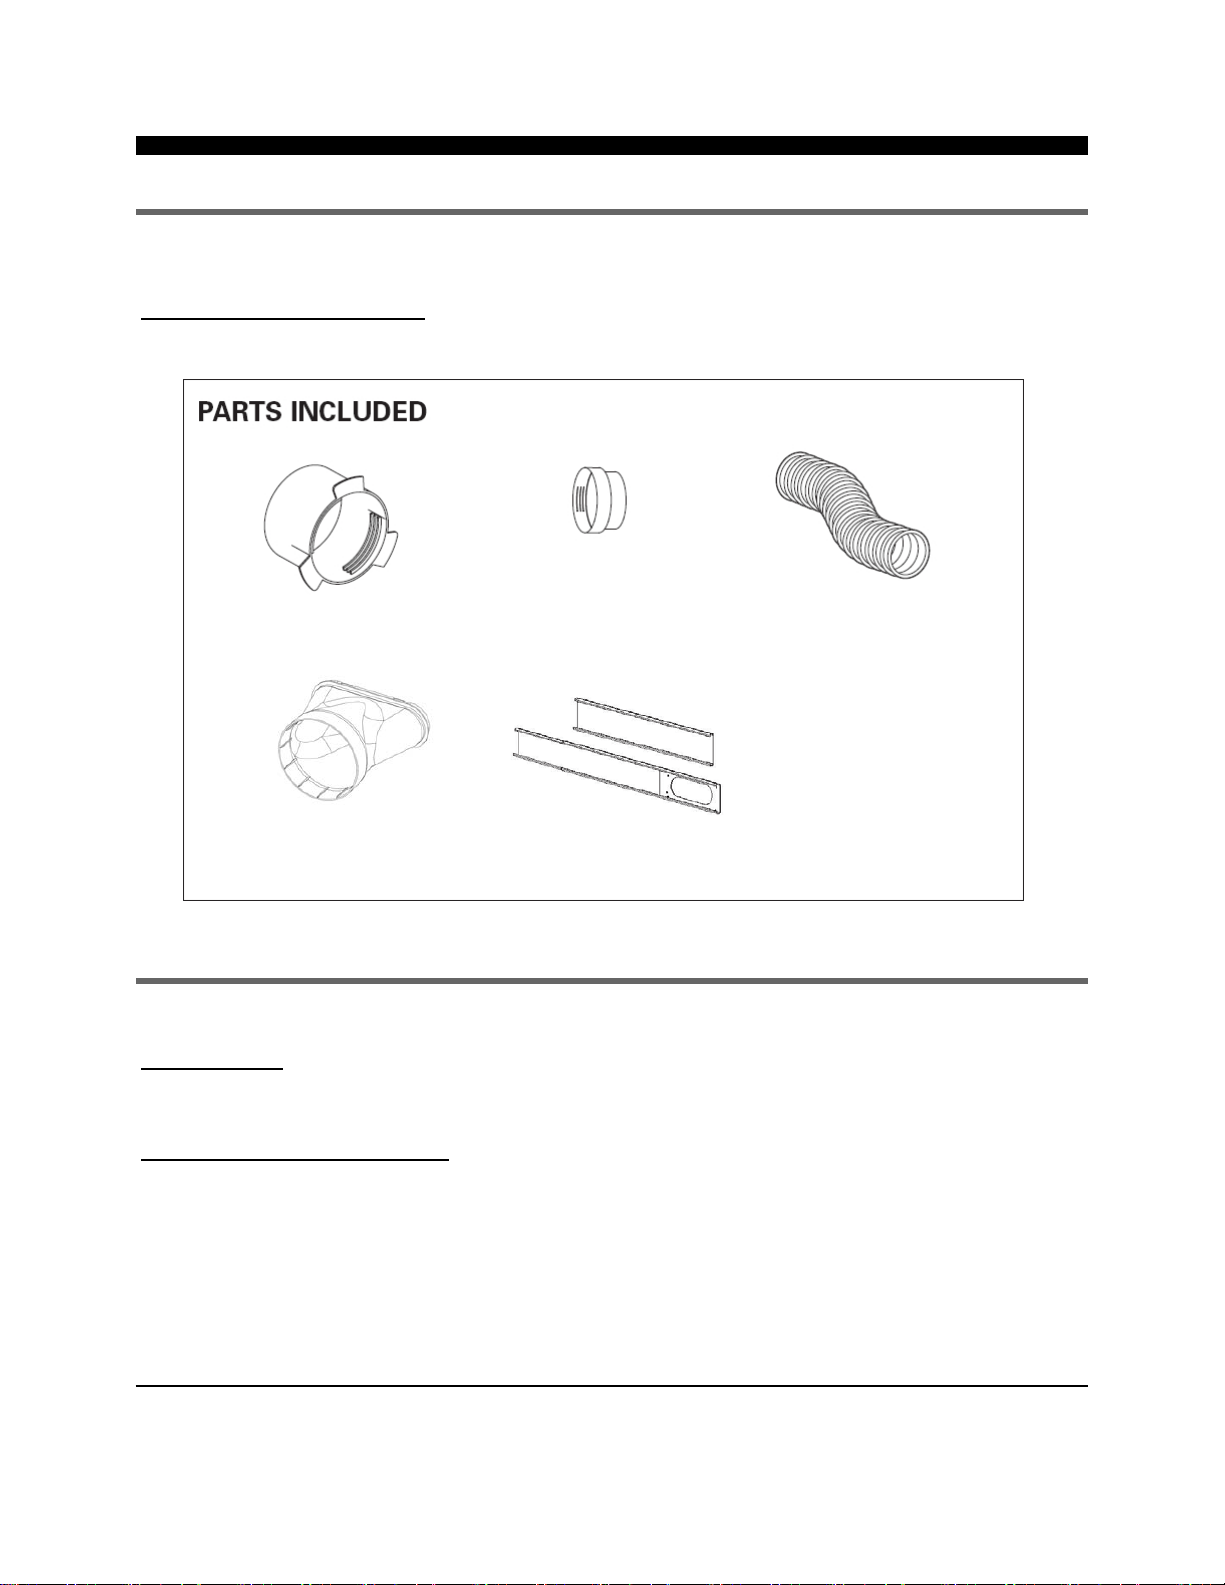
PARTS & WI NDO W K IT ASSE MBLY
PARTS
EXHAUST HOSE & ADAPTERS
ASSEMBLY & INSTALLATION
INSTALLATION
When the unit is operating as an air conditioner or dehumidifier, the window kit and exhaust hose must be installed.
When the unit is operating in fan mode, the window kit and exhaust hose do not need to be installed .
MOUNTING THE EXHAUST HOSE
• Choose a suitable location, near a grounded electrical outlet and suitable window or door. Remove
packaging and locate components.
• Extend both ends of the exhaust hose approximately 6 inches.
• Screw the REAR and FRONT Exhaust Hose Adapters onto each end of the exhaust hose. Once both
adapters are attached, attach the Window Kit Adapter to the REAR Exhaust Hose Adapter.
• Connect the FRONT Exhaust Hose Adapter to the back of your portable air conditioner.
• Attach the Window Kit Adapter to the window kit.
• For maximum efficiency bend the exhaust hose as little as possible once installation is complete.
6
Exhaust Hose Rear Exhaust Hose
Adapter
Front Exhaust Hose
Adapter
Window Kit Adapter
Sliding Panels (3)
 Loading...