

Gree GWH18UC-D3DNA1A/I, GWH09UB-D3DNA2A/I, GWH18UC-D3DNA2A/I, GWH09UB-D3DNA1A/I, GWH12UB-D3DNA3A/I Owner's Manual
...
Split Air Conditioner Wall
Mounted Model
OWNER’S MANUAL
Please read this owner's manual carefully before operating,
and keep it for reference.
00630-19/04/12
© Copyright, Sunrise Tradex Corp., 2012
MODELS
GWH09UB-D3DNA3A/I
GWH09UB-D3DNA2A/I
GWH09UB-D3DNA1A/I
GWH12UB-D3DNA3A/I
GWH12UB-D3DNA1A/I
GWH12UB-D3DNA2A/I
GWH18UC-D3DNA1A/I
GWH18UC-D3DNA2A/I
WWW.GREE.CA
St-Mathieu-de-Beloeil (Québec) Canada
1
-866-680-GREE

CONTENTS
In accordance with the company’s policy of continual product improvement, this appliance’s
aesthetic and dimensional characteristics, technical data and accessories may be changed
without notice.
Thank you for selecting a Gree product
By purchasing a Gree air conditioner, you not only get comfort, but also good health. These operating instructions
present the various features your unit has to offer. In addition, they provide important maintenance and service
information as well as tips to operate the unit more economically. Take a few minutes to discover how to achieve
maximum comfort and save energy with your new Gree air conditioner.
The figures in this manual may differ from the actual objects. Please refer to the actual objects for reference.
This appliance is not intended for use by people (including children) with reduced physical, sensory or mental
capabilities or lack of experience and knowledge unless they are closely supervised by the person responsible for
their safety. Children should be watched to ensure that they do not play with the appliance.
External static pressures of the appliance was tested at 0 Pa
Fuse link: T250 V; 3,15 A
Do not dispose of this product with unsorted municipal waste.
This product must be disposed of separately according to
electronic waste regulations.
Parts and their functions 1
How to use the remote control 2
Care & Cleaning 6
Operating guide 7
Precautions 9
Before contacting a service technician 10
Warning & Recommendations 11
Installing the indoor unit 12
Post-installation verification 15
Warranty 16
O P E R A T I N G
INSTRUCTIONS
I N S T A L L A T I O N
INSTRUCTIONS
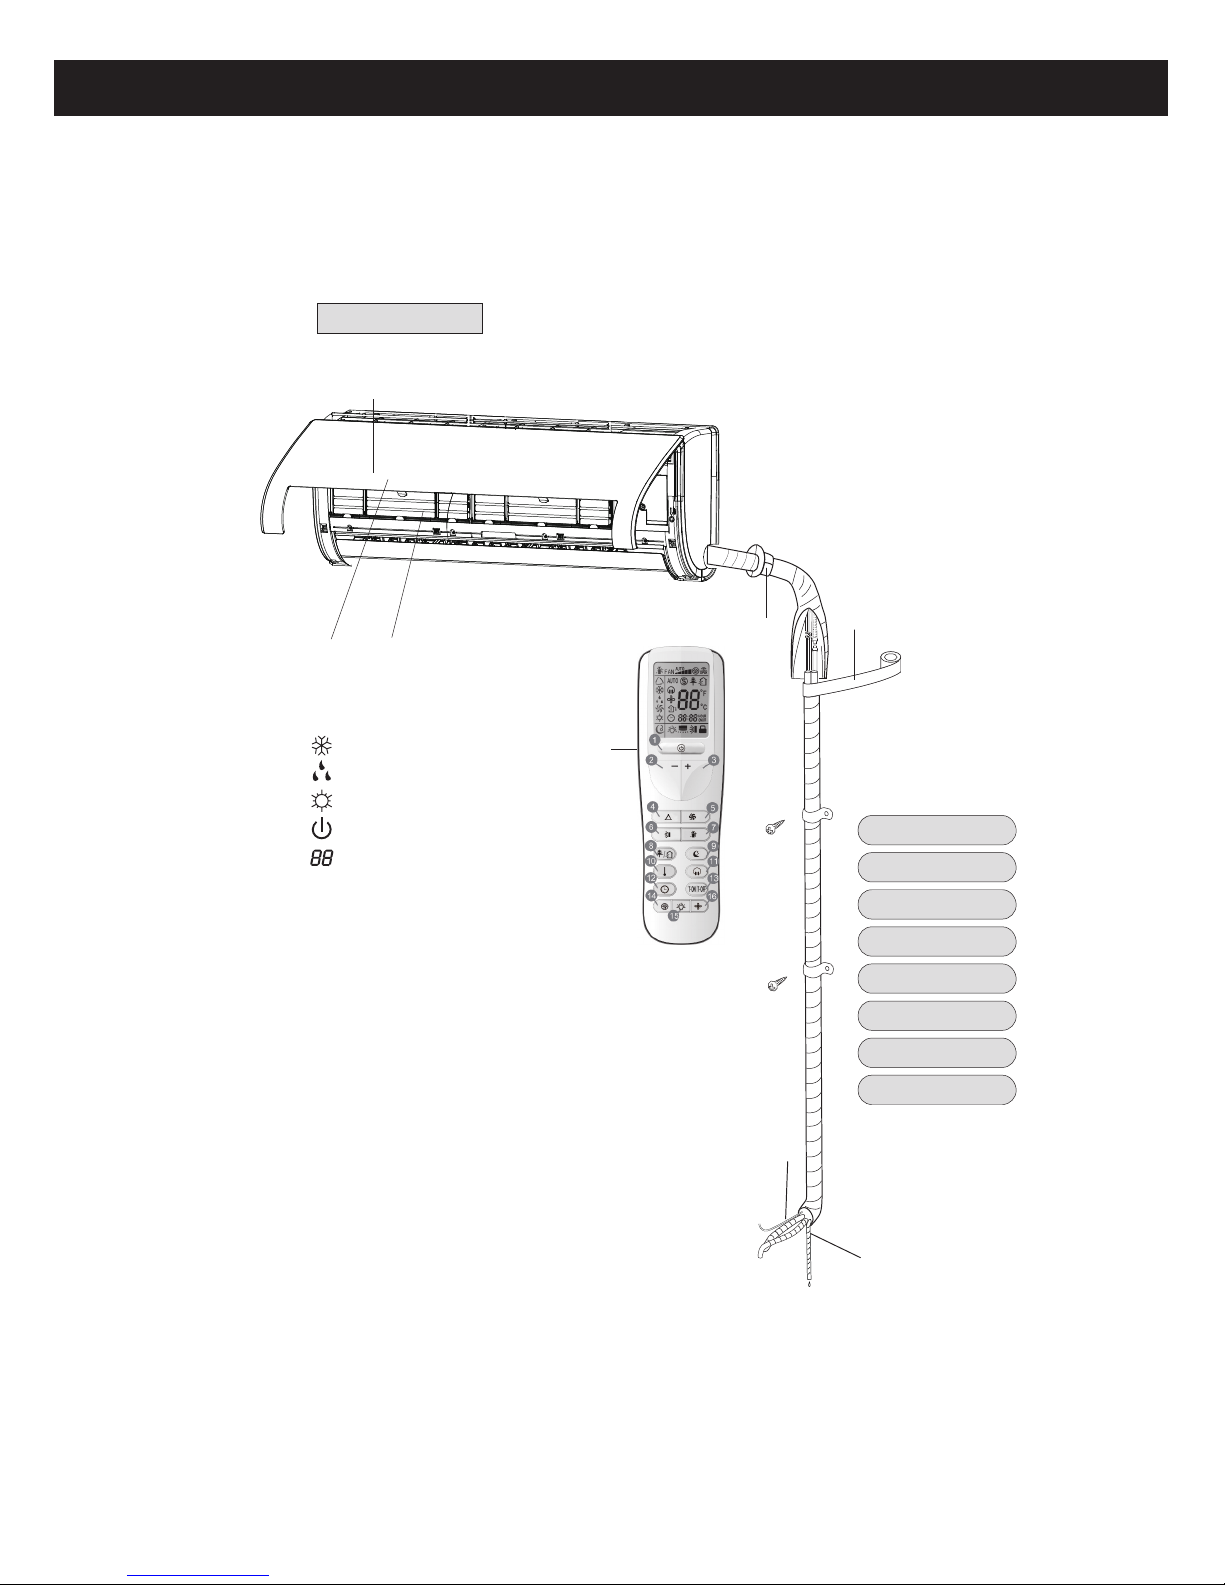
Front panel
Filter
H
orizontal louver
Wall pipe
Binding tape
C
onnection wires
Dr ain hose
Indoor unit
˖Cool
˖Dry
˖Heat
˖Set temp
˖Power
The icons displayed:
Remote controller
1 Parts and their functions
INDOOR UNIT
1
1
OPERATING INSTRUCTIONS
2
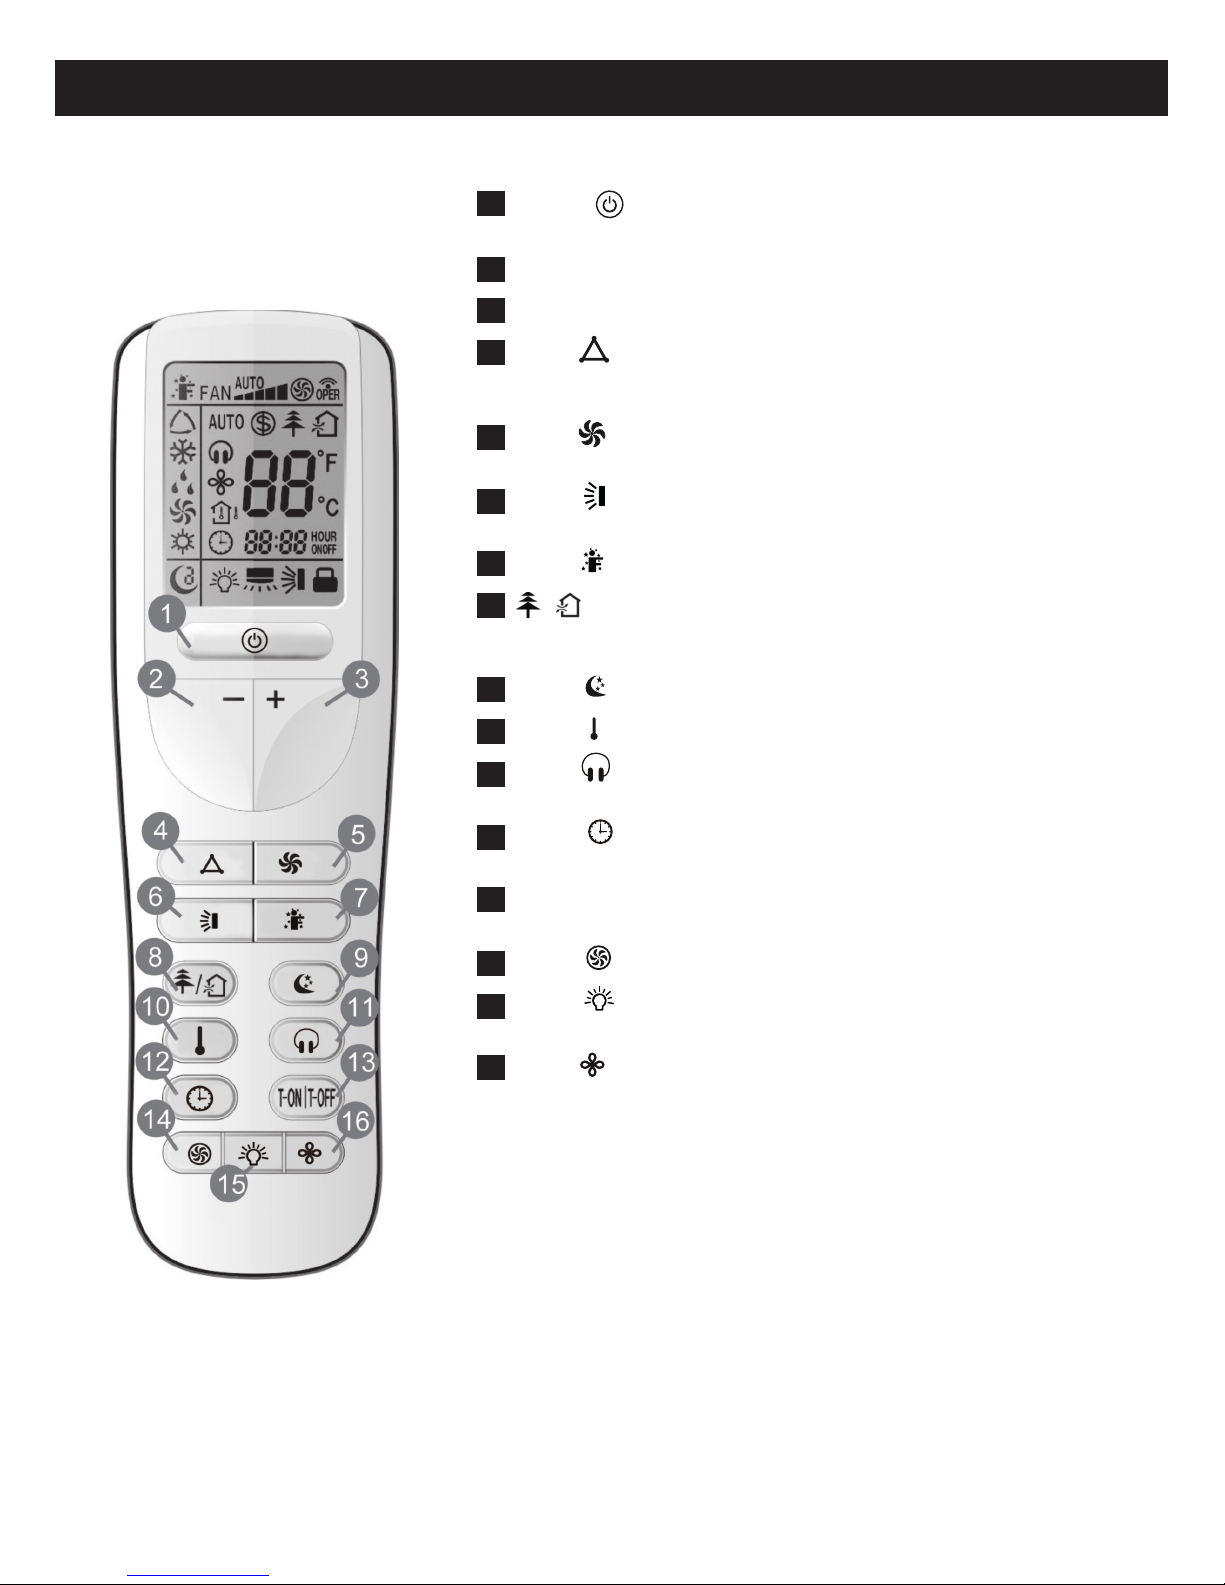
2 How to use the remote control
• Remote control description
OPERATING INSTRUCTIONS
1 ON/OFF
Press to start or stop the unit.
2 - : Press to decrease the temperature setting.
3 + : Press to increase the temperature setting.
4 MODE
Press to select the running mode
(AUTO/COOL/DRY/FAN/HEAT/).
5 FAN
Press to set the fan speed.
6 SWING
Press to set the swing angle of the louvers.
7 I FEEL
8
Press to set the OUTSIDE or RECYCLED AIR
function.
9 SLEEP
10 TEMP
11 QUIET
Press to set the QUIET function.
12 CLOCK
Press to set the clock.
13 T-ON/T-OFF
Press to set the auto-off/auto-on timer.
14 TURBO
15 LIGHT
Press to turn the light on/off.
16 X-FAN

3
How to use the remote control
• Remote control description
OPERATING INSTRUCTIONS
1 ON/OFF
Press this button to turn the unit on. Press again to turn the unit off.
2 :
Press this button to decrease the set temperature. Hold it down for longer than two seconds to decrease the set temperature at
a faster rate. The set temperature is not adjustable in AUTO mode.
3 :
Press this button to increase the set temperature. Hold it down for longer than two seconds to increase the set temperature at a
faster rate. The set temperature is not adjustable in AUTO mode.
4 MODE
Press this button to select a mode from a sequence of
AUTO, COOL, DRY, FAN, and HEAT *, as follows:
AUTO COOL DRY FAN HEAT*
*Note: Only for models with the heating function
AUTO is the default mode when the unit is started. When in AUTO mode, the set temperature will not be displayed on the unitʼs LED screen, and the unit will
automatically select the suitable running mode based on the room temperature.
5 FAN
Press this button to select the Fan Speed from a sequence of AUTO,
to then back to Auto.:
6 SWING
Press this button to set the swing angle of the louvers, which changes in a sequence as below:
7 I FEEL
Press this button to activate the I FEEL function. The unit will automatically adjust the temperature according to the detected
room temperature. Press this button again to cancel the I FEEL function.
▲
▲
▲
▲
Low speed Low-Medium speed
Medium-High speed High speed
Medium speed
This is a universal remote control. If the or positions are chosen, the unit will
c
arry out the command as
indicates the guide louver swings in this sequence
4
How to use the remote control
OPERATING INSTRUCTIONS
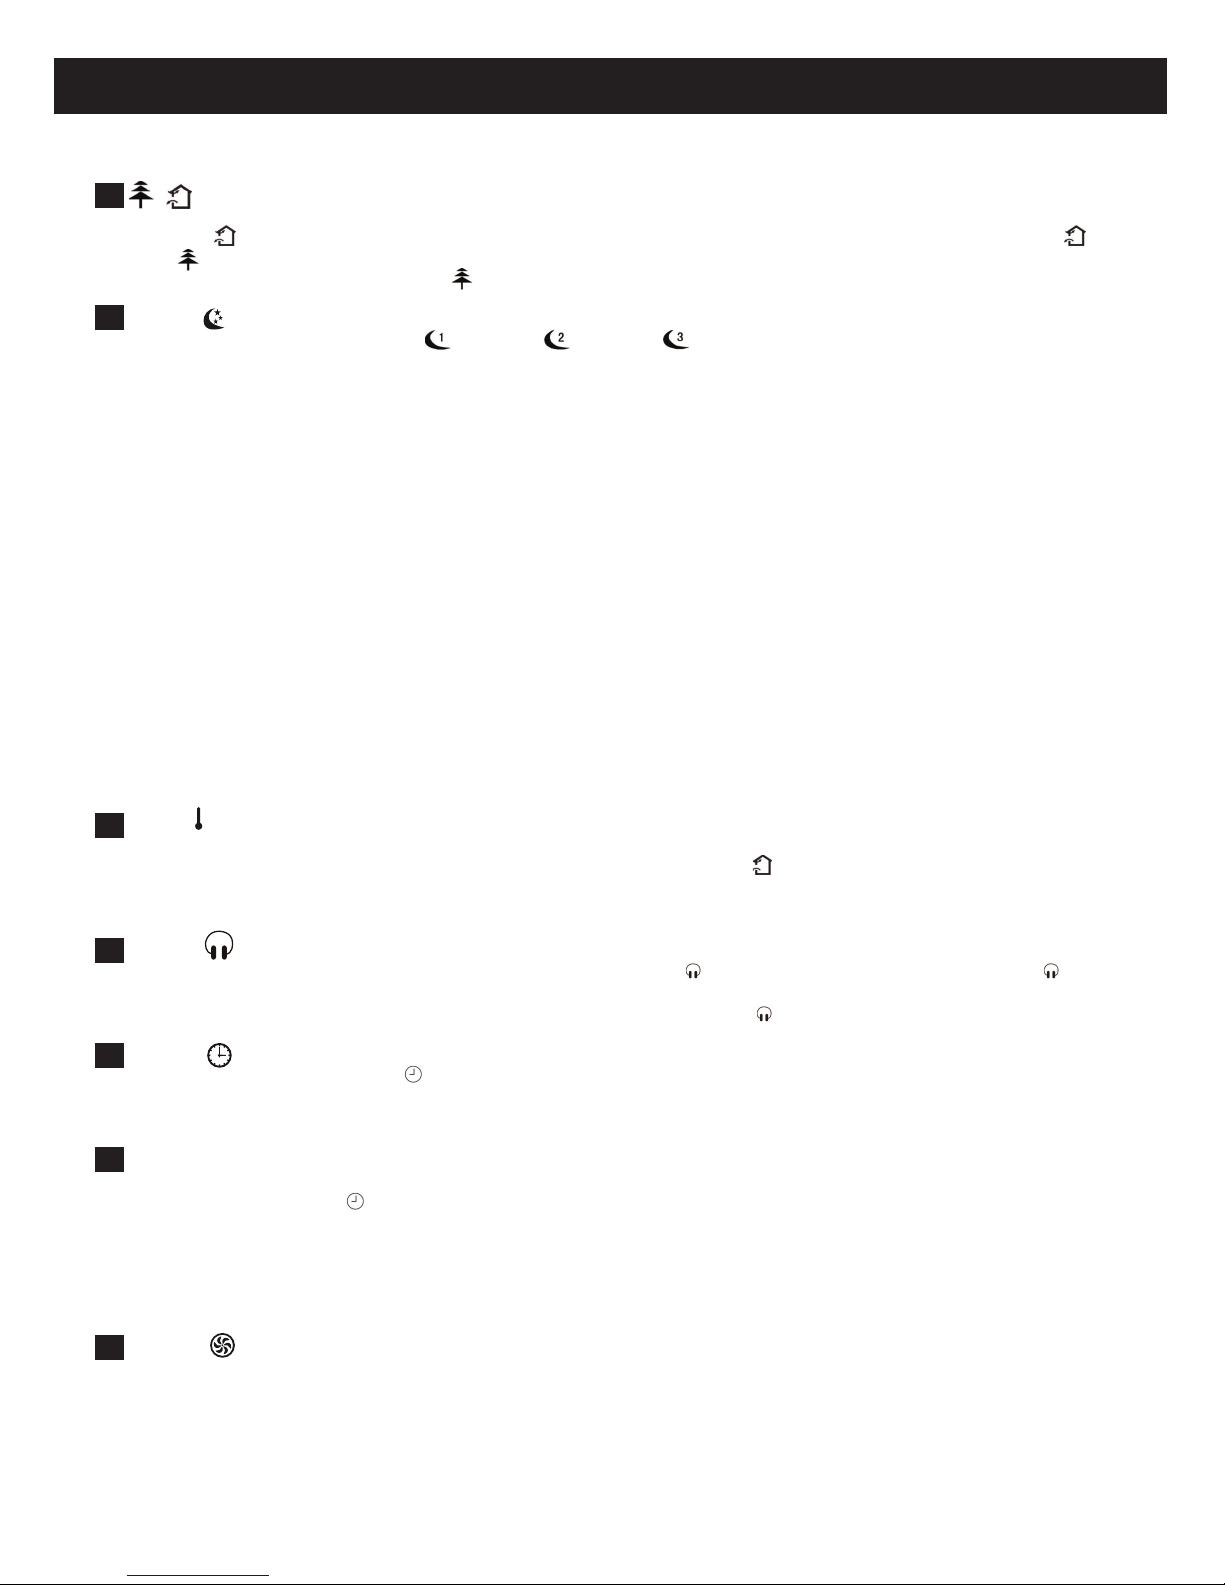
8
Press this button to select either outside or recycled air. Press once for the recycled air mode, and the LCD screen
displays “ ”. Press a second time to use set both the recycled and outside air modes, and the LCD screen displays “ ”
and “ ” . Press a third time to stop the simultaneous outside and recycled air mode. Press a fourth time to run in the outside
air mode, and the LCD screen displays “ ”. Press the button again to repeat the above operation.
9 SLEEP
• Press this button to select Sleep 1 ( ), Sleep 2 ( ), Sleep 3 ( ) and cancel Sleep, from the sequence. Sleep Cancel
is the default setting when the unit is turned on.
• Sleep 1 is Sleep mode 1. In Cool or Dehumidify mode: after running for one hour in Sleep, the main unit`s temperature setting
will increase 1°C. After running for two hours in Sleep, the temperature setting will increase 2°C, and the unit will continue
running at this temperature. In Heat mode: after running for one hour in Sleep, the temperature setting will decrease 1°C.
After running for two hours, the temperature setting will decrease 2°C, and the unit will continue running at this temperature.
• Sleep 2 is sleep mode 2. The air conditioner will run based on a preset temperature curve.
• Sleep 3- Set your own temperature curve for the Sleep mode:
(1) In Sleep 3 mode, press the "Turbo" button for several seconds; the remote control will show the user customization sleep
setting status. The time on the remote control will be "1 hour" and the flashing set temperature "88" will be the last temperature
in the sleep-mode temperature curve. (The first displays you see are the initial factory settings.);
(2) Press "+" or "-" to change the temperature settings. Once selected, press "Turbo" to confirm;
(3) The remote control display will automatically move to the next hour setting (2 hours, 3 hours or 8 hours). The flashing set
temperature "88" will display the last temperature setting in the sleep-mode temperature curve;
(4) Repeat step (2) to (3) until the “8 hour” temperature setting has been entered and the temperature curve is set. The remote
control will return to the “1 hour” display and the temperature display will return to the first set temperature.
Sleep 3- It is possible to verify the temperature curve settings in the user-set SLEEP mode.
• The user can verify the temperature curve settings without changing the temperatures by simply pressing the "Turbo" button to
confirm the temperature and go to the next one. Note: When setting or verifying the temperature curve, if no button is pressed
within 10 seconds, the setting mode will automatically turn off and the originally set temperatures will remain. Also, if
"ON/OFF," "Mode," "Timer," or "Sleep" are pressed when setting or verifying the temperature curve for the sleep mode, the
setting mode will automatically turn off.
10 TEMP
Press this button to set the indoor temperature setting or the indoor ambient temperature. When the indoor unit is first turned
on, it will display the set temperature. If the temperature display is changed to " ", the ambient temperature will be displayed.
Either five seconds later or if it receives a remote control signal within five seconds, the set temperature will again be displayed.
If the temperature display has not been set, the temperature will be displayed.
11 QUIET
Press this button to set the Quiet status to Auto Quiet mode (displays " " and "Auto" signal), Quiet mode (displays " " signal)
or Quiet OFF (no display). When first turned on, Quiet OFF is the default setting. Note: The Quiet function cannot be used when
running in the Fan or Dry mode. The fan speed is not available in Quiet mode (" "),.
12 CLOCK
Press the CLOCK button and the “ ” will flash. Within 5 seconds, press + or - to set the time. Hold down either of those
buttons for two seconds or longer to increase or decrease the time by 1 minute every 0.5 second and then by 10 minutes every
0.5 second. After setting the time and while it is flashing, press the CLOCK button again to confirm the set time.
13 T-ON|T-OFF
Press T-ON to turn on the auto-ON timer. To cancel the auto-timer program, simply press this button again.
After pressing this button, “ “ disappears and a flashing "ON" appears. The ON time can be set when 00:00 is displayed.
Within 5 seconds, press + or - to set the time. Each time the + or – buttons are pressed, the time setting changes by
1 minute. Hold down either button to change the time by 10 minute intervals. Within 5 seconds of setting the time, press TIMER
ON to confirm.
Press T-OFF to turn on the auto-off timer. To cancel the auto-timer program, simply press the button again. Set the TIMER OFF
in the same manner as the TIMER ON.
14 TURBO
Press this button to activate/deactivate the Turbo function, which enables the unit to reach the preset temperature in the
shortest time. In COOL mode, the unit will blow cool air at super-high fan speed. In HEAT mode, the unit will blow warm air at
super-high fan speed.
 Loading...