

Gree GMV-ND112ZD/A-T, GMV-ND36ZD/A-T, GMV-ND125ZD/A-T, GMV-ND63ZD/A-T, GMV-ND140ZD/A-T Owner's Manual
...
Change for life
Multi Variable Air Conditioners
Floor and Ceiling Type Indoor Unit
Owner's Manual
Air Conditioners
Models:
GMV-ND28ZD/A-T GMV-ND36ZD/A-T
GMV-ND50ZD/A-T GMV-ND63ZD/A-T
GMV-ND71ZD/A-T GMV-ND90ZD/A-T
GMV-ND112ZD/A-T GMV-ND125ZD/A-T
GMV-ND140ZD/A-T
Thank you for choosing Air Conditioners, please read this owner’s manual carefully before
operation and retain it for future reference.If you have lost the Owner’s Manual, please
contact the local agent or visit www.gree.com or sent email to global@gree.com.cn or
electronic version.
GREE reserves the right to interpret this manual which will be subject to any change due to
product improvement without further notice.
GREE Electric Appliances, Inc. of Zhuhai reserves the nal right to interpret this manual.

Preface
For correct installation and operation, please read all instructions carefully. Before reading the
instructions, please be aware of the following items:
(1) For the safe operation of this unit, please read and follow the instructions carefully.
(2) During operation, total capacity of indoor units should not exceed the total capacity of outdoor
units. Otherwise, poor effect of cooling or heating may result.
(3) Direct operators or maintainers should well keep this manual.
(4) If this unit fails to operate normally, please contact our service center as soon as possible and
provide the following information:
● Content on the nameplate(model number, cooling capacity, production code, ex-factory date).
● Malfunction details(before and after the malfunction occurs).
(5) Each unit has been strictly tested and proved to be qualified before ex-factory. In order to
prevent units from being damaged or operating normally because of improper disassembly,
please do not disassemble the unit by yourself. If you need to disassemble and check units,
please contact our service center. We will send specialists to guide the disassembly.
(6) All graphics in this manual is only for your reference. For sales or production reasons, these
graphics are subject to change by manufacturer without prior notice.
User Notice
● This appliance can be used by children aged from 8 years and above and persons with
reduced physical, sensory or mental capabilities or lack of experience and knowledge if they
have been given supervision or instruction concerning use of the appliance in a safe way and
understand the hazards involved. Children shall not play with the appliance. Cleaning and user
maintenance shall not be made by children without supervision.
● DISPOSAL: This marking indicates that this product should not be disposed with
other household wastes. To prevent possible harm to the environment or human
health from uncontrolled waste disposal, recycle it responsibly to promote the
sustainable reuse of material resources. To return your used device, please use
the return and collection systems or contact the retailer where the product was
purchased. They can take this product for environmental safe recycling.

Contents
1 Safety Precautions .............................................................................................................. 1
2 Product Introduction ............................................................................................................. 3
2.1 Names of Key Components ........................................................................................................ 3
2.2 Rated Working Condition ............................................................................................................ 3
2.3 Unit Functions ............................................................................................................................. 4
3 Preparations for Installation .................................................................................................. 5
3.1 Standard Fittings ......................................................................................................................... 5
3.2 Installation Position Selection ..................................................................................................... 5
3.3 Requirements of Communication Wire Selection .......................................................................6
3.4 Wiring Requirements ..................................................................................................................7
4 Installation Instructions ......................................................................................................... 8
4.1 Installation of Indoor Unit ............................................................................................................8
4.2 Refrigerant Pipe Connection ..................................................................................................... 10
4.3 Drainage Pipe Installation and Drainage System Testing ......................................................... 11
4.4 Installation of Wired Controller ................................................................................................. 14
5 Wiring Work ........................................................................................................................ 15
5.1 Connection of Wire and Patch Board Terminal ........................................................................ 15
5.2 Power Cord Connection ............................................................................................................ 16
5.3 Connection of Communication Wire between Indoor Unit and Outdoor Unit(or indoor unit) ....16
5.4 Connection of Communication Wire for Wired Controller ......................................................... 17
5.5 Wiring Instructions of Wired Controller and Indoor Units Network ............................................17
6 Routine Maintenance.......................................................................................................... 19
6.1 Cleaning of Filter ....................................................................................................................... 19
6.2 Maintenance before the Seasonal Use ..................................................................................... 19
6.3 Maintenance after the Seasonal Use ........................................................................................ 19
7 Table of Error Codes for Indoor Unit ................................................................................... 20
8 Troubleshooting .................................................................................................................. 20

Multi Variable Air Conditioners Floor and Ceiling Type Indoor Unit
Exclusive
accessory
exclusive
N
2
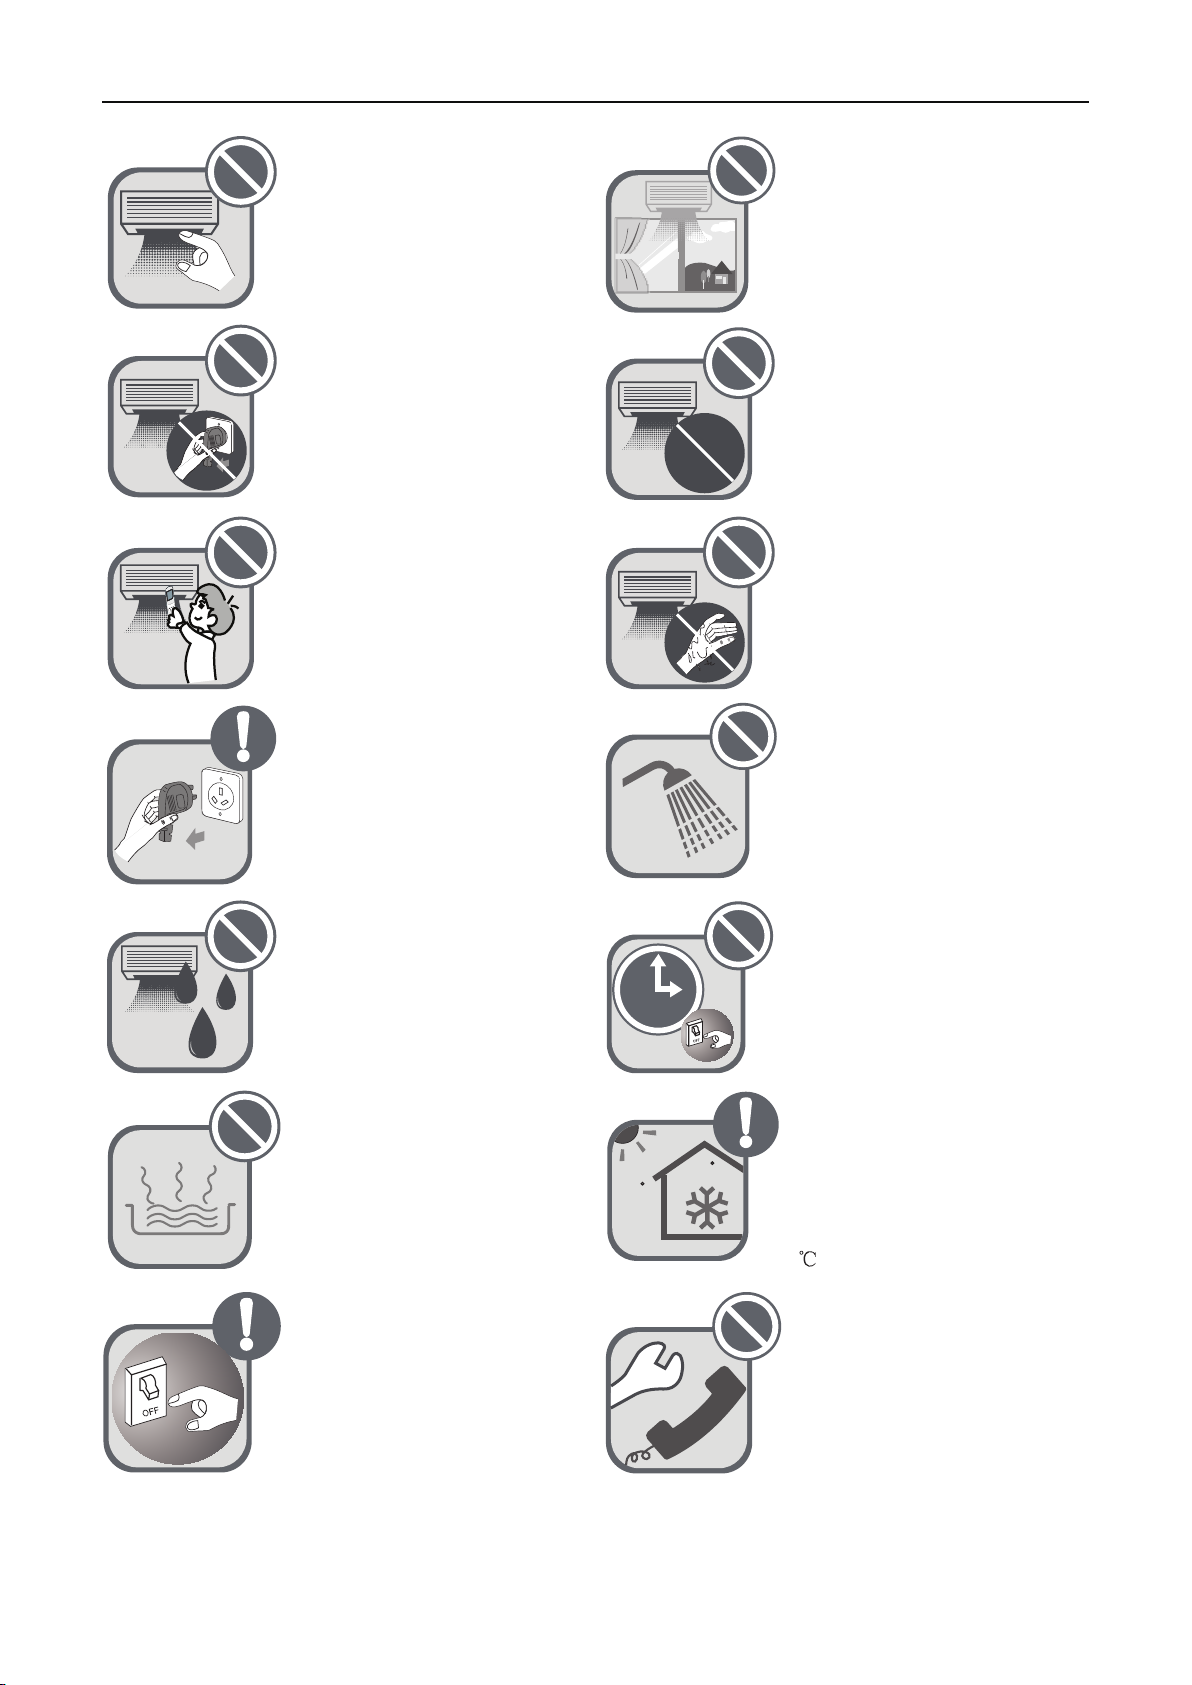
1 Safety Precautions
means items that must be forbidden! Otherwise, it may lead to personal injury or death or
serious damage.
means items that must be followed! Otherwise, it may lead to personal injury or property
loss.
Follow this instruction to complete
the installation work. Please
carefully read this manual before
unit startup and service.
Installation should be conducted
by dealer or qualied personnel.
Please do not attempt to install the
unit by yourself. Improper handling
may result in water leakage,
electric shock or re disaster etc.
Before installation, please check if
the power supply is in accordance
with the requirements specied on
the nameplate. And also take care
of the power safety.
Be sure to use the exclusive
accessory and part to prevent the
water leakage, electric shock and
re accidents.
Wire size of power cord should
be large enough.The damaged
power cord and connection wire
should be replaced by exclusive
cable.
Make sure the unit can be earthed
properly and soundly after
plugging into the socket so as to
avoid electric shock. Please do
not connect the ground wire to gas
pipe, water pipe, lightning rod or
telephone line.
If refrigerant leakage happens
during installation, please ventilate
immediately. Poisonous gas will
emerge if the refrigerant gas meets
re.
After connecting the power cord,
please x the electric box cover
properly in order to avoid accident.
Never fail to comply with the
nitrigen charge requirements.
Charge nitrogen when welding
pipes.
Please rstly connect the wired
controller before energization,
otherwise wired controller can
not be used.
Never short-circiut or cancel the
pressure switch to prevent unit
damage.
Before using the unit, please check
if the piping and wiring are correct
to avoid water leakage, refrigerant
leakage, electric shock, or re etc.
1
Multi Variable Air Conditioners Floor and Ceiling Type Indoor Unit
<5Min
24H
26
C
30
C
Do not insert fingers or objects
into air outlet/inlet grille.
Open the door and window and
keep good ventilation in the room
to avoid oxygen decit when
the gas/oil supplied heating
equipment is used.
Never start up or shut off the air
conditioner by means of directly
plug or unplug the power cord.
Do not allow children
operate this unit.
Turn off the unit or cut off the
power supply before cleaning the
unit, otherwise electric shock or
injury may happen.
Do not expose the unit
to the moist or corrosive
circumstances.
Turn off the unit after it runs at
least ve minutes; otherwise it
will inuence oil return of the
compressor.
Do not operate this unit
with wet hands.
Never spray or ush water
towards unit, otherwise
malfunction or electric shock
may happen.
Electrify the unit 8 hours before
operation. Please switch on for
8 hours before operation. Do not
cut off the power when 24 hours
short-time halting (to protect the
compressor).
Volatile liquid, such as diluent
or gas will damage the unit
appearance.Only use soft cloth
with a little neutral detergent to
clean the outer casing of unit.
If anything abnormal happens
(such as burning smell), please
power off the unit and cut off
the main power supply, and
then immerdiately contact Gree
appointed service center.If
abnormality keeps going, the unit
might be damaged and lead to
electric shock or re.
Under cooling mode, please
don't set the room temperature
too low and keep the
temperature difference between
indoor and outdoor unit within
.
5
User is not allowed to repair the
unit. Fault service may cause
electric shock or re accidents.
Please contact Gree appointed
service center for help.
2
Multi Variable Air Conditioners Floor and Ceiling Type Indoor Unit
Any personal injury or property loss caused by improper installation, improper debug,
unnecessary repair or not following the instructions of this manual should not be the responsibility of
Gree Electric Appliances, Inc. of Zhuhai.
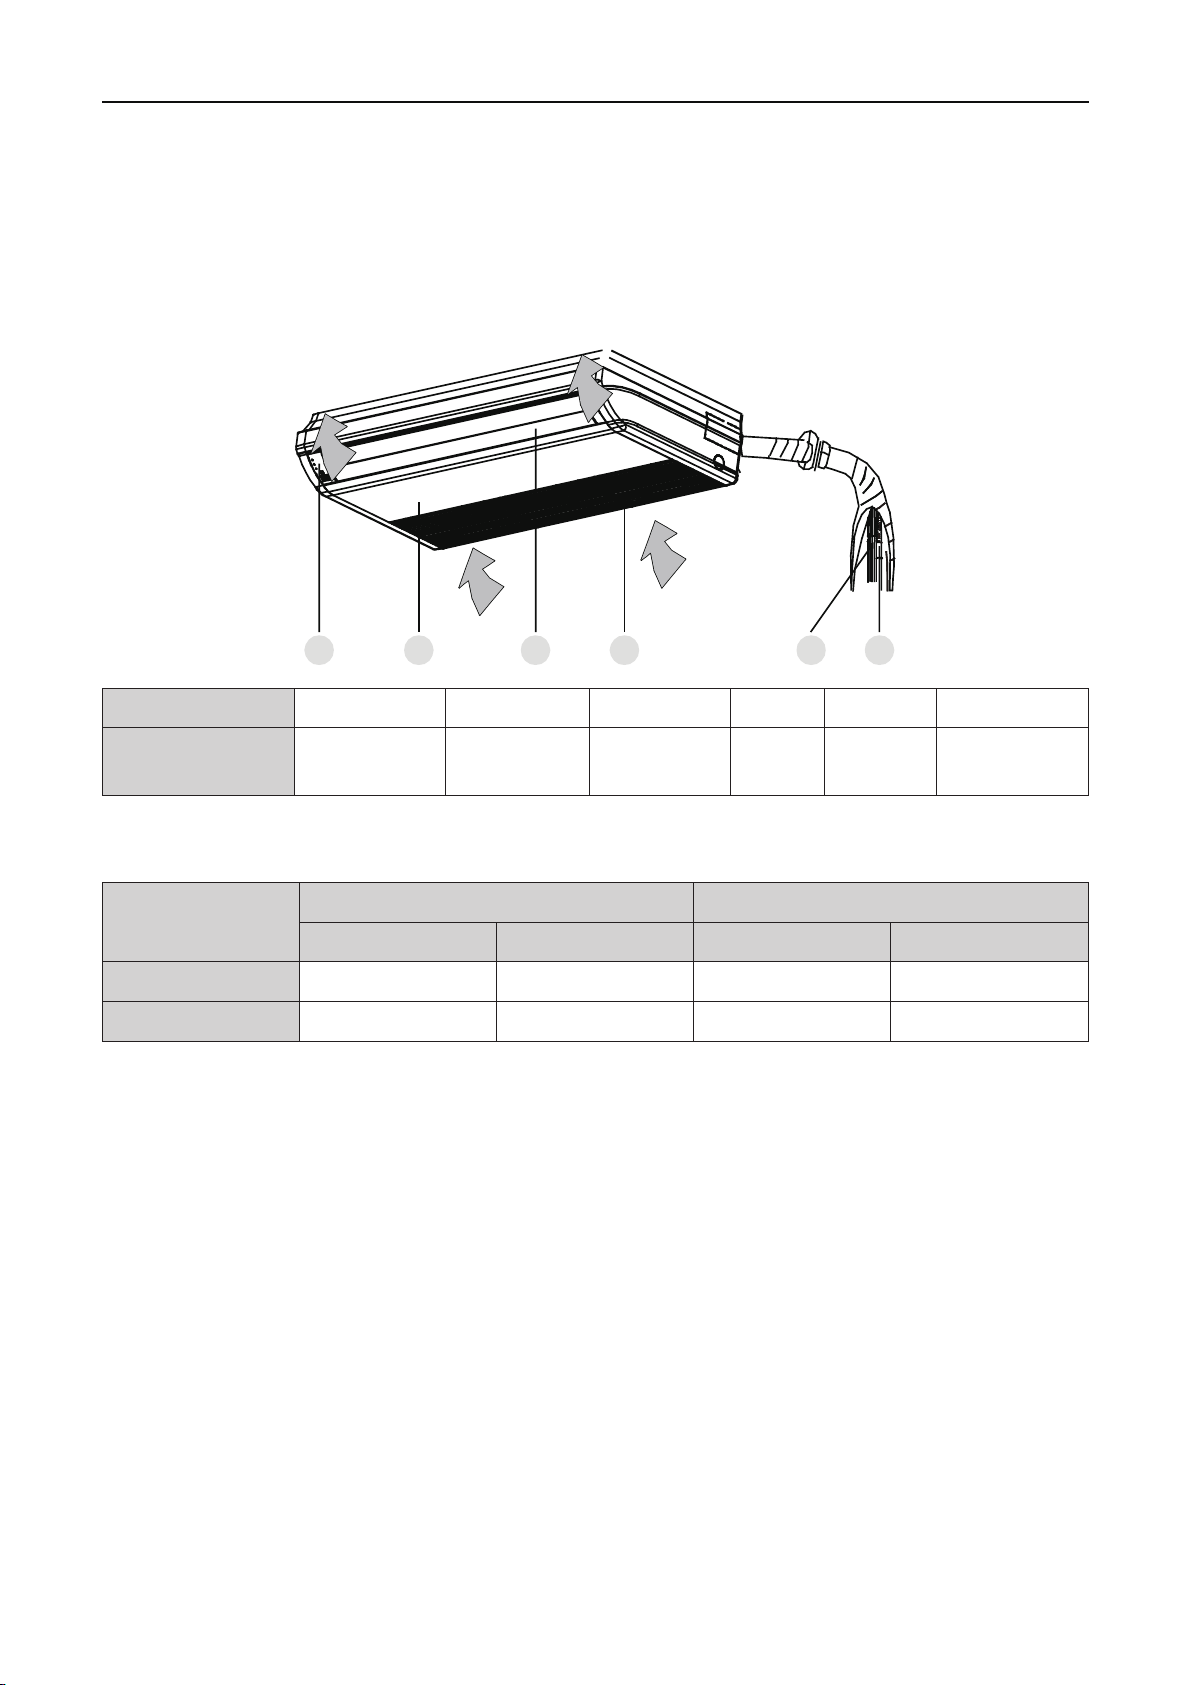
2 Product Introduction
2.1 Names of Key Components
56
No.
Name Drainage Pipe
① ② ③ ④ ⑤ ⑥
4
Connection
Pipe
3
Air Inlet Grille
(With Filter)
12
Louver Main Unit Display board
2.2 Rated Working Condition
Indoor Side Condition Outdoor Side Condition
Dry Bulb Temp °C Wet Bulb Temp °C Dry Bulb Temp °C Wet Bulb Temp °C
Rated Cooling 27 19 35 24
Rated Heating 20 15 7 6
3
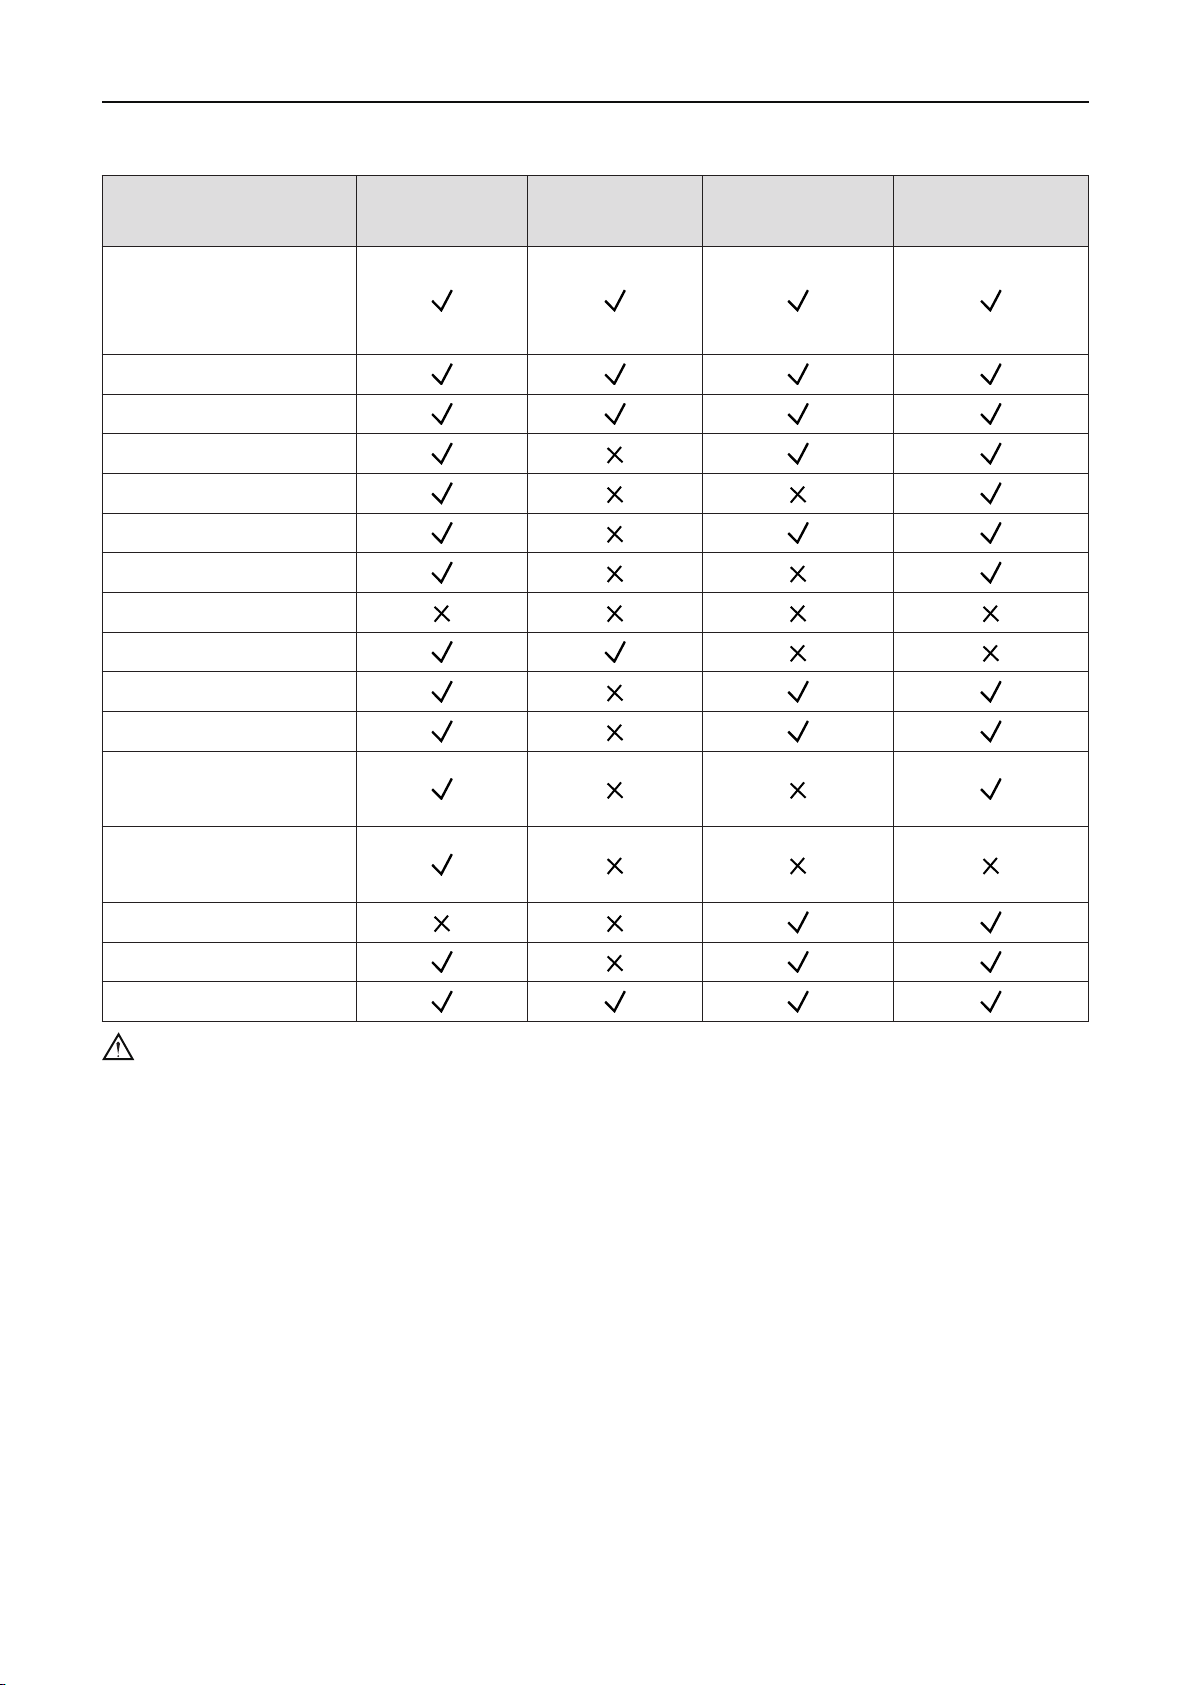
2.3 Unit Functions
Multi Variable Air Conditioners Floor and Ceiling Type Indoor Unit
Unit Functions
Operation Mode
(Cooling, Heating, Fan,
Dehumidifying)
Fan Speed Adjustment
Temperature Adjustment
X-fan Function
Quiet Function
Sleep Function
Save Function
E-heater Function
Memory Function
Absence Function
Timer Function
Low Temp Dehumidify
Function
Wired Controller
XK46(Optional)
Wired Controller
XK49(Optional)
Remote Controller
YAD1F(Standard)
Remote Controller
YV1L1(Optional)
Filter Cleaning
Reminding Function
I Feel
Light Function
Swing
Notes:
√: included, X: not included.
①
Please refer to the user manual of Wired Controller or Remote Controller for function details.
②
4
Multi Variable Air Conditioners Floor and Ceiling Type Indoor Unit
3 Preparations for Installation
Note:
measure unit is mm.
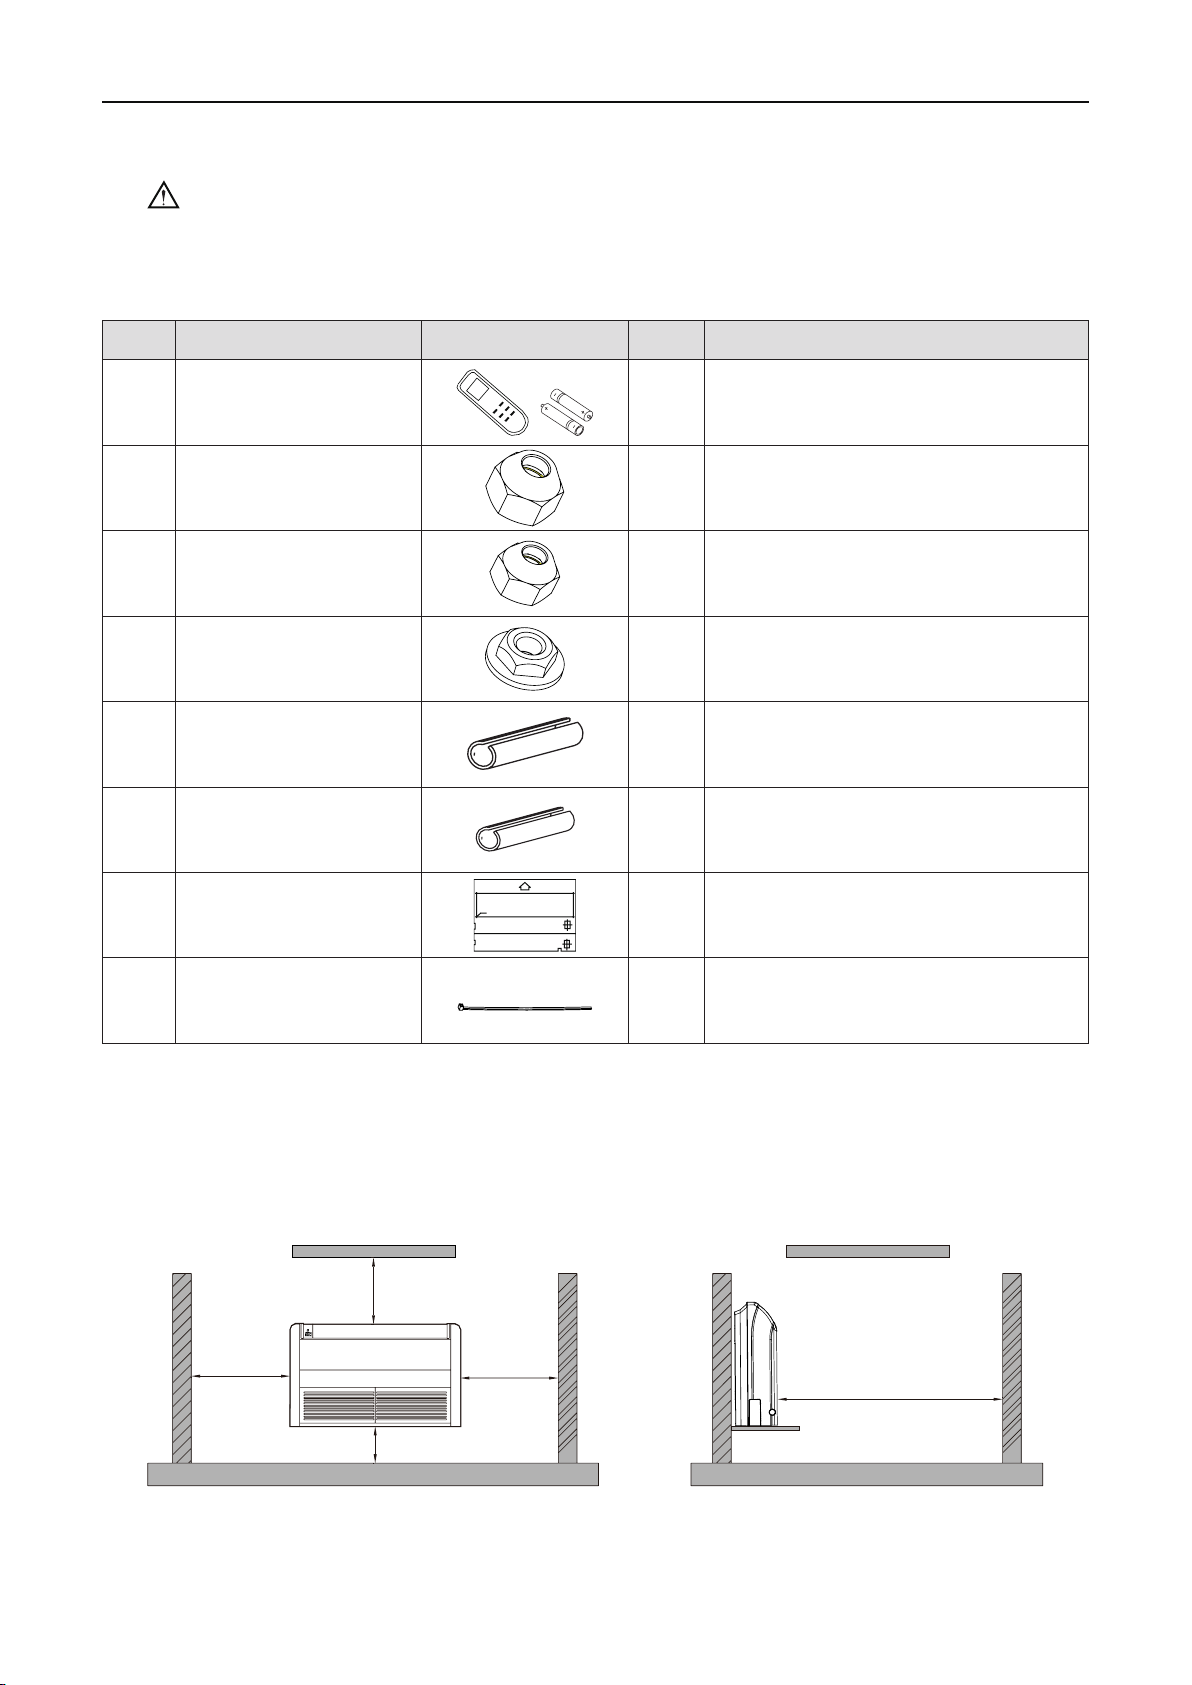
3.1 Standard Fittings
Use the following provided accessories according to the requirement.
No. Name Appearance Q’ty Usage
Product graphics are only for reference. Please refer to actual products. Unspecied
1 Remote controller
2 Special nut 1 To connect gas pipe
3 Special nut 1 To connect liquid pipe
4 M10X8 nut with washer 8
5 Insulation 1 To insulate the gas pipe
6 Insulation 1 To insulate the liquid pipe
7 Installation Paperboard
4-φ12
1+2 To control the indoor unit
To be used together with the suspension
bolt for installing the unit.
Locate the drill hole on ceiling
1
Or Wall
8 Fastener 4 To fasten the sponge
3.2 Installation Position Selection
(1) The location should be able to withstand the weight of unit.
(2) The water can be drained conveniently from drainage pipe.
(3) There should be no obstruction near air inlet and air outlet.
Floor type
◆
>1500
>600
Ceiling type
◆
>300
>600
Unit: mm
>1000
5
 Loading...