


Change for Life
Console Type
Air Conditioner
Owner's Manual
Residential Air Conditioners
MODEL: GEH09AA-K3DNA1A
GEH12AA-K3DNA1A
GEH18AA-K3DNA1A
Thank you for choosing Residential Air Conditioners,please read this owner’s
manual carefully before operation and retain it for future reference.

Contents
OPERATION INSTRUCTIONS
1. Part names and their functions ........................................................................................................... 1
2. How to use the remote control to operate the unit .............................................................................. 2
3. Maintenance ...................................................................................................................................... 7
4. Operating guide ................................................................................................................................. 10
5. Precautions ....................................................................................................................................... 12
6. Checking before contact the service man ........................................................................................ 13
INSTALLATION INSTRUCTIONS
7. Installation of indoor unit .................................................................................................................... 14
8. Outdoor unit installation .................................................................................................... ................. 22
9. Pipe preparation...................................................................................................................................23
10. Refriger
11. Air purging and check or pipe leakage .............................................................................................. 25
12. Liquid pipe and drain pipe .................................................................................................................. 26
13. Routine check after installation ......................................................................................................... .27
ant piping work ..................................................................................................................... 24
Thank you for selecting our products
One of the benefits awaiting you with our room air conditioner is not only
comfort of life but also good health. This operation instruction brings you the
many omfort and technological features your unit has to offer. In addition, it
provides you vital information about maintenance, service and economical
operating. Take the next few minutes to discover how to get your comfort and
economy of the operation from your new room air conditioner.
The figures in this manual may be different with the material objects, please
refer to the material objects for reference.
This appliance is not intended for use by persons (including children) with
reduced physical , sensory or mental capabilities or lack of experience
and knowledge,unless they have been given supervision or instruction
concerning use of the appliance by a person responsible for their safety.
Children should be supervised to ensure that they do not play with the appliance.
External static pressures at the appliance was tested is 0 Pa
Fuse link: T250 V; 3.15 A
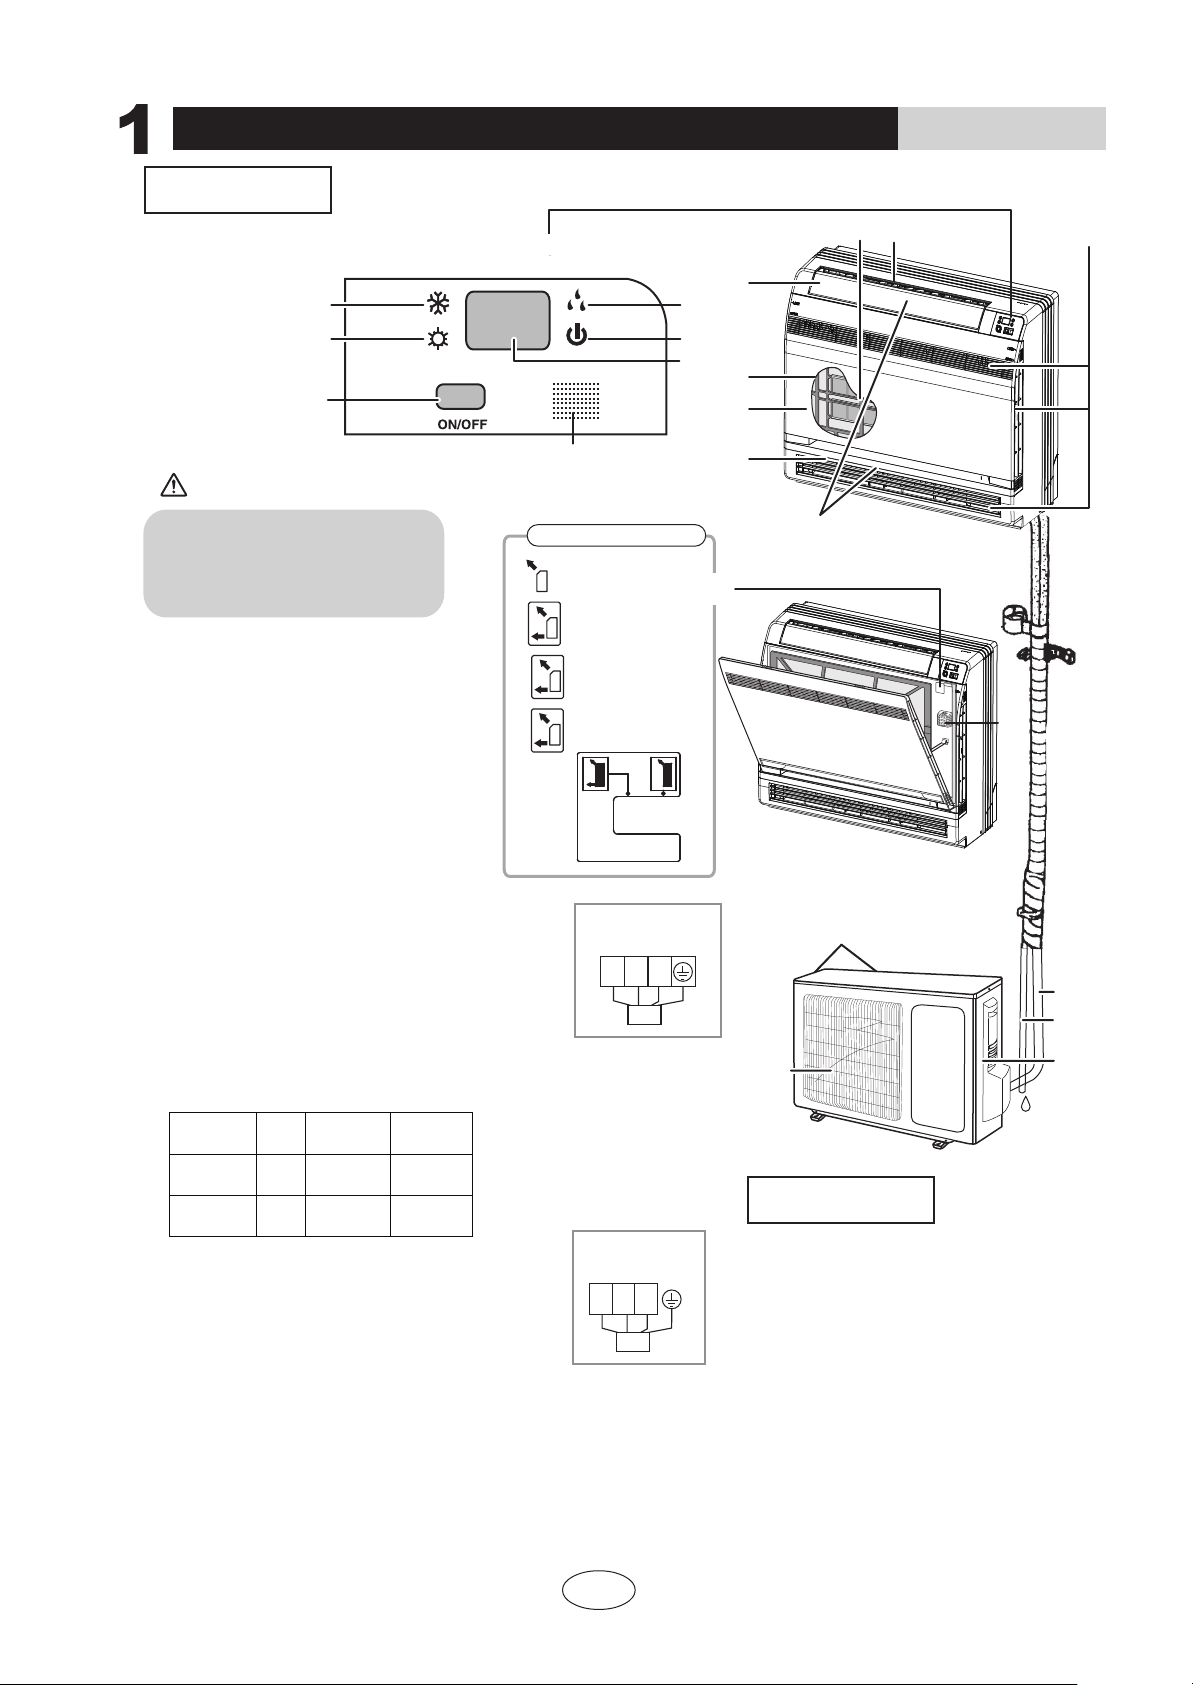
Part names and their functions
INDOOR UNIT
3
3
9
10
14
11
12
13
OPERATION INSTRUCTIONS
1 2
6
8
7
4
CAUTION
Before opening the front panel, be sure to
stop the operation and turn the breaker OFF.
Do not touch the metal parts on the inside
of the indoor unit, as it may result in injury.
1. Titanium Apatite Photocatalytic
Air-Purifying Filter:
• These filters are attached to the inside
of the air filters.
2. Air outlet
3. Display
4. Front panel
5. Louvers (vertical blades)
• The louvers are inside of the air outlet.
6. Air inlet
7. Air filter
8. Flap (horizontal blade)
9. Cool mode lamp
10. Heat mode lamp
11. Dry mode lamp
12. Run lamp
13. LED display
14. Indoor Unit ON/OFF switch:
• Push this switch once to start operation.
Push once again to stop it.
• The operation mode refers to the following table.
COOL
AUTO
Temperature
setting
25℃
25℃
Model Mode
COOLING
ONLY
HEAT
PUMP
• This switch is useful when the remote controller
is missing.
Air flow rate
AUTO
AUTO
15.Signal receiver:
• It receives signals from the remote controller.
• When the unit receives a signal, you will hear
a short beep.
•Settings changed.....beep
16.Air outlet selection switch
17.Room temperature sensor:
•It senses the air temperature around the unit.
15
Air outlet selection switch
This setting blows air from
•
upper outlet only.
This setting automatically
decides a blow pattern
•
depending on mode and
conditions.
• This setting is recommended.
• The unit is shipped from the
factory with this setting.
Indoor unit
wiring terminal
N(1) 2 3
BU BK BN
Outdoor unit
wiring terminal
N(1)
BU BK BN
2 3
YELLOW/
GREEN
YELLOW/
GREEN
2
5
16
17
Opening the Front Panel
18
22
OUTDOOR UNIT
18.Air inlet: (Back and side)
19.Refrigerant piping and inter-unit cable
20.Drain hose
21.Earth terminal:
•It is inside of this cover.
22.Air outlet
Appearance of the outdoor unit may
differ from some models.
19
20
21
NOTE:
① If the supply cord is damaged, it must be replaced by the manufacturer or its service agent or a similarly qualified person in order to avoid a hazard.
② The appliance shall be installed in accordance with national wiring regulations.
③ An all-pole disconnection switch having a contact separation of at least 3mm in all poles should be connected in fixed wiring.
1

How to use the remote control to operate the unit
Remote Controller Description
1
ON/OFF
Press it to start or stop operation.
2
: Press it to decrease temperature
-
setting.
3
+
: Press it to increase temperature
setting.
4
MODE
Press it to select operation mode
(AUTO/COOL/DRY/FAN/HEAT).
5
FAN
Press it to set fan speed.
OPERATION INSTRUCTIONS
2
4
6
8
10
12
14
1
6
SWING
Press it set swing angle.
3
7
I FEEL
8
5
7
9
10
11
9
/
Press it to set HEALTH or AIR function.
SLEEP
TEMP
QUIET
Press it to set
QUIET function.
11
12
CLOCK
13
16
Press it set clock.
13
T-ON T-OFF
Press it to set auto-off/auto-on timer.
15
14
TURBO
15
LIGHT
Press it to turn on/off the light.
16
X-FAN
2

How to use the remote control to operate the unit
Remote Controller Description
1
ON/OFF :
Press this button to turn on the unit .Press this button again to turn off the unit.
2
Press this button to decrease set temperature. Holding it down above 2 seconds rapidly
decreases set temperature. In AUTO mode, set temperature is not adjustable.
+ :
3
Press this button to increase set temperature.Holding it down above 2 seconds rapidly
increases set temperature. In AUTO mode, set temperature is not adjustable.
4
MODE :
Each time you press this button,a mode is selected in a sequence that goes from AUTO,
COOL,DRY, FAN,and HEAT
AUTO
COOL
DRY
After energization, AUTO mode is defaulted. In AUTO mode, the set temperature will not
be displayed on the LED of the indoor, and the unit will automatically select the suitable
operation mode in accordance with the room temperature to make indoor room comfortable.
, as the following:
*
FAN HEAT
*
*Note:Only for models with heating function.
OPERATION INSTRUCTIONS
FAN
:
5
This button is used for setting Fan Speed in the sequence that goes from AUTO,
, ,
to
Auto
,
then back to Auto.
Medium speedLow-Medium speedLow speed
High speedMedium-High speed
6
SWING:
Press this button to set up &down swing angle, which circularly changes as below
OFF
:
This remote controller is universal . If any command , or is sent out,
the unit will carry out the command as
indicates the guide louver swings as:
I FEEL:
7
Press this button to turn on I FEEL function. The unit automatically adjust temperature
according to the sensed temperature. Press this button again to cancel I FEEL function.
,
3
 Loading...