


Owner’s
Manual
Portable Room
Dehumidifier
G17-30ESDEHC
G17-50ESDEHC
G17-70ESDEHC
Write the model and serial numbers below for your records:
Model #
Serial #
Date Purchased
Please read the entire manual carefully to
ensure proper operation of the product.
To find an electronic version of this manual,
please visit www.greeproducts.com
Phone: 1-866-658-0466
Email: customerservice@greeproducts.com

TABLE OF CONTENTS
PAGE
IMPORTANT SAFETY INSTRUCTIONS ............................................................................................... 3-4
OPERATING INSTRUCTIONS ........................................................................................................... 5-11
CLEANING & MAINTENANCE ..............................................................................................................12
BEFORE YOU CALL ....................................................................................................................... 13-14
WARRANTY .........................................................................................................................................15
NOTICE:
Pictures within this manual are for reference only. Please refer to the actual product for the appearance.
2

SAFETY INFORMATION
SYMBOL INDICATES A HAZARDOUS SITUATION WHICH IF NOT
AVOIDED COULD RESULT IN SERIOUS INJURY OR DEATH.
Please read and understand this entire manual before attempting to assemble, operate or install your
dehumidifier. Use this unit only as instructed in this manual. While this manual covers a wide variety of
troubleshooting, the instructions are not meant to cover every situation that may occur. Caution and
common sense are to be practiced when installing, operating or maintaining your unit.
WARNING
• Use caution when unpacking and installing. Fins
may be sharp and could harm you.
• Do not stop the unit by pulling out the power plug.
This may cause electric shock or fire.
• Replace immediately any part that has become
frayed or damaged. Do not use a cord that
shows damage or cracks along the length or at
the connector. A damaged power cord should
be replaced with a new cord obtained from the
manufacturer. Please contact Customer Service for
replacement options.
• Do not modify power cord length or share an outlet
with another appliance. This may cause electric
shock or fire.
• Always use a dedicated power circuit. The voltage
on the outlet should match the voltage rating on the
rating plate.
• The power cord is equipped with a 3-prong
grounding plug which can only be used with a
standard 3-prong wall outlet to minimize the
possibility of electric shock hazard. Where
a 2-prong outlet is encountered, it is your
responsibility to have it replaced with a properly
grounded 3-prong wall outlet.
• Do not use the outlet if it is loose or damaged.
It may cause electric shock.
• Do not open the unit during operation. It may cause
electric shock.
• Keep away from heating appliances, flammable
gas, or combustibles such as gasoline, benzene,
thinner, etc.
• Ventilate room before operating dehumidifier if there
is a gas leak from another appliance.
• Never use an extension cord, surge protector, or
multi-outlet adapter with this unit.
• Plug in power cord properly. Always unplug your
dehumidifier by pulling on the power plug. Grip plug
firmly and unplug to remove.
• Do not disassemble or modify the unit.
• Do not operate with wet hands.
• Do not clean with water that may run inside the
units electrical parts. This may cause failure of the
machine or electric shock.
• Do not place obstacles around air-inlets or inside of
air-outlet.
• Switch off the unit and unplug the unit before
cleaning. See cleaning instructions on page 12
• Always insert the filters securely. Clean the filter
once every two weeks.
• Do not place heavy objects on the power cord.
Ensure that the power cord is not compressed.
• Turn off the main power switch when not using the
unit for a long period of time.
• All dehumidifiers contain refrigerants which, under
federal law, must be removed prior to disposal.
If you are getting rid of an old product with
refrigerants, check with the company handling
disposal about what to do.
• These R410A air conditioning systems require
contractors and technicians to use tools, equipment
and safety standards approved for use with this
refrigerant.
• The appliance must be installed in accordance with
national wiring regulations.
• This unit has fuse style T3.15AH250V. The maximal
current that may pass through the fuse cannot be
above 3.15A.
• This appliance is not intended for use by persons
(including children) with reduced physical, sensory,
or mental capabilities.
3

SAFETY INFORMATION
Memory function is included in this
Electrical Information
In the event that the power cord is damaged, it cannot be repaired. It must be replaced
with a power cord from the product manufacturer. Do not under any circumstances cut, remove,
or bypass the grounding prong.
Do NOT use the power cord to turn the unit on or off.
• The power cord is equipped with a 3-Prong Grounding Plug which can only be used with a
standard 3-prong wall outlet to minimize the possibility of electric shock hazard. Where a 2-prong
outlet is encountered, it is your responsibility to have it replaced with a properly grounded 3-prong
wall outlet.
• Do NOT use a power cord that shows damage or cracks along the length or at the connector.
A damaged power cord should be replaced with a new cord obtained from the manufacturer.
Please contact Customer Service for replacement options.
dehumidifier. When nobody is taking care
of the unit, please turn it off and remove
the power plug or disconnect power.
• Do NOT modify power cord length or share an outlet with another appliance. This may cause
electric shock or fire.
• Always use a dedicated power circuit. The voltage on the outlet should match the voltage rating
on the rating plate.
• Do NOT use the outlet if it is loose or damaged. It may cause electric shock.
• Never use an extension cord, surge protector, or multi-outlet adapter with this unit.
• This unit has fuse style T3.15AH250V. The maximal current that may pass through the fuse
cannot be above 3.15A.
4

OPERATING INSTRUCTIONS
Before You Begin
WARNING
• Observe all electrical governing codes and ordinances.
• Do NOT use damaged or non-standard power cords.
• Use caution during installation and maintenance.
• Use proper operation to prevent electric shock, casualty and other accidents.
• Proper installation is the responsibility of the installer. If not installed properly the warranty is void.
• All parts described must be used with no substitutions.
IMPORTANT: Save these instructions for future reference.
Product failure due to any improper installation is not covered under the One Year Limited Warranty.
IMPORTANT: You MUST use the parts provided for installation as well as proper installation
procedures as described in this manual when installing this Portable Dehumidifier.
Selection of Installation Location
Installing the unit in the following places can be dangerous and may cause malfunction:
1. Areas with strong heat sources, vapors, flammable or explosive gas, sulfated gas or volatile objects
spread in the air.
2. Near high-frequency devices such as welding machines, medical equipment, etc.
Requirements for Electric Connection
• Follow the Electric Safety Information when installing the unit.
• According to your local safety regulations, use a qualified power circuit.
• Do NOT plug into an outlet if it is loose or damaged. It may cause electric shock.
• Please make sure the power supply complies with the requirement of dehumidifier. Unstable power
supply or wrong wiring may lead to electric shock, hazard or malfunction. Note: Electricity requirements
are 115V (60 Hz).
• Do NOT connect to the power outlet before finishing installation.
• Please make sure the outlet is always grounded effectively, otherwise it may cause electric shock.
The grounding resistance should comply with national electric safety regulations.
5

OPERATING INSTRUCTIONS
Unit Overview
1
2
Control Panel
1
Water Bucket
2
Castors
3
Air Outlet
4
Rear Case
5
Drain Cover Plate
3
4
5
7
6
Power Plug
7
6
NOTICE:
This picture is for reference only. Please refer to the actual product for the appearance.
6

OPERATING INSTRUCTIONS
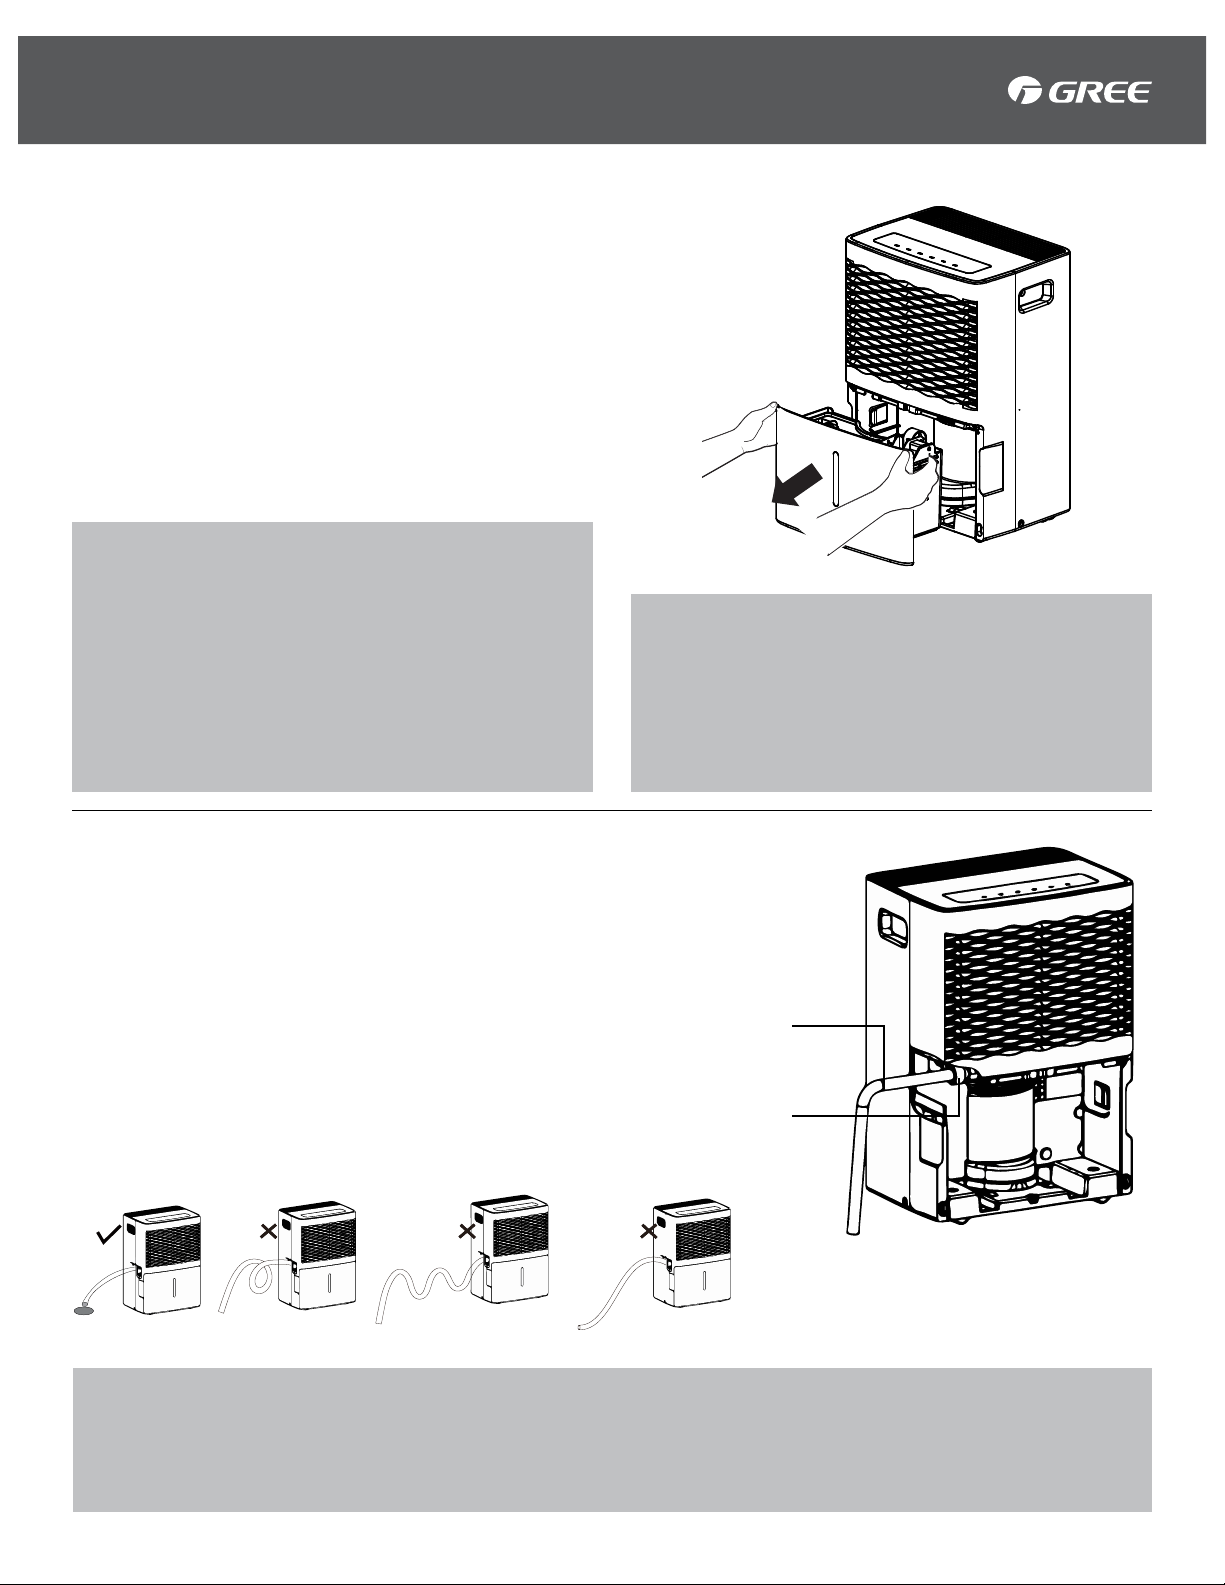
Choosing Your Location
A dehumidifier operating in a basement will have little or no effect in drying an adjacent enclosed
storage area, such as a closet, unless there is adequate circulation of air in and out of the area.
• Do not use outdoors.
• This dehumidifier is intended for indoor residential applications only. This dehumidifier should
not be used for commercial or industrial applications.
• Place the dehumidifier on a smooth, level floor strong enough to support the unit with a full
bucket of water.
• Allow at least 18 inches of air space on all sides of the unit for good air circulation.
• Place the dehumidifier in an area where the temperature will not fall below 41°F (5°C) or above
90°F (32°C). The coils can become covered with frost at temperatures below 41°F, which may
reduce performance.
• The suggested range of humidity is between 30% and 90%.
• Use the dehumidifier in a basement to help prevent moisture damage.
• The dehumidifier must be operated in an enclosed area to be most effective.
• Close all doors, windows and other outside openings to the room.
Correct Wrong
Above
(41°F)
18" (45.7 cm)
Below
(41°F)
18" (45.7 cm)
NOTE:
• The dehumidifier has rollers to aid placement, but it should only be rolled on smooth,
flat surfaces. Do NOT attempt to roll the dehumidifier on carpet or over objects.
NOTICE:
This picture is for reference only. Please refer to the actual product for the appearance.
7
OPERATING INSTRUCTIONS
Removing Collected Water
There are 2 ways to remove collected water:
using a bucket, or using a hose.
Using the Bucket
When the bucket is removed, the unit will shut off.
Empty and replace the bucket.
NOTE:
• Do NOT remove the bucket while the
dehumidifier is operating or if it has just
stopped operating. This might cause some
water to drip from the drain pan.
• The bucket must be in place and securely
seated for the dehumidifier to operate.
IMPORTANT:
• Do NOT use the hose if using the bucket to
collect water. When the hose is connected,
water will flow through it onto the floor
instead of into the bucket.
Using a Hose
Water can be automatically emptied into a floor drain by
attaching a garden water hose (not included).
1. Remove the bucket from the front of the unit.
2. Open the Drain Cover Plate on the side of the unit.
3. Thread a garden hose (not supplied) onto
the nozzle, cut to length, and lead it to the floor drain.
4. Replace the bucket in the unit.
NOTE:
Hose
Nozzle
• The bucket must be in place and securely seated for the dehumidifier to operate.
• Do NOT kink or crimp hose. Hose must be positioned downward to the drain.
8
OPERATING INSTRUCTIONS
Use of Your Dehumidier
Water Level
The dehumidifier will turn off automatically when the bucket is full, or when the bucket is removed or not
replaced in the proper position.
The bucket must be replaced in the proper position for the dehumidifier to work. The light will be on and
the dehumidifier will not run if the bucket is not in the proper position.
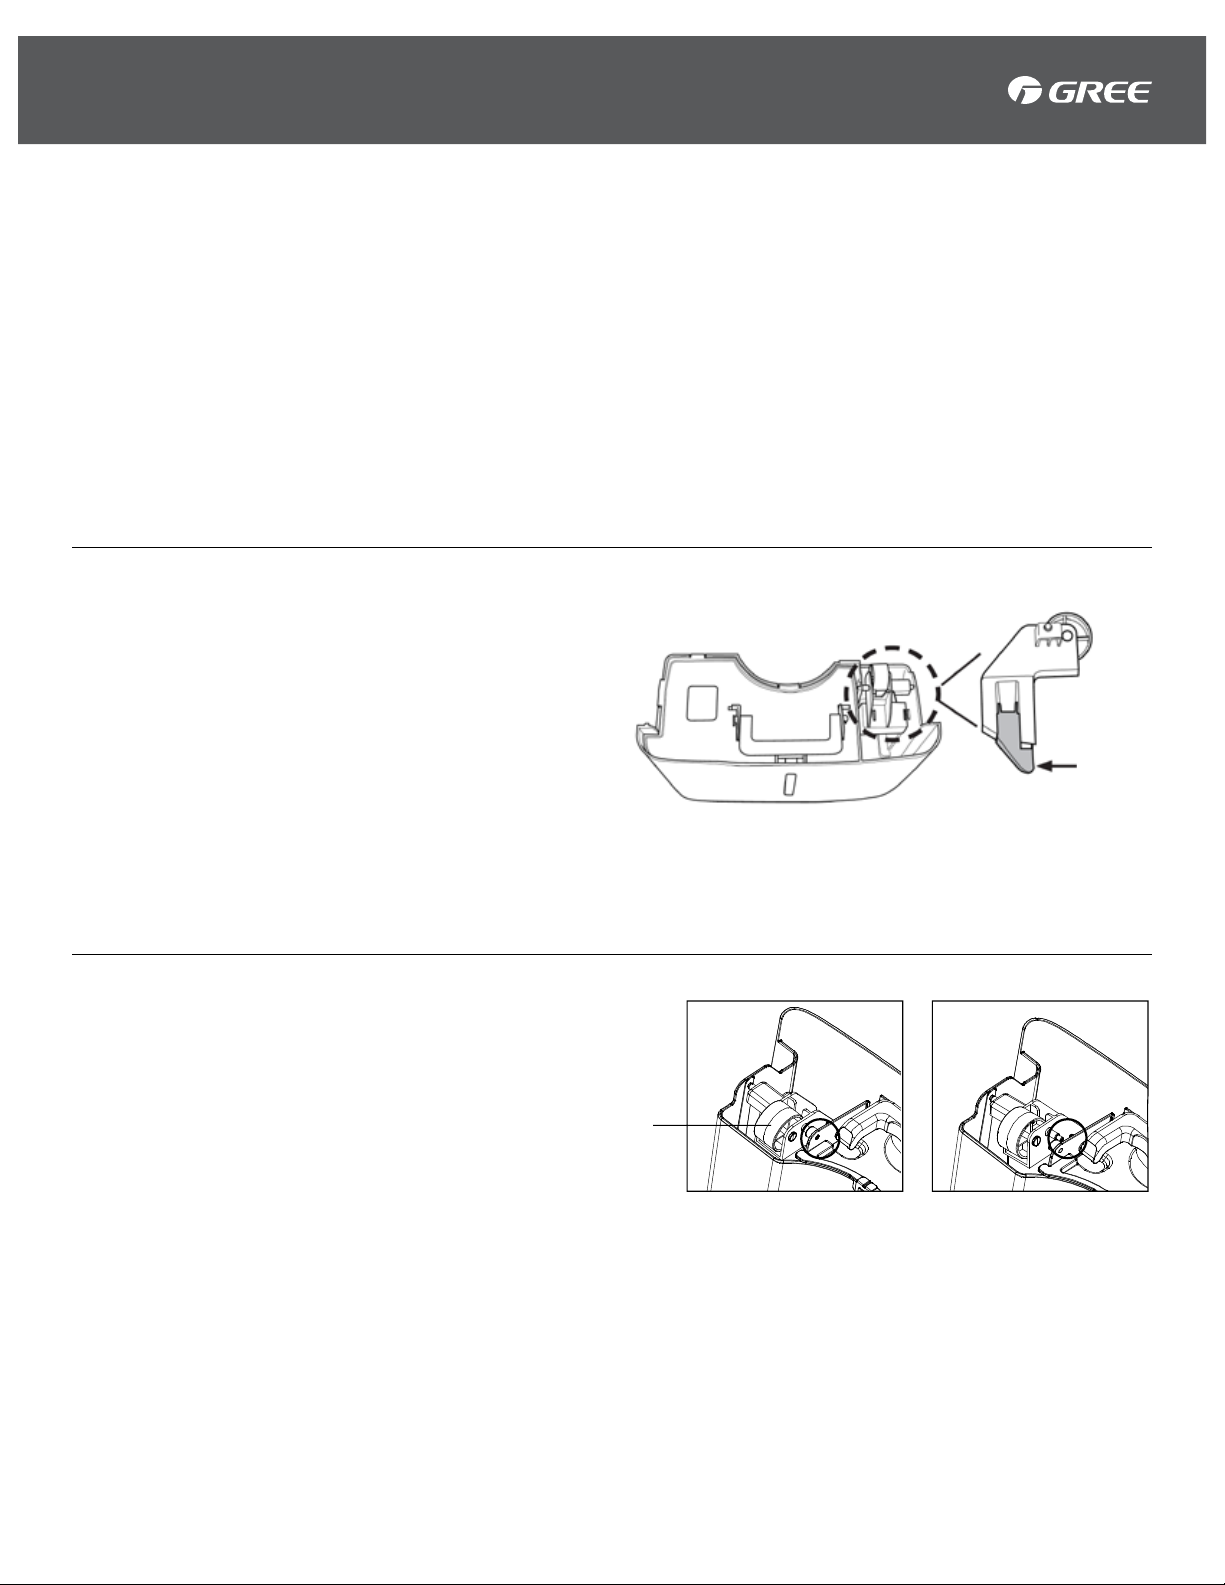
Bucket Operation
DO NOT remove the foam piece in the bucket
assembly.
If removed the Dehumidifier will not work
properly.
When the coil is defrosted, the compressor or
fan will automatically restart and dehumidifying
will resume.
Check whether float in water bucket is
properly placed, as it might have moved during
transportation. If not placed properly, move to
correct position shown below.
Float
Float
Foam
Correct Position Wrong Position
Correct position Incorrect position
Correct
9

OPERATING INSTRUCTIONS
Function & Control Display
4 hour or 2 hour
delay on/o
indicator lights
1 2 34 5 6
# DESCRIPTION FUNCTION
1 Power
2
Filter
3 -/+
4
Display
Press to turn the dehumidifier on and off.
After 250 hours of operation, the FILTER indicator light will glow to remind you to
clean the filter. Press the filter button to turn off the Filter light. Remove the filter
and clean it. See Cleaning and Maintenance page 12.
The humidity level can be set within a range of 35% RH (Relative Humidity) to 80%
RH (Relative Humidity) in 5% increments, or at NONSTOP for continuous operation.
Press (-) until the screen reads NONSTOP.
NOTE: If NONSTOP is selected, the dehumidifier will operate continuously at its
maximum dehumidification settings if attached to a hose, or until bucket is full.
• For drier air, press the (-) pad and set to a lower percent value (%).
• For damper air, press the (+) pad and set to a higher percent value (%).
When you first use the dehumidifier, set the humidity control to 45% or 50%.
Allow at least 24 hours for the dehumidifier to achieve the humidity level. If you still
have damper air than desired, set the humidity level to a lower setting, or select
NONSTOP for maximum dehumidification.
Shows the set % humidity level while setting, then shows the actual (+/- 5%
accuracy) room % humidity level.
5
Fan Speed
6 Timer
Controls the fan speed. Press to select either HIGH, MEDIUM or LOW.
Set the fan control to HIGH for maximum moisture removal. When the humidity has
been reduced and quiet operation is preferred, set the fan control to MEDIUM or
LOW.
While unit is ON, press to set unit to automatically turn off in 2 or 4 hours.
While unit is OFF, press to set unit to automatically turn on in 2 or 4 hours
10

OPERATING INSTRUCTIONS
Other Features
Auto Shut Off
Water level control switch shits off dehumidifier when the bucket is full.
3 Speed Fan
Increase circulation with 3 speeds to maximize moisture removal.
Programmable Digital Humidistat
Precise humidity control.
Low-Temp Operation
Reduce freezing during the cold winters months down to 41˚F.
Auto-Restart
Automatically restarts unit after power outage.
Auto Defrost
Automatically defrosts the coils for worry-free operation.
External Drain Option
Attach hose for gravity fed drainage.*
*Garden hose not included.
NOTICE:
This picture is for reference only. Please refer to the actual product for the appearance.
11

CLEANING AND MAINTENANCE
CAUTION:
• Turn off the dehumidifier and remove the plug from the wall outlet before cleaning.
To Clean the Case:
Use water and a mild detergent. Do not use bleach
or abrasives.
Water Bucket
To Remove: Remove the bucket and pour out
any water.
To Clean: Every few weeks, clean the bucket
to prevent growth of mold, mildew and bacteria.
Partially fill the bucket with clean water and add a
little mild detergent. Swish it around in the bucket,
empty and rinse.
To Replace: Slide the bucket into the dehumidifier.
Air Filter
To Clean the Front Grille:
Use a vacuum attachment or brush.
The air filter behind the front grille should be
checked and cleaned at least every 250 hours of
operation or more often if necessary.
After 250 hours of operation, the Clean the Filter
indicator light will glow to remind you to clean the
filter. Remove the filter and clean it. Replace the
filter and press the Filter Timer pad (for 3 seconds)
to turn off the Clean the Filter light.
To Remove: Remove the bucket. Grasp the filter
edge, and pull it straight down and out.
To Clean: Clean the filter with warm, soapy water.
Rinse and let the filter dry before replacing it.
NOTE:
• DO NOT rinse or put the filter in an automatic
dishwasher.
Air Filter
CAUTION:
• DO NOT operate the dehumidifier without
a filter because dirt and lint will clog it and
reduce performance.
12
BEFORE YOU CALL
Malfunction Code
If the following Malfunction Code appears, please call Customer Service.
MALFUNCTION CODE SOLUTION
F0
F1
F2
L1
H3
Please Contact Customer Service
IF THESE SOLUTIONS FAIL, PLEASE CALL 1-866-658-0466 FOR GREE CUSTOMER SERVICE
13

BEFORE YOU CALL
PROBLEM POSSIBLE CAUSE SOLUTION
There is a protective time delay (up to 3 minutes) to prevent
tripping of the compressor overload. For this reason, the
unit may not start normal heating or cooling for 3 minutes
after it turned back on.
Check the house fuse/circuit breaker box and replace the
fuse or reset the breaker.
The dehumidifier automatically turns off when either
condition occurs. Change to a lower setting or empty the
bucket and replace properly.
The bucket must be in place and securely seated for the
dehumidifier to operate.
Makes sure the dehumidifier’s plug is pushed completely
into the outlet.
This is normal. Frost will usually disappear within 60
minutes. See the Automatic Defrost section
When first installed, allow at least 24 hours to maintain the
desired dryness.
Make sure there are no curtains, blinds or furniture blocking
the front of back of the dehumidifier. See the Choosing a
Location section.
Install the dehumidifier away from the dyer. The dryer should
be vented to the outside.
Check that all doors, windows and other openings are
securely closed.
Dehumidifier
Will Not Operate
Dehumidifier Runs
Too Much
Frost Appears On
The Coils
Dehumidifier
Does Not Dry The Air
As It Should
Power Failure
The fuse is blown/circuit breaker is
tripped
Dehumidifier has reached its preset
level or bucket is full
Bucket is not in the proper position
The dehumidifier is unplugged
Area to be dehumidified is too large The capacity of your dehumidifier may not be adequate.
Doors and windows are open Close all doors and windows to the outside.
Dehumidifier has been turned on
recently, or room temperature is
below 41°F (5°C)
Did not allow enough time to remove
the moisture
Airflow is restricted
Clothes dryer may be blowing
moisture-laden air into the room
Dirty Filter See the Care and Maintenance section.
Doors and windows may not be
closed tightly
The Humidity Control may not be set
low enough
Room temperature is too low
The compressor will turn off and the
Control Cannot
Be Set
Water On Floor
Bucket Full Led Light
Flashing And Alarm
Sounds While Drain
Hose Is Connected.
Fan Noise Air is moving through the dehumidifier This is normal.
fan will automatically continue to run
for approximately 3 minutes at a fixed
setting
Hose connection may be loose
Intended to use the bucket to collect
water, but a hose was attached
Drain hose not tight on fitting Check drain hose connection.
Drain hose is kinked
For drier air, press the + pad and set to a lower percent
value (%) or at NS (Nonstop) for maximum dehumidification.
Moisture removal is best at higher room temperatures.
Lower room temperatures will reduce the moisture removal
rate. Models are designed to be operated at temperatures
above 41°F (5°C).
This is normal. Wait approximately 3 minutes and set the
fan as desired.
Check the hose connection. See the Removing Collected
Water section.
Disconnect the hose if using a bucket to collect water. See
the Removing Collected Water section.
Ensure the drain hose is pointed straight down to the floor
and is not kinked in anyway.
IF THESE SOLUTIONS FAIL, PLEASE CALL 1-866-658-0466 FOR GREE CUSTOMER SERVICE
14

WARRANTY STATEMENT
One Year Limited Warranty
In order to make your Warranty Claim:
Please call 1-866-658-0466 or email us at customerservice@greeproducts.com
This product is warranted for a period of 1 year after date of purchase.
Customer must possess this Warranty Statement along with a copy of the original receipt of purchase,
serial number and date of purchase.
Warranty only covers new products purchased from authorized dealers or retailers. It does not include
used, salvaged, refurbished products or unauthorized Internet sales.
THIS WARRANTY DOES NOT COVER:
Commercial use.
Damage done to the unit while in possession of the consumer; not caused by a defect.
Damage caused by improper installation, delivery, maintenance and failing to follow the proper
instructions provided by the manual.
Damage caused by modifications to the product or unreasonable use.
Damage caused by replacement of house fuses or resetting circuit breakers.
Damage caused by repairs or alterations.
Damage caused after delivery.
Labor or other costs incurred for diagnosing, repairing, removing, installing, shipping, servicing or
handling of either defective parts, or replacement parts, or new units.
Exclusion of Implied Warranties:
GREE is not responsible for any consequential or incidental damages. GREE’s liability will not exceed the
retail value of the Dehumidifier unit.
This warranty does not cover, and is not intended to exclude any liability on the part of GREE, whether
under this warranty or implied by law for any indirect or consequential damages for breach of warranty.
Some states may not allow the exclusion or limitation so this limitation may not apply to you.
For your own records, please attach a copy of your sales receipt to this manual. Also, please fill in the
below:
Retailer:
Model #:
Purchase Location:
Purchase Date:
Serial Number:
Register your product at: www.greeproducts.com
15

Gree Customer Service
Hours: 9am–5pm CST Monday–Friday
Phone: 1-866-658-0466
Email: customerservice@greeproducts.com
Website: www.greeproducts.com M111716-305070CH
16
 Loading...