


Before using this dehumidifier, please read the following instructions carefully and keep
this manual along with your proof of purchase in a safe place for future reference.
MODEL : 13-04661
00528-11/10/11
©
Copyright, Sunrise Tradex Corp., 2011
OWNER’S MANUAL
MOBILE AIR CONDITIONER
WWW.GREE.CA
St-Mathieu-de-Beloeil
(Québec) Canada
1-866-680-GREE
2
TABLE OF CONTENTS
SUMMARY........................................................................................3,4
WORKING PRINCIPLE......................................................................4
STRUCTURE ....................................................................................5
OPERATING METHODS ..................................................................6
Functions and operation methods of control panel ..........................7
Environmental temperature ..............................................................8
Operation of wireless remote control................................................9
Names and functions of wireless remote control ..............................10
Guide for operation- General operation ..........................................10
Guide for operation- Optional operation ..........................................11
Changing batteries and notices ........................................................11
DRAINAGE METHOD ......................................................................12,13
ACCESSORIES AND INSTALLATION OF HEAT EXHAUST HOSE......14,15
MAINTENANCE................................................................................16
MALFUCTION ANALYSIS ................................................................16
SAFE NOTE AND NOTICE................................................................17,18
AFTER SALES SERVICE......................................................................18
Thank you for your selection, please read this instruction carefully before operating and
keep it for consultation.
2
3
Mobile Air Conditioner is a type of small multifunctional and movable air conditioner that contains func
tions of COOL DRY and separate ventilation and it can be moved freely according to different location
and occasion.it is suitable for office and houses especially those with many rooms. This product also
contains the ad- vantages of compact configuration, excellent process, elegant appearance, convenient
moving, low cost and low noise.
Note: Please read this instruction carefully before operating the unit.This instruction is only for refe-
rence the specification parameters are subject to be changed without notice.
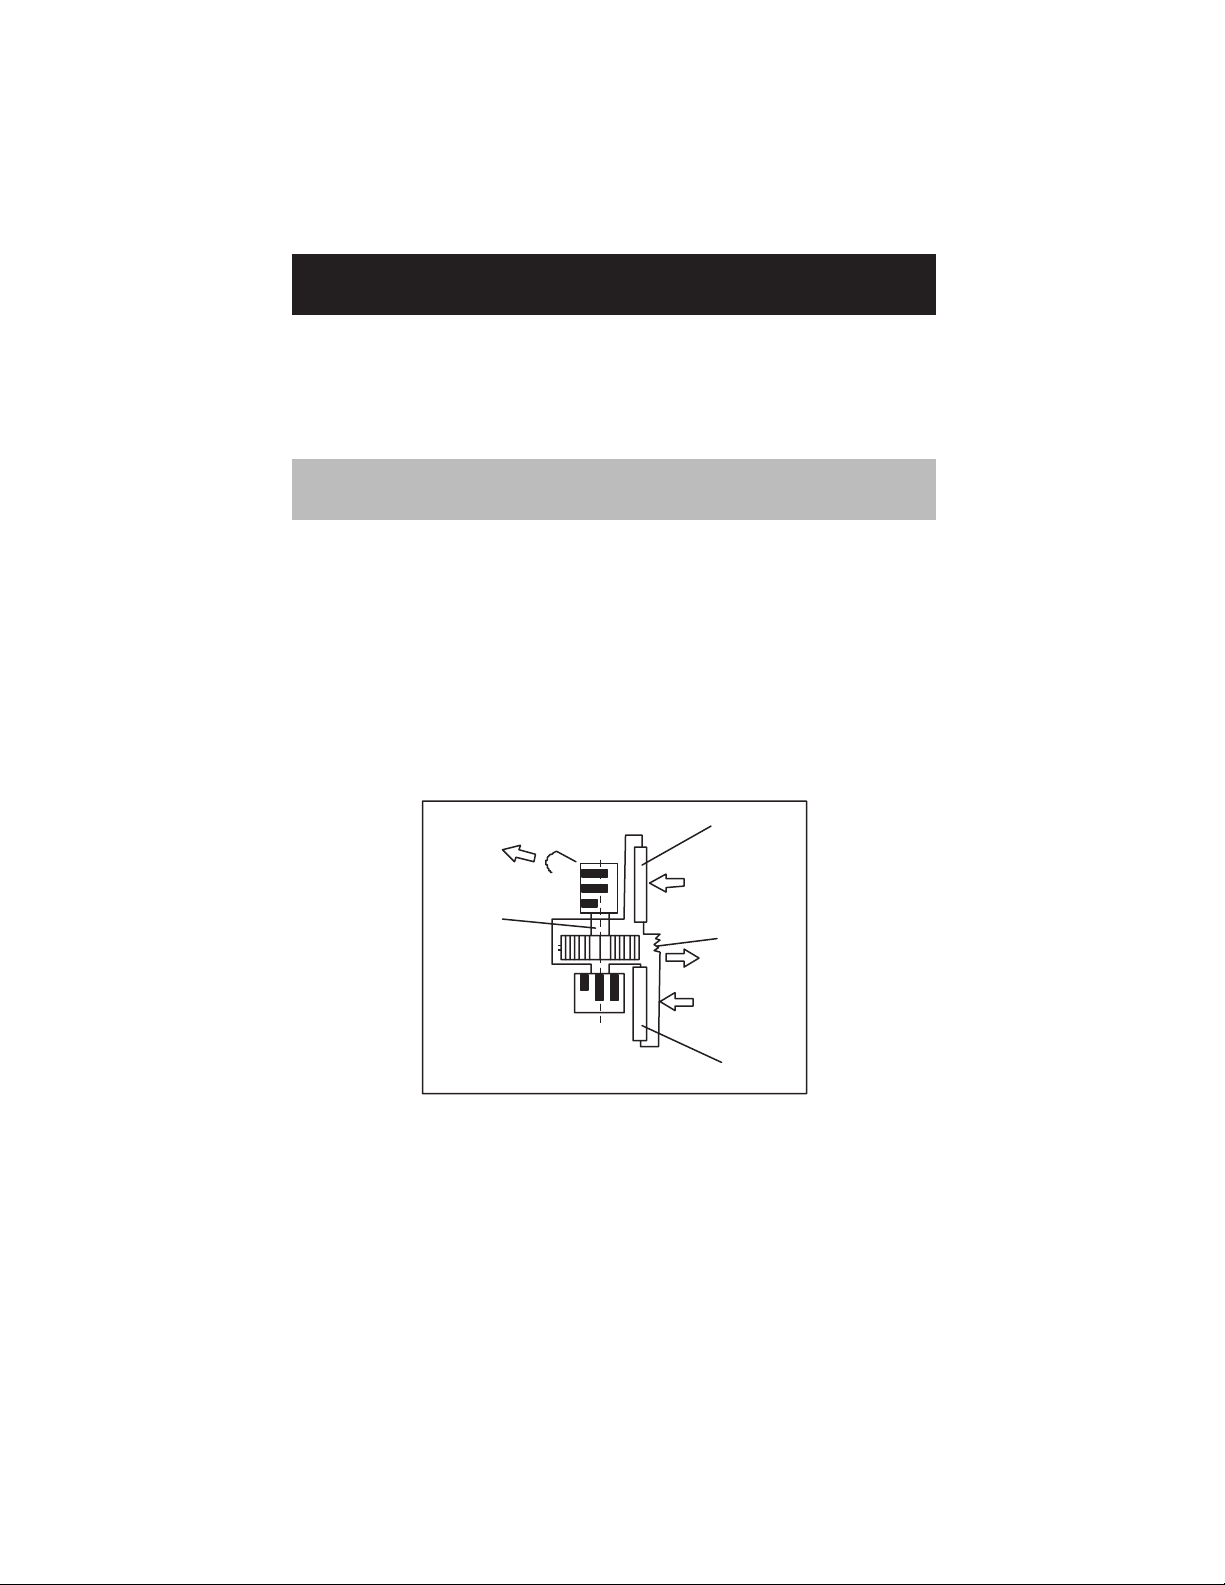
Under function of fan motor, indoor airflow changed into cooled air through evaporator then blew out,
while the indoor airflow changed into heated air though condenser then blew out. There are 2 flues
designed on structure of this unit: heated air is discharged from rear air outlet vent on back air conditioner while cooled air from front air outlet vent of the unit.After guide louver, gentle and steady cooled
ai- rflow is produced to reach needed cooling effect.
SUMMARY
WORKING PRINCIPLE
Working principle
evaporator
cool air
fan motor
capillary
fluel
condenser
heat air
4
SUMMARY
When only used as dehumidifier, remember
to take off heat discharge pipe from unit and
install it onto unit when the unit is used as
air conditioner. Since partial indoor air will
be heated as heat air and discharged to outside by discharge pipe after cycling then
outdoor air will enter to maintain balance
air pressure, thus the air conditioner will
only lower temperature of partial re- gional
air of indoor room instead of turning entire
indoor air to a lower temperature.
1.Where room area is smaller than 15m2, and wall (or building) has well heat insulation
effect. As shown in following figure, if unit is in shown location, the cooling effect will be
better.
2.If room area is larger than20m2, for example workshop or factory, the unit can only offer
cooled air to partial area(as shown in following figure),and people in this area can enjoy
better cooling effect.
Usage Location
1.5~2m
60 ~70
Window or wall
Discharge pipe
Room
Mobile AC
Heat air
Cooling region
(Sector cooling area)
Flow direction of
cooled air
Heated air
Cooled air
4
1.5~2m
60 ~70
1.5~2m
60 ~70
1.5~2m
60 ~70
Fenêtre ou mur
Tuyau d’éva-
cuation de l’air
chaud
Room
Zone de
refroidissement
Circulation de
l’air frais
Air chaud
Air frais
5
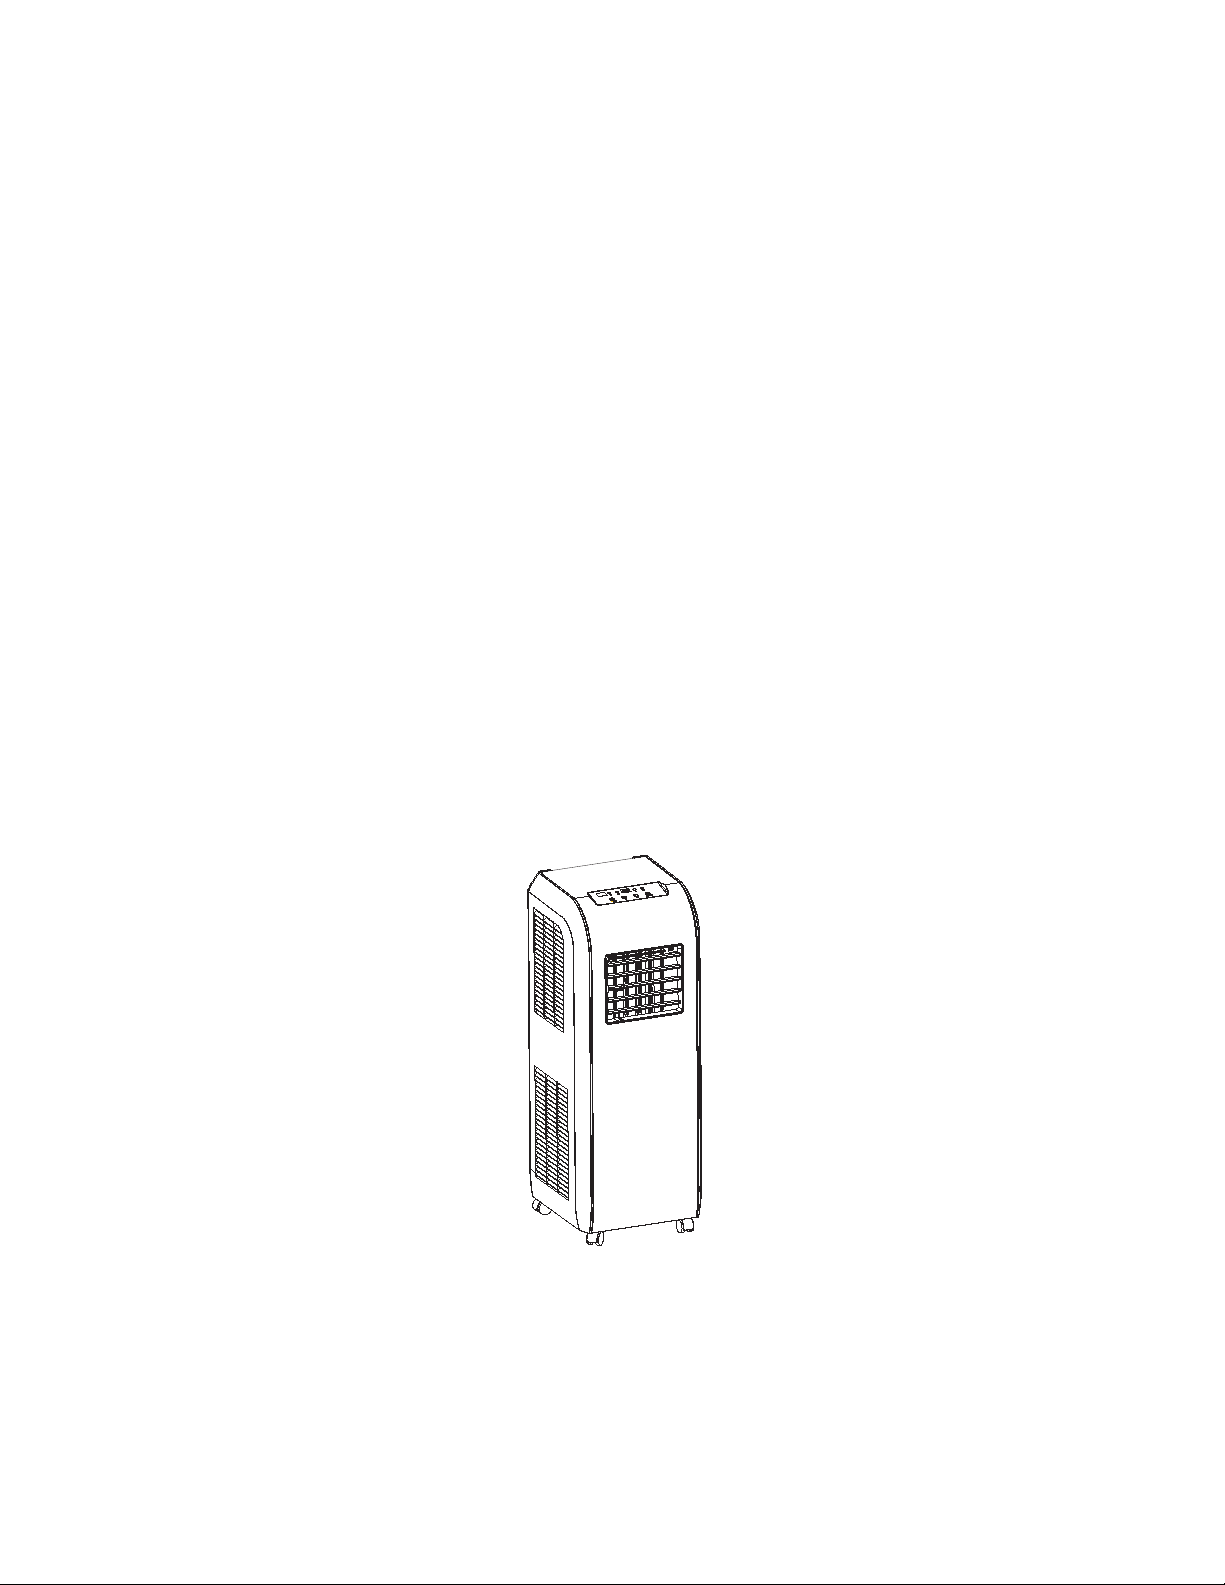
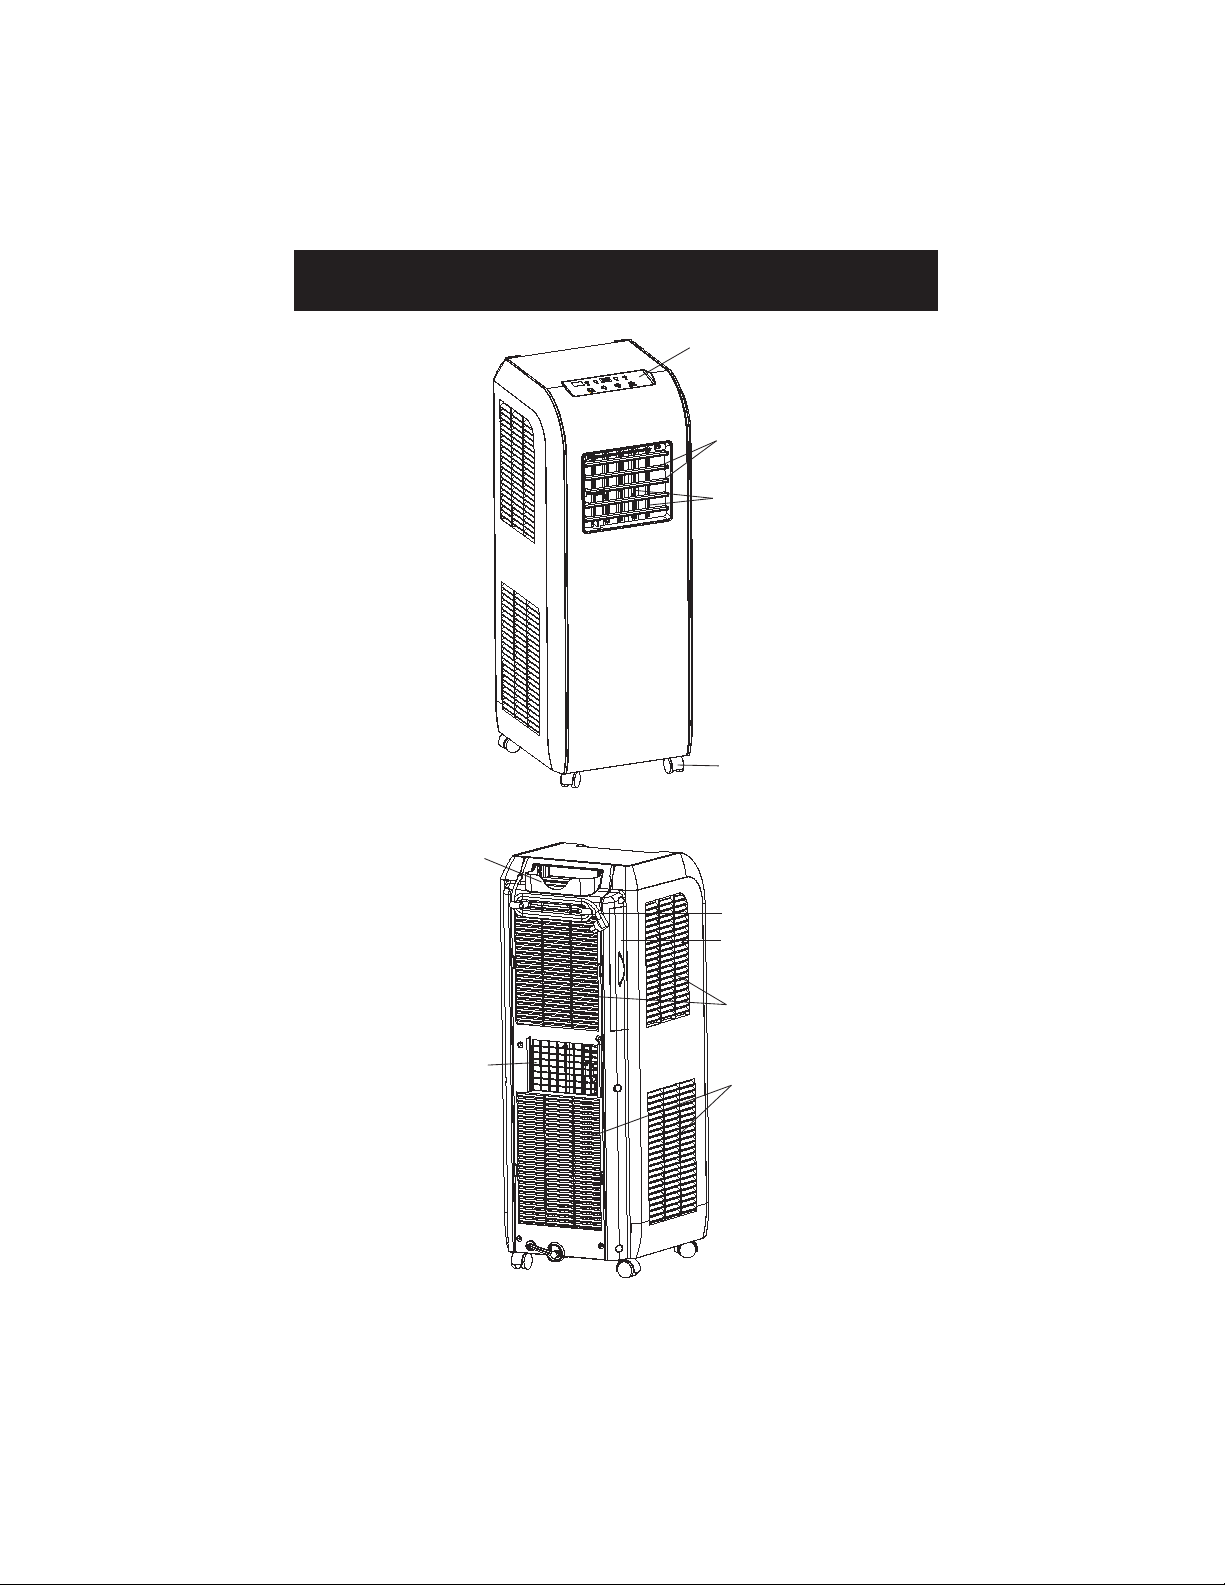
STRUCTURE
Control panel
Guide louver
Swing louver
Wheel
Remote
Power cord
Filters
Upper air inlet grille
Air outlet vent
Lower air inlet grille
Front
Rear
CONTROL PADS ON THE DEHUMIDIFIER
6
The temp. range of this unit is 16°C
-35°C for cooling and ranges from
16°C-35°C for dehumidifying
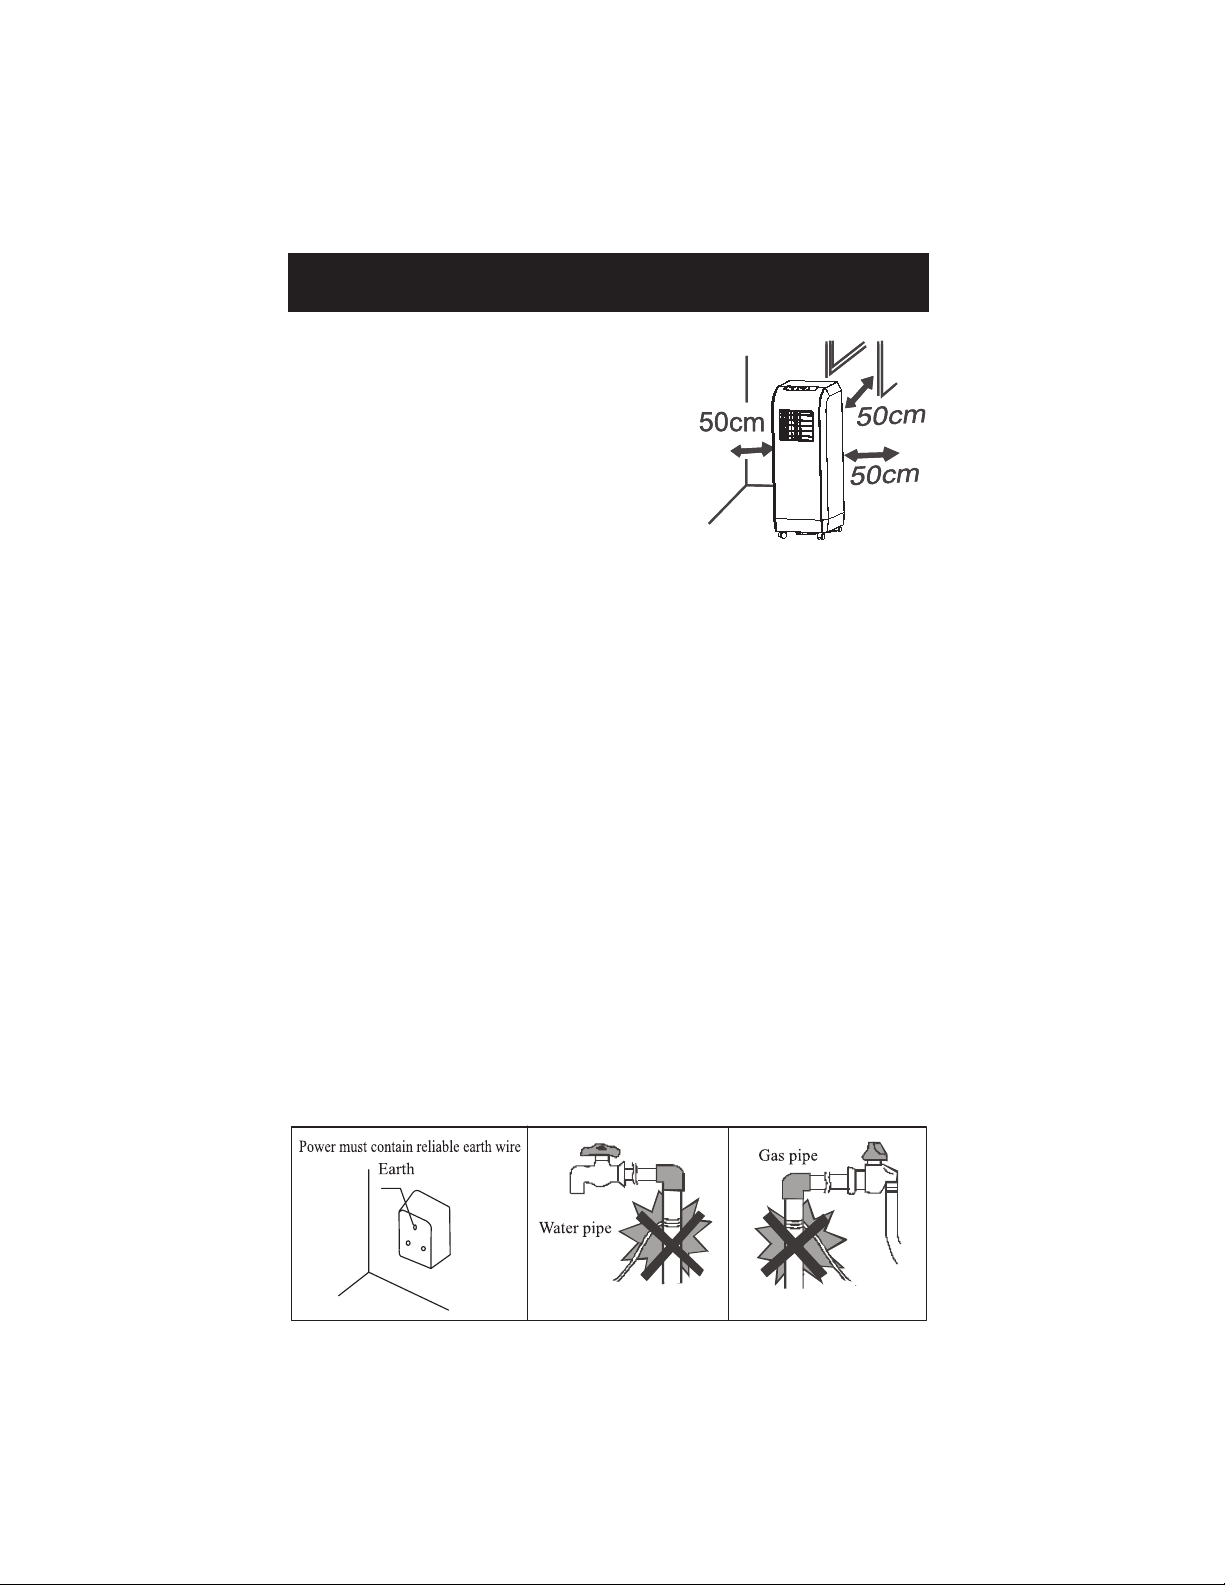
Place the unit on horizontal floor
when using and ma- intain a distance for above 50cm from walls,surface of flammable objects or other
obstructions.
Check before connecting power:
The normal running fluctuation
range of voltage of the unit is + 10% of value listed on nameplate. Too
high or too low of voltage will influence the unit.
It is better to adopt power lead with pickup current above 10A to prevent sudden drop of voltage when the unit is running. It is necessary to
exchange broken power hose by special power hose. When it is necessary to change power hose or maintain, please contact the seller and have
them repaired by professional personnel. Earth must be conducted reliably and should connect to special earthing equipments in building to
ensure well earth. Do not replace fuse by steel or copper and capacity
for fuse should be pro- per. it is forbidden to fix power on blade or sharp
objects to prevent creep- age leaded by mangled wire. Circuitry must be
installed and fixed by professional personnel following the national
wiring regulations.Creepage protect switch with enough capa- city and.
10A solenoid heat tripping air switch must be contained in circuitry. It is forbidden to
connect earth wire to water pipe or gas pipe, plug off power plug or cut off power supply
when the unit is not going
to be used.
Apply range for
COOL and DRY
Disposal
requirement
Power
6
Conduite de gaz

Functions and operation methods of control panel
7
When pressing key is valid,buzzer makes a sound,indicated light indicates relevant
state,system will last for 2 seconds.
l. ON/OFF
Turn on or turn off the unit (press once to turn on unit and repress to turn off).
2. "+","-" key
In COOL mode, press "-" once, the set temperature will decrease 1°C(1 ), press "+"
once, the set tem- perature will incresae 1°C(1°F). The set temperature can be selected
from 16°C-30°C(61°F-86 °F).
3. MODE In the state of running,press the key to enter the mode of COOL,
DEHUMIDIFY, FAN.
4. Fan speed
When working in FAN or COOL mode, the air conditioner can select 3 speeds and the
initial speed is hi- gh; when running in DRY, fan motor runs in Low speed.
5. Dry mode
When the unit running in the dry mode,it can decrease the humidity of the room.
6. Cool mode When the unit running in cool mode, it can decrease the temperature of the room, and make people very comfortable.
7. Water full
When it twinkling, that means the water in the tank is full, We should drain off the
water.
Panel control

8
Environmental temperature
Usage environmental temperature of this unit is 16 °C ~ 35°C.
Cool
1 Install heat discharge pipe well, select a location near door and window, connect the
heat discharge pipe to outside and note to leave an air return vent such as a window or
door to guarantee the indoor air return normal.
2 After press “ON/OFF“ to turn on unit and pressed MODE to select cool mode,cool
indicated light on and unit runs in cooling way.
3 Press SPEED to select proper fan speed (High/Medium/Low).
4 Turn on the switch firstly, approve to run in COOL mode ,then initial fan speed is high.
Note
While COOL is running, in order to raise cooling effect, please: Draw up curtain to prevent sunshine from shining into the air conditioning room: Prevent
setting other heat source in the room.
Compressor delay protect
No matter under what circumstance after electrified, the interval between twice
start of compressor should not be less than 3 minutes; after started, compressor
will not stop by the change of temp. in 6 minutes.
Dry
Closed doors and windows can get better dry effect.Press
“ON/OFF“ to turn on
the unit and MODE is selected DRY,then cool and dry indicated lights are on
and unit runs in dry mode.
Note
When drying, indoor fan motor runs in low speed, compressor and outdoor fan
motor run continuously, set te- mperature will not be displayed and is not adjustable.Discharge pipe is unnecessary to be installed.
Fan
Press
“ON/OFF“ to turn on unit and select FAN by SPEED, indoor fan motor can
run in 3 speeds of High, Medium and low, set temperature will not be displayed
and is not adjusable, High,Medium or low symbol will be displayed in display
window according to speed of indoor fan.
8

9
Operation of wireless remote control
Press this button, the unit will be turned on,
press it once more, the unit will be turned
off. When turning on or turning off the unit,
the Timer, Sleep function will be canceled,
but the presetting time is still remained.
Press this button, Sleep On and Sleep Off
can be selected. After powered on,Sleep
Off is defaulted. After the unit is turned
off, the Sleep function is canceled. After
Sleep function set up, the signal of Sleep
will display. In this mode, the time of
timer can be adjusted. Under Fan and
Auto modes, this function is not available.
By pressing this key, you may select
AUTO, FAN 1, FAN 2, FAN 3 or FAN 4,
and may also cycle between them. FAN 4
only in cool mode. After being energized,
AUTO is defaulted. Only LOW fan can
be set under DRY mode, pressing this key
cannot adjust the fan speed, but can send
message.
Press this key to activate or deactivate the
swing.
Press this button, Auto, Cool,Dry, Fan, Heat
mode can be selected circularly. Auto
mode is default while power on. Under
Auto mode,the temperature will not be disp
layed; Under Heat mode, the initial value
is 28°C( 82°F);Under other modes, the
i
nitial value is 25°C( 77°F).
Signal transmitter
Names and functions of wireless remote control
Note: Be sure that there are no obstructions between receiver and remote controller; Don't
drop or throw the remote control; Don't let any liquid in the remote control and put the remote control directly under the sunlight or any place where is very hot.
ƷƷ
Ʒ
ƷƷ
AUTO
COOL
DRY
FAN
HEAT
(Only for cooling and heating unit.)
Fan 2Fan 1
Fan 3
Fan 4
AUTO
COOL
DRY
FAN
HEAT
Remote control
SLEEP
SLEEP button
FAN button
SWING button (optional)
FAN
SWING
ON/OFF
ON/OFF button
MODE button
MODE

+
-
Operation of wireless remote control
10
Notice: This is a general use remote controller, it could be used for the air conditioners with
multifunction; For some function, which the model dosen't have, if press the corresponding
button on the remote controller that the unit will keep the original running status.
For presetting temperature increasing. Press
this button,can set up the temperature,
when unit is on . Continuously press and
hold this button for more than 2 seconds,
the corresponding contents will be changed
rapidly, until unpress the button then send
the information,°C(°F)is disp- laying all
along. In Auto mode, the temp- erature can
not be set up, but operate this button can
send the signal. Centigrade setting range
:16°C-30°C; Fahrenheit scale setting range
61°F-86°F.
By pressing this key under switch-off
state, you may set the time for auto switch-on. The range of setting is 0.5 ~ 24
hours. The characters "T-ON" and "H" will
flash for 5 seconds. Within 5 seconds,you
may make one press of this key to complete the setting and send the message.If
the setting is valid, the set time will be
displayed for 2 seconds before display of
the temperature message. During flash,
you may press "+" key to increase the
value and press "-" key to decrease the
value. The time will increase or decrease
by 0.5 hours with each press of this key.
If pressing "+" or "-" key continuously, the
time value will change rapidly. The remote controller can increase the set time by
0.5 hours every 0.25 seconds. After being
energized, the fault is no timer setting,
and there is no display of "T-ON" or "H".
Press ON/OFF key to switch on the unit
and cancel the auto switch-on.When the
temperature display becomes constant,
you may press this key again to display
the remaining set time. The time value,
"T-On" and "H" will display constantly for
2 seconds. After 2 seconds,the preset
temperature will be displayed. Within
these 2 seconds, you may press this key
again to cancel the auto switch-on and
send the message.
By pressing this key under switch-on
state, you may set the time for auto
switch-off. The method of setting as the
same as for auto switch-on.
P
resetting temperature can be decreased.
Press this button, the temperature can be
s
et up, continuously press this button and
hold for two seconds, the relative contents
can quickly change, until unhold this button and send the order that the °C (°F)
signal will be displayed all the time. The
t
emperature adjustment is unavailable
under the Auto mode, but the order can be
s
ent by if pressing this button.
TIMER
Remote control
TIMER button
+ button
- button
+
-
10
Ce bouton sert à programmer la minute-
rie lorsque l’appareil est hors tension. La
plage de programmation est de 0,5 à 24
heures. Appuyer sur le bouton et les
mentions « T-ON » et « H » clignoteront
pendant cinq secondes. Pendant ces cinq
secondes, vous pouvez appuyer de nou-
veau sur ce bouton afin de régler les
paramètres. Si les paramètres sont
valides, l’heure de mise en marche sera
affichée pendant deux secondes avant
que ne réapparaissent les renseignements
relatifs à la température. Pendant le cli-
gnotement, appuyer sur le bouton « + »
pour faire augmenter la valeur, et « - »
pour la faire diminuer. L’heure augmente-
ra ou diminuera par tranche de 0,5 heure
chaque fois que vous appuyez sur ces
boutons. Appuyer en permanence sur « +
» ou sur « - » afin de faire changer les
valeurs rapidement. La durée peut être
augmentée de 0,5 heure chaque 0,25
seconde au moyen de la télécommande.
Par défaut, la minuterie ne fonctionne pas
si l’appareil est sous tension (aucune
mention « T-ON » ou « H »). Le fait de
mettre l’appareil sous tension en
appuyant sur ON/OFF annule le démarra-
ge automatique de la minuterie. Une fois
que la température est affichée, appuyer
sur ce bouton afin d’afficher l’heure de
mise en marche. Les mentions « T-ON »
et « H » seront affichées pendant deux
secondes. Après cette période, la tempé-
rature désirée sera affichée. Pendant les
deux secondes, vous pouvez appuyer de
nouveau sur ce bouton afin d’annuler le
démarrage automatique.
Le fait d’appuyer sur ce bouton lorsque
l’appareil est sous tension permet de pro-
grammer l’heure d’arrêt de l’appareil. La
méthode de réglage est la même que
celle utilisée pour le démarrage automa-
tique.
MINUTERIE
Bouton TIMER
11
Operation of wireless remote control
Guide for operation- General operation
1. After powered on, press ON/OFF button, the unit
will start to run.(Note: When it is powered off, the
guide louver of main unit will close automatically.)
2. Press MODE button, select desired running mode, or
press COOL or HEAT mode to enter into the corresponding operation directly. 3. Pressing + or - button,
to set the desired temperature.
(It is unnecessary to set the temp. at AUTO mode.)
4. Pressing FAN button, set fan speed, can select
AUTO, FAN 1, FAN 2, FAN 3 or FAN 4.
5. Pressing SWING button, to select the swing. (Not
available on this model.)
Guide for operation- Optional operation
1. Press SLEEP button, to set sleep.
2. Press TIMER button, can set the scheduled timer on
or timer off.
Changing batteries and notice
1. Slightly to press the place to take out the back
cover of wireless remote control.(As shown in figure)
2 Take out the old batteries. (As show in figure)
3. Insert two new AAA1.5V dry batteries, and pay
attention to the polarity. (As show in figure)
4. Attach the back cover of wireless remote control.
(As show in figure)
NOTE:
• When changing the batteries, do not use the old
or different batteries, other wise, it can cause the
malfunction of the wireless remote control.
• If the wireless remote contro lwill not be used for a
long time, please take them out, and don't let the
leakage liquid damage the wireless remote control.
• The operation should be in its receiving range.
• It should be placed at where is 1m away from the
TV set or stereo sound sets.
• If the wireless remote control can not operate normally, please take them out, after 30s later and reinsert, if they cannot normally run, please change
them.
.

When COOL or DRY is running,condensate will drain to water tank.When water tank is
filled buz- zer will sound 8 timers for warn, water tank green indicated light on panel on
with H8 displayed on display window and whole unit stop running.Plug out plug on
drainage hose and take off the hose fro- m fixing clamp, then drain out water in
tank.After that,plug the pipe plug onto pipe to prevent leaka- ge of condensate and fix
drainage pipe fixing clamp as shown in following figure.The unit will resu- me running
when water filled protect released and compressor stops for 3 minutes.
Install of drainage hose(as shown in following figure): Note Drainage hose must be
installed before using otherwise block of drain may occur and affects normal run of unit.
Drain Hose included:
2. Attach one end of the drain hose to the drain port with the clamp. See Drain Hose
graphic.
3. Insert the drain plug into the other end of the drain hose and secure with clamp. See
Drain Hose graphic.
4. Attach the drain hose clip to the back panel of the air conditioner near the drain port
with the screw provided.
1. Remove drain cap from drain port.
Install Drain Hose
Drain Cap
DRAINAGE METHOD
12
A. Drain port
B
. Drain cap
A
B
Drainage pipe
Clamp
Pipe hoop
Rubber plug
Screw
12
A. Drain port
B. Drain cap
A
B
Drainage pipe
Clamp
Pipe hoop
Rubber plug
Screw
Attache de
tuyau
Bouchon en
caoutchouc
Vis

Drain Hose Clip
DRAINAGE METHOD
13
A. Drain plug
B. Drain port
C. Drain hose
D.
E.
A
B
C
D
E
B
A
C
-
A
B
Clamps
Drain hose clip
5. Snap the free end of the drain hose into the drain hose clip.
Drain Hose
A. Drain port
B. Attach drain hose clip with screw
provided.
1. Roll air conditioner to its selected location. See “Location Requirements.”
2. Insert one end of the flexible exhaust hose into the exhaust adapter.
3. Twist clockwise to lock hose into place.
4. Insert the other end of the flexible exhaust hose into the window exhaust adapter.
5. Twist clockwise to lock hose into place.
Drain Hose
Install Exhaust Hose and Adapter
A. Exhaust adapter
B. Flexible exhaust hose
C. Window exhaust adapter

ACCESSORIES AND INSTALLATION OF HEAT
EXHAUST HOSE
14
FP
FP
Length range of exhaust pipe should be 500mm-1500mm.
It is recommended to use it with shortest length.
When installing, exhaust pipe should be as flat as possible.
Don't prolong the pipe or connect it with other exhaust
pipe
Correct installation is as shown in figure (When installing it
on wall, height of hall should be about 40cm-130cm from
floor).
14
FP
FP

ACCESSORIES AND INSTALLATION OF HEAT
EXHAUST HOSE
15
55cm
55cm
If the pipe are to be bent, please install it by considering
following dimension.
Wrong installation is shown in following figure (If the pipe
is bent too much, it would easily cause malfunction.)

MAINTENANCE
16
G
as
1
2
Mobile AC
Warning
Clean air filter
Note :
Wash
Clean AC
There are wheels at bottom of mobile air conditioner that enable the
unit moves among rooms conveniently according to need.
Plug off power plug from socket and cut off power before any maintenance to prevent creepage occurs.
If too much duct deposed on filter, performance of air conditioner will
reduce, thus it is better to clean filter at least once 2 weeks.
Disassembly From these two direction to take out filters.
Clean filter individually, When cleaning , wash it by shooting
water(for example shower) and shakes it. Or soak it in warm
soap water then dry it.
Please soak the cloth by warm whose temperature is lower than 40 °C
(or soap water or water with proper cleaner)and wipe the dirty part on
unit slightly after the cloth is wrung.Don't clean the unit by gasoline,
diesel oil or similar thing. Pull out the power plug before cleaning.
16
Gas
1
2
indiquées

MAINTENANCE
17
If malfunction occur, please check the following before maintenance:
The air conditioner doesn't start.
The power supply is not
connected well. The power
plug is not inserted tightly.
There is the malfunction of
power plug or socket.
The fuse is broken.
1. Insert the power plug
tightly.
2. Replace the power
plug or socket.
3. Ask for the
maintenance man to
replace the fuse.
The LCD displays the
number of time, but it
doesn't work.
Is the TIMER ON in
operation?
Cancel the "SET TIMER"
operation or to wait the
auto running.
Although it was set to
COOL mode, there is no
cool wind.
1. The room temp. is lower
than the set temp.
2. The evaporator frosts.
1. This is the normal
phenomenon.
2. Unit is running in
defrosting operation,
it will resume running
in original operation
after defrosting.
Although it was set the
DRY mode, there is no
cool wind.
1. The evaporator frosts. 1. Unit is running in
defrosting operation, it
will resume running in
original operation after
defrosting.
The LCD displays"E5". 1. Low voltage over current
protection.
Cut off power supply,
after 10 minutes, turn on
the unit, if "E5" still be displays, please inform the
maintenance man to
maintain.
The LCD displays"H8". The water tank gets full. 1. Pour out water in the
tank
2. If the malfunction still
exists, please inform
the maintenance man
to maintain.
Troubles Possible Causes Solutions

SAFE NOTE AND NOTICE
18
Don't place the unit in narrow location. Guarantee better ventilation for
unit to prevent malfunction occurs.
Don't place the unit in where there is direct sunburn to prevent fade
and re- duce of effect.
The unit should be at least 50cm away from surface of flammable thing.
Don't soak the unit or operate it in place where is easy to get wet to
prevent creepage.
Don't operate the unit in following location for malfunction may be led:
*Gas place *Fire *where is easy to get oil.
Consider safe problem to following people.
1) Children and patients
2)Sick people or who cannot express himself or herself
3) Those who are exhausted, badly drunk or taken lot of soporific.
Don't climb on the unit or place something on it for drop may occur
and le- ading malfunction.
Don't let wind blows to human directly for long time for it is not good
for health.
The unit should leave TV for at least lm to prevent disturbance of electro- magnetic wave.
Don't block air inlet or outlet vent for it would lead malfunction.
Don't insert finger or stick etc. into air outlet vent; take special care to
child- ren to prevent accidence.
It is forbidden to slope or turn down air conditioner. Take off power
plug immediately if abnormal circumstance occurs and contact the
authorized seller for check and repair.
Don't sprinkle and shower unit by insecticide for it will lead deformation or breakage
If your air conditioner has problems on quality or others, please contact
lo- cal seller.
Location
Others :
18

SAFE NOTE AND NOTICE
AFTER SALES SERVICE
18
For disposal there are several possibilities:
a) The municipality has established collection systems, where
electronic waste can
be disposed of at least free of charge to the user.
b) When buying a new product, the retailer will take back the old
product at least free of charge.
c) The manufacturer will take back the old appliance for disposal at
least free of charge to the user.
d) As old products contain valuable resources, they can be sold to
scrap metal dealers. Wild disposal of waste in forests and landscapes
endangers your health when hazardous substances leak into the
ground-water and find their way into the food chain.
If any quality problems or any other problems exist, please contact with the local dealer.
DISPOSAL: Do not dispose this product as unsorted municipal
waste. Collection of such waste separately for special treatment
is necessary.
WWW.GREE.CA
St-Mathieu-de-Beloeil
(Québec) Canada
1-866-680-GREE

19
LIMITED WARRANTY
This air conditioner is covered by a warranty against defects in materials and
workmanship including the compressor, if used for the applications specified in this owner’s
manual, for a period of ONE (1) YEAR from the date of original purchase in Canada.
Note : The internal compressor is covered by a 5-YEAR limited warranty.
During the warranty period, if this air conditioner fails under normal use, GREE will, at its
option, either repair the unit or replace it, free of charge, within a
reasonable period of time after the air conditioner is returned.
As a condition to any warranty service obligation, the customer must present this warranty
certificate along with the proof of purchase.
THIS WARRANTY DOES NOT COVER :
1. Damage, accidental or otherwise, to the air conditioner that are not caused by materials
or workmanship defect.
2. Damage caused by misuse, tampering or failure to follow the operating and maintenance
instructions provided in this owner’s manual.
3. Damage to the finish of the unit enclosure or to other outer features caused by wear.
4. Filter.
5. Damage caused by repairs or modifications to the air conditioner made by any person not
duly authorized by GREE
6. Insurance and freight costs for the warranty service.
ALL IMPLIED WARRANTIES, INCLUDING ANY IMPLIED WARRANTY OF MERCHANTABILITY,
ARE LIMITED TO A ONE YEAR (1) PERIOD COVERED BY THIS EXPRESS LIMITED
WARRANTY. GREE DISCLAIMS ANY LIABILITY FOR CONSEQUENTIAL OR INCIDENTAL
DAMAGES AND, IN NO EVENT, SHALL GREE. LIABILITY EXCEEED THE RETAIL VALUE OF
THIS AIR CONDITIONER FOR BREACH OF ANY WRITTEN OR IMPLIED WARRANTY WITH
RESPECT TO THIS AIR CONDITIONER.
Keep this owner’s manual along with your proof of purchase in a safe
place for future reference. You must provide proof of purchase for
warranty service.
Enter the following information on your air conditioner; it will help you upon getting
assistance or service if you ever need it. You will have then to provide the model and serial
numbers of the air conditioner – these data are detailed on the rating plate of the unit.
Dealer name :
Address :
Model number:
Serial number :
Date of purchase :
WARRANTY
19
 Loading...