

Page 1

PSR-282
200-Channel VHF/Air/UHF
Handheld Scanner
Owner’s Manual
Add photograph
1
Page 2

INTRODUCTION
Your new 200 Channel VHF/Air/UHF Handheld Scanner
lets you scan conventional transmissions, and is
preprogrammed with search banks for convenience. By
pressing a one touch search key, you can quickly search
those frequencies most commonly used by public service and other agencies without tedious and complicated
programming
This scanner gives you direct access to over 25,000 exciting frequencies, including those used by aircraft and
amateur radio services, and you can change your selection at any time.
Your scanner also has these special features:
Liquid-Crystal Display—makes it easy to view and
change programming information. The display backlight
also makes the scanner easy to read in low-light situations.
One-Touch Search Banks—let you search preset frequencies in separate band 1–4, and ham bands, to make
it easy to locate specific types of calls.
Priority Channel—lets you program a channel as the priority channel. As the scanner scans, it checks the priority
channel every 2 seconds so you do not miss transmissions on that channel.
Tune—lets you tune for new and unlisted frequencies
starting from a specified frequency.
Ten Channel-Storage Banks—you can store 20 channels in each bank (200 total channels), letting you group
channels so you can more easily identify calls.
High Speed Search and High Speed Scan—lets you
set the scanner to search at up to 50 steps per second (in
frequency bands with 5 kHz steps) and scan at up to 25
channels per second, to help you quickly find interesting
broadcasts.
Lockout Function—lets you set your scanner to skip over
specified channels or frequencies when scanning or
searching.
Memory Backup—keeps the channel frequencies stored
in memory for about an hour in the event of a power loss.
Scan Delay—delays scanning for about 2 seconds before moving to another channel, so you can hear more
replies that are transmitted on the same channel.
© 2003 General Research of Electronics, Inc.
2
Page 3

Duplicate Channel Alert—warns you when the frequency
you are storing already exists in memory.
Key Lock—lets you lock the scanner’s keys to prevent
accidentally changing the scanner’s programming.
Three Power Options—you can power the scanner from
internal (rechargeable or non-rechargeable batteries) or
external AC or DC power (using an optional AC or DC
adapter).
Your PSR-282 scanner can receive these bands:
66–88 MHz 118–136.9916 MHz
137–174 MHz 380–512 MHz
CONTENTS
PREPARATION......................................................................... 4
Installing Batteries ............................................................. 4
Using AC Power ................................................................ 6
Using Vehicle Battery Power ............................................. 6
Connecting the Supplied Antrenna .................................. 7
Connecting an Earphone/Headphones ............................ 7
Connecting Extension Speaker ........................................ 8
Using the Belt Clip............................................................. 8
ABOUT YOUR SCANNER ........................................................ 9
A Look at the Keyboard .................................................... 9
A Look at the Display ...................................................... 10
UNDERSTANDING BANKS.................................................... 12
OPERATION ........................................................................... 13
Turning on the Scanner/Setting Volume and Squelch ... 13
Storing Known Frequencies into Channels .................... 13
Searching the One Touch Banks .................................... 14
Using Tune ...................................................................... 15
Scanning the Stored Channels ....................................... 16
Monitoring a Stored Channels ........................................ 17
Clearing a Stored Channels ............................................ 18
SPECIAL FEATURES ............................................................. 19
Delay ............................................................................... 19
Locking Out Channels or Frequencies ........................... 20
Using Priority ................................................................... 21
Using the Display Backlight ............................................ 21
Turning the Key Tone On and Off .................................... 21
Using the Key Lock ......................................................... 22
Resetting/Initializing the Scanner .................................... 22
GENERAL HINTS ................................................................... 24
Birdies ............................................................................. 24
CARE ..................................................................................... 25
IN CASE OF FAULT ............................................................... 25
SPECIFICATIONS .................................................................. 26
3
Page 4

PREPARATION
You can power your scanner from any of three sources:
Note: Connecting an AC or DC adapter to the scanner
disconnects internal batteries when you use the supplied
non-rechargeable battery holder (black), but it does not
disconnect internal batteries when you use the supplied
rechargeable battery holder (yellow).
• internal non-rechargeable batteries or rechargeable
batteries (not supplied—see “Installing Batteries”).
• standard AC power (with an optional AC adapter—
see “Using AC Power” on Page 6).
• Vehicle power (with an optional DC adapter—see “Using Vehicle Battery Power” on Page 6).
Installing Batteries
Your scanner uses four AA batteries (not supplied) for
power. You can use either the supplied non-rechargeable
battery holder (black), or the supplied rechargeable battery holder (yellow) to install the batteries.
Warning: Never install non-rechargeable batteries in the
rechargeable yellow battery holder. Non-rechargeable
batteries can get hot or explode if you try to recharge
them.
If you install the rechargeable battery holder, you can
operate the scanner and recharge the rechargeable batteries at the same time. See “Charging Rechargeable
Batteries” on Page 5.
Warning:
• The battery holder fits only one way. Do not force it.
• Use only fresh batteries of the required size and recommended type.
• Do not mix old and new batteries, different types of
batteries (standard, alkaline, or rechargeable), or rechargeable batteries of different capacities.
Follow these steps to install batteries.
1. Press in on the battery compartment cover on the back
of the scanner and slide the cover down to remove it.
2. Pull the battery holder out of the battery compartment.
4
Page 5

3. If you are using non-rechargeable batteries, place them
into the black holder, as indicated by the polarity symbols (+ and –) marked on the holder. Or, if you are
using rechargeable batteries, place them into the yellow holder, as indicated by the polarity symbols (+
and –) marked on the holder.
4. Place the battery holder into the battery compartment.
5. Replace the cover.
When B appears and the scanner beeps or the scanner
stops operating properly, replace or recharge the batteries.
Warning: Dispose of old batteries promptly and properly. Do not burn or bury them.
Caution: If you do not plan to use the scanner with batteries for a month or more, remove the batteries. Batteries can leak chemicals that can destroy electronic parts.
If the scanner stops working properly after connecting it
to power, try resetting it. See “Resetting the Scanner” on
Page 23.
Note: You must charge rechargeable batteries before you
use them the first time. See “Charging Rechargeable
Batteries.”
Charging Rechargeable Batteries
Your scanner has a built-in charging circuit that lets you
charge nickel-metal hydride (Ni-MH) or nickel cadmium
(Ni-CD) rechargeable batteries (not supplied) while they
are in the scanner. To charge rechargeable batteries, you
need to use a 9V AC adapter or 10V DC adapter with
4.7mm outer/1.7mm inner plug.
Cautions:
• You must use an adapter that supplies 9V DC and delivers at least 300mA. Its center tip must be set to positive and its plug must fit the scanner’s PWR DC 9V
jack. Using an adapter that does not meet these specifications could damage the scanner or the adapter.
• Always connect the AC adapter to the scanner before
you connect it to AC power. When you finish, disconnect the adapter from AC power before you disconnect it from the scanner.
Note: It takes about 15 hours to recharge fully discharged
1500mAh Ni-MH rechargeable batteries. You can operate the scanner while recharging the rechargeable batteries, but charging takes longer.
5
Page 6

Connect 4.7mm outer/1.7mm inner plug to the scanner’s
PWR DC 9V jack.
Note: When you charge Ni-CD batteries, pay attention
not to over charge. Overcharging shortens battery life.
The scanner can also charge Ni-Cd batteries. 600mAh
batteries require 6 hours and 850 mAh batteries require
8 hours to charge.
Rechargeable batteries last longer and deliver more
power if you let them fully discharge once a month. To do
this, use the scanner until B appears. Then fully charge
the rechargeable batteries.
Using AC Power
You can power the scanner using a 9V, 300mA AC adapter
with 4.7mm outer/1.7mm inner plug.
Cautions:
• You must use an adapter that supplies 9V DC and delivers at least 300 mA. Its center tip must be set to
positive and its plug must fit the scanner’s PWR DC
9V jack. Using an adapter that does not meet these
specifications could damage the scanner or the
adapter.
• Always connect the AC adapter to the scanner before
you connect it to AC power. When you finish, disconnect the adapter from AC power before you disconnect it from the scanner.
To power the scanner using an AC adapter, insert the
plug (4.7mm outer/1.7mm inner plug) into the scanner’s
PWR DC 9V jack. Then connect the other end of the
adapter to a standard AC outlet.
Using Vehicle Battery Power
You can also power the scanner from a vehicle’s 12V
power source (such as a cigarette-lighter socket) using a
9V, 300mA adapter with 4.7mm outer/1.7mm inner plug.
Caution: Always connect the DC adapter to the scanner
before you connect it to the power source. When you
finish, disconnect the adapter from the power source
before you disconnect it from the scanner.
To power the scanner using a DC adapter, set the
adapter’s voltage switch to 9V. Next, insert the plug
(4.7mm outer/1.7mm inner plug) into the scanner’s PWR
DC 9V jack. Plug the other end of the DC adapter into
your vehicle’s cigarette-lighter socket.
6
Page 7

Note: If you use a cigarette-lighter power cable and your
vehicle’s engine is running, you might hear electrical noise
from the engine while scanning. This is normal.
Connecting the Supplied Antenna
To attach the supplied flexible antenna to the ANT jack
on top of your scanner, align the slots around the
antenna’s connector with the tabs on the ANT jack. Press
the antenna down over the jack and turn the antenna’s
base clockwise until it locks into place.
Connecting an Outdoor Antenna
The antenna connector on your scanner makes it easy to
use the scanner with a variety of antennas, such as an
external mobile antenna or outdoor base station antenna.
Always use 50 Ohm coaxial cable, such as RG-58 or RG8, to connect an outdoor antenna. For lengths over 50
feet, use RG-8 low-loss dielectric coaxial cable. If the antenna cable’s connector does not have a BNC connector, you will also need a BNC adapter.
Follow the installation instructions supplied with the antenna, route the antenna cable to the scanner, then connect it to the ANT jack.
Connecting an Earphone/Headphones
For private listening, you can plug a 3.5 mm mini-plug
earphone or headphones (not supplied), into jack on
the top of the scanner. This automatically disconnects
the internal speaker.
Listening Safely
To protect your hearing, follow these guidelines when you
use an earphone or headphones.
• Set the volume to the lowest setting before you begin
listening. After you begin listening, adjust the volume
to a comfortable level.
• Do not listen at extremely high volume levels. Extended
high-volume listening can lead to permanent hearing
loss.
• Once you set the volume, do not increase it. Over time,
your ears adapt to the volume level, so a volume level
that does not cause discomfort might still damage your
hearing.
7
Page 8

Traffic Safety
Do not use an earphone or headphones with your scanner when operating a motor vehicle or riding a bicycle in
or near traffic. Doing so can create a traffic hazard and
could be illegal in some areas.
If you use an earphone or headphones with your scanner while riding a bicycle, be very careful. Do not listen to
a continuous broadcast. Even though some earphones/
headphones let you hear some outside sounds when listening at normal volume levels, they still can present a
traffic hazard.
Connecting an Extension Speaker
In a noisy area, an amplified extension speaker (not supplied), might provide more comfortable listening. Plug
the speaker cable’s 3.5 mm mini-plug into jack.
Note: You must use an amplified speaker with this scanner. Non-amplified speakers do not provide sufficient
volume for comfortable listening.
Using the Belt Clip
You can use the belt clip attached to the back of the scanner for hands-free carrying when you are on the go. Slide
the belt clip over your belt or waistband.
8
Page 9
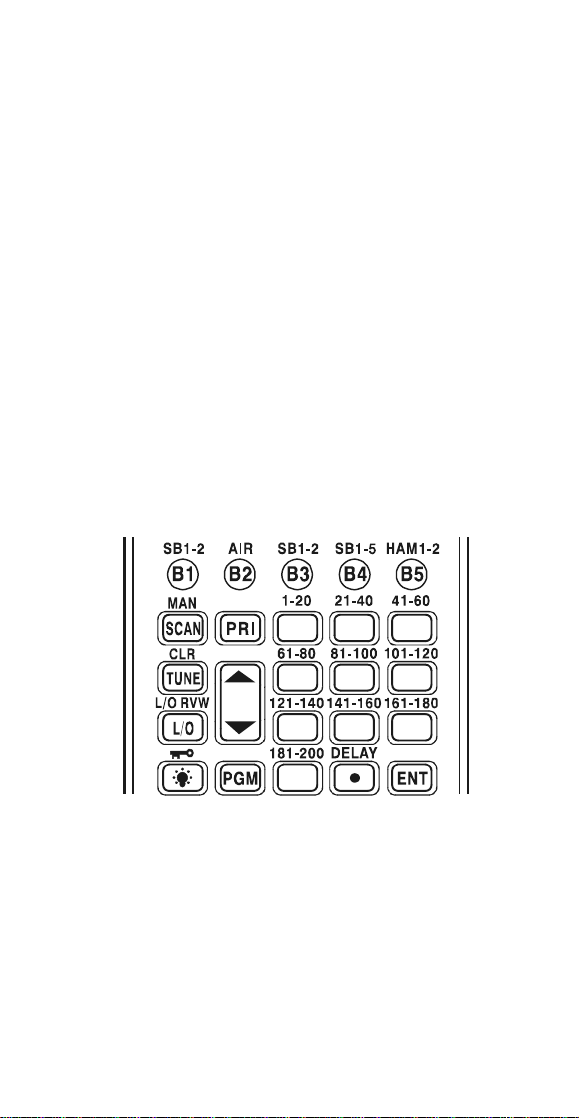
ABOUT YOUR SCANNER
Once you understand a few simple terms used in this
manual and familiarize yourself with your scanner’s features, you can put the scanner to work for you. You simply determine the type of communications you want to
receive, then set the scanner to scan them.
A frequency is the receiving signal location (expressed in
kHz or MHz). To find active frequencies, you can use the
search function.
You can also search the One Touch Search Banks, which
are preset groups of frequencies categorized by type of
service.
When you find a frequency, you can store it into a programmable memory location called a channel, which is
grouped with other channels in a channel-storage bank.
You can then scan the channel-storage banks to see if
there is activity on the frequencies stored there. Each time
the scanner finds an active frequency, it stays on that
channel until the transmission ends.
A LOOK AT THE KEYPAD
1
2
3
4
5
6
7
8
9
0
B1/SB1-2—Lets you search the scanner’s
preprogrammed search band 1.
B2—Lets you search the scanner’s preprogrammed
search band 2.
B3/SB1-2—Lets you search the scanner’s
preprogrammed search band 3.
B4/SB1-5—Lets you search the scanner’s
preprogrammed search band 4.
B5/HAM—Lets you search the scanner’s preprogrammed
amateur radio band.
9
Page 10
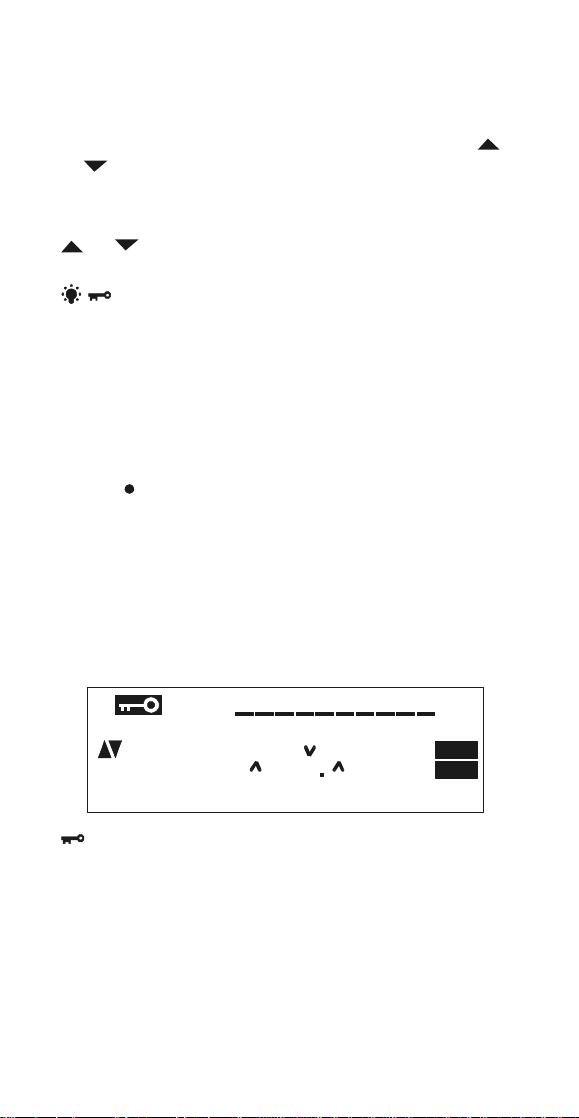
SCAN/MAN— Scans any preprogrammed channels;
stops scanning and lets you directly enter a channel number.
PRI—Turns the priority feature on and off.
TUNE/CLR—Lets you tune a frequency along with
or ; clears an incorrect entry.
L/O RVW/L/O—Reviews locked-out frequencies; lets you
lock out selected channels or frequencies.
or —Searches up or down for active frequencies
or selects the direction when scanning channels.
/ —Locks (and unlocks) the keypad to prevent accidental entries; turns the backlight on and off.
PGM—Programs frequencies into channels.
Number Keys—Each key has a single digit (0 to 9) and a
range of numbers. Use the range of numbers above the
key (21-40 for example) to select the channel in a channel-storage bank. See “Understanding Banks” on Page
XX.
DELAY/ —Programs a 2-second delay for the selected
channel; enters a decimal point.
ENT (enter)—Enters frequencies into channels.
A LOOK AT THE DISPLAY
The display has indicators that show the scanner’s current operating status. This quick look at the display will
help you understand how your scanner operates.
BANK
12345678910
HAM
888 888 888
SRCH
—Appears when you lock the keypad.
BANK—Appears with numbers (1-10) to indicate the scan
bank. Bank numbers with a bar under them show which
banks are turned on for scanning (see “Understanding
Banks” on Page 12).
b-1 to b-4—Indicates that the scanner is searching the
bank 1, 2, 3, or 4.
HAM—Indicates that the scanner is searching the amateur radio bank.
10
CH
SCANMAN PGM PRI DLY
8
B
L/O
Page 11

or —Indicates the search or scan direction.
CH—Appears with digits (1-200) or P to show which channel the scanner is turned to.
SRCH—Appears during searches.
MAN—Appears when you manually select a channel.
B—Appears when the batteries are low.
L/O (lockout)—Appears when you manually select a
channel that was previously locked out during scanning
or when you review a locked-out frequency.
SCAN—Appears when the scanner scans channels.
PGM—Appears when you program frequencies into the
scanner’s channels.
PRI—Appears when the priority feature is turned on.
DLY—Appears when you program a 2-second delay.
Ch–FULL—Appears when you try to enter a frequency
during a search when all channels are full.
–dUPL– —Appears when you try to store a frequency
that is already stored in another channel.
DEFAULt—Appears when you remove all the lock-outs
from the each search bands frequencies.
Error—Appears when you make an entry error.
FLo ALL–CL—Appears when you remove all the locked-
out frequencies during a search.
FLo–FULL—Appears when you try to lock out a frequency
during a tune when 50 frequencies are already locked
out.
F L–out—Appears when you start a tune from a lockedout frequency.
L–r—Appears when you review locked-out frequencies.
oFF tonE—Appears when you turn the key tone off.
on tonE—Appears when you turn the key tone on.
P—Appears when the scanner is tuned to the priority
channel.
–t– —Appears when the scanner is turning frequencies.
11
Page 12

UNDERSTANDING BANKS
Channel Storage Banks
A bank is a storage area for a group of channels. Channels are storage areas for frequencies. Whereas a channel can only contain one frequency, a bank can hold numerous channels.
To make it easier to identify and select the channels you
want to listen to, your scanner divides the channels into
10 banks (1 to 10) of 20 channels each, a total of 200
channels. You can use each channel-storage bank to
group frequencies.
One Touch Banks
The scanner is preprogrammed with the frequencies. This
is handy for quickly finding active frequencies instead of
searching through an entire bank (see “Searching the
One Touch Banks” on Page 12).
Note: The frequencies in the scanner’s one touch banks
are preset. You cannot change them.
BAND Sub-Bank Frequency Range
BAND 1 Bank 1 66–77.995 MHz
Bank 2 78–88 MHz
BAND 2 ---------- 118–137 MHz
BAND 3 Bank 1 137–144 MHz
Bank 2 146–174 MHz
BAND 4 Bank 1 380–405.9875 MHz
Bank 2 406–429.9875 MHz
Bank 3 440.0125–449.9875 MHz
Bank 4 450–469.9875 MHz
Bank 5 470–512 MHz
HAM Bank 1 144–146 MHz
Bank 2 430–440 MHz
12
Page 13

OPERATION
Turning On the Scanner/Setting Volume
and Squelch
1. Turn SQUELCH until the indicator points to MIN before you turn on the scanner.
2. To turn on the scanner, turn VOLUME clockwise until
you hear a hissing sound.
3. Turn SQUELCH clockwise, just until the hissing sound
stops.
Notes:
• To listen to a weak or distant station, turn SQUELCH
counterclockwise. If reception is poor, turn SQUELCH
clockwise to cut out weak transmissions.
• If SQUELCH is adjusted so you always hear a hissing
sound, the scanner will not scan or search properly.
4. To turn off the scanner when you finish, turn VOLUME
counterclockwise to OFF.
Storing Known Frequencies Into
Channels
Follow these steps to store frequencies into channels.
1. Press PGM. PGM appears. Then enter the channel
number (1–200) where you want to store a frequency,
then press PGM again.
2. Use the number keys and DELAY/ to enter the frequency (including the decimal point) you want to store.
3. Press ENT to store the frequency into the channel.
Notes:
• If you made a mistake in Step 2, Error appears and
the scanner beeps three times when you press ENT.
Simply start again from Step 2.
• If you entered a frequency that is already stored in
another channel, the scanner beeps three times while
displaying the lowest channel number where the frequency is already stored, the –dUPL– then the frequency you entered flash on the display. To store the
frequency anyway, press ENT again. Press TUNE/CLR
to clear the frequency.
13
Page 14

Your scanner automatically rounds the entered frequency
down to the closest valid frequency. For example, if you
enter a frequency of 151.473, your scanner accepts it as
151.470.
Press DELAY/ if you want the scanner to pause 2 sec-
onds on this channel before it proceeds to the next channel after a transmission ends (see “Delay” on Page 19).
The scanner also stores this setting in the channel.
To program the next channel in sequence, press PGM
and repeat Steps 2 and 3.
SEARCHING THE ONE TOUCH BANKS
Your scanner contains groups of preset frequencies called
One Touch Banks. Each one touch bank is associated
with a specific activity (see “One Touch Banks” on Page
12).
Note: You can use the scanner’s delay feature while
searching the banks (see “Delay” on Page 19).
1. Press B1, B2, B3, B4, or B5 (HAM). The scanner dis-
plays search range for about 2 seconds. Then, the
scanner starts searching.
Notes:
• To reverse the search direction at any time, hold down
or for about 1 second.
• To search up or down the band in small increments,
repeatedly press or . (See “One Touch Banks”
on Page 12 for frequency steps).
• To pause the search while receiving a signal, press
o r . To resume searching, hold down or
.
• To quickly move up or down through the frequencies,
hold down or . The scanner tunes through the
frequencies until you release or .
• If necessary, you can select search groups using the
number keys.
2. When the scanner finds an active frequency, it stops
searching and displays the frequency’s number.
3. To search for another active frequency in the selected
band, hold down or for about 1 second. To
select a different band and search for another active
frequency, repeat Steps 1 and 2.
14
Page 15

Once you find interesting frequencies during the search,
you can store them into the scanner’s channel-storage
banks.
1. To store the displayed frequency in the lowest avail-
able channel, press ENT when you find a frequency.
The channel number flashes.
2. Press ENT again to store the frequency. The channel
and frequency flash twice. If you want to cancel the
operation, press TUNE/CLR instead of ENT.
Note: If you entered a frequency that is already stored in
another channel, –dUPL– (duplicate) and the lowest-numbered channel containing the duplicate frequency flash
for about 3 seconds. If you want to store the frequency
anyway, press ENT again. You can then delete the frequency later. See “Clearing a Stored Channel” on Page
18.
If there is no empty channel, Ch–FULL appears after you
press ENT. To store more frequencies, you must clear
some channels. See “Clearing a Stored Channel” on Page
18. To continue searching after Ch–FULL appears, press
TUNE/CLR.
Using Tune
You can set the scanner to search through all receivable
frequencies from a specified frequency. You can use the
scanner’s delay feature while using tune.
Notes:
To reverse the tuning direction at any time, hold down
or for about 1 second.
To tune up or down the selected band in small increments (5, 8.333 or 12.5 kHz steps), repeatedly press
or .
1. Repeatedly press SCAN/MAN until MAN appears.
2. Enter the desired channel number you want to use as
a starting point for the tune. Then press SCAN/MAN
again.
3. Press TUNE/CLR to start tune. –t– appears.
4. Hold down or for about 1 second to tune up
or down. or appear and the scanner searches
the frequencies.
15
Page 16

Notes:
• To pause tuning, press or . To resume tuning,
hold down or for about 1 second.
• To quickly move up or down through the frequencies,
hold down or . The scanner tunes through the
frequencies until you release or .
5. When the scanner finds an active frequency, it stops
searching and displays the frequency’s number.
6. To search for another active frequency, hold down
or for about 1 second.
Once you find a frequency you want during the search,
you can store it in the scanner’s channel.
1. To store the displayed frequency in the lowest available channel, press ENT. The channel number flashes.
2. Press ENT again to store the frequency. The channel
and frequency flash twice. If you want to cancel the
operation, press TUNE/CLR instead of ENT. After storing the frequency, the scanner continues to search for
frequencies.
Notes:
If there is no empty channel, Ch–FULL appears after
you press ENT. To store more frequencies, you must
clear some channels. See “Clearing a Stored Channel” on Page 18. To continue tuning after Ch–FULL
appears, press TUNE/CLR.
If you entered a frequency that is already stored in
another channel, –dUPL– (duplicate) and the lowestnumbered channel containing the duplicate frequency
flash for about 3 seconds. If you want to store the frequency anyway, press ENT again. You can then delete the frequency later. See “Clearing a Stored Channel” on Page 18.
Scanning the Stored Channels
To set the scanner to continuously scan through all channels with stored frequencies, repeatedly press SCAN until
SCAN and appear. The scanner rapidly scans until it
finds an active frequency.
If the scanner finds an active frequency, it stops and displays that channel and frequency number, then it automatically begins scanning again when the transmission
on that frequency ends.
16
Page 17

Notes:
• To reverse the scanning direction, press or .
• To set the scanner to remain on the current channel
for 2 seconds after the transmission ends, see “Delay” on Page 19.
• To set the scanner to remain on the current channel,
even after the transmission stops, press SCAN/MAN
at any time during the transmission. MAN appears and
SCAN disappears (see “Monitoring a Stored Channel”).
• To lock out channels so the scanner does not stop for
a transmission on those channels, see “Locking Out
Channels or Frequencies” on Page 19.
Turning Channel-Storage Banks Off and
On
Channel-storage banks (1-10) are on when they have a
bar underneath them and off when no bar appears underneath them. To turn off a channel-storage bank, press
the bank’s number key during scanning. The bar under
the bank’s number disappears.
To turn on a channel-storage bank (1-10) during scanning, press the bank’s number key. A bar appears under
the bank’s number.
Note: The scanner does not scan any of the channels
within the banks you have turned off.
You cannot turn off all banks. There must be at least one
active bank.
You can manually select any channel in a bank, even if
the bank is turned off.
When you turn on a bank during scanning, the scanner
moves to the selected bank and scans it.
If no transmission is found, the scanner continues to scan
through all selected banks.
Monitoring a Stored Channel
You can continuously monitor a specific channel without
scanning. This is useful if you hear a transmission on a
channel and do not want to miss any details—even though
there might be periods of silence—or if you simply want
to monitor that channel.
17
Page 18

Follow these steps to manually select a channel.
1. Repeatedly press SCAN/MAN until MAN appears.
2. Enter the channel number (1–200).
3. Press SCAN/MAN again.
Clearing a Stored Channel
If you no longer want a frequency stored in a channel
(and you do not want to replace that frequency with a
different one), follow these steps to clear the stored frequency.
1. Press SCAN/MAN to stop scanning.
2. Use the number keys to enter the channel number (1–
200) you want to clear.
3. Press PGM. PGM appears.
4. Press 0 then ENT. The frequency number changes to
000.0000 to indicate the channel is cleared.
18
Page 19

SPECIAL FEATURES
Delay
Many transmissions use a two-way radio system that has
a period of several seconds between a query and a reply. To avoid missing a reply, you can program a 2-second delay into any channel or frequency. When your scanner stops on a channel or frequency with a programmed
delay, DLY appears and the scanner continues to moni-
tor that channel or frequency for 2 seconds after the transmission stops before resuming scanning, searching, or
tuning.
You can program a 2-second delay in any of these ways:
• If the scanner is scanning and stops on an active channel, quickly press DELAY/ before it resumes scanning.
• If the desired channel is not selected, manually select
the channel, then press DELAY/ .
• If the scanner is searching or tuning, press DELAY/ .
DLY appears and the scanner automatically adds a 2second delay to every transmission it stops on in that
band.
To turn off the 2-second delay in a channel or for all frequencies, press DELAY/ while the scanner is monitor-
ing that channel or frequency. DLY disappears.
Locking Out Channels or Frequencies
You can increase the effective scanning or search speed
by locking out individual channels or frequencies that have
a continuous transmission.
To lock out a channel while scanning or a frequency during one-touch search or while tuning, press L/O/L/O RVW
when the scanner stops on the channel or frequency. If
you locked out a frequency, the scanner locks it out then
continues searching.
To manually lock out a channel, select the channel then
hold down L/O/L/O RVW until L/O appears.
To remove the lockout from a channel, manually select
that channel again, then press L/O/L/O RVW until L/O
disappears. See “Removing Lockouts From All Frequencies in a One Touch Search Bank” on Page 20 and “Removing Lockouts From All Frequencies” on Page 20 for
more information about removing lockout from frequencies.
19
Page 20

Notes:
• Your scanner automatically locks out empty channels.
• You can still manually select locked-out channels
• You can lock out as many as 50 frequencies during a
search. If you try to lock out more, FLo–FULL appears
(see “Reviewing Locked-Out Frequencies” and “Removing Lockouts From All Frequencies”).
Reviewing Locked-Out Frequencies
To review the frequencies you locked out, hold down L/
O/L/O RVW for about 2 seconds during a search, then
repeatedly press or . The scanner beeps if there
are no locked-out frequencies, or L–r appears and the
scanner displays all locked out frequencies as you press
or . When you reach the highest locked-out frequency, the scanner beeps twice and returns to the lowest locked-out frequency.
Removing Lockouts From All Fre-
quencies in a One Touch Search Bank
1. Hold down L/O/L/O RVW for about 2 seconds during
a search or while tuning. L–r appears.
Note: If you locked out frequencies which are within the
range of any of the one touch search banks during tune,
the scanner also removes those locked-out frequencies
when you use these steps. For example, if you locked
out 68.000 MHz while tuning, the scanner removes it since
68.000 MHz is one of the frequencies in the search band
1.
2. While holding down TUNE/CLR, press the one-touch
search key where you locked out frequencies.
DEFAULt appears.
3. Press ENT. The scanner clears any lockouts from all
frequencies in a one touch bank. Or, if you do not want
to clear the lockouts, press TUNE/CLR.
Removing Lockouts From All
Frequencies
1. Hold down L/O/L/O RVW for about 2 second during a
search or tune. L–r appears.
2. While holding down TUNE/CLR, press L/O/L/O RVW.
FLo ALL–CL appears.
20
Page 21

3. Press ENT. The scanner clears any lockouts from all
frequencies. Or, if you do not want to clear the lockouts, press TUNE/CLR.
Using Priority
The priority feature lets you scan through channels and
still not miss important or interesting calls on a frequency
you select. You can program one frequency into the priority channel. As the scanner scans, if the priority feature
is turned on, the scanner checks the priority channel for
activity every 2 seconds.
1. Press PGM, then press PRI. PCH and 000.0000 or
the previously-stored frequency appear.
2. Enter the frequency you want to enter into the priority
channel, then press ENT. The display flashes twice.
To turn on the priority feature, press PRI during scanning
or searching. PRI appears. The scanner checks the priority channel every 2 seconds and stays on the channel
if there is activity. PCH and the frequency appear whenever the scanner is set to the priority channel.
To turn off the priority feature, press PRI. PRI disappears.
Using the Display Backlight
You can turn on the display’s backlight for easy viewing
in the dark. Press / to turn on the light for 5 seconds. To turn off the light sooner, press / again.
Press both PGM and / to turn on the display’s backlight for an extended period of time. To turn it off, press
both PGM and / , or press / .
Turning the Key Tone On and Off
The scanner is preset to sound a tone each time you
press one of its keys (except / ). You can turn the
key tone off or back on.
1. If the scanner is on, turn it off by tuning VOLUME coun-
terclockwise until it clicks.
2. While you hold down 2 and ENT, turn on the scanner.
3. When oFF tonE or on tonE appear, release 2 and ENT.
21
Page 22

Using the Key Lock
Once you program your scanner, you can protect it from
accidental program changes by turning on the keylock
feature. When the keypad is locked, the only controls that
operate are / , VOLUME, and SQUELCH.
Note: The keylock does not prevent the scanner from
scanning channels or monitoring a single channel, whichever feature you last selected.
To turn on the keylock, hold down / for about 3
seconds until the scanner beeps three times and appears. To turn it off, hold down / for about 3 seconds until the scanner beeps three times and disappears.
Avoiding Image Frequencies
You might hear one of your regular stations on another
frequency that is not listed. For example, you might find
a service that regularly uses a frequency of 453.275 also
on 474.675 MHz. Do the following to determine of you
are listening to an image frequency:
Note the new frequency 474.675
Double the intermediate (21.400)
frequency of 10.7 MHz
and subtract it from the new frequency –21.400
If the answer is the regular frequency 453.275
then you have tuned to an image.
Occasionally, you might get interference on a weak or
distant channel from a strong transmission 21.4 MHz
above or below the tuned frequency. This is rare, and the
image signal is usually cleared whenever there is a transmission on the actual frequency.
Resetting/Initializing the Scanner
If the scanner’s display locks up or does not work properly after you connect a power source, you might need to
reset or initialize the scanner.
Important: If you have problems, first try to reset the scanner (see “Resetting the Scanner” on Page 23). If that does
not work, you can initialize the scanner (see “Initializing
the Scanner” on Page 23); however, this clears all information stored in your scanner’s memory.
22
Page 23

Resetting the Scanner
1. Turn off the scanner, then turn it on again.
2. Insert a pointed object, such as a straightened paper
clip, into the reset opening on the side of the scanner.
Then gently press the reset button inside the opening.
Note: If the scanner still does not work properly, you might
need to initialize the scanner (see “Initializing the Scanner”).
Initializing the Scanner
Important: This procedure clears all information you
stored in the scanner’s memory. Initialize the scanner only
when you are sure the scanner is not working properly.
1. Turn off the scanner, then turn it on again.
2. Hold down TUNE/CLR.
3. While holding down TUNE/CLR, insert a pointed object (such as a straightened paper clip) into the reset
opening on the side of the scanner, then gently press
the reset button inside the opening. The display should
turn off.
4. When the display turns on again, release TUNE/CLR.
Note: You must release the reset button before releasing
TUNE/CLR; otherwise the memory might not clear.
23
Page 24

GENERAL HINTS
Birdies
Every scanner has birdie frequencies. Birdies are signals
created inside the scanner’s receiver. These operating
frequencies might interfere with transmissions on the
same frequencies. If you program one of these frequencies, you hear only noise on that frequency. If the interference is not severe, you might be able to turn SQUELCH
clockwise to cut out the birdie. This scanner’s birdie frequencies (in MHz) are:
71.940 MHz 76.800 MHz 79.930 MHz
112.0625 120.025 128.025
136.025 139.995 140.800
144.030 152.090 160.100
165.430 168.035 173.485
392.250 400.0875 424.250
432.0125 440.250 445.6375
448.0875 453.650 456.0875
461.650 464.100 472.0125
480.100 485.400 488.0125
493.3875 496.0125 501.400
504.100
24
Page 25

CARE
Keep the scanner dry; if it gets wet, wipe it dry immediately. Use and store the scanner only in normal temperature environments. Handle the scanner carefully; do not
drop it. Keep the scanner away from dust and dirt, and
wipe it with a damp cloth occasionally to keep it looking
new.
IN CASE OF FAULT
Where a fault arises, contact your supplier. However, before you do so check that the fault was not caused by an
operational error. Carefully reread the relevant section in
the instructions.
25
Page 26

SPECIFICATIONS
Frequency Coverage
66.000–88.000 ............................... 5 kHz steps (FM)
118.000–136.9916 MHz .......... 8.333 kHz steps (AM)
137.000–174.000 MHz .............. 12.5 kHz steps (FM)
380.000–512.000 MHz .............. 12.5 kHz steps (FM)
Channels of Operation ............................ 200 channels
Sensitivity (20 dB S/N):
66–88 MHz ....................................................... 0.5 µV
118–136.9916 ..................................................... 1 µV
137–174 MHz ................................................... 0.5 µV
380–512 MHz ................................................... 0.7 µV
Spurious Rejection (FM @ 154 MHz) ................. 50 dB
Selectivity:
+/–10 kHz ........................................................ –6 dB
+/–18 kHz ...................................................... –50 dB
Search Speed ................................. Up to 50 Steps/Sec
Scan Speed .............................. Up to 25 Channels/Sec
Delay Time .................................................... 2 Seconds
IF Frequencies:
1st IF .......................................................... 10.7 MHz
2nd IF ............................................................455 kHz
IF Interference Ratio (10.7 MHz) ...... 70 dB at 154 MHz
Squelch Sensitivity:
Threshold (AM/FM) .......................................... 0.5 µV
Tight (AM) ........................................................ 20 dB
Tight (FM) ........................................................ 25 dB
Antenna Impedance ....................................... 50 Ohms
Audio Output Power (10% THD) ....... 180 mW Nominal
Power Requirements ................................... 6 Volts DC,
4 AA Batteries or an adapter
Current Drain (Squelched) ................................. 45 mA
Dimensions (HWD) ........................... 145 x 63 x 40 mm
Weight (without antenna) ........................ Approx. 220 g
26
Page 27

NOTE
27
Page 28

GE-03D-8880 04G03
28
 Loading...