

Grecom EZ Scan-SD PSR-700 Owner's Manual
GRECOM PSR-700
EZ Scan-SD
Owner’s Manual
GRECOM PSR-700
EZ Scan-SD
Handheld Scanning Receiver
OWNERʼS MANUAL - Please read before using this equipment.
IMPORTANT:
This manual uses the following symbols to emphasize Warnings, Notes and Usage Hints
WARNING
NOTE
HINT
A WARNING symbol is used to indicate possible risk of personal
injury or damage to equipment
A NOTE symbol is used to indicate an operational note that relates
to the current paragraph of the manual
A HINT symbol is used to indicate a usage hint that relates to the
current paragraph of the manual
Please take the time to read this manual completely
before using your new scanner.
IMPORTANT NOTICE:
The EZ Scan-SD handheld scanner is designed to receive analog transmissions
only, and cannot be used to monitor digital or encrypted radio traffic.
FCC ID ADV0602901
This device complies with part 15 of the FCC Rules. Operation is subject to the following two conditions: (1) This device may not cause
harmful interference, and (2) this device must accept any interference received, including interference that may cause undesired
operation.
Motorola, Smartnet, Smartzone, Omnilink, and Privacy Plus are registered trademarks of Motorola Inc. EDACS is a registered trademark
of Harris Inc. LTR is a registered trademark of E.F. Johnson, Inc.
Copyright © 2010 GRE America, Incorporated
All Rights Reserved

Table of Contents
..........................................................................................................Introduction! 5
...........................................................................................................Features! 5
................................................................................................MENU Key! 15
..................................................................................................SKIP Key! 15
.....................................................................................................WX Key! 16
...................................................................................................Getting Started! 23
..................................................................................................Overview! 29
........................................................................The FCC Wants You To Know! 6
............................................................................................Scanning Legally! 7
.........................................................Installing the EZ Scan-SD PC Application! 9
..........................................................Getting Familiar With Your EZ Scan-SD! 13
................................................................................EZ Scan-SD Front View! 13
..........................................................................Understanding the Keypad! 14
...................................................................................POWER/Backlight! 14
....................................................................SCAN/PAUSE/SELECT Key! 14
..........................................................................................UP Arrow Key! 14
....................................................................................DOWN Arrow Key! 15
....................................................................................RIGHT Arrow Key! 15
......................................................................................LEFT Arrow Key! 15
.................................................................Other Switches and Controls! 16
...................................................................................Main Power Off! 16
......................................................................Battery Type Selection! 17
...............................................................................................Squelch! 18
..........................................................................Understanding the Display! 18
...........................................................................................Display Icons! 19
.........................................................................................psD Indicators! 20
........................................................................How the EZ Scan-SD Works! 21
.....................................................................................Copyright Notice! 21
....................................................................Unpacking the EZ Scan-SD! 23
............................................................................Inserting the batteries! 23
............................................................................Attaching the antenna! 24
....................................................................Turning the EZ Scan-SD on! 24
........................................................................Battery Charge Indicator! 24
..............................................................................Low Battery Warning! 25
......................................................................................Listening Safely! 25
...........................................................................................Traffic Safety! 25
...........................................Connecting an Optional External Antenna! 26
............................................Connecting an Earphone or Headphones! 27
...........................................................Connecting an External Speaker! 27
......................................................................................Using AC Power! 27
..................................................................Using Vehicle Battery Power! 29
........Browsing the Library, Picking Objects and Importing to Scanlists! 29

............................................................................Browse the Library! 29
...........................................................Pick objects from the Library! 29
..............................................................Import objects to Scanlists! 30
...................................Basic Step by Step Programming Instructions! 30
.........................................................................Browsing the Library! 30
.....................................................Picking Objects from the Library! 31
........................................................Importing Objects to Scanlists! 32
.........................Conventional Frequencies and Trunking Talkgroups! 33
.....................................................................................Setting Up Scanlists! 35
.................................................................Enabling/Disabling Scanlists! 36
................................................................................Renaming Scanlists! 36
......................................................................Monitoring Imported Objects! 36
...........................................................Browsing Scanlists and Objects! 36
...................................................................................Scanning Objects! 36
..............................................................Monitoring While Browsing! 37
............................................................................................Scanning! 37
...............................................................................................Pausing! 37
..............................................................................................Skipping! 37
.....................................................................................Scan Resume! 37
.........................................................................More EZ Scan-SD Features! 38
...................................................................EZ Scan-SD PC Application! 38
....................................................................................................SD Card! 38
...............................................Inserting and removing the SD Card! 38
..............................................................................SD Card contents! 39
...................................................................SD Card error messages! 40
.......................................................................EZ Scan-SDʼs Main Menu! 41
.................................................................V-Scanner II Storage System! 42
........................................................................................Editing Objects! 43
.......................................................................................Weather Modes! 47
................................................................................Weather Monitor! 47
.................................................................................Weather Priority! 47
........................................Dedicated SAME Weather Alert Receiver! 48
..............................................................................................Skywarn! 49
.................................................................................................Searching! 50
.............................................................................Spectrum Sweeper! 50
...................................................................................Service Search! 52
.......................................................................................Limit Search! 54
.....................................................Storing found CTCSS or DCS codes! 55
.............Updating your programmed data to latest data from Library! 56
.................................................................................................Troubleshooting! 58
..................................................................................Birdie Frequencies! 59
..........................................................................................................Care! 60
..................................................................................Service and Repair! 60
.................................................Appendix A - The EZ Scan-SD Settings Menu! 61
....................................................................................................Specifications! 64
...............................................................................................Limited Warranty! 67


Introduction
Welcome to scanning with the EZ Scan-SD! The EZ Scan-SD is
an exciting new way to enjoy the hobby of scanning police, fire,
EMS, amateur, government and other two-way analog radio
communications.
The EZ Scan-SD provides a simple and easy to understand user
interface in a powerful and feature-rich state of the art analog
scanning receiver. The EZ Scan-SD is a professional-quality
scanning receiver, yet it is designed to provide ease of use,
especially for beginners.
The EZ Scan-SD is equipped with the entire USA
RadioReference database in a special on-board Library, giving
you instant access to the frequencies and systems used by
public safety, local government and business all over the United
States! Use the EZ Scan-SD PC application (included) to keep
your scannerʼs RadioReference Library and firmware up to date.
Please take a few moments to read this manual carefully before
using your EZ Scan-SD. The EZ Scan-SD is unlike any other
scanner ever produced, and we want you to fully understand how
it can maximize your enjoyment of the scanning hobby.
Features
Easy to Understand User Interface - A simplified keypad and
display with familiar Scan, Pause, Skip and Navigation controls
make it easy for you to use your EZ Scan-SD.
The Complete USA RadioReference Database On SD Card The entire USA database from www.radioreference.com is stored
on a standard SD Card that is included with the EZ Scan-SD,
giving you access to the most comprehensive radio data
available without connecting the EZ Scan-SD to a computer or
the Internet!
Upgradeable CPU Firmware and Library - Keep your radioʼs
firmware and RadioReference library current with enhancements
and updates as they become available with free upgrades!
Powerful EZ Scan-SD PC Application Software Included -
Customize existing programming or add new objects to scan,
and keep your EZ Scan-SD firmware and Library data up to date.
SKYWARN Storm Spotter Functionality - Instant access to
frequencies used by storm spotter networks. You can monitor
EZ Scan-SD User Manual! Page 5

storm conditions as they occur, and become aware of dangerous
conditions before the media or emergency management officials
are able to announce them to the general public.
SAME and All Hazards Weather Alerting - The EZ Scan-SD
features a Dedicated SAME Weather Alert Receiver mode,
alerting you to severe weather and other hazards in the specific
area(s) that you select, or, the EZ Scan-SD can check your local
NOAA weather frequency periodically, even while scanning, and
alert you when an All Hazards alert occurs.
Multi-System Trunking - Scans most common analog trunked
radio system signaling formats, including Motorola, EDACS and
LTR. Both talkgroup and individual call monitoring are supported.
Powerful Spectrum Sweeper - Quickly sweeps the EZ ScanSDʼs frequency ranges for transmissions from nearby sources.
When a nearby transmission is found, the EZ Scan-SD
automatically tunes to that frequency and receives the traffic.
Expanded V-Scanner II Storage System - With the expanded
V-Scanner II (VS-II) storage system, you can use the
EZ Scan-SD PC application to save up to 200 V-Scanner
configurations on the SD card, which can be recalled at any time
in the field using the radioʼs keypad.
Built-in Service Searches - Predefined service search ranges
make it easy to find activity in your area.
Audible alarms - Programmable audible alarms can be
configured to sound when certain objects are active.
Programmable Backlight Alert Flash Patterns - The backlight
can be programmed to flash with custom flash patterns when
certain objects are active, providing another way alerting the
operator when important radio traffic is present.
Signal Strength Meter – Shows relative strength of received
signals.
Slim, compact case design with rubberized exterior and
large speaker - Designed for durability, one-handed operation
and ease of use.
The FCC Wants You To Know
This equipment has been tested and found to comply with the
limits for a scanning receiver, pursuant to Part 15 of the FCC
EZ Scan-SD User Manual! Page 6

Rules. These limits are designed to provide reasonable
protection against harmful interference in a residential
installation. This equipment generates, uses and can radiate
radio frequency energy and, if not installed and used in
accordance with the instructions, may cause harmful interference
to radio communications.
There is no guarantee that interference will not occur in a
particular installation. If this equipment does cause harmful
interference to radio or television reception, which can be
determined by turning the equipment off and on, the user is
encouraged to try to correct the interference by one or more of
the following measures:
Reorient or relocate the receiving antenna.
•
Increase the separation between the equipment and receiver.
•
Connect the equipment into an outlet on a circuit different from
•
that to which the receiver is connected.
This device complies with Part 15 of the FCC Rules. Operation is
subject to the following two conditions:
1." This device may not cause harmful interference.
2." This device must accept any interference received, including
interference that may cause undesired operation.
Scanning Legally
Your scanner covers frequencies used by many different groups
including police and fire departments, ambulance services,
government agencies, private companies, amateur radio
services, military operations, pager services, and wireline
(telephone and telegraph) service providers. It is legal to listen to
almost every transmission your scanner can receive. However,
there are some transmissions you should never intentionally
listen to. These include:
Telephone conversations (cellular, cordless, or other means
•
of private telephone transmission)
Paging transmissions
•
Any intentionally scrambled or encrypted transmissions
•
EZ Scan-SD User Manual! Page 7

According to the Electronic Communications Privacy Act (ECPA),
you are subject to fines and possible imprisonment for
intentionally listening to, using, or divulging the contents of such
a transmission unless you have the consent of a party to the
communication (unless such activity is otherwise illegal).
This scanner has been designed to prevent illegal reception of
protected transmissions. This is done to comply with the legal
requirement that scanners be manufactured so as to not be
easily modifiable to pick up those transmissions. Do not open
your scanner's case to make any modifications that could allow it
to pick up transmissions that are illegal to monitor. Doing so
could subject you to legal penalties.
GRE encourages responsible, legal scanner use.
In some areas, mobile use of this scanner is unlawful or requires
a permit. Check the laws in your area. It is also illegal in many
areas to interfere with the duties of public safety officials by
traveling to the scene of an incident without authorization.
EZ Scan-SD User Manual! Page 8

Installing the EZ Scan-SD PC Application
EZ Scan-SD comes with an easy to use computer application that you can use to
modify your EZ Scan-SD’s programming or to add your own custom
programming. To begin the installation process, insert the CD into your
computer’s CD-ROM drive. The EZ Scan-SD Application installer will then start.
The EZ Scan-SD Application installer will install the following components by
default:
•
The EZ Scan-SD PC Application and help files
•
The currently available frequency database library
•
The current USB cable drivers
The following install procedure is used to install the software. Screen captures of
each screen the user may see while installing will be shown alongside the steps
needed.
EZ Scan-SD User Manual! Page 9
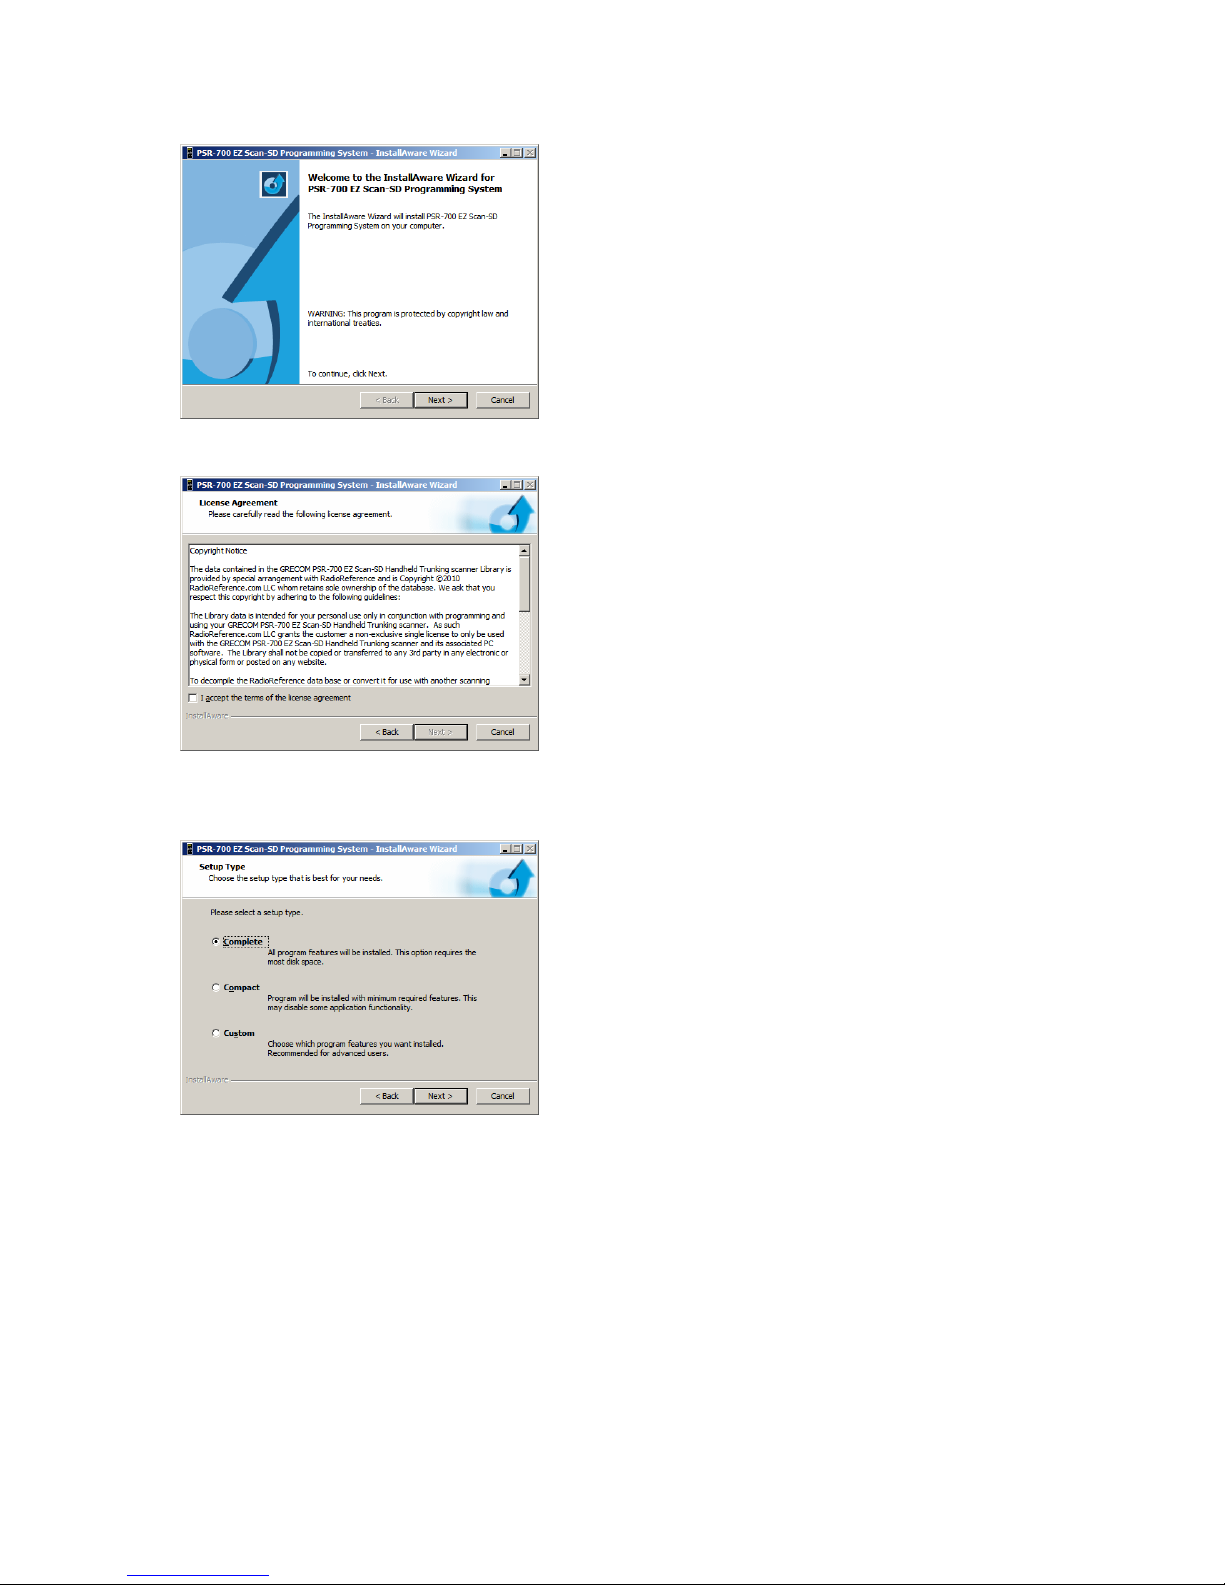
Welcome Screen:
This screen is the initial welcome screen for
the installer. This is an informational screen
only. Click on the “Next” button to begin the
installation.
Click the “Cancel” button to abort the install.
License Agreement:
In keeping with the agreement with
RadioReference.com LLC, license text is
displayed regarding the use of the frequency
database library files that are included in the
installer package. The user must click on the
Accept message before they may install the
software. Check the accept box and then
click the “Next” button to begin the install.
Setup Type:
This screen allows the user to limit what
options will be installed. A complete install
will install all parts of the EZ Scan-SD
package.
A custom install will allow the user to disable
the installation of some portions of the
package. Select the install type desired, and
then click the “Next” button.
EZ Scan-SD User Manual! Page 10

Custom Setup:
If the user selects a custom install, this
screen will appear. This screen allows the
user to limit what components will be
installed.
Once the components have been selected,
click on the “Next” button to continue to the
next step.
Destination Folder:
This screen allows the user to select the
destination folder for the application and the
USB Cable install. The database library files
will be installed in the EZScan\DB folder
located in the user’s My Documents folder
regardless of this setting.
Click “Next” to continue.
Select Program Folder:
This screen allows the user to set the name
of the folder used to store shortcuts in the
Start menu.
Click “Next” to continue.
EZ Scan-SD User Manual! Page 11
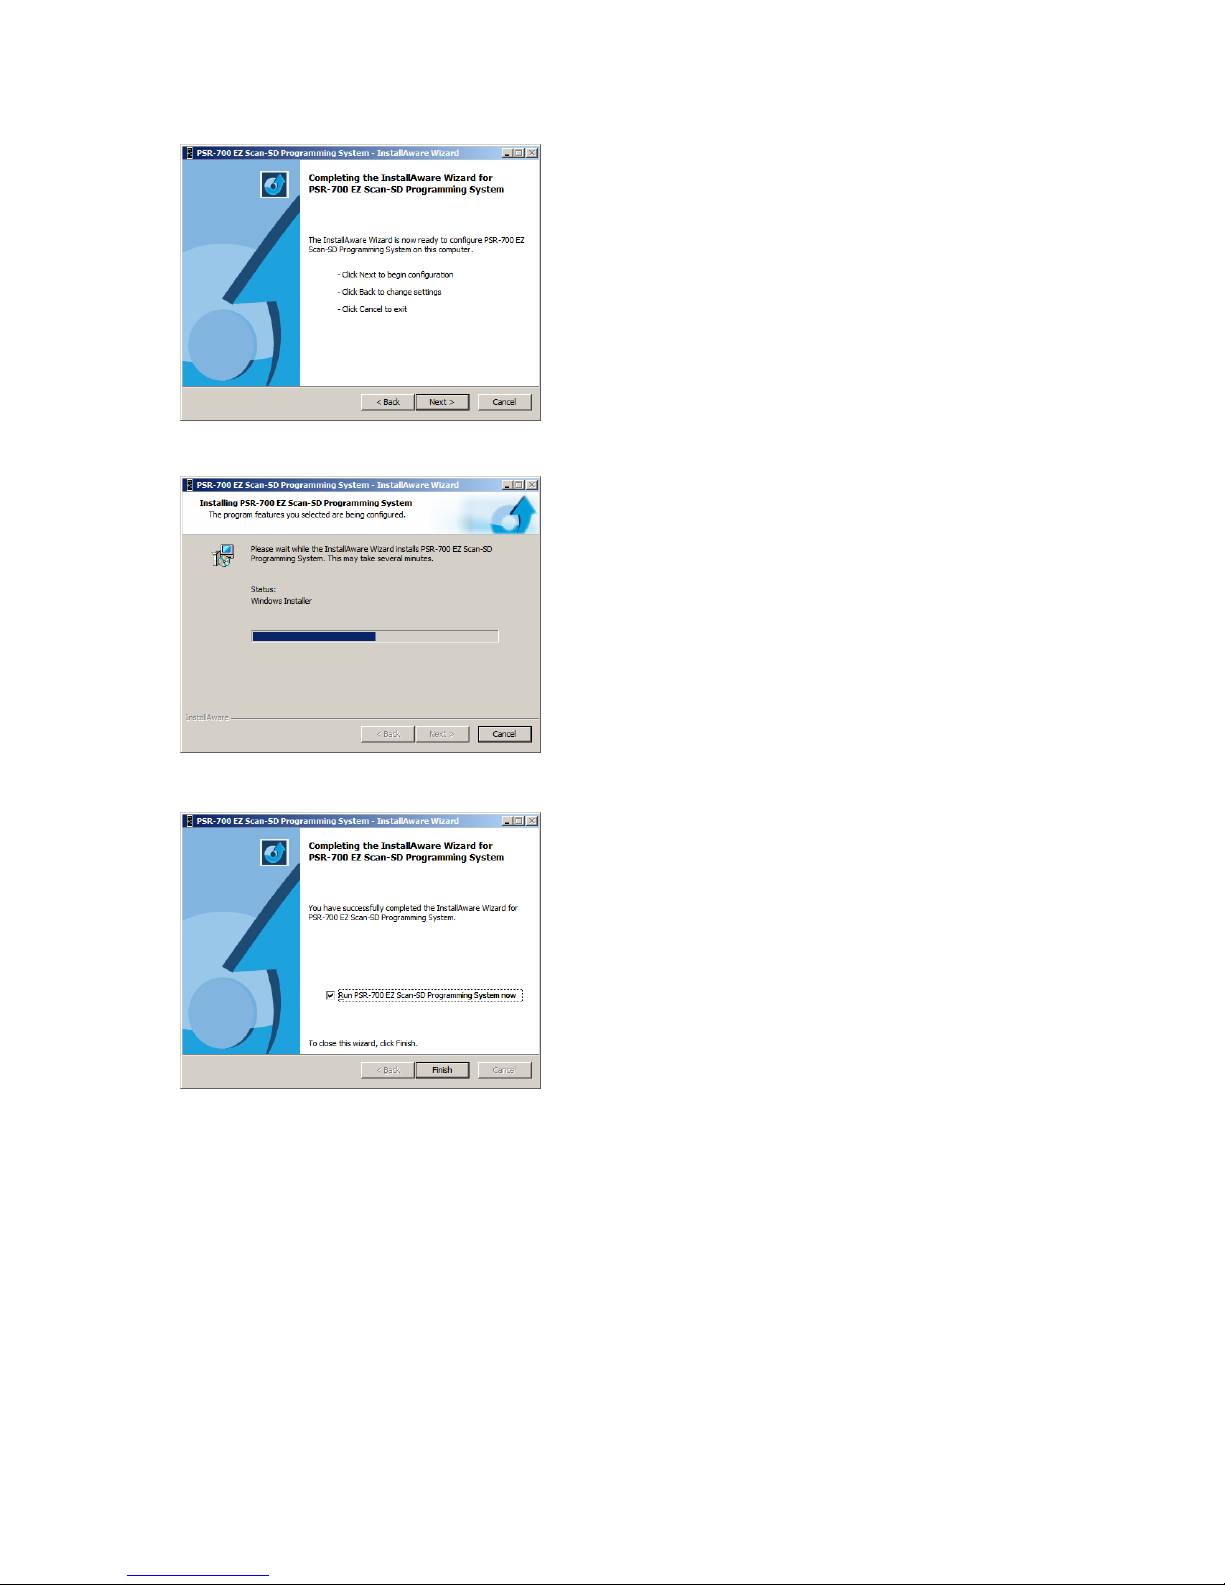
Completing the install:
This screen is the final check for the user
before the installation actually begins. Click
“Next” to perform the actual installation.
Installing EZ Scan-SD:
This screen is shown while the selected files
are being copied to the computer. When this
process completes, click the “Next” button to
continue.
Completing the Install:
This is the final screen shown to the user
during the install. If the option to install the
USB Cable drivers was selected, a DOS
window with the install will be shown briefly
while this screen is visible.
If the “Run EZ Scan-SD now” checkbox is
checked, the EZ Scan-SD Application will be
started when the “Finish” button is clicked.
EZ Scan-SD User Manual! Page 12
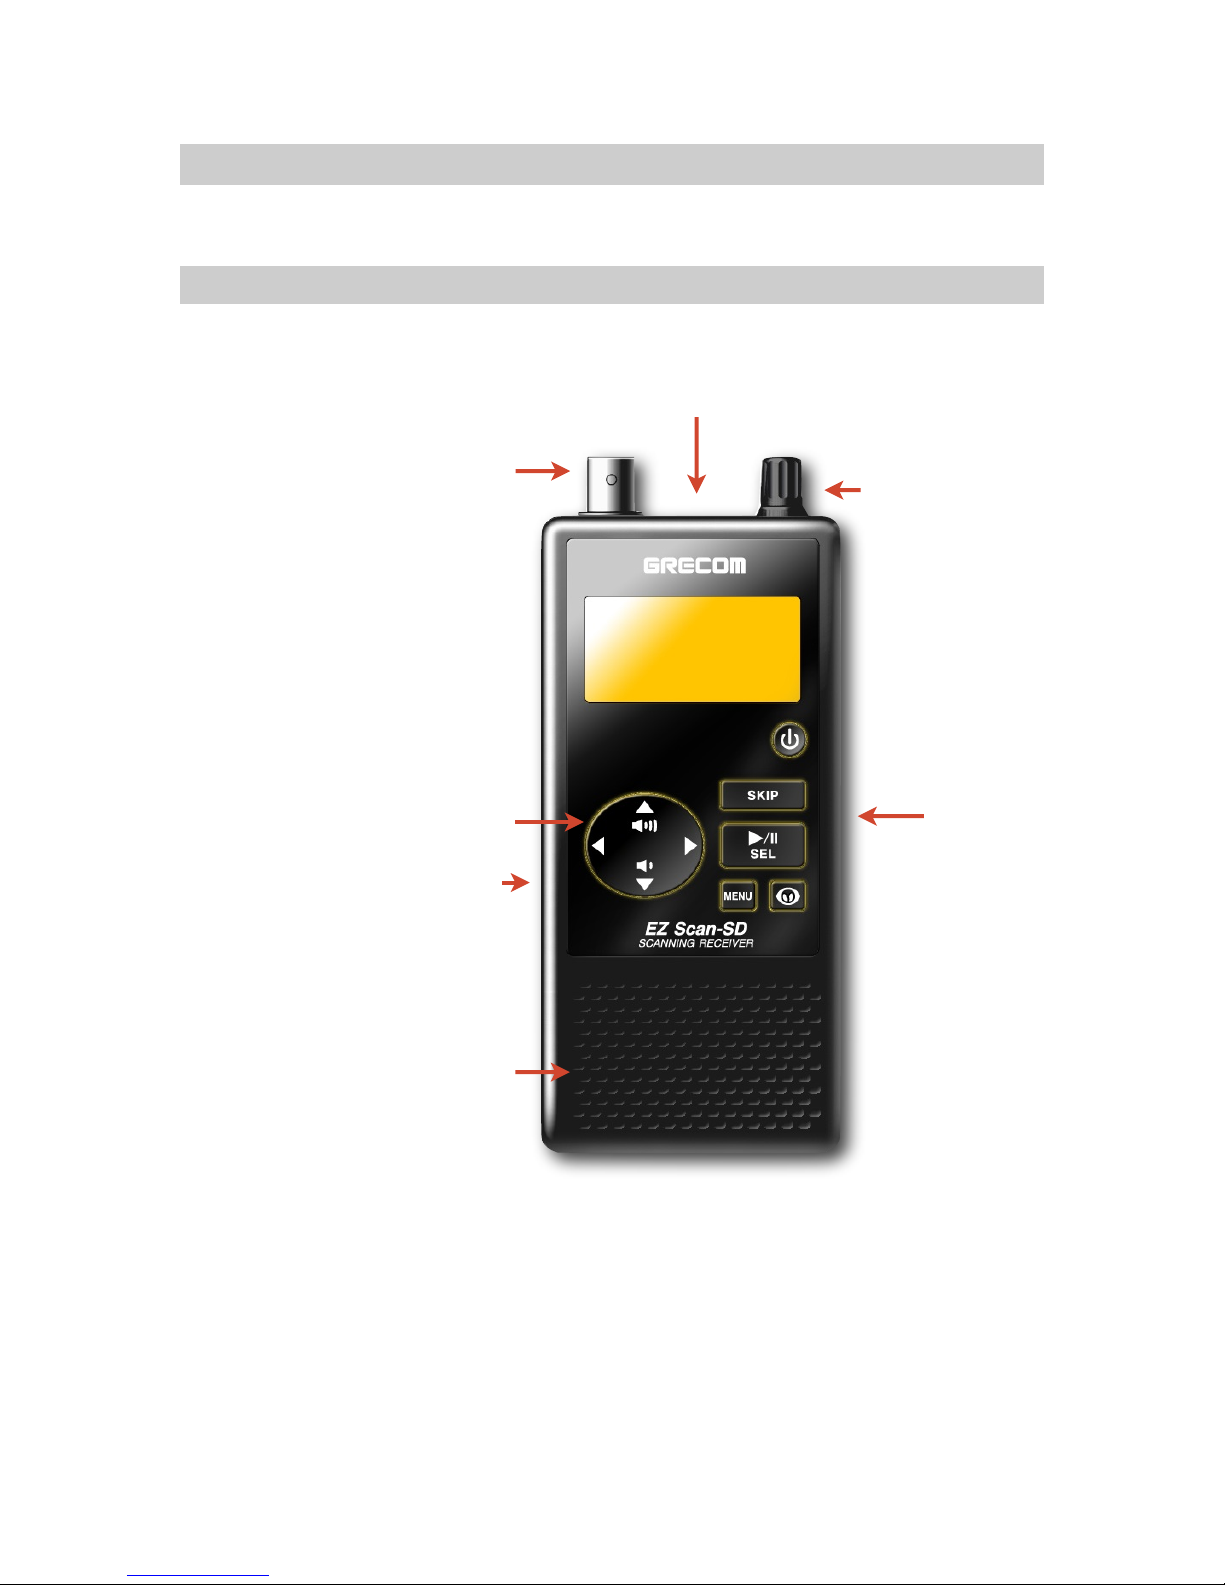
Getting Familiar With Your EZ Scan-SD
Squelch
Control
Keypad
Speaker
PC/IF
DC Power
Jack
BNC Antenna
Connector
Headset
Connector
Main
Power
The following illustrations are provided to help you get familiar
with your EZ Scan-SD controls and display.
EZ Scan-SD Front View
Figure 1 - EZ Scan-SD front view
EZ Scan-SD User Manual! Page 13
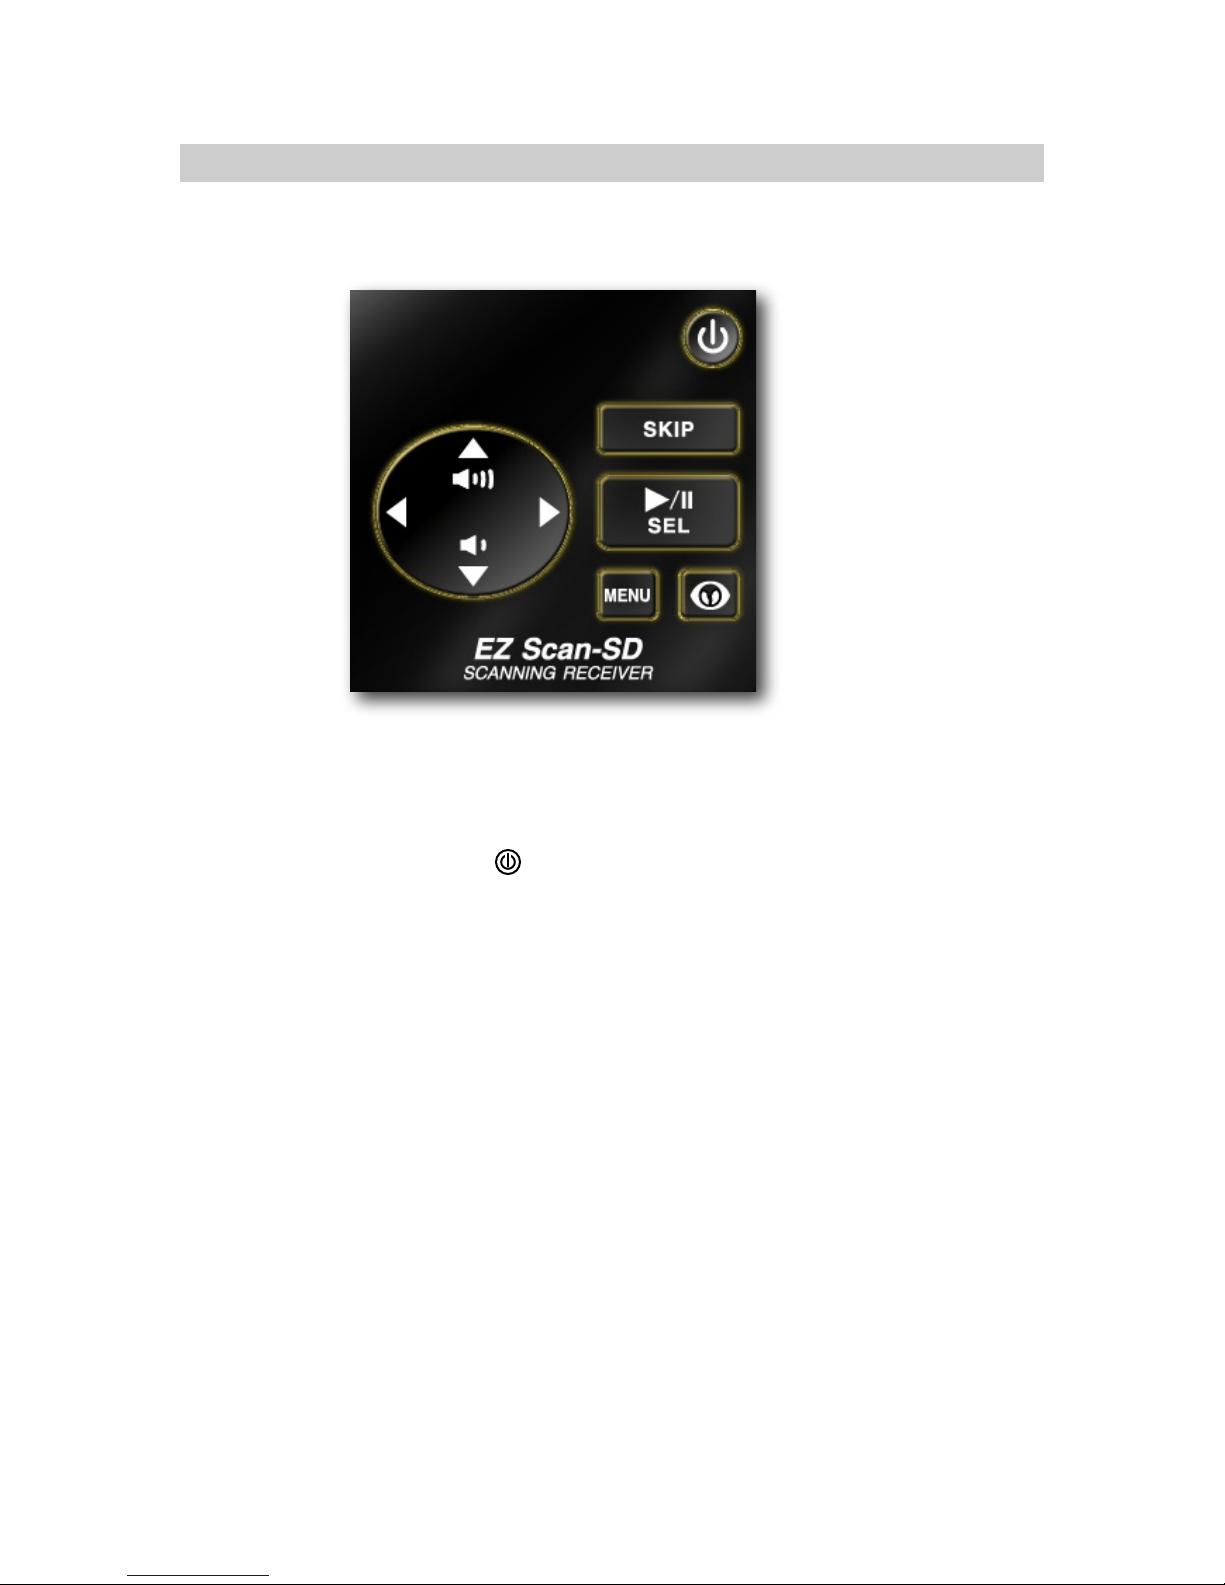
Understanding the Keypad
Your EZ Scan-SD features an simplified backlit keypad with 9
keys that are used to operate the unit. Figure 2 highlights the
various keys and their basic functions.
Figure 2 - Keypad layout
POWER/Backlight
The POWER key is located to the top right of the keypad.
Press and hold for one second to turn the EZ Scan-SD on and
off. Press briefly to toggle the backlight on and off.
SCAN/PAUSE/SELECT Key
The SCAN/PAUSE/SELECT key ▶/II/SEL controls EZ ScanSDʼs Scan and Pause modes, and is used in menus to select,
enable or disable options.
UP Arrow Key
The UP Arrow key is used to increase the volume when the
EZ Scan-SD is scanning or monitoring objects. When browsing
objects, the key scrolls up through objects in a Scanlist.
When using menus or the Library, the scrolls up through the
available items.
EZ Scan-SD User Manual! Page 14

DOWN Arrow Key
The DOWN Arrow key is used to decrease the volume when
the EZ Scan-SD is scanning or monitoring objects. When
browsing objects, the key scrolls down through objects in a
Scanlist. When using menus or the Library, the scrolls down
through the available items.
RIGHT Arrow Key
The RIGHT Arrow key is used to resume scanning when the
EZ Scan-SD is scanning or monitoring objects and is stopped on
an active object while scanning without locking out or skipping
the object. When browsing objects, the key scrolls up
through the Scanlists. When using menus or the Library, the
navigates forward, or in, to the next menu or Library listing or
level.
LEFT Arrow Key
MENU Key
SKIP Key
The LEFT Arrow key is used to resume scanning when the EZ
Scan-SD is scanning or monitoring objects and is stopped on an
active object while scanning without locking out or skipping the
object. When browsing objects, the key scrolls down through
the Scanlists. When using menus or the Library, the
navigates backward, or out, to the previous menu or Library
listing or level.
The MENU key provides access to additional functions related to
the current operating mode of the scanner, and provides access
to the Home Menu, where the main EZ Scan-SD functions are
controlled.
When pressed while the EZ Scan-SD is monitoring or paused on
an object, the SKIP key will temporarily disable reception on the
object. Pressing SKIP again while the object is selected will
resume normal monitoring. Skipped objects can also be restored
using the Restored Skipped option from the Main Menu. When
EZ Scan-SD User Manual! Page 15

editing text, pressing the SKIP key clears all text to the right of
the cursor.
WX Key
When pressed, the WX key provides instant access to NOAA
Weather Radio broadcasts, and is used to access Dedicated
SAME Weather Alert Receiver mode, which allows the EZ ScanSD to remain silent while monitoring for severe weather
conditions in the area you specify by entering NOAA SAME
codes. Pressing the key a second time selects the
SKYWARN Scanlist for monitoring and temporarily disables all
other Scanlists.
Other Switches and Controls
Main Power Off
EZ Scan-SD is equipped with a Main Power Off switch which is
located on the left hand side of the unit, underneath a protective
cover. The Main Power Off switch can be used if desired to
prevent battery drain when the EZ Scan-SD is not used for long
periods of time.
Like many modern portable electronic devices, the EZ Scan-SD
exhibits a very low level battery drain when powered off. The
Main Power Off switch isolates the batteries from the EZ ScanSD completely, which will prevent this low level battery drain. It is
not necessary or recommended to use the Main Power Off
switch on a routine basis. Most batteries will self-discharge long
before they are affected by the battery drain that the EZ Scan-SD
exhibits while powered off.
Always use the front panel key to turn the EZ Scan-SD off.
Using the main power switch to turn the EZ Scan-SD off or
removing the batteries without first turning the unit off via the
key may result in lost data or corrupted memory on the SD Card.
To access the Main Power Off switch, use your fingernail or a
miniature screwdriver to open the switch cover at the bottom of
the cover as shown in Figure 3. To close the cover, press it down
against the housing until it snaps into place.
EZ Scan-SD User Manual! Page 16
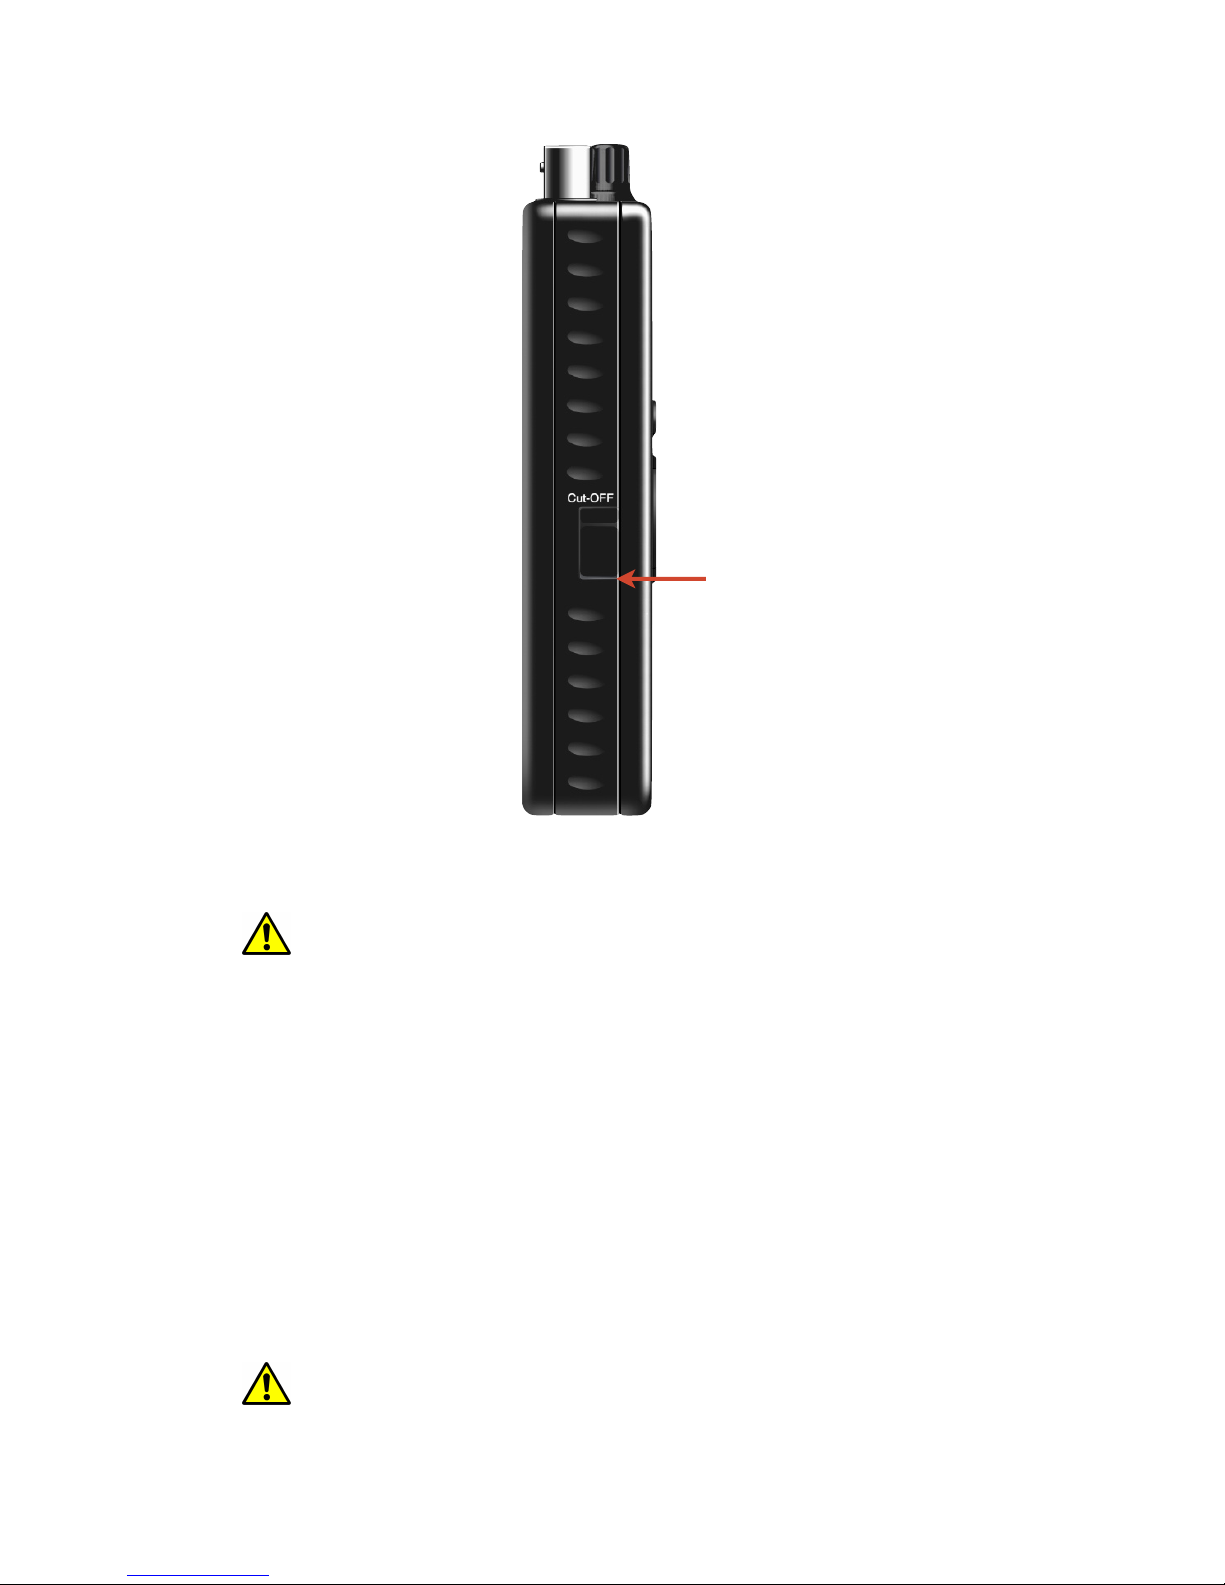
Figure 3 - Main Power cover
WARNING:! The Main Power Off switch will not protect your EZ Scan-SD
! from damage that may occur due to battery leakage when
! the EZ Scan-SD is stored for long periods of time. Always
! remove the batteries from the EZ Scan-SD when placing it into
! long-term storage. !
Battery Type Selection
The EZ Scan-SD is equipped with a Battery Type Selection
switch which is located inside of the battery compartment. The
Battery Type Selection switch is used to select standard
disposable alkaline batteries or rechargeable NiMH batteries.
Setting the Battery Type Selection switch to the correct option for
the batteries you are using selects the appropriate low battery
detection threshold for the type of batteries in use and enables
in-radio charging for rechargeable NiMH batteries.
Lift here to open
WARNING:! ALKALINE BATTERIES CANNOT BE RECHARGED. Never
! operate EZ Scan-SD with alkaline batteries if the Battery Type
! Selection switch is set to the NI-MH position. Doing so may
EZ Scan-SD User Manual! Page 17

! result in battery leakage or other damage to your scanner if the
! scanner is connected to an external power source. !
Squelch
The EZ Scan-SD is equipped with a top mounted squelch
control. The squelch control acts as a gate for the transmissions
that EZ Scan-SD receives. When the squelch control is rotated
fully clockwise, only stronger signals will pass through the
squelch gate, and weaker signals may not be received. When
the squelch is rotated fully counterclockwise, the squelch gate
will be open even when no signal is present, causing EZ Scan-
SD to operate slowly or to stop on objects where no transmission
is present, playing noise only. The EZ Scan-SD works best when
the gate is set so that it is closed when no transmissions are
present, but able to open when a transmission occurs.
The ideal setting for the squelch control is between 11 and 12
oʼclock. If you find that you are missing some transmissions, try
setting the squelch control further counterclockwise. If you find
that the EZ Scan-SD seems to be scanning very slowly or
stopping on frequencies with noise only, rotate the squelch
control clockwise until normal scanning resumes again.
Understanding the Display
Your EZ Scan-SD features a high contrast, backlit Liquid Crystal
Display (LCD) to provide you with information about the status of
the EZ Scan-SD while you are using it. A menu-driven user
interface provides access to the settings that control what the EZ
Scan-SD monitors. Figure 4 shows an example of an EZ Scan-
SD menu.
EZ Scan-SD User Manual! Page 18

-Main Menu-
Scan
Browse objects ▶
Scanlists
Search
Browse library
Figure 4 - EZ Scan-SD Main Menu
A “Scanning” display shows a scrolling list of enabled Scanlists
while the EZ Scan-SD is scanning. Figure 5 provides an example
of the EZ Scan-SDʼs Scanning display.
Scanning ▶
Fire
County Police
Sheriff
City Police
State Police
Figure 5 - EZ Scan-SD Scanning display
Display Icons
Individual object displays are shown when the scanner is
monitoring activity on an enabled object. The LCD includes a row
of icons at the top that provides information about the status of
the EZ Scan-SD while monitoring an object. Figure 6 provides an
example of an individual object display.
S G II
County Police
Channel: psD
Police North
Figure 6 - EZ Scan-SD Channel Object display
In the Individual Object displays, a row of icons at the top of the
display provides status information about the scanner. The top
row of icons are defined as follows:
" EZ Scan-SDʼs squelch circuit (or “gate”) is open.
EZ Scan-SD User Manual! Page 19
" Signal meter indicating strength of the received signal.

" The scanner is currently receiving trunking control channel
data.
" When present, the attenuator is set for Global mode.
" When present, the attenuator is active.
▶" EZ Scan-SD is in Scan mode (scanning)
II EZ Scan-SD is in Pause mode (monitoring a single object)
" Battery status indicator. All black indicates battery is fully
charged. When Battery Type Selection switch is set to
NI-MH and radio is connected to external power, an
animated icon is displayed to indicate that battery is being
charged.
" External power indicator. Indicates that the EZ Scan-SD is
being powered by an external source. Present when the
EZ Scan-SD is connected to external power and Battery
Type Selection switch is set to ALKA, or, when the EZ
Scan-SD is connected to external power and Battery Type
Selection switch is set to NI-MH and the charge cycle has
completed.
psD Indicators
In the Individual Object displays there are three characters on
the right hand side of the display that indicate the status of
priority, skip/lockout, and delay. The following indicators are
possible:
p=priority off, P=priority on
s=skip off, S=skip on, L=lockout on
d=delay off, D=delay on
EZ Scan-SD User Manual! Page 20
 Loading...