

Great Power Innovation And Technology Enterprise 1201781 User Manual
1201781
User’s Guide
Digital Clock Radio with Weather Forecast
We hope yo u enjoy your Di gital Clo ck Radio wit h Weather
Forecas t from RadioS hack. Thi s radio keeps yo u updated
with t ime, humid ity, temper ature and wea ther foreca st while
liste ning to AM/F M radio. Plea se read this use r's guide b efore
using your radio.
Package Contents
• Digital Clock Radio
• AC Adapte r
• Wireless Sensor
• User’s Guide
Specifications
Power Supply..................................................................................................
AC Adapter....................................................................6V DC, 600mA
Radio...................................................3 x AA batteries (not included)
Sensor................................................2 x AA batteries (not included)
Frequency Range................AM: 530 – 1710 KHz; FM: 88 – 108 MHz
Tuning Step.....................................................AM: 10 KHz; FM: 200 KHz
Frequency Response..................................................270 Hz – 1.7 KHz
S/N Ratio...................................................................AM: 30dB; FM: 40dB
Impedance......................................................................................8 Ohms
Transmission Frequency............................................................433 MHz
Operating Range..............................................................90 ft. (27.43 m)
Temperature Operating Range.................................................................
Indoor......................................................32°F to 113°F (0°C to 45°C)
Outdoor..............................................-4°F to 140°F (-20°C to 60°C)
Temperature Accuracy................................................................................
Indoor...........................................32°F to 104°F (0°C to 40°C): ±1°C
Outdoor...................................-4°F to 140°F (-20°C to 60°C): ±2°C
Humidity Range............................................................20% to 95% ±5%
Specications are subject to change and improvement without notice.
Actual product may vary from the images found in this document.
2 3 4 5 6
Important Safety Information
1. Read instructions before operating the product.
2. Retain instructions for future reference.
3. Heed all warnings.
4. Follow all instructions.
5. Do not us e this appa ratus near wa ter.
6. Clean on ly with a dr y cloth.
7. Do not ins tall near a ny heat source s such as radia tors,
heat reg isters, sto ves, or other a pparatus (i ncluding
ampl iers) that p roduce heat .
8. Do not defe at the safety p urpose of th e polarized
or groun ding - typ e plug. Whe n the provid ed plug
does not t into your ou tlet, consu lt an elect rician for
repla cement of the o bsolete out let.
9. Protec t the power co rd from being w alked on or pi nched,
part icularl y plugs, con venience rec eptacles , and the
point where they exit from the radio.
10. Do not bl ock any of the ve ntilatio n openings . Instal l in
accordance with the manufacturers instructions.
11. O nly use atta chments / accessori es specie d by the
manufacturer.
12. Unplug this radio during lightning storms or when
unuse d for long per iods of time .
13. The radio shall not be exposed to dripping or splashing
and th at no object s lled wi th liquid s, such as vase s, shall
be pla ced on radio.
14. Batte ries shall n ot be exposed to e xcessive heat s uch as
sunsh ine, re or th e like.
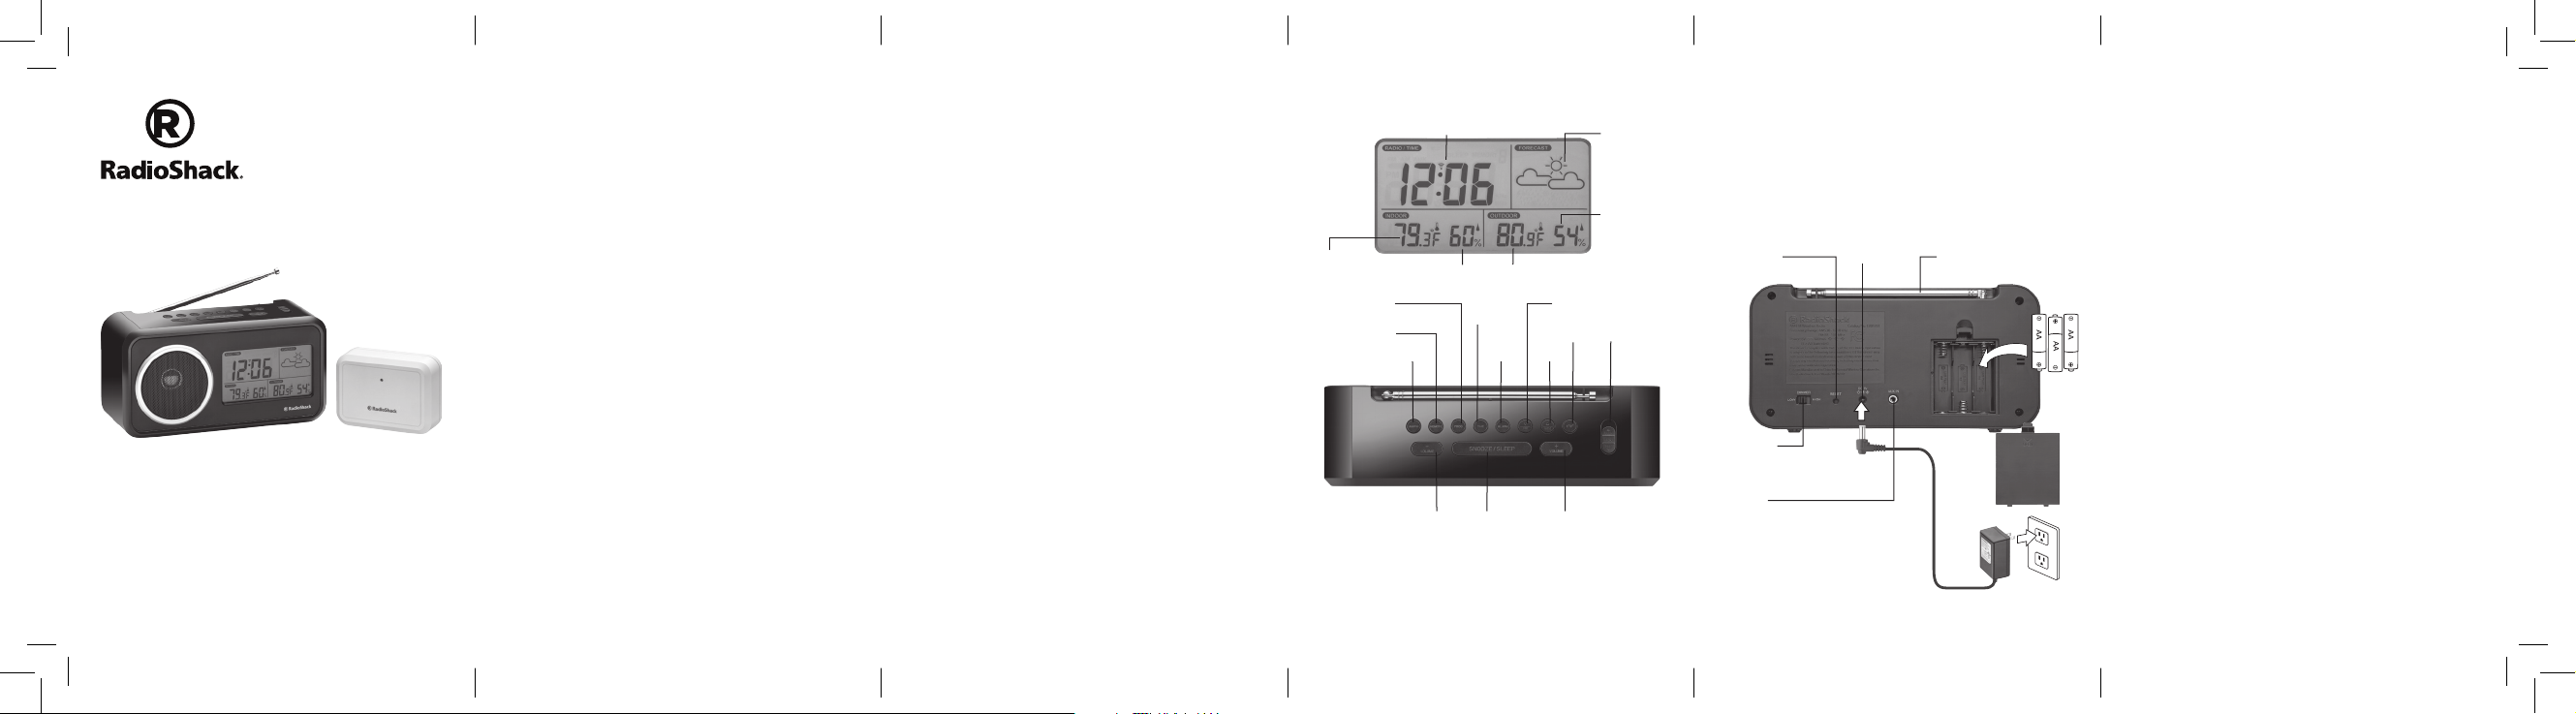
Clock/Alarm/Radio Frequency
Indoor
Temperature
MEMO RY
Indoor Humidity
PROG
AM/FM
- VOLUME SNOOZ E/
Outdoor Temperature
TIME
e/MIN
ALARM
SLEEP
d/HR
°C /°F
+ VOLUME
Weathe r
Forec ast
Outdoor
Humidity
BEEP/
RADIO/OFF
Power your Radio
The rad io can be pow ered by AC power an d by batteri es. When
it is powe red by AC power, batt eries can ac t as a backup pow er
source fo r power outa ges. Sett ings and dat a memory w ill be
lost if b oth AC is out and b atteries a re removed,
• Conne ct the supp lied AC adapt er cable in to the radio' s
power p ort, and p lug the ada pter into a sta ndard AC
outl et. The LCD back lit displ ay lights bl ue.
DC 6V
RESET
DIMMER
Switch to LO W or HIGH
to dim or b righten th e
backlit display.
AUX IN
Conne ct to an exter nal audio
source us ing a 3.5 mm au dio
cable (not included).
Power Por t
Telescoping Antenna
Install Batteries
1. Open t he batter y cover.
2. Insta ll three A A batterie s (not includ ed) as indic ated by the
polarity symbols (+ and -) marked inside.
3. Repl ace the batt ery cover.
Note:
• When ( and the rea dings in th e radio's RA DIO/TI ME display
ash, re place the b atteries .
• In batt ery-powere d mode, the L ED backlig ht lights b lue
when yo u press any rad io button. I t then turn s o after 5
second s to save the bat tery powe r.
• Dispos e of batteri es promptly a nd properl y. Do not burn or
bury them.
• Use onl y fresh batte ries of the req uired size and t ype.
• Do not mi x old and new ba tteries, d ierent ty pes of batter ies
(alkal ine or recha rgeable), or re chargeabl e batterie s of
dierent capacities.
• If you do n ot plan to use th e radio for a lo ng time, rem ove
the bat teries. B atteries c an leak chem icals that c an damage
electronic parts.
Dim the LED Backlight
You can adj ust the bri ghtness of th e LED by setti ng DIMMER to
LOW or HIGH.
Set up the Wireless Sensor
Install Batteries
1. Slid e open the bat tery cover.
2. Inser t two AA bat teries (not i ncluded) i n the batter y
compar tment ma tching the p olarity s ymbols (+ and -)
marked inside.
3. Repl ace the batt ery cover.
1201781_UG_EN_A_102416.indd 1-6 12/13/2016 11:22:03 AM
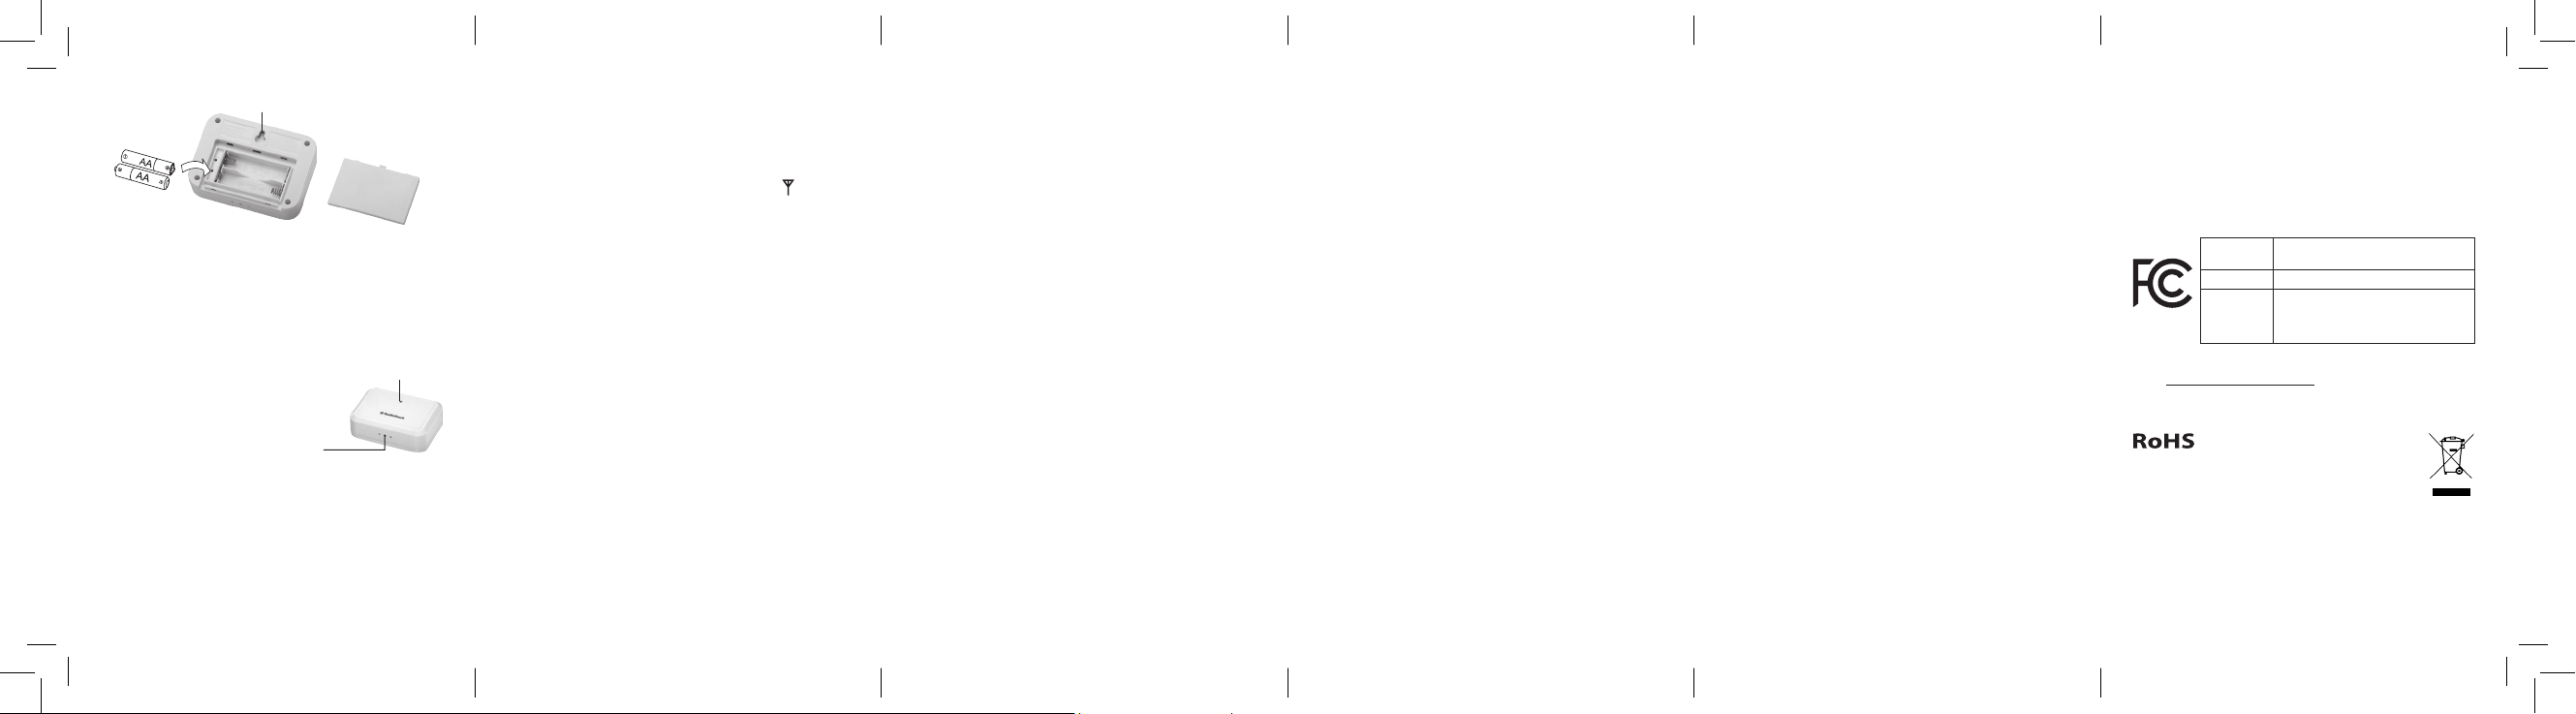
Keyhole Slot
Place the Remote Sensor
Place th e sensor on a a t surface w ithin 90 fe et (27.43
m) of your ra dio, in an ope n area free from t rees or other
obstructions.
To mount the se nsor on a wall :
1. Select a p osition th at is not highe r than 5 feet (1.5 m) on a n
outdoor wall.
2. Drill a ho le at the posi tion.
3. Thread a screw (not included) into the
hole a nd let it exten d slightl y from the
wall.
4. Fit the hea d of the screw int o the keyhole
slot of th e sensor.
Note:
• When ( and t he readings
ash on t he radio's O UTDOOR dis play, replace t he batter ies
in the se nsor.
• Bef ore mountin g the wirel ess sensor, veri fy the rad io can
receive s ignals fro m the chosen l ocation. M ove the senso r
closer i f the radio d oes not receiv e any signals .
• Do n ot block vent s. Do not subm erge the sens or in water.
Avoid exp osing the se nsor to direc t rain, snow, o r sunligh t.
Remove t he sensor fro m outdoors i n extreme or h arsh weathe r.
Do not pl ace the senso r in areas of hig h winds.
7 8 9 10 11 12
Vent s
LED
Flash es once a minu te
to indi cate signa l
transmission.
Weather Forecast
The rad io calcul ates the weat her forecas t for the next 12 to 24
hours , and it disp lays the cur rent indoor/out door tempe rature
and humidity readings.
When yo u power on the r adio, wait fo r about 1 min ute to
receive a n outdoor si gnal from t he remote senso r. a shes
until t he signal i s received, t hen it disap pears when re ady.
Note:
• If AC power i s interrupt ed and you have n ot install ed backup
batte ries, the ra dio will be gin search ing for a signa l.
• Press °C /°F to display temperatures in °C or °F.
• When te mperature f alls belo w 0°C (32°F ) and the wea ther
is rain , the snow ico n will appea r.
Set the Clock
1. Press an d hold TIME to enter tim e setting .
2. Press d/HR to set the hou r, and press e/MIN to set t he
minute.
3. Press TIME again to en ter time form at settin g. Then
press d/HR or e/MIN to s elect 12H or 24H.
4. Press TIME to confir m and exit.
Set the Alarm
1. Press an d hold ALARM to enter al arm clock se tting.
2. Press d/HR to set the h our, and press e/MI N to set the
minute.
3. Press ALARM again to confirm and exit.
Alarm Options
• To activat e the alarm , move the BEEP/RADIO/OFF switch
to RADIO or BEEP.
• Select RADIO if you wis h to wake up to your A M/FM radio
stat ion. º displ ays in radio' s RADIO/T IME. Sele ct BEEP
if you wis h to wake up to a bee per. » displays i n radio's
RADIO/TIME.
• At the set a larm time , the alarm s ounds for 60 m inutes.
Press any r adio butt on to stop the al arm and reset i t to
come on t he next set day.
• Press SNOOZE/SLEEP to sile nt the alar m for 5 minutes .
º or » ash es in radio's R ADIO/T IME displa y.
• To turn o the a larm, move t he BEEP/RADIO/OFF switch
to OFF.
Listen to your Radio
1. Exte nd the anten na (for FM radi o).
2. Press an d hold AM/FM to tur n on the radi o and then
adjust the volume.
3. Press AM/FM repe atedly to sel ect a radio b and (AM/F M/
AUX).
4. The radio di splay alway s default s to time. Press d/HR or
e/MIN to show the frequency in the di splay.
5. Press d/HR or e/MIN to tune a sta tion, or pre ss and
hold d/HR or e/MIN to sca n availabl e station s.
6. Press - VOLUME or + VOLUME to adjust vol ume.
7. Press an d hold AM/FM to sw itch o the ra dio.
Store Preset Stations
You can store 10 A M and 10 FM stati ons.
1. Press an d hold AM/FM to tu rn on the radi o.
2. Press AM/FM repe atedly to sel ect the ban d.
3. Press d/HR or e/MIN to tune to y our desired s tation.
4. Press and h old PROG to enter programming mode.
MEMO RY ashes in t he RADIO/ TIME disp lay, and a
number indicating the preset memory location appears.
Press PROG again to store.
5. Repe at 2-4 to store more sta tions, or pr ess any other
keys to quit programming mode.
Listen to Preset Stations
Press an d hold AM/FM to tu rn on the radi o. Press MEM ORY
repeate dly to selec t a preset sta tion. The d isplay show s the
corresponding preset station number.
Listen to an External Audio Source
1. Press an d hold AM/FM to tu rn on the radi o.
2. Use a 1/8" (3. 5 mm) audio ca ble (not incl uded) to
conne ct the earp hone jack on yo ur auxil iary audi o
source to AU X IN jack on th e back of the ra dio.
3. Press AM/FM repe atedly unt il the radi o's RADIO/ TIME
displ ay shows AUX to sel ect auxi liary mod e.
4. Use the co ntrols on your c onnected d evice to contro l
the volume.
5. Whe n nished, d isconnec t the audio c able, press a nd
hold A M/FM to turn t he radio o.
Reset
1. Switch o t he radio, rem ove the batte ries, and u nplug
the adapter.
2. Using a p ointed obje ct (such as th e end of paper cl ip or
pen), pres s the RESET hole fo r at least 1 secon d to reset
the ra dio to its def ault fact ory setti ngs (with 5 AM a nd 5
FM preset s).
3. Repl ace batteri es or reconne ct your ada pter and turn o n
the radio.
FCC Information
This eq uipment h as been teste d and found to co mply with
the li mits for a Cla ss B digita l device, pur suant to Par t 15
of the FCC Ru les. These l imits are d esigned to p rovide
reasonable protection against harmful interference in a
residential installation. This equipment generates, uses, and
can rad iate radio f requency e nergy and, i f not insta lled and
used in a ccordance wi th the inst ruction s, may cause ha rmful
inter ference to ra dio commun ications . However, there is
no guar antee that i nterferen ce will not occ ur in a part icular
installation. If this equipment does cause harmful interference
to radi o or televisi on reception , which can b e determin ed by
turni ng the equ ipment o an d on, the user i s encourag ed to
try to co rrect the i nterferen ce by one or more of t he followi ng
measures:
• R eorient or re locate the r eceiving a ntenna.
• I ncrease th e separatio n between t he equipm ent and
receiver.
• C onnect th e equipme nt into an out let on a circui t dierent
from th at to which the r eceiver is con nected.
• C onsult th e dealer or an ex perienc ed radio/T V techni cian
for help.
If you ca nnot elimi nate the inte rference, t he FCC require s that
you stop u sing your eq uipment. C hanges or m odicat ions not
expres sly approved b y the part y responsib le for compli ance
could vo id the user ’s authori ty to operate t he equipm ent.
This de vice compli es with Par t 15 of the FCC Rule s. Operat ion
is subj ect to the fol lowing two c onditio ns: (1) this device ma y
not caus e harmful i nterferen ce, and (2) this d evice must
accept a ny interfere nce receive d, includi ng interf erence that
may caus e undesire d operatio n.
Product
Model
Responsible
Party
Digi tal Clock Ra dio with Weat her
Forec ast
120 1781
Gener al Wirele ss Operat ions Inc.
dba RadioShack
300 Ra dioShack C ircle
Fort Wor th, TX 76102
817-4 15-3 20 0
Limited Warranty
Go to www.radioshack.com/help for details.
RadioShack Customer Relations
300 Ra dioShack Ci rcle, Fort Wor th, TX 76102
Compl ies with t he Europea n Union’s
“Rest rictio n of Hazardou s Substan ces
Direc tive,” whic h protect s the
enviro nment by res tricti ng speci c
hazardous materials and products.
© 2016 Gener al Wireles s Operati ons Inc.
All ri ghts reser ved. Rad ioShack is a re gistered
trad emark used b y General W ireless
Oper ations In c. dba Radio Shack.
radioshack.com
12A16
120 1781
Printed
in China
1201781_UG_EN_A_102416.indd 7-12 12/13/2016 11:22:05 AM
 Loading...