

Great Planes GPMM3155 User Manual
™
™
INTRODUCTION
TritonEQ™ offers all of the specifi cations and features of the original Triton Jr., and adds a built-in AC power supply,
lithium balancing circuit, and a new reversed LCD with adjustable view angle. The range of currents and cell counts
make TritonEQ great for smaller sized electric fl ight applications. But it can still be used in various other applications,
such as for Tx and Rx batteries, fi eld batteries, and more. TritonEQ can charge, discharge, and cycle multiple types
of rechargeable batteries with high output power. A Quick Reference Guide, plus state-of-the ar t programming and
fl owcharts make TritonEQ easy to understand and use. Its very small size and light weight make Tr itonEQ extremely
easy to transport.
It is strongly recommended to completely read this manual bef ore use! Dama ge resulting fr om misuse
or modifi cation will void your warranty.
WARNING!! Charging lithium-based rechargeable batteries poses a risk of FIRE! NEVER treat
lithium-based batteries in the same manner as other battery types. NEVER leave lithium batteries
unattended while being charged! ALWAYS charge lithium-based batteries in a fi reproof location!
Failure to follow all care and handling instructions contained in this manual could result in quick,
severe, permanent damage to the batteries and all surroundings!! Follow all safety precautions
when using such batteries, as listed on pages 9-12 of this manual!
QUICK REFERENCE GUIDE
1. Connect TritonEQ to the AC or DC input power source. (See page 3 for details)
2. Find the programming fl owcharts included in the package.
3. Press BATT TYPE to fi nd the screen which matches your battery type. (See page 5 for details)
4. Connect the proper charge adapter to the “Output” jacks . Connect the battery to the charge lead, observing proper polarity.
5. To charge:
a. For NiCd and NiMH batteries see page 5.
b. For lithium based batteries see page 11.
c. For lead-acid (Pb) batteries see page 12.
6. To discharge:
a. For NiCd and NiMH batteries see page 7.
b. For lithium based batteries see page 12.
c. For lead-acid (Pb) batteries see page 13.
7. For cycling of NiCd and NiMH batteries see page 8.
INDEX
Specifi cations .........................................................................2
Special Features and Functions ...........................................2
Important Warnings ................................................................2
Glossary of Terms ..................................................................3
Input Power – Connection, Protections and Limitations ....3
Charger Controls and Output Connections .........................4
Determining Battery Type and Specifi cations......................5
Getting Started – Main Menu .................................................5
Care and Handling Instructions for NiMH Batteries ...............5
Charging NiCd or NiMH Batteries .........................................5
Discharging NiCd and NiMH Batteries .................................7
Cycling NiCd and NiMH Batteries .........................................8
Important Care and Handling Instructions for
Lithium-Polymer Batteries .....................................................9
Selecting LiPo, Li-Ion or LiFe Battery Types ......................10
Balanced vs. Non-balanced Lithium Packs ........................10
Charging LiPo, Li-Ion, or LiFe Batteries .............................11
Discharging LiPo, Li-Ion, or LiFe Batteries ........................12
Care and Handling for Lead-Acid (Pb) Batteries ...............12
Charging Pb (Lead-Acid) Batteries .....................................12
Discharging Pb Batteries .....................................................13
Miscellaneous Functions .....................................................13
Data Vie w Screens – Charge, Disc har ge and Cycle Data .....14
Heat Ventilation .....................................................................15
Errors Indications and Safety Features ..............................15
Troubleshooting Guide ........................................................15
1-Year Limited Warranty – U.S.A. and Canada Only ..........16

SPECIFICATIONS
AC input voltage: 110V 60Hz – 240V 50Hz
(detachable AC cord)
DC input: 11-15.0V DC, with large
alligator clips
Number of outputs: one, banana jacks
Battery types, # cells: 1-14 NiCd, NiMH
1-6 LiPo, Li-Ion, or LiFe
(3.6, 3.7 or 3.3V cells)
2, 4, 6, 8, 10, 12V Pb
(2V per cell)
Fast charge current: 0.1-5.0A (1C maximum for
lithiums)
63W max DC, 50W max AC
Fast charge termination: peak detection NiCd, NiMH
cc/cv for Pb and lithiums
Trickle current: chg current / 20
(NiCd/MH only)
Peak sensitivity: 8mV NiCd, 5mV NiMH
(NiCd/MH only)
Peak delay at start: 3 minutes
(NiCd/MH only)
Fast charge safety timer: NiCd/NiMH 1.5 hours,
lithiums 3 hours,
or turn off
Lithium balancing accuracy: 5mV per cell
Lithium balancing connector: FlightPower and ElectriFly
adapters included
Lithium max. node current: 300mA
Discharge current: 0.1-1.0A (5W max)
Discharge cutoff voltage: NiCd, NiMH 0.1-16.8V
LiPo, Li-Ion 3.0V per cell
LiFe 2.5V per cell
Pb 1.8V per cell
Cycle count: 1-5 cycles
(NiCd, NiMH only)
Battery memories: one
Programming controls: membrane touchpad, 4 buttons
Display type: 2x16 reversed LCD
w/backlight and adjustable
angle
Audible indicators: beeper
Case material: aluminum and ABS plastic
Safety devices: solid-state reverse
polarity and overload
Case size: 5.9 x 6.0 x 2.3 in
[150 x 153 x 58mm]
Weight: 23.8 oz [675g, w/o AC
power cord]
SPECIAL FEATURES AND FUNCTIONS
• Includes a tiny, lightweight built-in switching AC power supply
• A new easy to see 2x16 reversed LCD with backlight and 0-45° adjustable view angle
• Built-in balancing for 1-6S LiPo, LI-Ion, or LiFe (A123) cells, with FlightPower and ElectriFly adapters included
• Durable membrane touchpad input controls, and very simple programming menu
• Handles 1- 14 nickel-cadmium (NiCd) or nickel-metal hydride (NiMH) cells, 1-6 lithium-polymer (LiPo), lithium-ion
cells (Li-Ion), or lithium ferrite nanophosphate (LiFe) cells, or 2-12V lead-acid batteries (Pb)
• Precision “zero deltaV” peak detection for NiCd and NiMH batteries
• “Constant current / constant voltage” charge method for Pb and lithium based batteries
• 0.1 – 5.0A adjustable charge current
• Automatically sets trickle charge current for NiCd and NiMH batteries
• 0.1 – 1.0A adjustable discharge current
• Adjustable discharge cutoff voltages for NiCd/NiMH
• Cycle NiCd and NiMH batteries one to fi ve times
• Displays input and output volts, peak v olts, avg dsch volts, chg and dsch capacity, currents and time, error messages.
• Status screen constantly updates capacity, battery voltage, current, and time during use.
• Audible beeper aids in programming and notifi es of function changes.
• Safety features include fast charge safety timer, current overload and reverse polarity protection.
• Small and lightweight, with a rugged aluminum case for long-lasting durability and excellent heat dissipation.
IMPORT ANT W ARNINGS
Disconnect the battery and remove input power from the charger immediately if the charger or battery
become hot!! Allow the charger or battery to cool down before reconnecting.
• NEVER attempt to charge incompatible types of rechargeable batteries as permanent damage to the battery and
charger could result.
• NEVER use automotive type battery chargers to power the charger.
• NEVER allow water, moisture or foreign objects into the charger.
• NEVER block the air intake holes which could cause the charger to overheat.
• NEVER attempt to use batteries with more cells or total voltage than listed in the specifi cations
• NEVER leave the room where a battery is being charged or discharged.
2

• NEVER place the charger or battery on a fl ammable surface or near a fl ammable object while in use. K eep a wa y from
carpets, cluttered workbenches, etc.
• NEVER overcharge batteries as permanent damage could result. Do not use a charge or discharge current rate
which exceeds the safe level of the battery. Do not attempt to charge or discharge a battery if it is hot.
• ALWAYS disconnect from power source when not in use.
• ALWAYS keep out of reach of children.
• ALWAYS connect the charge lead to the charger before connecting the battery to the lead. And AL WAYS disconnect the
battery from the charge lead BEFORE disconnecting the charge lead from the charger. Otherwise, if the ends of the charge
lead touch each other while the battery is still connected it will cause a severe and dangerous short-circuit condition.
GLOSSARY OF TERMS
Amps (A): The unit of measure for charge or discharge current.
Milli-amps (mA): A unit of measure for current, being amps (A) multiplied by 1000 and listed as “mA”. So 2.5A is the
same as 2500mA (2.5 x 1000). Or, to convert mA to amps, divide the mA number by 1000. So 25mA is the same as
0.025A (25 divided by 1000).
Capacity, milli-amp hours (mAh), and amp-hours (Ah): Charge energy stored by a battery is called capacity, which
is defi ned as how much current a battery can supply in one hour of time. Most hobby batteries are rated for capacity in
“mAh” or milli-amp hours. A 650mAh battery can deliver 650mA of current for one hour (650mA x 1hr = 650mAh).
A 3200mAh battery can deliver 3200mA (3.2A) of current for one hour (3200mA x 1hr = 3200mAh), etc. Very large
batteries, such as lead-acid fi eld batteries, are usually rated in “Ah” or amp-hours. A “12V 7A” fi eld battery can deliver
7 amps of current for one hour (7A x 1hr = 7Ah).
“C” rating: Capacity is also referred to as the “C” rating. Some battery suppliers recommend charge and discharge
currents based on the battery’s “C” rating. A battery’s “1C” current value is the same number as the battery’s rated
capacity number, but noted in mA or amps. A 600mAh battery has a 1C current value of 600mA…a 3C current value of
(3 x 600mA) 1800mA. The 1C current value for a 3200mAh battery would be 3200mA (3.2A), etc.
INPUT POWER – CONNECTION, PROTECTIONS AND LIMITATIONS
AC Input: For indoor use, this charger includes a built-in switching AC power supply that delivers power by connecting
the included AC power cord to a common 110V AC outlet. This built-in power supply is also compatible with 220V 50Hz
sources (220V input power cord not included).
DC Input: This charger can also be powered by a por table 12V DC power source for use at the fi eld. It’s best to use a
clean DC power source whose output is fi ltered to remove unwanted electrical noise. Do NOT use an automobile battery
charger as a power source. On the left side of the charger, connect the DC power cord’s alligator clips directly to the
output terminals on the 12V DC power source. Always match polarities (red lead to red “+” terminal, black lead to black
“-” terminal). To utilize the charger’s absolute maximum power capabilities the DC power source must be capable of
delivering at least 7.2A while maintaining 11 volts DC.
WARNING! Never accidentally short together the positive (+) and negative (-) DC input connections
when connected to 12V DC power. Failure to do so could result in permanent damage to the power
source and the charger.
TritonEQ has a maximum overall pow er rating of 63 watts with DC input, and 50 w atts with AC input. If charging a battery
with high voltage at high current, or if the input voltage is low, the charger might limit the output current as a result of the
charger’s maximum power rating. This is normal.
The charger will be on at all times when connected to input power. Disconnect the charger from input power when not
in use.
3
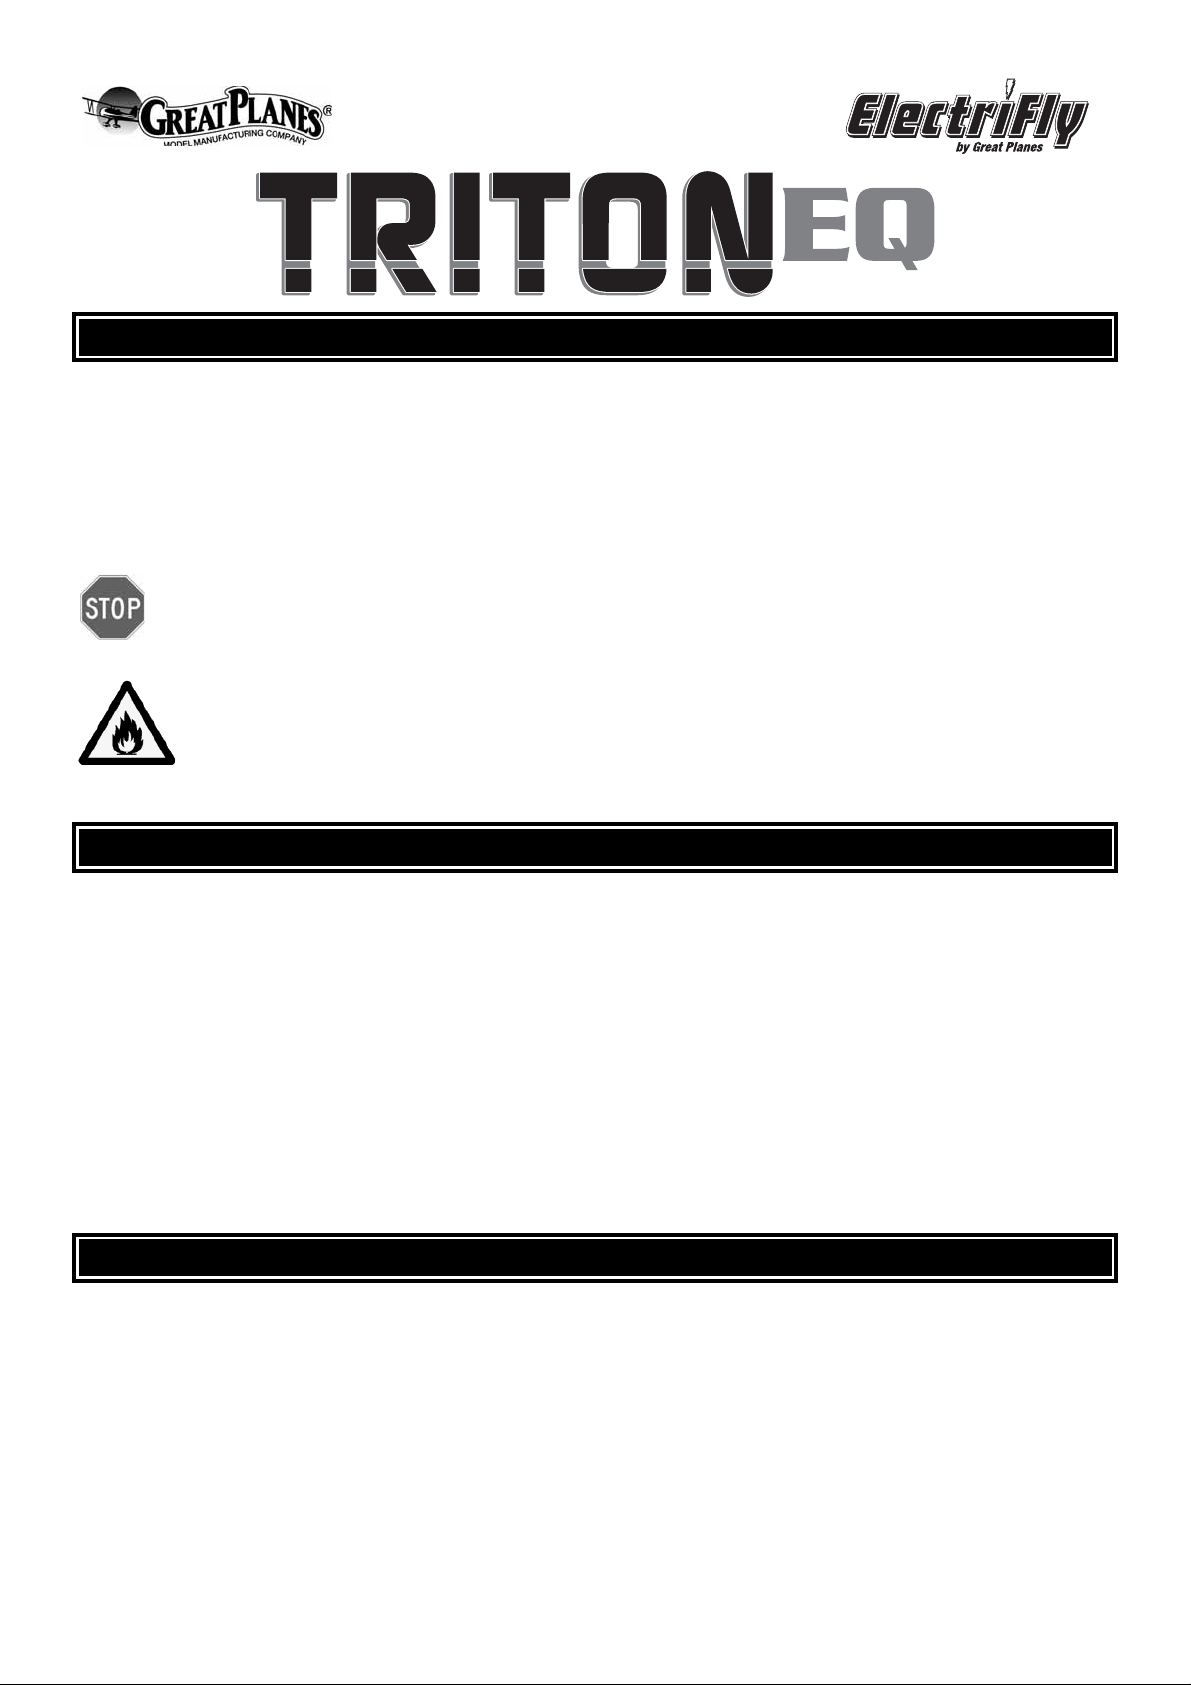
CHARGER CONTROLS AND OUTPUT CONNECTIONS
BATT TYPE button: To change batter y type, move to the
right through all menus, and to fi nd the data screens.
INC button: To increase values on-screen and move
upwards through menus.
DEC button: To decrease values on-screen and move
downward through menus.
ENTER/START button: To confi rm settings, and to start and
manually stop functions.
Lithium Balancing Jack: To connect an adapter for balancing of
LiPo batteries. See page 10.
Banana Jacks: Main output for charging, discharging, and cycling.
For best performance it’ s recommended to use pre-assembled leads
to connect batteries to the charger. Alwa ys connect the charge lead
to the charger FIRST. Then connect the battery to the charge lead.
Always match polarities from the battery’s lead to the banana jac ks
(red positive (+) lead to red banana jack, black negative (-) lead to
the black banana jack).
WARNING! NEVER allow the positive and negative output connections to touch while a battery is
connected to the output. Failure to do so could result in permanent damage to the batter y and/or the
charger and void your warranty.
Great Planes offers a large variety of charge leads which can be found at most hobby retailers nationwide:
Part Number Description
GPMM3105 charge lead – banana plug to 2-pin connector
®
GPMM3148 charge lead – banana plugs to Deans
GPMM3149 charge lead – banana plugs to Deans
Ultra® male
®
micro
GPMM3200 Balancing lead – 1-6S ElectriFly LiPos
GPMM3201 Balancing lead – 1-6S FlightPower, Thunder Power LiPos
HCAP0101 Futaba J Tx and Rx charge leads, except 9VAP
HCAP0102 Futaba J Tx and Rx charge leads, 9VAP only
HCAP0104 Airtronics/Sanwa Tx and Rx charge leads
HCAP0105 JR/Spektrum Tx and Rx charge leads
HCAP0106 Hitec Tx and Rx charge leads
HCAP0108 Charge leads, banana plugs to alligator clips
HCAP0110 9V-style Tx connector, Futaba-J Rx charge lead
HCAP0310 Banana Plugs (3 pair)
HCAP0320 Heavy Duty Banana Plugs (2 pair)
4

DETERMINING BATTERY TYPE AND SPECIFICATIONS
IMPORTANT: It is always CRUCIAL to know your battery’s exact type, rated voltage and capacity!! To
avoid causing permanent damage to your battery, carefully read your battery’s label and/or instruction sheet or
consult your battery supplier and determine:
1. Type: Is the battery a nickel-cadmium (NiCd), nickel-metal hydride (NiMH), lithium-polymer (LiPo), lithium-ion (Li-
Ion), lithium ferrite nanophosphate (LiFe), or lead-acid (Pb)?
2. Rated capacity: This should be listed on the battery’s label in “mAh” (“milli-amp hours”). Capacity is also referred to
as the “C” rating. Charge and discharge currents are also expressed as a function of this “C” rating. For example, a
2100mAh battery would have a “1C” charge or discharge current rate of 2100mA or 2.1 amps . This battery’s 2C rating
would be (2.1 x 2) 4.2 amps, etc.
3. Rated voltage: NEVER guess the rated v oltage of a lithium battery! If not printed on the battery’s outer label, consult
your battery supplier or determine pack voltage as follows:
a. NiMH and NiCd batteries: multiply the total number of cells in the pack by 1.20.
b. LiPo batteries: multiply the total number of cells in the pack by 3.70.
c. Li-Ion batteries: multiply the total number of cells in the pack by 3.60.
d. LiFe batteries (A123): multiply the total number of cells in the pack by 3.30.
e. Lead-acid (Pb): multiply the total number of cells in the battery by 2.0.
GETTING STARTED – MAIN MENU
All main functions (charge, discharge, cycle) for all battery types are found in the Main Men u. When pow er is applied, the
charger will start at one of the “CHARGE” screens as seen along the top of the Main Menu. More specifi c details about
all settings for all battery types can be found in the included fl owcharts.
IMPORTANT: Different parameters exist for each battery type. It‘s CRUCIAL to use functions in the
menu which are marked for your exact battery type!!
To change battery types, press BATT TYPE until the proper battery type is found (moving right across the
programming fl owchart).
CARE AND HANDLING INSTRUCTIONS FOR NiMH BATTERIES
• NEVER allow NiMH batteries to overheat, as this could adversely aff ect their perf ormance or damage the cells. If this
happens, disconnect the battery from the charger immediately and allow to cool!
• NEVER deep cycle NiMH batteries as permanent damage could result.
• NEVER attempt to use the NiCd, Pb, or lithium functions with NiMH batteries.
• Store NiMH packs with some voltage remaining on the cells (refer to battery supplier).
CHARGING NiCd or NiMH BATTERIES
1. In the MAIN MENU, fi nd the “NiCd CHARGE” screen to charge a NiCd battery and skip to step 3.
2. To charge a NiMH battery, press BATT TYPE until the “NiMH CHARGE” screen is found. Press ENTER to confi rm
this battery type.
3. To change the charge current, press ENTER to cause the value to fl ash. Press INC or DEC to fi nd the desired
charge current (0.1 – 5.0 amps). See the chart on the next page for recommended current settings. Note that “0.1A”
is the same as 100mA… “0.8A” is the same as 800mA, etc. Press ENTER, or wait 5 seconds and TritonEQ will
automatically confi rm this selection.
5
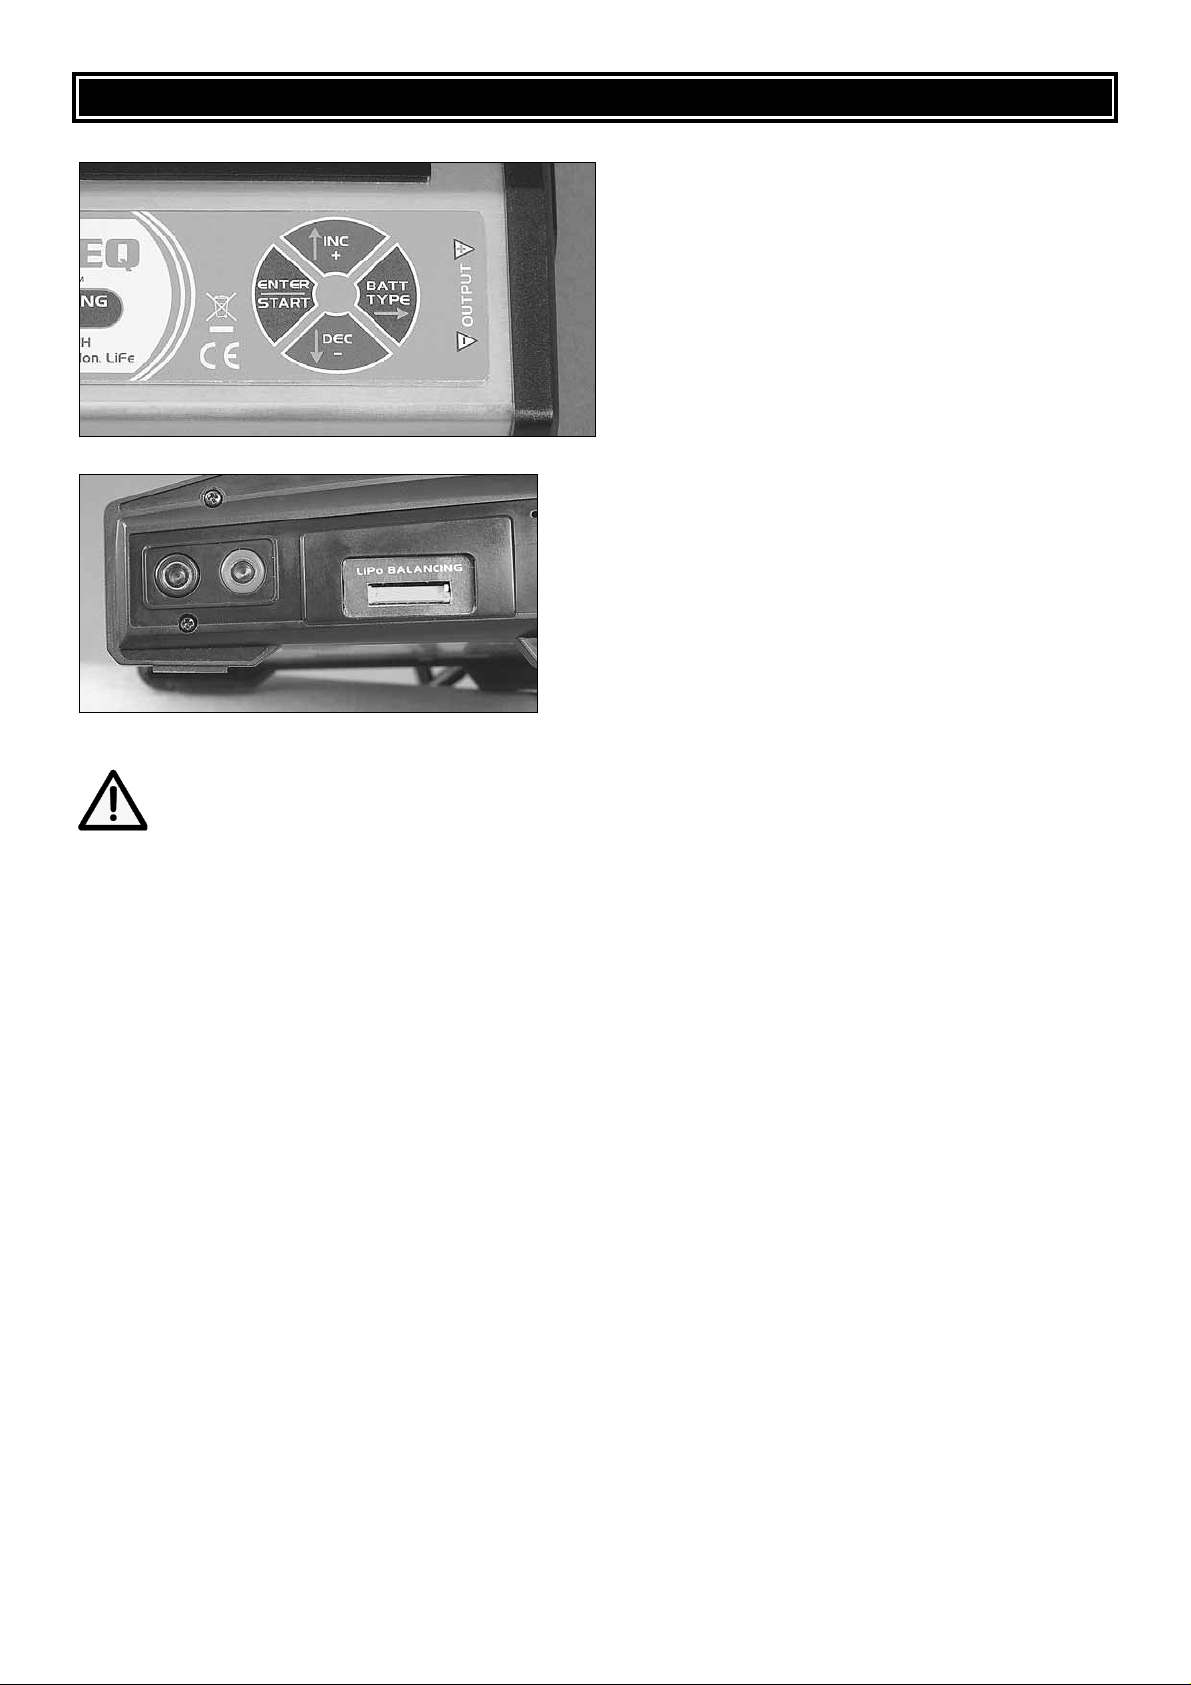
NiCd and NiMH CHARGE AND DISCHARGE CURRENT CHART
CHARGE TIPS: Using a
current which could fully charge
an empty pack in 1 or 2 hours
should avoid overheating of the
battery. This table shows
recommended 1 and 2 hour
charge current settings for
batteries of different rated
capacities.
DISCHARGE TIPS: More
accurate mAh measurements
can be achieved when using a
current which can discharge
the pack in 1 or 2 hours, as
shown in the table. Note: The
maximum discharge current is
1 amp. And, the maximum
power dissipation during
discharge is 5 watts, which
might cause discharge currents
to automatically be limited for
packs having high voltage.
Battery
Capacity (mAh)
100-200
300-400
500-600
700-800
900-1000
1100-1200
1300-1400
1500-1600
1700-1800
1900-2000
2100-2200
2300-2400
2500-2600
2700-2800
2900-3000
3100-3300
3400-3600
3700-4000
4100-4300
2 Hour
Currents
0.1A
0.2A
0.3A
0.4A
0.5A
0.6A
0.7A
0.8A
0.9A
1.0A
1.1A
1.2A
1.3A
1.4A
1.5A
1.7A
1.8A
1.9A
2.1A
1 Hour
Currents
0.2A
0.4A
0.6A
0.8A
1.0A
1.2A
1.4A
1.6A
1.8A
2.0A
2.2A
2.4A
2.6A
2.8A
3.0A
3.3A
3.6A
4.0A
4.3A
4. To START PEAK CHARGE, press and hold ENTER for 2 seconds. “BATTERY CHECK, PLEASE WAIT…” will
show briefl y as TritonEQ evaluates the condition of the battery. If the battery is ready, the charge process will star t
automatically at which time you’ll see a screen like shown below.
Battery
Type
CHG =
charging
Charge capacity: This is how much capacity (energy , in “mAh”) has been delivered
to the pack during charge. For a battery which previously had some charge, this
number could be low. For a battery which had little or no charge, this number
should be higher (ideally within 10% of the battery’s own mAh rating).
NiMH CHG 02492
10.08V 1.4A 107m
Elapsed charge time: This is the number of minutes the battery has been on charge.
For a battery which previously has some charge, this number could be low. For a
Output
Voltage
Charge
Current
battery which previously had little charge, this number should be larger .
WARNING! It is normal for NiCd and NiMH batteries to become warm dur ing charge. Disconnect batteries
IMMEDIATELY if they become hot at any time! If batteries become overheated, it may be necessary to use a
lower charge current in the future. Never attempt to charge batteries at excessiv e rates , as permanent damage
could result.
5. When peak charge is fi nished, the screen will show “END” and tones will sound for 10 seconds. The charger will
automatically go to trickle charge at this time (see the section below for details), b ut the battery should now be ready for
use. Other data measured during charge can be vie w ed in the DATA VIEW screens, as shown on page 14.
6
 Loading...