

Page 1

Predelivery Instructions
TSF1060 and TSF1260
Front Fold Boom Sprayer
Manufacturing, Inc.
www.greatplainsmfg.com
Read the operator’s manual entirely. When you see this symbol, the subsequent
instructions and warnings are serious - follow without exception. Your life and
!
the lives of others depend on it!
22953
Cover illustration may show optional equipment not supplied with standard unit.
© Copyright 2005 Printed 11/09/2006 500-642Q
Page 2

Table of Contents
Important Safety Information...................................1
Introduction...............................................................6
Description of Unit................................................6
Intended Usage .............................................6
Models Covered.............................................6
Using This Manual................................................6
Definitions......................................................6
Assembly and Setup Assistance..........................6
Product Support.............................................6
Assembly...................................................................7
Tools Required.....................................................7
Pre-Assembly Checklist .......................................7
Unload Boom from Truck .....................................7
Remove Shipping Straps......................................7
Swivel Bolt Snap ..................................................8
Remove Shipping Tires........................................8
Marker Tank.........................................................9
Handrail................................................................9
Preparation and Setup ...........................................10
Before You Start.................................................10
Hitching Tractor to Sprayer................................ 10
Predelivery......................................................... 12
Ace Pump Flow Limiter................................ 13
To Install Pump Flow Limiter.................13
Tractor / PTO Shaft Hook-Up.............................14
Axle Wheel Spacing Adjustment........................15
Specifications and Capacities...............................16
Appendix.................................................................17
Torque Values Chart..........................................17
Tire Inflation Chart..............................................17
© Copyright 2006 All rights Reserved
Great PlainsManufacturing, Inc.pro videsthis publication “as is” without warranty of any kind, either expressed or implied. While every precaution has been taken in the preparation of this manual, Great Plains Manufacturing, Inc. assumes no responsibility for errors or omissions. Neither is any liability assumed for damages resulting from the use of
the information contained herein. Great Plains Manufacturing, Inc. reserves the right to revise and improve its products as it sees fit. This publication describes the state of this
product at the time of its publication, and may not reflect the product in the future.
The following are trademarks of Great Plains Mfg., Inc.: Application Systems, Ausherman, Land Pride, Great Plains
All other brands and product names are trademarks or registered trademarks of their respective holders.
11/09/2006 500-642Q
Great Plains Manufacturing, Incorporated Tr ademarks
Printed in the United States of America.
Page 3

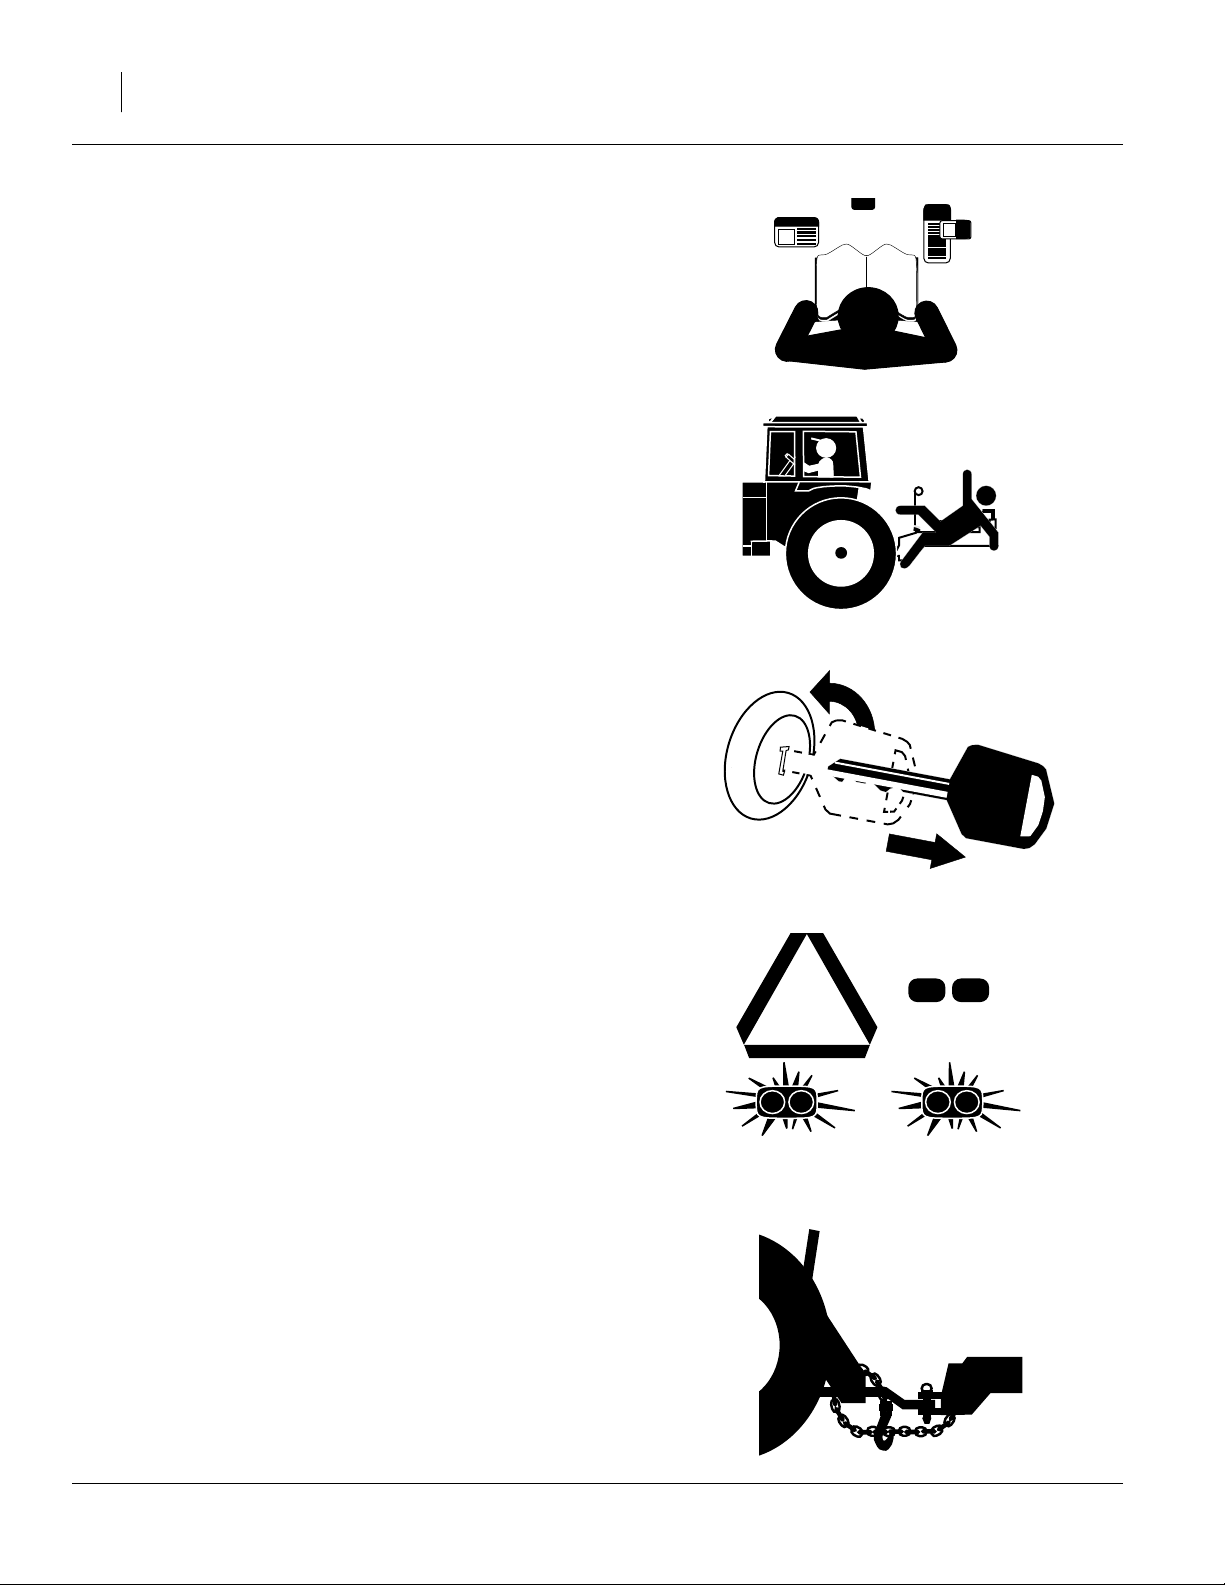
Important Safety Information
Look for Safety Symbol
The SAFETY ALERT SYMBOL indicates there is a
potential hazard to personal safety involved and extra
safety precaution must be taken. When you see this
symbol, be alert and carefully read the message that
follows it. In addition to design and configuration of
equipment, hazard control and accident preventionare
dependent upon the awareness, concern, prudence
and proper training of personnel involved in the operation, transport, maintenance and storage of equipment.
Be Aware of Signal Words
Signal words designate a degree or level of hazard
seriousness.
Important Safety Information 1
!
DANGER indicates an imminently hazardous situation
which, if not avoided, will result in death or serious
injury. This signal word is limited to the most extreme
situations, typically for machine components that, for
functional purposes, cannot be guarded.
WARNING indicates a potentially hazardous situation
which, if not avoided, could result in death or serious
injury, and includes hazards that are exposed when
guards are removed. It may also be used to alert
against unsafe practices.
CAUTION indicates a potentially hazardous situation
which, if not avoided, may result in minor or moderate
injury. It may also be used to alert against unsafe practices.
DANGER
!
WARNING
!
CAUTION
!
11/09/2006 500-642Q
Page 4
2 TSF1060 and TSF1260
Be Familiar with Safety Decals
▲ Read and understand “Safety Decals,” thoroughly.
▲ Read all instructions noted on the decals.
Keep Riders Off Machinery
Riders obstruct the operator’s view. Riders could be
struck by foreign objects or thrown from the machine.
▲ Never allow children to operate equipment.
▲ Keep all bystanders away from machine during
operation.
Shutdown and Storage
▲ Fold Front Fold Boom Sprayer, put tractor in park,
turn off engine, and remove the key.
▲ Secure Front Fold Boom Sprayer using blocks and
supports provided.
▲ Detach and store Front Fold Boom Sprayer in an
area where children normally do not play.
Use Safety Lights and Devices
Slow-moving tractors and towed implements can create a hazard when driven on public roads. They are
difficult to see, especially at night.
▲ Use flashing warning lights and turn signals when-
ever driving on public roads.
▲ Use lights and devices provided with implement.
Use A Safety Chain
▲ Use a safety chain to help control drawn machinery
should it separate from tractor drawbar.
▲ Use a chain with a strength rating equal to or
greater than the gross weight of towed machinery.
▲ Attach chain to tractor drawbar support or other
specified anchor location. Allow only enough slack
in chain to permit turning.
▲ Replace chain if any links or end fittings are broken,
stretched or damaged.
▲ Do not use safety chain for towing.
OFF
500-642Q 11/09/2006
Page 5
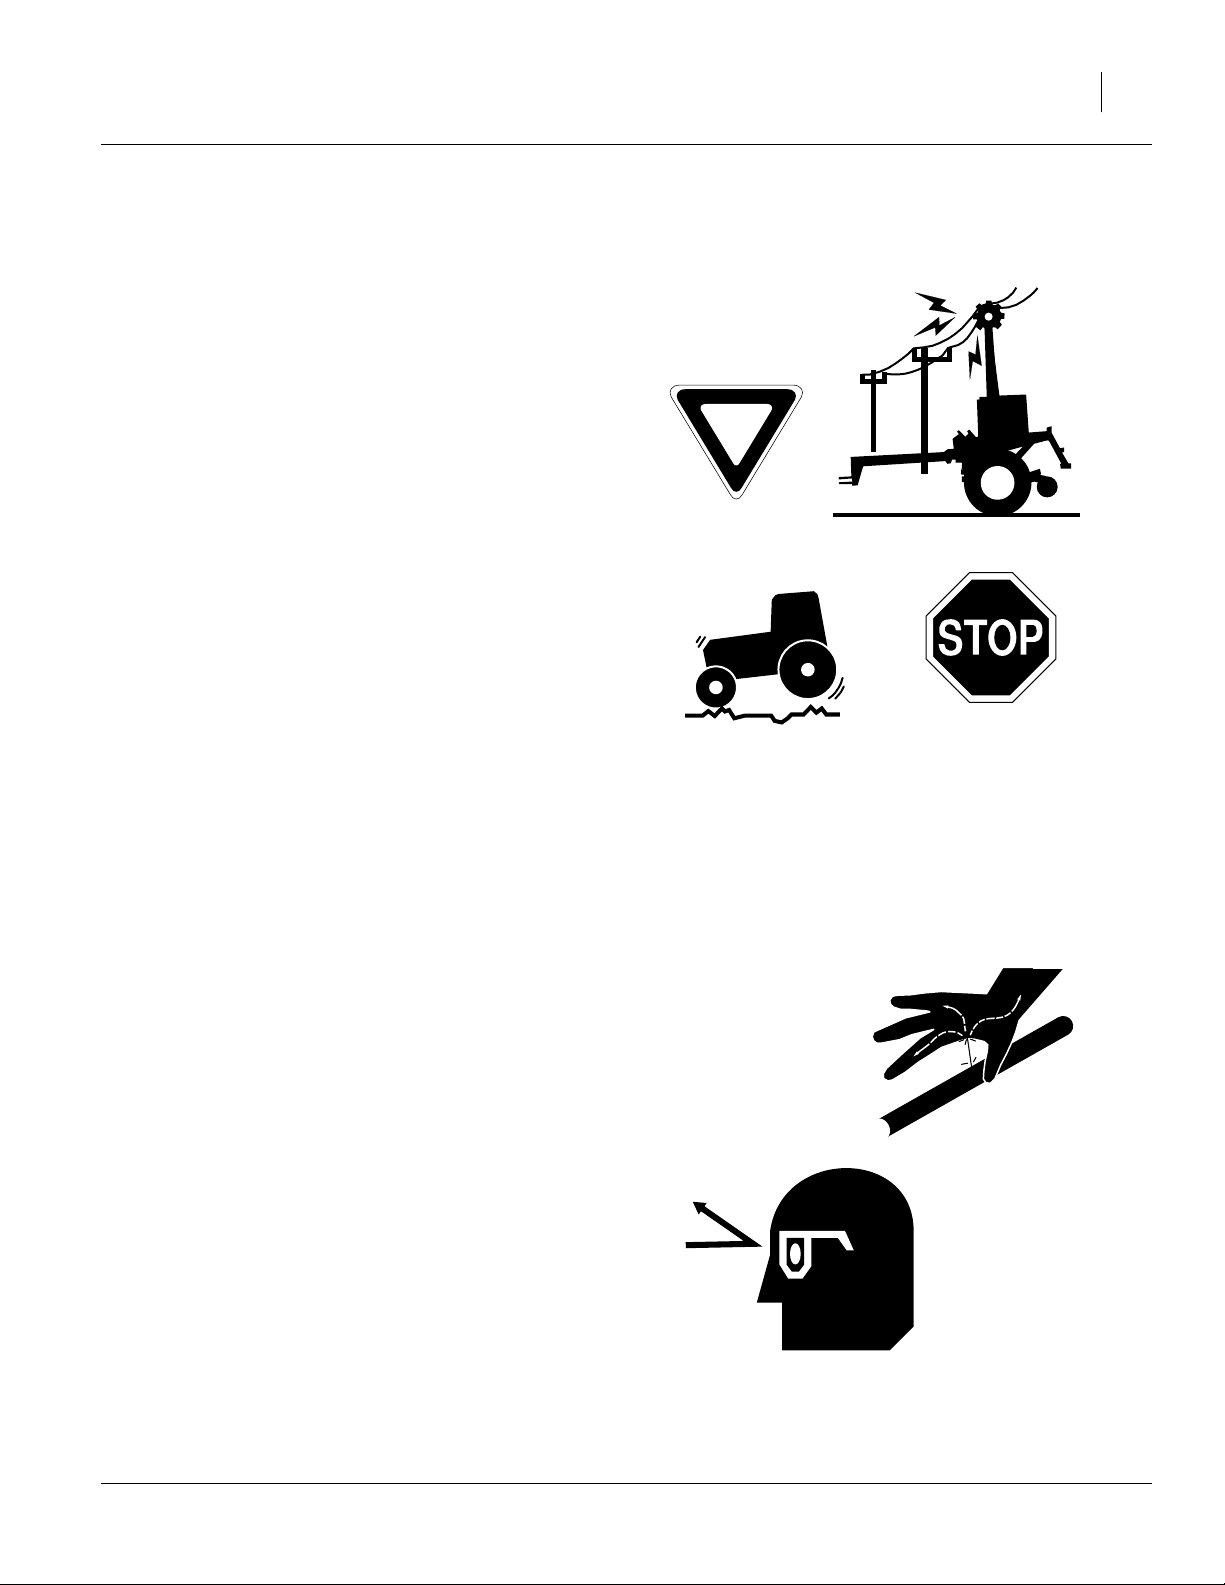
Transport Machinery Safely
Maximum transport speed for implement is 20 mph.
Some rough terrains require a slower speed. Sudden
braking can cause a towed load to swerve and upset.
▲ Do not exceed 20 mph. Never travel at a speed
which does not allow adequate control of steering
and stopping. Reduce speed if towed load is not
equipped with brakes.
▲ Comply with state and local laws.
▲ Do not tow an implement that, when fully loaded,
weighs more than 1.5 times the weight of towing
vehicle.
▲ Carry reflectors or flags to mark Front Fold Boom
Sprayer in case of breakdown on the road.
▲ Keep clear of overhead power lines and other
obstructions when transporting. Refer to transport
dimensions under “Specifications and Capacities”
on page 16.
Important Safety Information 3
▲ Do not fold or unfold the Front Fold Boom Sprayer
while the tractor is moving.
Avoid High Pressure Fluids
Escaping fluid under pressure can penetrate the skin,
causing serious injury.
▲ Avoid the hazard by relieving pressure before dis-
connecting hydraulic lines.
▲ Use a piece of paper or cardboard, NOT BODY
PARTS, to check for suspected leaks.
▲ Wear protective gloves and safety glasses or gog-
gles when working with hydraulic systems.
▲ If an accident occurs, see a doctor immediately. Any
fluid injected into the skin must be surgically
removed within a few hours or gangrene may result.
11/09/2006 500-642Q
Page 6
4 TSF1060 and TSF1260
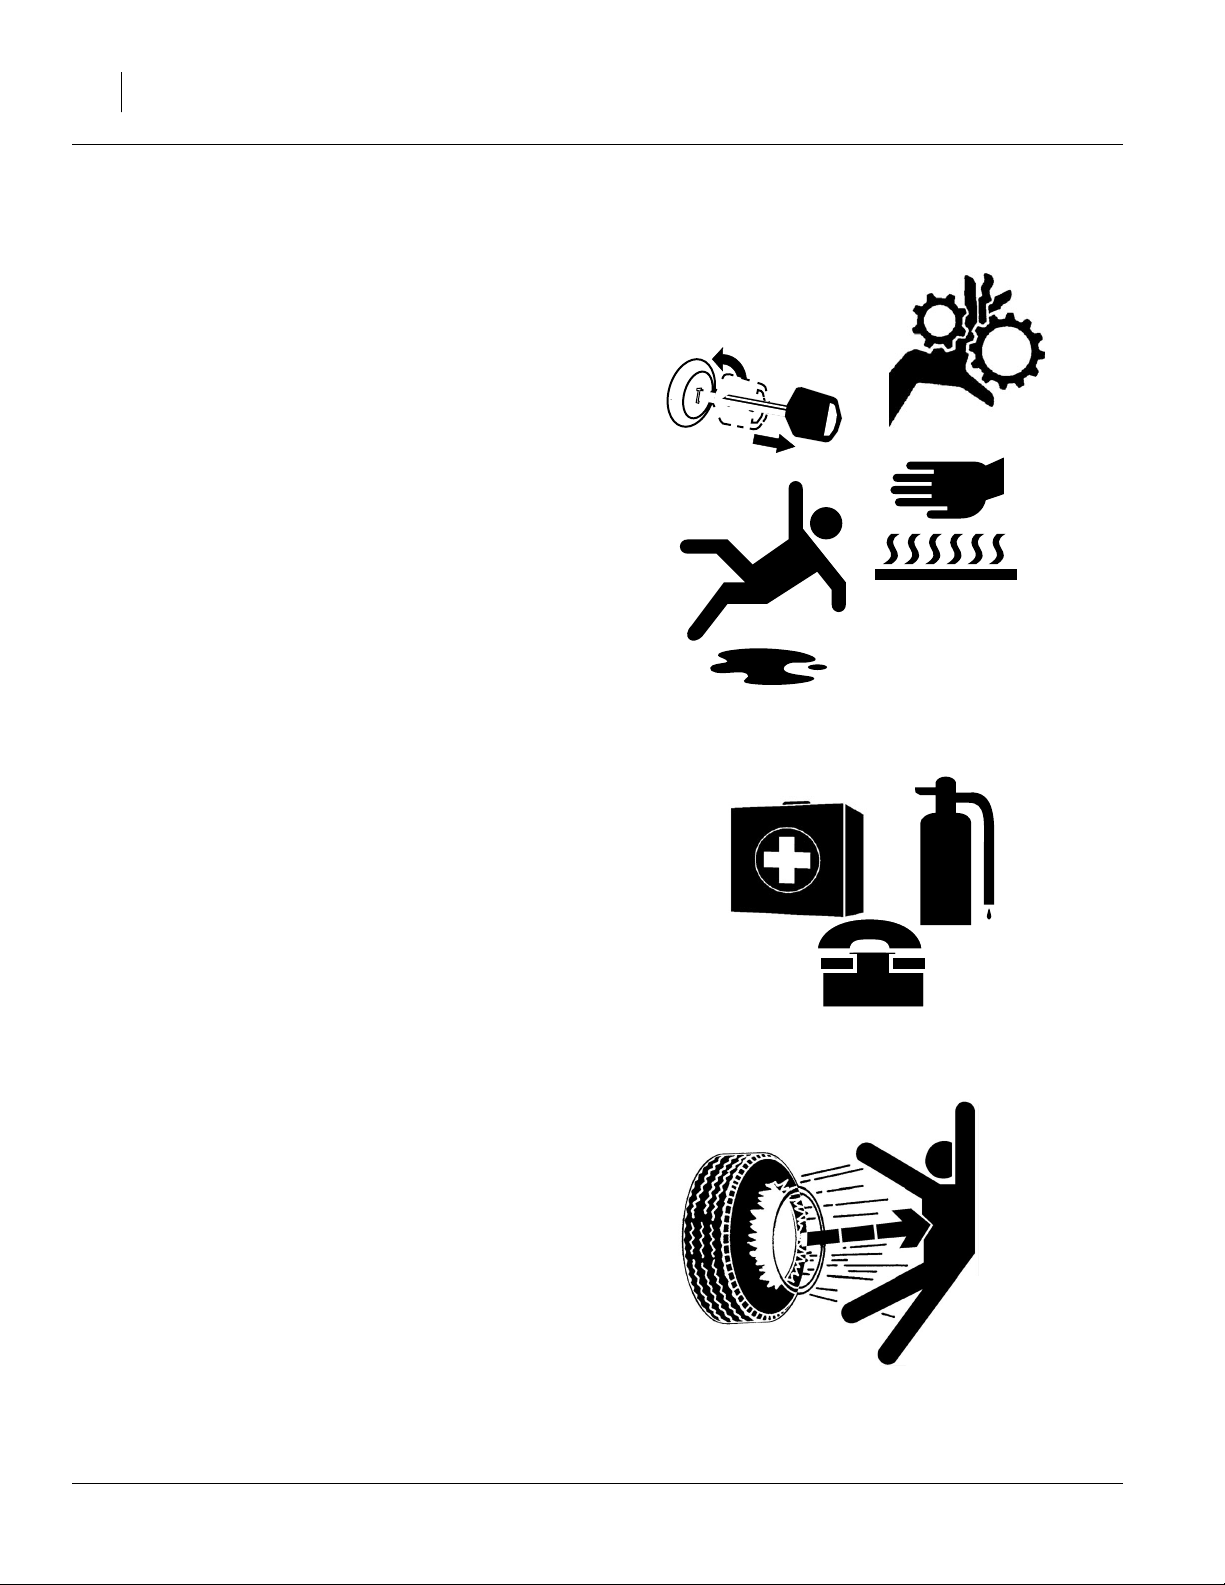
Practice Safe Maintenance
▲ Understand procedure before doing work. Use
proper tools and equipment. Refer to this manual for
additional information.
▲ Work in a clean, dry area.
▲ Fold the Front Fold Boom Sprayer, put tractor in
park, turn off engine, and remove key before performing maintenance.
▲ Make sure all moving parts have stopped and all
system pressure is relieved.
▲ Allow Front Fold Boom Sprayer to cool completely.
▲ Disconnect battery ground cable (-) before servicing
or adjusting electrical systems or before welding on
Front Fold Boom Sprayer.
▲ Inspect all parts. Make sure parts are in good condi-
tion and installed properly.
OFF
▲ Remove buildup of grease, oil or debris.
▲ Remove all tools and unused parts from Front Fold
Boom Sprayer before operation.
Prepare for Emergencies
▲ Be prepared if a fire starts.
▲ Keep a first aid kit and fire extinguisher handy.
▲ Keep emergency numbers for doctor, ambulance,
hospital and fire department near phone.
Tire Safety
Tire changing can be dangerous and should be performed by trained personnel using correct tools and
equipment.
▲ When inflating tires, use a clip-on chuck and exten-
sion hose long enough for you to stand to one side–
not in front of or over tire assembly. Use a safety
cage if available.
▲ When removing and installing wheels, use wheel-
handling equipment adequate for weight involved.
911
500-642Q 11/09/2006
Page 7

Safety At All Times
Thoroughly read and understand the instructions in
this manual before operation. Read all instructions
noted on the safety decals.
▲ Be familiar with all Front Fold Boom Sprayer func-
tions.
▲ Operate machinery from the driver’s seat only.
▲ Do not leave Front Fold Boom Sprayer unattended
with tractor engine running.
▲ Do not dismount a moving tractor. Dismounting a
moving tractor could cause serious injury or death.
▲ Do not stand between the tractor and Front Fold
Boom Sprayer during hitching.
▲ Keep hands, feet and clothing away from power-
driven parts.
Important Safety Information 5
▲ Wear snug-fitting clothing to avoid entanglement
with moving parts.
▲ Watch out for wires, trees, etc., when folding and
raising Front Fold Boom Sprayer. Make sure all persons are clear of working area.
▲ Do not turn tractor too tightly, causing Front Fold
Boom Sprayer to ride up on wheels. This could
cause personal injury or equipment damage.
▲ When using a PTO pump, be sure that PTO shield is
in place on the tractor, PTO coupler bolts are
torqued to the correct specification, and torque bar
is properly chained to tractor drawbar.
▲ The boom has many pinch points duringfield opera-
tion and folding. Keep all bystanders away.
11/09/2006 500-642Q
Page 8

6 TSF1060 and TSF1260
Introduction
Great Plains welcomes you to its growing family of new
product owners. This Front Fold Boom Sprayer has
been designed with care and built by skilled workers
using quality materials. Proper setup, maintenance and
safe operating practices will help you get years of satisfactory use from the machine.
Description of Unit
The TSF1060 and TSF1260 sprayers are capable of
spraying at 60ft. The level float boom is fully suspended
starting with vertical springsuspension in a 36in hydraulic elevator which provides a wide range of boom height
adjustment along with gas shocks that provide side-toside stability.
Intended Usage
Use these booms as part of a pressurized sprayer system to apply liquid pesticides, herbicides or fertilizers to
production-agriculture crops only. Do not modify sprayer
for use with attachments other than those approved by
Great Plains.
Models Covered
TSF1060 and TSF1260
Using This Manual
This manual was written to help you assemble and prepare the new machine for the customer. The manual
includes instructions for assembly and setup. Read this
manual and follow the recommendations for safe, efficient and proper assembly and setup.
The information in this manual is current at printing.
Some parts may change to assure top performance.
Definitions
The following terms are used throughout this manual.
Right-hand and left-hand as used in this manual are
determined by facing the direction the machine will
travel while in use unless otherwise stated.
IMPORTANT !
A crucial point of information related to the preceding
topic. For safe and correct operation, read and follow
the directions provided before continuing.
Note: Useful information related to the preceding topic.
Assembly and Setup Assistance
To order additional copies of predelivery instructions or
operator’s and parts manuals, write to the following
address. Include model and serial numbers in all correspondence.
If you do not understand any partof this manual or have
other assembly or setup questions, assistance is available. Contact
Product Support
Great Plains Mfg. Inc., Service Department
PO Box 5060
Salina, KS 67402-5060
An operator’s manual is also provided with the new
machine. Read and understand “Important Safety
Information” and “Operating Instructions” in the operator’s manual before assembling the machine. As a reference, keep the operators’s manual on hand while
assembling.
500-642Q 11/09/2006
Page 9

Assembly
Assembly 7
The following headings are step-by-step instructions for
assembling the Trailer Sprayer. Begin with Tools
Required and Pre-Assembly Checklist to make sure you
have all necessary parts and equipment. Then proceed
with Unload Boom from Truck. Follow each step in order
to make the job as quick and safe as possible and produce a properly working machine.
The TrailerSprayeris shipped via flat bed truck. It is the
dealer’s responsibility to unload the boom. Unload all
equipment before beginning assembly. Do not attempt
any assembly work with the TrailerSprayer on the truck.
Tools Required
• General hand tools
Pre-Assembly Checklist
1. Read and understand “Important Safety Information” on page 1 before assembling.
2. Have at least two people on hand while assembling.
3. Make sure the assembly area is level and free of
obstructions (preferably an open concrete area).
4. Have all major components.
5. Have all fasteners and pins shipped with boom.
IMPORTANT !
If a pre-assembled part or fastener is temporarily
removed, remember where it goes. Keep the parts
separated.
6. Have a copy of the parts manual on hand. If unsure
of proper placement or use of any part or fastener,
refer to the parts manual.
7. Check that all workingparts are moving freely,bolts
are tight, and cotter pins are spread.
8. Check that safety labels and reflectors are correctly
located and legible. Replace if necessary. Refer to
Safety Decals in the “Important Safety Informa-
tion” chapter of the operator’s manual.
Unload Boom from Truck
9. Using a forklift or tractor,remove boom from truck.
Do not remove shipping stands until boom is ready
to be assembled.
10. When ready to assembly boom, place sprayer in
an open, level area. Make sure there is enough
overhead and side clearance to fold and unfold
assembled boom.
Remove Shipping Straps
Refer to Figure 1
11. Remove strap securing booms to shipping brackets.
12. Unscrew U-bolts to remove shipping brackets
securing boom arms to sprayer during shipping.
Shipping Strap & Bracket
11/09/2006 500-642Q
Figure 1
24346
Page 10

8 TSF1060 and TSF1260
Swivel Bolt Snap
Refer to Figure 2 and Figure 3
13. Unhook swivel bolt snap from stationary ring. Rehook swivel bolt snap to ring located in outer boom
lock plunger rod.
14. Carefully unfold sprayer. Consult Operator’s Manual for procedure.
Remove Shipping Tires
Refer to Figure 4
Figure 2
Swivel Bolt Snap (transport)
Figure 3
Swivel Bolt Snap (operation)
24164
24165
Note: To remove shipping tires, boom arms must be
foldedintotransportposition.Inaddition,a forklift
orjackis neededtoremoveandreplaceshipping
tires.
15. Unscrew wheel lugs from shipping tires. Depending on size, tires will have either 8-bolts or 10bolts.
16. Remove shipping tires.
17. Replace shipping tires with standard sprayer tires.
18. Secure sprayer tires to implement with wheel lugs
removed in step 15.
500-642Q 11/09/2006
8- and 10-bolt Transport
Figure 4
Wheels and Tires
24347
24348
Page 11

Marker Tank
Refer to Figure 5
19. Mount the marker tank on the right side of the
sprayer.
Assembly 9
Handrail
Refer to Figure 6
20. Cut plastic tie securing handrail to sight gauge
weldment. Remove handrail.
Refer to Figure 5
21. Attach handrail to left-hand walkboard.
Figure 5
Marker Tank
Figure 6
Handrail in Transport
23243
24349
Figure 7
Handrail in Operation
11/09/2006 500-642Q
24349
Page 12

10 TSF1060 and TSF1260
Preparation and Setup
Before You Start
Read and understand the owners manual for your
sprayer. A basic understanding of how the sprayer
works will aid in the assembly, setup and operation of
your sprayer.
Perform these checks before setting up your front fold
boom.
1. Read and understand “Important Safety Informa-
tion” on page 1.
2. Check that all working parts are moving freely,
bolts are tight, and cotter pins are spread.
3. Check that all grease fittings are in place and lubricated.
4. Check that all safety decals and reflectors are correctly located and legible. Replace if damaged.
Hitching Tractor to Sprayer
!
DANGER
You may be severely injured or killed by being crushed
between the tractor and Front Fold Boom Sprayer. Do not
stand or place any part of your body between Front Fold
Boom Sprayer and moving tractor. Stop tractor engine and
set park brake before installing the hitch pin.
!
DANGER
Electrocution hazard. To prevent serious injury or death
from electric shock, keep clear of overhead power lines
when transporting, folding or unfolding boom. Boom is not
grounded. Electrocution can occur without direct contact.
Refer to transport dimensions under “Specifications and
Capacities” on page 16. Do not fold or unfold boom while
tractor is moving.
The Great Plains Trailer Sprayeris equipped with a ball
hitch on sprayers equipped with a PTO drive-line
pump.
A single tang hitch is used in place of the ball hitch on
other pump options. If the sprayer has a single tang
hitch, attach it to the tractor using a hitch pin with a
retaining hair pin. Park the sprayer in an open, flat area
with the jack in the park position. Skip instructions 5-8
and proceed with 9.
500-642Q 11/09/2006
Page 13

If the sprayer is equipped with the ball hitch, use the
instructions 5-8 to assemble the hitch plate.
Refer to Figure 8
5. Remove the hammer-strap on the tractor. Assemble the ball hitch plate
➀ to the drawbar by placing
the 1in x 5in long bolt ➁ through the drawbar hole
using flat washers on both ends.
6. Secure the
3
⁄
in x 5in long bolts ➂ in the slots of
4
the ball hitch plate ➀ and in the slots of the backup
plate ➃ using the flange nuts provided. Orient the
backup plate ➃ with the slots in the opposite direc-
tion of the ball hitch plate.
Preparation and Setup 11
Refer to Figure 9
7. Park the sprayer in an open, flat area with the jack
in the park position.
Refer to Figure 8
8. Back the tractor up to the sprayer and hook up the
sprayer ball hitch onto the stud ➄ mounted on the
ball hitch plate ➀. Secure the ball hitch with the
flat washer ➅ and the lynch pin ➆.
Refer to Figure 10
9. With the sprayer is attached to the tractor, prepare
to level the frame of the sprayer by securely supporting the front of the frame with a hoist.
10. Adjust the frame by moving the adjustment bolts
➀ to a position where the frame is sloping to the
front about one degree. This allows the fluid in the
tank to drain into the sump when the sprayer is in
use. Securely fasten the adjustment bolts ➀ using
the Torque Values Chart in the “Appendix” on
page 17.
Figure 8
Hitch Hook-Up Assembly
Figure 9
Jack in Parking Position
13851
13811
Figure 10
13852
Hitch Height Adjustment
11/09/2006 500-642Q
Page 14

12 TSF1060 and TSF1260
Predelivery
1. Have tractor delivered to dealership that will be
operating sprayer.
2. Confirm row spacing, and set wheel spacing on
sprayer. (Axles are adjustable.)
3. Set drawbar length to ASAE standards as shown on
decal if equipped with a PTOpump.Mount ball hitch
plate to tractor drawbar, and ball joint hitch to
sprayer.
4. Hook sprayer to tractor, and adjust hitch height so
that front of sprayer is 1
5. Install control switch boxes inside of tractor cab, and
route power supplies to the tractor battery.
6. The following equipment must be connected to the
tractor’s battery: Front Fold Boom Sprayer Controller, Fasse Valve Hydraulic Control Box, and
Optional Foam Marker Control.
a. To connect the Front Fold Boom Sprayer Con-
troller to the tractor battery, see pages 7 and 8
in the Raven Installation and Service manual.
b. To connect the Fasse Valve Hydraulic Control
Box to the tractor battery, follow the steps
below.
i. Use the 6 ft, two-wire red and black cable to
connect the hydraulic controls to the tractor
battery.
ii. Connect the red wire from each cable to the
positive terminal and the black wire from
each cable to the negative terminal.
c. Use the 6ft gray cable to connect the Optional
Foam Marker Control to the tractor battery.
7. Mount radar gun to tractor frame if applicable and
route cable up through cab. If using existing radar
on tractor,install “Y” cable according to tractor manufacturer’s recommendations.
8. Connect all hydraulic hoses to outlets (refer to tractor operator’s manual for designated outlet if
equipped with a hydraulic pump). The hydraulic
motor used on all liquid pumps is a 6 GPM motor. If
the tractor used on this sprayer does not have the
capabilities to adjust the remotes to this flow,then a
hydraulic flow divider kit must be installed so that
flow can be controlled and to prevent operating the
pump at excessive speeds. Place a stop in the neutral position for the tractor hydraulics so that the
hydraulic lever can only be moved to the float and
down positions. Refer to the tractor’s operator manual on information for the neutral stop.
1
⁄
in lower than the rear.
2
IMPORTANT !
Damage to the pump will occur if the hydraulic lever
is returned to the neutral position while the pump is
running.
9. Check all hydraulic functions of the boom/elevator.
10. With boom still unfolded, make sure boom locks are
adjusted correctly to just clear the stops.
11. Fill sprayer approximately 1/2 full of water. Open
tank sump valve and let water circulate throughout
the system and check for any leaks.
12. Before installing nozzles, engage pump slowly and
circulate water through the system, then turn on
boom valves individually to flush out the system.
(On sprayers equipped with a hydraulic pump, start
out with the hydraulic lever in the float position, and
engage the pump by placing the lever in the down
position. Make sure the hydraulic flow control valve
is set at a minimum flow.)
13. After system has been thoroughly flushed, install
nozzles and open boom valves again to check nozzle pattern across the boom.
14. Set the dead head pressure of the pump in the following ways depending on how pump is driven.
Hydraulic Drive Pumps
a. To determine the correct flow rate to the hydrau-
lic motor, start out with the hydraulic control
valve set at a minimum flow, and the hydraulic
lever in the float position.
b. Open up the sprayer control valve to its maxi-
mum setting. (On the Front Fold Boom Sprayer
monitor, with the power switch on, the rate
switch must be placed in the manual position,
and the increase/decrease switch must be
pushed to increase for 10-12 seconds.)
c. Start the tractor and engage the pump by plac-
ing the hydraulic lever in the down position.
Once the system builds pressure, speed up the
tractor to normal operating speed. Shut off the
boom section switches, and close the agitation
valve.
d. The pump is now at deadhead pressure and the
hydrauliccontrol valvemust be adjusted up until
the spray pressure reaches 80 P.S.I.maximum.
Mark this setting on the hydraulic control valve
for future reference.
e. Open up the agitation valve.
500-642Q 11/09/2006
Page 15

Ace Pump Flow Limiter
Refer to Figure 11
The flow limiter is a hydraulic device designed to shut
off the flow of hydraulic oil when a specified flow rate is
exceeded. On tractors with LOAD SENSING (LS)
Closed Center hydraulic systems, this device limits the
flow of oil to the Ace motor and prevents failures.
Newer Case-IH, John Deere, New Holland, and CAT
tractors have a great potential to run motors beyond
their rated speeds. Flows out of the hydraulic valves
can exceed 20 GPM while the motors are rated at 4-11
GPM. The flow limiter protects the Ace motor by shutting off on excess hydraulic flow.
The flow limiter should not be used on OPEN center or
PRESSURE COMPENSATING Closed Center hydraulic systems. The flow limiter should not be used with a
restrictor orifice.
Preparation and Setup 13
Figure 11
Ace Pump Flow Limiter
23395
To Install Pump Flow Limiter
1. Install the flow limiter in the inlet port of the Ace
motor.
2. Connect the hydraulic hoses so that the pump runs
with the hydraulic lever in the “Lower/Retract” position. Connect return hose to Low Pressure Return
Port, when available.
3. Shut off boom and agitation valveson the sprayerto
deadhead the sprayer pump flow.
4. Adjust the flow control on the tractor to minimum
flow setting (turtle).
5. Move the hydraulic lever to the “Lower/Retract”
position.
Note: Always shut the pump off in the “Float” position.
This eliminates high pressure being trapped in
the returnline and protects hydraulic seals. Avoid
returning the oil to the remote valve; use the Low
Pressure Return Port, when available.
6. Adjust the flow control on the tractor until the
sprayer system deadhead pressure is within the
pump’s operating parameters:
Note: If the flow limiter stops the flow of oil to the motor
a. Move the hydraulic lever to the “Neutral” posi-
tion. This removes the oil pressure from the flow
limiter and allows it to reset.
7. Set sprayerpressure by opening the agitation valve.
PTO Driven Pumps
a. Open up the sprayer control valve to its maxi-
mum setting. (On the Front Fold Boom Sprayer
monitor, with the power switch on, the rate
switch must be placed in the manual position,
and the increase/decrease switch must be
pushed to increase for 10-12 seconds.)
b. Start the tractor and engage the PTO pump
slowly with the tractor engine idling. Once the
system builds pressure on the pressure gauge,
shut off the boom section switched and close
the agitation valve.
c. The pump is now at deadhead pressure.
Increase the engine RPM’s until the spray pressure reaches 80 P.S.I. maximum on the pressure gauge or the PTO speed reaches the rated
RPM (540/1000). Never exceed the rated tractor PTO RPM. This is the RPM needed to spray
at to prevent excess pressure on the sprayer’s
plumbing.
8. The sprayer is now ready to be calibrated. Refer to
the Operator’s Manual or Front Fold Boom Sprayer
Manual for checking calibration depending on the
control system.
b. Adjust the flow control to a lower flow position.
c. Repeat steps 5 and 6.
11/09/2006 500-642Q
Page 16

14 TSF1060 and TSF1260
Tractor / PTO Shaft Hook-Up
!
DANGER
Rotating drive-line contact can cause death. KEEP AWAY!
Do not operate without guards attached and drive-line
securely attached at both ends.
Refer to Figure 12 and Figure 13
1. The tractor drawbar should be adjusted to ASAE
standard or as shown. Adjust implement drive-line
to a position which is level with the tractor PTO
2. Position PTO shaft on tractor. Be sure shaft is coupled on tractor.
Refer to Figure 14
3. Adjust the vertical position of the pump drive shaft
on the sprayer so that it is level, to slightly higher
than level with the PTO shaft on the tractor as
shown. This reduces drive-line vibration when
turning a corner. Adjust the vertical position by
moving the four bolts supporting the drive shaft
bracket.
IMPORTANT !
If, after adjusting the vertical position of the pump
drive shaft, the drive shaft is still a lot higher than the
PTO drive shaft on the tractor; adjust the hitch up
one position and readjust the pump drive shaft. Refer
to Hitching Tractor to Sprayer in this section starting
on page 10 to adjust the hitch.
Figure 12
Tractor Drawbar Adjustment
(540 rpm only)
Figure 13
Tractor Drawbar Adjustment
(1000 rpm only)
15764
15765
Figure 14
Hitch Height Adjustment
500-642Q 11/09/2006
15837
Page 17

Axle Wheel Spacing Adjustment
!
CAUTION
Axle position must be located correctly to avoid excessive
tongue weight or negative tongue weight which could cause
mechanical failure resulting in personal injury.
Refer to Figure 15
The wheel spacing of the axle can also be adjusted for
differing row spacings.
!
CAUTION
Do not adjust the wheel spacing wider than 120in. To do so
may cause a falling axle hazard while the sprayer is in service.
Preparation and Setup 15
Figure 15
Sprayer Axle Assembly
13855
11/09/2006 500-642Q
Page 18

16 TSF1060 and TSF1260
Specifications and Capacities
Model
Boom Width
Tank Capacity
Nozzle Spacing
Number Of Nozzles
Approx. Empty Weight
Approx. Full Weight (Max)
Working Width
Transport Width
Transport Height
Length
Wheel/Tire Size
Wheel Spacing
Model
Boom Width
Tank Capacity
Nozzle Spacing
Number Of Nozzles
Approx. Empty Weight
Approx. Full Weight (Max)
Working Width
Transport Width
Transport Height
Length
Wheel/Tire Size
Wheel Spacing
TSF1080
60’
1000 gal.
20” or 30”
36 (20” spacing)
25 (30” spacing)
7520 lbs.
16450 lbs.
63’
12’
13’
22’ 5”
13.6 x 38 6 ply
80” - 120”
TSF1260
60’
1200 gal.
20” or 30”
36 (20” spacing)
25 (30” spacing)
8070 lbs.
19075 lbs.
63’
12’
13’
22’ 5”
14.9 x 46 10 ply
80” - 120”
Note: All tires are warranted by the original manufac-
turer of the tire. Tire warranty information can be
found in the brochures included with your Operator’s and Parts Manuals or online at the manufac-
Manufacturer Website
Titan www.titan-intl.com
Goodyear now: www.titan-intl.com
Firestone www.firestoneag.com
turer’s websites. For service assistance or
information, contact your nearest Authorized
Farm Tire Retailer.
500-642Q 11/09/2006
Page 19

Appendix
Torque Values Chart
Appendix 17
Bolt Head Identification
Bolt Size
(Inches)
1
in-tpi
1/4" - 20 7.4 5.6 11 8 16 12 M 5 X 0.8 436597
1/4" - 28 8.5 6 13 10 18 14 M 6 X 1 7 5 11 8 15 11
5/16 - 18 15 11 24 17 33 25 M 8 X 1.25 17 12 26 19 36 27
5/16" - 24 17 13 26 19 37 27 M 8 X 1 18 13 28 21 39 29
3/8" - 16 27 20 42 31 59 44 M10 X 1.5 33 24 52 39 72 53
3/8" - 24 31 22 47 35 67 49 M10 X 0.75 39 29 61 45 85 62
7/16" - 14 43 32 67 49 95 70 M12 X 1.75 58 42 91 67 125 93
7/16" - 20 49 36 75 55 105 78 M12 X 1.5 60 44 95 70 130 97
1/2" - 13 66 49 105 76 145 105 M12 X 1 90 66 105 77 145 105
1/2" - 20 75 55 115 85 165 120 M14 X 2 92 68 145 105 200 150
9/16" - 12 95 70 150 110 210 155 M14 X 1.5 99 73 155 115 215 160
9/16" - 18 105 79 165 120 235 170 M16 X 2 145 105 225 165 315 230
5/8" - 11 130 97 205 150 285 210 M16 X 1.5 155 115 240 180 335 245
5/8" - 18 150 110 230 170 325 240 M18 X 2.5 195 145 310 230 405 300
3/4" - 10 235 170 360 265 510 375 M18 X 1.5 220 165 350 260 485 355
3/4" - 16 260 190 405 295 570 420 M20 X 2.5 280 205 440 325 610 450
7/8" - 9 225 165 585 430 820 605 M20 X 1.5 310 230 650 480 900 665
7/8" - 14 250 185 640 475 905 670 M24 X 3 480 355 760 560 1050 780
1" - 8 340 250 875 645 1230 910 M24 X 2 525 390 830 610 1150 845
1" - 12 370 275 955 705 1350 995 M30 X 3.5 960 705 1510 1120 2100 1550
1-1/8" - 7 480 355 1080 795 1750 1290 M30 X 2 1060 785 1680 1240 2320 1710
1 1/8" - 12 540 395 1210 890 1960 1440 M36 X 3.5 1730 1270 2650 1950 3660 2700
1 1/4" - 7 680 500 1520 1120 2460 1820 M36 X 2 1880 1380 2960 2190 4100 3220
1 1/4" - 12 750 555 1680 1240 2730 2010
1 3/8" - 6 890 655 1990 1470 3230 2380
1 3/8" - 12 1010 745 2270 1670 3680 2710
1 1/2" - 6 1180 870 2640 1950 4290 3160
1 1/2" - 12 1330 980 2970 2190 4820 35604mm x pitch = nominal thread diameter in millimeters x thread pitch
Grade 2 Grade 5
N · m2ft-lb3N · m ft-lb N · m ft-lb mm x pitch4N · m ft-lb N · m ft-lb N · m ft-lb
Torque tolerance + 0%, -15% of torquing values. Unless otherwise specified use torque values listed above.
Grade 8
Bolt Size
(Metric)
1
in-tpi = nominal thread diameter in inches-threads per inch
Bolt Head Identification
5.8 8.8 10.9
Class 5.8 Class 8.8 Class 10.9
2
N· m = newton-meters
3
ft-lb= foot pounds
Tire Inflation Chart
Tire Size Inflation
PSI
13.6 x 38 6 ply T ractor Tread 22
14.9 x 46 10 ply T ractor Tread 36
11/09/2006 500-642Q
Page 20

Great Plains Manufacturing, Inc.
Corporate Office: P.O. Box 5060
Salina, Kansas 67402-5060 USA
 Loading...