

Page 1
Great Plains Mfg., Inc.
Series II Native Grass Agitator
Native Grass Vintage Drills
Used with:
• 705 and 1005 Native Grass Drills
• Some earlier Native Grass drills
General Information
These instructions explain how to install a Series II
Native Grass Agitator. These kits enhance your Great
Plains Native Grass Drill for more consistent and efficient
seeding of native grass. Kits are supplied for most Great
Plains Native Grass Drills. If your drill is not listed above,
have your dealer contact the factory, as a kit may be
available.
These instructions apply to:
202-608A NG SERIES II AGITATOR PER ROW
Installation Instructions 1
The agitators in this kit are only for drills with3⁄4in hexagonal agitator shafts in the seed box. If your drill does not
have a3⁄4hex shaft, a shaft update kit may be available.
202-610A 705 NG 3/4 HEX SHAFT KIT
202-611A 1005 NG 3/4 HEX SHAFT KIT
If your drill is a Series II, you already have the enhancement in this kit.
For a complete Series II enhancement, separately order
seed sprocket kits below, and 2 decals:
202-597A NG CUP ENHANCEMENT KIT
(order one of these kits per row)
838-986C DECAL NATIVE GRASS SERIES II
Before You Start
Each kit converts one Native Grass seeding row. Order
one kit per row that can accept an agitator. Make sure
each row is not so close to a partition that no agitator can
be installed there.
Due to interference with partitions, it may not be possible
to install a full set of four agitators blades at all seed
cups. Due to partition re-alignments over various model
years, you may have blades left over after the upgrade.
Have the following at hand:
• Basic hand tools
• Updated Parts Manual for the drill
• Operator’s Manual for the drill
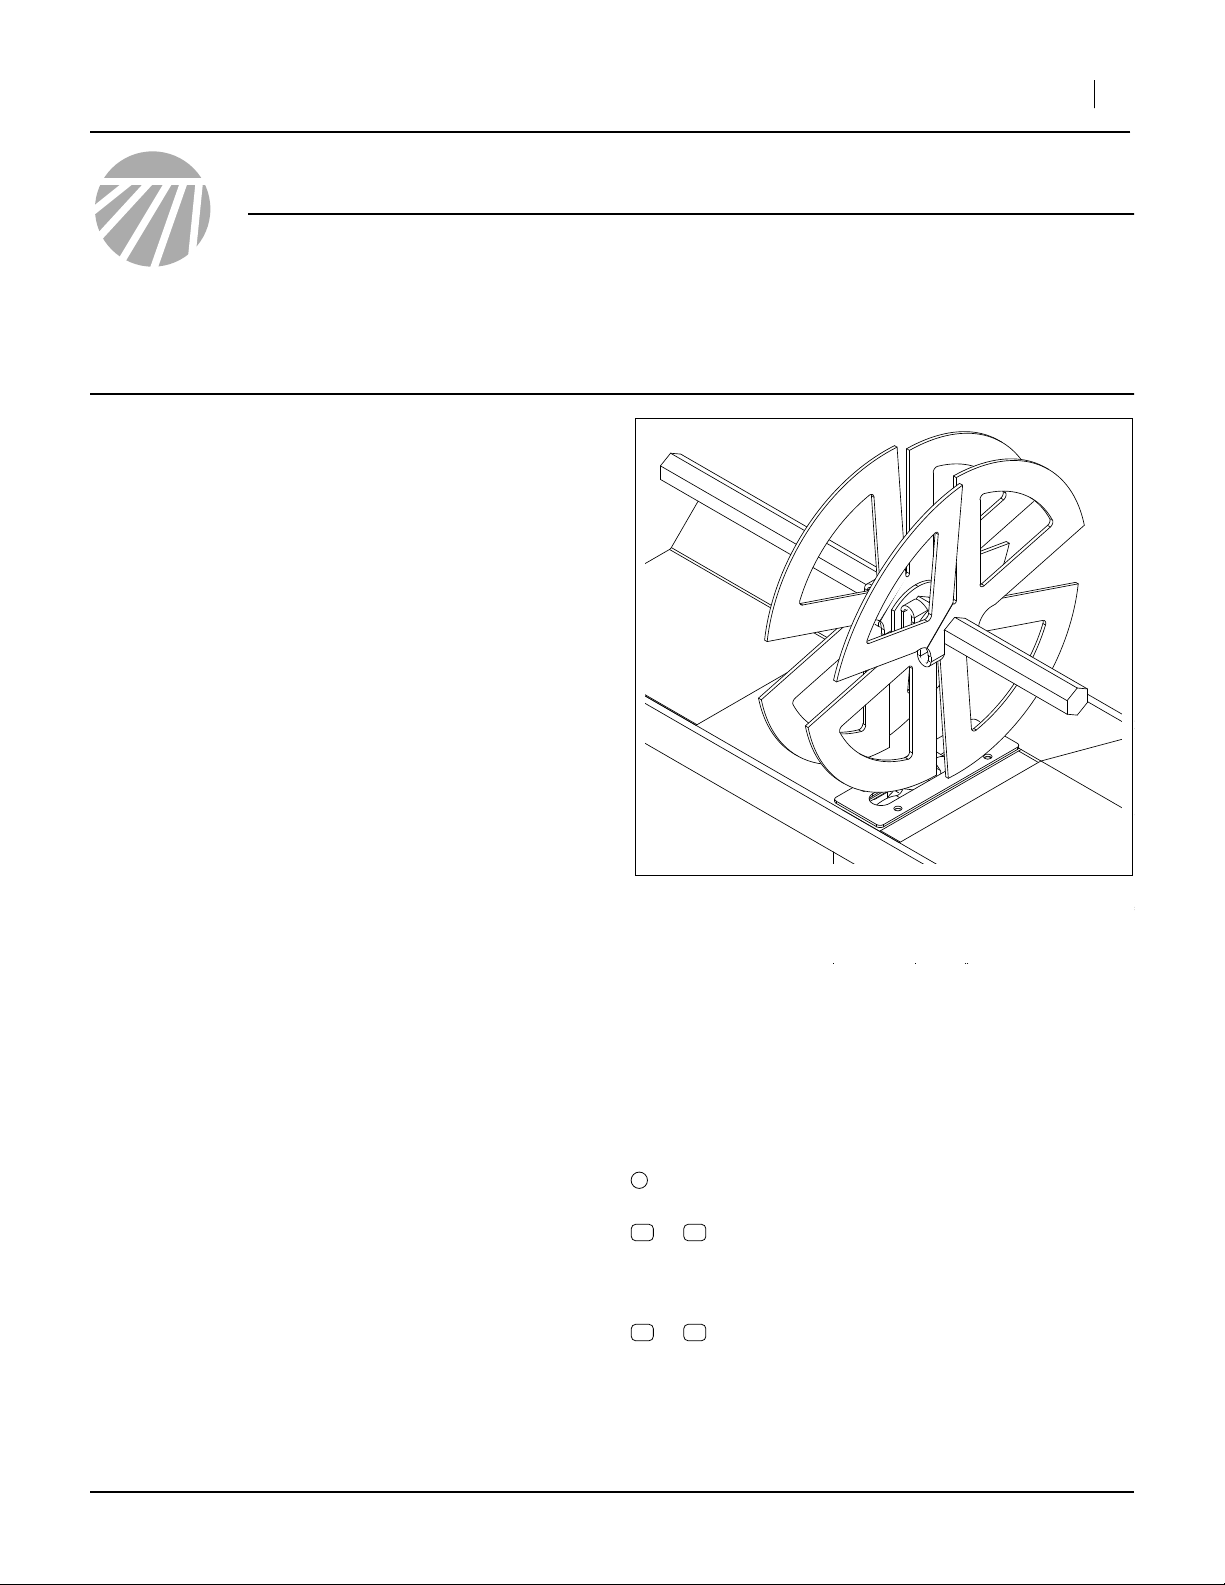
Figure 1
Series II Agitator
26289
Notations and Conventions
“Left” and “Right” are facing in the direction of machine
travel.
1
11 16
to
51 53
to
callouts identify components in the currently
referenced Figure or Figures.
callouts reference new parts from the list on
page 6. The descriptions match those on the
cartons, bags or item tags, as well as your
updated Parts Manual.
callouts reference existing parts. The descriptions match those in your Parts Manual.
©Copyright 2007 Printed 04/05/2007 202-609M
Page 2
2 Series II Native Grass Agitator
Installation
Preparation
0. If performing a complete Series II upgrade, install the
cup enhancements first.
1. Inventory the kit contents per the “Parts List” on
page 6.
Examine the new parts, noting that they are colorcoded for left hand (black) and right hand (plated or
green) placement. The Left fan-shaped agitators are
stamped “L”.
The (fan-shaped) Series II agitators each have two
blades; one flat, and one bent out slightly. The bend
will be away from the feeder sprocket in a correct
installation. In the normal direction of rotation, these
blades sweep seed toward the seed cup.
2. If you have just completed the Hex Shaft Update,
your shaft has no agitators installed, and the drive
chain is already dismounted. Skip to step 9.
3. Clean out any seed in box.
4. If necessary, move the drill to a dry well-lighted location suitable for disassembly. Park and secure the
drill. Secure the tractor if left connected.
Great Plains Mfg., Inc.
1
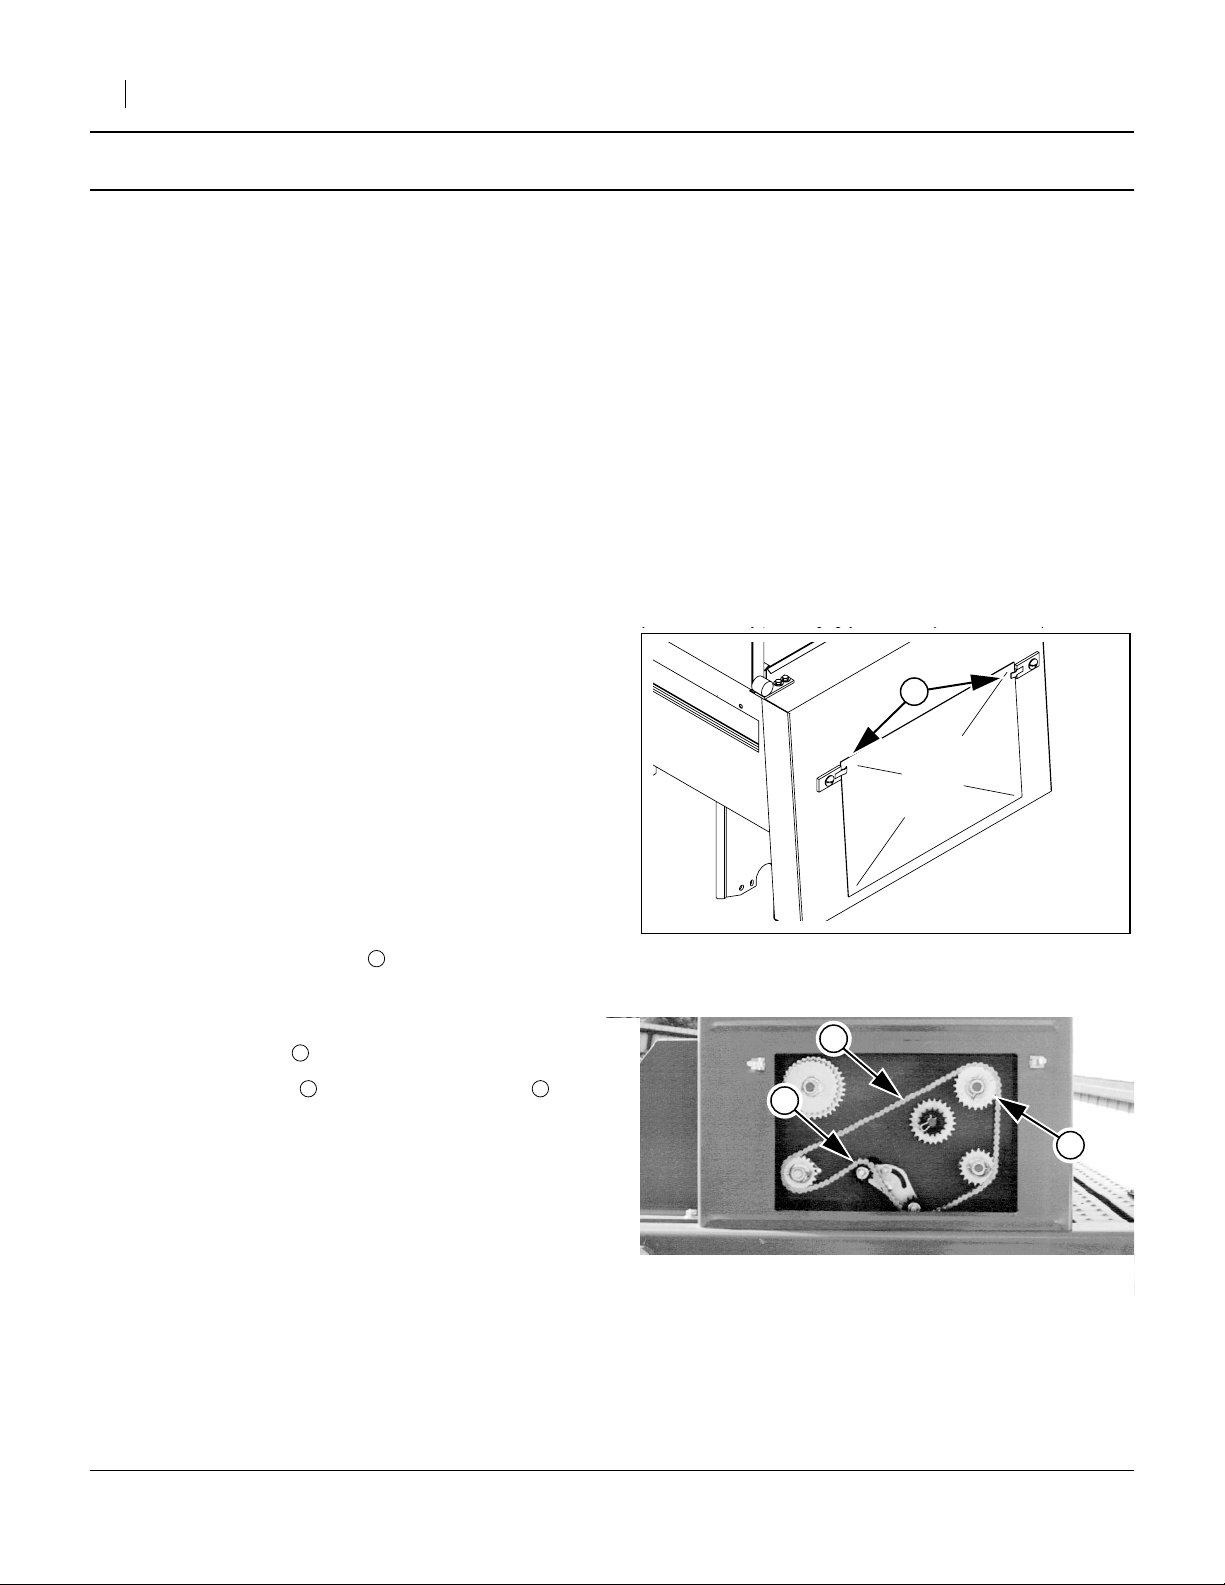
Dismount Drive Chain
For access to all fasteners, old and new, the shaft needs
to turn freely.
Refer to Figure 2
5. On the left (drive) end of the Native Grass seed box,
flip out the snap fasteners . Lift the access panel
up and out, and save it.
Refer to Figure 3
6. Loosen the idlers .
7. Remove the chain from the drive sprocket and
let it hang toward the idlers.
1
2 3
1
Figure 2
Remove Access Panel
2
1
Figure 3
Dismount Chain
26284
3
18113
202-609M 04/05/2007
Page 3

Great Plains Mfg., Inc.
Remove Existing Agitators
Refer to Figure 4
8. At each row, remove two each existing:
53
NUT HEX NYLOCK 5/16-18 PLT
52
HFSS 1/4-20X2 GR5
51
NG AGITATOR PADDLE
These parts are not re-used.
Installation Instructions 3
53
52
51
Apply new Decals
Refer to Figure 5
The new Warning decal location is on the stiffener rib on
the underside of the Native Grass box lid. Do not cover
any existing decals.
Note: Your kit includes one decal per row. As you will
have more than two decals per box, not all are
needed for the drill update.
9. Place two decals in each lid, or a foot or two from
each end of the lid.
10. Clean the location(s) for the Crush warning decal(s).
Peel the release paper backing from the decal, align
and apply it. Smooth it with a clean rag to remove
bubbles.
16
Install New Agitators
Mount Blades
Refer to Figure 6
11. Pick a starting feeder cup row that is not adjacent to
a seed box partition (to assure a starting example
using all four blades).
12. Select one each new:
13
202-281D LH NG SERIES 2 AGITATOR
14
802-448C HFSS 1/4-20 X 2 GR5
15
803-088C NUT HEX LOCK 1/4-20 FLG
13. Position the (black, fan-shaped) Left Series II agitator
13 1
to the left of a feeder sprocket . The slot in the
agitator fits over the drive shaft . The short side of
the “U” bend faces the sprocket.
14. Loosely attach the agitator to the shaft with a screw
14 15
and nut .
15. Rotate the shaft 180°.
16. Select one each new:
12
202-280D RH NG SERIES 2 AGITATOR
14
802-448C HFSS 1/4-20 X 2 GR5
15
803-088C NUT HEX LOCK 1/4-20 FLG
2
Figure 4
Remove Old Paddles
16
16
Figure 5
Warning Decal Location
2
13
Figure 6
Agitator Inside Blades
(viewed from back of drill)
1
25125
26290
12
25126
04/05/2007 202-609M
Page 4

4 Series II Native Grass Agitator
17. Position the (plated, fan-shaped) Right Series II agi-
12 13
tator to the right of the Left agitator just
placed. The slot in the agitator fits over the shaft. The
short side of the “U” bend faces the sprocket. Align it
on the opposite shaft faces from the Left agitator.
18. Loosely attach the agitator to the shaft with a screw
14 15
and nut .
Refer to Figure 7
19. Select one each new:
13
202-281D LH NG SERIES 2 AGITATOR
14
802-448C HFSS 1/4-20 X 2 GR5
15
803-088C NUT HEX LOCK 1/4-20 FLG
12
Great Plains Mfg., Inc.
3
20. Rotate the shaft 180°. Position a Left agitator to
the left of the previous Left agitator (away from the
sprocket ). The short side of the “U” bend faces the
2
1
13
sprocket. Loosely assemble.
21. Select one each new:
12
202-280D RH NG SERIES 2 AGITATOR
14
802-448C HFSS 1/4-20 X 2 GR5
15
803-088C NUT HEX LOCK 1/4-20 FLG
22. Rotate the shaft 180°. Position a Right agitator to
the right of the previous Right agitator (away from
the sprocket ). The short side of the “U” bend faces
2
3
12
the sprocket. Loosely assemble.
Position Blades
Refer to Figure 8
23. Slide the inner-most Left agitator so that there is
1
⁄4in clearance between the flat blade and the near-
est side of the seed sprocket . Tighten the screw
and nut (not shown).
24. Slide the inner-most Right agitator so that there is
1
⁄4in clearance between the flat blade and the near-
est side of the seed sprocket . Tighten screw & nut
(not shown).
1
2
3
2
1
2
Figure 7
Agitator Outside Blades
(viewed from back of drill)
1
1
2
13
25127
3
⁄4in
Figure 8
25127
Agitator Blade Placement
(viewed from back of drill)
202-609M 04/05/2007
Page 5

Great Plains Mfg., Inc.
Refer to Figure 9
25. Slide the outer-most Left agitator close to the
inner-most Left agitator , leaving1⁄8in clearance
2
1
between them (about the thickness of an agitator).
Tighten screw and nut (not shown).
Installation Instructions 5
1
1
4
⁄8in
26. Slide the outer-most Right agitator close to the
inner-most Right agitator , leaving1⁄8in clearance
4
3
between them (about the thickness of an agitator).
Tighten screw and nut (not shown). Spin the shaft for
a few turns to check clearances.
27. Repeat step 12 through step 26 for each seeder row.
Note: On rows adjacent to partitions, it may not be possi-
ble to install all agitators and still have at least1⁄8in
clearance from the partition. In those cases, do not
install blades that would not have clearance.
Closeout
Refer to Figure 3 on page 2 and Figure 2 on page 2
28. Re-mount the drive chain on the agitator sprocket.
29. Engage the idlers. Adjust the idlers to remove all but
1
⁄2in of slack in the longest span, and tighten.
30. Install the access panel door and close snaps.
Changing to Series II agitators does not materially
change seed rates. Changing to Series II seed sprocket
does affect seed rates, and new charts are included in
the instructions for that kit.
2
Figure 9
Agitator Spacing
(viewed from back of drill)
3
25127
04/05/2007 202-609M
Page 6

6 Series II Native Grass Agitator
Parts List
New Parts Included in the 202-610A and -611A Series II Native Grass Agitator:
Great Plains Mfg., Inc.
Callout Qty
11
12
13
14
15
16
1 202-609M
2 202-280D
2 202-281D
2 802-448C
2 803-088C
1 838-611C
Part
Number
Reference Information
Abbreviations
FLG Flanged
GR5 Grade 5
HFSS Hex Flange Serrated Screw
LH Left Hand
NG Native Grass
PLT Plated
RH Right Hand
Part Description
This manual
RH NG SERIES 2 AGITATOR
LH NG SERIES 2 AGITATOR
HFSS 1/4-20 X 2 GR5
NUT HEX LOCK 1/4-20 FLG
DECAL WARNING HAND CRUSHING
Fastener/Fitting N-m Ft-Lbs
1
⁄4-20 GR5
Torque Values
11 8
Great Plains Manufacturing, Inc.
Corporate Office: PO Box 5060
Salina, KS 67402-5060 USA
202-609M 04/05/2007
 Loading...