

Page 1
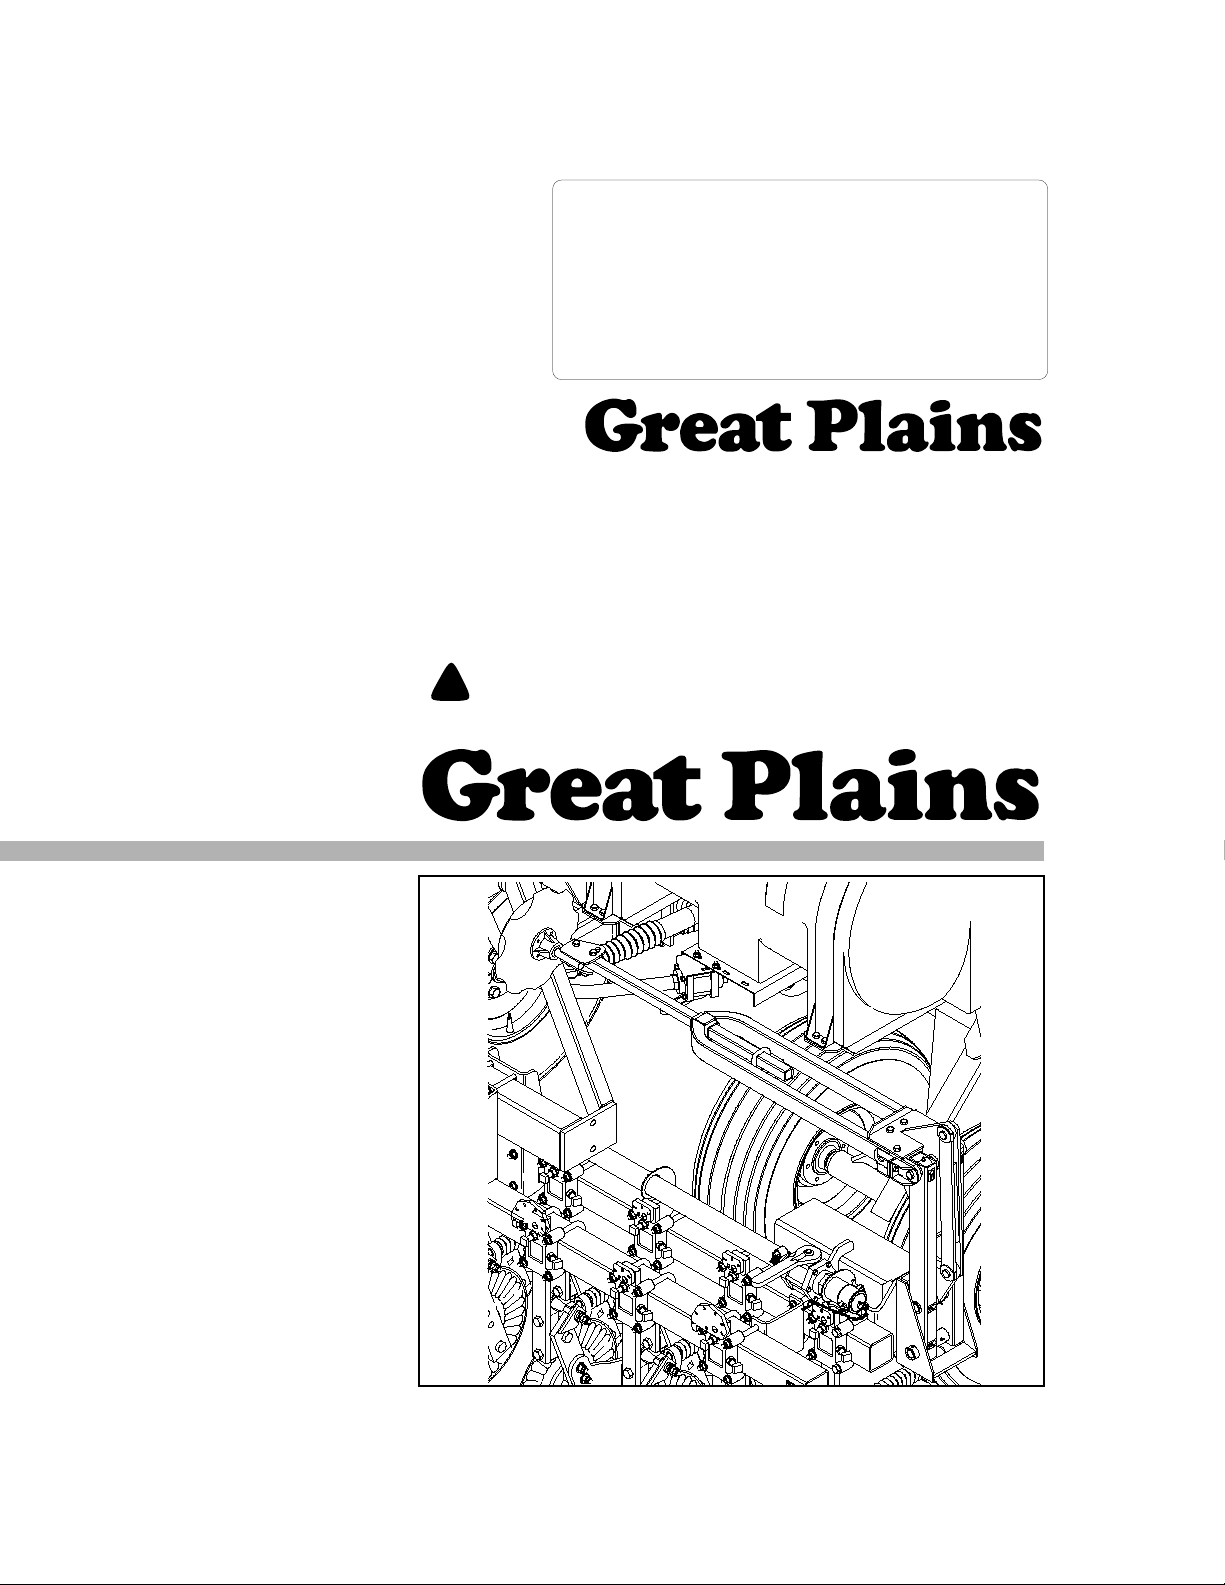
Operator’s/Parts Manual
All Seeds Hitch
Flat Fold Marker
Manufacturing, Inc.
P.O. Box 5060 ● Salina, Kansas 67402-5060
Read the Operator’s manual entirely. When you see this symbol, the subsequent in-
!
structions and warnings are serious - follow without exception. Your life and the lives of
others depend on it!
© Copyright 1995 Printed 3/19/03
12432
Cover illustration may show optional equipment not supplied with standard unit.
113-476M
Page 2

General Information
General Information
Important Notice
Great Plains Manufacturing, Inc. provides this publication “as is” without warranty of any kind, either
expressed or implied, while every precaution has been
taken in the preparation of this manual, Great Plains
Manufacturing, Inc. assumes no responsibility for errors
or omissions. Neither is any liability assumed for damages resulting from the use of the information contained
herein. Great Plains Manufacturing, Inc. reserves the
right to revise and improve its products as it sees fit. This
publication describes the state of this product at the time
of its publication, and may not reflect the product at all
times in the future.
Printed in the United States of America.
For your convenience, record your Serial Number, Mod-
el Number and the Date Purchased, of your drill, in the
spaces provided below. Have this information before
you when calling a Great Plains Authorized Dealer.
This Operator’s Manual applies to the All Seeds Hitch Flat Fold Marker listed below:
113-469A 15’ All Seeds Dual Marker
113-470A 20’ All Seeds Dual Marker
Owner’s Information
Name: _____________________________________
Address ____________________________________
City________________State ____ Zip ___________
Phone_______________________
Name of Dealership ___________________________
Dealer’s Name _______________________________
Address ____________________________________
City________________State ____ Zip ___________
Phone_______________________
Model Number_______________________________
Date Purchased______________________________
All Seeds Hitch Flat Fold Marker 113-476M 4/8/04Great Plains Mfg., Inc.
Page 3

Table of Contents
Table of Contents
Using this Manual. . . . . . . . . . . . . . . . . . . . . . . . . . . 2
Introduction . . . . . . . . . . . . . . . . . . . . . . . . . . . . . . . 2
Section 1Safety. . . . . . . . . . . . . . . . . . . . . . . . . . . . . 3
Safety Rules . . . . . . . . . . . . . . . . . . . . . . . . . . . . 3
General Operation & Repair . . . . . . . . . . . . . . . . 3
Transporting . . . . . . . . . . . . . . . . . . . . . . . . . . . . . 3
Section 2 Assembly Instructions & Set-Up . . . . . . 4
Torque Values Chart. . . . . . . . . . . . . . . . . . . . . . . 4
Installation Instructions . . . . . . . . . . . . . . . . . . . . 5
Section 3 Hydraulic System . . . . . . . . . . . . . . . . . . 9
Adjusting The Hydraulics . . . . . . . . . . . . . . . . . . . 9
Section 4 Maintenance & Lubrication. . . . . . . . . . 10
Section 5 Troubleshooting . . . . . . . . . . . . . . . . . . 12
Section 6 Warranty. . . . . . . . . . . . . . . . . . . . . . . . . 12
Parts Section
Section 7 Assembly . . . . . . . . . . . . . . . . . . . . . . . . 14
Flat Fold Marker Assembly . . . . . . . . . . . . . . . . 14
Disk Assembly . . . . . . . . . . . . . . . . . . . . . . . . . . 16
Section 8 Hydraulics . . . . . . . . . . . . . . . . . . . . . . . 18
Hydraulic Assembly . . . . . . . . . . . . . . . . . . . . . . 18
Hydraulics Cylinder (810-196C). . . . . . . . . . . . . 20
Sequence Valve (810-197C) . . . . . . . . . . . . . . . 22
4/8/04 Great Plains Mfg., Inc.
All Seeds Hitch Flat Fold Marker 113-476M
-1
Page 4
Using this Manual
Using this Manual
For your safety and to help in developing a better understanding of your equipment we highly recommend that
you read the operator sections of this manual. Reading
these sections not only provides valuable training but
also familiarizes you with helpful information and its lo
Introduction
This manual has been prepared to instruct you in the
safe and efficient operation of your All Seeds Hitch Flat
Fold Marker. Read and follow all instructions and safety
precautions carefully.
The parts on your All Seeds Hitch Flat Fold Marker have
been specially designed and should only be replaced
with genuine Great Plains parts. Therefore, should your
All Seeds Hitch Flat Fold Marker require replacement
parts go to your Great Plains Dealer.
The right hand and left hand as used throughout this
manual is determined by facing in the direction the ma
chine will travel when in use unless otherwise stated.
!
The SAFETY ALERT SYMBOL indicates that there is a
potential hazard to personal safety involved and extra
safety precautions must be taken. When you see this
symbol, be alert and carefully read the message that fol
lows it. In addition to design and configuration of
equipment; hazard control and accident prevention are
dependent upon the awareness, concern, prudence and
proper training of personnel involved in the operation,
transport, maintenance and storage of equipment.
cation. The parts sections are for reference only and
don’t require cover to cover reading. After reviewing
your manual store it in a dry, easily accessible location
for future reference.
-
Watch for the following safety notations throughout your Operators Manual:
!
DANGER!
Indicates an imminently hazardous situation which, if
not avoided, will result in death or serious injury. This
signal word is limited to the most extreme situations.
!
-
Indicates a potentially hazardous situation which, if not
avoided, could result in death or serious injury.
Indicates a potentially hazardous situation which, if not
avoided, may result in minor or moderate injury. It may
also be used to alert against unsafe practices.
-
WARNING!
!
CAUTION!
NOTE: Indicates a special point of information which
requires your attention.
2
All Seeds Hitch Flat Fold Marker 113-476M 4/8/04
Great Plains Mfg., Inc.
Page 5

Section 1 Safety Rules
Section 1 Safety Rules
Most accidents are the result of negligence and carelessness, usually caused by failure of the operator to
follow simple but necessary safety precautions. The fol
lowing safety precautions are suggested to help prevent
such accidents. The safe operation of any machinery is
a big concern to consumers and manufacturers. Your All
Seeds Hitch Flat Fold Marker has been designed with
many built-in safety features. However, no one should
operate this product before carefully reading this Oper
ators Manual.
!
General Operation & Repair
1. Never allow the Flat Fold Marker to be operated by anyone who is unfamiliar with the operation of all functions
of the unit. All operators should read and thoroughly understand the instructions given in this manual prior to
moving the unit.
2. Make sure safety rules are understood before operating
machinery or tractor.
3. Never permit any persons other than the operator to ride
on the tractor.
4. Never permit any persons to stand near the Flat Fold
Marker while it is in operation.
5. Regulate your speed to the field conditions, maintaining
complete control at all times.
6. After repairing or adjusting, make sure all tools and
parts are removed from the implement before attempting
to operate it.
7. Do not grease or oil machine while it is in operation.
8. Loose fitting clothing should not be worn as it may catch
in moving parts.
9. Never dismount from a moving tractor.
10. Do not leave the tractor or the implement unattended
with the engine running.
11. Do not stand between the tractor and the implement dur-
ing hitching.
12. Detach and store implements in an area where children
-
-
normally do not play. Stabilize implements by using suit
able supports and block wheels.
13. If a hydraulic leak develops, correct it immediately. Escaping hydraulic oil can have extremely high pressure. A
stream of high pressure oil may easily penetrate the skin
as with modern needle-less vaccination equipment - but
with the exception that hydraulic fluid may cause blood
poisoning. It is imperative that the connections are tight
and that all lines and pipes are in good condition. If an
injury is caused by the escaping hydraulic fluid, see doctor at once!
14. Use a piece of cardboard or wood to detect leaks of hydraulic oil under pressure.
15. Be sure to relieve all hydraulic pressure before disconnection any lines or pipes between the implement and the tractor hydraulic system. Keep all guards and shields in place.
Transporting
1. Use good judgement when transporting tractor and implements on the highway. Always maintain complete control of the machine.
2. Limit transport speed to 20 mph. Transport only with a
farm tractor of sufficient size and horse power.
3. Always make sure flashing safety lights, “Slow Moving
Vehicle” emblem, and reflectors are in place and visible
prior to transporting the machine on public roads.
4. Know your state and local laws concerning highway
safety and regulations. Comply with these laws when
transporting machinery.
5. Use warning flags or approved warning lights at night
and during other periods of poor visibility. Do your best
to prevent highway accidents
-
4/8/04 Great Plains Mfg., Inc.
All Seeds Hitch Flat Fold Marker 113-476M
-3
Page 6
Section 2 Assembly Instructions & Set-Up
Section 2 Assembly Instructions & Set-Up
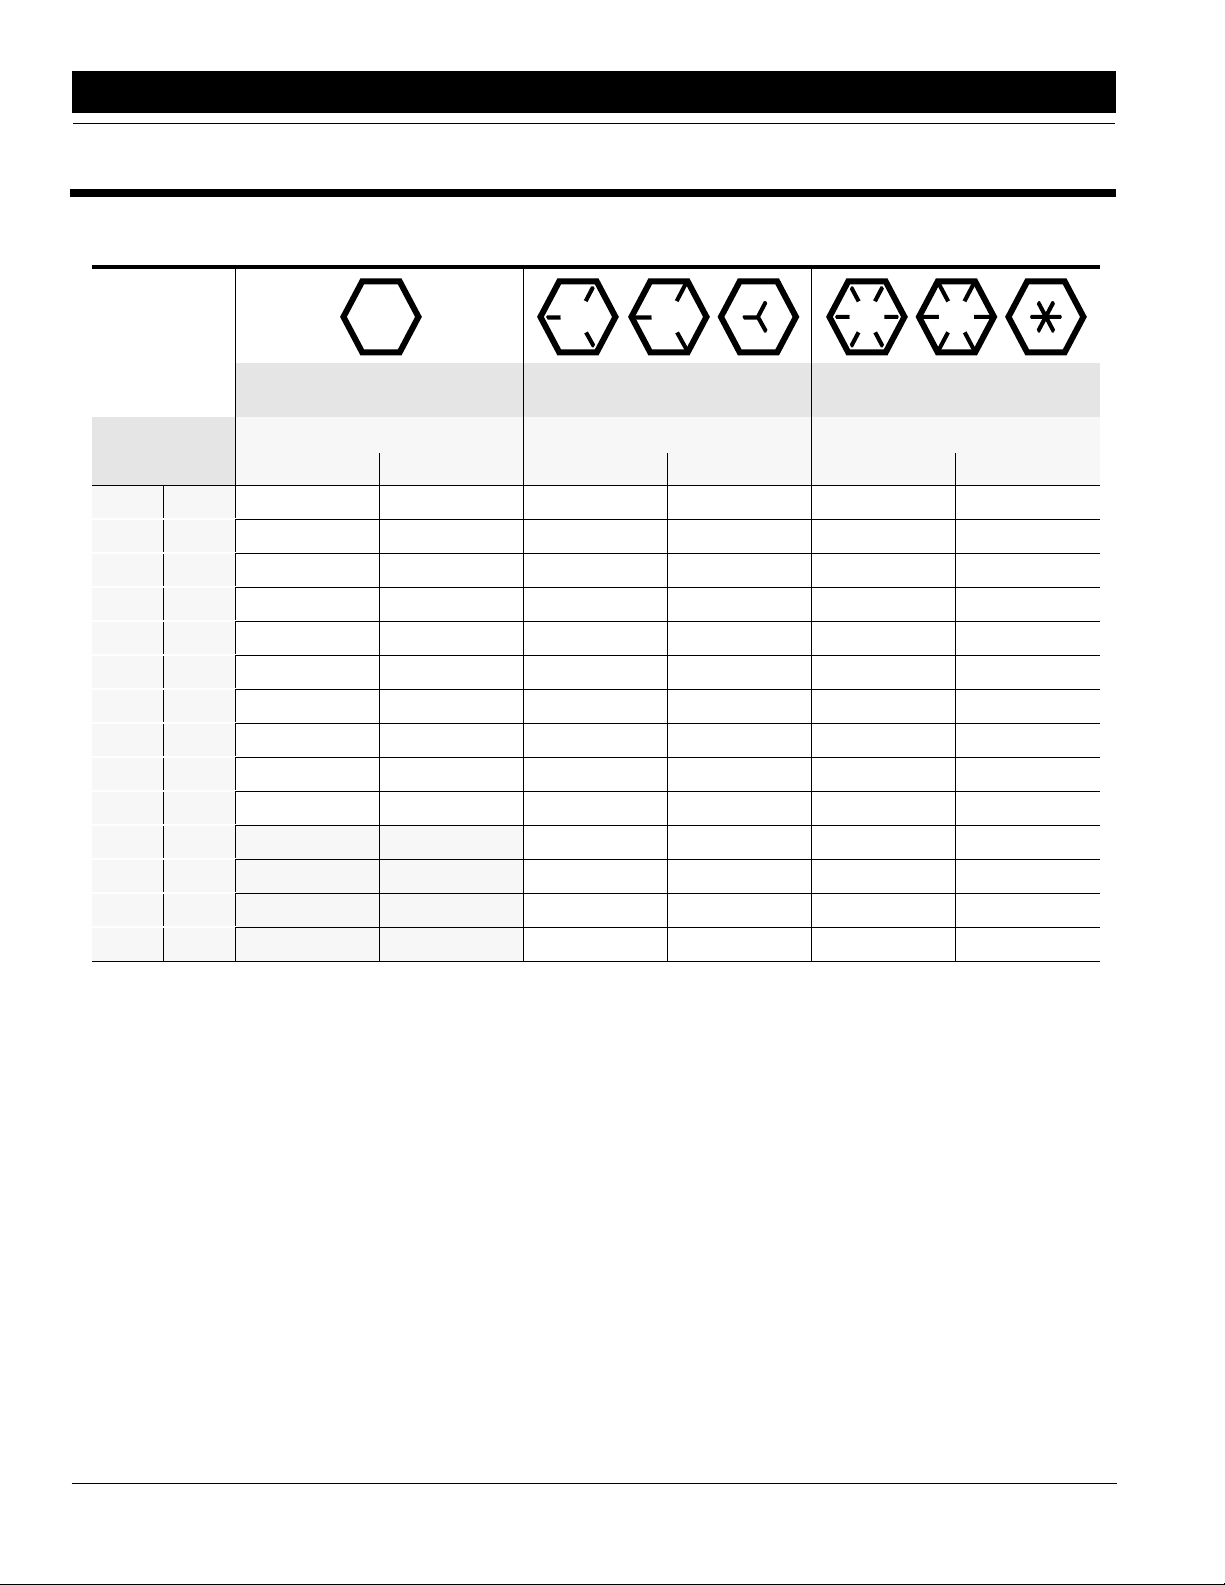
Torque Values Chart for UNC Threads
Bolt head
identification
marks are as per
grade.
NOTE: Manufacturing marks will vary.
Bolt Size
inches mm Min. Max. Min. Max. Min. Max. Min. Max. Min. Max. Min. Max.
1/4" 6.35
5/16" 7.94
3/8" 9.53
7/16" 11.11
1/2" 12.70
9/16" 14.29
5/8" 15.88
3/4" 19.05
7/8" 22.23
1" 25.40
1 1/8" 25.58
1 1/4" 31.75
1 3/8" 34.93
1 1/2" 38.10
Foot Pounds Newton-Meters Foot Pounds Newton-Meters Foot Pounds Newton-Meters
5 6 6.8 8.13 9 11 12.2 14.9 12 15 16.3 20.3
10 12 13.6 16.3 17 20.5 23.1 27.8 24 29 32.5 39.3
20 23 27.1 31.2 35 42 47.5 57.0 45 54 61.0 73.2
30 35 40.7 47.4 54 64 73.2 86.8 70 84 94.9 113.9
45 52 61.0 70.5 80 96 108.5 130.2 110 132 149.2 179.0
65 75 88.1 101.6 110 132 149.2 179.0 160 192 217.0 260.4
95 105 128.7 142.3 150 180 203.4 244.1 220 254 298.3 358.0
150 185 203.3 250.7 270 324 366.1 439.3 380 456 515.3 618.3
160 200 216.8 271.0 400 480 542.4 650.9 600 720 813.6 976.3
250 300 338.8 406.5 580 596 786.5 943.8 900 1080 1220.4 1464.5
Grade 2 Grade 5 Grade 8*
800 880 1084.8 1193.3 1280 1440 1735.7 1952.6
1120 1240 1518.7 1681.4 1820 2000 2467.9 2712.0
1460 1680 1979.8 2278.1 2380 2720 3227.3 3688.3
1940 2200 2630.6 2983.2 3160 3560 4285.0 4827.4
* Thick nuts must be used with Grade 8 bolts
NOTE: Torque requirements listed above do not apply to self-locking nuts . For self-locking nuts increase the torque requirements listed by 15%.
4
All Seeds Hitch Flat Fold Marker 113-476M 4/8/04
Great Plains Mfg., Inc.
Page 7
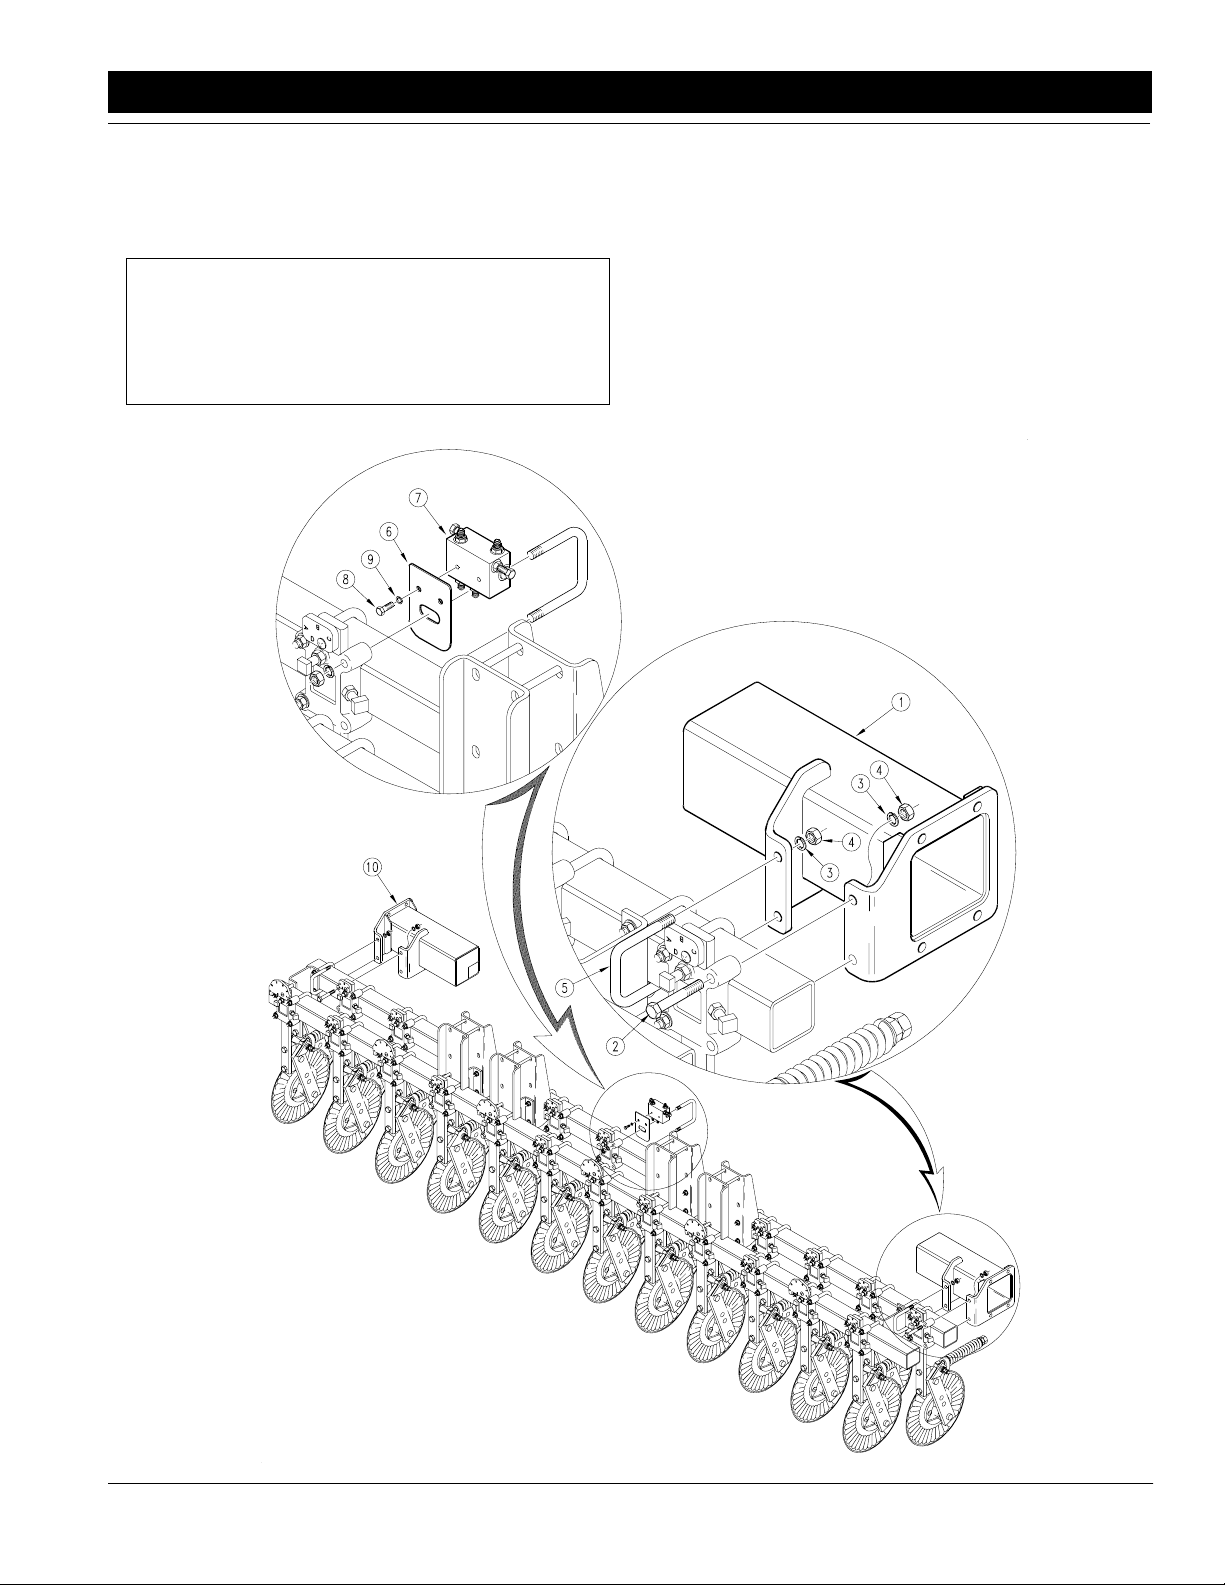
Section 2 Assembly Instructions & Set-Up
All Seeds Hitch Marker
Installation Instructions
NOTE: While using the following text to install your
flat fold marker, you may need to refer back to the
parts section of this manual for more details and for
positive identification of related items not mentioned
in these instructions.
Refer to Figure 2-1 for Installation Instructions steps 1,
2, and 3.
1. Lower the hitch to field position. Allow clearance of
9’ on a 15’ drill and 11’ on a 20’ drill from each end of
the coulter tool bar for marker assembly.
2. Remove the outside u-bolt on the rear, left and right
hand coulter clamp. Position the left marker mount
(#1) so the outer flange can be bolted through the
coulter clamp with 5/8" x 7" bolts, lockwashers and
nuts (#2, 3 & 4). The inside flange of the mount is
fastened to the tube with a 5/8" x 4 1/32" x 6" u-bolt,
Assembly Diagram
Figure 2-1
4/8/04
Great Plains Mfg., Inc.
12428
All Seeds Hitch Flat Fold Marker 113-476M
-5
Page 8

Section 2 Assembly Instructions & Set-Up
lock washers and nuts, (#5, 3, & 4).
NOTE: The offset of the mount must be in the upward direction.
The right hand mount (#10) is mounted similar to the
left mount only the u-bolt is installed in the outside
flange and the inside flange is bolted through the
coulter clamp (See
3. Install the marker valve mount (#6) under the inner
coulter clamp u-bolt of the coulter that is just to the
right of center on the coulter frame tube. Assemble
the valve (#7) to the mount with the 4-port side
downward using two 3/8" x 3/4" long bolts (#8) and
lock washers (#9).
NOTE: JIC fittings do not require high torque. JIC
and O-Ring fittings do not require sealant. Always
use liquid pipe sealant when adding or replacing
pipe thread fittings. To avoid possible danger of
cracking hydraulic fittings from over tightening, DO
NOT use plastic sealant tape.
Refer to Figure 2-2 for Installation Instructions steps 4,
5, and 6.
Figure 2-1).
4. Route the hoses from each marker through the
mount and out the opening in the inside end of the
mount. Slide the cylinder and first section assembly
(#1) into the mount and manually swing the first sec
tion into the lowered position. Bolt the flanges of the
assembly and mount together with four 5/8" x 1 3/4"
long bolts (#2), lockwashers (#3), and nuts (#4) in
each mount.
5. Route the hoses along the coulter frame tube and tie
them to the tube with the releasable cable ties (#6)
Figure 2-2.
See
NOTE: If your hitch is equipped with the fertilizer option, the hydraulic hose can be ran with the fertilizer
hoses.
Connect the hoses to the sequence valve (#7) with
four JIC elbows (#5). Note the port markings and re
fer to the drawing below for proper connections.
6. Connect the two 156" long hoses (#8) to the two top
ports of the sequence valve with two elbows (#5)
and route them to the tongue and through the hose
loop. Use releasable cable ties to secure hose to
frame.
-
-
6
All Seeds Hitch Flat Fold Marker 113-476M 4/8/04
Great Plains Mfg., Inc.
Page 9

Section 2 Assembly Instructions & Set-Up
12553
4/8/04 Great Plains Mfg., Inc.
Marker Hydraulics Assembly
Figure 2-2
All Seeds Hitch Flat Fold Marker 113-476M
-7
Page 10

Section 2 Assembly Instructions & Set-Up
NOTE: Check the hydraulic fluid in the tractor reservoir and fill it to the proper level. Add fluid to the system as needed. A low reservoir may draw air back
into the system causing jerky or uneven movement.
The fluid capacity of the markers is.75 gallons.
7.
With the first section in the lowered position, connect the hoses to the tractor and cycle each cylinder
3 or 4 times. Both arms should move to the vertical
position on the first move and then they should lower
and raise alternately as the hydraulic lever is oper
ated.
!
Keep all persons clear of the marker when operating. Air in
the hydraulic system can cause the marker arm to dr op quick
ly. Make sure the system is properly charged.
Refer to Figure 2-3 for Installation Instructions steps 8
and 9.
8. Check the orientation of the second section mount-
9. Remove the rear 1/2 x 3 1/2 long bolt (#2) from the
DANGER!
ing pin (#1). The second stage mounting pin (#1)
must be assembled into the hinge with the flanged
head toward the tongue end of the hitch for the
breakaway to work properly,
out and insert it from the other direction.
second section mount and install the second marker
section (#3) between the plates. Align the holes and
replace the bolt and lock nut. Bolt the front flange on
the second section to the flange on the second sec
tion mounting pin with a 5/16 x 1 1/2 long grade 5 bolt
(#4) and locknut (#5).
Figure 2-3. If not, pull it
Disk Adjustments
The aggressiveness and the mark left by the disk may
be changed by two methods:
1. Disk Angle
To change the angle of cut, loosen the two bolts (#1)
Figure 2-4, rotate the disk assembly and retighten.
2. Direction Of Cut
The disk may be mounted to throw dirt either in or
out which will give different marks in different soil
-
-
-
12433
Disk Adjustments
Figure 2-4
conditions. To change the direction of cut:
a. Reverse the blade and depth band by removing
the four lug bolts on the disk hub.
b. Reverse the angle of the assembly by loosening
the u-bolt (#2), pulling the disk assembly out
and rotate it one half turn. Reinstall and tighten
all bolts.
3. Marker Width
Marker width adjustments are made by loosening
the marker tube u-bolt (#2) and sliding it in or out to
the desired width and retightening the u-bolt.
12551
8
All Seeds Hitch Flat Fold Marker 113-476M 4/8/04
Mounting Pin Orentation
Figure 2-3
Great Plains Mfg., Inc.
Page 11

Section 3 Hydraulic System
Section 3 Hydraulic System
Adjusting The Hydraulics
1. Be sure tractor hydraulic reservoir is full
2. Fold and unfold the marker(s) slowly in order to work
all the air out of your marker hydraulics. Use caution
when folding and unfolding the marker for the first
time, and check for pinching and kinking of hoses.
!
Never allow anyone near the drill when cycling the markers.
3. The marker hydraulic system is equipped with nee-
CAUTION!
dle valves to control how fast each marker operates.
The needle valves are built into the sequence valve
body. There are two hex adjustment heads, one for
raising the markers, and one for lowering the mark
ers. These are stamped in the valve body. To adjust
the speed of each marker, screw the needle valve
clockwise to adjust the raise or lower marker speed
to a low setting. Fold the marker up and down a few
times and recheck for pinching and kinking of hoses.
With the tractor engine at an operating rpm, adjust
the needle valve to limit the marker to a safe operat
ing speed. Excessive folding speeds can cause
marker damage.
!
Escaping Fluid under pressure can have sufficient force to
penetrate the skin. Check all hydraulic lines and hoses
1fpbefore applying pr essure. Fluid escaping fr om a very small
hole can be almost invisible. Use paper or cardboard, not
body parts, to check for suspected leaks. If injur ed, seek med
ical assistance form a doctor that is familiar with this type of
injury. For eign fluids in the tissue must be surgically r emo ved
within a few hours or gangrene will result.
General Notes
The markers cycle in the following sequence
-
-
CAUTION!
(1) Right Up, Left Up
(2) Right Down, Left Up
(3) Right Up, Left Up
(4) Right Up, Left Down
(5) Sequence Repeats
NOTE: JIC fittings do not require high torque. JIC and ORing fittings do not require sealant. Always use liquid pipe
sealant when adding or replacing pipe thread fittings. To
avoid possible danger of cracking hydraulic fittings from
over tightening,
DO NOT use plastic sealant tape.
-
4/8/04
Great Plains Mfg., Inc.
All Seeds Hitch Flat Fold Marker 113-476M
-9
Page 12

Section 4 Maintenance & Lubrication
Section 4 Maintenance & Lubrication
Maintenance
Proper servicing and adjustment is the key to the long
life of any farm implement. with careful and systematic
inspection, you can avoid costly maintenance, time and
repair.
Breakaway Protection
The marker arm is attached to the marker body with a
5/16" breakaway bolt. If excessive force is put on the
marker during operation, the bolt will break, allowing the
marker arm to swing away rather than cause damage to
the marker.
Lubrication Symbols
50
Lubrication is required every 50 hours of operation.
10
Lubrication is required every 10 hours of operation.
NOTE: The breakaway bolt is a 5/16"-18 x 1 1/2" long
grade 5 (G.P. # 802-012C). It is identified as a grade
5 by having three marks on the head. If it breaks, it
must be replaced by an equivalent grade 5 bolt to
prevent marker damage.
Marker Transporting
Always transport the marker with it folded in the flat fold
position.
Lubrication
12434
As
Required
Use a multipurpose spray lube. Use as required.
Do not over lubricate.
Seasonally
Lubrication is required
10
Zerks
Type of Lubrication: Grease
10
Zerks
Type of Lubrication: Grease
12435
10
All Seeds Hitch Flat Fold Marker 113-476M 4/8/04
Great Plains Mfg., Inc.
Page 13

Section 4 Maintenance & Lubrication
Seasonally
Disk Bearings
Type of Lubrication: Grease
12436
Maintenance & Lubrication Record
Item to be Serviced When to Perform Reference Date
4/8/04
Great Plains Mfg., Inc.
All Seeds Hitch Flat Fold Marker 113-476M
-11
Page 14

Section 5 Troubleshooting
Section 5 Troubleshooting
Problem Solution
Hydraulic marker functioning
improperly
Blade does not mark
Section 6 Warranty
Great Plains Manufacturing, Incorporated warrants to the original purchaser that this seeding equipment will
be free from defects in material and workmanship for a period of one year from the date of original purchase
when used as intended and under normal service and conditions for personal use; 90 days for commercial
or rental purposes. This Warranty is limited to the replacement of any defective part by Great Plains Manufacturing, Incorporated and the installation by the dealer of any such replacement part. Great Plains reserves
the right to inspect any equipment or part which are claimed to have been defective in material or workmanship.
This Warranty does not apply to any part or product which in Great Plains’ judgement shall have been misused or damaged by accident or lack of normal maintenance or care, or which has been repaired or altered
in a way which adversely affects its performance or reliability, or which has been used for a purpose for which
the product is not designed. This Warranty shall not apply if the product is towed at a speed in excess of 20
miles per hour.
Claims under this Warranty must be made to the dealer which originally sold the product and all warranty
adjustments must by made through such dealer. Great Plains reserves the right to make changes in materials
or design of the product at any time without notice.
This Warranty shall not be interpreted to render Great Plains liable for damages of any kind, direct, consequential, or contingent, to property. Furthermore, Great Plains shall not be liable for damages resulting from
any cause beyond its reasonable control. This Warranty does not extend to loss of crops, losses caused by
harvest delays or any expense or loss for labor, supplies, rental machinery or for any other reason.
No other warranty of any kind whatsoever, express or implied, is made with respect to this sale; and
all implied warranties of merchantability and fitness for a particular purpose which exceed the obligations set forth in this written warranty are herby disclaimed and excluded from this sale.
This Warranty is not valid unless registered with Great Plains Manufacturing, Incorporated with 10 days from
the date of original purchase.
Check all hose fittings and connections for air and oil leaks.
Check tractor hydraulic oil level.
Check all bolts and fasteners.
If needle valve is plugged; open valve, cycle markers, and reset the needle valve.
The maximum marker down float is limited by the slot in the pivot link. If the blade does
not drop down to follow depressions in the field, make sure the marker cylinder is fully
extended.
The blade may be reversed to pull dirt in or throw dirt out depending on soil conditions.
Warranty
12
All Seeds Hitch Flat Fold Marker 113-476M 4/8/04
Great Plains Mfg., Inc.
Page 15

Notes:
4/8/04 Great Plains Mfg., Inc. All Seeds Hitch Flat Fold Marker 113-476M
-13
Page 16

Section 7 Flat Fold Marker Assembly
12425
14
All Seeds Hitch Flat Fold Marker 113-476M 4/8/04
Great Plains Mfg., Inc.
Page 17

Section 7 Flat Fold Marker Assembly
Ref. Part No. Part Description
1. 804-017C WASHER FLAT 1/2 USS PLT
2. 802-041C HHCS 1/2-13X3 1/2 GR5
3. 113-564S 2020 MARKER DISC & HUB ASSY
113-372S REPLACED BY 113-564S
4. 803-019C NUT LOCK 1/2-13 PLT
5. 113-353D MARKER TUBE 51 LG
6. 113-449H 6 ROW 2ND STAGE ARM WMNT
113-450H 8 ROW 2ND STAGE ARM WMNT
7. 113-440H 2ND STAGE MOUNT WMNT
8. 803-011C NUT LOCK 5/16-18 PLT
9. 113-442H 2ND STAGE MOUNT PIN
10. 802-012C HHCS 5/16-18X1 1/2 GR5
11. 113-439D 1ST STAGE MOUNTING PIN
12. 810-196C CYL 2.5X10X1.12 ROD(TIE)NOPINS
13. 113-435H PLANTER MARKER MOUNT WMNT
14. 805-180C PIN ROLL 1/4 X 1 1/2 LG PLT
15. 113-435D CYLINDER LUG PIN
16. 113-437D CYLINDER SPACER W/ HOLE
17. 113-436D CYLINDER SPACER
18. 801-045C SCREW SET 1/4-28X1/4 KNL CUP
19. 817-145C THREAD PROTECTOR-DELRIN
20. 113-444H CYLINDER TANG WMNT
21. 890-143C BUSHING HARDENED 1 1/4-1-3/4 L
22. 113-438D CYLINDER LINK PIN
23. 113-437H 1ST STAGE ARM WELDMENT
24. 113-448H CYL. PIVOT PIN WMNT
25. 800-001C GREASE ZERK STRAIGHT 1/4-28
26. 805-060C PIN COTTER 7/32 X 2
27. 113-447E PIVOT LINK WELDMENT
28. 113-453S PIVOT LINK BUSHING ASSY
29. 113-446H TRANSFER LINK WMNT
30. 816-166C O-RING 1 ID X 1 1/4 OD X 1/8
31. 806-103C U-BOLT 1/2-13 1 17/32 X 2 3/4
32. 802-053C HHCS 5/8-11X1 3/4 GR5
33. 804-022C WASHER LOCK SPRING 5/8 PLT
34. 803-021C NUT HEX 5/8-11 PLT
35. 148-195H MARKER MOUNT WLMT LH
148-196H MARKER MOUNT WLMT RH
36. 806-105C U-BOLT 5/8-11 X 4 1/32 X 6
37. 802-262C HHCS 5/8-11X7 GR5
38. 804-022C WASHER LOCK SPRING 5/8 PLT
39. 803-021C NUT HEX 5/8-11 PLT
40. 818-349C DECAL GREASE 10 HRS LH
41. 818-402C DECAL GREASE 10 HRS RH
4/8/04 Great Plains Mfg., Inc. All Seeds Hitch Flat Fold Marker 113-476M
-15
Page 18

Section 7 Disk Assembly
12426
16
All Seeds Hitch Flat Fold Marker 113-476M 4/8/04
Great Plains Mfg., Inc.
Page 19

Section 7 Disk Assembly
Ref. Part No. Part Description
1. 113-563S MARKER DISC & HUB ASSEMBLY
113-564S REP BY 113-563S
113-372S REP BY 113-564S
2. 113-562H 1 SPINDLE MARKER WELDMENT
3. 816-014C TINE GAUGE WHEEL HUB SEAL
4. 822-030C BEARING CONE L44643
5. 822-080C BEARING CUP L44610
6. 890-614C GREASE CAP #1505
7. 815-001C TINE GW HUB
8. 804-025C WASHER FLAT 3/4 SAE PLT
9. 803-053C NUT HEX SLOTTED 3/4-16
10. 805-019C PIN COTTER 5/32 X 1 PLT
11. 820-094C 16 4-BOLT NOTCHED MARKER DISK
12. 113-369H DEPTH BAND 10 4-BOLT 4B.C.
13. BO-47 NEILSON STUD 1/2-20UNF X 1 13/16
14. 803-159C NUT LUG 1/2-20 X 60 DEG PLT
4/8/04 Great Plains Mfg., Inc. All Seeds Hitch Flat Fold Marker 113-476M
-17
Page 20

Section 8 Hydraulic Assembly
12427
18
All Seeds Hitch Flat Fold Marker 113-476M 4/8/04
Great Plains Mfg., Inc.
Page 21

Section 8 Hydraulic Assembly
Ref. Part No. Part Description
1. 810-196C Cylinder 2 1/2" x 10" Mid
2. 811-065C Hydraulic Fitting, Elbow 9/16" JIC Male x 9/16" O-Ring Male
3. 811-226C Hydraulic Hose 1/4" R1 x 127" Long x 9/16" JIC Female F/20’
811-230C Hydraulic Hose 1/4" R1 x 95" Long x 9/16" JIC Female F/15’
4. 811-436C Hydraulic Hose 1/4" R1 x 156" Long x 9/16" JIC Female x 1/2" NPT Male
5. 802-014C Bolt, Hex Head 3/8"-16 x 3/4" Gr 5
6. 804-013C Washer, Lock Spring 3/8"
7. 148-425D Marker Valve Mount
8. 811-169C Hydraulic Fitting, Elbow 9/16" JIC Male x 9/16" JIC Female
9. 800-035C Cable Tie 28 Long
10. 811-178C Hydraulic Hose 1/4" R1 x 114" Long x 9/16" JIC Female F/20’
811-211C Hydraulic Hose 1/4" R1 x 84" Long x 9/16" JIC Female F/15’
11. 810-197C Valve, Sequence Shoemaker
4/8/04 Great Plains Mfg., Inc. All Seeds Hitch Flat Fold Marker 113-476M
-19
Page 22

Section 8 Hydraulic Cylinder (810-196C)
12027
20
All Seeds Hitch Flat Fold Marker 113-476M 4/8/04
Great Plains Mfg., Inc.
Page 23

Section 8 Hydraulic Cylinder (810-196C)
Ref. Part No. Part Description
1. 2A0022 Piston Nut
2. 4M3102 Piston
3. * Back-up
4. * O-Ring
5. 3R0310 MW Head
6. 2A0012 Tie Rod Nut
7. * O-Ring
8. * Back-up
9. * Wiper Seal
10. 2M3393 Rod
11. 5M3118 Tube
12. 7M3318 Tie Rod
13. 6R0154 Base Midway
14. 2A0126 Hex Port Plug
15. 810-210C Seal Kit
*Can Only Be Ordered In Seal Kit (15)
4/8/04 Great Plains Mfg., Inc. All Seeds Hitch Flat Fold Marker 113-476M
-21
Page 24

Section 8 Sequence Valve (810-197C)
12024
22
All Seeds Hitch Flat Fold Marker 113-476M 4/8/04
Great Plains Mfg., Inc.
Page 25

Section 8 Sequence Valve (810-197C)
Ref. Part No. Part Description
1. 3089 Body, Sequence Valve
2. 1088-908 O-Ring
3. 1132-08 Plug, Hex Socket
4. 1179 Needle, Flow Control
5. 1217 Pin, .125" Spring Pin
6. 1211 Spring, Compression
7. 1088-011 O-Ring
8. 1089-011 Ring, Teflon Back-Up
9. 1180 Screw, Flow Control Adjustment
10. 1218 Hex, Jam Nut Zink Plated
11. 1099 Spring, Detent
12. 1087-250 Chromium Steel Balls
13. 1087-437 ChromiumSteel Ball
14. 1042 Spring
15. 1088-906 O-Ring
16. 1182 Fitting, Port Adaptor
17. 1132-05 Hex, Socket O-Ring Plug
18. 1088-905 O-Ring
19. 1092-6 Connector, Straight
20. 2153 Spool, Marker Sequence .055" Orifice
4/8/04 Great Plains Mfg., Inc. All Seeds Hitch Flat Fold Marker 113-476M
-23
Page 26

Great Plains Manufacturing, Inc.
Corporate Offices: PO. Box 218
Assaria, Kansas 67416 USA
 Loading...