

Page 1

Quick Reference Guide for Daily
2012-12
1
401-909M
use of Yield-Pro® Planter
Caution Please Read!!
• Note:
• This guide is intended for quick reference only. For complete set-up
see owners manual, quick start guides and or your dealer.
• The use of this guide is assuming that your system is set up and
READY to go to the field.
• The factory sets planters up generically.
• Make sure that any and all calibrations are done before going to
the field (see owners manual, dealer, or quick start guides).
• This guide will help you get started planting by showing you how to
get to the settings summary page, from which you can quickly
adjust planting rates, meter pressure, Row Pro settings, and Swath
Control settings.
• Follow all safety rules and recommendations in Operator’s Manual.
Page 2
In order to plant, the following steps are required:
2012-12
2
401-909M
1.) Check that correct seed discs are present in meter.
2.) Check that seed gates at Y-splitters are all open for seed delivery.
3.) Check that no foreign matter is present in air box, then open hopper door.
4.) Turn on fan and set oil flow to get XXXXRPM.
5.) Check that Marker/Fold switch is set to “marker” even if you do not have them.
6.) Fill meters with seed by performing “Row Fill”, and waiting 2 minutes.
7.) Check that correct seed and target population is set on monitor/controller.
8.) Perform “Fill Disk” to avoid leaving a skip when starting. If fan is stopped for any
reason, then repeat this step.
9.) For hydraulic drive planters, turn on channel to enable meter operation. Valve
calibration is strongly recommended.
10.) Pull forward and lower planter to begin planting. If there is a delay before starting to
plant, you will need to re-enable seed meter drive due to safety delay.
YIELD-PRO® PLANTER
Model # ____________ Serial # ____________
Configurations
4 – Hyd. Drive 5 – Grd. Drive 6 – Air-Pro® 7 – Row-Pro™ 9 – Sw ath Command™
Level 2 Access
Unit has been configured at factory and operated with these configurations.
Material Configuration - Population Split-Air Target Rate Row-Pro Target Rate Swath Command Setback
1. ______ _______ ________
2.
Page 3
Yield-Pro®Planter w/AI-120 Terminal
2012-12
3
401-909M
Sections
1) Explanation of the buttons on the screen.
2) How to unlock the system.
3) How to find my WSMT II Serial Number.
4) Hyd. Drive - Changing Populations.
5) Grd. Drive – Changing Populations.
6) Changing Split-Air Settings.
6A) Zeroing the Split-Air pressure.
7) Changing Row Pro Settings.
7A) Re-setting load cell values.
8) Engaging planter Hydraulic Drive.
8A) Explanation of button function.
9) Swath Command Settings.
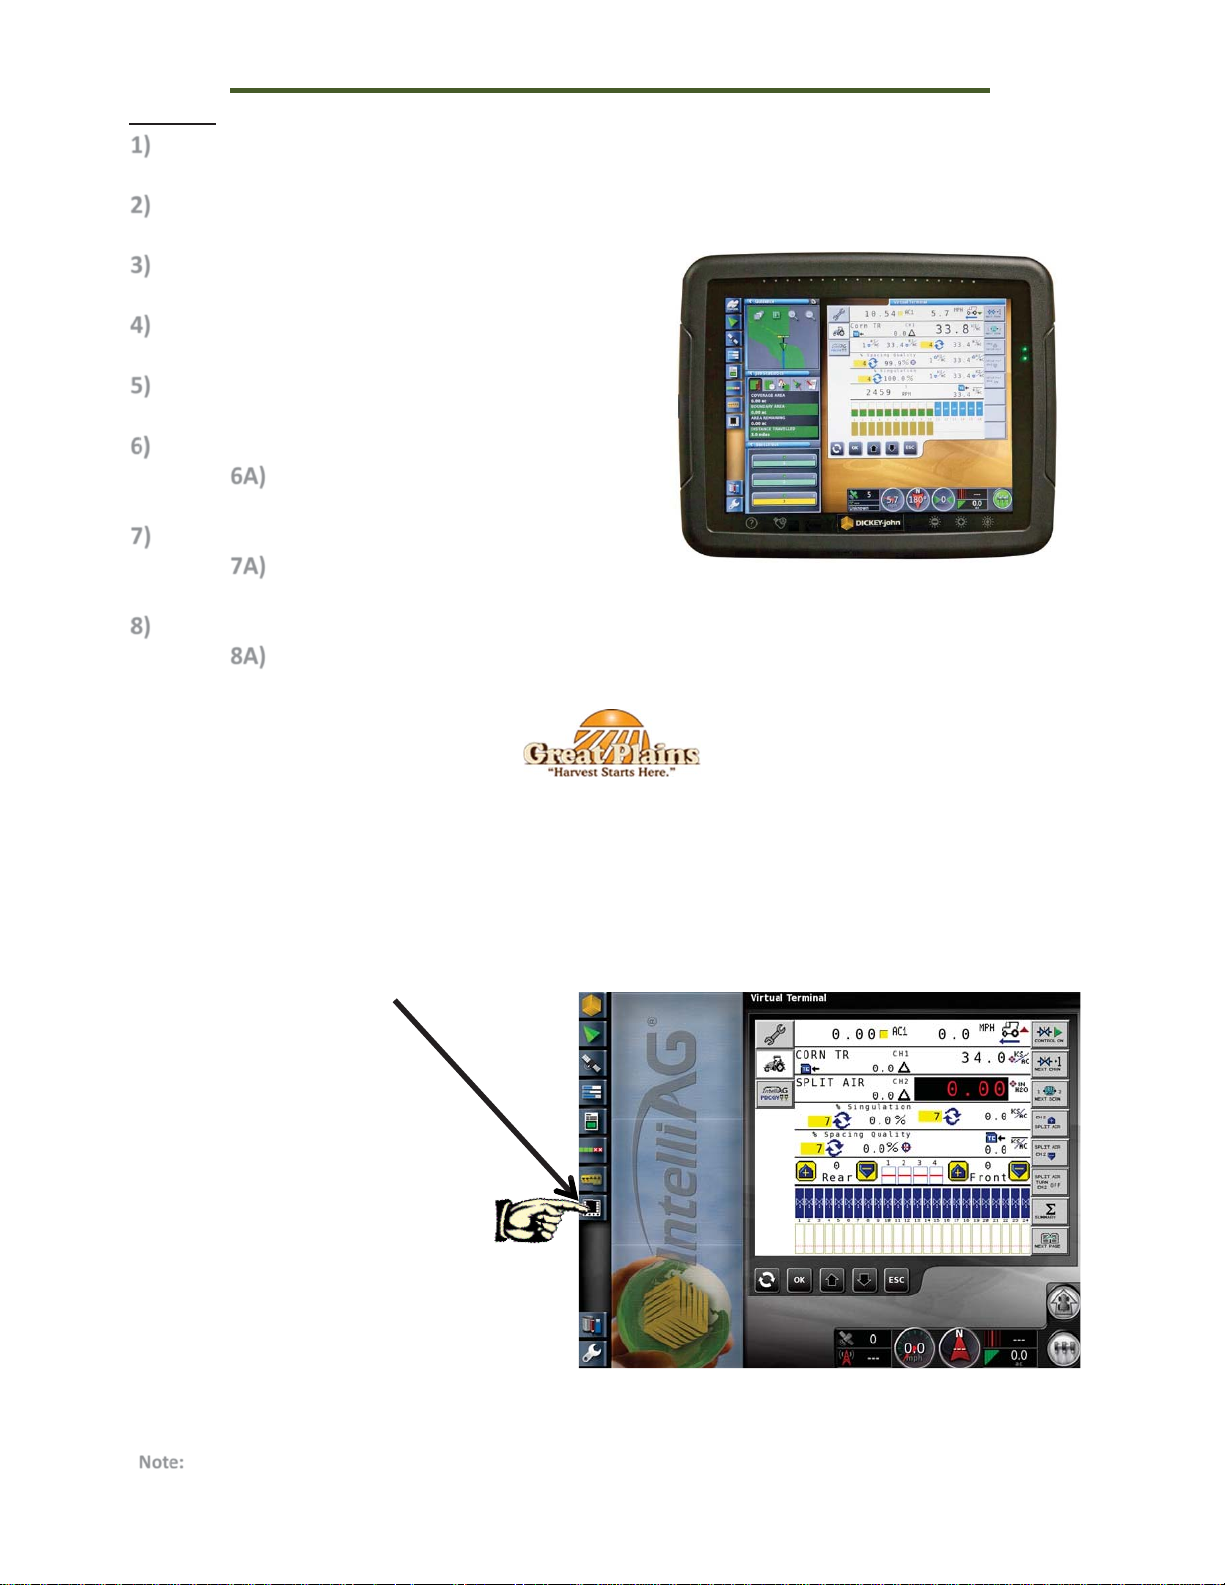
Sec. 1
To see your work screen you
must touch the terminal
icon as shown here.
Once you have touched it
the work screen will appear
as a small window. You may
then slide this to your large
view.
***More information on
this function is explained in
more detail in the operators
manual.
Explanation of on screen buttons
Note: If your work screen is not your main screen,
then you need to review your owners manual for
further information on how to configure your screen.
Page 4
Explanation of on screen buttons
2012-12
4
401-909M
These buttons on
the left are very
seldom used for
daily functions.
The PDCGY is the
most important
button for daily
use
The PDCGY button HOLDS all the buttons on right. The only way to see the right
hand set of buttons you MUST have this button selected (as shown in the
picture above).
These buttons
that are on the
right of the
screen are used
to OPERATE the
planter and also
change or adjust
different settings
for the planter.
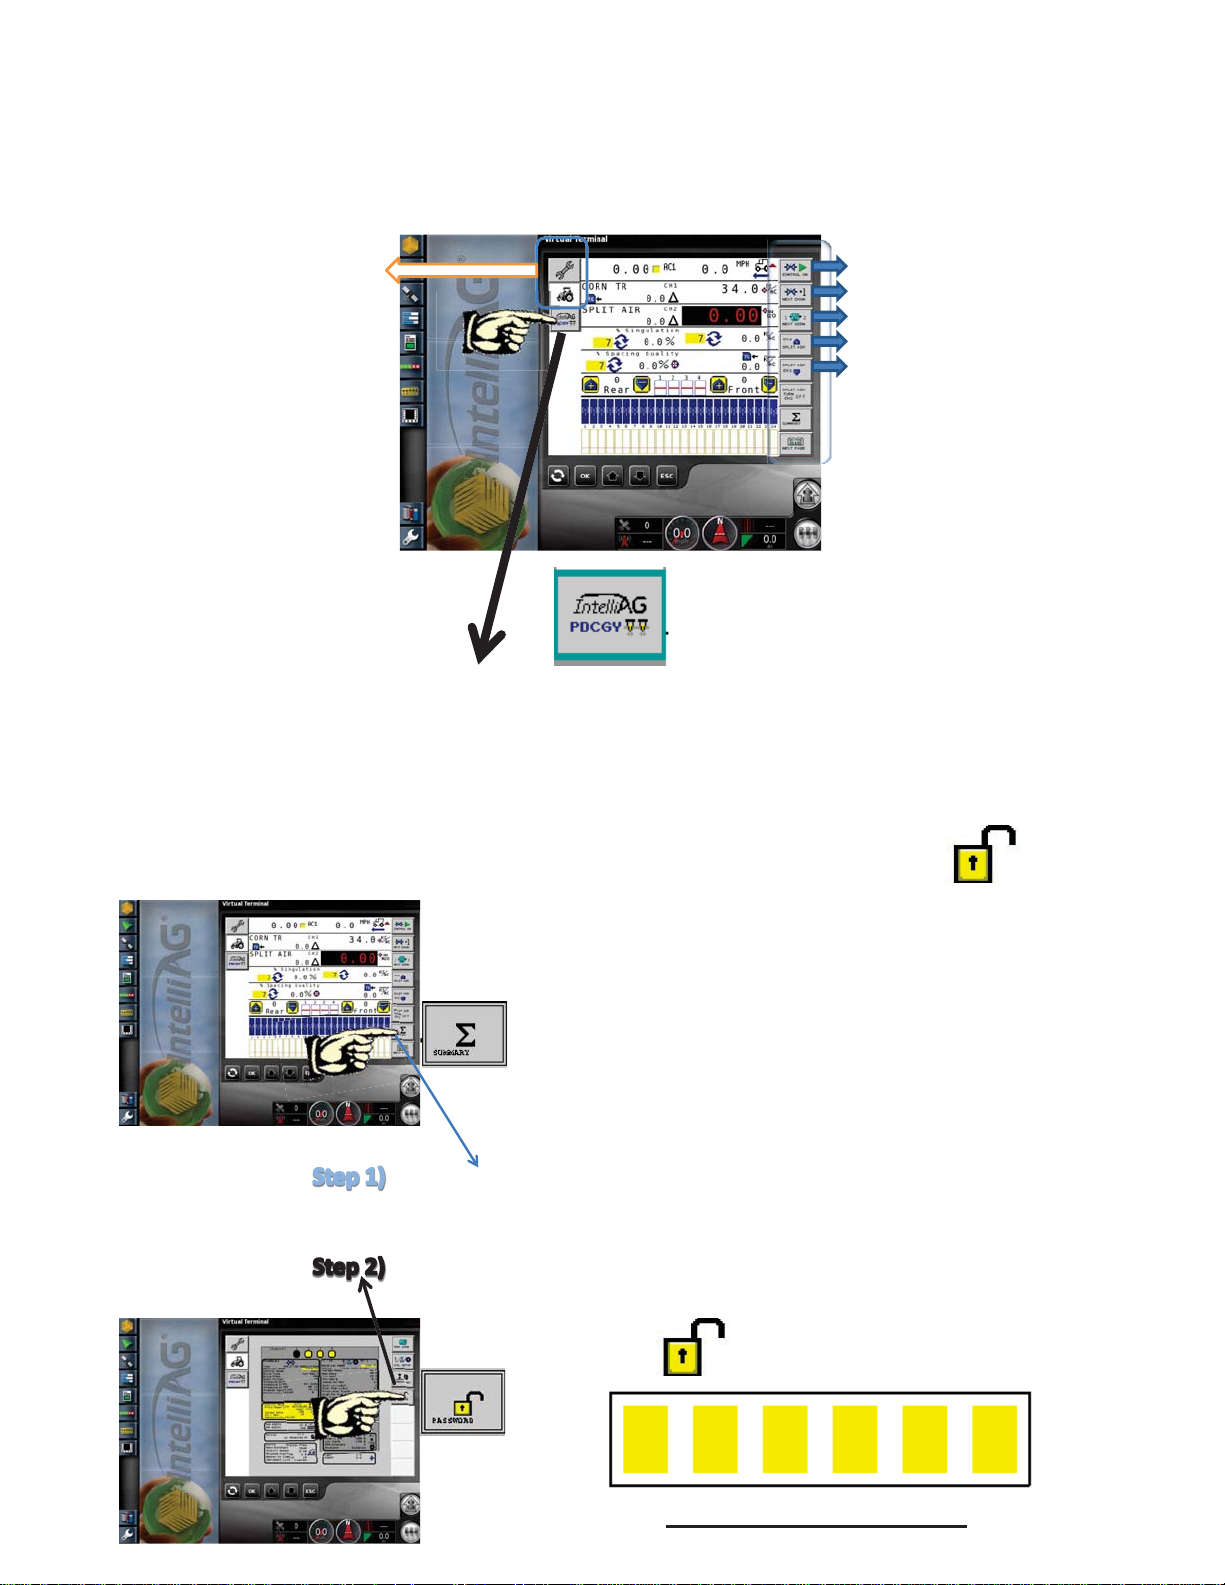
Sec. 2
How to unlock the system
To unlock the system we must enter the unlock code.
- The unlock code is the WSMT serial
number with a 2 in front of it (for level 2)
- More info is toward the bottom of this
section on how to find the S/N for the
WSMT.
Select the summary button.
Select the padlock option.
Write in your password here:
Page 5
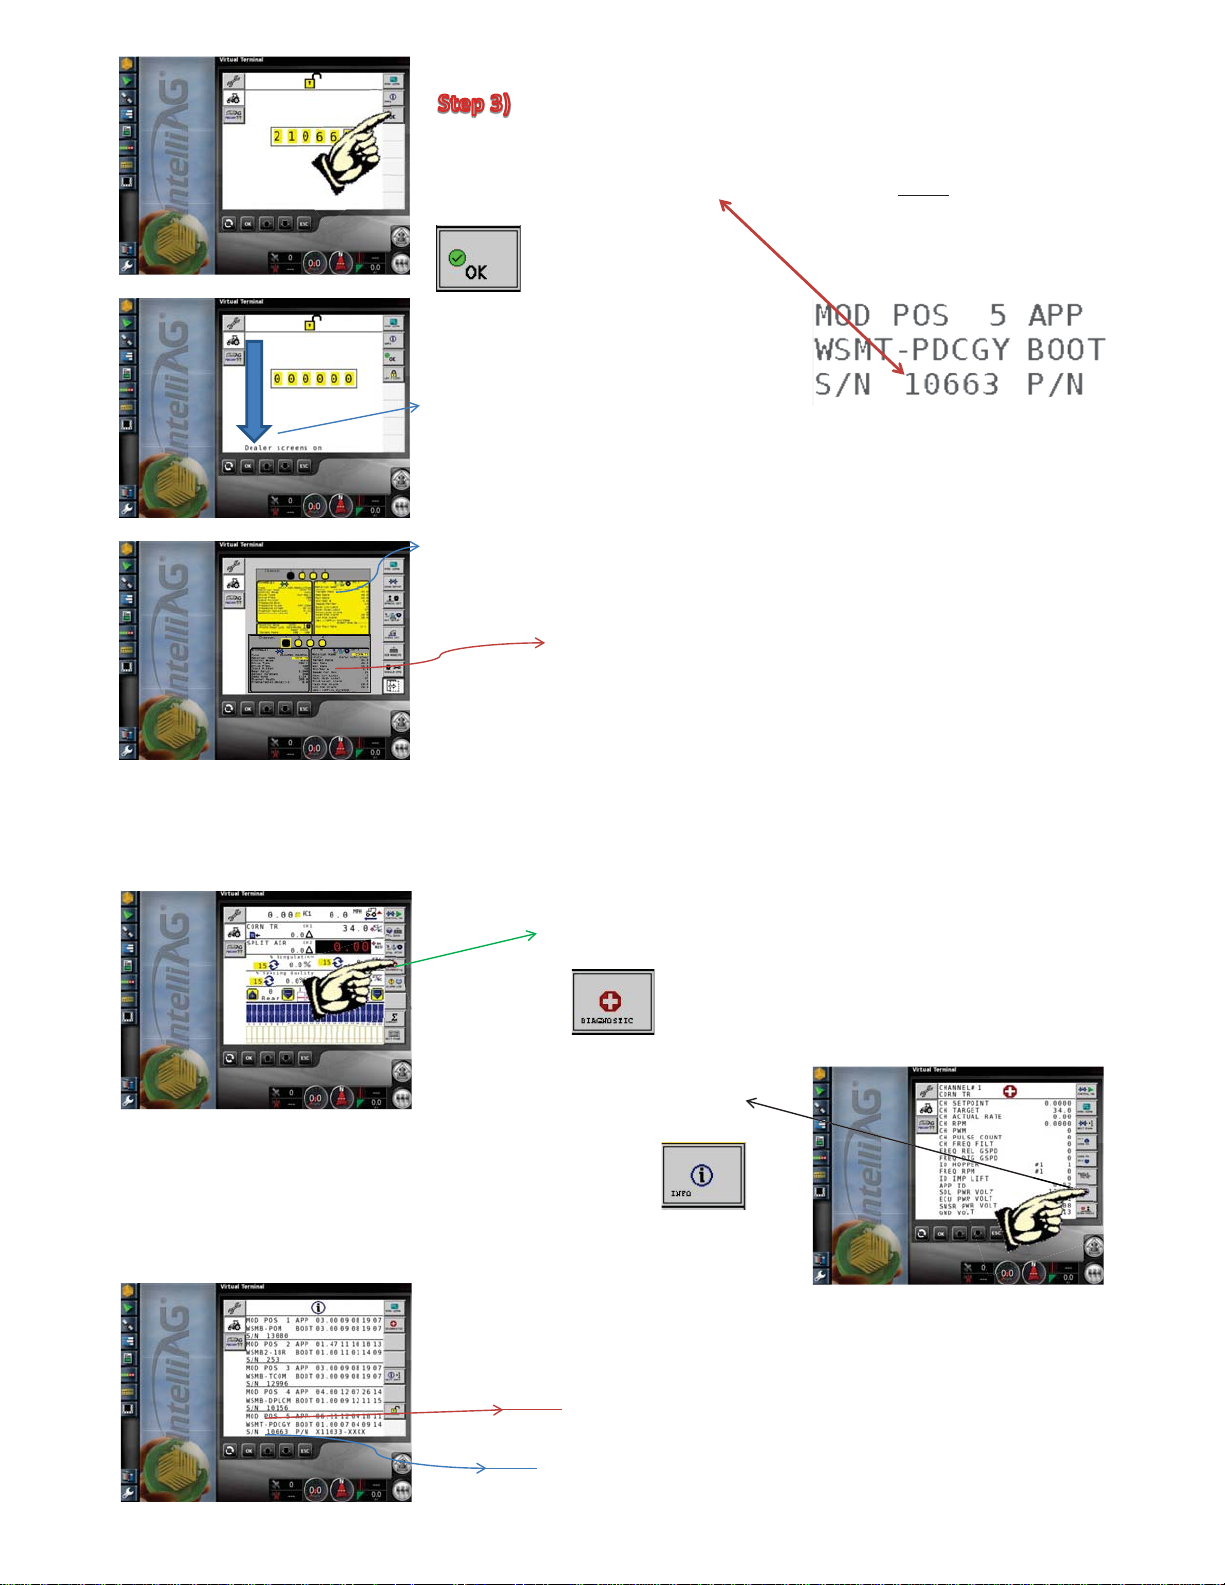
-Enter 2 followed by the WSMT Serial Number
2012-12
5
401-909M
which is found in the INFO screen. This is
explained on the last page of this section.
Example: If the S/N is 10663 then the unlock code is 210663
-
Then touch OK
Once you have correctly entered the
unlock code then the words “Dealer
screens on” should appear at the
bottom of the screen as shown
here.
You have unlocked the system to
level 2.
Now your summary screen should be
all yellow instead of gray.
This is an example of a system that is not unlocked,
when most of the screen is gray.
Sec. 3
How to find my WSMT Serial Number
Select the Diagnostic button from the main work screen
From there touch the INFO button
This brings you to the INFO
screen. From here you can
locate WSMT and below this
is your S/N number. This is
your code.
Page 6

Sec. 4
2012-12
6
401-909M
Hyd. Drive - Changing Populations
**Note: This is assuming that the system is unlocked. See the unlock section on how to unlock the
system.
This is the Summary Page
Select the Summary Button
Next make sure that Channel 1
is a black box , as shown here,
by touching it.
This will take you to the
summary page. From there
touch the yellow box as shown
here.
** Preset Method is disabled in this example.
NOTE: Once you have entered your changes
by touching the highlighted area to be changed
you MUST touch the
to
accept.
This will bring you to the area you can
change your Populations. NOTICE: Enter
the amount in THOUSAND SEEDS per
acre. Example: If you wish to plant 34,000
seeds per acre then you would enter 34.0
This is your target rate, the
amount you wish to seed or your
population.
Next you would make sure your
MAX Rate is set (maximum rate you wish
to plant).
Then you would make sure your
MIN Rate is set (minimum rate you wish
to plant).
Enter the percentage you wish to
increase or decrease your population on
the go.
Page 7

Once you have made your changes
2012-12
7
401-909M
now return to your “Home screen”
or another name is “Work screen”
by touching the WORK SCRN
button.
Notice: This will take you to the
Work Screen
Notice: Your New Population
should appear as shown here.
Sec. 5
Grd. Drive - Changing Population
Select the SUMMARY button
Now make sure that the word PopMon
shows at the top right of the screen as
shown here.
If you see PopMon then touch the yellow
area as shown here.
Page 8

This will take you to the screen where you
2012-12
8
401-909M
can change your Target Population. NOTICE:
Enter the amount in THOUSAND SEEDS per
acre. Example: If you wish to plant 34,000
seeds per acre then you would enter 34.0
Once you have entered your
target you may touch the
work screen button to
return to the home screen.
Sec. 6
Changing Split-Air Settings
Select the Summary Button
Next make sure that Channel 2
is a black box as shown here,
by touching it.
Page 9

This will take you to the Material
2012-12
9
401-909M
Setup screen.
Once you have blackened in Ch. 2 box
you may now touch the area shown
here.
Change your target air pressure
to what is desired.
NOTE: Once you have entered your values by
touching the highlighted area to be changed
you MUST touch the
to
accept it.
Once you have changed your Split-Air, then
return to your “Home screen” or another
name is “Work screen” by touching the
WORK SCRN button.
Notice: This will take you back
to the Work Screen
Page 10

Sec. 6A
2012-12
10
401-909M
Zeroing the Split-Air Pressure
Select the Summary Button
Next make sure that Channel 2
is a black box , as shown here,
by touching it.
This will take you to the Channel
Setup screen.
Once you have blackened in Ch. 2 box
you may now touch the area shown
here.
Zeroing the pressure in the split air is
recommended throughout the day due
to barometric pressure changes.
This is done by touching the area
shown here. Fan must be off to enable
pressure reset.
Page 11

Once you have zeroed out your Split-Air,
2012-12
11
401-909M
now return to your “Home screen” or
“Work screen” by touching the WORK
SCRN button.
Notice: This will take you to the
Work Screen
Sec.7
Changing Row Pro Settings
Select the Summary Button
Next select the highlighted RowPro box.
Page 12

Enter your Target rate as shown here.
2012-12
12
401-909M
Note: Once you have entered your values by
touching the highlighted area to be changed,
you MUST touch the
accept it.
Note: For full instructions on the Row Pro, see
owners manual.
Next return to the home screen by
touching the work screen button, or
you may need to Zero your load cells
out. See next section for this.
to
Sec. 7A
Re-setting Load Cell Values
If you have a weight reading when the planter
is up, or if you have a false reading it is
recommended that you reset the load cell
values.
From the Summary page select the DPRESS SET
button
Next touch the SET OFFSET button.
Page 13

Once you get here you must read the screen
2012-12
13
401-909M
and make sure you are ready to continue.
Next touch OK.
After you are done then touch the
Work Screen to return home.
Sec. 8
Option 1
Using the “soft key” on the screen.
Engaging planter hydraulic drive
Two ways to do this.
Select the Control On button to
engage the Planter .
*Note. Make sure that the planter is in the
ground and you are ready to plant.
**** All “soft key” (touch screen
buttons) that control a function are
buttons of intent!! This means that if
you want to turn your planter on you
must touch.
last page in this section.
If you wish to shut it off you must
touch
This is explained on the
Page 14

Option 2
2012-12
14
401-909M
Using the external switch.
*Note
To use the External Switch you
must first configure it on the IA
Screen first. To configure this
option see owners manual.
*Notice the Control On button is not
present when the external switch is
configured.
When using the External Switch the icon
will leave and the Control On becomes
the switch that is wired to the main
harness.
This External Switch becomes the
new Control ON.
To engage the planter toggle the
switch to the On position to “turn”
the planter on.
Sec. 8A
Explanation of button function
This button (when shown like this
means the planter is off) when
touched turns the planter on!
This button (when shown like this
means the planter is on) when
touched turns the planter off!
Note: In short it is the opposite of what most people would
think, meaning that if it says on it is really off.
Page 15

Sec. 9
2012-12
15
401-909M
Important: Accuracy of Swath Command is dependent upon accurate measurements
between the GPS receiver and where seed is placed in the ground. Failure to enter
exact measurements will impact the system’s performance to shut row sections off at
the proper location within the field. Refer to AI-120 & IntelliAg manual that these
measurements are entered correctly before making any further adjustments.
Timing
Timing is an adjustment to gap or overlap of product application when entering a
headland and using section control. Two timing options to turn sections on and off are
required.
• ON TIME- On Time establishes when actual product application starts after
the sections are switched on.
• OFF TIME- Off Time establishes when actual product application stops after
the sections are switched off. Off time cannot exceed the On time setting.
• **Note: This is a SPEED based timing, meaning that you must maintain the SAME
speed when entering and leaving your headlands.
Dialing in Swath Command
Setting Timing
- 1. Select the wrench button
- 2. Select Implement
- 3. Select Section Control
-4. Select Timing
From this screen you may dial in your Swath
Command by touching one of these 2 options.
4
2
3
When done setting timing then
return to the home screen by
touching this button.
Page 16

**Disclaimer**
2012-12
16
401-909M
Any and all information that was presented in this guide can be found in more detail
-
in the owners manual, quick start guides, and on our website.
-Each quick start guide is specific to your
model of planter.
-This book is intended to explain and show one how to change or modify settings for
daily operation basis and NOT intended for sole operation of your planter.
-Please contact your dealer for complete set-up, calibration, and operation of your
YP planter.
 Loading...