

Page 1

Table of Contents Main Box Rates
Manufacturing, Inc.
www.greatplainsmfg.com
Seed, Native Grass, Small Seeds and Fertilizer Rate Charts
for the 3P806NT 3-Point 8-Foot No-Till Drill
The following pages are to assist in the proper setting of seeding
rates for the 8-foot (2.5 m) no-till drill. The rates indicated in the
charts are approximate. To assure the most accurate seeding, it is
recommended that the drill be calibrated for the desired seed at
the time of planting.
ORIGINAL INSTRUCTIONS
© Copyright 2011 Printed 2011-10-21 151-143B
EN
Page 2

Great Plains Manufacturing, Inc. Cover Main Box Rates ii
Table of Contents
Introduction ..................................................................1
Models Covered .............................................................1
Document Family ...........................................................1
Material Rates Overview ................................................1
Calibration Overview ......................................................2
Calibration Crank Storage .......................................... 2
Using Calibration Crank..............................................2
Main and Dual Box Seed Rate.....................................3
Setting Drive Type......................................................3
Main and Dual Box Seed Rate Handle....................... 4
Position Seed Cup Doors ........................................... 4
Main/Dual Seed Row Shutoff .....................................4
Reading a Seed Rate Chart .......................................5
Main/Dual Box Seed Rate Calibration........................6
Rate Charts, Main Seed Box..........................................8
Alfalfa (Medicago sativa) ............................................ 8
Bahia Grass (Paspalum notatum) ..............................8
Barley (Hordeum vulgare) ..........................................8
Buckwheat (Fagopyrum esculentum).........................9
Buffalograss (Buchloe dactyloides) ............................ 9
Bermuda Grass (Cynodon dactylon) .......................... 9
K-31 Fescue (Festuca).............................................10
Flax (Linum usitatissimum) or Sudan
(Sorghum bicolor subsp. drummondii)..................10
Eastern Gamma Grass - Pete
(Tripsacum dactyloides) .......................................10
Kentucky Blue Grass (Poa pratensis).......................11
Millet (Pennisetum glaucum, Setaria italica,
Panicum miliaceum, Eleusine coracana)..............11
Milo (Sorghum).........................................................11
Oats (Avena sativa)..................................................12
Orchard Grass Potomac (Dactylis glomerata).......... 12
Peas (Pisum sativum)...............................................12
Pinto Beans (Phaseolus vulgaris).............................13
Rape (Brassica napus).............................................13
Rice, Long Grain (Oryza sativa indica)..................... 13
Rice, Short Grain (Oryza sativa japonica,
Oryza sativa sinica) ..............................................14
Rye (Secale cereale)................................................14
Perennial Rye Grass - Palmer
(Lolium perenne, Lolium multiflorum) ...................14
Soybeans (Glycine max) ..........................................15
Sunflower (Helianthus annuus) ................................15
Tiffany Teff, Coated (Erogrostis tef) .........................15
Wheat (Triticum)....................................................... 16
Wheatgrass (Pascopyrum smithii,
Agropyron elongatum).......................................... 16
Native Grass Rate ...................................................... 17
Setting Native Grass Seed Rate .................................. 17
Native Grass Rate Calibration ..................................... 17
Native Grass Meter Shaft Rates .................................. 20
Standard Shaft Rates...............................................20
Shaft Rates with Seed Rate Reduction.................... 20
Seed Lubricant ..................................................... 20
Brome Grass Seeding.................................................. 21
Brome Rate Charts .................................................. 23
Small Seeds Rate ....................................................... 24
Small Seeds Rate Calibration ...................................... 24
Small Seeds Row Shut-Off .................................. 26
Small Seeds Rate Charts............................................. 27
Alfalfa, Red Alsike, Crimson Clover ..............................27
Kentucky Bluegrass,
Fescue, Annual Rye Grass.......................................27
Bermuda, Red Top, Lespedeza Unhulled,
Sercia, Sand, Weeping Love Grass.......................... 27
Red & Sweet Clover, Lespedeza Hulled....................... 27
Orchard Grass ..............................................................27
Millet, Reed Canary ......................................................28
Ladino Clover, Canary Grass,
Timothy, Canola........................................................ 28
Birdsfoot, Trefoil, Sudan ...............................................28
Fertilizer Rate ............................................................. 29
Setting Fertilizer Rate .................................................. 29
Fertilizer Rate Chart..................................................... 29
Fertilizer Rates in Pounds per Acre .............................. 29
Metric Fertilizer Rate Chart ...........................................29
Adjusting for Density .................................................... 30
Density Conversion Charts ...................................... 30
U.S. Customary Units ...................................................30
Metric ............................................................................ 30
Fertilizer Rate Calibration......................................... 31
Appendix..................................................................... 33
Metric Rate Charts, Main Seed Box............................. 33
Metric Rate Charts, Small Seeds Box.......................... 42
Metric Native Grass Rates ........................................... 44
Metric Native Grass Shaft Rates.................................. 45
Brome Seed Rates, Metric ....................................... 46
© Copyright 2003, 2004, 2006, 2008, 2011 All rights Reserved
Great Plains Manufacturing, Inc. provides this publication “as is” without warranty of any kind, either expressed or implied. While every precaution has been
taken in the preparation of this manual, Great Plains Manufacturing, Inc. assumes no responsibility for errors or omissions. Neither is any liability assumed for
damages resulting from the use of the information contained herein. Great Plains Manufacturing, Inc. reserves the right to revise and improve its products as
it sees fit. This publication describes the state of this product at the time of its publication, and may not reflect the product in the future.
2011-10-21 Cover Main Box Rates 151-143B
Trademarks of Great Plains Manufacturing, Inc. include: Singulator Plus, Swath Command, Terra-Tine.
Registered Trademarks of Great Plains Manufacturing, Inc. include:
Air-Pro, Clear-Shot, Great Plains, Land Pride, MeterCone, Nutri-Pro, Seed-Lok, Solid Stand, Whirlfilter, Yield-Pro.
Brand and Product Names that appear and are owned by others are trademarks of their respective owners.
Printed in the United States of America
Page 3
Great Plains Manufacturing, Inc. Table of Contents Main Box Rates 1
Introduction
This manual is your guide to drill adjustments for
achieving specific seed populations.
Although some setup, operation and adjustment material
herein is repeated from the drill Operator Manual, you
need to be thoroughly familiar with drill operations and
adjustments before applying this Seed Rate Manual and
its table data.
Models Covered
This rate manual applies to drill models:
3P806NT-1375 13-row 7.5-inch (19.1 cm)
Document Family
151-143M Operator Manual
151-143P Parts Manual
151-143B Seed Rate Manual (this document)
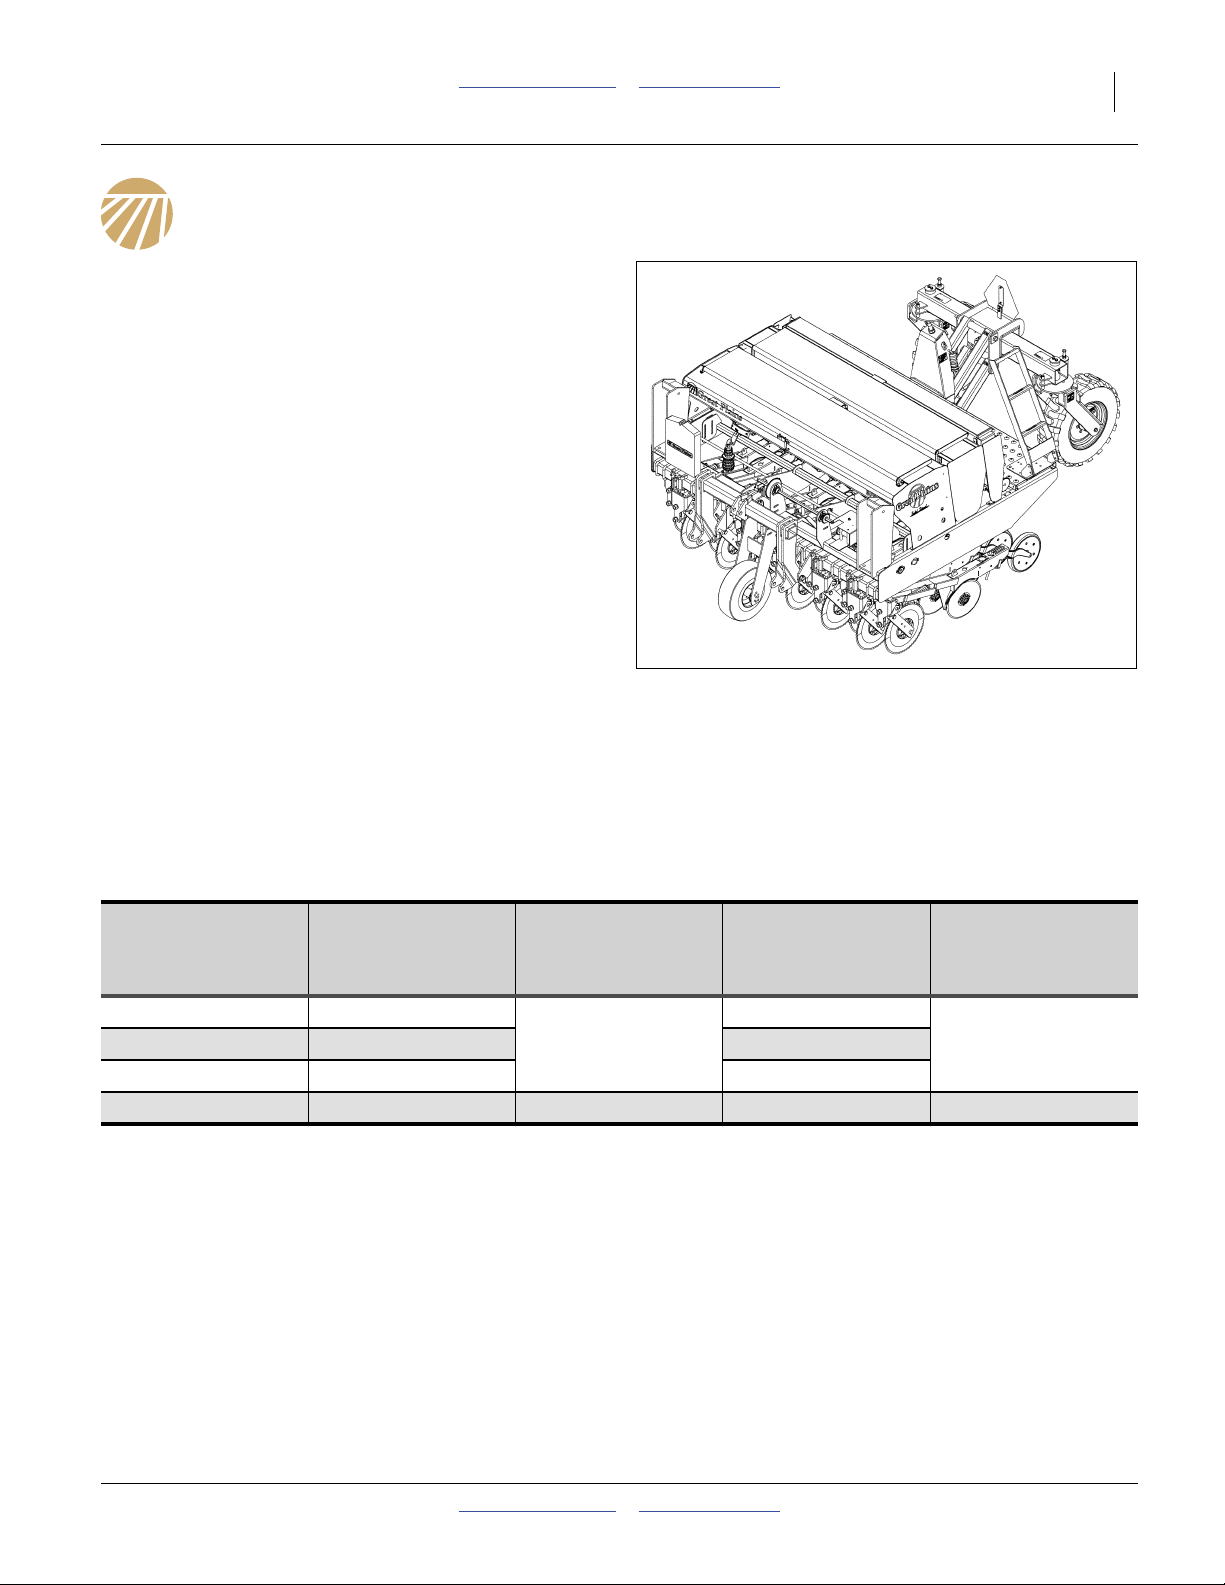
Figure 1
3P806NT No-Till Drill
28357
Material Rates Overview
Details of seed and fertilizer rate setting are found in the
Adjustments section of the Operator Manual, and rely
on data from this Seed Rate Manual.
Rate setting controls are different for each box. Some
boxes have more than one control.
Main Box
Dual Seed
(page 3)
Rate Range
Fine Rate Rate Handle Driver/Driven
Cup Adjustment Door Handle
Small Seeds
(page 24)
Rate Handle
All chart rates, for all boxes, are approximate.
Great Plains strongly recommends calibration of each
box to the material to be applied.
Native Grass
(page 17)
Seed Rate Reduction
Fertilizer
(page 29)
Rate KnobCoarse Rate Drive Type Drive Type
2011-10-21 Table of Contents Main Box Rates 151-143B
Page 4

2 3P806NT Table of Contents Main Box Rates Great Plains Manufacturing, Inc.
Calibration Overview
Detailed calibration steps vary with each box, see:
“Main/Dual Box Seed Rate Calibration” on page 6,
“Fertilizer Rate Calibration” on page 31,
“Native Grass Rate Calibration” on page 17, and
“Small Seeds Rate Calibration” on page 24,
Some general information applies to all boxes, and is not
repeated in those pages referenced above.
Calibrate with Drill Raised
Perform the calibration with the drill hitched and raised.
Install lift-assist cylinder lock(s). Calibration with the drill
lowered is not recommended, as the drive tires in ground
contact prevent drive operation.
2
1
Calibrate for1⁄
The number of revolutions per area is:
revolutions for
Full Acre 656 1170
1/10th Acre
Full Hectare 1622 2890
1/10th Hectare
Crank counts below 10 are not recommended. Sample
sizes may be too low, and fractional crank turns
introduce more error.
th
Acre or Hectare
10
Crank Tire
65.6 117
162 289
32341
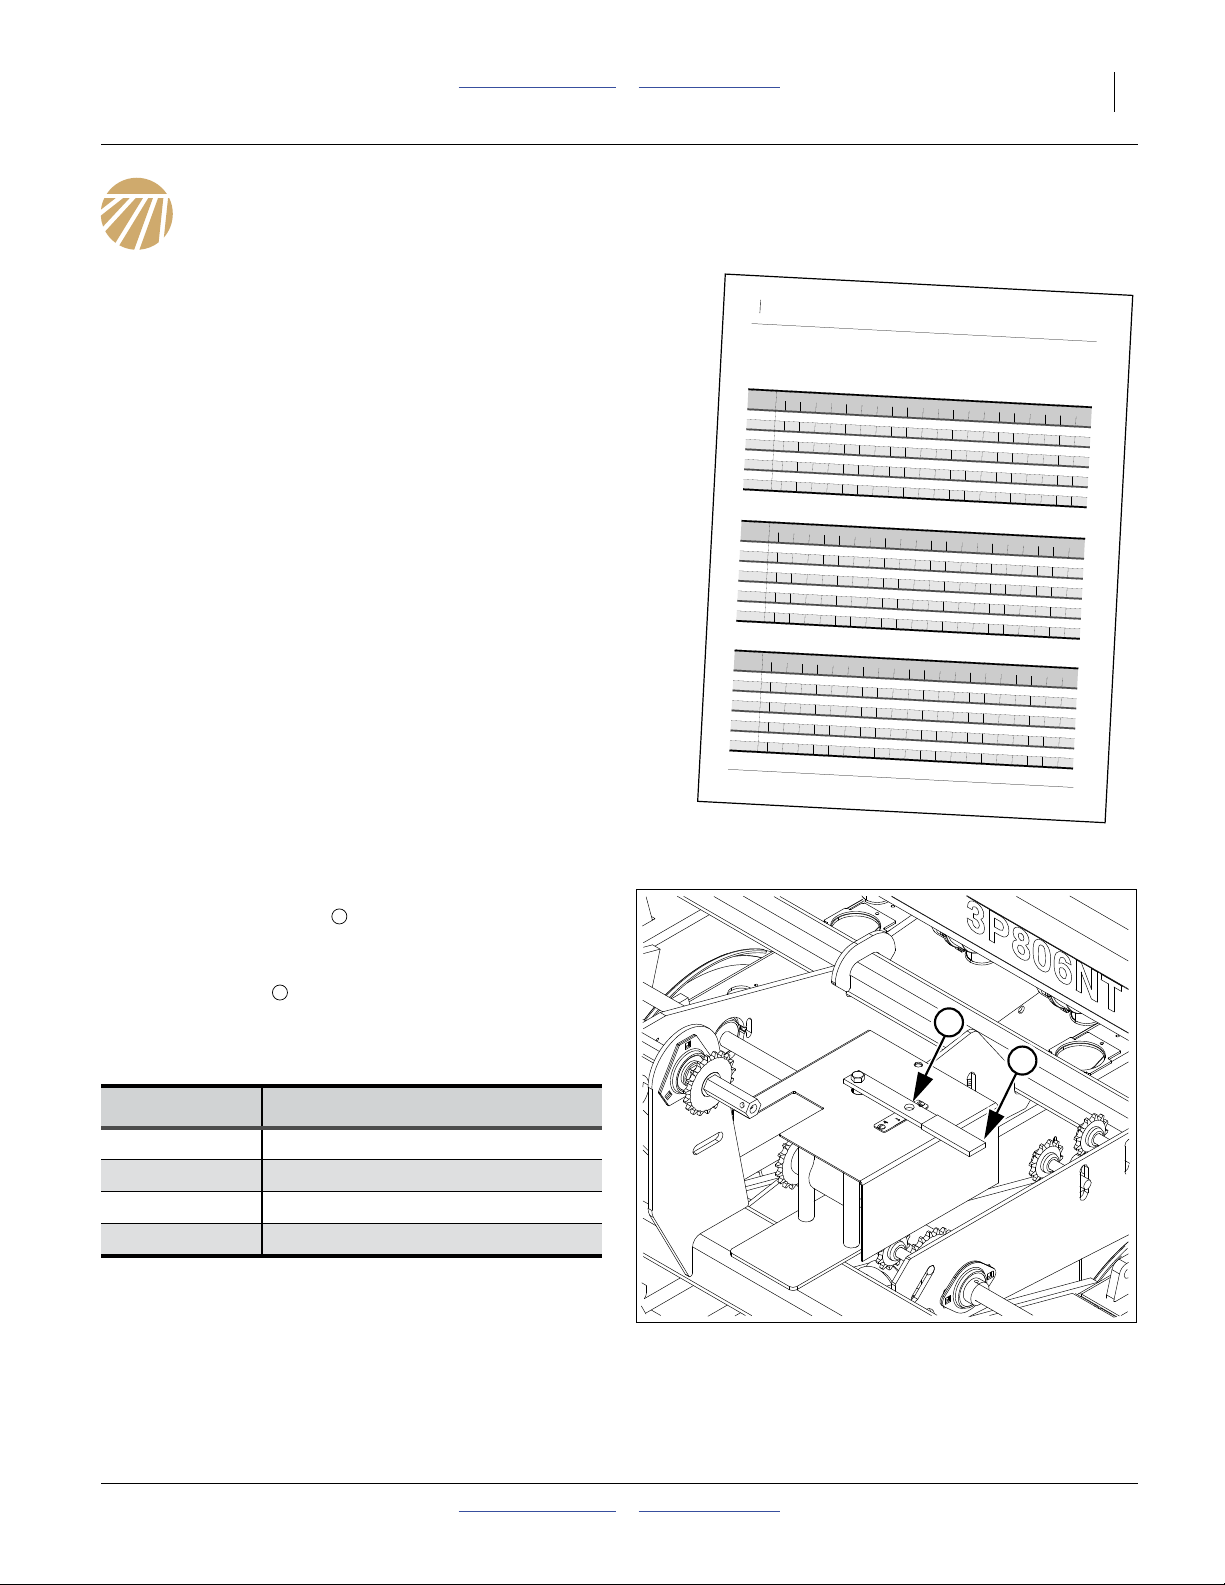
Calibration Crank Storage
Refer to Figure 2
The calibration crank is found at the top front frame,
left of center, pinned to a stob on a 3-point weldment.
Note: The retaining pin at the stob can also secure the
crank to the jackshaft.
1
Using Calibration Crank
Place the hex socket of the crank on the right end of the
main jackshaft .
Operate the crank clockwise
A wide range of cranking speeds produce accurate
calibrations. For reference, at 6 mph (10 kph) field speed,
jackshaft rpm is 65 (about 1 revolution per second).
2
Figure 2
Calibration Crank
28410
Check Affected Boxes
Empty any boxes not being calibrated or remove a drive
chain to prevent undesired meter operation. Alternatively,
set rate handles to zero.
151-143B Table of Contents Main Box Rates 2011-10-21
Page 5
Great Plains Manufacturing, Inc. Table of Contents Main Box Rates 3
83P806NT
2011 09 23
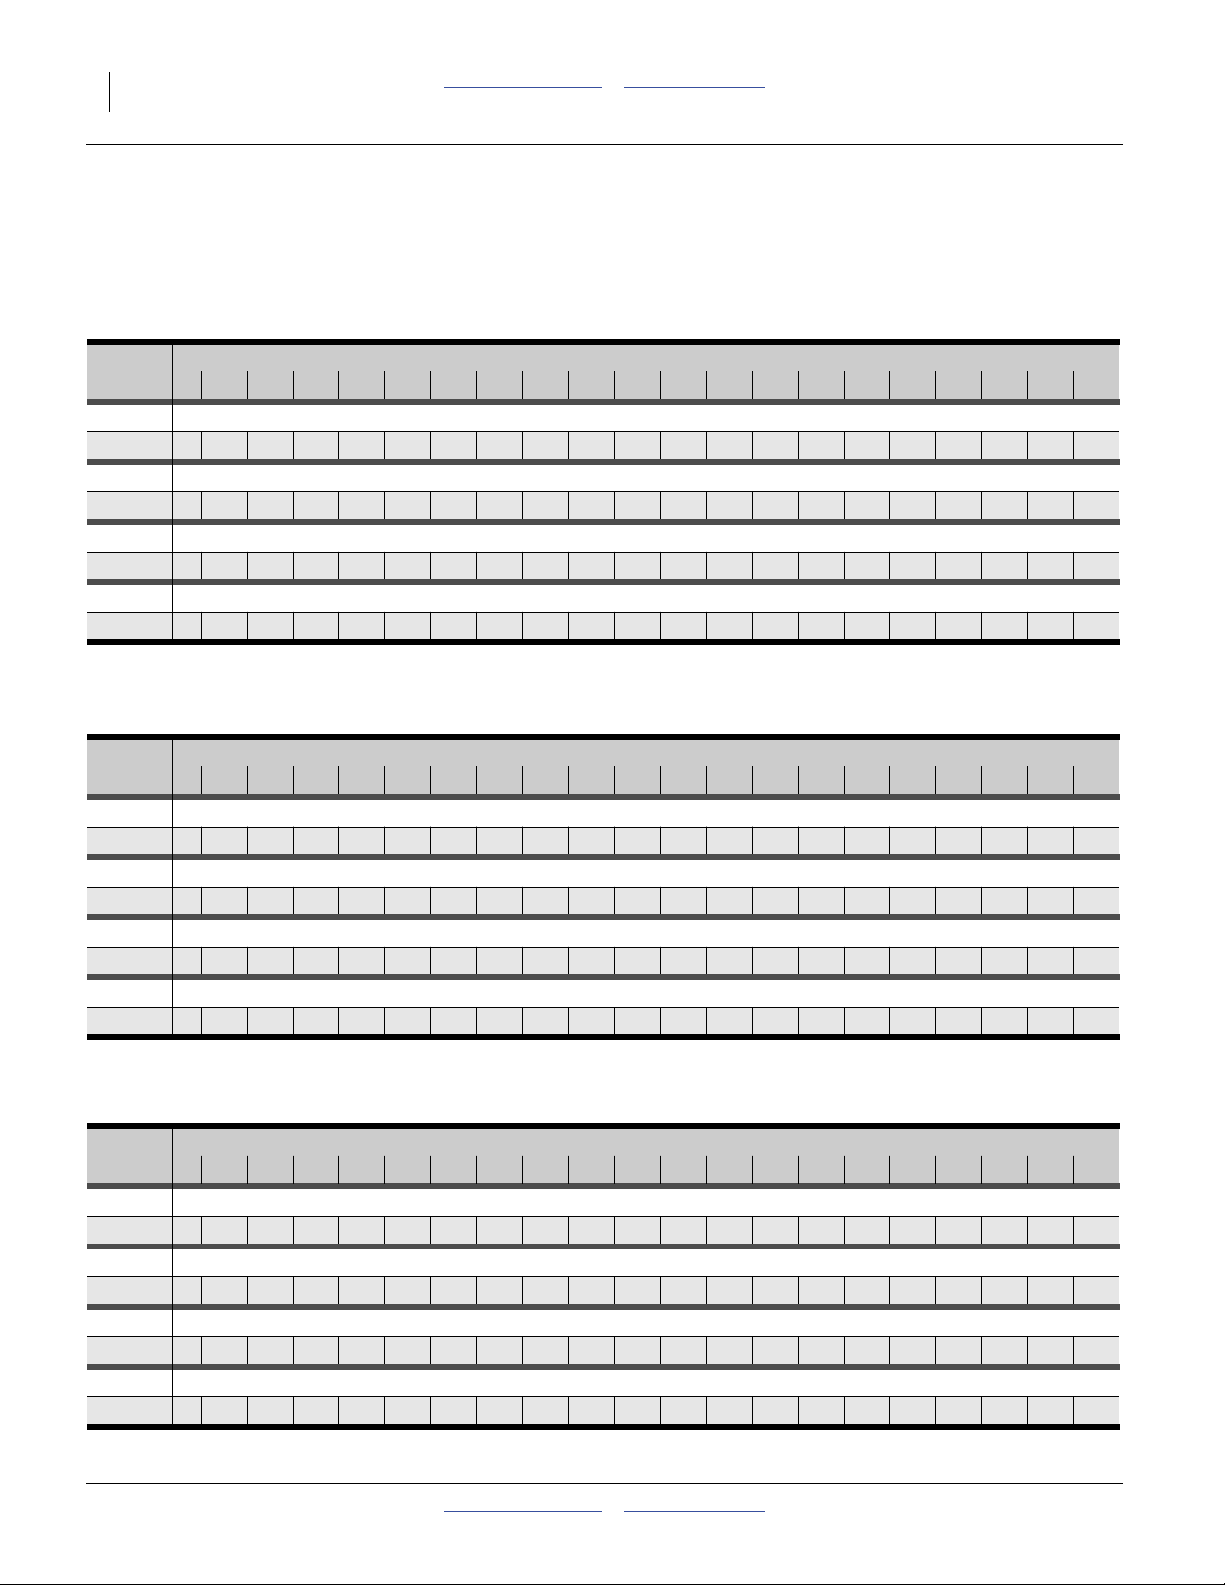
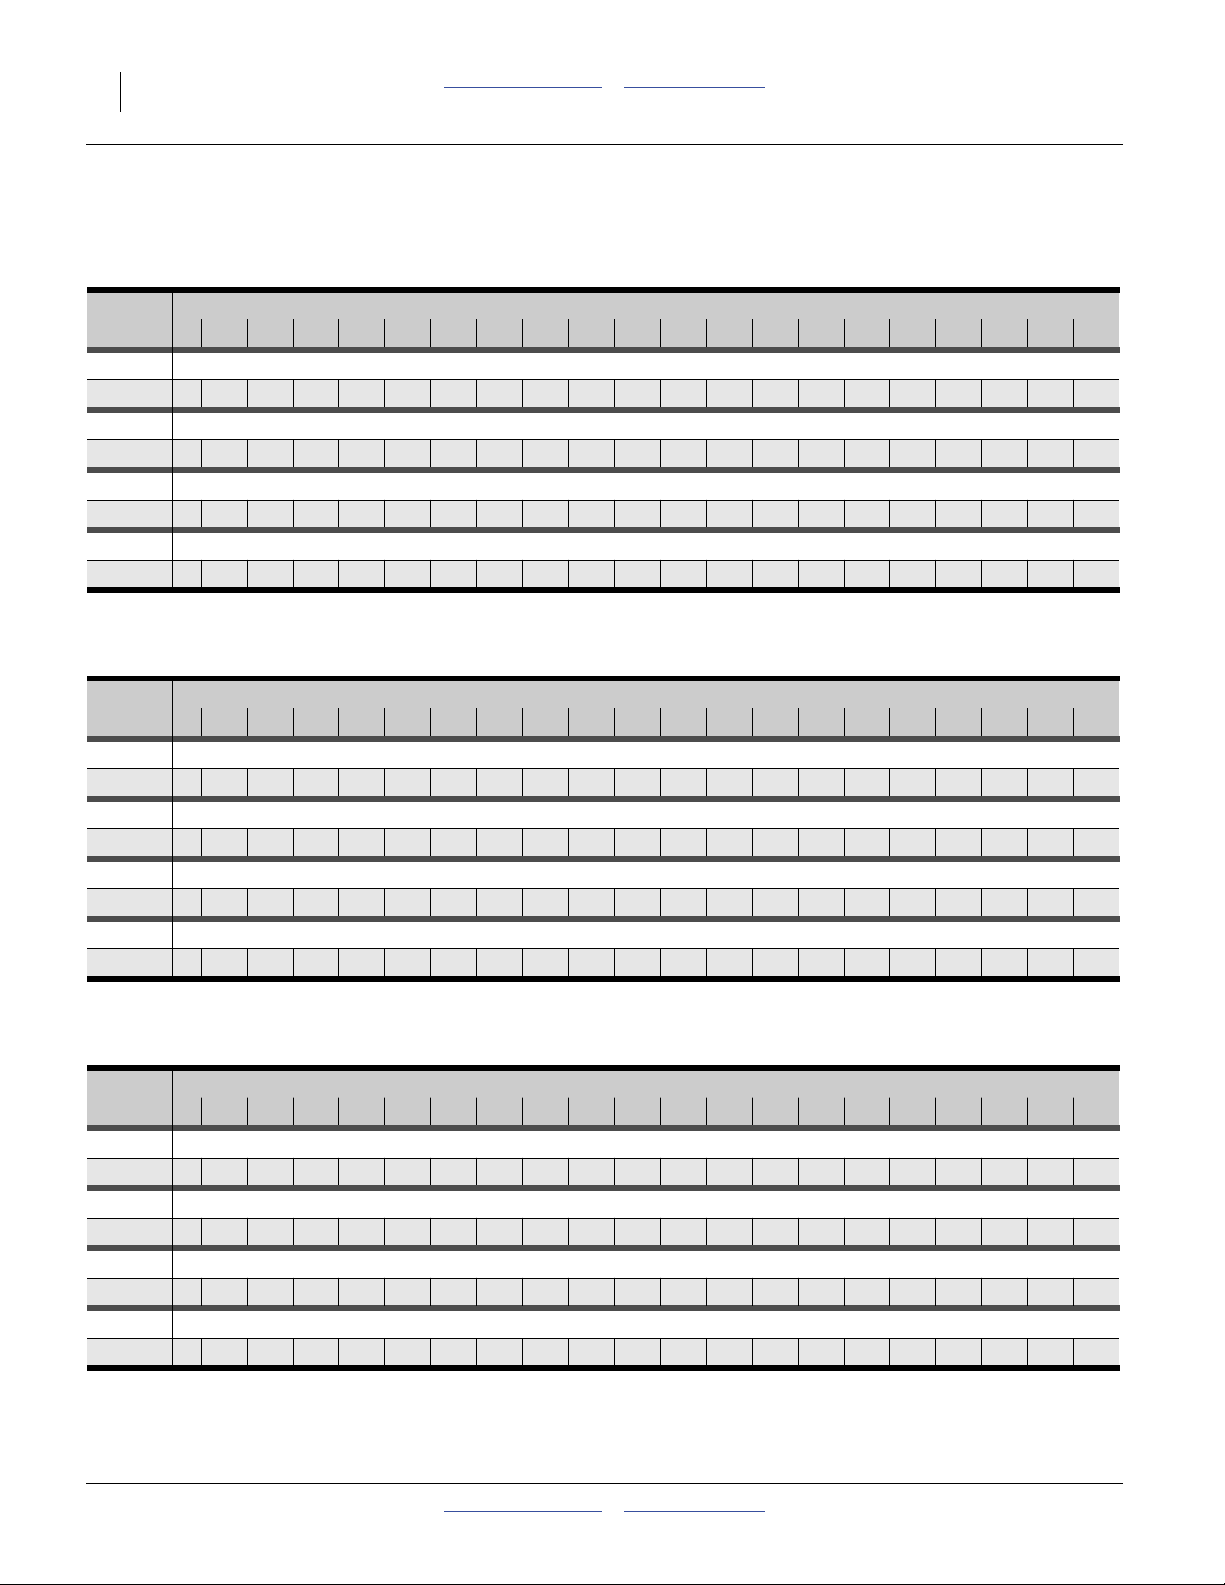
Rate Charts, Main Seed Box
Charts n U S customary units
Metric charts begin on page 33
Alfalfa (Medicago sativa)
Bahia Grass (Paspalum notatum)
Barley (Hordeum vulgare)
Seed Rate Handle Setting
0 5 10 15 20 25 30 35 40 45 50 55 60 65 70 75 80 85 90 95 100
Rows Drive Type: 1 Seed Rate in Pounds Per Acre
(based on 60 pounds/bushel)
7 5 in
04667911215182125283236394347505457616466
Drive Type: 2 Seed Rate n Pounds Per Acre
7 5 in
0 9 5 14 19 24 30 37 44 51 58 66 73 81 89 96 104 111 118 125 131 136
Dr ve Type: 3 Seed Rate in Pounds Per Acre
7 5 n
0 15 22 29 37 46 55 65 75 86 97 108 119 130 141 151 162 171 180 189 196
Drive Type: 4 Seed Rate in Pounds Per Acre
7 5 in
0 25 35 47 60 75 90 106 123 140 158 176 194 212 230 247 264 279 294 308 320
32291C
Seed Rate Handle Setting
0 5 10 15 20 25 30 35 40 45 50 55 60 65 70 75 80 85 90 95 100
Rows Drive Type: 1 Seed Rate in Pounds Per Acre
(based on 40 pounds bushe )
7 5 in
0 2 2 31 4 5 6 3 8 5 11 14 17 20 23 27 30 33 37 40 43 46 48 50 52
Drive Type: 2 Seed Rate in Pounds Per Acre
7 5 in
0 4 4 64 9 3 13 18 23 28 35 41 48 55 62 69 76 82 88 94 99 104 107
Drive Type: 3 Seed Rate n Pounds Per Acre
7 5 in
0 6 6 10 14 20 26 34 43 52 62 72 82 93 103 113 123 132 141 149 156 161
Drive Type: 4 Seed Rate in Pounds Per Acre
7 5 n
0 11 16 23 32 43 56 70 85 101 117 134 151 168 185 201 216 230 243 254 263
32292C
Seed Rate Handle Setting
0 5 10 15 20 25 30 35 40 45 50 55 60 65 70 75 80 85 90 95 100
Rows Drive Type: 1 Seed Rate in Pounds Per Acre
(based on 51 pounds/bushel)
7 5 in
04763841114172024273135394245495154565758
Drive Type: 2 Seed Rate in Pounds Per Acre
7 5 in
01013172228354249566472798693100105110115118120
Drive Type: 3 Seed Rate in Pounds Per Acre
7 5 in
0 14 19 26 34 43 52 62 72 83 94 105 116 126 137 147 156 165 173 180 186
Drive Type: 4 Seed Rate in Pounds Per Acre
7 5 in
0 22 32 43 56 70 85 101 118 135 153 171 189 206 223 239 255 269 282 293 303
32293C
Main and Dual Box Seed Rate
Accurately obtaining the desired seed population
requires four steps:
1. Setting Drive Type gearbox (from chart)
2. Setting initial Seed Rate Handle (from chart)
3. Positioning Seed Cup Door (by seed type)
4. Calibration: checking predicted seeding rate
Seed rate charts begin on page 8. The charts list proper
Drive Type and seed rate handle settings for various
seeds and seeding rates.
The seed rate charts are based on cleaned, untreated
seed of average size and test weight. The charts are
based on factory-supplied 5.70-8 8-Ply tires inflated to
factory specification. Many factors affect seeding rates
including foreign material, seed treatment, seed size,
seed weight, field conditions, tire pressure and test
weight.
Use the charts only as a starting point. Minor
adjustments are commonly required. Set and check the
seeding rate using the procedures beginning on page 6,
then readjust the rate as necessary.
32342
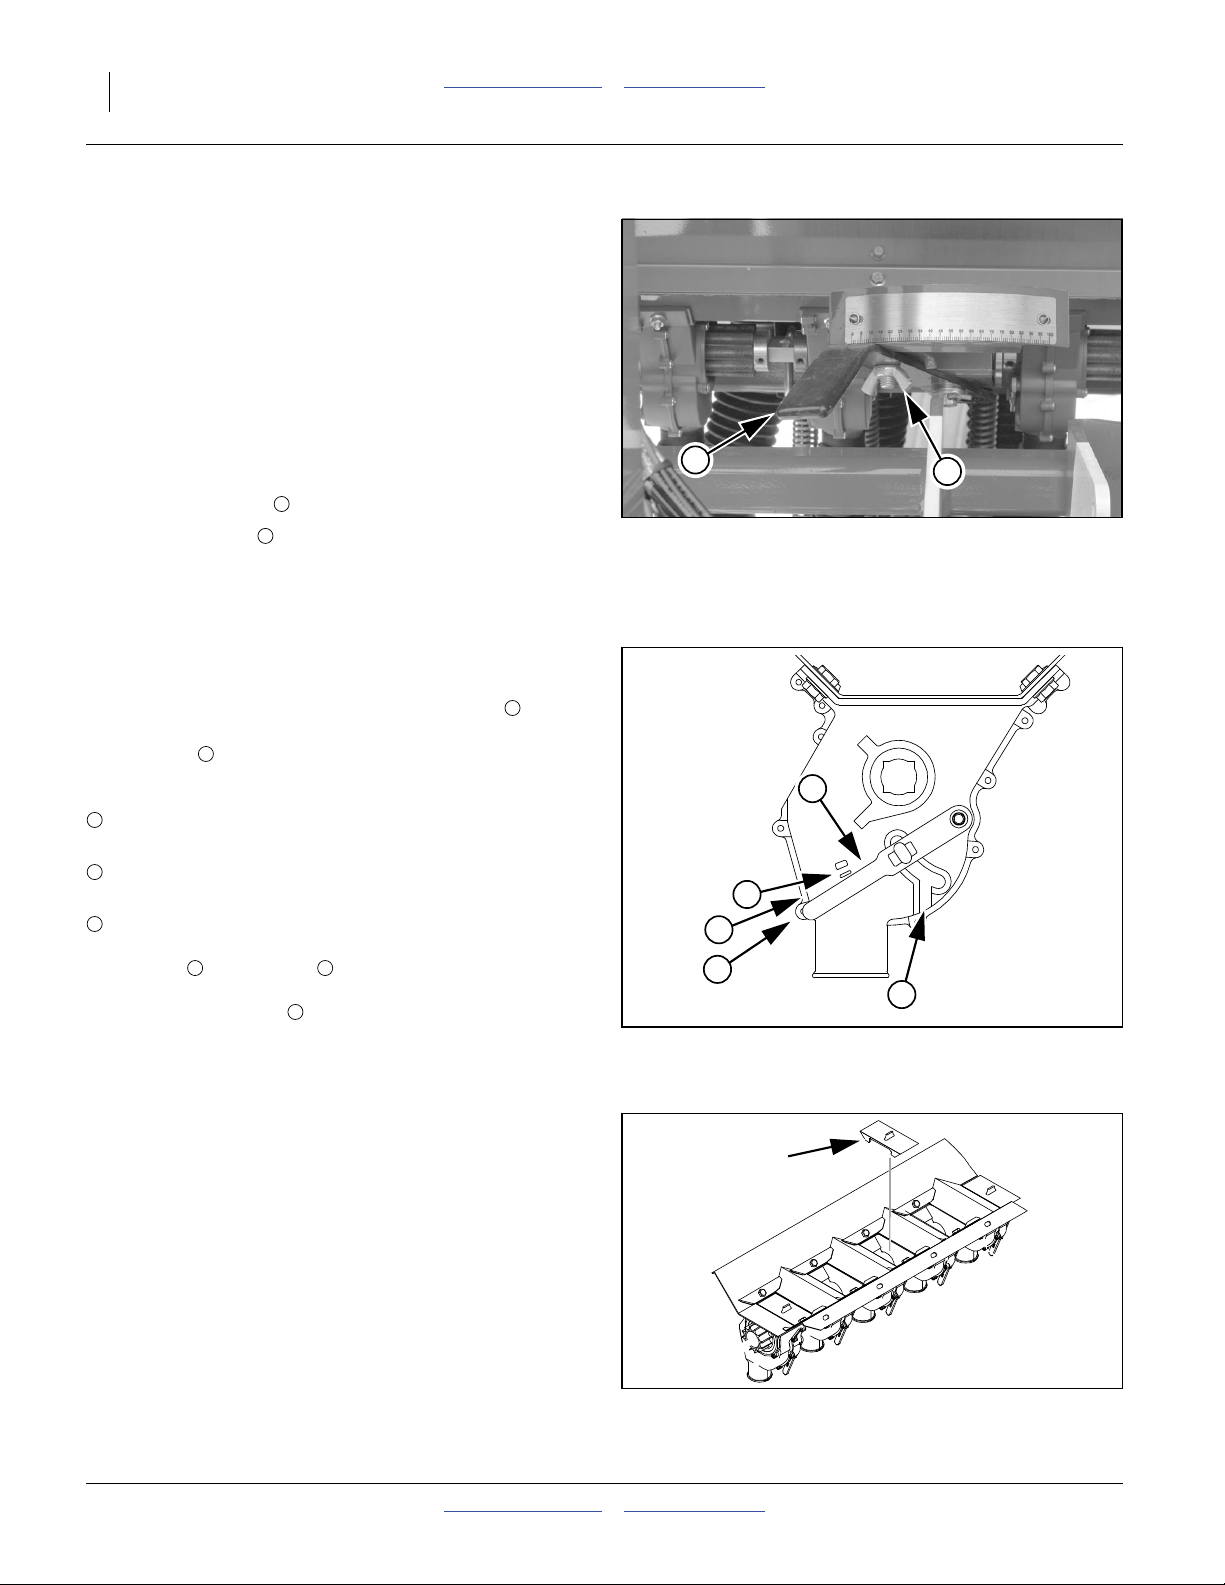
Setting Drive Type
Refer to Figure 3
The charts list Drive Types as 1, 2, 3 or 4. Drive Type is
determined by the handle on the gearbox cover, at left
front of drill.
Move the handle until the Drive Type number appears in
the handle window .
For correct Drive Type, refer to the charts in the Seed
Rate manual. Each Drive Type corresponds to a specific
gear ratio.
Drive Type Relative Speed
1 Slowest
Note: The gear box is shared between Main Seed Box
2011-10-21 Table of Contents Main Box Rates 151-143B
2 2.06 times faster than Type 1
3 3.08 times faster than Type 1
4 5.02 times faster than Type 1
and the optional Dual Seed and Native Grass
boxes. It is possible to plant from both boxes at the
same time only if their settings use the same Drive
Type.
2
1
2
1
32790
Figure 3
Gearbox Handle Adjustment
28414
Page 6
4 3P806NT Table of Contents Main Box Rates Great Plains Manufacturing, Inc.
Main and Dual Box Seed Rate Handle
Refer to Figure 4
There is a single rate handle for the entire box. There are
separate handles for the standard main seed box and the
optional dual seed box.
The seed rate handle controls the percent engagement
of the seed sprocket in each seed cup. The initial setting
of the handle is given by the Seed Rate Chart.
Note: You can temporarily stop main seed flow (such as
for adjusting level/depth) with handle set to zero.
To set the handle:
1. Loosen wing nut under handle.
2. Move indicator from current setting to about 10
higher than the new desired value from calibration or
the Seed Rate Chart, then back to the desired value.
3. Tighten wing nut.
6
7
7
Figure 4
Main/Dual Box Seed Rate Handle
6
32772
Position Seed Cup Doors
Refer to Figure 5,
which depicts the seed cup door handle in position .
At each main seed box seed tube, adjust the seed cup
door handle for the seed size.
The handle has three normal operating position detents:
1
(top detent) is for the smallest seeds.
Use it for wheat and similar small seeds.
2
(middle detent) is for larger seeds.
Use it for soybeans and similar larger seeds.
3
(bottom detent) is for oversize or fragile seeds.
If you experience excessive cracking with
setting , use setting .
Note: Handle position is used for clean-out, not
4
2 3
5
planting. If set to this position with seed loaded,
it may be difficult to reset it to a normal operating
position.
3
4
1
2
3
5
Figure 5
Seed Cup Door Handle
26211
Main/Dual Seed Row Shutoff
If alternate row spacings are desired, the unused rows
can be shut off with optional plugs.
1. Clean-out seed. The seed box must be empty prior
to inserting plugs. See “Main Box Clean-Out” in
Operator manual.
Refer to Figure 6
2. Insert one plug at each row to shut off. Verify the
seed hose path before inserting the plug, as some
hoses do not make a strictly vertical drop to their row
units.
3. Review seed rate settings prior to planting. Perform
calibration calculations with the actual active row
count.
151-143B Table of Contents Main Box Rates 2011-10-21
Figure 6
Seed Cup Plug
26279
Page 7
Great Plains Manufacturing, Inc. Table of Contents Main Box Rates Main and Dual Box Seed Rate 5
Seed Rate Handle Se
e
e
04.76.38.411141720242731
n
n
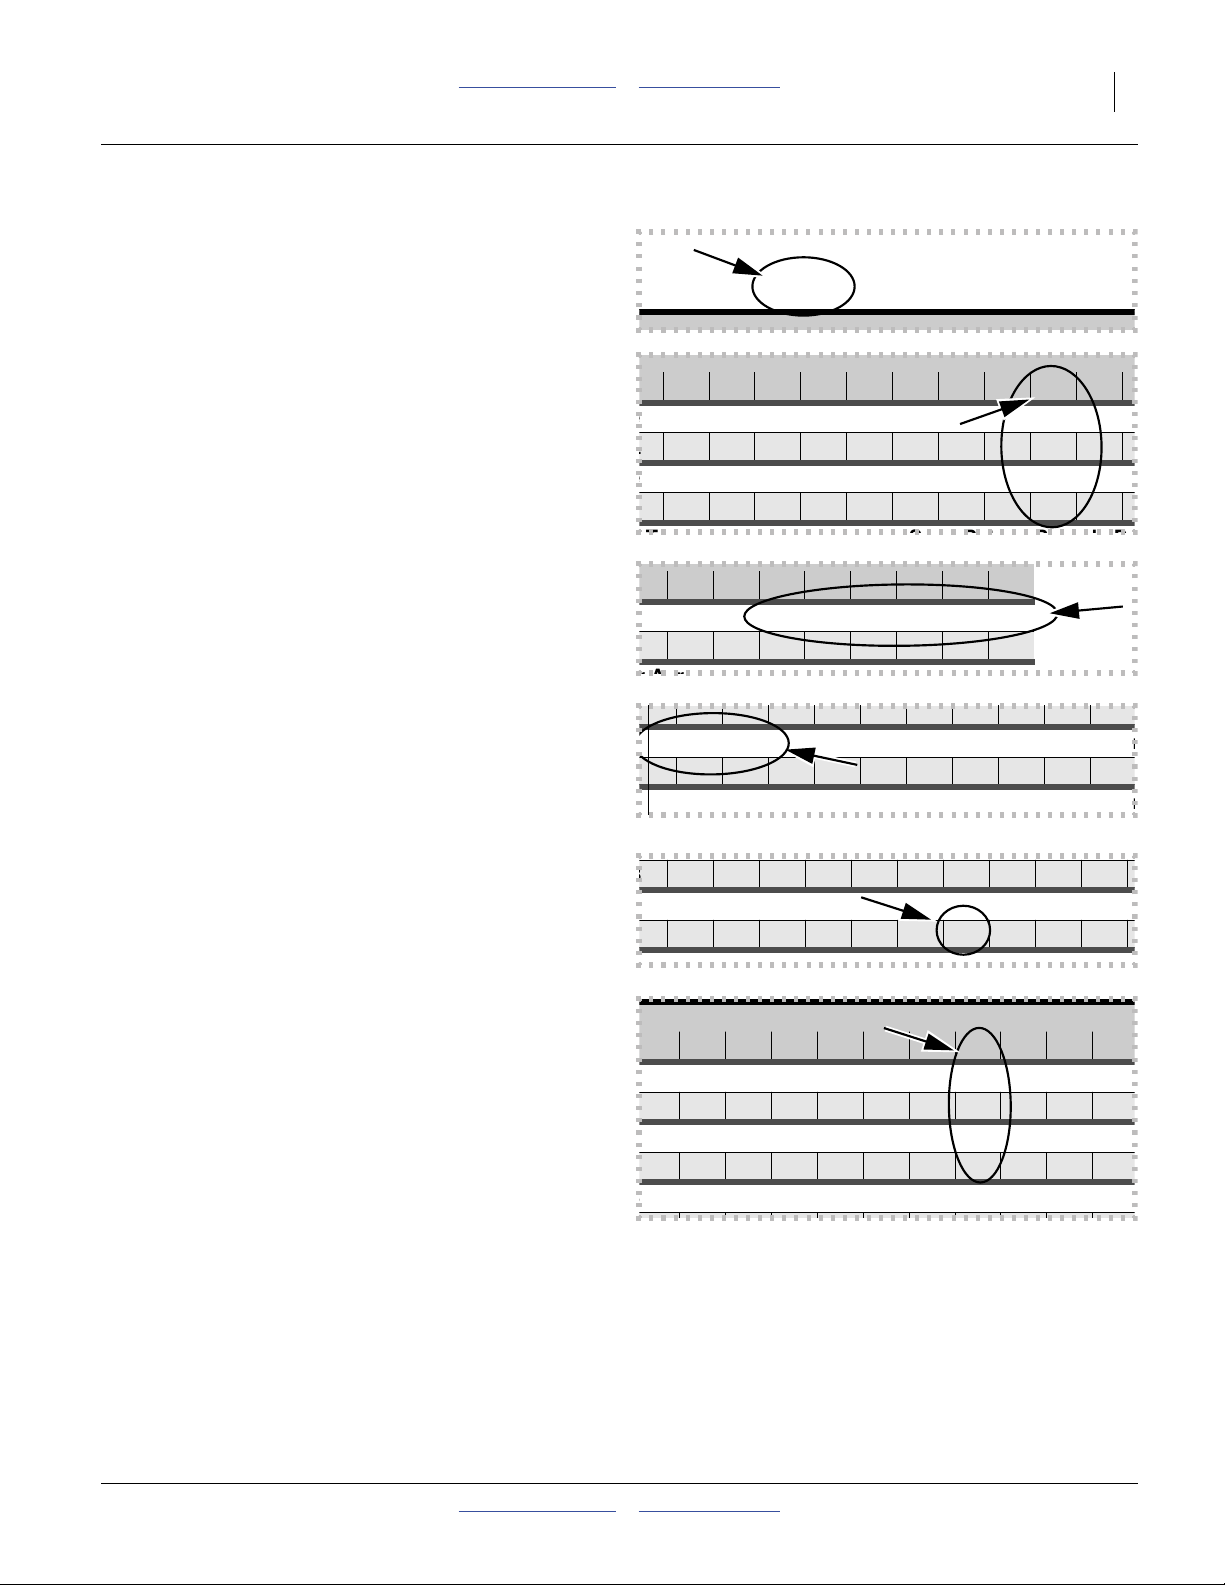
Reading a Seed Rate Chart
1. Find your seed. Charts are in alphabetical order by
common North American seed name. Scientific
names are provided. Charts covering more than one
seed may be out of order.
For Sudan, see Flax.
The example presumes Barley at 60 pounds/acre.
There are multiple chart sections for some seeds,
and the rates may overlap. Use the chart where your
desired rate is closest to 50 on the Seed Rate Handle scale.
In the example, this would be Drive Type 2.
If your seed is not listed, find one with similar size,
shape and density. Density of the test seed used to
develop the chart appears under the right end of the
handle scale values.
Barley (Hordeum vulgare)
10 15 20 25 30 35 40 45 50 55
Type: 1 Seed Rate in Pounds P
32342
76.38.41114172024273135
Type: 2 Seed Rate in Pounds P
013172228354249566472
065707580859095100
Acre
94245495154565758
(based on 51 pounds/bushel)
32342
32342
2. Note the Drive Type for the chart rate row chosen (at
left above rates). This number (1-4) is used to
determine the gearbox handle setting. See page 3.
In the example, this is
Drive Type 2
3. Locate your desired seed rate in the table row for
your row spacing.
In the example the rate closest to 60 is:
64
4. Note the Seed Rate Handle setting required, at the
top of the column at that seed rate. This is the initial
value set on the Seed Rate Handle. See page 4.
In the example, start with a handle setting of:
50 (or interpolate to 48),
and calibrate. When a target rate falls halfway
between handle settings, you can adjust the handle
slightly to compensate, as in the example, but
calibration is apt to result in further adjustment
anyway.
Drive Type: 2 Seed Rate in Pou
32342
010131722283542495664
Drive Type: 3 Seed Rate in Pou
.4 11 14 17 20 24 27 31 35 39 42
32342
Seed Rate in Pounds Per Acre
722283542495664727986
Seed Rate Handle Setting
15 20 25 30 35 40 5 50 55 60 65
Seed Rate in Pounds Per Acre
8.411141720242731353942
32342
Seed Rate in Pounds Per Acre
17 22 28 35 42 49 56 64 72 79 86
Seed Rate in Pounds Per Acre
2011-10-21 Table of Contents Main Box Rates 151-143B
Page 8

6 3P806NT Table of Contents Main Box Rates Great Plains Manufacturing, Inc.
Main/Dual Box Seed Rate Calibration
Differences will exist between the tested seed and field
conditions used to generate the Seed Rate Charts, and
your seed and conditions. To accurately achieve your
target population, Great Plains recommends calibrating.
Due to the large number of crank revolutions per acre
(310 or 569) and per hectare (766 or 1405), a practical
calibration is a simulation of1⁄
th
acre or1⁄
10
th
hectare.
10
1. Estimate the sample sizes.
TargetRate
RateSample
SamplePerRow
ExpectedSample SamplePerRow SampledRows×=
-----------------------------
=
=
10
RateSample
-----------------------------------
RowCount
Example: You want to apply barley at a TargetRate of
60 pounds per acre. RateSample is:
60
------
6.0
=
10
Example: the drill has 13 rows. SamplePerRow is:
6.0
0.46
------- -
=
13
Example: 3 rows are to be used in the sampling.
ExpectedSample is:
1.38 0.46 3×=
The expected sample net weight is 1.2 lb.
2. To perform this calibration, you need a scale that is
accurate at the aggregate sample size, and three (3)
light containers, each capable of holding the
expected SamplePerRow. Record the empty
container weights.
3. Raise the drill so the gauge wheel is out of ground
contact.
4. Remove the calibration crank from its storage stob.
Store the retaining pin on the stob.
5. Place the hex socket of the crank on the end of the
gearbox input jackshaft (see page 2).
6. Pull the seed hoses off the top of three opener seed
tubes, at the top of the openers. Place the hoses into
each sample container.
7. If not already done, set the Drive Type, Seed Rate
Handle and Seed Cup Doors across the drill. If any
optional seed boxes are loaded, disconnect their
drive or set their rate to zero (unless you are
simultaneously calibrating multiple boxes).
8. Load seed above the rows to be sampled. Load well
more than the expected sample size.
9. Rotate the crank or tire several turns to ensure that
the drives and seed cups are engaged, working
properly, free from foreign material, and that seed is
flowing steadily from the meters. Stop.
10. Note the current reading of the acremeter, unless
you do not plan to rely on it for the calibration.
11. Empty the sample containers back into the seed box,
and place them back under the three hoses to gather
metered seed.
Example: 3 containers, each weighing 0.5lb:
ContainerWeight = 1.5 lb
Crushing Hazard:
Install lift cylinder lock(s) on a raised drill.
Note: You can also rotate the tire, the gauge wheel
jackshaft or the gear box jackshaft. If using a
non-standard rotating/cranking point, rely on the
acremeter to determine the area simulated.
Example: you desire to plant barley at:
60 pounds per acre
which is between
45 and 50
on the Drive Type 2 chart.
Use an initial Seed Rate Handle (InitialHandle) scale
setting of:
48
151-143B Table of Contents Main Box Rates 2011-10-21
Page 9

Great Plains Manufacturing, Inc. Table of Contents Main Box Rates Main and Dual Box Seed Rate 7
12. Turn crank at a steady rate for the number of turns
specified on page 2, or until one tenth acre or
hectare is tallied on acremeter. While turning, check
that cups have ample seed coming into them.
13. Weigh metered seed. Subtract initial weight of
container(s).
NetWeight GrossWeight ContainerWeight–=
14. Divide the net seed weight by three. Multiply by
number of openers on your drill, and then by ten, to
determine the total of pounds per acre seeded.
NetWeight
MeasuredRate
--------------------------------------
SampledRows
OpenerCount× 10×=
15. The Seed Rate Handle scale is a percentage of
meter opening, and its effect is linear near scale
center. Calculate a new scale setting based on the
test.
Set the Seed Rate Handle to the new scale setting.
16. You may want to repeat calibration procedure at the
new setting if your results varied greatly from the
Seed Rate Chart, or if you must operate near the
ends of the Seed Rate handle scale (0-20 or
90-100).
TargetRate
NewScale
-------------------------------------- -
MeasuredRate
PreviousScale×=
3P806NT crank rotations for1⁄
10
th
acre:
31
Example: the containers weighed a total of
2.98 pounds after test. NetWeight is:
1.48 lbs net
1.48 2.98 1.5–=
Example: MeasuredRate is:
64 lbs/ac
1.48
64.3
-----------
3
13 10××=
For example:
the target rate was 60 lbs/ac, and the initial scale 48:
the NewScale setting is:
45
60
44.8
------
64
48×=
17. With calibration complete, store calibration crank,
reinstall any removed chains or sprockets and
reconnect seed hoses.
18. Check that your tire(s) is(are) properly inflated. See
“Tire Inflation Chart” in Operator manual.
When drilling, check seeding rate by noting acres drilled,
amount of seed added to drill and seed level in drill box.
If you are seeding more or less than desired, adjust rate
slightly to compensate for field conditions.
2011-10-21 Table of Contents Main Box Rates 151-143B
Page 10
8 3P806NT Table of Contents Main Box Rates Great Plains Manufacturing, Inc.
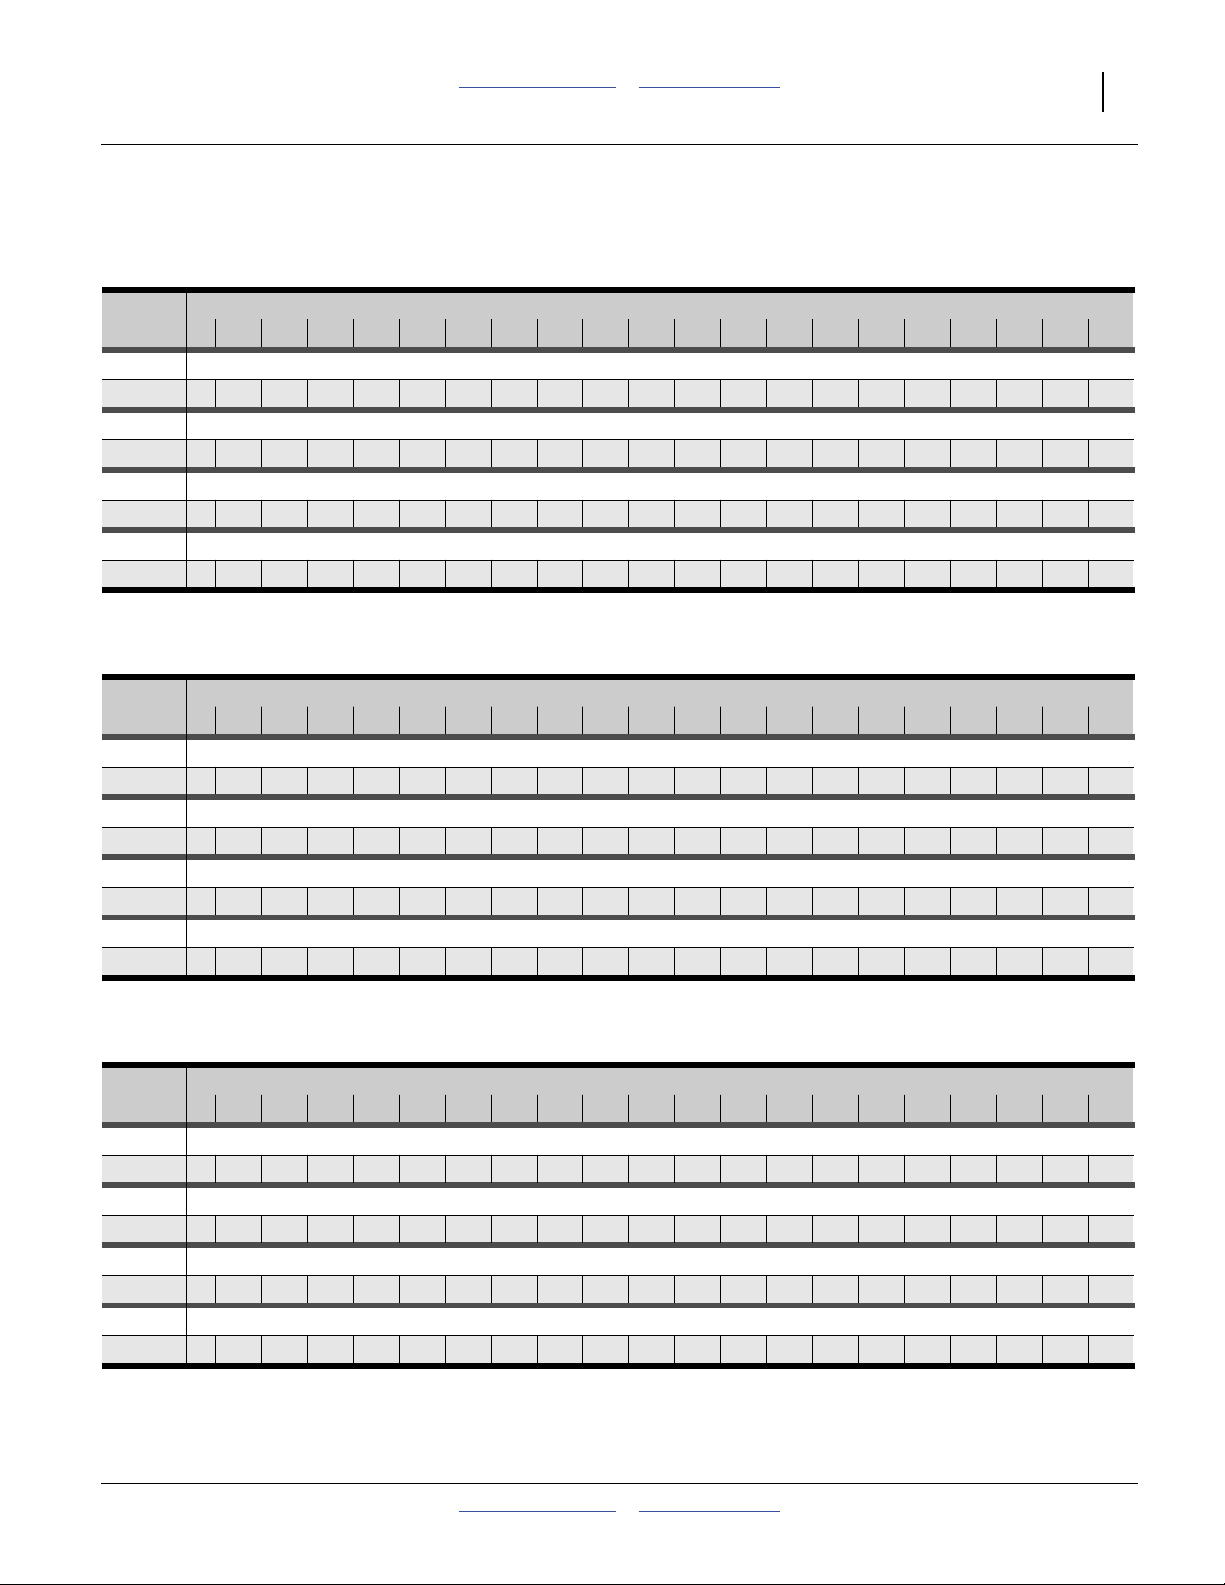
Rate Charts, Main Seed Box
Charts in U.S. customary units.
Metric charts begin on page 33.
Alfalfa (Medicago sativa)
Seed Rate Handle Setting
0 5 10 15 20 25 30 35 40 45 50 55 60 65 70 75 80 85 90 95 100
Rows Drive Type: 1 Seed Rate in Pounds Per Acre
7.5 in
7.5 in
7.5 in
7.5 in
0 4.6 6.7 9.1 12 15 18 21 25 28 32 36 39 43 47 50 54 57 61 64 66
Drive Type: 2 Seed Rate in Pounds Per Acre
0 9.5 14 19 24 30 37 44 51 58 66 73 81 89 96 104 111 118 125 131 136
Drive Type: 3 Seed Rate in Pounds Per Acre
015222937465565758697108119130141151162171180189196
Drive Type: 4 Seed Rate in Pounds Per Acre
0 25 35 47 60 75 90 106 123 140 158 176 194 212 230 247 264 279 294 308 320
(based on 60 pounds/bushel)
32291C
Bahia Grass (Paspalum notatum)
Seed Rate Handle Setting
0 5 10 15 20 25 30 35 40 45 50 55 60 65 70 75 80 85 90 95 100
Rows Drive Type: 1 Seed Rate in Pounds Per Acre
7.5 in
7.5 in
7.5 in
7.5 in
0 2.2 3.1 4.5 6.3 8.5 11 14 17 20 23 27 30 33 37 40 43 46 48 50 52
Drive Type: 2 Seed Rate in Pounds Per Acre
0 4.4 6.4 9.3 13 18 23 28 35 41 48 55 62 69 76 82 88 94 99 104 107
Drive Type: 3 Seed Rate in Pounds Per Acre
0 6.6 10 14 20 26 34 43 52 62 72 82 93 103 113 123 132 141 149 156 161
Drive Type: 4 Seed Rate in Pounds Per Acre
01116233243567085101117134151168185201216230243254263
Barley (Hordeum vulgare)
Seed Rate Handle Setting
0 5 10 15 20 25 30 35 40 45 50 55 60 65 70 75 80 85 90 95 100
Rows Drive Type: 1 Seed Rate in Pounds Per Acre
7.5 in
7.5 in
7.5 in
7.5 in
0 4.7 6.3 8.4 11 14 17 20 24 27 31 35 39 42 45 49 51 54 56 57 58
Drive Type: 2 Seed Rate in Pounds Per Acre
01013172228354249566472798693100105110115118120
Drive Type: 3 Seed Rate in Pounds Per Acre
014192634435262728394105116126137147156165173180186
Drive Type: 4 Seed Rate in Pounds Per Acre
0 22 32 43 56 70 85 101 118 135 153 171 189 206 223 239 255 269 282 293 303
(based on 40 pounds/bushel)
32292C
(based on 51 pounds/bushel)
32293C
151-143B Table of Contents Main Box Rates 2011-10-21
Page 11
Great Plains Manufacturing, Inc. Table of Contents Main Box Rates Main and Dual Box Seed Rate 9
Rate Charts, Main Seed Box, continued...
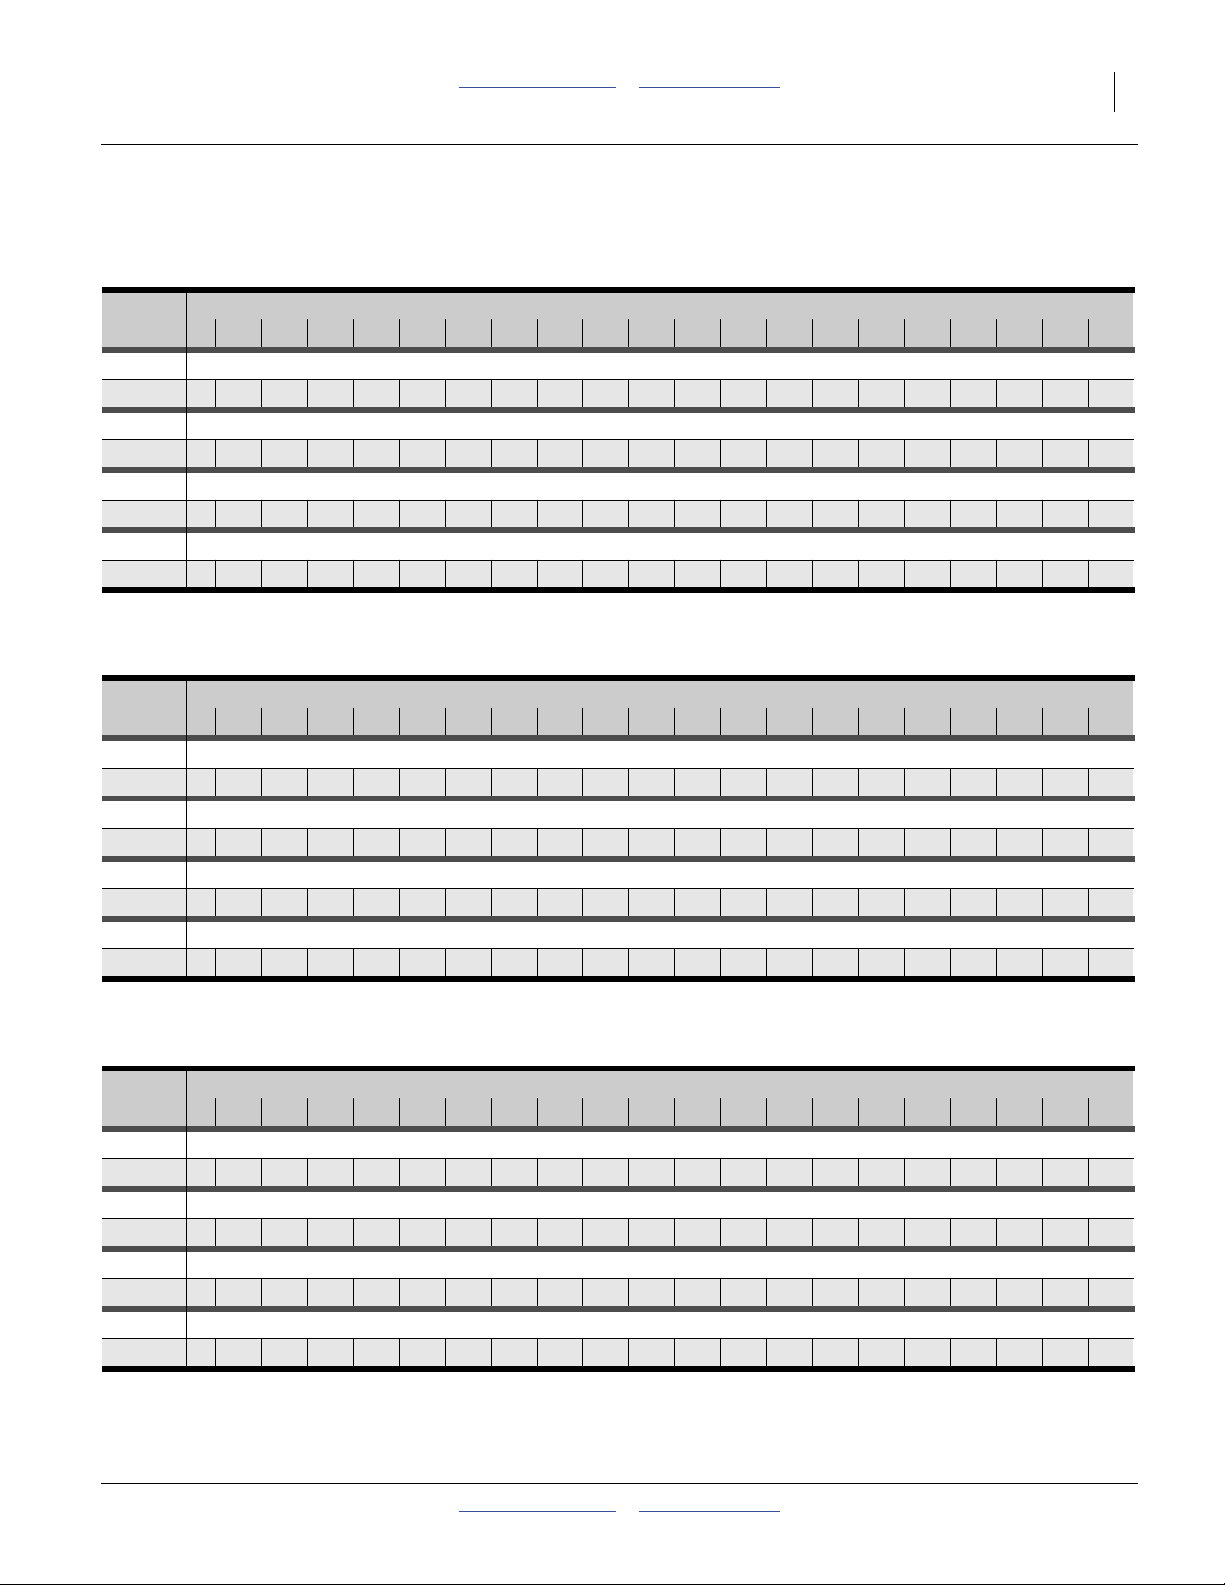
Buckwheat (Fagopyrum esculentum)
Seed Rate Handle Setting
0 5 10 15 20 25 30 35 40 45 50 55 60 65 70 75 80 85 90 95 100
Rows Drive Type: 1 Seed Rate in Pounds Per Acre
7.5 in
7.5 in
7.5 in
7.5 in
0 3.9 5.7 7.9 10 13 16 20 23 27 30 34 37 41 44 47 50 52 54 55 57
Drive Type: 2 Seed Rate in Pounds Per Acre
0 8.0 12 16 22 27 34 41 48 55 62 70 77 84 90 96 102 107 111 114 116
Drive Type: 3 Seed Rate in Pounds Per Acre
015182431394960728597110123136148159170179187192197
Drive Type: 4 Seed Rate in Pounds Per Acre
0 24 30 39 50 64 80 98 118 138 159 180 201 222 241 260 277 292 304 314 320
Buffalograss (Buchloe dactyloides)
(based on 48 pounds/bushel)
32295C
Seed Rate Handle Setting
0 5 10 15 20 25 30 35 40 45 50 55 60 65 70 75 80 85 90 95 100
Rows Drive Type: 1 Seed Rate in Pounds Per Acre
7.5 in
7.5 in
7.5 in
7.5 in
01.21.92.94.05.36.68.09.4111214151617181920202020
Drive Type: 2 Seed Rate in Pounds Per Acre
02.44.06.08.311141619222528313336383940414141
Drive Type: 3 Seed Rate in Pounds Per Acre
0 4.4 6.4 8.9 12 16 20 24 28 33 37 42 46 50 54 57 60 62 63 63 63
Drive Type: 4 Seed Rate in Pounds Per Acre
0 7.2 10 15 20 26 32 39 46 54 61 68 75 82 88 93 97 101 103 103 103
Bermuda Grass (Cynodon dactylon)
Seed Rate Handle Setting
0 5 10 15 20 25 30 35 40 45 50 55 60 65 70 75 80 85 90 95 100
Rows Drive Type: 1 Seed Rate in Pounds Per Acre
7.5 in
7.5 in
7.5 in
7.5 in
0 1.8 3.5 5.3 7.2 9.1 11 13 15 17 19 21 23 25 27 29 31 33 35 36 38
Drive Type: 2 Seed Rate in Pounds Per Acre
03.67.2111519232731353943475155596367717578
Drive Type: 3 Seed Rate in Pounds Per Acre
0 5.7 11 17 22 28 34 40 46 52 58 64 70 76 81 87 92 97 102 107 112
Drive Type: 4 Seed Rate in Pounds Per Acre
0 9.3 18 27 36 46 55 65 75 85 94 104 114 123 132 141 150 159 167 175 182
(based on 23 pounds/bushel)
32296C
(based on 60 pounds/bushel)
32294C
2011-10-21 Table of Contents Main Box Rates 151-143B
Page 12
10 3P806NT Table of Contents Main Box Rates Great Plains Manufacturing, Inc.
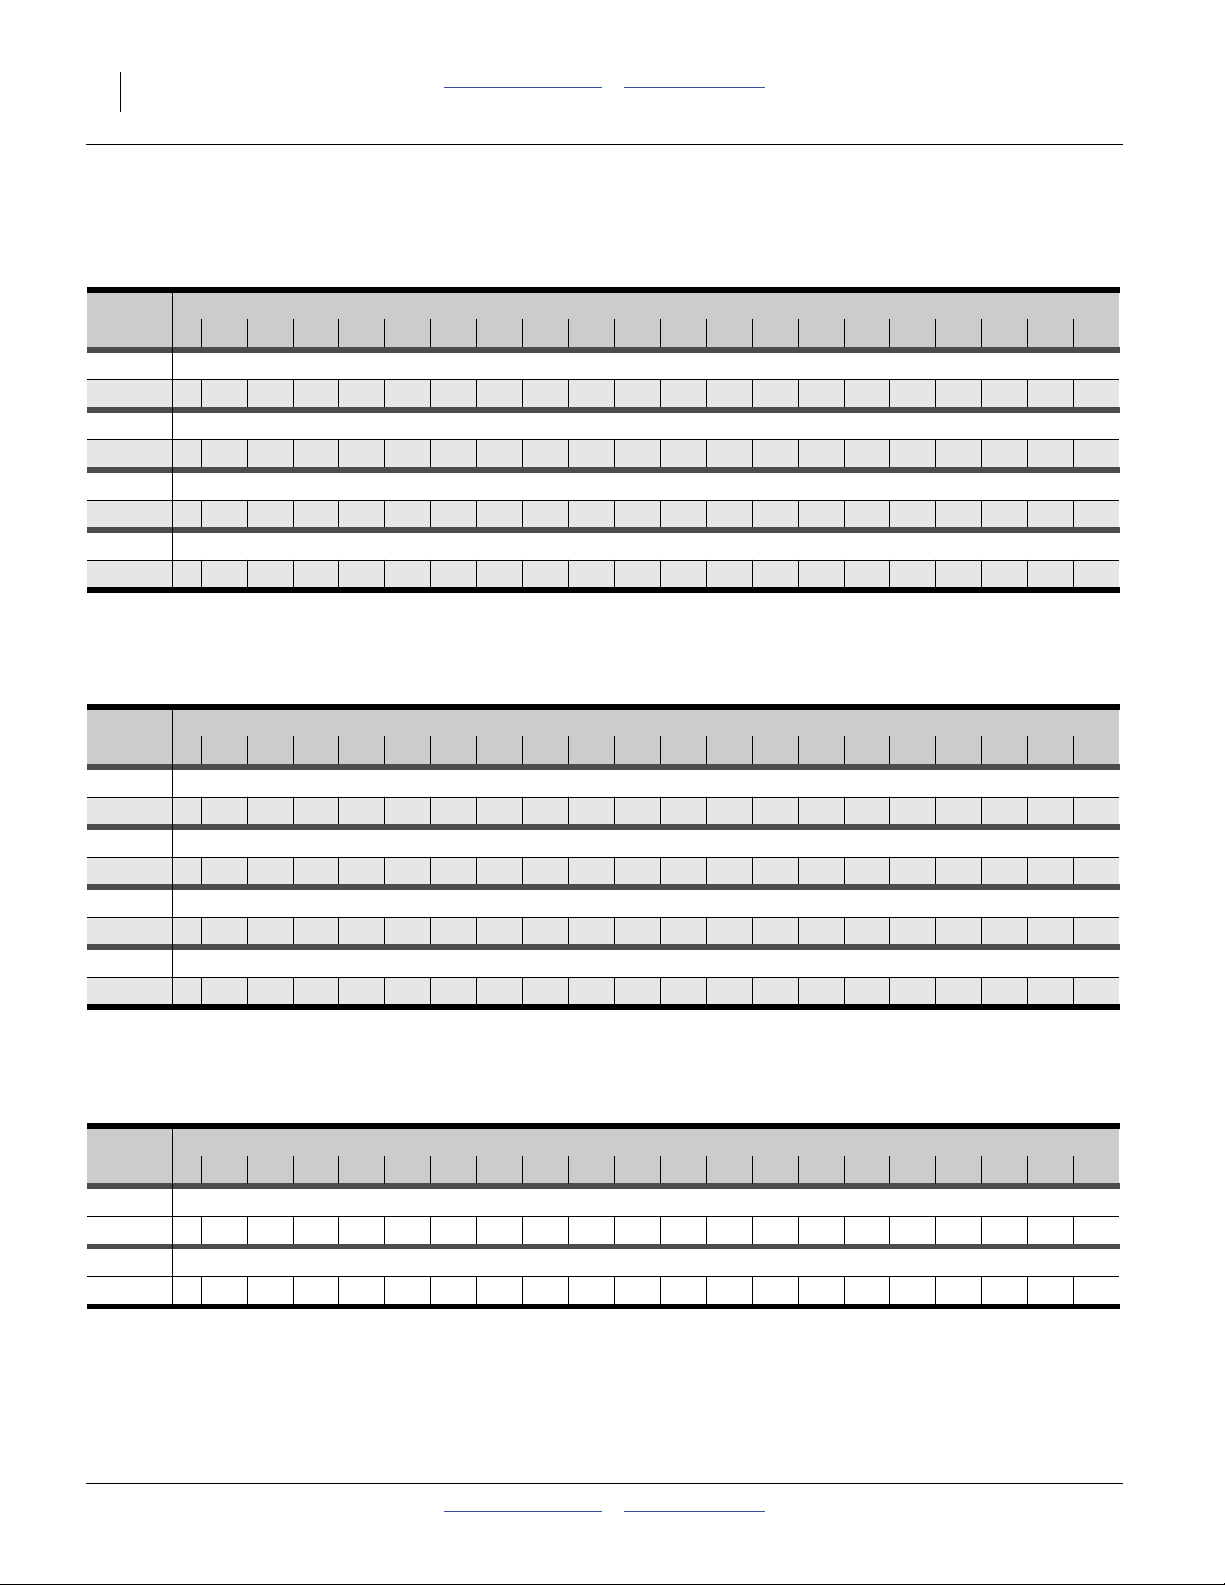
Rate Charts, Main Seed Box, continued...
K-31 Fescue (Festuca)
Seed Rate Handle Setting
0 5 10 15 20 25 30 35 40 45 50 55 60 65 70 75 80 85 90 95 100
Rows Drive Type: 1 Seed Rate in Pounds Per Acre
7.5 in
7.5 in
7.5 in
7.5 in
0 1.9 2.9 4.0 5.2 6.4 7.7 9.0 10 12 13 14 16 17 18 19 20 21 21 22 23
Drive Type: 2 Seed Rate in Pounds Per Acre
0 3.9 5.9 8.2 11 13 16 18 21 24 27 29 32 34 37 39 41 43 44 45 46
Drive Type: 3 Seed Rate in Pounds Per Acre
06.69.3121619232731353943475155586164676970
Drive Type: 4 Seed Rate in Pounds Per Acre
0111520253137445057647077838995100105109112115
Flax (Linum usitatissimum) or Sudan
(Sorghum bicolor subsp. drummondii)
(based on 21 pounds/bushel)
32297C
Seed Rate Handle Setting
0 5 10 15 20 25 30 35 40 45 50 55 60 65 70 75 80 85 90 95 100
Rows Drive Type: 1 Seed Rate in Pounds Per Acre
7.5 in
7.5 in
7.5 in
7.5 in
0 4.6 6.8 9.3 12 15 19 22 26 29 33 37 41 44 48 52 55 59 62 65 67
Drive Type: 2 Seed Rate in Pounds Per Acre
0 9.4 14 19 25 31 38 45 53 60 68 76 84 91 99 107 114 121 127 133 139
Drive Type: 3 Seed Rate in Pounds Per Acre
014212937465666768697108118129140150160169179187195
Drive Type: 4 Seed Rate in Pounds Per Acre
0 23 35 47 61 75 91 107 124 141 158 175 193 210 228 244 261 276 291 305 318
Eastern Gamma Grass - Pete
(Tripsacum dactyloides)
Seed Rate Handle Setting
0 5 10 15 20 25 30 35 40 45 50 55 60 65 70 75 80 85 90 95 100
Rows Drive Type: 1 Seed Rate in Pounds Per Acre
7.5 in
7.5 in
03.85.37.09.011141619212426293134363840414243
Drive Type: 2 Seed Rate in Pounds Per Acre
0 7.9 11 14 18 23 28 33 38 44 49 54 60 65 69 74 78 81 84 86 88
(based on 55 pounds/bushel)
32298C
32299C
151-143B Table of Contents Main Box Rates 2011-10-21
Page 13
Great Plains Manufacturing, Inc. Table of Contents Main Box Rates Main and Dual Box Seed Rate 11
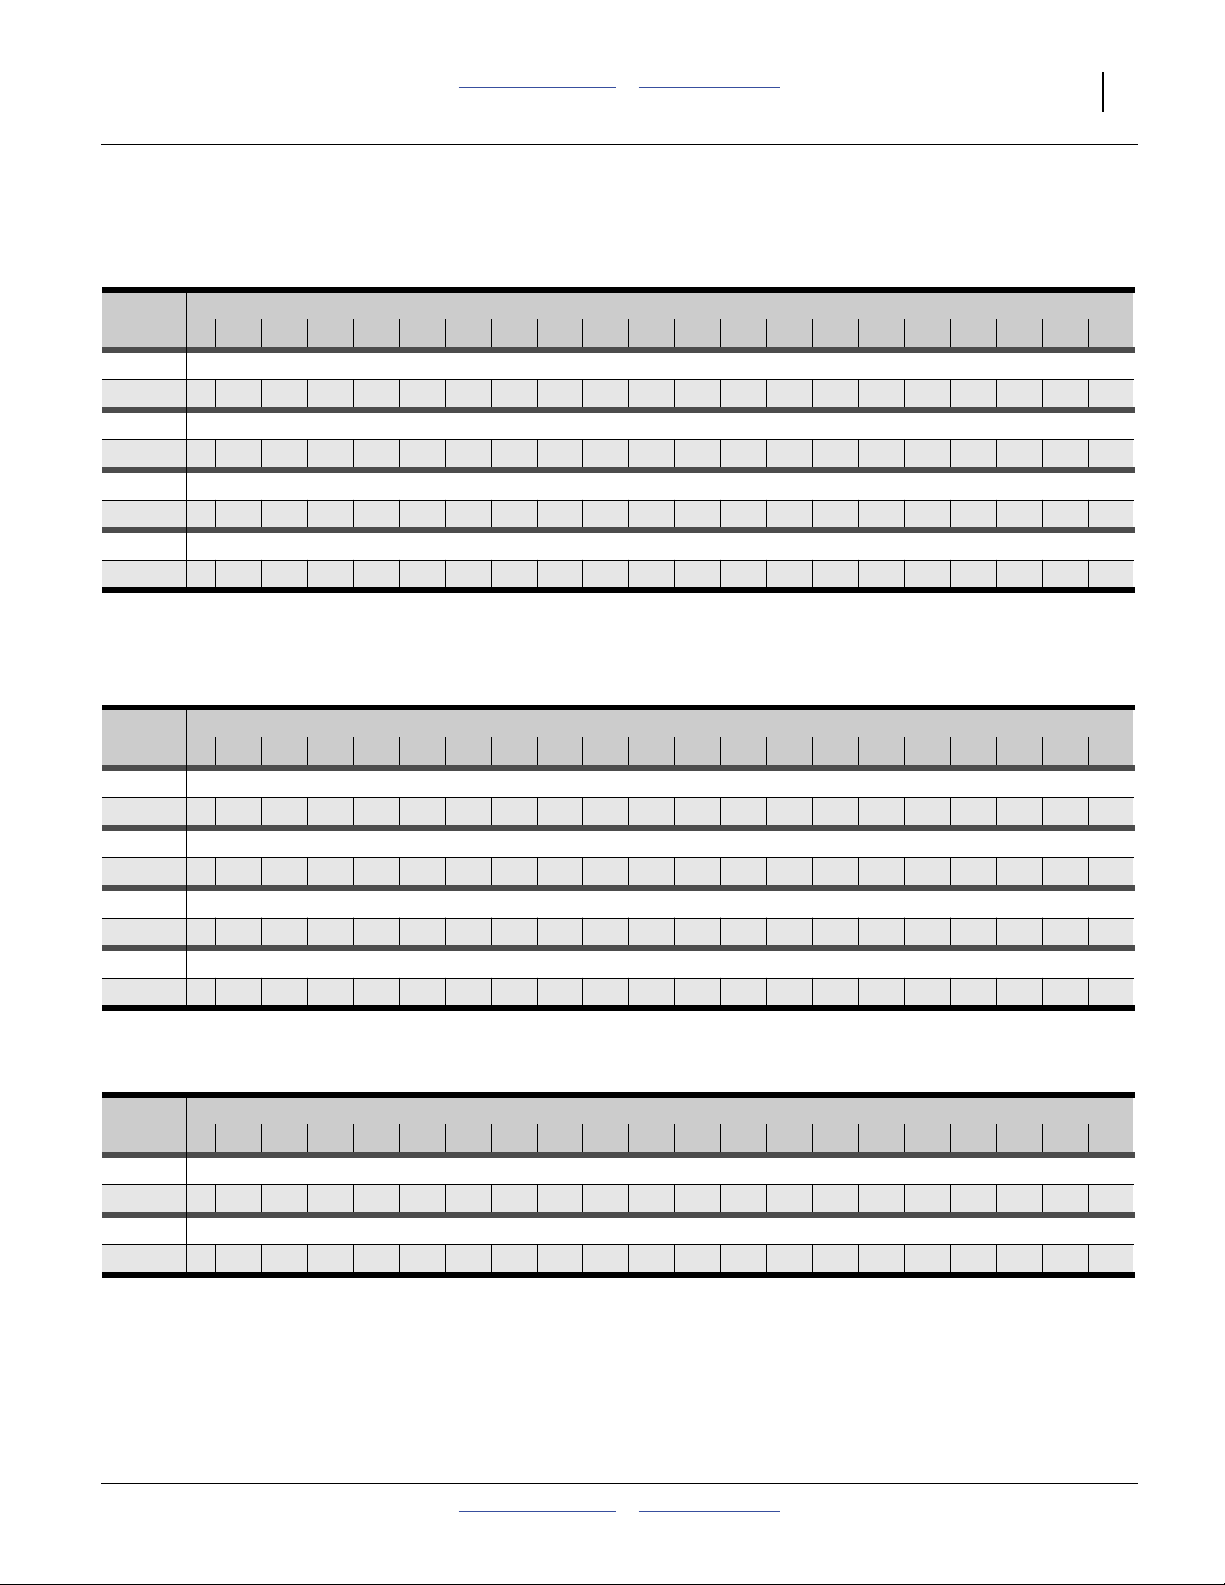
Rate Charts, Main Seed Box, continued...
Kentucky Blue Grass (Poa pratensis)
Seed Rate Handle Setting
0 5 10 15 20 25 30 35 40 45 50 55 60 65 70 75 80 85 90 95 100
Rows Drive Type: 1 Seed Rate in Pounds Per Acre
7.5 in
7.5 in
7.5 in
7.5 in
0 1.5 2.1 2.9 3.7 4.6 5.6 6.7 7.7 8.8 10 11 12 13 14 15 16 17 17 18 18
Drive Type: 2 Seed Rate in Pounds Per Acre
03.04.45.97.710121416182023252729313334353737
Drive Type: 3 Seed Rate in Pounds Per Acre
04.87.2101215182124273033363942444749515355
Drive Type: 4 Seed Rate in Pounds Per Acre
0 7.9 12 16 20 25 29 34 39 44 49 54 59 63 68 72 76 80 83 87 89
Millet (Pennisetum glaucum, Setaria italica,
Panicum miliaceum, Eleusine coracana)
(based on 23 pounds/bushel)
32300C
Seed Rate Handle Setting
0 5 10 15 20 25 30 35 40 45 50 55 60 65 70 75 80 85 90 95 100
Rows Drive Type: 1 Seed Rate in Pounds Per Acre
7.5 in
7.5 in
7.5 in
7.5 in
0 4.8 6.8 9.2 12 15 18 21 25 28 32 35 39 42 46 49 52 55 58 60 62
Drive Type: 2 Seed Rate in Pounds Per Acre
01014192430374351586573808794101107113118123127
Drive Type: 3 Seed Rate in Pounds Per Acre
014202836455565768798109120131141151161170178185191
Drive Type: 4 Seed Rate in Pounds Per Acre
0 22 33 45 59 74 90 107 124 142 160 178 196 213 230 247 262 277 290 301 311
Milo (Sorghum)
Seed Rate Handle Setting
0 5 10 15 20 25 30 35 40 45 50 55 60 65 70 75 80 85 90 95 100
Rows Drive Type: 1 Seed Rate in Pounds Per Acre
7.5 in
7.5 in
04.67.1101417222631364045505560646872757880
Drive Type: 2 Seed Rate in Pounds Per Acre
0 9.4 15 21 28 36 44 54 63 73 83 93 103 113 122 131 140 148 154 160 165
(based on 60 pounds/bushel)
32301C
(based on 60 pounds/bushel)
32302C
2011-10-21 Table of Contents Main Box Rates 151-143B
Page 14
12 3P806NT Table of Contents Main Box Rates Great Plains Manufacturing, Inc.
Rate Charts, Main Seed Box, continued...
Oats (Avena sativa)
Seed Rate Handle Setting
0 5 10 15 20 25 30 35 40 45 50 55 60 65 70 75 80 85 90 95 100
Rows Drive Type: 1 Seed Rate in Pounds Per Acre
7.5 in
7.5 in
7.5 in
7.5 in
0 1.8 3.1 4.5 6.1 7.8 10 12 14 16 18 20 22 24 26 28 30 32 33 35 36
Drive Type: 2 Seed Rate in Pounds Per Acre
0 3.7 6.3 9.2 13 16 20 24 28 32 37 41 46 50 54 58 62 65 69 71 74
Drive Type: 3 Seed Rate in Pounds Per Acre
0 6.8 10 14 18 24 30 36 43 50 57 64 71 78 84 90 96 101 105 109 111
Drive Type: 4 Seed Rate in Pounds Per Acre
011162230394859708193104115127137147156164171177181
Orchard Grass Potomac (Dactylis glomerata)
(based on 37 pounds/bushel)
32303C
Seed Rate Handle Setting
0 5 10 15 20 25 30 35 40 45 50 55 60 65 70 75 80 85 90 95 100
Rows Drive Type: 1 Seed Rate in Pounds Per Acre
7.5 in
7.5 in
7.5 in
7.5 in
0 1.1 1.5 2.0 2.7 3.3 4.1 4.9 5.8 6.7 7.6 8.5 9.4 10 11 12 13 13 14 14 15
Drive Type: 2 Seed Rate in Pounds Per Acre
02.33.14.25.56.98.51012141618192123252627282930
Drive Type: 3 Seed Rate in Pounds Per Acre
03.34.66.17.910121417202225273032353739414344
Drive Type: 4 Seed Rate in Pounds Per Acre
05.47.4101316202428323640454953576164677072
Peas (Pisum sativum)
Seed Rate Handle Setting
0 5 10 15 20 25 30 35 40 45 50 55 60 65 70 75 80 85 90 95 100
Rows Drive Type: 1 Seed Rate in Pounds Per Acre
7.5 in
7.5 in
7.5 in
7.5 in
0 2.1 5.2 8.7 13 17 21 26 30 35 40 44 49 53 57 61 64 67 70 72 73
Drive Type: 2 Seed Rate in Pounds Per Acre
0 4.4 11 18 26 34 43 53 62 72 81 91 100 109 117 125 132 138 143 147 150
Drive Type: 3 Seed Rate in Pounds Per Acre
0 3.2 12 22 33 45 58 71 84 98 112 125 138 151 163 174 184 192 199 205 209
Drive Type: 4 Seed Rate in Pounds Per Acre
0 5.2 20 36 54 74 94 116 138 160 182 204 225 246 265 283 299 313 325 334 341
(based on 18 pounds/bushel)
32304C
(based on 61 pounds/bushel)
32305C
151-143B Table of Contents Main Box Rates 2011-10-21
Page 15
Great Plains Manufacturing, Inc. Table of Contents Main Box Rates Main and Dual Box Seed Rate 13
Rate Charts, Main Seed Box, continued...
Pinto Beans (Phaseolus vulgaris)
Seed Rate Handle Setting
0 5 10 15 20 25 30 35 40 45 50 55 60 65 70 75 80 85 90 95 100
Rows Drive Type: 1 Seed Rate in Pounds Per Acre
7.5 in
7.5 in
7.5 in
7.5 in
04.16.8101418222732374247525660646871737576
Drive Type: 2 Seed Rate in Pounds Per Acre
0 8.5 14 21 28 37 46 56 65 76 86 96 106 115 124 132 140 146 151 155 157
Drive Type: 3 Seed Rate in Pounds Per Acre
01422314254678195109124139153167180192203213221227231
Drive Type: 4 Seed Rate in Pounds Per Acre
0 23 35 51 68 88 109 131 155 178 203 226 250 272 294 313 331 347 360 369 376
Rape (Brassica napus)
(based on 61 pounds/bushel)
32306C
Seed Rate Handle Setting
0 5 10 15 20 25 30 35 40 45 50 55 60 65 70 75 80 85 90 95 100
Rows Drive Type: 1 Seed Rate in Pounds Per Acre
7.5 in
7.5 in
7.5 in
7.5 in
0 4.2 6.2 8.5 11 14 16 19 22 25 28 31 34 37 40 43 46 49 52 54 56
Drive Type: 2 Seed Rate in Pounds Per Acre
0 8.6 13 18 23 28 34 39 45 52 58 64 70 77 83 89 95 101 106 111 116
Drive Type: 3 Seed Rate in Pounds Per Acre
01318253139475665758494104113122131139147154161166
Drive Type: 4 Seed Rate in Pounds Per Acre
0 22 30 40 51 64 77 91 106 122 137 153 169 184 199 214 227 240 252 262 271
Rice, Long Grain (Oryza sativa indica)
Seed Rate Handle Setting
0 5 10 15 20 25 30 35 40 45 50 55 60 65 70 75 80 85 90 95 100
Rows Drive Type: 1 Seed Rate in Pounds Per Acre
7.5 in
7.5 in
7.5 in
7.5 in
00.93.35.88.311141619212426293133353739404142
Drive Type: 2 Seed Rate in Pounds Per Acre
01.86.7121722283339444954596468727679828587
Drive Type: 3 Seed Rate in Pounds Per Acre
0 3.0 10 18 25 33 40 48 56 63 71 78 85 92 99 106 113 119 125 130 136
Drive Type: 4 Seed Rate in Pounds Per Acre
0 4.9 17 29 41 53 66 78 91 103 115 127 139 151 162 173 183 194 203 213 221
(based on 51 pounds/bushel)
32307C
(based on 47 pounds/bushel)
32308C
2011-10-21 Table of Contents Main Box Rates 151-143B
Page 16

14 3P806NT Table of Contents Main Box Rates Great Plains Manufacturing, Inc.
Rate Charts, Main Seed Box, continued...
Rice, Short Grain (Oryza sativa japonica,
Oryza sativa sinica)
Seed Rate Handle Setting
0 5 10 15 20 25 30 35 40 45 50 55 60 65 70 75 80 85 90 95 100
Rows Drive Type: 1 Seed Rate in Pounds Per Acre
7.5 in
7.5 in
7.5 in
7.5 in
02.54.66.99.312141720232528313336384042444647
Drive Type: 2 Seed Rate in Pounds Per Acre
05.29.5141924303541475258636974798387919497
Drive Type: 3 Seed Rate in Pounds Per Acre
0111621283543515968778594102110117123128133136138
Drive Type: 4 Seed Rate in Pounds Per Acre
01826354557708397111125139153166179190200209217222225
(based on 43 pounds/bushel)
32309C
Rye (Secale cereale)
Seed Rate Handle Setting
0 5 10 15 20 25 30 35 40 45 50 55 60 65 70 75 80 85 90 95 100
Rows Drive Type: 1 Seed Rate in Pounds Per Acre
7.5 in
7.5 in
7.5 in
7.5 in
03.86.6101418222731364146515661656973767981
Drive Type: 2 Seed Rate in Pounds Per Acre
0 7.8 14 20 28 36 45 55 65 75 85 95 105 115 124 133 142 149 156 162 167
Drive Type: 3 Seed Rate in Pounds Per Acre
01321314254678196111126142157173188202216228240250259
Drive Type: 4 Seed Rate in Pounds Per Acre
0 22 35 50 68 88 109 132 156 181 206 231 257 282 306 329 352 372 391 407 422
Perennial Rye Grass - Palmer
(Lolium perenne, Lolium multiflorum)
Seed Rate Handle Setting
0 5 10 15 20 25 30 35 40 45 50 55 60 65 70 75 80 85 90 95 100
Rows Drive Type: 1 Seed Rate in Pounds Per Acre
7.5 in
7.5 in
7.5 in
7.5 in
0 2.4 3.6 4.9 6.3 7.9 10 11 13 15 17 19 21 22 24 26 27 29 30 31 31
Drive Type: 2 Seed Rate in Pounds Per Acre
04.97.3101316202327313539424650535659616365
Drive Type: 3 Seed Rate in Pounds Per Acre
010121519242935414754616773798590949799101
Drive Type: 4 Seed Rate in Pounds Per Acre
01619243138475767778899109120129138146153158162164
(based on 57 pounds/bushel)
32310C
(based on 36 pounds/bushel)
32311C
151-143B Table of Contents Main Box Rates 2011-10-21
Page 17

Great Plains Manufacturing, Inc. Table of Contents Main Box Rates Main and Dual Box Seed Rate 15
Rate Charts, Main Seed Box, continued...
Soybeans (Glycine max)
Seed Rate Handle Setting
0 5 10 15 20 25 30 35 40 45 50 55 60 65 70 75 80 85 90 95 100
Rows Drive Type: 1 Seed Rate in Pounds Per Acre
7.5 in
7.5 in
7.5 in
7.5 in
04.06.9101418222631354044495357616467707274
Drive Type: 2 Seed Rate in Pounds Per Acre
0 8.3 14 21 29 37 45 54 63 73 82 91 100 109 117 125 132 139 144 149 152
Drive Type: 3 Seed Rate in Pounds Per Acre
01121314355678093106120133146158170182193203212220228
Drive Type: 4 Seed Rate in Pounds Per Acre
0 18 34 51 70 89 110 131 152 173 195 216 237 258 278 297 314 331 346 359 371
Sunflower (Helianthus annuus)
(based on 58 pounds/bushel)
32312C
Seed Rate Handle Setting
0 5 10 15 20 25 30 35 40 45 50 55 60 65 70 75 80 85 90 95 100
Rows Drive Type: 1 Seed Rate in Pounds Per Acre
7.5 in
7.5 in
7.5 in
7.5 in
00.31.73.24.86.58.31012141618202223252728303132
Drive Type: 2 Seed Rate in Pounds Per Acre
0 0.6 3.4 6.5 10 13 17 21 25 29 33 37 41 44 48 52 55 58 61 64 66
Drive Type: 3 Seed Rate in Pounds Per Acre
0 2.5 5.4 9.0 13 17 22 27 33 38 44 50 55 61 66 71 76 80 84 88 90
Drive Type: 4 Seed Rate in Pounds Per Acre
04.18.91521283645546372819099108116124131137143147
Tiffany Teff, Coated (Erogrostis tef)
Seed Rate Handle Setting
0 5 10 15 20 25 30 35 40 45 50 55 60 65 70 75 80 85 90 95 100
Rows Drive Type: 1 Seed Rate in Pounds Per Acre
7.5 in
7.5 in
7.5 in
7.5 in
0 4.0 6.3 8.8 12 14 18 21 24 28 31 35 39 43 47 51 54 58 62 65 69
Drive Type: 2 Seed Rate in Pounds Per Acre
0 8.3 13 18 24 30 36 43 50 57 65 72 80 88 96 104 112 119 127 134 142
Drive Type: 3 Seed Rate in Pounds Per Acre
012192736455464758697109120132144156167179190202212
Drive Type: 4 Seed Rate in Pounds Per Acre
0 20 32 44 58 73 88 105 122 140 158 177 196 215 235 254 273 292 311 329 346
(based on 28 pounds/bushel)
32313C
(based on 65 pounds/bushel)
32314C
2011-10-21 Table of Contents Main Box Rates 151-143B
Page 18

16 3P806NT Table of Contents Main Box Rates Great Plains Manufacturing, Inc.
Rate Charts, Main Seed Box, continued...
Wheat (Triticum)
Seed Rate Handle Setting
0 5 10 15 20 25 30 35 40 45 50 55 60 65 70 75 80 85 90 95 100
Rows Drive Type: 1 Seed Rate in Pounds Per Acre
7.5 in
7.5 in
7.5 in
7.5 in
07.18.9111418222630354045505559646872757880
Drive Type: 2 Seed Rate in Pounds Per Acre
01518232937455363728293103113122131140147154159164
Drive Type: 3 Seed Rate in Pounds Per Acre
01826344455688094108122136150164177190201212222230236
Drive Type: 4 Seed Rate in Pounds Per Acre
0 30 42 56 72 90 110 131 153 176 199 222 245 267 289 309 329 346 362 375 385
Wheatgrass (Pascopyrum smithii,
Agropyron elongatum)
(based on 64 pounds/bushel)
32315C
Seed Rate Handle Setting
0 5 10 15 20 25 30 35 40 45 50 55 60 65 70 75 80 85 90 95 100
Rows Drive Type: 1 Seed Rate in Pounds Per Acre
7.5 in
7.5 in
7.5 in
7.5 in
0 0.9 1.7 2.4 3.2 4.0 4.9 5.8 6.6 7.5 8.4 9.3 10 11 12 13 14 14 15 16 16
Drive Type: 2 Seed Rate in Pounds Per Acre
0 1.9 3.4 4.9 6.6 8.3 10 12 14 15 17 19 21 23 25 26 28 29 31 32 33
Drive Type: 3 Seed Rate in Pounds Per Acre
0 3.5 5.3 7.4 10 12 15 17 20 23 25 28 31 33 36 39 41 43 45 47 49
Drive Type: 4 Seed Rate in Pounds Per Acre
05.78.7121620242832374146505559636770747779
(based on 23 pounds/bushel)
32316C
151-143B Table of Contents Main Box Rates 2011-10-21
Page 19

Great Plains Manufacturing, Inc. Table of Contents Main Box Rates 17
Native Grass Rate
Setting Native Grass Seed Rate
The Series II Native Grass Box is for seeding fluffy,
native grass blends like Big Blue Stem, Indian Grass,
and Side Oats Grama.
Refer to Figure 7
Native Grass mixes are too variable for seed rate tables
to be useful. Seeding rate for Native Grass is determined
by calibration, and set by:
• Drive Type handle at the ground drive gearbox ,
• Driven sprocket at the Native Grass box, using a
sprocket from the storage tree , and;
• Rate Reduction kit (See manual 202-583M), using
an alternate set of ground drive gearbox output and
Native Grass jackshaft input sprockets.
Great Plains recommends that you calibrate and adjust
your drill to help insure an accurate seeding rate. Fine
rate adjustment is done with the Driven sprocket.
1 a
2
b
3
Native Grass Rate Calibration
Before completing these steps, review “Calibration
Overview” on page 2.
This Native Grass calibration works on any type of native
grass no matter what seed type, weight, or density. It
also does not require any particular initial drive setup.
The drill’s revolutions-per-acre at the native grass cup
allows you to calibrate the output in pounds by cup
sprocket revolution per acre.
The pounds per acre in the seed charts are based on
drills with 5.70-8 8-Ply ground drive tires. Be certain that
your tires are properly inflated (see Operator Manual).
To calibrate seed mix:
1. Know your intended field seeding rate in pounds per
acre.
2. Raise drill and install lift-assist lock(s).
3. Rotate the right ground drive wheel to see that feed
cups and drive are working properly and are free
from foreign matter.
4. Record the weight of one or more empty containers
large enough to hold seed metered from three rows
of the native grass box.
Refer to Figure 2 on page 2
5. Remove the calibration crank from its storage stob
on the left top side of the main toolbar.
2
b
1
3
a
Figure 7
Native Grass Rate Control
Seeding Rate Risk:
Calibrate. All native grass mixes vary in weight, seed type, and
density. You must calibrate each mix.
Factors that affect seeding rates are: weight of seed, size of
seed, relative humidity and moisture content of the seed, ratio
of inert material to seed, different proportions of seed types
affecting density, tire configuration, tire pressure, and tire
slippage. The charts in this manual are based on factory tires
at recommended inflation.
For example:
You desire to plant at a TargetRate of:
32
pounds per acre
For example:
3 containers each weigh:
1.5 lb
or a total of:
4.5 lb.
28378
2011-10-21 Table of Contents Main Box Rates 151-143B
Page 20

18 3P806NT Table of Contents Main Box Rates Great Plains Manufacturing, Inc.
Refer to Figure 2 on page 2
6. At the right main (Native Grass) gearbox input
jackshaft, place the hex socket of the crank on
whichever end allows most convenient full crank
rotations.
7. Fill three or more Native Grass compartments at
least1⁄2 full of seed. Pull seed hoses off openers
under those compartments.
8. Turn gauge wheel or crank several times to fill seed
cups with seed. Turn wheel or crank until seed falls
to the ground from each cup.
9. Place empty container(s) under the seed tubes to
gather the seed as it is metered.
1
Refer to Figure 8 and Figure 9
10. Note the Drive Type and Native Grass driven
sprocket . Also establish whether or not optional
2
1
Native Grass Rate Reduction is installed. This
information is needed for step 12 and for the
calculations later.
Note: If you are planting a mix similar to mixes planted in
the past with this drill, set the Drive Type and final
sprocket for the previous mix.
11. Note the current reading of the acremeter, unless
you do not plan to rely on it for the calibration.
12. Rotate crank or ground drive tire for one acre or
hectare (see chart on page 2).
13. Check that the three seed cups have plenty of seed
coming into them.
Figure 8
Native Grass Drive Type 2
For example, the drill is presently configured for:
Drive Type: 2
Driven Sprocket: 20T
Standard Range: (no Rate Reduction)
2
Figure 9
Native Grass Driven Sprocket 20T
28374
28379
151-143B Table of Contents Main Box Rates 2011-10-21
Page 21

Great Plains Manufacturing, Inc. Table of Contents Main Box Rates Native Grass Rate 19
14. Calculate the area rate at current drill settings.
Weigh metered seed, and subtract the initial weight
of the container. Divide this number by SampleRows
(the number of cups measured, typically 3). Multiply
by the number of openers (which is less than 13 if
using alternate spacing)
NetWeight GrossWeight EmptyContainer s()–=
PoundsPerSeedCup
PoundsPerAcre PoundsPerSeedCup 13×=
NetWeight
----------------------------------
=
SampleRows
15. If the measured rate is within 3% of your desired field
rate, no further adjustment is necessary. Skip to
step 21.
The rate just measured is used to locate a new setting in
the Native Grass Cup Rate tables on page 20.
16. Calculate the revolutions needed for the target field
rate. Multiply the calibration revolution rate by the
ratio of desired to measured seeding rate. Divide the
rate just measured by the cup revolution rate (from
the tables) at the current drill settings.
TargetRate
FinalRevs RevolutionsPerAcre
-------------------------------------------
×=
PoundsPerAcre
For example, GrossWeight of containers & sample is:
13 pounds
The NetWeight (pounds) is:
8.5 = 13 - 4.5
The PoundsPerSeedCup per acre is:
2.83 = 8.5 ÷ 3
The PoundsPerAcre is:
36.8 = 2.83 x 13
In our example, the 36.8 lbs/ac rate is 115% of the
desired 32 lbs/ac rate, or 15% high. An adjustment is
indicated.
For example:
Drive Type 2, 20T Driven, and no Rate Reduction is a
cup shaft rate of:
139 RevolutionsPerAcre
The FinalRevs shaft rate needed for the target rate is
120.8 = 139 x 32 ÷ 36.8
17. Find this number (or the closest number to this) in
the drive setting chart. This gives Drive Type and
Native Grass sprocket sizes. If the setting needed is
below 50 revs/ac, the Rate Reduction kit is required.
18. Set the new Drive Type at the gearbox lever.
19. Remove the access panel at the right end of the
Native Grass box, and exchange the current Driven
sprocket for the new one (from the storage tree at
drill front).
20. As necessary, exchange installed sprockets at
gearbox with those from the Rate Reduction kit (see
instructions in kit).
You may want to repeat the calibration procedure if your
results vary greatly from the seed rate chart.
21. Remove the crank from the jackshaft and store it on
the stob.
22. When drilling, check the amount of seed you are
using by noting the acres drilled, amount of seed
added to drill, and the level of seed in the box. If you
suspect you are drilling more or less seed than
desired, and you have accurately calibrated the drill
to you seed, you may need to change your sprocket
arrangement to compensate for your field conditions.
Note: On older model drills, if all sprocket combinations
result in rates higher than desired, a Seed Rate
Reduction kit (202-580A) is available.
For example:
The closest setting to 120.8 revs/ac is:
120 (found in the Standard rate table)
which is a configuration of:
Drive Type: 2
Driven Sprocket: 23T
2011-10-21 Table of Contents Main Box Rates 151-143B
Page 22

20 3P806NT Table of Contents Main Box Rates Great Plains Manufacturing, Inc.
Native Grass Meter Shaft Rates
These charts are used during calibration. They provide
rotations of the meter shaft per acre, and are not seed
rate charts. For metric charts, see page 45.
Once the pounds per shaft revolution is known for your
seed mix, the charts provide the Transmission, Drive
Type, and Final Sprocket required.
Standard Shaft Rates
Native Grass Driven Sprocket (Standard Rate)
Drive
Type
196.389.984.279.374.970.967.464.261.358.6
2 198 185 173 163 154 146 139 132 126 120
3 297 277 260 244 231 219 208 198 189 181
4 484 452 424 399 377 357 339 323 308 295
14T 15T 16T 17T 18T 19T 20T 21T 22T 23T
Native Grass Cup Revolutions Per Acre
32343A
Shaft Rates with Seed Rate Reduction
Native Grass Driven Sprocket (with Rate Reduction Kit)
Drive
Type
154.450.847.644.842.340.138.136.334.633.1
2 112 104 97.9 92.1 87.0 82.4 78.3 74.6 71.2 68.1
3 168 157 147 138 130 124 117 112 107 102
4 274 255 239 225 213 202 192 182 174 167
The Native Grass attachment includes, as standard
equipment, an agitator.
14T 15T 16T 17T 18T 19T 20T 21T 22T 23T
Native Grass Cup Revolutions Per Acre
32343B
Equipment Damage Risk:
Do not transport with seed loaded in the Native Grass box.
Load seed at field. Transport with seed loaded compacts the
seed at the meter inlets and can easily clog agitators and
meters. Drive system operation in the field can then damage
the agitator and drive components.
Seed Lubricant
Add graphite seed lubricant after loading seed in the
Native Grass box. For humid planting environments,
double or triple graphite as needed. Use1⁄3cup (80 mL)
across the top of the seed mix. Graphite part numbers:
821-042C 1 pound (0.45 kg) bottle
821-060C 5 pound (2.3 kg) jug
Native Grass Agitator Series II
When drilling, check the amount of seed you are using
by noting the acres drilled, amount of seed added to drill,
and the level of seed in the box. If you suspect you are
drilling more or less seed than desired, and you have
accurately calibrated the drill to your seed, change your
sprocket arrangement to compensate for your field
conditions.
151-143B Table of Contents Main Box Rates 2011-10-21
Figure 10
25041
Page 23

Great Plains Manufacturing, Inc. Table of Contents Main Box Rates Native Grass Rate 21
Brome Grass Seeding
When the seeding material is strictly brome grass, you
can set an initial rate based on the tables following, and
then calibrate. You can also use the procedure for mixes
(page 17), but what follows is usually easier.
Refer to Figure 11
1. Find the desired pounds per acre on the Brome
Grass Rate Charts on page 23. Determine which
Drive Type and Final Drive sprocket are required,
and for low rates, if Seed Rate Reduction is needed.
2. Set the Drive Type with the gearbox handle (see
“Setting Drive Type” on page 3).
3. Install the sprocket from storage on the right-hand
side of the Native Grass box. To change sprockets,
loosen the chain idlers and remove chain. Replace
with desired sprocket.
4. Fill three or more compartments at least half full of
seed at the outboard end of the box. Pull seed tubes
off the openers at rows to be sampled. This example
assumes three rows are used.
5. To perform this calibration, you need a scale that is
accurate at the aggregate sample size, and three (3)
light containers, each capable of holding the
expected SamplePerRow. Record the empty
container weights. The total is ContainerWeight.
6. Estimate the sample sizes. This example simulates a
full acre.
TargetRate
SamplePerRow
ExpectedSample SamplePerRow SampledRows×=
------------------------------
=
RowCount
7. Raise the drill so the gauge wheel is out of ground
contact.
8. Remove the calibration crank from its storage stob.
Store the retaining pin on the stob.
9. Place the hex socket of the crank on the gearbox
input jackshaft (see page 2).
10. If the Main Box or optional Small Seeds box are
loaded, disconnect their drive or set their rates to
zero (unless you are simultaneously calibrating
multiple boxes).
11. Rotate the crank several turns to ensure that the
drives and seed cups are engaged, working properly,
free from foreign material, and that seed is flowing
steadily from the meters. Stop.
12. Note the current reading of the acremeter, unless
you do not plan to rely on it for the calibration.
13. Empty the sample containers back into the seed box,
and place them back under the three hoses to gather
metered seed.
Figure 11
Native Grass Final Drive Sprocket
Example: You want to apply brome at a TargetRate of
121⁄4 pounds per acre. The nearest chart rate is:
12.0
Standard Transmission,
Drive Type: 2
Final Drive: 22T
Example: 3 containers, each weighing 8 oz. (1⁄2 lb.).
ContainerWeight is 1.5 lb:
1.5 = 3 x 0.5
SamplePerRow is 0.92 pounds:
12.25
=
--------------
13
0.94
ExpectedSample is 2.8 pounds:
2.8 0.92 3×=
Crushing Hazard:
Install lift cylinder lock(s) on a raised drill.
18670
2011-10-21 Table of Contents Main Box Rates 151-143B
Page 24

22 3P806NT Table of Contents Main Box Rates Great Plains Manufacturing, Inc.
14. Turn crank at a steady rate for the number of turns
specified on page 2, or until one acre or hectare is
tallied on acremeter. While turning, check that cups
have ample seed coming into them.
15. Weigh metered seed. Subtract initial weight of
container(s).
NetWeight GrossWeight ContainerWeight–=
16. Divide the sample NetWeight by SampleRows (the
number of row sampled, typically 3). Multiply by
number of openers on your drill to determine the
total of pounds per acre seeded.
NetWeight
MeasuredRate
--------------------------------------
SampleRows
OpenerCount×=
17. If the calibration sample is more than a few percent
different than the desired FieldRate, pick a new chart
rate based on the difference factor.
TargetRate
NewChart
-------------------------------------- -
MeasuredRate
PreviousChart×=
18. Find the chart rate closest to NewChart. Change the
Final Drive sprocket and Drive Type as needed. If the
correction went off the Standard chart to the low
side, consider installing the Rate Reduction kit.
19. You may want to repeat calibration procedure at the
new setting if your results varied greatly from the
Seed Rate Chart.
When drilling, check the amount of seed you are using
by noting the acres drilled, amount of seed added to drill,
and the level of seed in the box. If you suspect you are
drilling more or less seed than desired, and you have
accurately calibrated the drill to your seed, you may need
to change your sprocket arrangement to compensate for
your field conditions.
3P806NT crank rotations for 1 acre:
656
Example: the containers weighed a total of 7.66
pounds after test. NetWeight is 3.16 pounds.
3.16 7.66 4.5–=
Example: MeasuredRate is:
13.7 lbs/ac
3.16
13.7
-----------
3
13×=
Example:
TargetRate = 12.25
PreviousChart = 12.0
MeasuredRate = 13.7
The new chart rate is:
NewChart = 10.7 pounds per acre
12.25
10.7
--------------
13.7
12.0×=
The nearest Standard chart rate to 10.7 is 11.0, or
Drive Type: 2
Final Sprocket: 24T
Alternatively, you could use the Reduced Rate chart,
which has a 10.5 rate setting at Drive Type 3, 22T.
151-143B Table of Contents Main Box Rates 2011-10-21
Page 25

Great Plains Manufacturing, Inc. Table of Contents Main Box Rates Native Grass Rate 23
Brome Rate Charts
Factors which will affect seeding rates are: weight of
seed, size of seed, relative humidity and moisture
content of seed, ratio of inert material to seed, different
proportions of seed types affecting density, tire
configuration, tire pressure, and tire slippage. Seed
mixes vary.
Field Results Risk:
The charts are to be used as a reference to your own brome
grass mix. All brome grass mixes vary so this is why you must
calibrate each mix using the chart only as a starting point.
The rates are based on a 5.70-8 8-Ply tire inflated to
factory specification (see Operator Manual).
For metric charts, see page 46.
Standard Brome Rates
Native Grass Driven Sprocket (Standard Rate)
Drive
Type
1 8.6 8.1 7.6 7.2 6.8 6.4 6.1 5.9 5.6 5.4
217.716.515.614.713.913.212.612.011.511.0
326.524.823.422.120.919.918.918.117.316.5
443.240.538.136.034.132.430.829.428.227.0
15 16 17 18 19 20 21 22 23 24
Brome Grass Seeding Rate in Pounds per Acre
32336A
Reduced Brome Rates
Native Grass Driven Sprocket (with Rate Reduction Kit)
Drive
Type
1 5.0 4.7 4.4 4.2 3.9 3.7 3.5 3.4 3.2 3.1
2 10.3 9.6 9.0 8.5 8.1 7.7 7.3 7.0 6.7 6.4
315.414.413.612.812.111.511.010.510.0 9.6
425.023.522.120.919.818.817.917.016.315.6
15 16 17 18 19 20 21 22 23 24
Brome Grass Seeding Rate in Pounds per Acre
32336B
2011-10-21 Table of Contents Main Box Rates 151-143B
Page 26

24 3P806NT Table of Contents Main Box Rates Great Plains Manufacturing, Inc.
Small Seeds Rate
Seeding rate from the optional Small Seeds Attachment
is controlled entirely by the seed rate handle on the small
seeds box. No sprocket changes are required, and small
seeds rate is unaffected by settings for the main seed
box or other optional boxes.
Refer to Figure 12
To set Small Seeds rate, loosen the wing nut at the
handle. Move the lever until the indicator is about 10
2
higher than the intended setting, then return it to that
setting. Tighten nut.
Set the initial rate based on the charts on page 27 and
page 28.
Small Seeds Rate Calibration
Differences will exist between the tested seed and field
conditions used to generate the Small Seeds Rate
Charts, and your seed and conditions. To accurately
achieve your target population, Great Plains
recommends calibrating.
Due to the large number of crank revolutions per acre
(310 or 569) and per hectare (766 or 1405), a practical
calibration is a simulation of1⁄
1. Estimate the sample sizes.
TargetRate
RateSample
SamplePerRow
-----------------------------
=
=
10
RateSample
----------------------------------- -
RowCount
th
acre or1⁄
10
1
th
hectare.
10
2
1
Figure 12
Small Seeds Rate Handle
Example: You want to apply alfalfa at 12 pounds per
acre. RateSample is:
12
------
1.2
=
10
Example: SamplePerRow is
0.09 pounds:
1.2
0.092
-------
=
13
Example: 3 rows are to be used in the sampling.
ExpectedSample is:
0.28 pounds
32634
ExpectedSample SamplePerRow SampledRows×=
2. To perform this calibration, you need a scale that is
accurate near the aggregate sample size, and
0.277 0.092 3×=
Example: 3 containers each weighing 0.20 lb or:
0.60 lb total
three (3) light weight containers, each capable of
holding a row’s sample.
3. Raise the drill so the gauge wheel is out of ground
contact. If the gauge wheel is in ground contact,
cranking is difficult or impossible.
4. Remove the calibration crank from its storage stob.
Crushing Hazard:
Install lift cylinder lock(s) on a raised drill.
Store the retaining pin on the stob.
5. Rotate the crank or tire several turns to ensure that
the drives and seed cups are engaged, working
properly, free from foreign material, and that seed is
flowing steadily from the meters. Stop.
6. Pull the small seed hoses off the top of three opener
seed tubes, at the top of the openers. Place the
hoses into each sample container.
151-143B Table of Contents Main Box Rates 2011-10-21
Page 27

Great Plains Manufacturing, Inc. Table of Contents Main Box Rates Small Seeds Rate 25
7. If not already done, set the Small Seeds Rate
Handle.
8. Load seed above the rows to be sampled. Load well
more than the expected sample size.
9. Rotate the crank several turns to ensure that the
drives and seed cups are engaged, working properly,
free from foreign material, and that seed is flowing
steadily from the meters. Stop.
10. Note the current reading of the acremeter, unless
you do not plan to rely on it for the calibration.
11. Empty the sample containers back into the seed box,
and place them back under the three hoses to gather
metered seed.
12. Turn crank at a steady rate for the number of turns
specified on page 2, or until one tenth acre or
hectare is tallied on acremeter. While turning, check
that cups have ample seed coming into them.
13. Weigh metered material. Subtract initial weight of
container(s).
NetWeight GrossWeight ContainerWeights–=
14. Divide the net material weight by three. Multiply by
number of openers on your drill, and then by ten, to
determine the total of pounds per acre applied.
NetWeight
MeasuredRate
--------------------------------------
SampleRows
RowCount× 10×=
Example: planting alfalfa at 12 pounds/ac has an initial
small seeds rate handle setting of:
60
Crank rotations for one tenth acre is:
65.6
Example: the three containers weighed a total of
0.85 pounds after test, NetWeight is:
0.25 pounds
0.25 0.85 0.60–=
Example: MeasuredRate is:
10.8 lbs/ac, lower than the target rate of 12.
0.25
10.8
-----------
3
13× 10×=
15. Divide the desired original field rate by the measured
rate to calculate a scale adjustment factor.
FieldRate
CorrectionFactor
--------------------------------------
=
MeasuredRate
16. Multiply the scale setting just used times correction
factor to obtain the next scale setting to use.
NextScale PreviousS cale CorrectionFactor×=
17. Set the Small Seeds Rate Handle to the new scale
setting.
18. You may want to repeat calibration procedure at the
new setting if your results varied greatly from the
Seed Rate Chart, or if you must operate near the
ends of the Seed Rate handle scale (0-20 or
90-100).
19. Check that your tire(s) is (are) properly inflated. See
“Tire Inflation Chart” in the Operator manual.
20. With calibration complete, store calibration crank,
reinstall any removed chains or sprockets and
reconnect seed hoses.
For example: the target rate was 12 lbs/ac:
the CorrectionFactor is:
1.11
12
˙
1.11
-----------
=
10.8
For example: the previous scale setting was 60,
the NextScale setting is:
66.5
66.5 60 1.11×=
2011-10-21 Table of Contents Main Box Rates 151-143B
Page 28

26 3P806NT Table of Contents Main Box Rates Great Plains Manufacturing, Inc.
When drilling, check seeding rate by noting acres drilled,
amount of seed added to drill and seed level in drill box.
If you are seeding more or less than desired, adjust rate
slightly to compensate for field conditions.
Small Seeds Row Shut-Off
If alternate row spacing is required for small seeds,
optional plugs are available to block flow inside the seed
box tray.
1. Clean-out seed. The seed box must be empty prior
to inserting plugs. See “Small Seeds Box
Clean-Out” in Operator manual.
2. Before installing plugs, inspect the seed boxes for
existing factory-installed plugs. These are blocking
extra unused seed ports. You may want to identify
these plugs with an indelible marker.
3. Insert one plug at each row to shut off. Verify the
seed hose path before inserting the plug, as some
hoses do not make a strictly vertical drop to their row
units.
4. Review seed rate settings prior to planting. Perform
calibration calculations with the actual active row
count.
When removing plugs to restore rows to operation, be
sure to not disturb a factory-installed plug.
Figure 13
27407
Small Seeds Tube Plug
151-143B Table of Contents Main Box Rates 2011-10-21
Page 29

Great Plains Manufacturing, Inc. Table of Contents Main Box Rates Small Seeds Rate 27
Small Seeds Rate Charts
U.S customary units. Metric charts begin on page 42.
Alfalfa, Red Alsike, Crimson Clover
Small Seeds Cup Lever Setting
0 5 10 15 20 25 30 35 40 45 50 55 60 65 70 75 80 85 90 95 100
Rows Seeding Rate in Pounds per Acre
7.5 inch 0 0.0 1.8 2.8 3.9 4.8 6.0 7.0 7.9 9.0 10.0 11.1 12.1 13.2 14.0 15.3 16.2 17.2 18.3 19.3 20.3
Kentucky Bluegrass, Fescue, Annual Rye Grass
Small Seeds Cup Lever Setting
0 5 10 15 20 25 30 35 40 45 50 55 60 65 70 75 80 85 90 95 100
Rows Seeding Rate in Pounds per Acre
7.5 inch 0 0.0 0.2 .9 1.5 2.2 2.7 3.3 3.7 4.2 4.6 5.1 5.5 5.9 6.3 6.7 7.0 7.4 7.7 8.1 8.4
Bermuda, Red Top, Lespedeza Unhulled, Sercia, Sand, Weeping Love Grass
Small Seeds Cup Lever Setting
0 5 10 15 20 25 30 35 40 45 50 55 60 65 70 75 80 85 90 95 100
Rows Seeding Rate in Pounds per Acre
7.5 inch 0 0.0 0.5 0.9 1.4 2.1 2.6 3.3 4.0 4.7 5.3 5.8 6.3 6.7 7.2 7.6 8.2 8.8 9.3 9.8 10.4
Red & Sweet Clover, Lespedeza Hulled
Small Seeds Cup Lever Setting
0 5 10 15 20 25 30 35 40 45 50 55 60 65 70 75 80 85 90 95 100
Rows Seeding Rate in Pounds per Acre
7.5 inch 0 0.0 1.2 2.7 4.2 5.7 7.2 9.1 10.6 12.3 13.7 15.3 16.7 18.1 19.7 21.2 22.7 24.2 25.8 27.2 28.6
Orchard Grass
Small Seeds Cup Lever Setting
0 5 10 15 20 25 30 35 40 45 50 55 60 65 70 75 80 85 90 95 100
Rows Seeding Rate in Pounds per Acre
7.5 inch 0 0.0 0.0 0.2 0.5 0.7 1.1 1.2 1.6 1.9 2.3 2.6 2.8 3.2 3.5 3.9 4.0 4.4 4.6 4.9 5.1
2011-10-21 Table of Contents Main Box Rates 151-143B
Page 30

28 3P806NT Table of Contents Main Box Rates Great Plains Manufacturing, Inc.
Rate Charts, Small Seeds Box, continued...
Millet, Reed Canary
Small Seeds Cup Lever Setting
0 5 10 15 20 25 30 35 40 45 50 55 60 65 70 75 80 85 90 95 100
Rows Seeding Rate in Pounds per Acre
7.5 inch 0 0.3 1.2 2.0 2.8 3.6 4.4 5.2 6.0 6.8 7.6 8.4 9.3 10.1 10.9 11.7 12.5 13.3 14.1 14.9 15.1
Ladino Clover, Canary Grass, Timothy, Canola
Small Seeds Cup Lever Setting
0 5 10 15 20 25 30 35 40 45 50 55 60 65 70 75 80 85 90 95 100
Rows Seeding Rate in Pounds per Acre
7.5 inch 0 0.0 0.9 1.6 2.6 3.9 4.9 6.1 7.4 8.6 9.8 11.1 12.5 13.7 14.9 16.3 17.6 18.8 20.4 21.9 23.5
Birdsfoot, Trefoil, Sudan
Small Seeds Cup Lever Setting
0 5 10 15 20 25 30 35 40 45 50 55 60 65 70 75 80 85 90 95 100
Rows Seeding Rate in Pounds per Acre
7.5 inch 0 0.0 1.4 2.6 4.2 5.4 7.0 8.6 10.2 11.9 13.5 15.4 17.0 18.8 20.5 22.5 24.0 25.8 27.6 29.1 30.9
151-143B Table of Contents Main Box Rates 2011-10-21
Page 31

Great Plains Manufacturing, Inc. Table of Contents Main Box Rates 29
Fertilizer Rate
Setting Fertilizer Rate
The fertilizer meters are driven by a chain system
independent of the seed meter drives, and are
unaffected by Drive Type. Fertilizer rate is adjusted with
the Rate Adjuster at the fertilizer box.
Fertilizer application rates vary with fertilizer type,
density and particle size. Relative humidity and field
conditions can also affect application rates. The chart is
based on fertilizer with average particle size and a
density of 65 pounds per cubic foot. Initially set rate
according to charts, then calibrate the drill to your
material as described on this page.
Accurately obtaining the desired application rate requires
three steps:
1. Adjusting target rate for large differences between
material and chart density.
2. setting the Rate Adjuster to the scale value from
the chart, and;
3. calibration: checking predicted application rate, and
resetting rate adjuster as needed.
1 2
Figure 14
Fertilizer Rate Adjuster
1
2
32673
Fertilizer Rate Chart
Fertilizer Rates in Pounds per Acre
Setting Number
15 20 25 30 35 40 45 50 55 60 65 70 75 80 85 90 95 100
Rows Application Rate - Pounds per Acre (based on 65 lbs/cu.ft)
7.5 inch 11 20 38 54 72 89 105 123 138 157 174 187 209 223 234 242 245 247
Metric Fertilizer Rate Chart
Setting Number
10 15 20 25 30 35 40 45 50 55 60 65 70 75 80 85 90 95 100
Rows Application Rate - Kilograms per Hectare (based on 1.04 kg/liter)
19.1cm (7.5in) 13 20 27 42 57 76 98 112 126 150 175 189 202 222 243 265 287 310 331
2011-10-21 Table of Contents Main Box Rates 151-143B
Page 32

30 3P806NT Table of Contents Main Box Rates Great Plains Manufacturing, Inc.
Adjusting for Density
The fertilizer meter rate charts are based on fertilizer with
a density of 65 pounds per cubic foot (1.04 kg/liter). If
your fertilizer density is within a few percent of that, you
can skip this step and rely on calibration to determine
final Rate Adjuster setup.
For larger variances, particularly with very low densities,
pre-compensating can simplify calibration, by choosing a
different target chart value for the application rate.
Density Conversion Charts
U.S. Customary Units
Density, lb/ft
Conversion Factor
3
Metric
Density, kg/liter 725 800 875 950 1041 1125 1200 1275
Conversion Factor
45.0 50.0 55.0 60.0 65.0 70.0 75.0 80.0
1.45 1.30 1.20 1.10 1.00 0.93 0.87 0.81
1.44 1.30 1.19 1.10 1.00 0.93 0.87 0.82
1. Find your actual material density. Normally, this
reported on the container in which it was supplied. If
not, weigh a known volume and calculate it.
2. Find your material Density in the table at right, and
the Conversion Factor below it.
3. Adjust your target application rate prior to consulting
the Fertilizer Rate Chart.
AdjustedRate TargetRate ConversionFactor×=
4. Consult the Fertilizer Rate Chart for the Adjusted
rate.
5. Calibrate using the Rate Adjuster setting for the
adjusted rate.
Example: You want to apply 109 pounds per acre.
TargetRate = 109
Example: Your fertilizer has a density of 45 pounds per
cubic foot.
ConversionFactor = 1.45 (from chart)
Adjusted Rate = 158 pounds per acre
158 109 1.45×=
Example: The adjusted rate is 158. The closest chart
rate of 157 corresponds to a Rate Adjuster setting of:
60
151-143B Table of Contents Main Box Rates 2011-10-21
Page 33

Great Plains Manufacturing, Inc. Table of Contents Main Box Rates Fertilizer Rate 31
Fertilizer Rate Calibration
Differences will exist between the tested fertilizer and
field conditions used to generate the Rate Chart, and
your fertilizer and conditions. To accurately achieve your
target application, Great Plains recommends calibrating.
Perform the calibration with the opener frames lowered
(if the openers are raised, the clutch disengaged). Leave
the tractor hitched for movement control.
Due to the large number of crank revolutions per acre
(310 or 569) and per hectare (766 or 1405), a practical
calibration is a simulation of
1
⁄
10
th
acre or1⁄
10
th
hectare.
1. Estimate the sample sizes.
TargetRate
RateSample
SamplePerRow
ExpectedSample SamplePerRow SampledRows×=
-----------------------------
=
=
10
RateSample
----------------------------------- -
RowCount
Example: You want to apply 109 pounds per acre, and
want to simulate1⁄
109
10.9
---------
=
10
th
acre. RateSample is 10.9.
10
Example: SamplePerRow is 0.84:
10.9
0.84
-----------
=
13
Example: 3 rows are to be used in the sampling.
ExpectedSample is 2.52:
2.52 0.84 3×=
2. To perform this calibration, you need a scale that is
accurate near the aggregate sample size, and 3 light
weight containers, each capable of holding a row’s
sample.
3. Raise the drill so the gauge wheel is out of ground
contact.
4. Remove the calibration crank from its storage stob.
Store the retaining pin on the stob.
5. Place the hex socket of the crank on the gearbox
input jackshaft (see page 2).
6. Pull the fertilizer hoses off the top of three openers,
at the top of the openers. Place the hoses into each
sample container.
7. If not already done, make any density correction,
then using the chart for the TargetRate, set rate
adjuster. If seed is loaded, remove the drive chain for
the seed box (unless you are simultaneously
calibrating seed rate).
8. Load fertilizer above the rows to be sampled. Load
well more than the expected sample size.
Possible Agricultural Chemical Hazard:
Follow material supplier recommendations for safety
precautions in handling fertilizer.
9. Rotate the crank several turns counter-clockwise to
ensure that the drive and meters are engaged,
working properly, free from foreign material, and that
material is flowing steadily from the meters. Stop.
Example: 3 containers each weighing 0.5 lb
or 1.5 lb total
Crushing Hazard:
Install lift cylinder lock(s) on a raised drill.
See example on page 30, which determined an initial
rate adjuster setting of:
60
2011-10-21 Table of Contents Main Box Rates 151-143B
Page 34

32 3P806NT Table of Contents Main Box Rates Great Plains Manufacturing, Inc.
10. Note the current reading of the acremeter, unless
you do not plan to rely on it for the calibration.
11. Empty the sample containers back into the fertilizer
box, and place them back under the three hoses to
gather metered material.
12. Turn crank at a steady until one tenth acre is tallied
on acremeter or for the number of turns from the
Crank rotations for one tenth acre is:
65.6
charts on page 2.
13. Weigh metered material. Subtract initial weight of
container(s).
NetWeight GrossWeight ContainerWeights–=
Example: GrossWeight is 3.69 pounds.
NetWeight is 2.19 pounds
2.19 3.69 1.5–=
14. Divide the net material weight by the number of row
sampled. Multiply by number of openers on your drill,
and by 10 if a1⁄
th
sample size was collected, to
10
determine the total of pounds per acre applied.
NetWeight
MeasuredRate
------------------------------------ -
SampledRows
RowCount× 10×=
Example: MeasuredRate is 95 lbs/ac
2.19
-----------
95
13× 10×=
3
15. Divide the desired TargetRate by the MeasuredRate
to calculate a scale adjustment factor.
TargetRate
CorrectionFactor
--------------------------------------
=
MeasuredRate
16. Multiply the scale setting just used (the
PreviousScale, which is the initial adjusted setting for
the first calibration run) times the CorrectionFactor to
obtain the next scale setting to use.
NextScale PreviousS cale CorrectionFactor×=
17. Reset the fertilizer rate adjuster based on the
settings at the new chart rate.
18. You may want to note the current scale setting and
repeat the calibration procedure at the new setting if
your results varied greatly from the desired field rate.
19. With calibration complete, store the calibration crank,
re-install any seed chain removed and reconnect
fertilizer hoses.
Example: the TargetRate was 109 lbs/ac:
the CorrectionFactor is 1.15
109
1.15
---------
=
95
Example: the previous scale setting was 60,
the next scale setting is 69.
69 60 1.15×=
20. Check that your end-wheel tires are 5.70-8 8-Ply,
and properly inflated. See “Tire Inflation Chart” in
the Operator manual.
21. When drilling, check application rate by noting acres
treated, amount of fertilizer added to drill and
fertilizer level in drill box. If you are applying more or
less than desired, adjust rate slightly to compensate
for field conditions.
151-143B Table of Contents Main Box Rates 2011-10-21
Page 35

Great Plains Manufacturing, Inc. Table of Contents Main Box Rates 33
Appendix
Metric Rate Charts, Main Seed Box
See page 3 for instructions.
Charts in U.S. customary units begin on page 8.
Alfalfa (Medicago sativa)
Seed Rate Handle Setting
0 5 10 15 20 25 30 35 40 45 50 55 60 65 70 75 80 85 90 95 100
Rows Drive Type: 1 Seed Rate in Kilograms Per Hectare
19.1 cm
19.1 cm
19.1 cm
19.1 cm
05.27.5101316202428323640444852576164687174
Drive Type: 2 Seed Rate in Kilograms Per Hectare
011152127344149576574829199108116124132140146153
Drive Type: 3 Seed Rate in Kilograms Per Hectare
0172432415162738597109121134146158170181192202212220
Drive Type: 4 Seed Rate in Kilograms Per Hectare
0 28 40 53 67 84 101 119 138 157 177 197 218 238 258 277 295 313 330 345 359
(based on 0.77 kg/litre)
32291D
Bahia Grass (Paspalum notatum)
Seed Rate Handle Setting
0 5 10 15 20 25 30 35 40 45 50 55 60 65 70 75 80 85 90 95 100
Rows Drive Type: 1 Seed Rate in Kilograms Per Hectare
19.1 cm
19.1 cm
19.1 cm
19.1 cm
02.43.55.17.110121619222630343841454851545759
Drive Type: 2 Seed Rate in Kilograms Per Hectare
05.07.11015202532394654626977859299105111116120
Drive Type: 3 Seed Rate in Kilograms Per Hectare
0 7.5 11 16 22 29 38 48 58 69 81 92 104 116 127 138 148 158 167 174 181
Drive Type: 4 Seed Rate in Kilograms Per Hectare
01217253648627895113131150170189207225242258272284294
(based on 0.51 kg/litre)
32292D
2011-10-21 Table of Contents Main Box Rates 151-143B
Page 36

34 3P806NT Table of Contents Main Box Rates Great Plains Manufacturing, Inc.
Metric Rate Charts, Main Seed Box, continued...
Barley (Hordeum vulgare)
Seed Rate Handle Setting
0 5 10 15 20 25 30 35 40 45 50 55 60 65 70 75 80 85 90 95 100
Rows Drive Type: 1 Seed Rate in Kilograms Per Hectare
19.1 cm
19.1 cm
19.1 cm
19.1 cm
0 5.3 7.1 9.4 12 15 19 23 27 31 35 39 43 47 51 54 58 60 62 64 65
Drive Type: 2 Seed Rate in Kilograms Per Hectare
011151925323947556372808997105112118124128132134
Drive Type: 3 Seed Rate in Kilograms Per Hectare
0152229384858698193105117130142153165175185194202208
Drive Type: 4 Seed Rate in Kilograms Per Hectare
0 25 36 48 62 78 95 113 132 152 171 191 211 231 250 268 285 301 316 329 340
Buckwheat (Fagopyrum esculentum)
(based on 0.66 kg/litre)
32293D
Seed Rate Handle Setting
0 5 10 15 20 25 30 35 40 45 50 55 60 65 70 75 80 85 90 95 100
Rows Drive Type: 1 Seed Rate in Kilograms Per Hectare
19.1 cm
19.1 cm
19.1 cm
19.1 cm
0 4.4 6.4 8.9 12 15 18 22 26 30 34 38 42 46 49 53 56 58 60 62 63
Drive Type: 2 Seed Rate in Kilograms Per Hectare
0 9.0 13 18 24 31 38 46 53 62 70 78 86 94 101 108 114 120 124 128 130
Drive Type: 3 Seed Rate in Kilograms Per Hectare
0172026344455688195109124138152166179190200209216220
Drive Type: 4 Seed Rate in Kilograms Per Hectare
0 27 33 43 56 72 90 110 132 155 178 202 225 249 271 291 310 327 341 352 359
Buffalograss (Buchloe dactyloides)
Seed Rate Handle Setting
0 5 10 15 20 25 30 35 40 45 50 55 60 65 70 75 80 85 90 95 100
Rows Drive Type: 1 Seed Rate in Kilograms Per Hectare
19.1 cm
19.1 cm
19.1 cm
19.1 cm
0 4.4 6.4 8.9 12 15 18 22 26 30 34 38 42 46 49 53 56 58 60 62 63
Drive Type: 2 Seed Rate in Kilograms Per Hectare
0 9.0 13 18 24 31 38 46 53 62 70 78 86 94 101 108 114 120 124 128 130
Drive Type: 3 Seed Rate in Kilograms Per Hectare
0172026344455688195109124138152166179190200209216220
Drive Type: 4 Seed Rate in Kilograms Per Hectare
0 27 33 43 56 72 90 110 132 155 178 202 225 249 271 291 310 327 341 352 359
(based on 0.62 kg/litre)
32295D
(based on 0.30 kg/litre)
32296D
151-143B Table of Contents Main Box Rates 2011-10-21
Page 37

Great Plains Manufacturing, Inc. Table of Contents Main Box Rates Appendix 35
Metric Rate Charts, Main Seed Box, continued...
Bermuda Grass (Cynodon dactylon)
Seed Rate Handle Setting
0 5 10 15 20 25 30 35 40 45 50 55 60 65 70 75 80 85 90 95 100
Rows Drive Type: 1 Seed Rate in Kilograms Per Hectare
19.1 cm
19.1 cm
19.1 cm
19.1 cm
02.03.96.08.010121517192124262830323537394143
Drive Type: 2 Seed Rate in Kilograms Per Hectare
04.08.1121721253034394448535862677175808488
Drive Type: 3 Seed Rate in Kilograms Per Hectare
0 6.4 12 19 25 31 38 45 51 58 65 72 78 85 91 97 103 109 115 120 125
Drive Type: 4 Seed Rate in Kilograms Per Hectare
0102030415162738495106117127138148159168178187196204
K-31 Fescue (Festuca)
(based on 0.77 kg/litre)
32294D
Seed Rate Handle Setting
0 5 10 15 20 25 30 35 40 45 50 55 60 65 70 75 80 85 90 95 100
Rows Drive Type: 1 Seed Rate in Kilograms Per Hectare
19.1 cm
19.1 cm
19.1 cm
19.1 cm
02.13.24.55.87.28.61012131516171920212223242525
Drive Type: 2 Seed Rate in Kilograms Per Hectare
0 4.3 6.7 9.2 12 15 18 21 24 27 30 33 36 39 41 44 46 48 50 51 52
Drive Type: 3 Seed Rate in Kilograms Per Hectare
0 7.4 10 14 18 22 26 30 35 39 44 48 53 57 61 65 69 72 75 77 79
Drive Type: 4 Seed Rate in Kilograms Per Hectare
012172229354249576472798693100106112118122126129
Flax (Linum usitatissimum) or Sudan
(Sorghum bicolor subsp. drummondii)
Seed Rate Handle Setting
0 5 10 15 20 25 30 35 40 45 50 55 60 65 70 75 80 85 90 95 100
Rows Drive Type: 1 Seed Rate in Kilograms Per Hectare
19.1 cm
19.1 cm
19.1 cm
19.1 cm
05.17.6101417212529333741465054586266697376
Drive Type: 2 Seed Rate in Kilograms Per Hectare
0111622283543515967768594102111119128135143149155
Drive Type: 3 Seed Rate in Kilograms Per Hectare
0162432425262738597109121133145156168179190200210219
Drive Type: 4 Seed Rate in Kilograms Per Hectare
0 26 39 53 68 85 102 120 138 158 177 197 216 236 255 274 292 310 326 342 356
(based on 0.27 kg/litre)
32297D
(based on 0.71 kg/litre)
32298D
2011-10-21 Table of Contents Main Box Rates 151-143B
Page 38

36 3P806NT Table of Contents Main Box Rates Great Plains Manufacturing, Inc.
Metric Rate Charts, Main Seed Box, continued...
Eastern Gamma Grass - Pete
(Tripsacum dactyloides)
Seed Rate Handle Setting
0 5 10 15 20 25 30 35 40 45 50 55 60 65 70 75 80 85 90 95 100
Rows Drive Type: 1 Seed Rate in Kilograms Per Hectare
19.1 cm
19.1 cm
0 4.3 5.9 7.9 10 13 15 18 21 24 27 30 33 35 38 40 42 44 46 47 48
Drive Type: 2 Seed Rate in Kilograms Per Hectare
0 8.8 12 16 21 26 31 37 43 49 55 61 67 73 78 83 87 91 94 97 98
Kentucky Blue Grass (Poa pratensis)
Seed Rate Handle Setting
0 5 10 15 20 25 30 35 40 45 50 55 60 65 70 75 80 85 90 95 100
Rows Drive Type: 1 Seed Rate in Kilograms Per Hectare
19.1 cm
19.1 cm
19.1 cm
19.1 cm
05.17.6101417212529333741465054586266697376
Drive Type: 2 Seed Rate in Kilograms Per Hectare
0111622283543515967768594102111119128135143149155
Drive Type: 3 Seed Rate in Kilograms Per Hectare
0162432425262738597109121133145156168179190200210219
Drive Type: 4 Seed Rate in Kilograms Per Hectare
0 26 39 53 68 85 102 120 138 158 177 197 216 236 255 274 292 310 326 342 356
(based on 0.30 kg/litre)
32299D
32300D
Millet (Pennisetum glaucum, Setaria italica,
Panicum miliaceum, Eleusine coracana)
Seed Rate Handle Setting
0 5 10 15 20 25 30 35 40 45 50 55 60 65 70 75 80 85 90 95 100
Rows Drive Type: 1 Seed Rate in Kilograms Per Hectare
19.1 cm
19.1 cm
19.1 cm
19.1 cm
151-143B Table of Contents Main Box Rates 2011-10-21
05.37.6101317202428313640444751555862656769
Drive Type: 2 Seed Rate in Kilograms Per Hectare
011162127344149576573818998105113120127133138143
Drive Type: 3 Seed Rate in Kilograms Per Hectare
0152331415162738598110122135147158170180190199207214
Drive Type: 4 Seed Rate in Kilograms Per Hectare
0 25 37 51 66 83 101 120 139 159 179 199 219 239 258 277 294 310 325 338 349
(based on 0.77 kg/litre)
32301D
Page 39

Great Plains Manufacturing, Inc. Table of Contents Main Box Rates Appendix 37
Metric Rate Charts, Main Seed Box, continued...
Milo (Sorghum)
Seed Rate Handle Setting
0 5 10 15 20 25 30 35 40 45 50 55 60 65 70 75 80 85 90 95 100
Rows Drive Type: 1 Seed Rate in Kilograms Per Hectare
19.1 cm
19.1 cm
05.17.9111520242934404551566267727680848790
Drive Type: 2 Seed Rate in Kilograms Per Hectare
011162331405060718293104116127137147157165173180185
Oats (Avena sativa)
Seed Rate Handle Setting
0 5 10 15 20 25 30 35 40 45 50 55 60 65 70 75 80 85 90 95 100
Rows Drive Type: 1 Seed Rate in Kilograms Per Hectare
19.1 cm
19.1 cm
19.1 cm
19.1 cm
0 2.0 3.4 5.0 6.8 8.8 11 13 15 18 20 22 25 27 29 32 34 36 37 39 40
Drive Type: 2 Seed Rate in Kilograms Per Hectare
04.27.0101418222732364146515661656973778083
Drive Type: 3 Seed Rate in Kilograms Per Hectare
0 7.7 11 15 21 27 33 40 48 56 64 72 79 87 94 101 107 113 118 122 124
Drive Type: 4 Seed Rate in Kilograms Per Hectare
0121825344354667891104117129142154165175184192198203
(based on 0.77 kg/litre)
32302D
(based on 0.48 kg/litre)
32303D
Orchard Grass Potomac (Dactylis glomerata)
Seed Rate Handle Setting
0 5 10 15 20 25 30 35 40 45 50 55 60 65 70 75 80 85 90 95 100
Rows Drive Type: 1 Seed Rate in Kilograms Per Hectare
19.1 cm
19.1 cm
19.1 cm
19.1 cm
2011-10-21 Table of Contents Main Box Rates 151-143B
01.31.72.33.03.84.65.56.57.58.510111212131415161616
Drive Type: 2 Seed Rate in Kilograms Per Hectare
02.63.54.76.17.79.51113151820222426272931323334
Drive Type: 3 Seed Rate in Kilograms Per Hectare
03.75.16.88.911141619222528313436394244464849
Drive Type: 4 Seed Rate in Kilograms Per Hectare
06.18.3111418222631364045505559646872757880
(based on 0.23 kg/litre)
32304D
Page 40

38 3P806NT Table of Contents Main Box Rates Great Plains Manufacturing, Inc.
Metric Rate Charts, Main Seed Box, continued...
Peas (Pisum sativum)
Seed Rate Handle Setting
0 5 10 15 20 25 30 35 40 45 50 55 60 65 70 75 80 85 90 95 100
Rows Drive Type: 1 Seed Rate in Kilograms Per Hectare
19.1 cm
19.1 cm
19.1 cm
19.1 cm
02.45.9101419242934394449545964687275788082
Drive Type: 2 Seed Rate in Kilograms Per Hectare
0 4.9 12 20 29 38 49 59 70 80 91 102 112 122 131 140 148 155 160 165 168
Drive Type: 3 Seed Rate in Kilograms Per Hectare
0 3.6 14 25 37 51 65 79 95 110 125 140 155 169 182 195 206 215 224 230 234
Drive Type: 4 Seed Rate in Kilograms Per Hectare
0 5.9 22 40 61 82 106 130 154 179 204 229 253 276 297 317 335 351 365 375 382
Pinto Beans (Phaseolus vulgaris)
(based on 0.79 kg/litre)
32305D
Seed Rate Handle Setting
0 5 10 15 20 25 30 35 40 45 50 55 60 65 70 75 80 85 90 95 100
Rows Drive Type: 1 Seed Rate in Kilograms Per Hectare
19.1 cm
19.1 cm
19.1 cm
19.1 cm
04.67.6111520253036414752586368727680828486
Drive Type: 2 Seed Rate in Kilograms Per Hectare
010162332415162738596108119129139148157164169173176
Drive Type: 3 Seed Rate in Kilograms Per Hectare
0 16 24 35 47 60 75 90 106 123 139 156 172 187 202 215 228 238 247 254 258
Drive Type: 4 Seed Rate in Kilograms Per Hectare
0 26 40 57 76 98 122 147 173 200 227 254 280 305 329 351 371 389 403 414 421
Rape (Brassica napus)
Seed Rate Handle Setting
0 5 10 15 20 25 30 35 40 45 50 55 60 65 70 75 80 85 90 95 100
Rows Drive Type: 1 Seed Rate in Kilograms Per Hectare
19.1 cm
19.1 cm
19.1 cm
19.1 cm
04.77.0101215182125283235384245495255586163
Drive Type: 2 Seed Rate in Kilograms Per Hectare
01014202531384451586572798693100106113119124130
Drive Type: 3 Seed Rate in Kilograms Per Hectare
015212735445363738494105116127137147156165173180186
Drive Type: 4 Seed Rate in Kilograms Per Hectare
0 24 34 45 57 71 87 102 119 136 154 172 189 206 223 239 255 269 282 293 303
(based on 0.79 kg/litre)
32306D
(based on 0.66 kg/litre)
32307D
151-143B Table of Contents Main Box Rates 2011-10-21
Page 41

Great Plains Manufacturing, Inc. Table of Contents Main Box Rates Appendix 39
Metric Rate Charts, Main Seed Box, continued...
Rice, Long Grain (Oryza sativa indica)
Seed Rate Handle Setting
0 5 10 15 20 25 30 35 40 45 50 55 60 65 70 75 80 85 90 95 100
Rows Drive Type: 1 Seed Rate in Kilograms Per Hectare
19.1 cm
19.1 cm
19.1 cm
19.1 cm
01.03.76.59.312151821242730323537394243454647
Drive Type: 2 Seed Rate in Kilograms Per Hectare
02.07.5131925313743495561667277818589929597
Drive Type: 3 Seed Rate in Kilograms Per Hectare
0 3.3 12 20 28 37 45 54 62 71 79 87 96 104 111 119 126 133 140 146 152
Drive Type: 4 Seed Rate in Kilograms Per Hectare
0 5.5 19 32 46 60 74 88 102 115 129 142 156 169 181 194 206 217 228 238 248
Rice, Short Grain (Oryza sativa japonica,
Oryza sativa sinica)
(based on 0.60 kg/litre)
32308D
Seed Rate Handle Setting
0 5 10 15 20 25 30 35 40 45 50 55 60 65 70 75 80 85 90 95 100
Rows Drive Type: 1 Seed Rate in Kilograms Per Hectare
19.1 cm
19.1 cm
19.1 cm
19.1 cm
0 2.8 5.2 7.7 10 13 16 19 22 25 29 32 35 38 40 43 45 48 50 51 53
Drive Type: 2 Seed Rate in Kilograms Per Hectare
0 5.8 11 16 21 27 33 40 46 52 59 65 71 77 83 88 93 98 102 105 108
Drive Type: 3 Seed Rate in Kilograms Per Hectare
01218243139485767768696105114123131138144149153155
Drive Type: 4 Seed Rate in Kilograms Per Hectare
0 20 29 39 51 64 78 93 109 124 140 156 172 186 200 213 225 235 243 249 252
Rye (Secale cereale)
Seed Rate Handle Setting
0 5 10 15 20 25 30 35 40 45 50 55 60 65 70 75 80 85 90 95 100
Rows Drive Type: 1 Seed Rate in Kilograms Per Hectare
19.1 cm
19.1 cm
19.1 cm
19.1 cm
04.37.4111520253035414652576368737782858891
Drive Type: 2 Seed Rate in Kilograms Per Hectare
0 8.8 15 23 31 41 51 61 72 84 95 107 118 129 139 150 159 168 175 182 187
Drive Type: 3 Seed Rate in Kilograms Per Hectare
0 15 24 35 47 60 75 91 107 124 142 159 177 194 210 226 242 256 269 280 290
Drive Type: 4 Seed Rate in Kilograms Per Hectare
0 25 39 57 76 99 123 148 175 203 231 259 288 316 343 369 394 417 438 457 473
(based on 0.55 kg/litre)
32309D
(based on 0.73 kg/litre)
32310D
2011-10-21 Table of Contents Main Box Rates 151-143B
Page 42

40 3P806NT Table of Contents Main Box Rates Great Plains Manufacturing, Inc.
Metric Rate Charts, Main Seed Box, continued...
Perennial Rye Grass - Palmer
(Lolium perenne, Lolium multiflorum)
Seed Rate Handle Setting
0 5 10 15 20 25 30 35 40 45 50 55 60 65 70 75 80 85 90 95 100
Rows Drive Type: 1 Seed Rate in Kilograms Per Hectare
19.1 cm
19.1 cm
19.1 cm
19.1 cm
0 2.7 4.0 5.5 7.1 8.9 11 13 15 17 19 21 23 25 27 29 30 32 33 34 35
Drive Type: 2 Seed Rate in Kilograms Per Hectare
05.58.2111518222630353943485256596366687172
Drive Type: 3 Seed Rate in Kilograms Per Hectare
0111317212632394653616875828995101105109112113
Drive Type: 4 Seed Rate in Kilograms Per Hectare
018222735435363758799111123134145155164171178182184
(based on 0.46 kg/litre)
32311D
Soybeans (Glycine max)
Seed Rate Handle Setting
0 5 10 15 20 25 30 35 40 45 50 55 60 65 70 75 80 85 90 95 100
Rows Drive Type: 1 Seed Rate in Kilograms Per Hectare
19.1 cm
19.1 cm
19.1 cm
19.1 cm
04.57.8111620252934404550555964687276798183
Drive Type: 2 Seed Rate in Kilograms Per Hectare
0 9.3 16 24 32 41 51 61 71 81 92 102 112 122 131 140 148 156 162 167 171
Drive Type: 3 Seed Rate in Kilograms Per Hectare
0 12 23 35 48 61 75 90 104 119 134 149 163 177 191 204 216 228 238 247 255
Drive Type: 4 Seed Rate in Kilograms Per Hectare
0 20 38 57 78 100 123 146 170 194 219 243 266 289 311 333 353 371 388 403 416
Sunflower (Helianthus annuus)
Seed Rate Handle Setting
0 5 10 15 20 25 30 35 40 45 50 55 60 65 70 75 80 85 90 95 100
Rows Drive Type: 1 Seed Rate in Kilograms Per Hectare
19.1 cm
19.1 cm
19.1 cm
19.1 cm
00.31.93.55.37.39.31113161820222426283032333536
Drive Type: 2 Seed Rate in Kilograms Per Hectare
0 0.7 3.8 7.3 11 15 19 23 28 32 37 41 45 50 54 58 62 65 68 71 74
Drive Type: 3 Seed Rate in Kilograms Per Hectare
02.86.11015202531374349566268748085909498101
Drive Type: 4 Seed Rate in Kilograms Per Hectare
0 4.6 10 16 24 32 41 50 60 70 81 91 101 111 121 130 139 147 154 160 165
(based on 0.75 kg/litre)
32312D
(based on 0.36 kg/litre)
32313D
151-143B Table of Contents Main Box Rates 2011-10-21
Page 43

Great Plains Manufacturing, Inc. Table of Contents Main Box Rates Appendix 41
Metric Rate Charts, Main Seed Box, continued...
Tiffany Teff, Coated (Erogrostis tef)
Seed Rate Handle Setting
0 5 10 15 20 25 30 35 40 45 50 55 60 65 70 75 80 85 90 95 100
Rows Drive Type: 1 Seed Rate in Kilograms Per Hectare
19.1 cm
19.1 cm
19.1 cm
19.1 cm
04.57.0101316202327313539444852576165697377
Drive Type: 2 Seed Rate in Kilograms Per Hectare
0 9.3 14 20 27 33 41 48 56 64 73 81 90 99 108 116 125 134 142 151 159
Drive Type: 3 Seed Rate in Kilograms Per Hectare
0142230405061728496109122135148161175188201214226238
Drive Type: 4 Seed Rate in Kilograms Per Hectare
0 23 35 50 65 82 99 118 137 157 177 198 220 241 263 285 306 327 348 369 388
Wheat (Triticum)
(based on 0.84 kg/litre)
32314D
Seed Rate Handle Setting
0 5 10 15 20 25 30 35 40 45 50 55 60 65 70 75 80 85 90 95 100
Rows Drive Type: 1 Seed Rate in Kilograms Per Hectare
19.1 cm
19.1 cm
19.1 cm
19.1 cm
0 8.0 10 13 16 20 24 29 34 40 45 51 56 61 67 72 76 80 84 87 89
Drive Type: 2 Seed Rate in Kilograms Per Hectare
016202633415060708192104115126137147157165172179183
Drive Type: 3 Seed Rate in Kilograms Per Hectare
0 21 29 38 50 62 76 90 105 121 137 153 168 184 199 213 226 238 249 258 265
Drive Type: 4 Seed Rate in Kilograms Per Hectare
0 34 47 63 81 101 123 147 172 197 223 249 274 300 324 347 368 388 405 420 432
Wheatgrass (Pascopyrum smithii,
Agropyron elongatum)
Seed Rate Handle Setting
0 5 10 15 20 25 30 35 40 45 50 55 60 65 70 75 80 85 90 95 100
Rows Drive Type: 1 Seed Rate in Kilograms Per Hectare
19.1 cm
19.1 cm
19.1 cm
19.1 cm
01.11.92.73.64.55.56.47.48.49.510111213141516171818
Drive Type: 2 Seed Rate in Kilograms Per Hectare
0 2.2 3.8 5.5 7.4 9.3 11 13 15 17 19 22 24 26 28 29 31 33 35 36 37
Drive Type: 3 Seed Rate in Kilograms Per Hectare
0 3.9 6.0 8.3 11 13 16 19 22 25 28 31 35 38 40 43 46 48 51 53 54
Drive Type: 4 Seed Rate in Kilograms Per Hectare
0 6.3 10 14 18 22 27 31 36 41 46 51 56 61 66 70 75 79 83 86 89
(based on 0.82 kg/litre)
32315D
(based on 0.30 kg/litre)
32316D
2011-10-21 Table of Contents Main Box Rates 151-143B
Page 44

42 3P806NT Table of Contents Main Box Rates Great Plains Manufacturing, Inc.
Metric Rate Charts, Small Seeds Box
See page 24 for instructions.
Charts in U.S. customary units begin on page 27.
Alfalfa, Red Alsike, Crimson Clover
Small Seeds Cup Lever Setting
0 5 10 15 20 25 30 35 40 45 50 55 60 65 70 75 80 85 90 95 100
Rows Seeding Rate in Kilograms per Hectare
19.1cm (7.5in) 0 0.0 2.0 3.2 4.4 5.4 6.8 7.9 8.9 10.1 11.3 12.5 13.6 14.9 15.8 17.2 18.3 19.4 20.6 21.7 22.9
Kentucky Bluegrass, Fescue, Annual Rye Grass
Small Seeds Cup Lever Setting
0 5 10 15 20 25 30 35 40 45 50 55 60 65 70 75 80 85 90 95 100
Rows Seeding Rate in Kilograms per Hectare
19.1cm (7.5in) 0 0.0 0.2 1.0 1.7 2.5 3.0 3.7 4.2 4.7 5.2 5.7 6.2 6.6 7.1 7.5 7.9 8.3 8.3 9.1 9.5
Bermuda, Red Top, Lespedeza Unhulled, Sercia, Sand, Weeping Love Grass
Small Seeds Cup Lever Setting
0 5 10 15 20 25 30 35 40 45 50 55 60 65 70 75 80 85 90 95 100
Rows Seeding Rate in Kilograms per Hectare
19.1cm (7.5in) 0 0.0 0.6 1.0 1.6 2.4 2.9 3.7 4.5 5.3 6.0 6.5 7.1 7.5 8.1 8.6 9.2 9.9 10.5 11.0 11.7
Red & Sweet Clover, Lespedeza Hulled
Small Seeds Cup Lever Setting
0 5 10 15 20 25 30 35 40 45 50 55 60 65 70 75 80 85 90 95 100
Rows Seeding Rate in Kilograms per Hectare
19.1cm (7.5in) 0 0.0 1.4 3.0 4.7 6.4 8.1 10.3 11.9 13.9 15.4 17.2 18.8 20.4 22.2 23.9 25.6 27.3 29.1 30.6 32.2
Orchard Grass
Small Seeds Cup Lever Setting
0 5 10 15 20 25 30 35 40 45 50 55 60 65 70 75 80 85 90 95 100
Rows Seeding Rate in Kilograms per Hectare
19.1cm (7.5in) 0 0.0 0.0 0.2 0.6 0.8 0.8 1.4 1.4 1.4 1.4 1.4 3.2 3.6 3.9 4.4 4.5 5.0 5.2 5.5 5.5
151-143B Table of Contents Main Box Rates 2011-10-21
Page 45

Great Plains Manufacturing, Inc. Table of Contents Main Box Rates Appendix 43
Metric Rate Charts, Small Seeds Box, continued...
Millet, Reed Canary
Small Seeds Cup Lever Setting
0 5 10 15 20 25 30 35 40 45 50 55 60 65 70 75 80 85 90 95 100
Rows Seeding Rate in Kilograms per Hectare
19.1cm (7.5in) 0 0.3 1.4 1.4 1.4 4.1 5.0 5.9 6.8 7.7 8.6 9.5 10.5 11.4 12.3 13.2 14.1 15.0 15.9 16.8 17.0
Ladino Clover, Canary Grass, Timothy, Canola
Small Seeds Cup Lever Setting
0 5 10 15 20 25 30 35 40 45 50 55 60 65 70 75 80 85 90 95 100
Rows Seeding Rate in Kilograms per Hectare
19.1cm (7.5in) 0 0.0 1.0 1.8 2.9 4.4 4.4 4.4 8.3 9.7 11.0 12.5 14.1 15.4 16.8 18.4 19.8 21.2 23.0 24.7 26.5
Birdsfoot, Trefoil, Sudan
Small Seeds Cup Lever Setting
0 5 10 15 20 25 30 35 40 45 50 55 60 65 70 75 80 85 90 95 100
Rows Seeding Rate in Kilograms per Hectare
19.1cm (7.5in) 0 0.0 1.6 1.6 1.6 1.6 7.9 9.7 11.5 11.5 15.2 17.4 17.4 17.4 17.4 25.4 27.0 29.1 31.1 32.8 32.8
2011-10-21 Table of Contents Main Box Rates 151-143B
Page 46

44 3P806NT Table of Contents Main Box Rates Great Plains Manufacturing, Inc.
Metric Native Grass Rates
For U.S. customary units, see page 20.
Formulas Metric Example
Know your Desired seed rate in pounds per acre:
TargetRate
Example target seed rate:
40 kg per hectare
Choose the number of rows to sample. Example:
3
Weigh the empty sample container(s):
ContainerWeight
Example container are three 680 gram buckets:
2.04 kg
For a larger sample, we set the Drive Type high. Example starting calibration Drive Type:
2
As there is only minor benefit in changing the final drive
sprocket for calibration, we leave it as is.
Examine the transmission for Standard vs. Seed Rate
Reduction/
Operate crank/gauge wheel for one tenth hectare:
CalibrationRevs
Weigh the collected seed plus container(s):
GrossWeight
Example final drive sprocket:
20T
Example transmission: Rate Reduction not installed:
Standard
Example:
162 revolutions (
1
⁄
10
th
of 1622)
Example:
GrossWeight = 4.2 kg
Obtain the net sample weight: Example:
NetSample GrossWeight ContainerWeight–=
2.16 = 4.2 - 2.04, or:
NetSample = 2.16 kg
Determine the net sample weight per cup: Example:
NetPerCup
NetSample
---------------------------------------
=
SampledRows
2.16 ÷ 3, or:
NetPerCup = 0.72 kg
Scale the sample to drill-wide: Example:
NetFullWidth NetPerCup 13×=
93.5 = 0.72x 13, or:
NetFullWidth = 9.35 kg
Scale the sample to a full hectare: Example:
NetPerHa NetFullWidth 10×=
93.5 = 9.35x 10, or:
NetPerHa = 93.5 kg/ha
Look up the number of meter shaft revolutions per ha:
CalCharRevs
for the current Drive Type, final sprocket and
transmission configuration.
Example:
Drive Type 2, 20T and Standard is:
342 cup revolutions per ha.
CalChartRevs = 342
Detemine the cup rate for this seed mix: Example:
NetPerHa
WeightPerRev
--------------------------------------
=
CalChartRevs
Determine the number of revolutions required for the
target field rate weight metered per shaft revolution:
TetRatearg
TetRevsarg
------------------------------------------
=
WeightPerRev
Look up the Drive Type and final sprocket for
TargetRevs
0.273 = 93.5 ÷ 342, or:
WeightPerRev = 0.273 kg
Example:
146 = 40 ÷ 0.277, or:
TargetRevs = 146
Example:
Drive Type: 1
Final Sprocket: 23 T
151-143B Table of Contents Main Box Rates 2011-10-21
Page 47

Great Plains Manufacturing, Inc. Table of Contents Main Box Rates Appendix 45
Metric Native Grass Shaft Rates
These charts are used for calibration, providing rotations
of meter shaft per ha. They are not seed rate charts.
For instructions, see page 17.
For charts in U.S. customary units, see page 20.
Metric Standard Shaft Rates
Native Grass Driven Sprocket (Standard Rate)
Drive
Type
1 238 222 208 196 185 175 167 159 151 145
2 489 456 428 403 380 360 342 326 311 298
3 734 685 642 604 571 540 513 489 467 446
4 1197 1117 1047 985 931 882 838 798 761 728
14T 15T 16T 17T 18T 19T 20T 21T 22T 23T
Native Grass Cup Revolutions Per Hectare
Metric Shaft Rates with Seed Rate Reduction
Native Grass Driven Sprocket (with Rate Reduction Kit)
Drive
Type
1 134 125 118 111 105 99.1 94.1 89.6 85.5 81.8
2 276 258 242 228 215 204 193 184 176 168
3 415 387 363 341 322 305 290 276 264 252
4 676 631 592 557 526 498 473 451 430 412
14T 15T 16T 17T 18T 19T 20T 21T 22T 23T
Native Grass Cup Revolutions Per Hectare
32343C
32343D
2011-10-21 Table of Contents Main Box Rates 151-143B
Page 48

Brome Seed Rates, Metric
For instructions, see page 21.
For charts in U.S. customary units, see page 23.
Metric Standard Brome Rates
Metric
Drive
Type
1 9.6 9.1 8.5 8.1 7.6 7.2 6.8 6.6 6.3 6.1
219.818.517.516.515.614.814.113.512.912.3
329.727.826.224.823.422.321.220.319.418.5
448.445.442.740.438.236.334.533.031.630.3
15 16 17 18 19 20 21 22 23 24
Native Grass Driven Sprocket (Standard Rate)
Brome Grass Seeding Rate in Kilograms per Hectare
32336C
Metric Reduced Brome Rates
Metric
Drive
Type
1 5.6 5.3 4.9 4.7 4.4 4.2 4.0 3.8 3.6 3.5
2 11.5 10.7 10.1 9.5 9.0 8.6 8.2 7.8 7.5 7.1
317.216.115.214.413.612.912.311.811.210.7
428.126.324.723.422.221.020.019.118.317.5
15 16 17 18 19 20 21 22 23 24
Native Grass Driven Sprocket (with Rate Reduction Kit)
Brome Grass Seeding Rate in Kilograms per Hectare
32336D
Great Plains Manufacturing, Inc.
Corporate Office: P.O. Box 5060
Salina, Kansas 67402-5060 USA
 Loading...