

Great Plains 3P600 User Manual

Table of Contents Main Box Rates
Manufacturing, Inc.
www.greatplainsmfg.com
Seed and Small Seeds Rate Charts
for the 3P500, 3P500V & 3P600
3-Point 5-Foot and 6-Foot Compact Drills
The following pages are to assist in the proper setting of seeding
rates for the 5-foot (1.4 m) and 6-foot (1.8 m) compact drills. The
rates indicated in the charts are approximate. To assure the most
accurate seeding, it is recommended that the drill be calibrated for
the desired seed at the time of planting.
ORIGINAL INSTRUCTIONS
© Copyright 2011 Printed 2011-10-21 118-794B
EN

ii 3P500, 3P500V & 3P600 Cover Main Box Rates Great Plains Manufacturing, Inc.
Table of Contents
Introduction .................................................................. 1
Models Covered............................................................. 1
Document Family ........................................................... 1
Main Box Seed Rate..................................................... 2
Setting Drive Type ......................................................... 2
Main Box Seed Rate Handle...................................... 3
Position Seed Cup Doors........................................... 3
Main Seed Row Shutoff ............................................. 3
Reading a Seed Rate Chart....................................... 4
Main Box Seed Rate Calibration................................ 5
Calibration Revolutions .......................................... 5
Rate Charts, Main Seed Box ......................................... 7
Alfalfa (Medicago sativa)............................................ 7
Bahia Grass (Paspalum notatum).............................. 8
Barley (Hordeum vulgare).......................................... 9
Buckwheat (Fagopyrum esculentum)....................... 10
Buffalograss (Buchloe dactyloides).......................... 11
Bermuda Grass (Cynodon dactylon)........................ 12
K-31 Fescue (Festuca) ............................................ 13
Flax (Linum usitatissimum) or Sudan
(Sorghum bicolor subsp. drummondii) ................. 14
Eastern Gamma Grass - Pete
(Tripsacum dactyloides) ....................................... 15
Kentucky Blue Grass (Poa pratensis) ...................... 16
Millet (Pennisetum glaucum, Setaria italica,
Panicum miliaceum, Eleusine coracana) ............. 17
Milo (Sorghum) ........................................................ 18
Oats (Avena sativa) ................................................. 19
Orchard Grass Potomac (Dactylis glomerata) ......... 20
Peas (Pisum sativum) .............................................. 21
Pinto Beans (Phaseolus vulgaris) ............................ 22
Rape (Brassica napus) ............................................ 23
Rice, Long Grain (Oryza sativa indica) .....................24
Rice, Short Grain (Oryza sativa japonica,
Oryza sativa sinica) ..............................................25
Rye (Secale cereale) ................................................26
Perennial Rye Grass - Palmer
(Lolium perenne, Lolium multiflorum) ...................27
Soybeans (Glycine max)...........................................28
Sunflower (Helianthus annuus).................................29
Tiffany Teff, Coated (Erogrostis tef)..........................30
Wheat (Triticum) .......................................................31
Wheatgrass (Pascopyrum smithii,
Agropyron elongatum) ..........................................32
Small Seeds Rate........................................................33
Small Seeds Rate Calibration.......................................33
Calibration Revolutions.........................................34
Small Seeds Row Shut-Off ...................................35
Small Seeds Rate Charts .............................................36
Alfalfa, Red Alsike, Crimson Clover.............................. 36
Kentucky Bluegrass,
Fescue, Annual Rye Grass....................................... 36
Bermuda, Red Top, Lespedeza Unhulled,
Sercia, Sand, Weeping Love Grass ......................... 36
Red & Sweet Clover, Lespedeza Hulled ...................... 36
Orchard Grass .............................................................. 36
Millet, Reed Canary ...................................................... 37
Ladino Clover, Canary Grass,
Timothy, Canola ....................................................... 37
Birdsfoot, Trefoil, Sudan ............................................... 37
Appendix .....................................................................38
Metric Rate Charts, Main Seed Box .............................38
Metric Rate Charts, Small Seeds Box ..........................64
© Copyright 2003, 2005, 2007, 2011 All rights Reserved
Great Plains Manufacturing, Inc. provides this publication “as is” without warranty of any kind, either expressed or implied. While every precaution has been
taken in the preparation of this manual, Great Plains Manufacturing, Inc. assumes no responsibility for errors or omissions. Neither is any liability assumed for
damages resulting from the use of the information contained herein. Great Plains Manufacturing, Inc. reserves the right to revise and improve its products as
it sees fit. This publication describes the state of this product at the time of its publication, and may not reflect the product in the future.
2011-10-21 Cover Main Box Rates 118-794B
Trademarks of Great Plains Manufacturing, Inc. include: Singulator Plus, Swath Command, Terra-Tine.
Registered Trademarks of Great Plains Manufacturing, Inc. include:
Air-Pro, Clear-Shot, Great Plains, Land Pride, MeterCone, Nutri-Pro, Seed-Lok, Solid Stand, Whirlfilter, Yield-Pro.
Brand and Product Names that appear and are owned by others are trademarks of their respective owners.
Printed in the United States of America
Great Plains Manufacturing, Inc. Table of Contents Main Box Rates 1
Introduction
This manual is your guide to drill adjustments for
achieving specific seed populations. It covers seeding
rates for:
• the standard Main Seed Box (page 2), and
• the optional Small Seeds Attachment (page 33).
Although some setup, operation and adjustment material
herein is repeated from the drill Operator Manual, you
need to be thoroughly familiar with drill operations and
adjustments before applying this Seed Rate manual and
its table data.
Models Covered
This rate manual applies to Great Plains drill models:
3P500-0775 7-Row 7.5 in. (19.1 cm)
3P500-0906 9-Row 6 in. (15.2 cm)
3P500V-0775 7-Row 7.5 in. (19.1 cm)
3P500V-0872 8-Row 7.25 in. (18.4 cm)
3P500V-0906 9-Row 6 in. (15.2 cm)
3P600-0975 9-Row 7.5 in. (19.1 cm)
3P600-1106 11-Row 6 in. (15.2 cm)
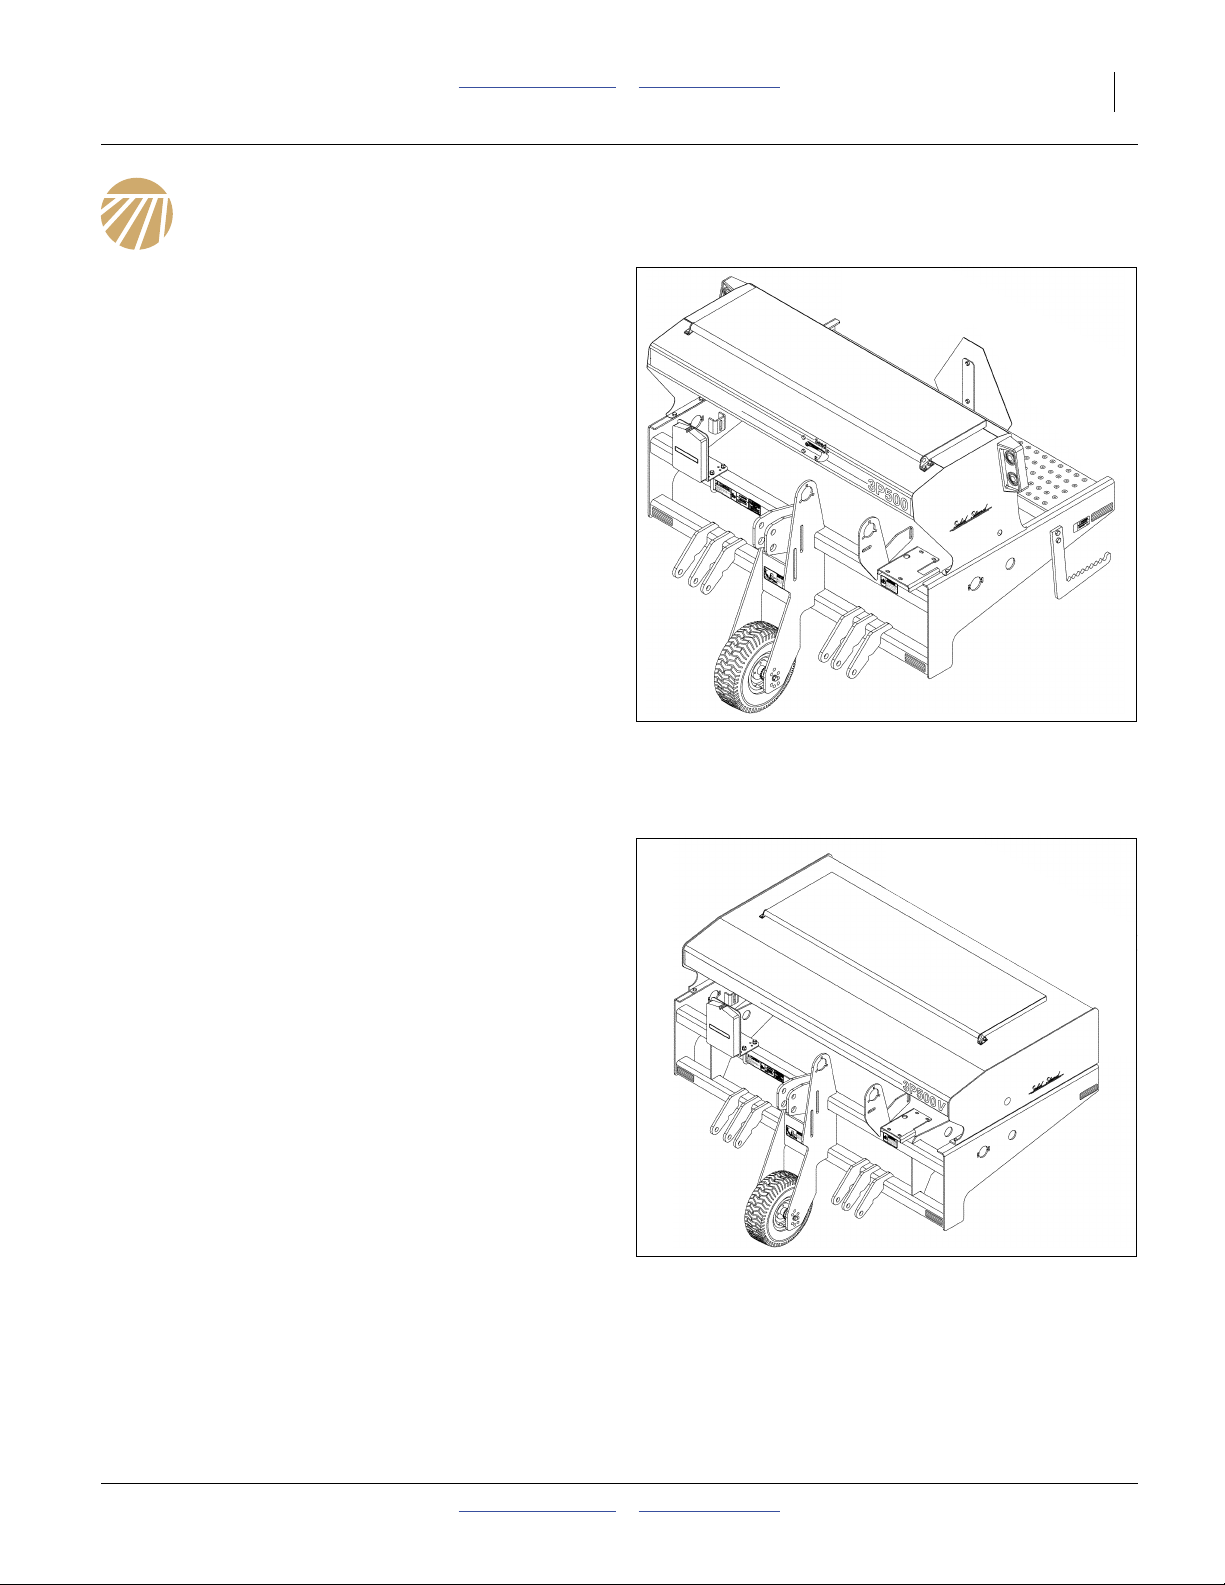
Figure 1
3P500 Compact Drill
32713
Document Family
118-794M Operator Manual
118-794P Parts Manual
118-794B Seed Rate Manual (this document)
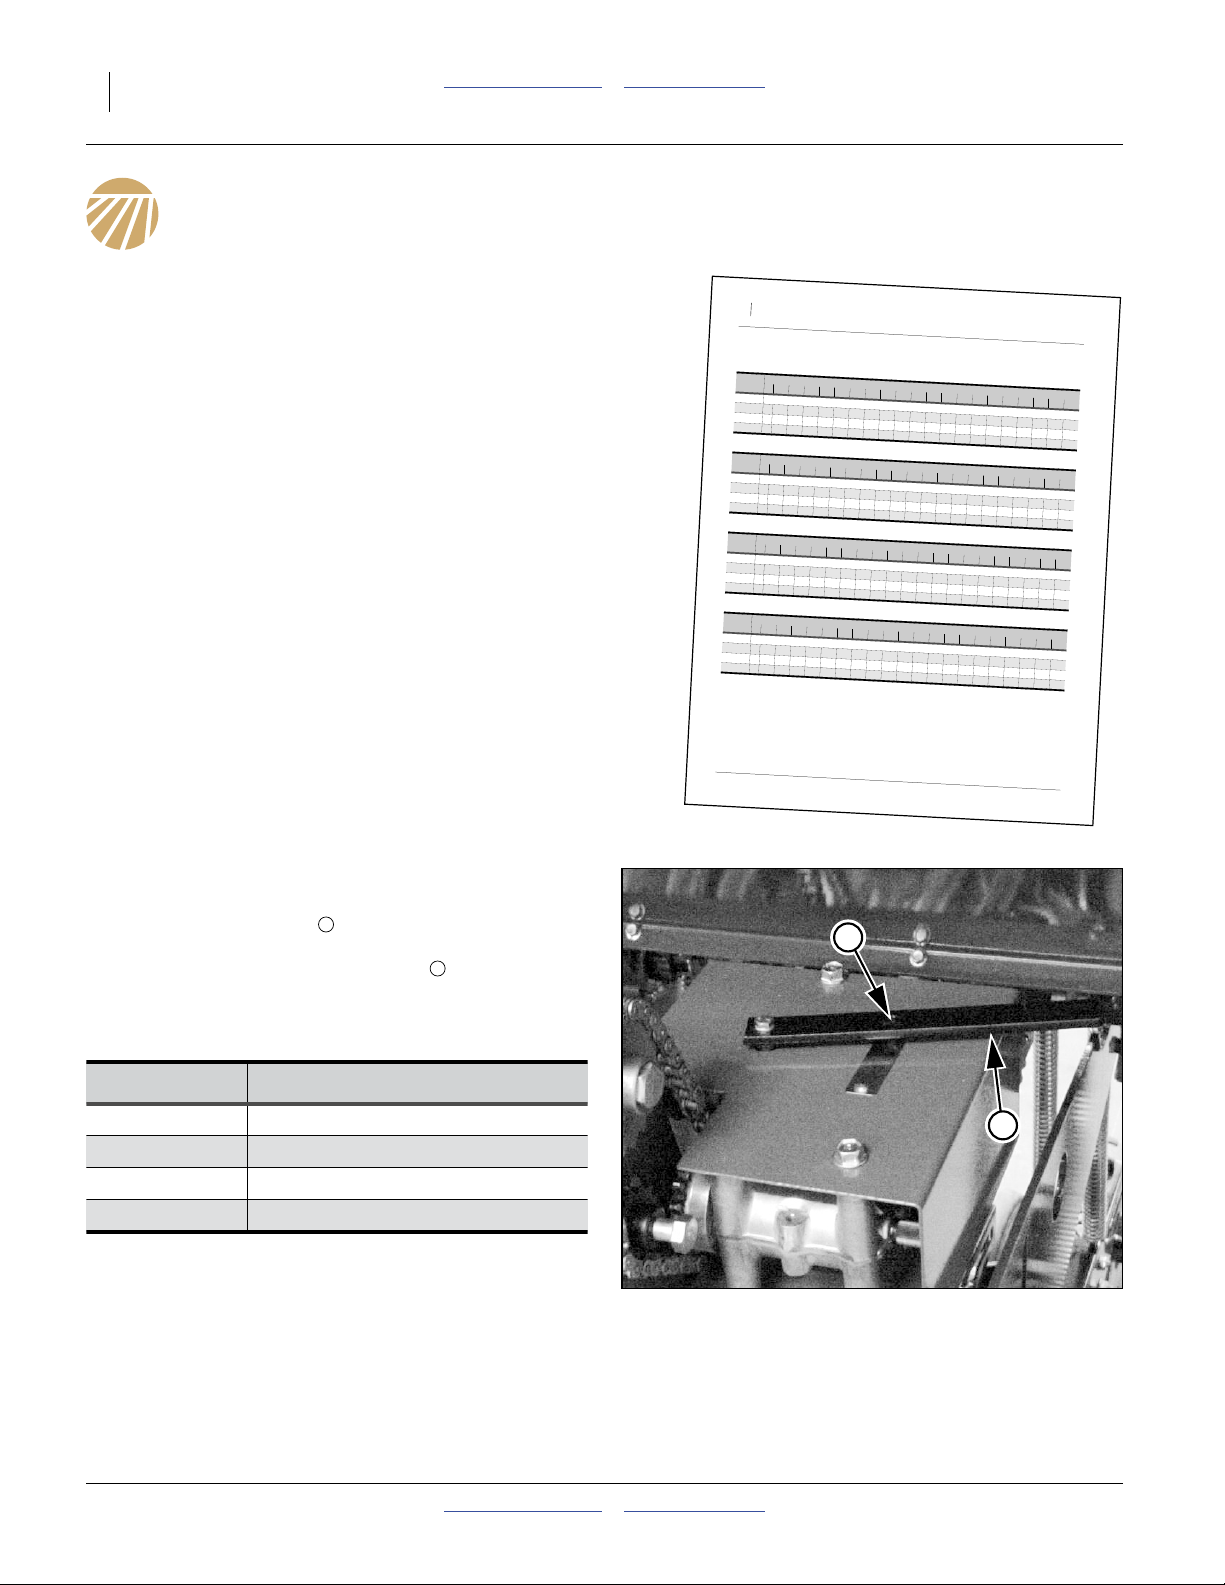
Figure 2
3P500V Compact Drill
32727
2011-10-21 Table of Contents Main Box Rates 118-794B
2 3P500, 3P500V & 3P600 Table of Contents Main Box Rates Great Plains Manufacturing, Inc.
3P
500
,3P
500V
& 3P600
Rate Charts
, M
ain S
eed
B
ox, co
nti
nu
ed
...
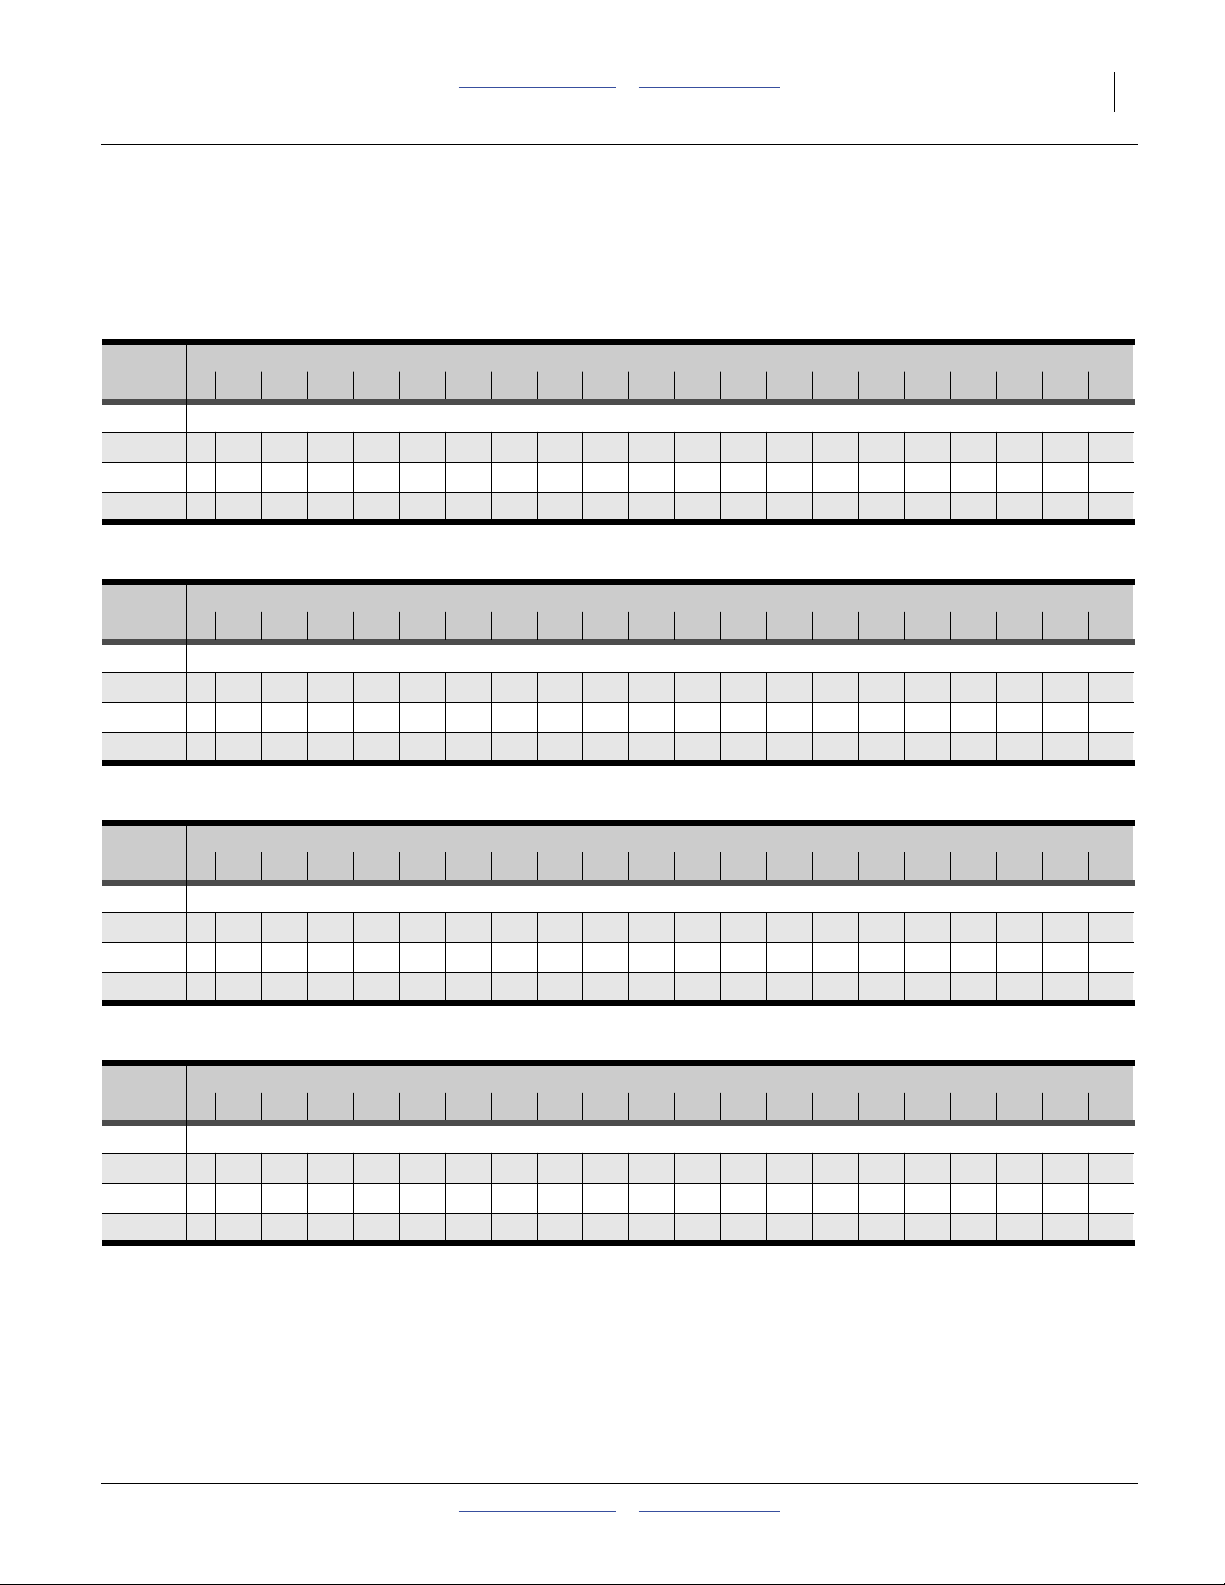
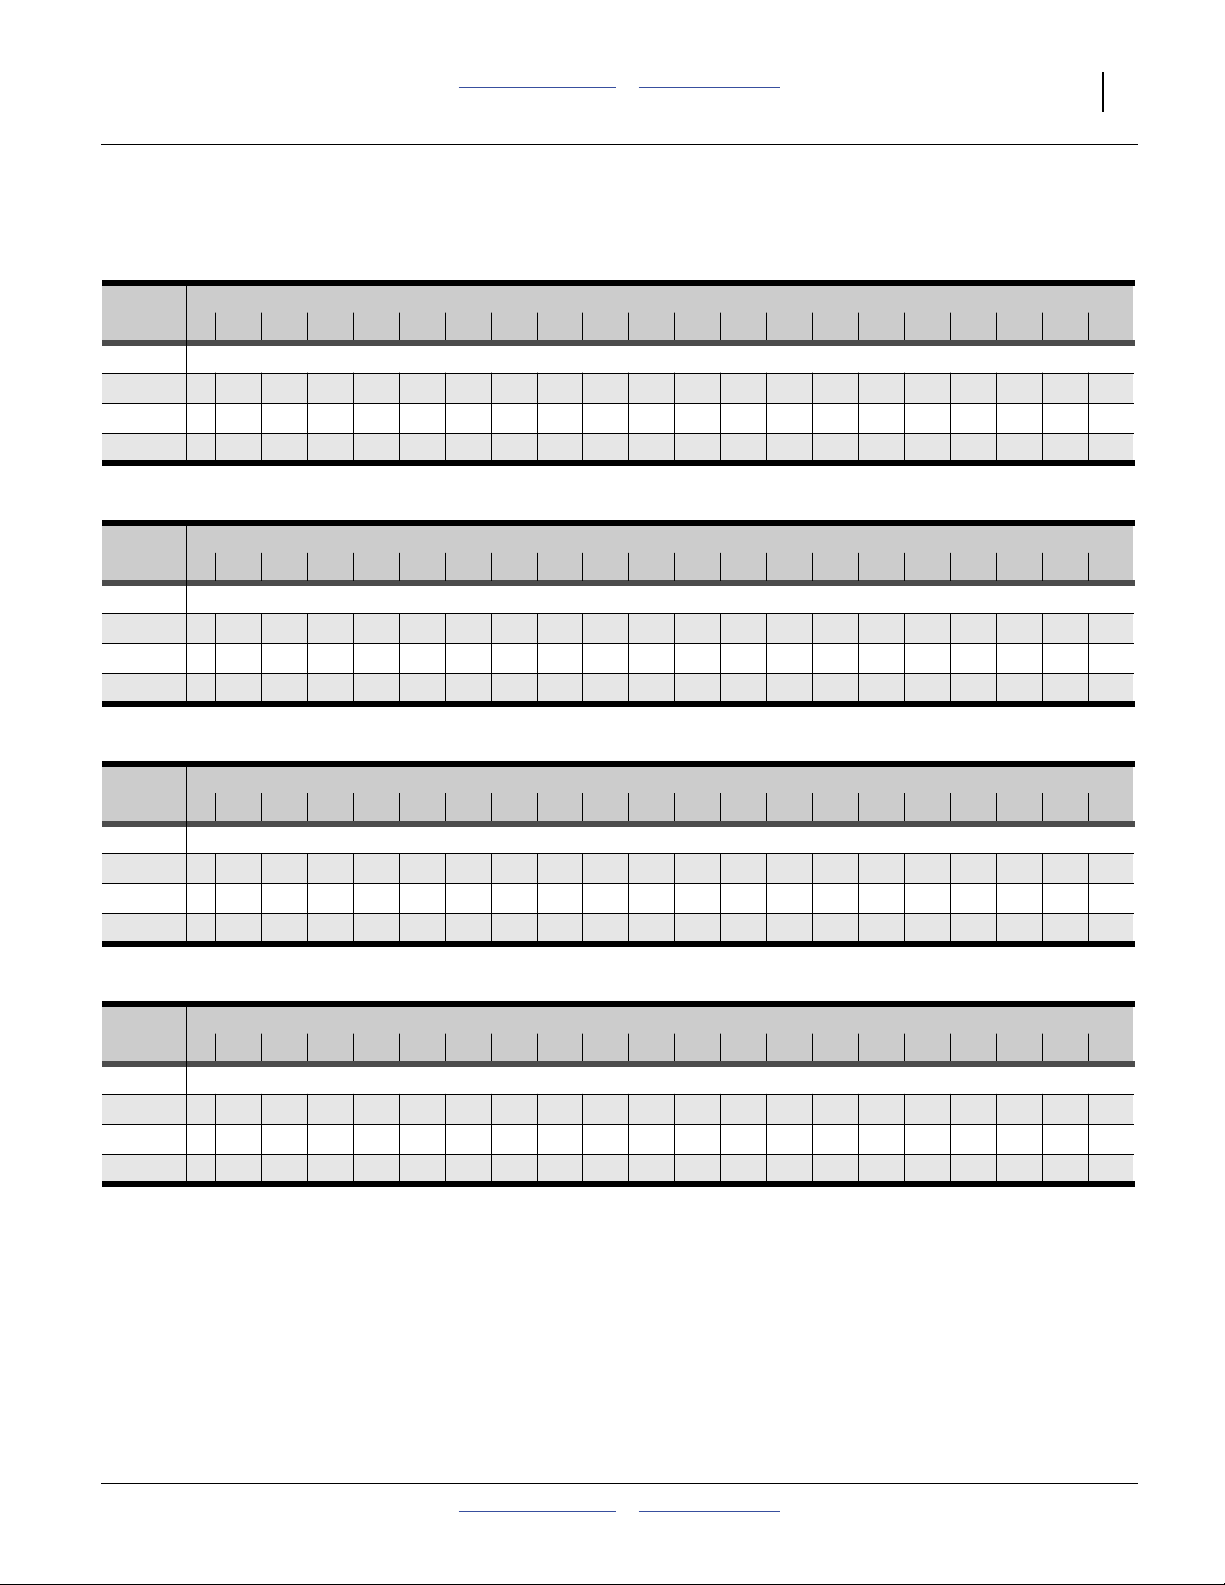
Barley (Hordeum vulgare)
S
eed
Ra
t
e Handle Setting
0 5 10 15 20 25 30 35 40 45 50 55 60 65 70 75 80 85 90 95 100
R
ow
s Drive Type: 1Seed Ra
t
e in Pounds Per Acre
(based on 51 pounds/bushel)
6 in.
05.97.9101417212530343944485357616467707273
7.25 in
04.96.58.71114172125283236404447505356585960
7.5 in
04.76.38.41114172024273135394245495154565758
32293G
Seed Rat
e Handle Setting
0 5 10 15 20 25 30 35 40 45 50 55 60 65 70 75 80 85 90 95 100
R
o
w
s Drive Type: 2 Seed Rate in Pounds Per Acre
(based on 51 pounds/bushel)
6 in.
0121622283543526171809099108117125132138143147150
7.25 in
01013182329364351586674828997103109114119122124
7.5 in
01013172228354249566472798693100105110115118120
32293G
S
eed
R
at
e Handle Setting
0 5 10 15 20 25 30 35 40 45 50 55 60 65 70 75 80 85 90 95 100
R
ow
s Drive Type: 3 Seed Ra
t
e in Pounds Per Acre
(based on 51 pounds/bushel)
6 in.
0 17 24 33 43 53 65 77 90 104 117 131 145 158 171 183 195 206 216 225 232
7.25 in
014202735445464758697108120131142152162171179186192
7.5 in
014192634435262728394105116126137147156165173180186
32293G
S
eed
R
at
e Handle Setting
0 5 10 15 20 25 30 35 40 45 50 55 60 65 70 75 80 85 90 95 100
R
ow
s Drive Type: 4 Seed R
at
e in Pounds Per Acre
(based on 51 pounds/bushel)
6 in.
0 28 40 54 70 87 106 126 147 169 191 214 236 258 279 299 318 336 352 367 379
7.25 in
0 23 33 44 58 72 88 104 122 140 158 177 195 213 231 248 263 278 292 303 314
7.5 in
0 22 32 43 56 70 85 101 118 135 153 171 189 206 223 239 255 269 282 293 303
32293G
Main Box Seed Rate
Accurately obtaining the desired seed population
requires four steps:
1. Setting Drive Type gearbox (from chart)
2. Setting initial Seed Rate Handle (from chart)
3. Positioning Seed Cup Door (by seed type)
4. Calibration: checking predicted seeding rate
Seed rate charts begin on page 7. The charts list proper
Drive Type and seed rate handle settings for various
seeds and seeding rates.
The seed rate charts are based on cleaned, untreated
seed of average size and test weight. The charts are
based on factory-supplied new 5.70L x 8 tires, inflated to
factory specification. Many factors affect seeding rates
including foreign material, seed treatment, seed size,
seed weight, field conditions, tire pressure and test
weight.
Use the charts only as a starting point. Minor
adjustments are commonly required. Set and check the
seeding rate using the procedures beginning on page 5,
then readjust the rate as necessary.
32811
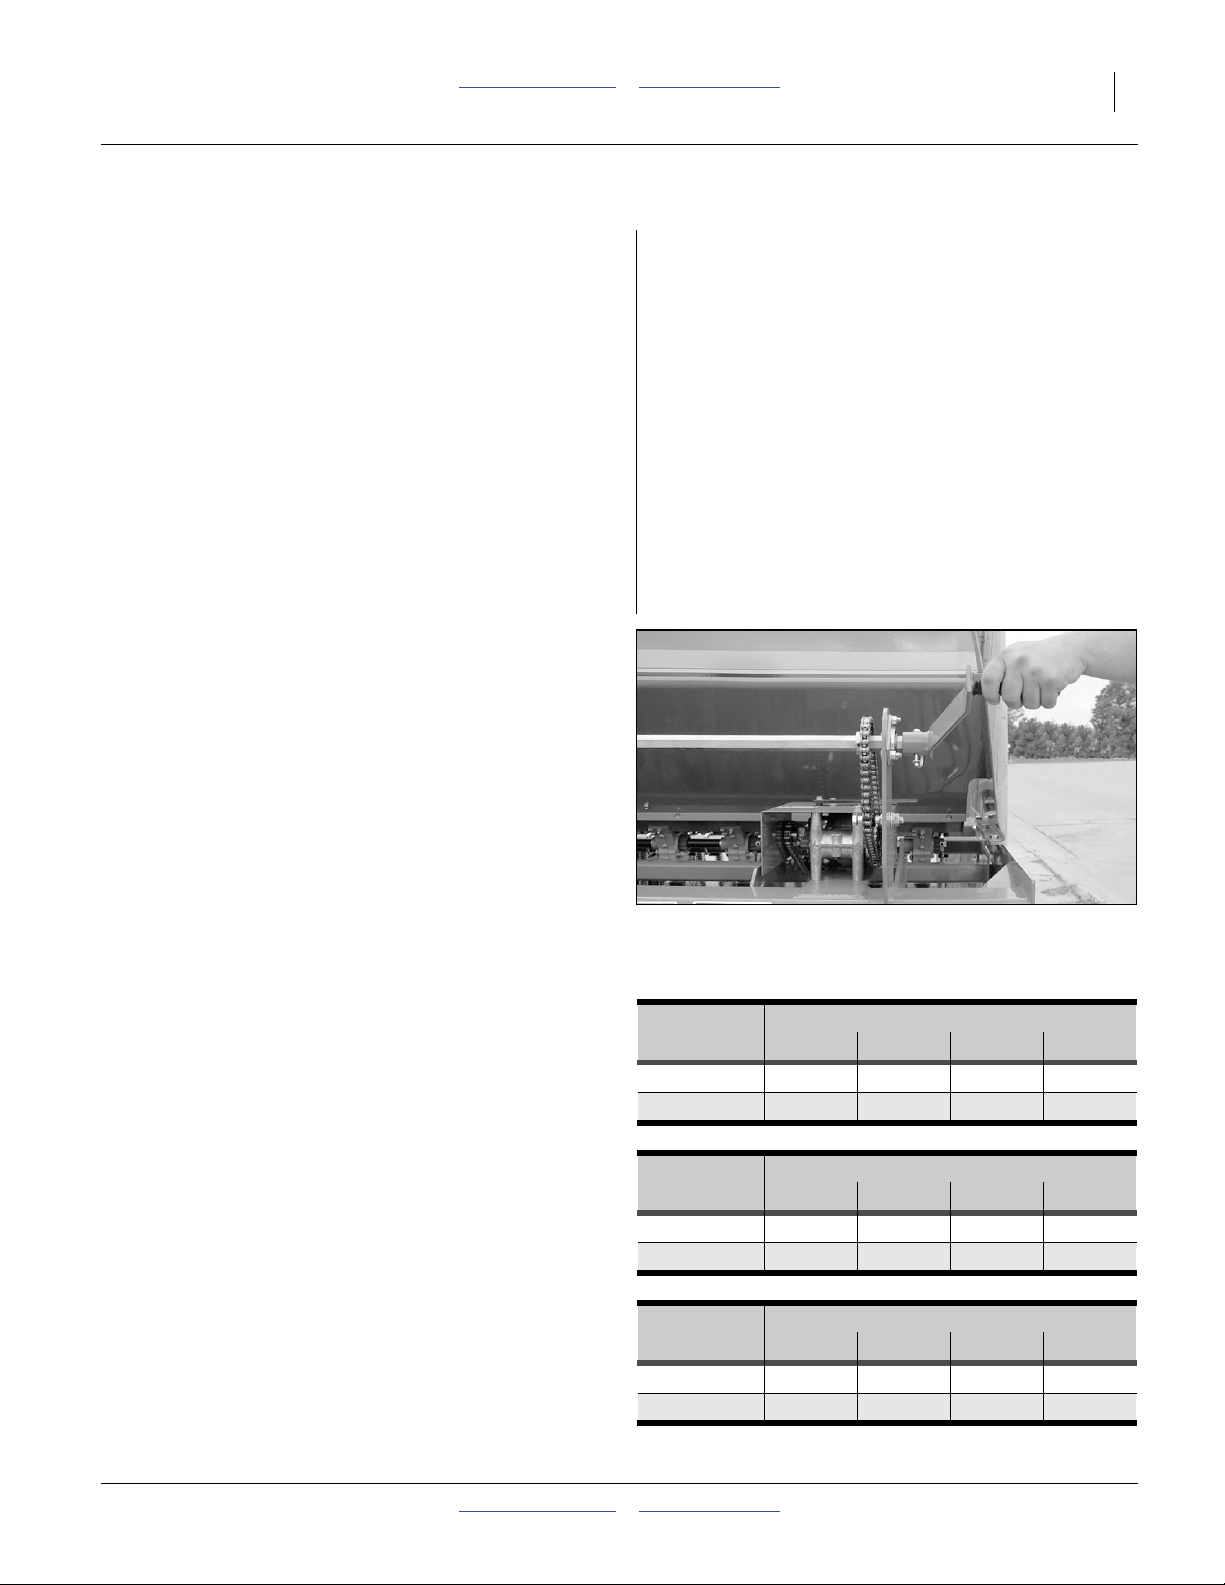
Setting Drive Type
Refer to Figure 3
The charts list Drive Types as 1, 2, 3 or 4. Drive Type is
determined by the handle on the gearbox cover at left
front of the drill. Move the handle until the Drive Type
number appears in the handle window .
For correct Drive Type, refer to the charts in the Seed
Rate manual. Each Drive Type corresponds to a specific
gear ratio.
Drive Type Relative Speed
1 Slowest
2 2.06 times faster than Type 1
3 3.08 times faster than Type 1
4 5.02 times faster than Type 1
Note: Drive Type affects both Main Box and optional
Native Grass seed rates.
1
2
32790
2
Figure 3
Gearbox Handle Adjustment
1
18476
118-794B Table of Contents Main Box Rates 2011-10-21
Great Plains Manufacturing, Inc. Table of Contents Main Box Rates Main Box Seed Rate 3
Main Box Seed Rate Handle
Refer to Figure 4
There is a single main seed box rate handle for the entire
drill.
The seed rate handle controls the percent engagement
of the seed sprocket in each seed cup. The initial setting
of the handle is given by the Seed Rate Chart.
Note: You can temporarily stop main seed flow (such as
for adjusting level/depth) with handle set to zero.
To set the handle:
1. Loosen wing nut under handle.
2. Move indicator from current setting to about 10
1
2
higher than the new desired value from calibration or
the Seed Rate Chart, then back to the desired value.
1
Figure 4
Main Box Seed Rate Handle
2
32792
3. Tighten wing nut.
Position Seed Cup Doors
Refer to Figure 5,
which depicts the seed cup door handle in position .
At each main seed box seed tube, adjust the seed cup
door handle for the seed size.
4
The handle has three normal operating position detents:
1
(top detent) is for the smallest seeds.
Use it for wheat and similar small seeds.
2
(middle detent) is for larger seeds.
Use it for soybeans and similar larger seeds.
3
(bottom detent) is for oversize or fragile seeds.
If you experience excessive cracking with
setting , use setting .
Note: Handle position is used for clean-out, not
2 3
5
planting. If set to this position with seed loaded,
it may be difficult to reset it to a normal operating
position.
3
4
1
2
3
5
Figure 5
Seed Cup Door Handle
26211
Main Seed Row Shutoff
If alternate row spacings are desired, the unused rows
can be shut off with optional plugs.
1. Clean-out seed. The seed box must be empty prior
to inserting plugs. See “Main Box Clean-Out” in
Operator manual.
Refer to Figure 6
2. Insert one plug at each row to shut off. Verify the
seed hose path before inserting the plug, as some
hoses do not make a strictly vertical drop to their row
units.
3. Review seed rate settings prior to planting. Perform
calibration calculations with the actual active row
Figure 6
Seed Cup Plug
count.
2011-10-21 Table of Contents Main Box Rates 118-794B
26279

4 3P500, 3P500V & 3P600 Table of Contents Main Box Rates Great Plains Manufacturing, Inc.
Seed Rate Handle Se
e
n
6 in.
01216222835435261
1
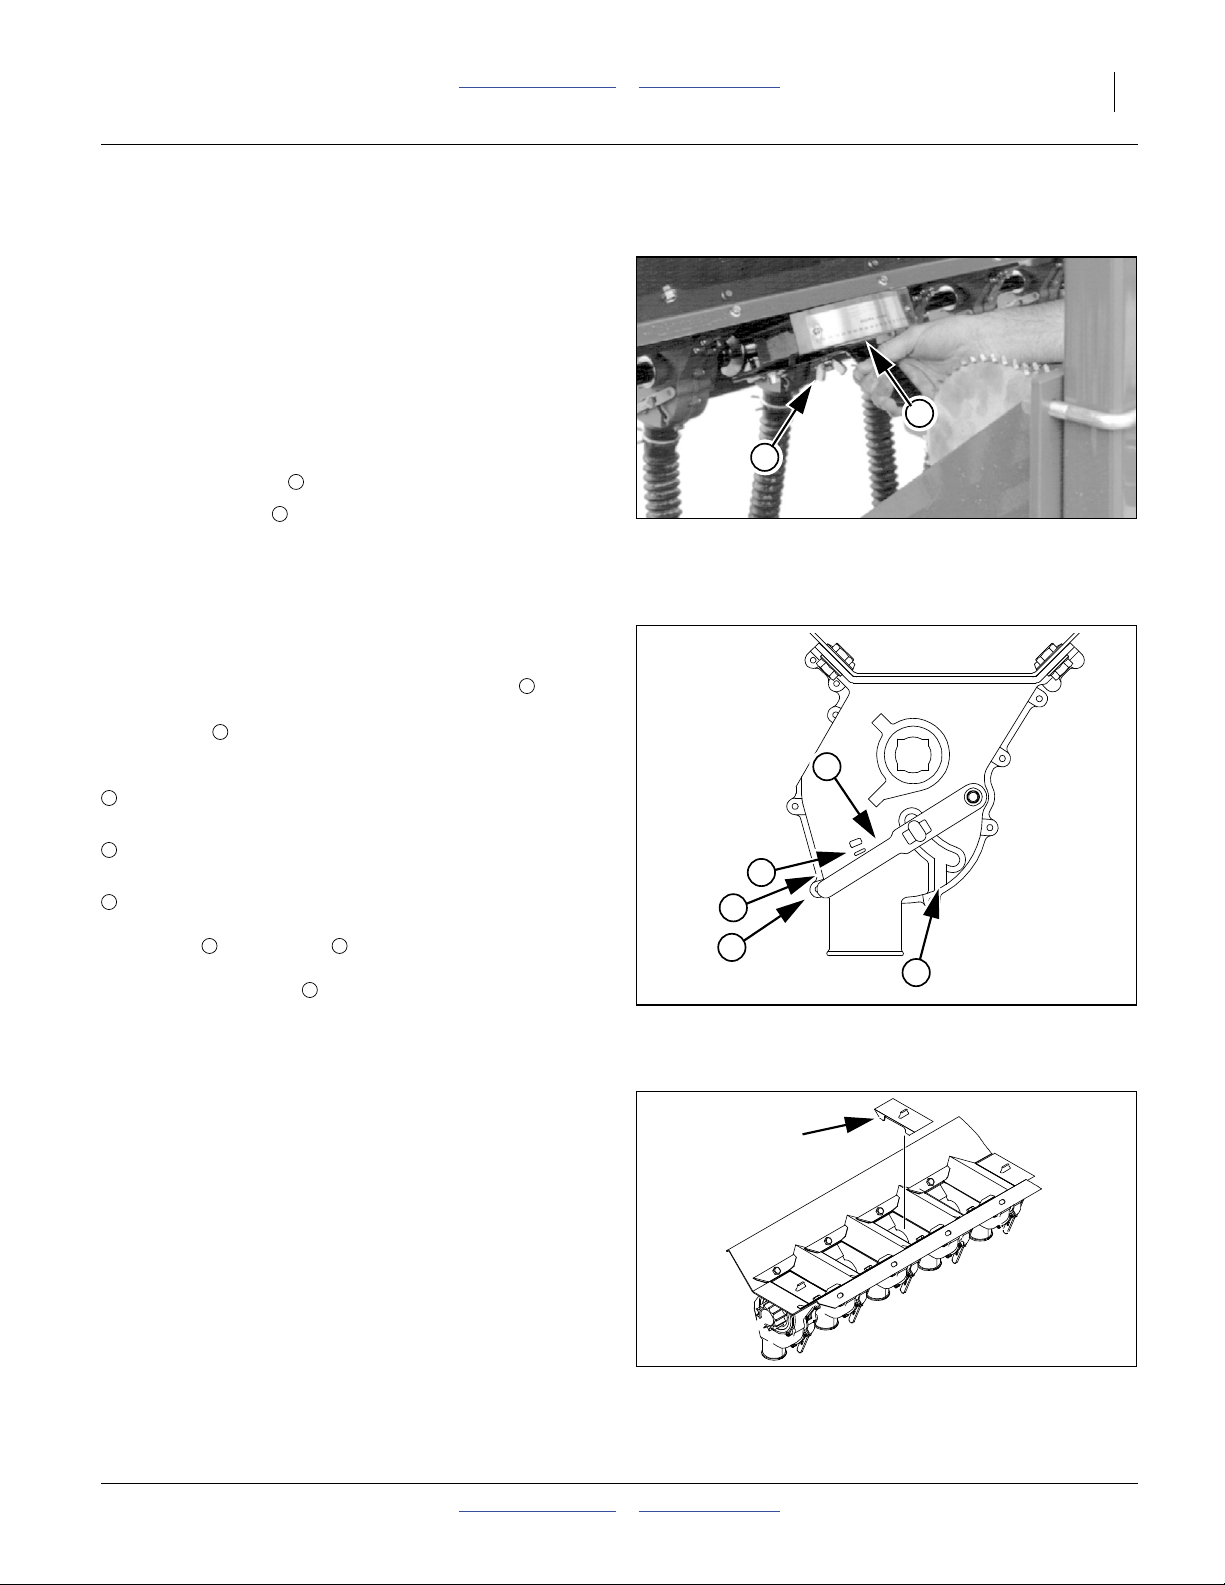
Reading a Seed Rate Chart
1. Find your seed. Charts are in alphabetical order by
common North American seed name. Scientific
names are provided. Charts covering more than one
seed may be out of order.
For Sudan, see Flax.
Box, continued...
Barley (Hordeum vulgare)
32811
The example presumes you desire to plant:
Barley at 60 pounds per acre with a 7.5 in. drill.
There are multiple chart sections for some seeds,
and the rates may overlap. Use the chart where your
desired rate is closest to 50 on the Seed Rate Handle scale.
In our example, that would be Barley Drive Type 2.
If your seed is not listed, find one with similar size,
shape and density. Density of the test seed used to
develop the chart appears under the right end of the
handle scale values.
2. Note the Drive Type for the chart rate row chosen (at
left above rates). This number (1-4) is used to
determine the gearbox handle setting. See page 2.
In the example, this is
Drive Type 2
3. Find your row spacing in the far left column.
10 15 20 25 30 35 40 45 50 55
Type: 2 Seed Rate in Pounds P
32811
216222835435261718090
013182329364351586674
013172228354249566472
065707580859095100
Acre
5 158 171 183 195 206 216 225 232
(based on 51 pounds/bushel)
32811
0 5 10 15 20 25 30 35 40 45 50
Drive Type: 2 Seed Rate in Pou
32811
012162228354352617180
010131823293643515866
7.25 in
7.5 in
01013182329364351
01013172228354249
32811
4. Locate your desired seed rate in the table row for
your row spacing.
2283543526171809099108
823293643515866748289
In the example the rate closest to 60 is:
722283542495664727986
64
5. Note the Seed Rate Handle setting required, at the
top of the column at that seed rate. This is the initial
value set on the Seed Rate Handle. See page 3.
In the example, start with a handle setting of:
50 (or interpolate to 47),
and calibrate. When a target rate falls halfway
between handle settings, you can adjust the handle
slightly to compensate, as in the example, but
15 20 25 30 35 40 45 50 55 60 65
22 28 35 43 52 61 71 80 90 99 108
32811
18 23 29 36 43 51 58 66 74 82 89
17 22 28 35 42 49 56 64 72 79 86
Seed Rate Handle Setting
Seed Rate in Pounds Per Acre
calibration is apt to result in further adjustment
anyway.
118-794B Table of Contents Main Box Rates 2011-10-21
32811
Great Plains Manufacturing, Inc. Table of Contents Main Box Rates Main Box Seed Rate 5
Main Box Seed Rate Calibration
Differences will exist between the tested seed and field
conditions used to generate the Seed Rate Charts, and
your seed and conditions. To accurately achieve your
target population, Great Plains recommends calibrating.
Due to the large number of crank revolutions per acre
(786 or 982) and per hectare (1942 or 2427), a practical
calibration is a simulation of1⁄
th
acre or1⁄
10
10
th
hectare.
1. Estimate the sample sizes.
FieldRate
RateSample
SamplePerRow
ExpectedSample SamplePerRow SampledRows×=
----------------------------
=
=
10
RateSample
----------------------------------- -
RowCount
2. To perform this calibration, you need a scale that is
accurate at the aggregate sample size, and three (3)
light containers, each capable of holding the
expected SamplePerRow. Record the empty
container weights.
3. Raise the drill so the gauge wheel is just out of
ground contact.
4. Remove the calibration crank from its storage stob.
Store the retaining pin on the stob.
Note: On older drills lacking a calibration crank, you can
crank the gearbox input jackshaft, by means of a
wrench or socket, for the same number of rotations
as shown for “Crank” in the table. You can
alternatively rotate the gauge wheel tire. A
calibration crank upgrade kit is available (see
Operator manual 118-794M).
Refer to Figure 7
5. Place the hex socket of the crank on the left end of
the main jackshaft.
6. Pull the seed hoses off the top of three opener seed
tubes, at the top of the openers. Place the hoses into
each sample container.
Example: You want to apply barley at 60 pounds per
acre with a 3P600 7.5 inch drill. RateSample is:
60
------
6.0
=
10
Example: the drill has 9 rows. SamplePerRow is:
6.0
0.67
------- -
=
9
Example: 3 rows are to be used in the sampling.
ExpectedSample is:
2.0 0.67 3×=
The expected sample weight is 2.0 lb.
Example: 3 containers, each weighing 0.5lb:
ContainerWeight = 1.5 lb
Figure 7
32793
Calibration Crank
Calibration Revolutions
Drill Model Rotations Per ...
3P500 Acre Hectare
1
/10th ac.
1
/10th ha
Crank 982 98.2 2427 243
Tire 1752 175 4329 433
Drill Model Rotations Per ...
3P500V Acre Hectare
1
/10th ac.
1
/10th ha
Crank 982 98.2 2427 243
Tire 1752 175 4329 433
Drill Model Rotations Per ...
3P600 Acre Hectare
1
/10th ac.
1
/10th ha
Crank 786 78.6 1942 194
Tire 1402 140 3464 346
32366
2011-10-21 Table of Contents Main Box Rates 118-794B

6 3P500, 3P500V & 3P600 Table of Contents Main Box Rates Great Plains Manufacturing, Inc.
7. If not already done, set the Drive Type, Seed Rate
Handle and Seed Cup Doors across the drill. If any
optional seed boxes are loaded, disconnect their
drive or set their rate to zero (unless you are
simultaneously calibrating multiple boxes).
8. Load seed above the rows to be sampled. Load well
more than the expected sample size.
9. Rotate the crank several turns to ensure that the
drives and seed cups are engaged, working properly,
free from foreign material, and that seed is flowing
steadily from the meters. Stop.
10. Note the current reading of the acremeter, unless
removed or you do not plan to rely on it for the
calibration.
11. Empty the sample containers back into the seed box,
and place them back under the three hoses to gather
metered seed.
12. Turn crank at a steady rate until one tenth acre or
hectare is tallied on acremeter (or count rotations
based on the table on page 5). While turning, check
that cups have ample seed coming into them.
13. Weigh metered seed. Subtract initial weight of
container(s).
NetWeight GrossWeight ContainerWeight–=
Example: you desire to plant barley at:
60 pounds per acre
which is between
45 and 50
on the Drive Type 2 chart.
Use an initial Seed Rate Handle (InitialHandle) scale
setting of:
48
3P600 crank rotations for one tenth acre:
78.6
Example: the containers weighed a total of 3.23
pounds after test:
1.73 lbs net
1.73 3.23 1.5–=
14. Divide the net seed weight by three. Multiply by
number of openers on your drill, and then by ten, to
determine the total of pounds per acre seeded.
NetWeight
MeasuredRate
---------------------------
3
OpenerCount× 10×=
15. The Seed Rate Handle scale is a percentage of
meter opening, and its effect is linear near scale
center. Calculate a new scale setting based on the
test.
Set the Seed Rate Handle to the new scale setting.
TargetRate
NewScale
-------------------------------------- -
MeasuredRate
PreviousScale×=
16. You may want to repeat calibration procedure at the
new setting if your results varied greatly from the
Seed Rate Chart, or if you must operate near the
ends of the Seed Rate handle scale (0-20 or
90-100).
17. With calibration complete, store calibration crank,
re-engage hub if locked-out, reinstall any removed
chains or sprockets, reconnect seed hoses and reinstall acremeter (if removed - tighten only to snug).
Example: MeasuredRate is:
52 lbs/ac
1.73
-----------
52
910××=
3
Example:
the target rate was 60 lbs/ac, and the initial scale 48:
the new scale setting is:
55
60
------
55
52
48×=
18. Check that your tire(s) is(are) properly inflated. See
“Tire Inflation Chart” in Operator manual.
When drilling, check seeding rate by noting acres drilled,
amount of seed added to drill and seed level in drill box.
If you are seeding more or less than desired, adjust rate
slightly to compensate for field conditions.
118-794B Table of Contents Main Box Rates 2011-10-21
Great Plains Manufacturing, Inc. Table of Contents Main Box Rates Main Box Seed Rate 7
Rate Charts, Main Seed Box
Charts in U.S. customary units.
Metric charts begin on page 38.
Alfalfa (Medicago sativa)
Seed Rate Handle Setting
0 5 10 15 20 25 30 35 40 45 50 55 60 65 70 75 80 85 90 95 100
Rows Drive Type: 1 Seed Rate in Pounds Per Acre
6 in.
7.25 in
7.5 in
05.88.4111518222631354045495459636772767983
0 4.8 6.9 9.4 12 15 18 22 25 29 33 37 41 45 48 52 56 59 63 66 69
0 4.6 6.7 9.1 12 15 18 21 25 28 32 36 39 43 47 50 54 57 61 64 66
Seed Rate Handle Setting
0 5 10 15 20 25 30 35 40 45 50 55 60 65 70 75 80 85 90 95 100
Rows Drive Type: 2 Seed Rate in Pounds Per Acre
6 in.
7.25 in
7.5 in
01217233038465463738292101111120130139147156163171
010141925313845526068768492100107115122129135141
0 9.5 14 19 24 30 37 44 51 58 66 73 81 89 96 104 111 118 125 131 136
(based on 60 pounds/bushel)
32291G
(based on 60 pounds/bushel)
32291G
Seed Rate Handle Setting
0 5 10 15 20 25 30 35 40 45 50 55 60 65 70 75 80 85 90 95 100
Rows Drive Type: 3 Seed Rate in Pounds Per Acre
6 in.
7.25 in
7.5 in
01927364657698194108121135149163176189202214225236246
0162230384757677889100112123135146157167177187195203
015222937465565758697108119130141151162171180189196
Seed Rate Handle Setting
0 5 10 15 20 25 30 35 40 45 50 55 60 65 70 75 80 85 90 95 100
Rows Drive Type: 4 Seed Rate in Pounds Per Acre
6 in.
7.25 in
7.5 in
0 31 44 59 75 93 112 133 154 175 198 220 243 265 287 309 329 349 368 385 400
0 26 36 49 62 77 93 110 127 145 164 182 201 219 238 255 273 289 304 318 331
0 25 35 47 60 75 90 106 123 140 158 176 194 212 230 247 264 279 294 308 320
(based on 60 pounds/bushel)
32291G
(based on 60 pounds/bushel)
32291G
2011-10-21 Table of Contents Main Box Rates 118-794B
8 3P500, 3P500V & 3P600 Table of Contents Main Box Rates Great Plains Manufacturing, Inc.
Rate Charts, Main Seed Box, continued...
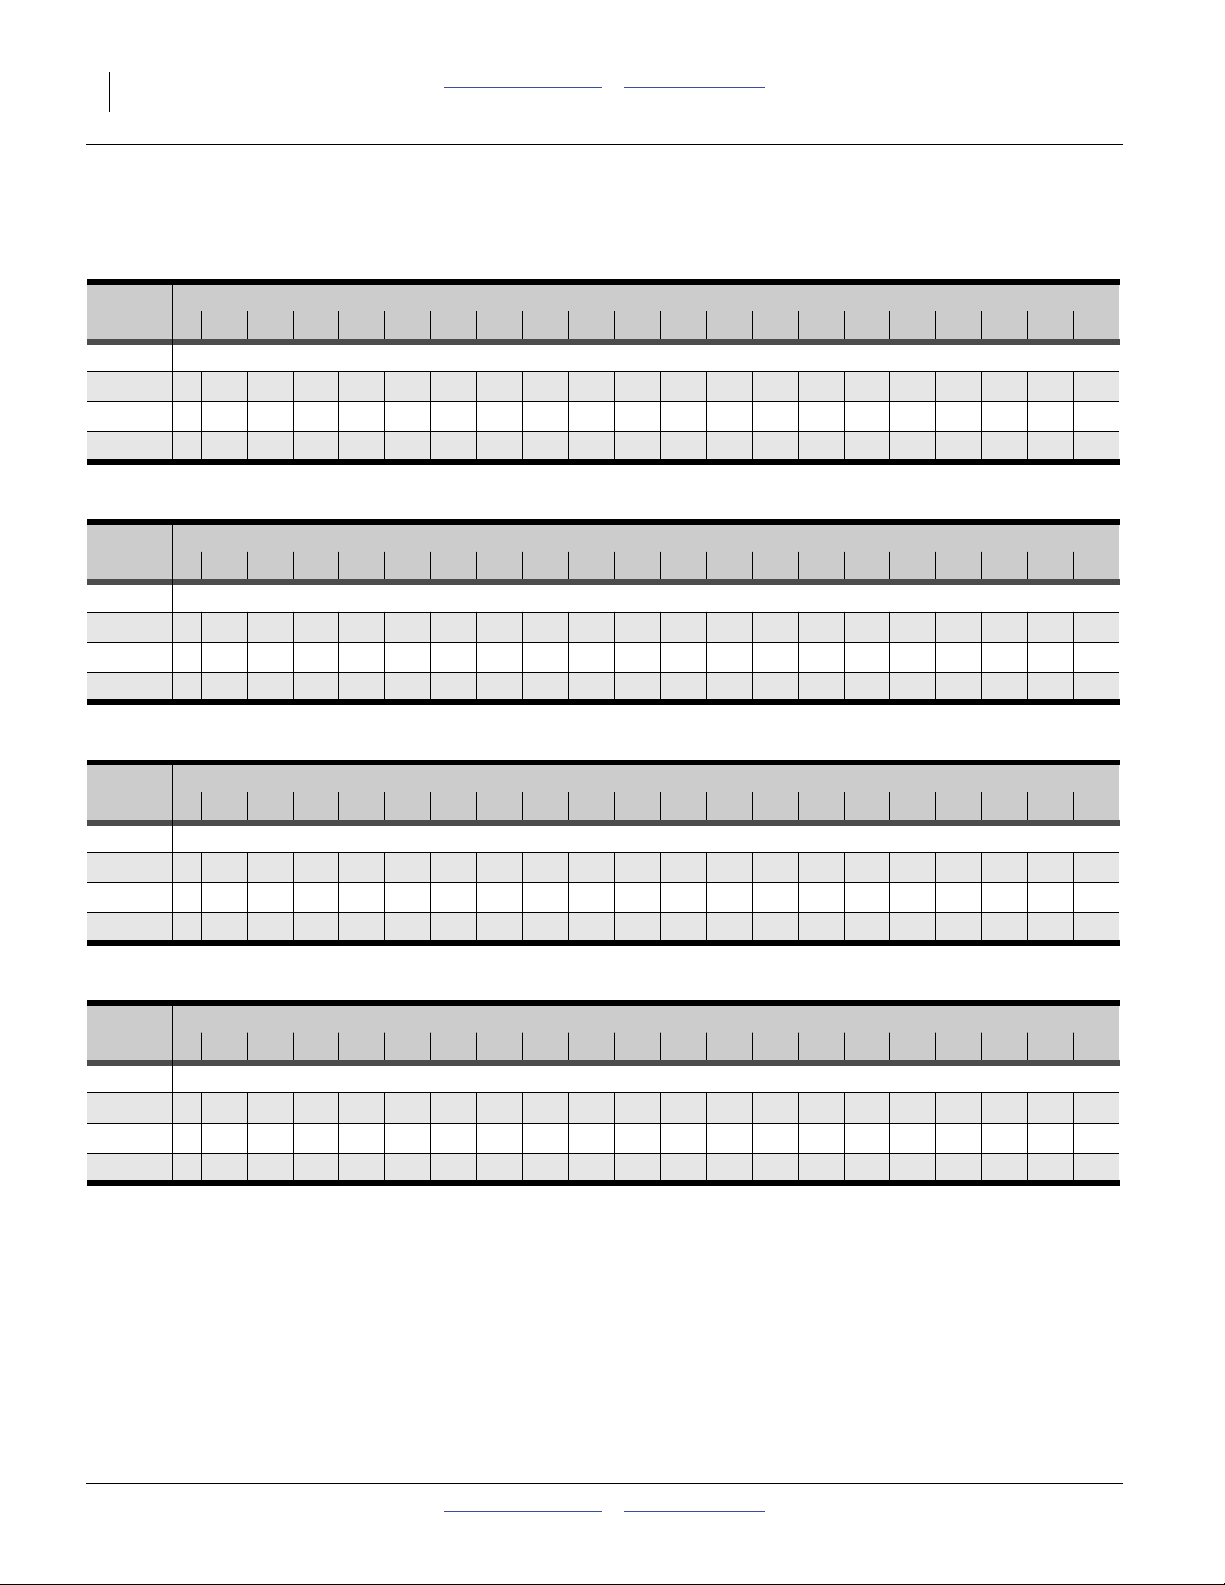
Bahia Grass (Paspalum notatum)
Seed Rate Handle Setting
0 5 10 15 20 25 30 35 40 45 50 55 60 65 70 75 80 85 90 95 100
Rows Drive Type: 1 Seed Rate in Pounds Per Acre
6 in.
7.25 in
7.5 in
02.73.95.67.911141721252933384246505457606365
0 2.2 3.2 4.7 6.6 8.8 11 14 17 21 24 28 31 35 38 41 44 47 50 52 54
0 2.2 3.1 4.5 6.3 8.5 11 14 17 20 23 27 30 33 37 40 43 46 48 50 52
Seed Rate Handle Setting
0 5 10 15 20 25 30 35 40 45 50 55 60 65 70 75 80 85 90 95 100
Rows Drive Type: 2 Seed Rate in Pounds Per Acre
6 in.
7.25 in
7.5 in
05.58.0121622283643516069778694103110118124130134
04.66.6101318232936435057647178859197103107111
0 4.4 6.4 9.3 13 18 23 28 35 41 48 55 62 69 76 82 88 94 99 104 107
(based on 40 pounds/bushel)
32292G
(based on 40 pounds/bushel)
32292G
Seed Rate Handle Setting
0 5 10 15 20 25 30 35 40 45 50 55 60 65 70 75 80 85 90 95 100
Rows Drive Type: 3 Seed Rate in Pounds Per Acre
6 in.
7.25 in
7.5 in
0 8.3 12 17 24 33 43 53 65 77 90 103 116 129 142 154 166 176 186 194 201
0 6.9 10 14 20 27 35 44 54 64 74 85 96 107 117 127 137 146 154 161 167
0 6.6 10 14 20 26 34 43 52 62 72 82 93 103 113 123 132 141 149 156 161
Seed Rate Handle Setting
0 5 10 15 20 25 30 35 40 45 50 55 60 65 70 75 80 85 90 95 100
Rows Drive Type: 4 Seed Rate in Pounds Per Acre
6 in.
7.25 in
7.5 in
0 14 19 28 40 54 69 87 106 126 147 168 189 210 231 251 270 287 303 317 328
01116233344577288104121139157174191208223238251262272
01116233243567085101117134151168185201216230243254263
(based on 40 pounds/bushel)
32292G
(based on 40 pounds/bushel)
32292G
118-794B Table of Contents Main Box Rates 2011-10-21
Great Plains Manufacturing, Inc. Table of Contents Main Box Rates Main Box Seed Rate 9
Rate Charts, Main Seed Box, continued...
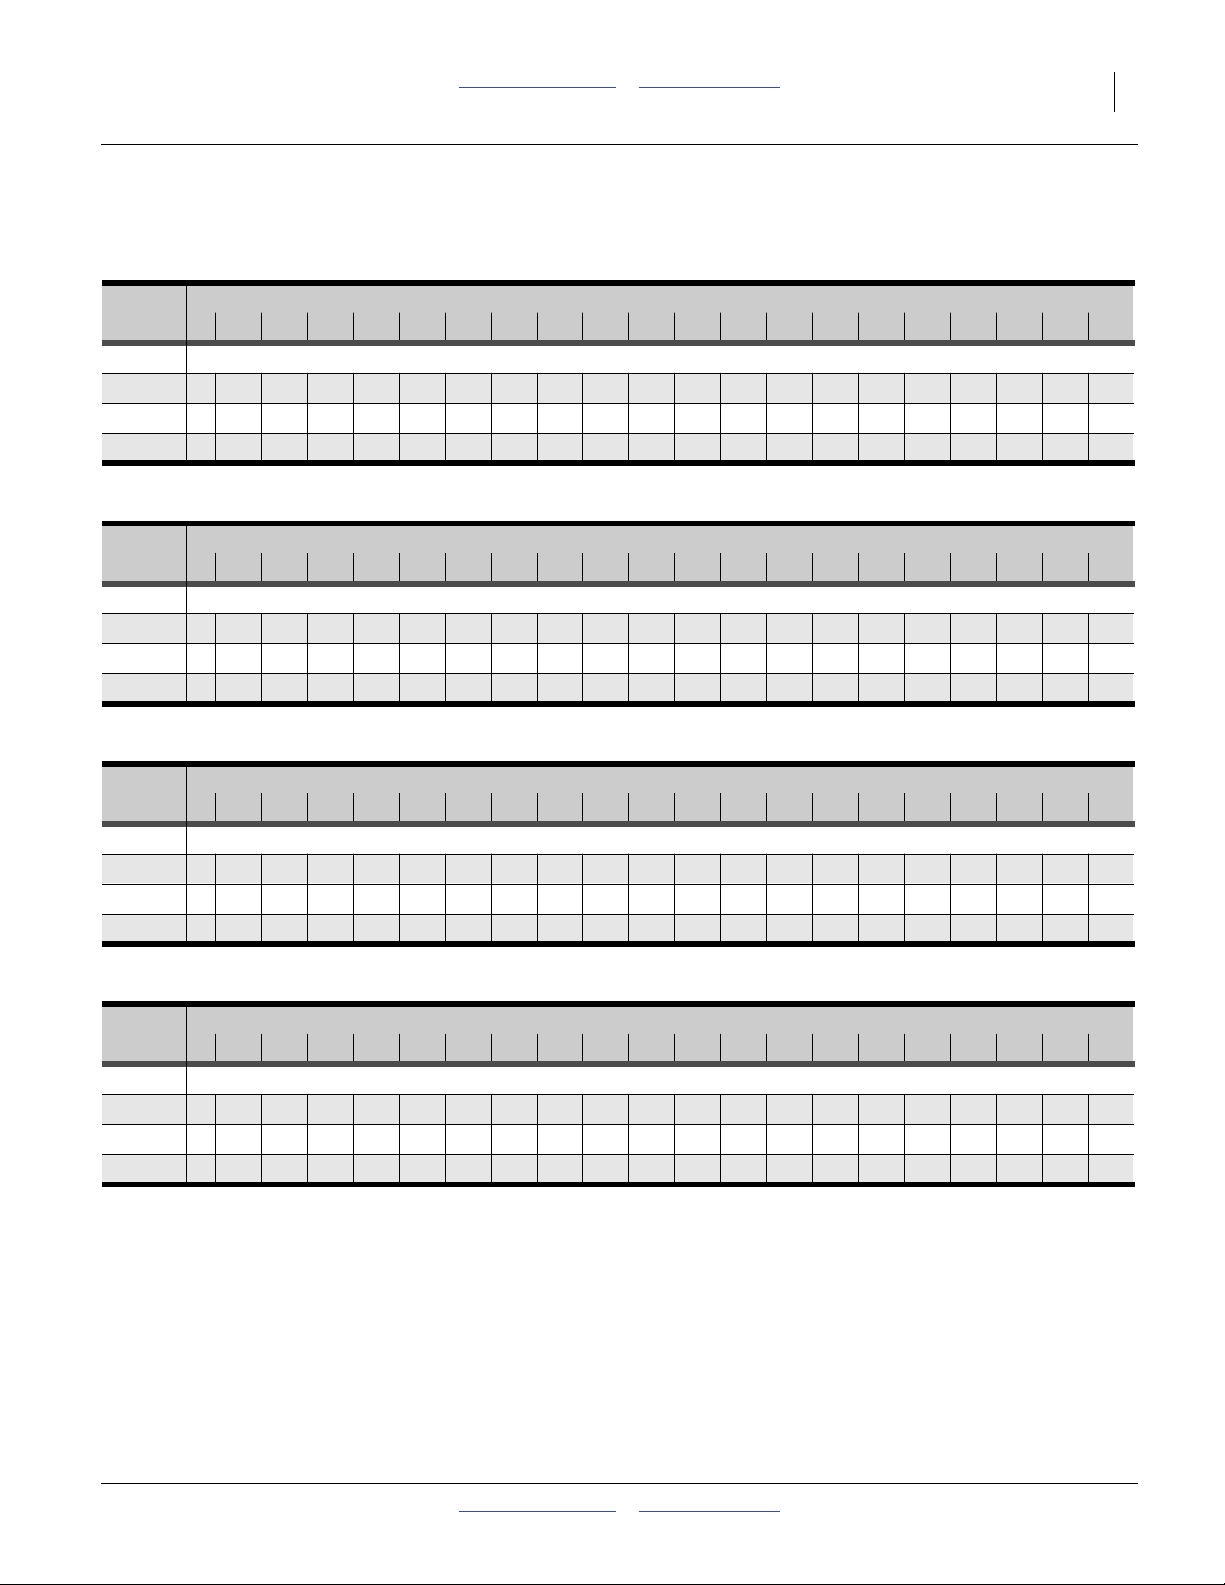
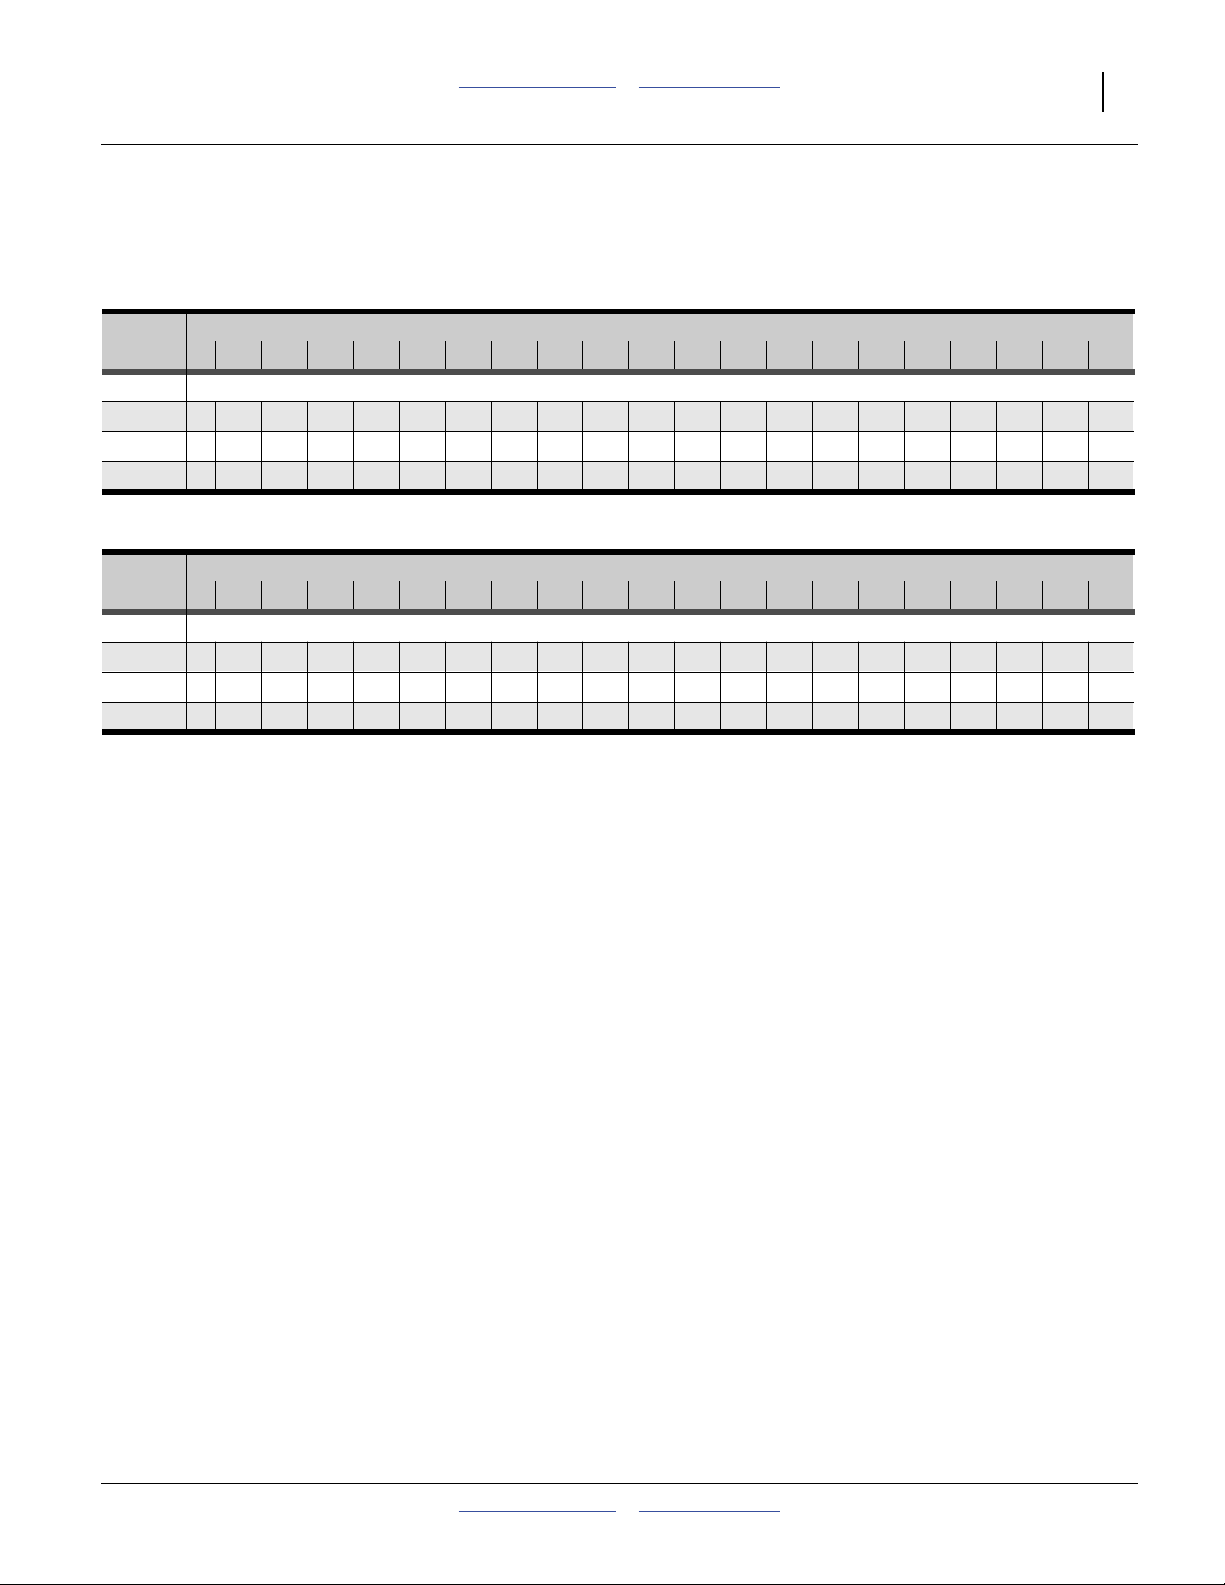
Barley (Hordeum vulgare)
Seed Rate Handle Setting
0 5 10 15 20 25 30 35 40 45 50 55 60 65 70 75 80 85 90 95 100
Rows Drive Type: 1 Seed Rate in Pounds Per Acre
6 in.
7.25 in
7.5 in
05.97.9101417212530343944485357616467707273
0 4.9 6.5 8.7 11 14 17 21 25 28 32 36 40 44 47 50 53 56 58 59 60
0 4.7 6.3 8.4 11 14 17 20 24 27 31 35 39 42 45 49 51 54 56 57 58
Seed Rate Handle Setting
0 5 10 15 20 25 30 35 40 45 50 55 60 65 70 75 80 85 90 95 100
Rows Drive Type: 2 Seed Rate in Pounds Per Acre
6 in.
7.25 in
7.5 in
0121622283543526171809099108117125132138143147150
01013182329364351586674828997103109114119122124
01013172228354249566472798693100105110115118120
(based on 51 pounds/bushel)
32293G
(based on 51 pounds/bushel)
32293G
Seed Rate Handle Setting
0 5 10 15 20 25 30 35 40 45 50 55 60 65 70 75 80 85 90 95 100
Rows Drive Type: 3 Seed Rate in Pounds Per Acre
6 in.
7.25 in
7.5 in
01724334353657790104117131145158171183195206216225232
014202735445464758697108120131142152162171179186192
014192634435262728394105116126137147156165173180186
Seed Rate Handle Setting
0 5 10 15 20 25 30 35 40 45 50 55 60 65 70 75 80 85 90 95 100
Rows Drive Type: 4 Seed Rate in Pounds Per Acre
6 in.
7.25 in
7.5 in
0 28 40 54 70 87 106 126 147 169 191 214 236 258 279 299 318 336 352 367 379
0 23 33 44 58 72 88 104 122 140 158 177 195 213 231 248 263 278 292 303 314
0 22 32 43 56 70 85 101 118 135 153 171 189 206 223 239 255 269 282 293 303
(based on 51 pounds/bushel)
32293G
(based on 51 pounds/bushel)
32293G
2011-10-21 Table of Contents Main Box Rates 118-794B

10 3P500, 3P500V & 3P600 Table of Contents Main Box Rates Great Plains Manufacturing, Inc.
Rate Charts, Main Seed Box, continued...
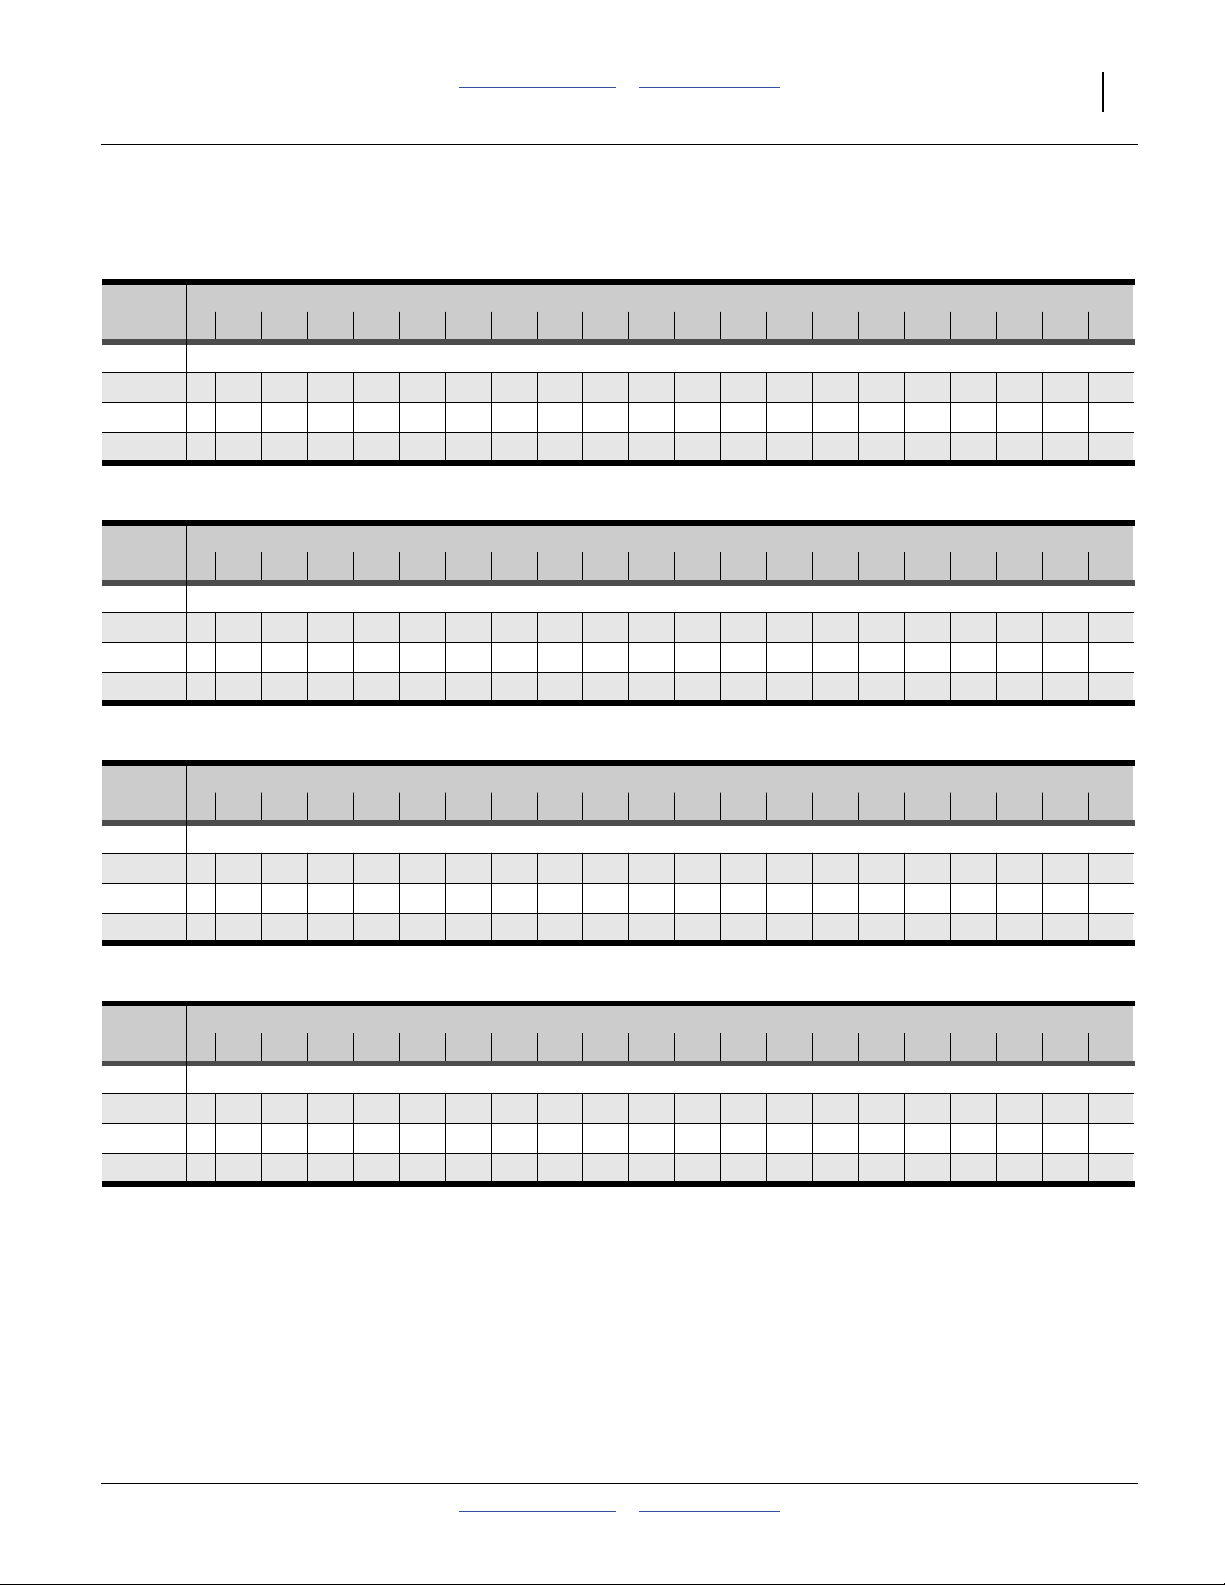
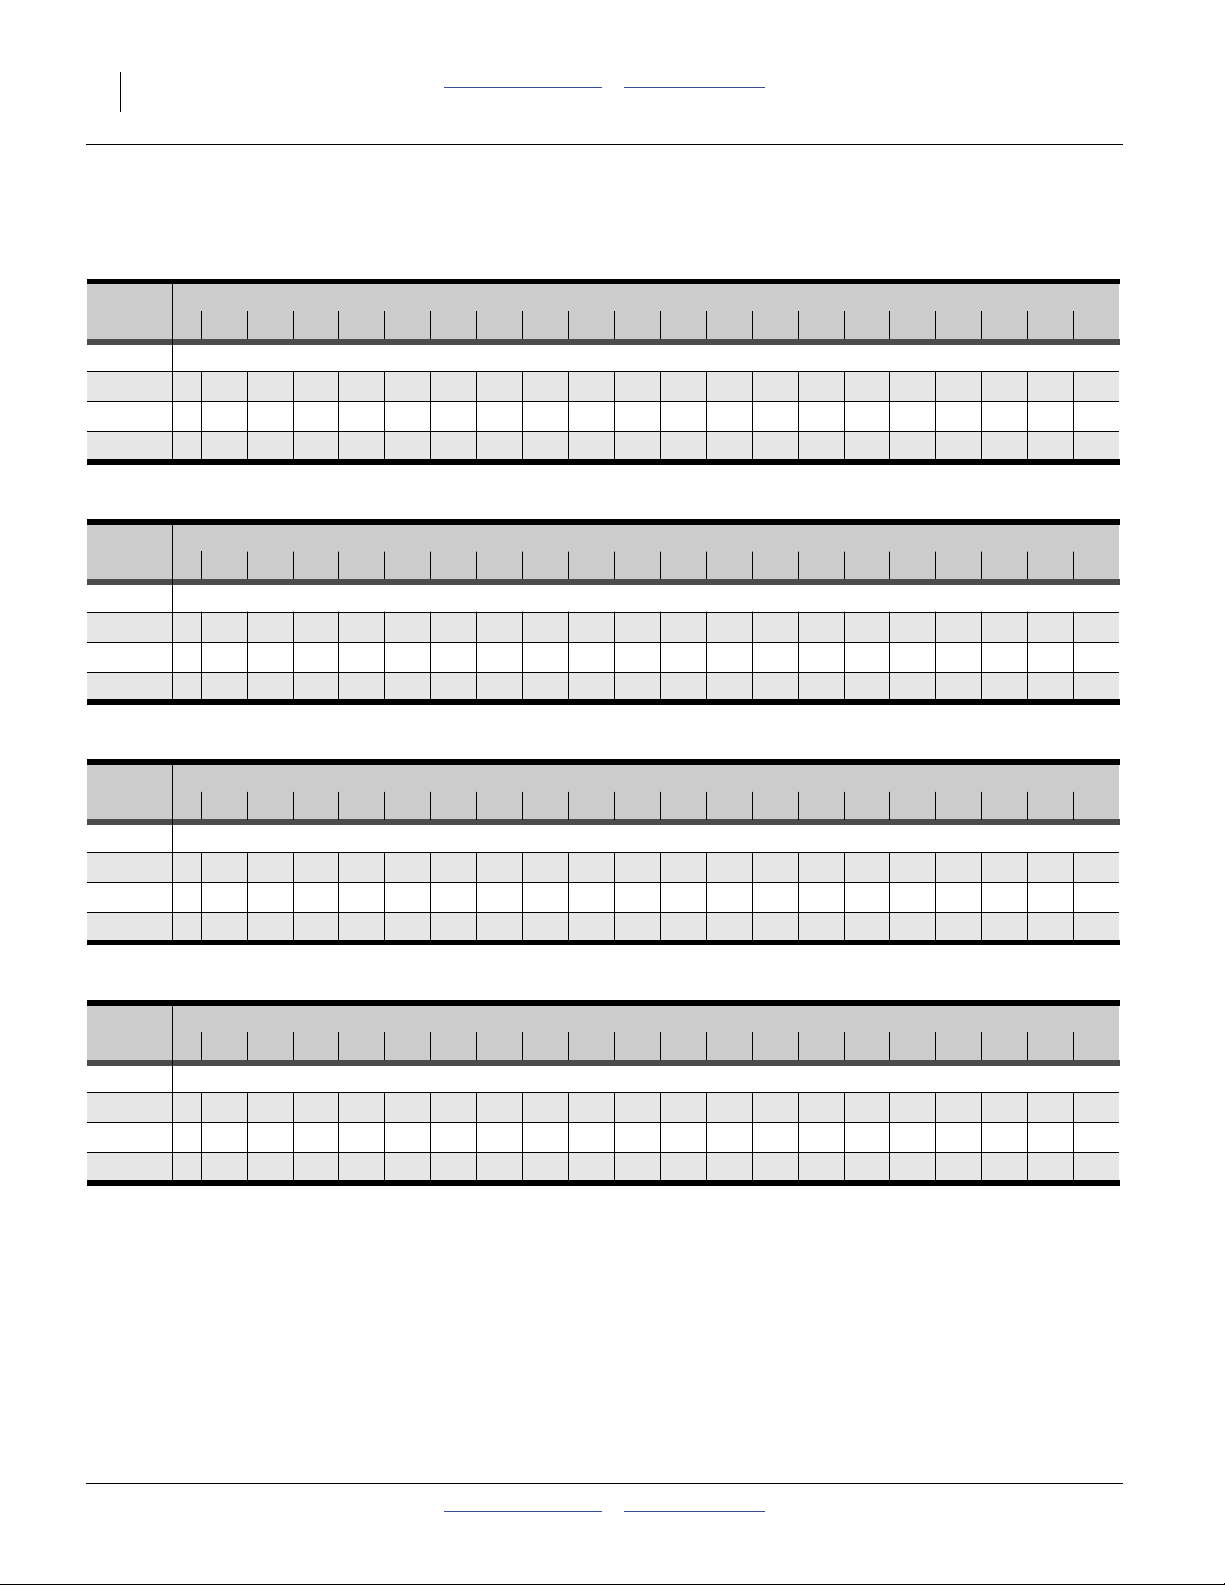
Buckwheat (Fagopyrum esculentum)
Seed Rate Handle Setting
0 5 10 15 20 25 30 35 40 45 50 55 60 65 70 75 80 85 90 95 100
Rows Drive Type: 1 Seed Rate in Pounds Per Acre
6 in.
7.25 in
7.5 in
04.97.1101317212529333842475155596265676971
0 4.0 5.9 8.2 11 14 17 20 24 28 31 35 39 42 45 49 51 54 56 57 58
0 3.9 5.7 7.9 10 13 16 20 23 27 30 34 37 41 44 47 50 52 54 55 57
Seed Rate Handle Setting
0 5 10 15 20 25 30 35 40 45 50 55 60 65 70 75 80 85 90 95 100
Rows Drive Type: 2 Seed Rate in Pounds Per Acre
6 in.
7.25 in
7.5 in
0101520273442516069788796105113120127133139142145
0 8.3 12 17 22 28 35 42 49 57 64 72 79 87 93 100 105 110 115 118 120
0 8.0 12 16 22 27 34 41 48 55 62 70 77 84 90 96 102 107 111 114 116
(based on 48 pounds/bushel)
32295G
(based on 48 pounds/bushel)
32295G
Seed Rate Handle Setting
0 5 10 15 20 25 30 35 40 45 50 55 60 65 70 75 80 85 90 95 100
Rows Drive Type: 3 Seed Rate in Pounds Per Acre
6 in.
7.25 in
7.5 in
01923303849627590106122138154170185199212224233241246
0151924324151627588101114128141153165176185193199203
015182431394960728597110123136148159170179187192197
Seed Rate Handle Setting
0 5 10 15 20 25 30 35 40 45 50 55 60 65 70 75 80 85 90 95 100
Rows Drive Type: 4 Seed Rate in Pounds Per Acre
6 in.
7.25 in
7.5 in
0 30 37 48 63 80 100 123 147 172 199 225 251 277 302 325 346 364 380 392 401
0 25 31 40 52 66 83 102 122 143 164 186 208 229 250 269 286 302 315 325 332
0 24 30 39 50 64 80 98 118 138 159 180 201 222 241 260 277 292 304 314 320
(based on 48 pounds/bushel)
32295G
(based on 48 pounds/bushel)
32295G
118-794B Table of Contents Main Box Rates 2011-10-21
Great Plains Manufacturing, Inc. Table of Contents Main Box Rates Main Box Seed Rate 11
Rate Charts, Main Seed Box, continued...
Buffalograss (Buchloe dactyloides)
Seed Rate Handle Setting
0 5 10 15 20 25 30 35 40 45 50 55 60 65 70 75 80 85 90 95 100
Rows Drive Type: 1 Seed Rate in Pounds Per Acre
6 in.
7.25 in
7.5 in
01.52.43.65.06.68.21012141517192022232425252525
0 1.2 2.0 3.0 4.2 5.4 6.8 8.3 10 11 13 14 16 17 18 19 20 20 21 21 20
01.21.92.94.05.36.68.09.4111214151617181920202020
Seed Rate Handle Setting
0 5 10 15 20 25 30 35 40 45 50 55 60 65 70 75 80 85 90 95 100
Rows Drive Type: 2 Seed Rate in Pounds Per Acre
6 in.
7.25 in
7.5 in
0 3.0 5.0 7.5 10 13 17 21 24 28 32 35 39 42 45 47 49 51 51 52 51
02.54.16.28.511141720232629323537394142434342
02.44.06.08.311141619222528313336383940414141
(based on 23 pounds/bushel)
32296G
(based on 23 pounds/bushel)
32296G
Seed Rate Handle Setting
0 5 10 15 20 25 30 35 40 45 50 55 60 65 70 75 80 85 90 95 100
Rows Drive Type: 3 Seed Rate in Pounds Per Acre
6 in.
7.25 in
7.5 in
05.68.0111520253035414752586367717577797979
0 4.6 6.6 9.3 13 16 20 25 29 34 39 43 48 52 56 59 62 64 65 66 65
0 4.4 6.4 8.9 12 16 20 24 28 33 37 42 46 50 54 57 60 62 63 63 63
Seed Rate Handle Setting
0 5 10 15 20 25 30 35 40 45 50 55 60 65 70 75 80 85 90 95 100
Rows Drive Type: 4 Seed Rate in Pounds Per Acre
6 in.
7.25 in
7.5 in
0 9.1 13 18 25 32 40 49 58 67 76 85 94 102 110 116 122 126 128 129 128
0 7.5 11 15 20 26 33 40 48 56 63 71 78 85 91 96 101 104 106 107 106
0 7.2 10 15 20 26 32 39 46 54 61 68 75 82 88 93 97 101 103 103 103
(based on 23 pounds/bushel)
32296G
(based on 23 pounds/bushel)
32296G
2011-10-21 Table of Contents Main Box Rates 118-794B

12 3P500, 3P500V & 3P600 Table of Contents Main Box Rates Great Plains Manufacturing, Inc.
Rate Charts, Main Seed Box, continued...
Bermuda Grass (Cynodon dactylon)
Seed Rate Handle Setting
0 5 10 15 20 25 30 35 40 45 50 55 60 65 70 75 80 85 90 95 100
Rows Drive Type: 1 Seed Rate in Pounds Per Acre
6 in.
7.25 in
7.5 in
02.24.46.69.011141619212426293134363941434547
0 1.8 3.6 5.5 7.4 9.4 11 13 15 18 20 22 24 26 28 30 32 34 36 38 39
0 1.8 3.5 5.3 7.2 9.1 11 13 15 17 19 21 23 25 27 29 31 33 35 36 38
Seed Rate Handle Setting
0 5 10 15 20 25 30 35 40 45 50 55 60 65 70 75 80 85 90 95 100
Rows Drive Type: 2 Seed Rate in Pounds Per Acre
6 in.
7.25 in
7.5 in
04.59.0141823283338444954596469747984899398
03.77.5111519232832364045495357616670737781
03.67.2111519232731353943475155596367717578
(based on 60 pounds/bushel)
32294G
(based on 60 pounds/bushel)
32294G
Seed Rate Handle Setting
0 5 10 15 20 25 30 35 40 45 50 55 60 65 70 75 80 85 90 95 100
Rows Drive Type: 3 Seed Rate in Pounds Per Acre
6 in.
7.25 in
7.5 in
0 7.1 14 21 28 35 42 50 57 65 72 80 87 94 102 108 115 122 128 134 140
0 5.9 11 17 23 29 35 41 47 54 60 66 72 78 84 90 95 101 106 111 115
0 5.7 11 17 22 28 34 40 46 52 58 64 70 76 81 87 92 97 102 107 112
Seed Rate Handle Setting
0 5 10 15 20 25 30 35 40 45 50 55 60 65 70 75 80 85 90 95 100
Rows Drive Type: 4 Seed Rate in Pounds Per Acre
6 in.
7.25 in
7.5 in
01223344557698194106118130142154166177188198209218227
010192838475767778898108118127137146155164173181188
0 9.3 18 27 36 46 55 65 75 85 94 104 114 123 132 141 150 159 167 175 182
(based on 60 pounds/bushel)
32294G
(based on 60 pounds/bushel)
32294G
118-794B Table of Contents Main Box Rates 2011-10-21
Great Plains Manufacturing, Inc. Table of Contents Main Box Rates Main Box Seed Rate 13
Rate Charts, Main Seed Box, continued...
K-31 Fescue (Festuca)
Seed Rate Handle Setting
0 5 10 15 20 25 30 35 40 45 50 55 60 65 70 75 80 85 90 95 100
Rows Drive Type: 1 Seed Rate in Pounds Per Acre
6 in.
7.25 in
7.5 in
0 2.4 3.6 5.0 6.4 8.0 10 11 13 15 16 18 19 21 22 24 25 26 27 28 28
0 1.9 3.0 4.1 5.3 6.6 7.9 9.3 11 12 13 15 16 17 18 20 21 21 22 23 23
0 1.9 2.9 4.0 5.2 6.4 7.7 9.0 10 12 13 14 16 17 18 19 20 21 21 22 23
Seed Rate Handle Setting
0 5 10 15 20 25 30 35 40 45 50 55 60 65 70 75 80 85 90 95 100
Rows Drive Type: 2 Seed Rate in Pounds Per Acre
6 in.
7.25 in
7.5 in
04.87.4101316202326303337404346495153555758
0 4.0 6.1 8.5 11 14 16 19 22 25 28 30 33 36 38 40 42 44 46 47 48
0 3.9 5.9 8.2 11 13 16 18 21 24 27 29 32 34 37 39 41 43 44 45 46
(based on 21 pounds/bushel)
32297G
(based on 21 pounds/bushel)
32297G
Seed Rate Handle Setting
0 5 10 15 20 25 30 35 40 45 50 55 60 65 70 75 80 85 90 95 100
Rows Drive Type: 3 Seed Rate in Pounds Per Acre
6 in.
7.25 in
7.5 in
0 8.3 12 15 20 24 29 34 39 44 49 54 59 64 68 73 77 80 84 86 88
0 6.9 10 13 16 20 24 28 32 36 41 45 49 53 57 60 64 67 69 71 73
06.69.3121619232731353943475155586164676970
Seed Rate Handle Setting
0 5 10 15 20 25 30 35 40 45 50 55 60 65 70 75 80 85 90 95 100
Rows Drive Type: 4 Seed Rate in Pounds Per Acre
6 in.
7.25 in
7.5 in
0141925323947556371808896104112119125131136140144
0111621263239455259667380869298104108113116119
0111520253137445057647077838995100105109112115
(based on 21 pounds/bushel)
32297G
(based on 21 pounds/bushel)
32297G
2011-10-21 Table of Contents Main Box Rates 118-794B

14 3P500, 3P500V & 3P600 Table of Contents Main Box Rates Great Plains Manufacturing, Inc.
Rate Charts, Main Seed Box, continued...
Flax (Linum usitatissimum) or Sudan
(Sorghum bicolor subsp. drummondii)
Seed Rate Handle Setting
0 5 10 15 20 25 30 35 40 45 50 55 60 65 70 75 80 85 90 95 100
Rows Drive Type: 1 Seed Rate in Pounds Per Acre
6 in.
7.25 in
7.5 in
05.78.5121519232732374146515660656973778184
04.77.0101316192326303438424650545761646770
0 4.6 6.8 9.3 12 15 19 22 26 29 33 37 41 44 48 52 55 59 62 65 67
Seed Rate Handle Setting
0 5 10 15 20 25 30 35 40 45 50 55 60 65 70 75 80 85 90 95 100
Rows Drive Type: 2 Seed Rate in Pounds Per Acre
6 in.
7.25 in
7.5 in
01217243139485666758595105114124133142151159166173
010142026323947546270788695102110118125132138143
0 9.4 14 19 25 31 38 45 53 60 68 76 84 91 99 107 114 121 127 133 139
(based on 55 pounds/bushel)
32298G
(based on 55 pounds/bushel)
32298G
Seed Rate Handle Setting
0 5 10 15 20 25 30 35 40 45 50 55 60 65 70 75 80 85 90 95 100
Rows Drive Type: 3 Seed Rate in Pounds Per Acre
6 in.
7.25 in
7.5 in
01827364758708295108121134148161174187200212223234244
0152230394858687889100111122133144155165175185193202
014212937465666768697108118129140150160169179187195
Seed Rate Handle Setting
0 5 10 15 20 25 30 35 40 45 50 55 60 65 70 75 80 85 90 95 100
Rows Drive Type: 4 Seed Rate in Pounds Per Acre
6 in.
7.25 in
7.5 in
0 29 43 59 76 94 113 134 154 176 197 219 241 263 284 305 326 345 364 381 397
0 24 36 49 63 78 94 111 128 145 163 181 200 218 235 253 270 286 301 315 329
0 23 35 47 61 75 91 107 124 141 158 175 193 210 228 244 261 276 291 305 318
(based on 55 pounds/bushel)
32298G
(based on 55 pounds/bushel)
32298G
118-794B Table of Contents Main Box Rates 2011-10-21
Great Plains Manufacturing, Inc. Table of Contents Main Box Rates Main Box Seed Rate 15
Rate Charts, Main Seed Box, continued...
Eastern Gamma Grass - Pete
(Tripsacum dactyloides)
Seed Rate Handle Setting
0 5 10 15 20 25 30 35 40 45 50 55 60 65 70 75 80 85 90 95 100
Rows Drive Type: 1 Seed Rate in Pounds Per Acre
6 in.
7.25 in
7.5 in
0 4.8 6.6 8.8 11 14 17 20 23 27 30 33 36 39 42 45 47 49 51 52 53
04.05.57.39.312141719222527303335373941424344
03.85.37.09.011141619212426293134363840414243
Seed Rate Handle Setting
0 5 10 15 20 25 30 35 40 45 50 55 60 65 70 75 80 85 90 95 100
Rows Drive Type: 2 Seed Rate in Pounds Per Acre
6 in.
7.25 in
7.5 in
010141823293541485561687581879297102105108110
0 8.1 11 15 19 24 29 34 40 45 51 56 62 67 72 76 81 84 87 89 91
0 7.9 11 14 18 23 28 33 38 44 49 54 60 65 69 74 78 81 84 86 88
(based on 0 pounds/bushel)
32299G
(based on 0 pounds/bushel)
32299G
2011-10-21 Table of Contents Main Box Rates 118-794B
16 3P500, 3P500V & 3P600 Table of Contents Main Box Rates Great Plains Manufacturing, Inc.
Rate Charts, Main Seed Box, continued...
Kentucky Blue Grass (Poa pratensis)
Seed Rate Handle Setting
0 5 10 15 20 25 30 35 40 45 50 55 60 65 70 75 80 85 90 95 100
Rows Drive Type: 1 Seed Rate in Pounds Per Acre
6 in.
7.25 in
7.5 in
0 1.8 2.6 3.6 4.7 5.8 7.0 8.3 10 11 12 14 15 16 18 19 20 21 22 22 23
0 1.5 2.2 3.0 3.9 4.8 5.8 6.9 8.0 9.1 10 11 12 14 15 16 16 17 18 18 19
0 1.5 2.1 2.9 3.7 4.6 5.6 6.7 7.7 8.8 10 11 12 13 14 15 16 17 17 18 18
Seed Rate Handle Setting
0 5 10 15 20 25 30 35 40 45 50 55 60 65 70 75 80 85 90 95 100
Rows Drive Type: 2 Seed Rate in Pounds Per Acre
6 in.
7.25 in
7.5 in
0 3.8 5.4 7.4 10 12 14 17 20 23 25 28 31 34 36 39 41 43 44 46 47
03.14.56.17.910121416192123262830323435373839
03.04.45.97.710121416182023252729313334353737
(based on 23 pounds/bushel)
32300G
(based on 23 pounds/bushel)
32300G
Seed Rate Handle Setting
0 5 10 15 20 25 30 35 40 45 50 55 60 65 70 75 80 85 90 95 100
Rows Drive Type: 3 Seed Rate in Pounds Per Acre
6 in.
7.25 in
7.5 in
06.19.0121519232630343841454952555961646668
05.07.4101316192225283134374043464851535557
04.87.2101215182124273033363942444749515355
Seed Rate Handle Setting
0 5 10 15 20 25 30 35 40 45 50 55 60 65 70 75 80 85 90 95 100
Rows Drive Type: 4 Seed Rate in Pounds Per Acre
6 in.
7.25 in
7.5 in
010152025313743495561677379859095100104108111
0 8.2 12 16 21 26 30 35 40 46 51 56 61 66 70 75 79 83 86 90 92
0 7.9 12 16 20 25 29 34 39 44 49 54 59 63 68 72 76 80 83 87 89
(based on 23 pounds/bushel)
32300G
(based on 23 pounds/bushel)
32300G
118-794B Table of Contents Main Box Rates 2011-10-21

Great Plains Manufacturing, Inc. Table of Contents Main Box Rates Main Box Seed Rate 17
Rate Charts, Main Seed Box, continued...
Millet (Pennisetum glaucum, Setaria italica,
Panicum miliaceum, Eleusine coracana)
Seed Rate Handle Setting
0 5 10 15 20 25 30 35 40 45 50 55 60 65 70 75 80 85 90 95 100
Rows Drive Type: 1 Seed Rate in Pounds Per Acre
6 in.
7.25 in
7.5 in
06.08.5111518222631354044495357616569727577
0 4.9 7.0 9.5 12 15 18 22 25 29 33 36 40 44 47 51 54 57 60 62 64
0 4.8 6.8 9.2 12 15 18 21 25 28 32 35 39 42 46 49 52 55 58 60 62
Seed Rate Handle Setting
0 5 10 15 20 25 30 35 40 45 50 55 60 65 70 75 80 85 90 95 100
Rows Drive Type: 2 Seed Rate in Pounds Per Acre
6 in.
7.25 in
7.5 in
01217243038465463728191100109118126134141148154159
01014202531384552606775839097104111117123128132
01014192430374351586573808794101107113118123127
(based on 60 pounds/bushel)
32301G
(based on 60 pounds/bushel)
32301G
Seed Rate Handle Setting
0 5 10 15 20 25 30 35 40 45 50 55 60 65 70 75 80 85 90 95 100
Rows Drive Type: 3 Seed Rate in Pounds Per Acre
6 in.
7.25 in
7.5 in
01725354557698295109123136150164177189201212222231239
0142129384757687990101113124135146157166176184191198
014202836455565768798109120131141151161170178185191
Seed Rate Handle Setting
0 5 10 15 20 25 30 35 40 45 50 55 60 65 70 75 80 85 90 95 100
Rows Drive Type: 4 Seed Rate in Pounds Per Acre
6 in.
7.25 in
7.5 in
0 28 41 57 74 93 113 133 155 177 200 222 245 267 288 308 328 346 362 377 389
0 23 34 47 61 77 93 110 128 147 165 184 203 221 238 255 271 286 300 312 322
0 22 33 45 59 74 90 107 124 142 160 178 196 213 230 247 262 277 290 301 311
(based on 60 pounds/bushel)
32301G
(based on 60 pounds/bushel)
32301G
2011-10-21 Table of Contents Main Box Rates 118-794B

18 3P500, 3P500V & 3P600 Table of Contents Main Box Rates Great Plains Manufacturing, Inc.
Rate Charts, Main Seed Box, continued...
Milo (Sorghum)
Seed Rate Handle Setting
0 5 10 15 20 25 30 35 40 45 50 55 60 65 70 75 80 85 90 95 100
Rows Drive Type: 1 Seed Rate in Pounds Per Acre
6 in.
7.25 in
7.5 in
05.78.91317222733384450576369748085909498101
04.77.3101418222732374247525762667074788183
04.67.1101417222631364045505560646872757880
Seed Rate Handle Setting
0 5 10 15 20 25 30 35 40 45 50 55 60 65 70 75 80 85 90 95 100
Rows Drive Type: 2 Seed Rate in Pounds Per Acre
6 in.
7.25 in
7.5 in
0121826354556677991104116129141153164175184193201207
01015212937465565768696107117127136145153160166171
0 9.4 15 21 28 36 44 54 63 73 83 93 103 113 122 131 140 148 154 160 165
(based on 60 pounds/bushel)
32302G
(based on 60 pounds/bushel)
32302G
118-794B Table of Contents Main Box Rates 2011-10-21

Great Plains Manufacturing, Inc. Table of Contents Main Box Rates Main Box Seed Rate 19
Rate Charts, Main Seed Box, continued...
Oats (Avena sativa)
Seed Rate Handle Setting
0 5 10 15 20 25 30 35 40 45 50 55 60 65 70 75 80 85 90 95 100
Rows Drive Type: 1 Seed Rate in Pounds Per Acre
6 in.
7.25 in
7.5 in
02.33.85.67.610121517202225283033353840424345
0 1.9 3.2 4.6 6.3 8.1 10 12 14 16 19 21 23 25 27 29 31 33 35 36 37
0 1.8 3.1 4.5 6.1 7.8 10 12 14 16 18 20 22 24 26 28 30 32 33 35 36
Seed Rate Handle Setting
0 5 10 15 20 25 30 35 40 45 50 55 60 65 70 75 80 85 90 95 100
Rows Drive Type: 2 Seed Rate in Pounds Per Acre
6 in.
7.25 in
7.5 in
04.67.8121620253035414652576268737782868992
03.86.5101317212529343843475256606468717477
0 3.7 6.3 9.2 13 16 20 24 28 32 37 41 46 50 54 58 62 65 69 71 74
(based on 37 pounds/bushel)
32303G
(based on 37 pounds/bushel)
32303G
Seed Rate Handle Setting
0 5 10 15 20 25 30 35 40 45 50 55 60 65 70 75 80 85 90 95 100
Rows Drive Type: 3 Seed Rate in Pounds Per Acre
6 in.
7.25 in
7.5 in
0 8.5 12 17 23 30 37 45 53 62 71 80 89 97 105 113 120 126 131 136 139
0 7.1 10 14 19 25 31 37 44 51 59 66 73 80 87 93 99 104 109 112 115
0 6.8 10 14 18 24 30 36 43 50 57 64 71 78 84 90 96 101 105 109 111
Seed Rate Handle Setting
0 5 10 15 20 25 30 35 40 45 50 55 60 65 70 75 80 85 90 95 100
Rows Drive Type: 4 Seed Rate in Pounds Per Acre
6 in.
7.25 in
7.5 in
01420283848607387101116130144158172184195206214221226
012172331405061728496108119131142152162170177183187
011162230394859708193104115127137147156164171177181
(based on 37 pounds/bushel)
32303G
(based on 37 pounds/bushel)
32303G
2011-10-21 Table of Contents Main Box Rates 118-794B
 Loading...