

Page 1

Great Plains Mfg., Inc.
Manufacturing, Inc.
Seed and Small Seeds Rate
Charts
The following pages are to assist in the proper setting of seeding rates
for the 2700 and 3000 Three-Point drill. The rates indicated in the
charts are approximate values. To assure the most accurate seeding
rate it is recommended that the drill be calibrated for the desired seed
at the time of planting.
© Copyright 2010 Printed
9/9/2010
118-365B
Page 2

2
Table of Contents
Seeding Rate . . . . . . . . . . . . . . . . . . . . . . . . . . . . . . . . . . . . . . . . . . . . . . . . . . . . . . 3
Change Drive Sprockets . . . . . . . . . . . . . . . . . . . . . . . . . . . . . . . . . . . . . . . . . . 3
To change the drive type . . . . . . . . . . . . . . . . . . . . . . . . . . . . . . . . . . . . . . . . . . 3
Set Seed-Rate Handle . . . . . . . . . . . . . . . . . . . . . . . . . . . . . . . . . . . . . . . . . . . . 4
Position Seed-Cup Doors. . . . . . . . . . . . . . . . . . . . . . . . . . . . . . . . . . . . . . . . . . 5
Check Seeding Rate . . . . . . . . . . . . . . . . . . . . . . . . . . . . . . . . . . . . . . . . . . . . . 5
Small Seeds Attachment . . . . . . . . . . . . . . . . . . . . . . . . . . . . . . . . . . . . . . . . . . 5
Seed Rate Charts . . . . . . . . . . . . . . . . . . . . . . . . . . . . . . . . . . . . . . . . . . . . . . . . . . 6
Small Seeds Attachment Seed Rate Chart . . . . . . . . . . . . . . . . . . . . . . . . . . . . . 9
Great Plains Mfg., Inc.
118-365B 9/9/2010
Page 3
Great Plains Mfg., Inc.
Seeding Rate
Calibrating the seeding rate requires four steps: arranging
the drive sprockets, setting the seed-rate adjustment handle, positioning the seed-cup door, and checking the
seeding rate.
Refer to the seed-rate charts starting on page 6. These
charts list the proper sprocket sizes and seed-rate-handle
settings for various seeds and seeding rates.
The seed-rate charts are based on cleaned, untreated
seed of average size and test weight. The rates are based
on 9.5L x 15 rib implement tires. Many factors will affect
seeding rates including foreign material, seed treatment,
seed size, field conditions, tire pressure and test weight.
Minor adjustments likely will be needed. Set and check
the seeding rate using the procedures below, then re-adjust the rate as necessary.
Before setting the seeding rate, rotate the drive gauge
wheel to see that seed cups and drive are working properly and free from foreign material.
Change Drive Sprockets
Refer to Figure 1
3
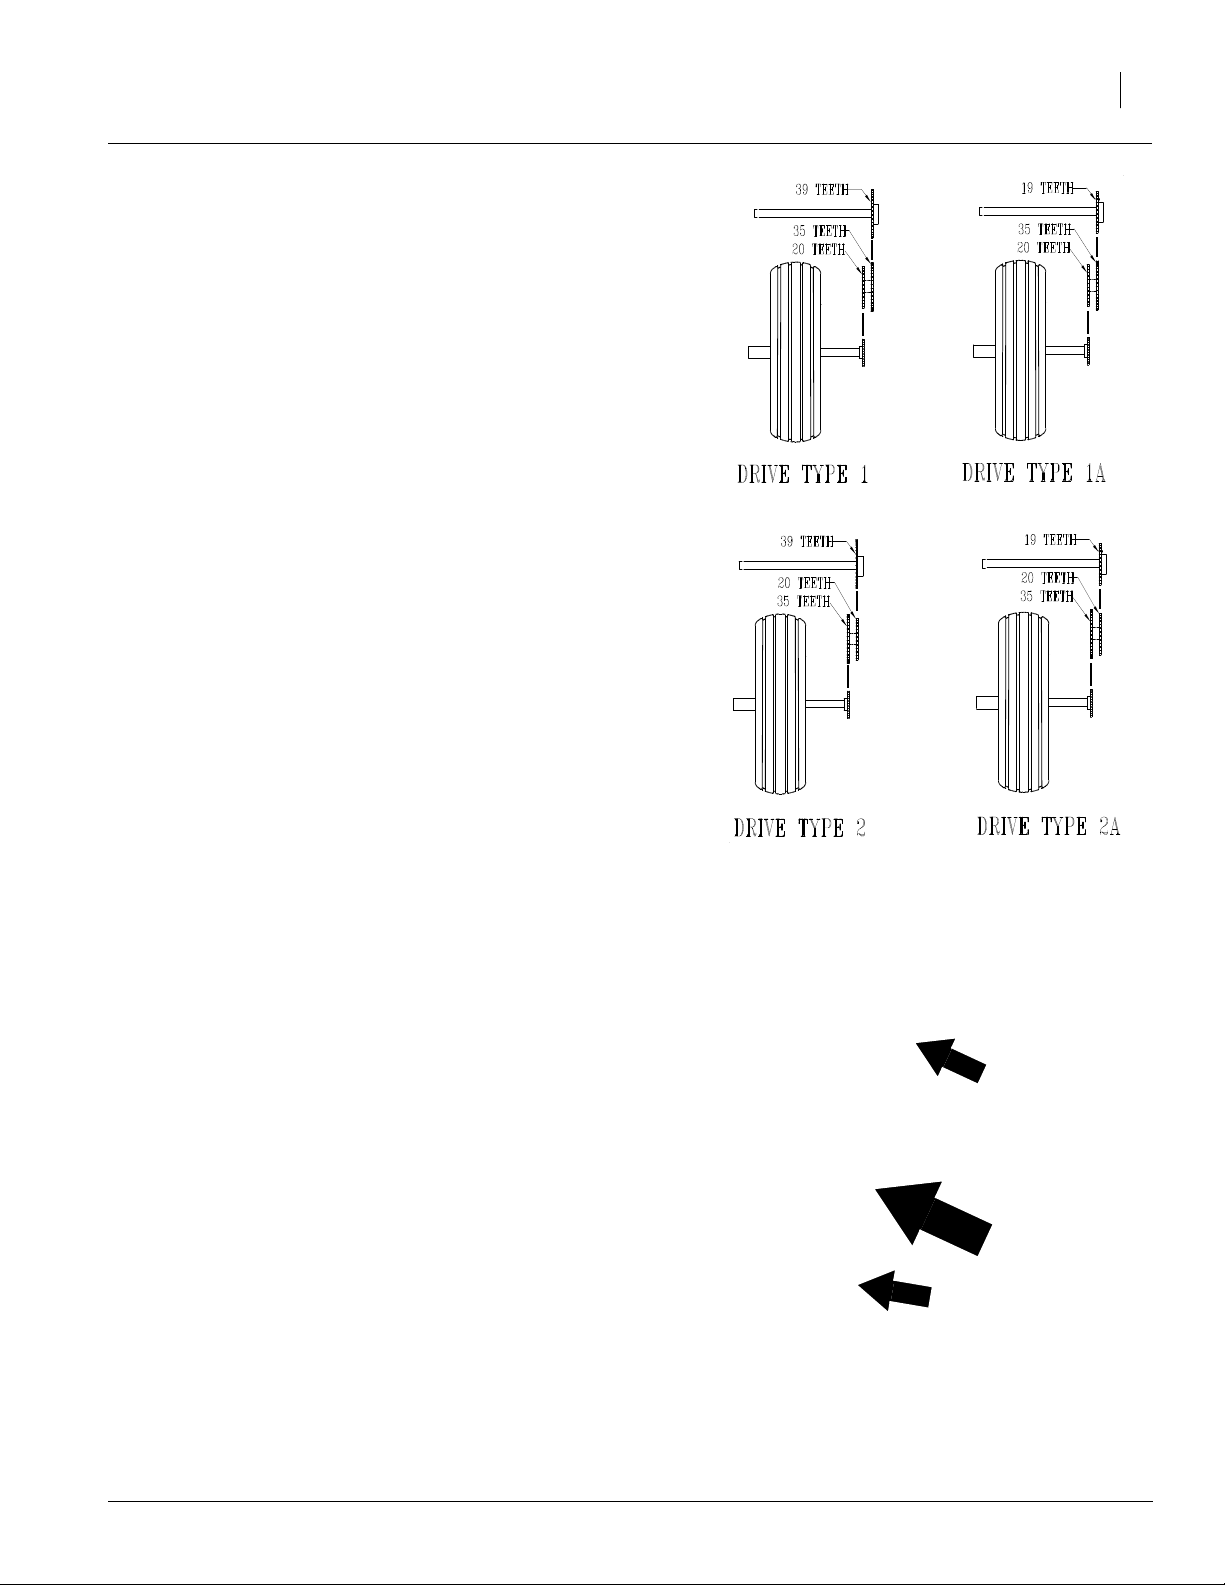
Refer to the seed-rate charts for the correct drive
type–1, 1A, 2 or 2A.
To change the drive type
Refer to Figure 2
1. Loosen the idler-arm bolts and remove chains.
2. To change the double speed-change sprocket, remove nut and turn sprocket over.
16400
Figure 1
Drive Types
Idler
Spr
oc
ket
Idler
16409
9/9/2010
Figure 2
Double Speed-Change Sprocket
118-365B
Page 4

4
Refer to Figure 3
3. To change the jackshaft sprocket, remove the set
screws and slide the sprockets so the correct-sized
sprockets are aligned. Reinsert set screws.
Great Plains Mfg., Inc.
16412
Refer to Figure 4
4. Shorten orlengthen chainsas necessary and reinstall
chains. Be sure chain is installed with the chain connector link retainer towards the centerline and the clip
opening (split end) is facing the opposite way of the
chain travel. Move the idler arms into chains. See Figure 4 for correct chain slack.
Set Seed-Rate Handle
Refer to Figure 5
5. The position the handle for each drill box to the setting
indicated on the chart. One handle is shown. To adjust
the handles, loosen the wing nut under the handles
and slide until the indicator lines up with the correct
setting.
Figure 3
Jackshaft Sprocket
1/2
3/4
Figure 4
Chain Slack
In.
In.
16409
12927
Figure 5
Seed-Rate Handle
118-365B 9/9/2010
Page 5

Great Plains Mfg., Inc.
5
Position Seed-Cup Doors
Refer to Figure 6
For wheat and other small seeds. move the seed-cupdoor handles to the highest position. For soybeans
and other large seeds, lower the handles to the second position. If excessive seed cracking occurs, lower
the handles to the third position. Move the handles to
the fourth, wide-open position for seed-cup clean out.
Make sure all handles are in the same position before
drilling.
13867
Figure 6
Seed-Cup-Door Handle
Check Seeding Rate
1. Record the weight of an empty container large enough
to hold the seed metered for one acre.
2. Place several pounds of seed over three seed cups on
an outside end of the drill box. Pull the seed tubes off
these three openers.
3. Raise the drill off the ground.
4. Turn the gauge wheel a few turns to fill the cups with
seed. Turn wheel until seed drops to the ground from
all three cups.
5. Place a container under the three seed tubes to gather the seed as it is metered.
6. Turn the drive gauge wheel until one acre has been
tallied on the acremeter (200 rotations on a 27-foot
drill or 182 rotations on a 30-foot drill). Check that
the three seed cups have plenty of seed coming into
them.
7. Weigh the metered seed. Subtract the initial weight
of the empty container. Divide by three for the
amount metered by each seed cup, then multiply by
the number of drill openers for the pounds-per-acre
seeding rate. If this figure is different than desired,
adjust the seed-rate handle and recheck the rate.
Note: If your results vary greatly from the charts, you
may want to repeat the calibration procedure.
When satisfied with the rate, set the same seeding rate
on the opposite drill box by repeating steps 1 through 3.
Small Seeds Attachment
To calibrate the seeding rate on the optional small seeds
attachment, follow these steps.
Refer to Figure 7
1. The proper small-seeds sprocket arrangement given different drive types on the main drill box. Arrange the sprockets on the small-seeds attachment
according to which drive type you will use on the
main drill box.
Note: For accurate metering on the small seeds attachment, the main drill box sprockets must be set to drive
type 1, 2 or 2A.
2. Set the seed-rate adjustment handle on the small
seeds attachment as indicated by the chart on
Small Seeds Attachment Seed Rate Chart, page 9.
3. Calibrate the small seeds attachment to your material by following the steps under Check Seeding
Rate, page 5.
Figure 7
Small Seeds Sprocket Arrangements
16399
118-365B9/9/2010
Page 6

6
Seed Rate Charts (pounds per acre)
Great Plains Mfg., Inc.
Setting number
Wheat
Drive
Type 1
Based on
60 lb/bu
Wheat
Drive
Type 2A
Based on
60 lb/bu
Rice,
Short
Grain
Drive
Type 1
Rice,
Short
Grain
Drive
Type 1A
Rice,
Long
Grain
Drive
Type 1
0 5 10 15 20 25 30 35 40 45 50 55 60 65 70 75 80 85 90 95 100
6" 0 11 20 28 37 47 55 65 75 85 96 106 116 129 140 153 161 170 175 184 189
7" 0 10 17 24 32 40 48 56 65 73 83 92 100 111 121 132 140 147 152 159 164
7.5" 0 9 16 23 29 37 44 52 60 68 77 85 93 103 112 122 129 136 140 147 152
8" 0 8 15 21 27 34 40 48 55 62 70 78 85 94 103 112 118 124 129 135 139
10" 0 7 12 17 22 28 33 39 45 51 58 64 70 77 84 92 97 102 105 110 114
Row Spacing
6" 0 8 13 19 25 31 37 44 50 57 64 71 78 86 94 102 108 114 117 123 127
7" 0 7 11 16 21 27 32 38 44 46 56 62 67 75 81 89 94 99 102 107 110
7.5" 0 6 11 15 20 25 30 35 40 45 52 57 62 69 75 82 86 91 94 99 102
8" 0 6 10 14 18 23 27 32 37 42 47 52 57 63 69 75 79 83 86 90 93
10"0 5 8 111519222630343943475256616568707476
Row Spacing
6" 0 7 13 18 23 30 35 42 46 51 57 62 66 74 83 90 98 103 107 112 115
7" 0 6 11 16 20 26 31 36 39 44 49 54 57 64 72 78 85 90 93 97 100
7.5" 0 6 10 14 19 24 28 33 36 41 45 50 53 59 66 72 78 83 85 90 92
8" 0 5 9 13 17 22 26 31 33 37 41 46 49 55 61 66 72 76 78 82 85
10"0 4 8 111418212527313437404550545962646769
Row Spacing
6" 0 15 26 37 48 61 73 85 93 104 116 128 136 153 169 185 201 212 219 230 237
7" 0 13 23 32 42 53 63 74 81 91 101 111 118 132 147 160 175 184 190 199 205
7.5" 0 12 21 30 39 49 58 68 75 84 93 103 109 122 136 148 161 170 175 184 189
8" 0 11 19 27 35 45 53 63 69 77 85 94 100 112 124 136 148 156 161 169 174
10" 0 9 16 22 29 37 44 51 56 63 70 77 81 92 102 111 121 127 132 138 142
Row Spacing
6" 0 6 10 15 20 25 29 34 39 44 49 54 58 64 73 79 85 91 93 97 100
7" 0 5 9 13 17 21 25 30 34 38 42 47 50 56 63 69 74 78 81 84 87
7.5" 0 5 8 12 16 20 23 28 31 35 39 43 46 51 59 63 98 72 74 78 80
8" 0 4 8 11 14 18 21 25 29 32 36 40 42 47 54 58 63 66 68 71 74
10" 0 4 6 9 12 15 17 21 23 26 29 32 35 39 44 47 51 54 56 58 60
Row Spacing
Rice,
Long
Grain
Drive
Type 1A
Barley
Drive
Type 1
Based on
46.4 lb/bu
Oats or
Safflower
Drive
Type 1
Based on
39 lb/bu
Rye
Drive
Type 2
6" 0 12 21 31 40 50 60 71 80 91 100 110 119 132 150 162 175 185 191 200 206
7" 0 11 19 27 35 44 52 61 69 78 87 96 103 114 130 141 152 160 165 173 179
7.5" 0 10 17 25 32 40 48 57 64 72 80 89 95 105 120 130 140 148 153 160 165
8" 0 9 16 23 29 37 44 52 59 66 74 81 87 97 110 119 129 135 140 146 151
10’ 0 7 13 18 24 30 36 42 48 54 60 66 71 79 90 97 105 111 115 120 124
Row Spacing
6" 0 0 7 142027333944505562687582889399102105107
7’ 0 0 6 12 18 23 28 34 38 44 48 54 59 65 71 76 81 86 88 91 93
7.5" 0 0 6 11 16 21 26 31 36 40 44 50 55 60 66 70 75 79 81 84 86
8" 0 0 5 10 15 20 24 28 33 37 40 46 50 55 60 64 68 73 75 77 79
10" 0 0 4 8 12 16 20 23 27 30 33 37 41 45 49 53 56 59 61 63 64
Row Spacing
6" 0 4 8 1419253137445157647176839096102107112116
7" 0 4 7 12 16 22 27 32 38 44 49 55 61 66 72 78 83 88 93 97 100
7.5" 0 3 7 11 15 20 25 29 35 41 45 51 57 61 67 72 77 81 85 89 93
8" 0 3 6 10 14 19 23 27 32 37 41 47 52 56 61 66 70 75 78 82 85
10" 0 3 5 8 11 15 19 22 26 31 34 38 42 46 50 54 58 61 64 67 70
Row Spacing
6" 0 3 6 8 11 14 16 18 20 23 25 28 30 33 36 38 40 42 43 46 47
7" 0 3 5 7 9 12 13 16 18 20 22 24 26 29 31 33 35 36 38 40 41
7.5" 0 3 5 7 9 11 12 14 16 18 20 22 24 27 29 31 32 34 35 36 38
8" 0 2 4 6 8 10 11 13 15 17 19 20 22 24 26 28 29 31 32 33 34
10"0 2 4 5 7 8 9 1112141517182021232425262728
Row Spacing
9/9/2010
118-365B
Page 7

Great Plains Mfg., Inc.
7
Setting number
Millet
Drive
Type 2
Buckwheat
Drive
Type 1
Flax or
Sudan
Drive
Type 2
Sunflow-
ers
Drive
Type 2
Based on
28.9 lb/bu
Soybeans
Drive
Type 1
Based on
59.1 lb/bu
0 5 10 15 20 25 30 35 40 45 50 55 60 65 70 75 80 85 90 95 100
6" 0 3 5 7 10 12 15 18 21 24 26 30 32 36 39 43 47 50 52 53 53
7" 0 2 4 6 8 11 13 16 18 21 23 26 28 31 34 37 40 43 45 46 46
7.5" 0 2 4 6 8 10 12 14 17 19 21 24 26 29 31 34 37 40 42 42 42
8" 0 2 3 5 7 9 11 13 15 17 19 22 24 26 29 31 34 36 38 39 39
10"0 2 3 4 6 7 9 1113141618192123262830313232
Row Spacing
6" 0 8 14 20 26 33 40 47 55 62 70 77 85 94 102 111 118 124 128 134 138
7" 0 7 12 17 22 29 34 40 47 54 61 67 73 81 88 97 102 107 111 116 120
7.5" 0 6 11 16 21 26 32 37 44 50 56 62 68 75 82 89 94 99 102 107 111
8" 0 6 10 15 19 24 29 34 40 45 51 57 62 69 75 82 86 91 94 98 101
10"0 5 8 121520242833374246515661677174778083
Row Spacing
6" 0 2 4 6 9 12141619212426293235384245474748
7" 0 2 3 5 8 10 12 14 16 18 21 23 25 28 30 33 36 39 41 41 41
7.5" 0 2 3 5 7 9 11 13 15 17 19 21 23 26 28 30 33 36 37 38 38
8" 0 1 3 5 7 9 10 12 14 16 17 19 21 23 26 28 31 33 34 35 35
10" 0 1 2 4 5 7 8 10 11 13 14 16 18 19 21 23 25 27 28 28 29
Row Spacing
6" 0 0 0 2 3 4 6 8 9 11 14 15 17 19 20 23 24 26 27 28 29
7" 0 0 0 2 3 3 5 7 8 10 12 13 15 16 18 20 21 22 23 24 25
7.5" 0 0 0 1 3 3 56891112141516181921212223
8" 0 0 0 1 2 3 5 6 7 8 10 11 12 14 15 17 18 19 20 20 21
10"000123456789101112141415161717
Row Spacing
6" 0 0 0 0 30 40 55 70 84 98 113 127 140 154 166 176 188 200 204 207 209
7" 0 0 0 0 26 35 48 61 72 85 98 110 122 133 144 153 163 173 177 180 181
7.5" 0 0 0 0 24 32 44 56 67 79 91 101 112 123 132 141 150 160 164 166 167
8" 0 0 0 0 22 30 40 51 61 72 83 93 103 113 121 129 138 147 150 152 153
10" 0 0 0 0 18 24 33 42 50 59 68 76 84 92 99 106 113 120 123 124 125
Row Spacing
Soybeans
Drive
Type 2
Based on
59.1 lb/bu
Soybeans
Drive
Type 2A
Based on
59.1 lb/bu
Peas
Drive
Type 1
Pinto
Beans
Drive
Type 2
Based on
60 lb/bu
6" 0 0 0 0 10 13 18 23 27 32 37 41 46 50 54 57 61 65 67 68 68
7" 0 0 0 0 8 11 16 20 24 28 32 36 40 43 47 50 53 57 58 59 59
7.5" 0 0 0 0 8 11 14 18 22 26 30 33 37 40 43 46 49 52 53 54 55
8" 0 0 0 0 7 10 13 17 20 24 27 30 34 37 40 42 45 48 49 50 50
10" 0 0 0 0 6 8 11 14 16 19 22 25 27 30 32 34 37 39 40 41 41
Row Spacing
6" 0 0 0 0 20 27 37 47 56 66 76 85 94 103 111 118 126 134 137 139 140
7" 0 0 0 0 17 23 32 41 49 57 66 73 81 89 96 103 110 116 119 121 122
7.5" 0 0 0 0 16 22 30 37 45 53 61 68 75 82 89 95 101 107 110 111 112
8" 0 0 0 0 15 20 27 34 41 48 56 62 69 75 82 87 93 98 101 102 103
10" 0 0 0 0 12 16 22 28 34 40 45 51 56 62 67 71 76 80 82 84 84
Row Spacing
6" 0 0 10 26 41 55 70 82 95 110 123 135 150 163 176 189 204 215 227 235 241
7" 0 0 8 23 35 48 61 71 82 96 107 117 130 141 152 164 177 186 197 204 209
7.5" 0 0 8 21 33 44 56 66 76 88 99 108 120 130 140 151 163 172 182 188 193
8" 0 0 7 19 30 40 51 60 69 81 90 99 110 120 129 139 149 158 167 172 177
10" 0 0 6 16 24 33 42 49 57 66 74 81 90 98 105 113 122 129 136 141 145
Row Spacing
6" 0 0 0 4 7 12162024283236414448535660636465
7" 0 0 0 3 6 10 14 18 21 24 27 31 35 38 42 46 49 52 55 55 56
7.5" 0 0 0 3 6 9 13 16 19 22 25 29 32 35 39 42 45 48 50 51 52
8" 0 0 0 3 5 9 12 15 18 20 23 27 30 32 35 39 41 44 46 47 47
10" 0 0 0 2 4 7 10 12 14 17 19 22 24 27 29 32 34 36 38 38 39
Row Spacing
9/9/2010
118-365B
Page 8

8
Great Plains Mfg., Inc.
Setting number
Alfalfa or
Rape
Drive
Type 2
Milo
Drive
Type 2
Based on
62.4 lb/bu
Wheat
Grass
Drive
Type 2
0 5 10 15 20 25 30 35 40 45 50 55 60 65 70 75 80 85 90 95 100
6" 0 4 6 8 11 14 17 20 23 26 29 32 35 37 40 42 45 47 50 52 54
7" 0 3 5 7 10 13 15 18 20 23 25 28 30 32 34 37 39 41 43 45 46
7.5" 0 3 5 7 9 12 14 16 18 21 23 26 28 30 32 34 36 38 40 41 43
8" 0 3 4 6 8 11 13 15 17 19 22 24 26 27 29 31 33 35 36 38 39
10" 0 2 3 5 7 9 10 12 14 16 18 19 21 22 24 25 27 28 30 31 32
Row Spacing
6" 0 3 5 8 12 15 18 21 24 27 30 34 37 41 45 49 54 57 60 60 61
7" 0 2 4 7 10 12 15 18 21 24 26 29 32 36 39 42 46 50 52 52 53
7.5" 0 2 4 6 9 11 14 16 19 22 24 27 30 33 36 39 43 46 48 48 49
8" 0 2 3 6 8 10 13 15 18 20 22 25 27 30 33 36 39 42 44 44 45
10" 0 2 3 5 7 9 11 12 14 16 18 20 22 25 27 29 32 34 36 36 37
Row Spacing
6" 0 1 2 2 3 4 4 5 6 7 8 9 9 1011121314141515
7" 0 1 1 2 3 3 4 5 5 6 7 8 8 9 10 11 11 12 12 13 13
7.5" 0 1 1 2 2 3 4 4 5 6 6 7889101011111212
8" 0 1 1 2 2 3 3 4 4 5 6 6 7 8 8 9 10 10 10 11 11
10"011122334455667788999
Row Spacing
118-365B 9/9/2010
Page 9

Great Plains Mfg., Inc.
Small Seeds Attachment Seed Rate Chart (pounds per acre)
Setting number 5 10 15 20 25 30 35 40 45 50 55 60 65 70 75 80 85 90 95 100
Kentucky Blue
Grass, Fes-
cue, Annual
Rye Grass
6" 0 .2 1.2 1.9 2.7 3.3 4.1 4.6 5.2 5.8 6.3 6.8 7.3 7.8 8.3 8.8 9.2 9.7 10.0 10.5
7" 0 .2 1.0 1.6 2.3 2.8 3.5 4.0 4.5 5.0 5.4 5.9 6.3 6.7 7.1 7.5 7.9 8.0 8.6 9.0
7.5" 0 .2 .9 1.5 2.2 2.7 3.3 3.7 4.2 4.6 5.1 5.5 5.9 6.3 6.7 7.0 7.4 7.7 8.1 8.4
8" 0 .2 .9 1.4 2.0 2.5 3.0 3.5 3.9 4.3 4.8 5.1 5.5 5.9 6.2 6.6 6.9 7.5 7.5 7.9
Row Space
10" 0 .1 .7 1.1 1.6 2.0 2.4 2.7 3.1 3.4 3.7 4.0 4.3 4.6 4.9 5.2 5.4 5.7 5.9 6.2
9
Ladino Clo-
ver, Canary
Grass, Timo-
thy, Canola
Bermuda, Red
Top, Unhulled
Lespedeza,
Sercia, Sand &
Weeping Love
Grass
Red & Sweet
Clover, Lespe-
deza Hulled
Bird’s-foot Tre-
foil, Sudan
Orchard Grass
6" 0 1.1 2.1 3.3 4.7 6.1 7.6 9.2 10.7 12.2 13.8 15.5 17.0 18.5 20.3 21.7 23.4 25.4 27.3 29.2
7" 0 .9 1.7 2.8 4.1 5.2 6.6 7.9 9.2 10.5 11.8 13.3 14.6 15.9 17.4 18.7 20.0 22.0 23.4 25.1
7.5" 0 .9 1.6 2.6 3.9 4.9 6.1 7.4 8.6 9.8 11.1 12.5 13.7 14.9 16.3 17.6 18.8 20.4 21.9 23.5
8" 0 .8 1.5 2.5 3.6 4.6 5.7 6.9 8.0 9.2 10.3 11.6 12.8 13.9 15.2 16.4 17.5 19.0 20.5 21.9
Row Space
10" 0 .6 1.5 1.9 2.5 3.6 4.5 5.4 6.3 7.2 8.1 9.1 10.0 10.9 12.0 12.9 13.8 14.9 16.1 17.2
6" 0 .7 1.1 1.7 2.6 3.3 4.1 5.0 5.9 6.6 7.2 7.8 8.4 9.0 9.5 10.2 10.9 11.6 12.2 12.9
7" 0 .6 .9 1.5 2.2 2.8 3.6 4.3 5.1 5.6 6.2 6.7 7.1 7.7 8.1 8.7 9.4 10.0 10.5 11.0
7.5" 0 .5 .9 1.4 2.1 2.6 3.3 4.0 4.7 5.3 5.8 6.3 6.7 7.2 7.6 8.2 8.8 9.3 9.8 10.4
8" 0 .5 .8 1.3 2.0 2.5 3.1 3.8 4.4 4.9 5.4 5.9 6.5 6.7 7.1 7.6 8.2 8.7 9.2 9.7
Row Space
10" 0 .4 .6 1.0 1.5 1.9 2.4 3.0 3.5 3.9 4.2 4.6 4.9 5.3 5.6 6.0 6.4 6.8 7.2 7.6
6" 0 1.5 3.4 5.2 7.1 9.0 11.3 13.2 15.3 17.0 19.0 20.8 22.5 24.5 26.4 28.3 30.1 32.1 33.8 35.6
7" 0 1.3 2.9 4.5 6.1 7.7 9.7 11.3 13.1 14.6 16.3 17.8 19.3 21.0 22.7 24.6 25.8 27.5 29.0 30.5
7.5" 0 1.2 2.7 4.2 5.7 7.2 9.1 10.6 12.3 13.7 15.3 16.7 18.1 19.7 21.2 22.7 24.2 25.8 27.2 28.6
8" 0 1.1 2.5 3.9 5.3 6.7 8.5 9.9 11.5 12.8 14.3 15.6 16.9 18.3 19.8 21.2 22.6 24.1 25.4 26.7
Row Space
10" 0 .9 2.0 3.1 4.2 5.3 6.7 7.8 9.0 10.0 11.2 12.2 13.3 14.4 15.6 16.6 17.8 18.9 19.9 20.9
6" 0 1.7 3.3 5.2 6.8 8.7 10.7 12.7 14.7 16.8 19.2 21.2 23.4 25.6 28.0 29.9 32.1 34.2 36.3 38.4
7" 0 1.5 2.8 4.5 5.8 7.5 9.2 10.9 12.5 14.4 16.5 18.2 20.0 21.9 24.0 25.6 27.5 29.0 31.1 32.9
7.5" 0 1.4 2.6 4.2 5.4 7.0 8.6 10.2 11.9 13.5 15.4 17.0 18.8 20.5 22.5 24.0 25.8 27.6 29.1 30.9
8" 0 1.3 2.5 3.9 5.1 6.6 8.1 9.5 11.0 12.6 14.4 15.9 17.5 19.2 21.0 22.4 24.1 25.7 27.2 28.8
Row Space
10" 0 1.0 1.9 3.1 4.0 5.1 6.3 7.5 8.6 9.9 11.3 12.5 13.8 15.1 16.5 17.6 18.9 20.2 21.4 22.7
6" 0 0 .3 .7 .9 1.3 1.5 2.0 2.4 2.8 3.3 3.5 3.9 4.4 4.8 5.0 5.5 5.7 6.1 6.3
7" 0 0 .2 .6 .7 1.1 1.3 1.7 2.1 2.4 2.8 3.0 3.4 3.7 4.1 4.3 4.7 5.0 5.2 5.4
7.5" 0 0 .2 .5 .7 1.1 1.2 1.6 1.9 2.3 2.6 2.8 3.2 3.5 3.9 4.0 4.4 4.6 4.9 5.1
8" 0 0 .2 .5 .7 1.0 1.1 1.5 1.8 2.1 2.5 2.6 2.9 3.3 3.6 3.8 4.1 4.3 4.6 4.8
Row Space
10" 0 0 .1 .4 .5 .8 .9 1.2 1.4 1.7 1.9 2.1 2.3 2.6 2.8 3.0 3.2 3.3 3.6 3.7
Millet, Reed
Canary
Alfalfa, Red
Alsike, Crim-
son Clover
9/9/2010
6" .4 1.4 2.4 3.5 4.4 5.5 6.5 7.5 8.5 9.5 10.5 11.5 12.5 13.6 14.6 15.6 16.6 17.6 18.5 19.0
7" .4 1.2 2.1 3.0 3.8 4.7 5.6 6.4 7.3 8.1 9.0 9.9 10.7 11.6 12.5 13.3 14.2 15.1 15.9 16.1
7.5" .3 1.2 2.0 2.8 3.6 4.4 5.2 6.0 6.8 7.6 8.4 9.3 10.1 10.9 11.7 12.5 13.3 14.1 14.9 15.1
8" .3 1.1 1.8 2.6 3.3 4.1 4.9 5.6 6.4 7.1 7.9 8.6 9.4 10.2 10.9 11.7 12.4 13.2 13.9 14.1
Row Space
10" .3 .8 1.4 2.0 2.6 3.2 3.8 4.4 5.0 5.6 6.2 6.8 7.4 8.0 8.6 9.2 9.8 10.4 10.9 11.5
6" 0 2.2 3.5 4.8 6.0 7.5 8.7 9.8 11.2 12.5 13.8 15.1 16.4 17.5 18.6 20.2 21.4 22.9 24.0 25.2
7" 0 1.9 3.0 4.1 5.1 6.4 7.5 8.4 9.5 10.8 11.8 12.9 14.0 15.0 16.3 17.3 18.3 20.0 20.6 21.6
7.5" 0 1.8 2.8 3.9 4.8 6.0 7.0 7.9 9.0 10.0 11.1 12.1 13.2 14.0 15.3 16.2 17.2 18.3 19.3 20.3
8" 0 1.6 2.6 3.6 4.5 5.6 6.6 7.4 8.4 9.4 10.3 11.3 12.3 13.0 13.1 15.2 16.1 17.1 18.0 18.9
Row Space
10" 0 1.3 2.1 2.8 3.5 4.4 5.1 5.8 6.6 7.4 8.1 8.9 9.7 10.3 11.2 11.9 12.6 13.4 14.2 14.9
118-365B
 Loading...