

Page 1
Great Plains Mfg., Inc.
Assembly Instructions
24- and 30-Foot, No-Till
Flat Fold Marker Option
Used with:
2N-2410 and 2N-3010 Drills
•
2N-2420 and 2N-3020 Drills
•
When you see this symbol, the subsequent instructions
and warnings are serious - follow without exception. Your
!
!
life and the lives of others depend on it!
General Information
These instructions explain how to assemble, install and setup the
optional hydraulic markers for your two-section, folding no-till
drill. The units are operated hydraulically and hav e a cast hub, tapered roller bearings and a bolt-on notched blade to cut though
heavy residue, leaving a line to f ollo w on the next field pass.
Markers are sold as single or dual units. Dual markers are
equipped with a sequence valve f or easy oper ation.
These instructions apply to:
113-498A 24-Foot No-Till Left-Hand Flat-Fold Marker
113-499A 24-Foot No-Till Dual Flat-Fold Markers
113-500A 30-Foot No-Till Left-Hand Flat-Fold Marker
113-501A 30-Foot No-Till Dual Flat-Fold Markers
Manual Update
Refer to the drill operator’ s manual for detailed information on
safely operating, adjusting, troubleshooting and maintaining the
markers. Refer to the drill parts manual for part identification.
• 2N-2410 and 2N-3010 Operator’s Manual . . . . . . . . . . . . . . . . . . . . 196-126M
• 2N-2420 and 2N-3020 Operator’s Manual . . . . . . . . . . . . . . . . . . . . 196-164M
• 2N-2410 and 2N-3010 Parts Manual . . . . . . . . . . . . . . . . . . . . . . . . 196-126P
• 2N-2420 and 2N-3020 Parts Manual . . . . . . . . . . . . . . . . . . . . . . . . 196-164P
Definitions
Right and left as used in this manual are determined by facing
the direction the machine will travel while in use unless otherwise
stated.
IMPORTANT: A crucial point of information related to the
preceding topic. For safe and correct operation, read and
follow the directions provided before continuing.
NOTE: Useful information related to the
preceding topic.
Before You Start
Pages 8 through 11 are detailed listings of parts included in the
marker kit. Use these lists to inventory parts received.
Assembly and Setup Instructions
Marker Assembly
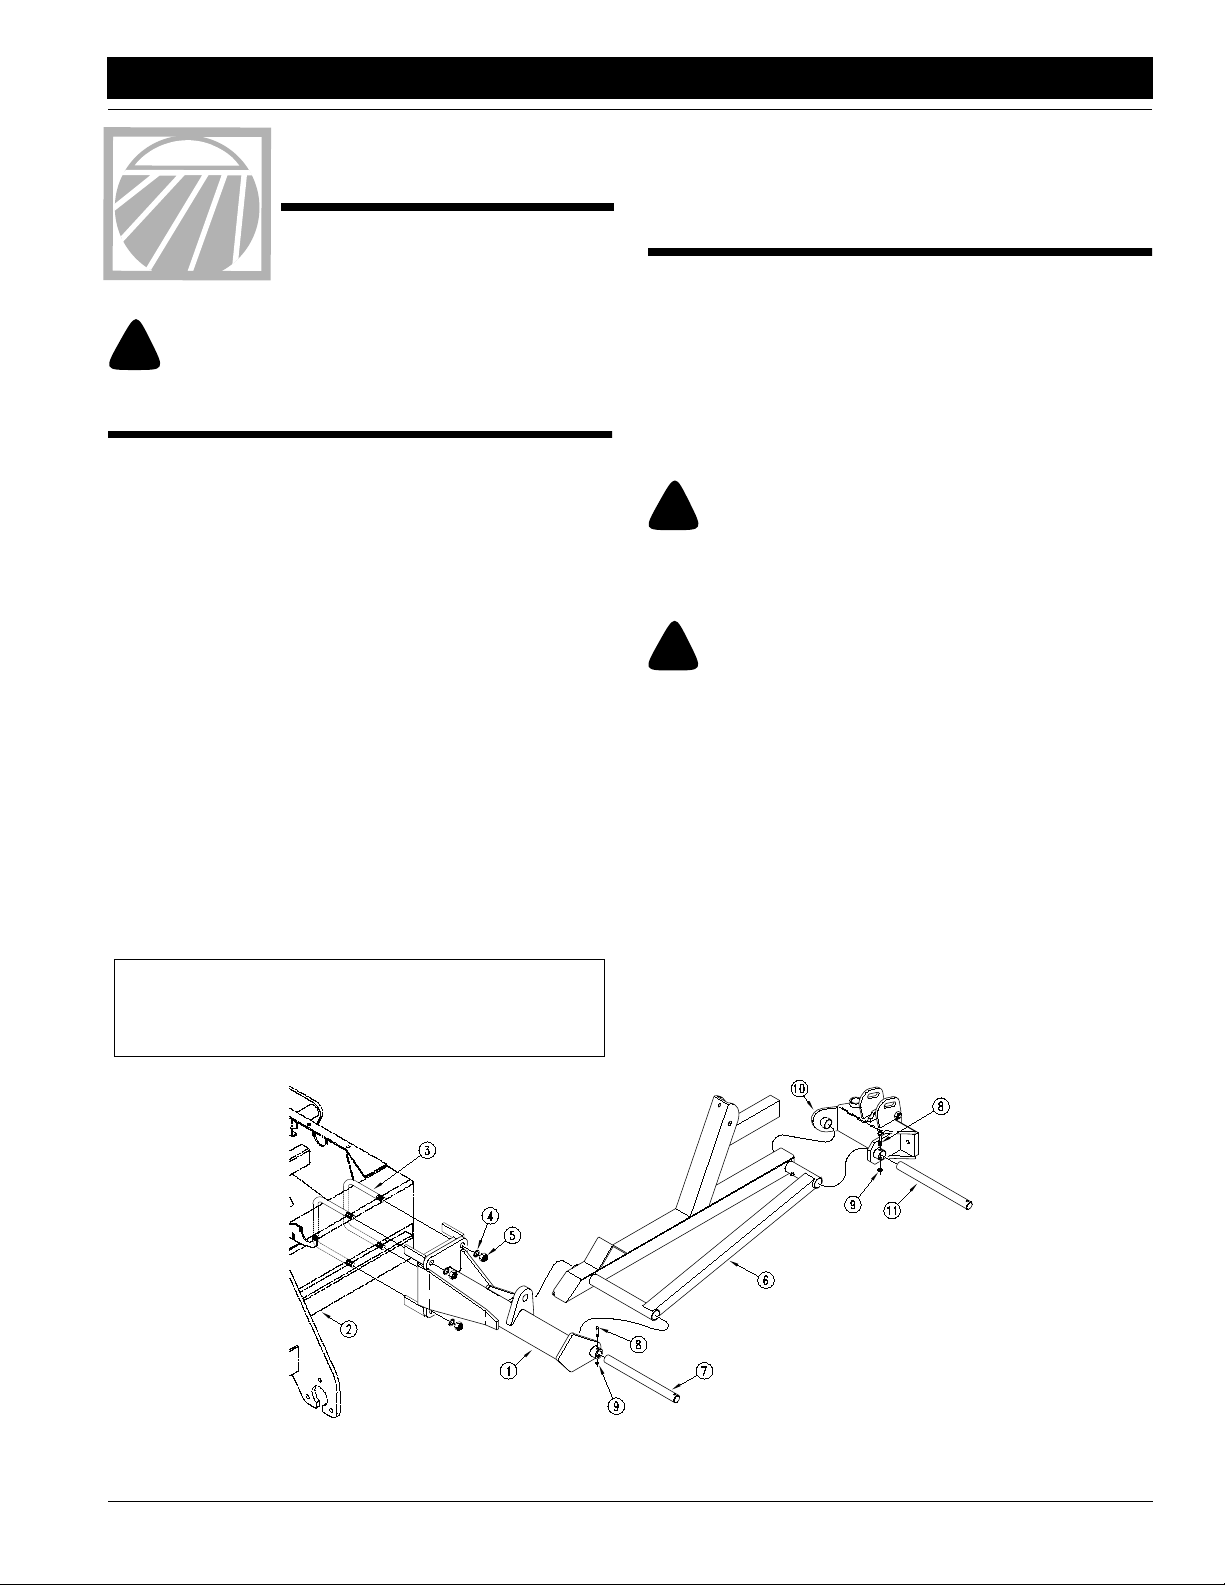
Refer to Figure 1.
1. Park the drill in an area large enough for folding and unfolding the assembled markers. A single marker will increase
the width of the drill by 15 feet.
1. Unfold and lower the drill. P ark and shut off the tractor.
2. The marker sections are pre-assembled and banded together for shipment. Unpack the shipment and group the assemblies according to right-hand or left-hand.
!
Do not lift the assemblies unassisted. Lifting the assemblies without
mechanical aid could cause severe injury. Use a forklift or hoist to
move the assemblies during installation, or disassemble the assemblies
into smaller pieces before installation.
You could be severely injur ed by a failing assembly. Obey all safety instructions from lifting-equipment manufacturer. Do not walk or place
any body part under the raised sections. Be sure lifting equipment has
enough capacity.
NOTE: These instructions explain how to assemble the marker
if the sections are completely disassembled. If you do not have
adequate lifting equipment, disassemble the sections before
proceeding. If you do have a forklift or hoist large enough to lift
the pre-assembled sections, you can skip many of the following
steps.
3. Install the left-hand marker mount (1) on the left wing (2) of
CAUTION!
!
WARNING!
the drill. Install the mount as close to the outside of the drill
as possible. F asten the mount to the 6-by-8-inch frame tube
using two u-bolts (3), lock washers (4) and nuts (5). Install
the first section of the marker (6) on the mount (1) by pushing the pivot shaft (7) through the pivot holes on the mount
and the first section. Use the bolt (8) and lock nut (9) to secure the shaft.
Mount the left-hand breakaway hinge (10) onto the first section (6) by pushing the pivot shaft (11) through the pivot
holes in each
part. Use the
bolt (8) and lock
nut (9) to secure
the shaft.
© Copyright 1997 Printed 2/19/01
■
Figure 1
Marker Assembly
113-502M
1
Page 2
Assembly Instructions
Great Plains Mfg., Inc.
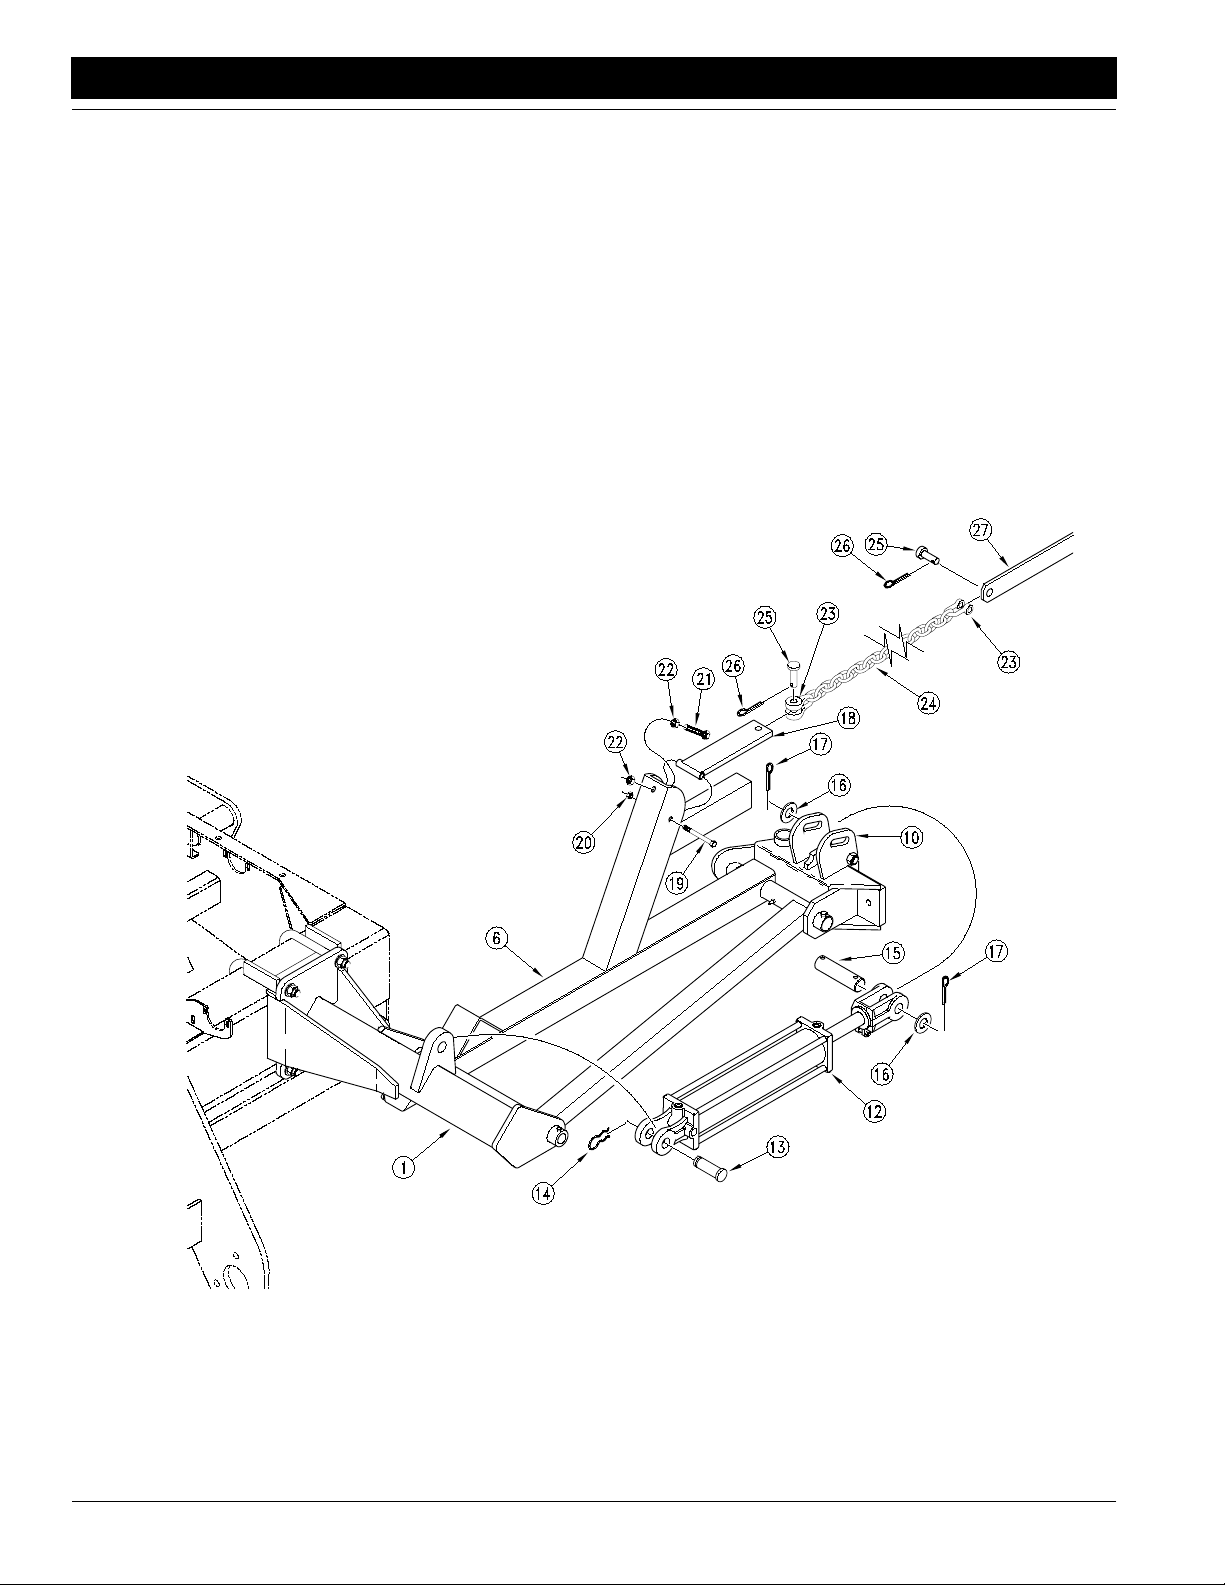
Refer to Figure 2.
4. Pin the base end of the hydraulic cylinder (12) to the marker
mount (1) using the pin and clip (13 and 14). Remove the
plastic plugs from the cylinder ports. Pull the rod end of the
cylinder out to its maximum length. Pin the rod end of the
cylinder to the breakaway hinge using the cylinder pin, flat
washers and cotter pins provided.
5. Install the chain bar (18) on the first section (6) with the bolt
(19) and lock nut (20). The chain bar should pivot freely
around the bolt (19).
6. Install the full-threaded adjustment bolt (21) in the hole directly above the pivot bolt (19). To install, first thread one
lock nut (22) up the entire length of the adjustment bolt.
Next, push the bolt with nut through the hole. Complete the
assembly by threading a second lock nut (22) up the entire
remaining length of the adjustment bolt.
After marker assembly, use the adjustment bolt to control
folding slack. F or no w, turn the adjustment bolt so its head
extends as little as possible to pre vent damage the first time
the marker is folded.
7. Thread a utility clevis (23) through one end of the chain (24).
Pin this clevis to the chain bar (18) using the pin and cotter
pin (25 and 26) provided. Do not fully bend the cotter pin at
this time. Thread a second utility clevis (23) through the last
link at the opposite end of the chain (24). Pin this clevis to
the rounded end of the chain bar (27) using the pin and cotter pin (25 and 26) provided.
Figure 2
Marker Assembly
24- and 30-Foot, No-Till Flat Fold Marker Option 113-502M 4/9/04
2
■
Page 3
Great Plains Mfg., Inc.
Assembly Instructions
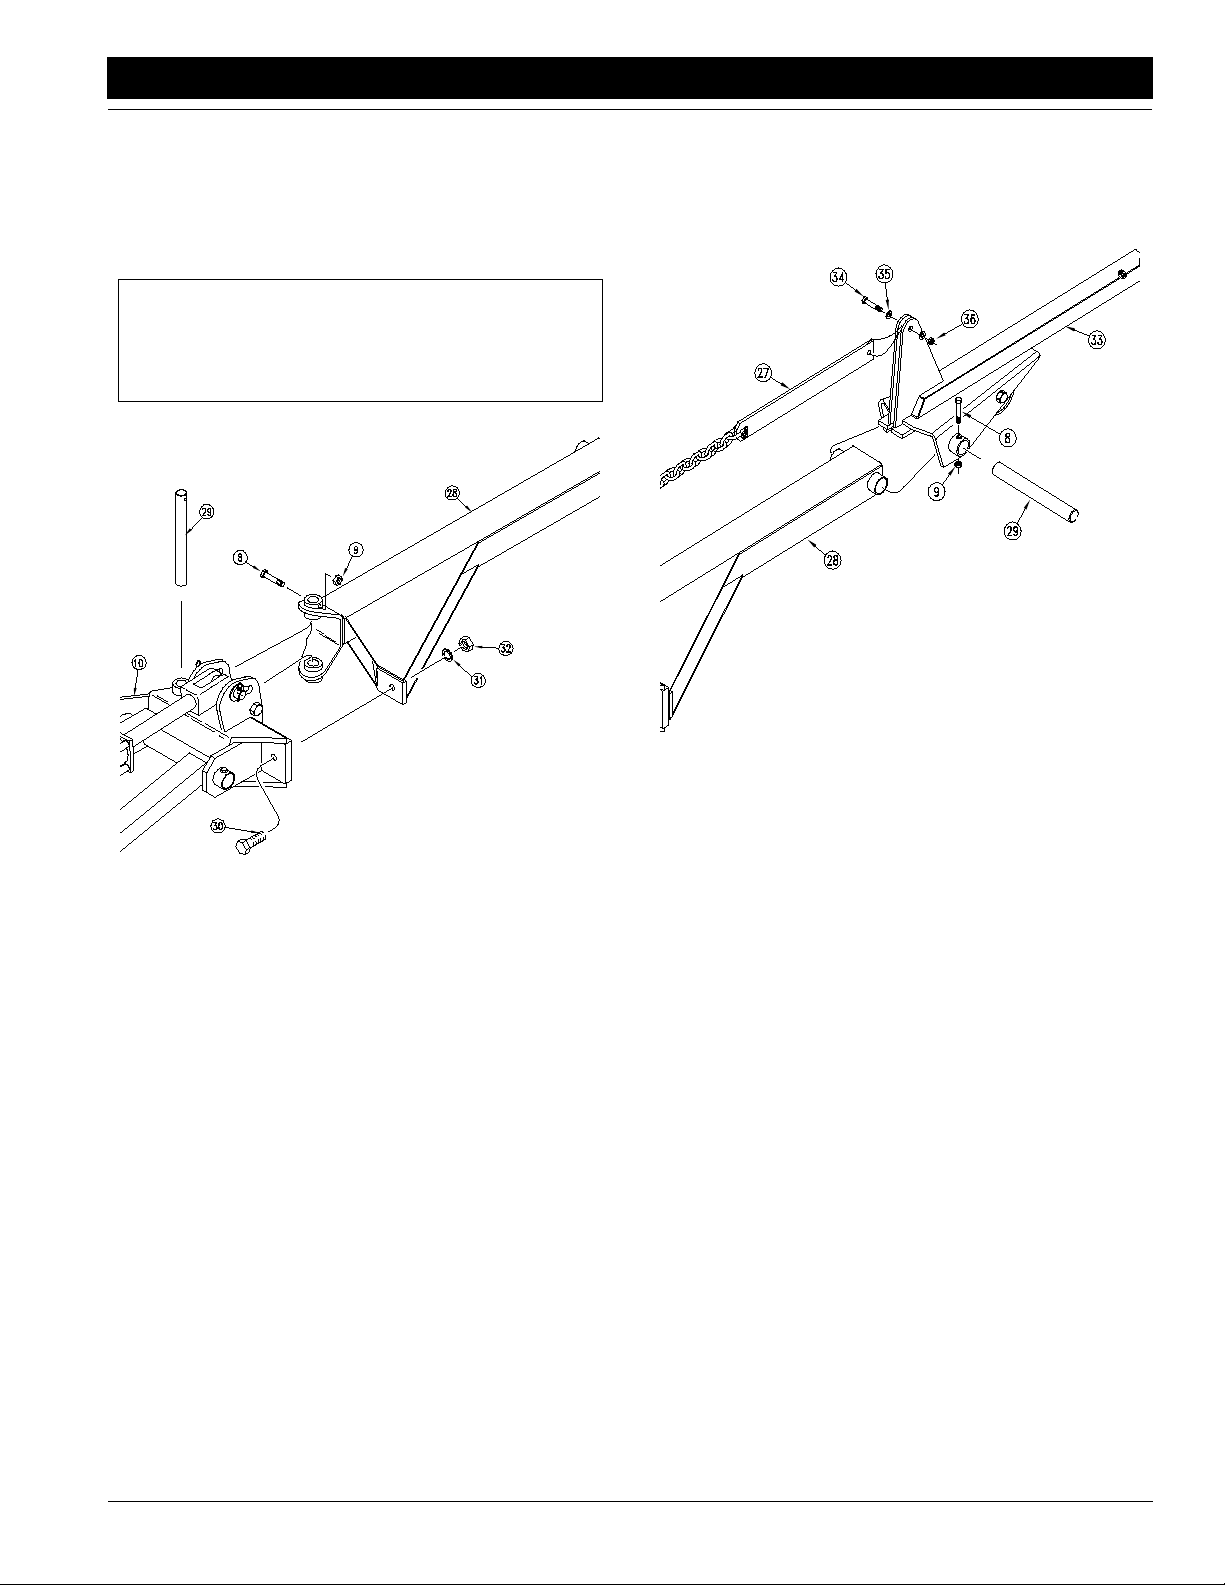
Refer to Figure 1.
8. Attach the second section (28) to the breakaway hinge (10)
with the pivot pin (29). Secure the pivot pin (29) with the bolt
and lock nut (8 and 9). Complete this joint by passing the
grade 5 breakawa y bolt (30) through the holes in the hinge
and second section. Install the lock washer (31) and nut (32)
on the breakaway bolt.
IMPORTANT: The breakaway bolt (30) is a 7/16 x
2 1/4-inch, grade 5 (G.P. # 802-234C). It is identified as a
grade 5 by having three marks on the head. If it breaks, replace it with an equivalent grade 5 bolt to prevent marker
damage.
third section (33) by using the bolt (34) flat washers (35) and
lock nut (36). Do not over tighten this pivot, which would
cause the ears to bend in. The chain bar must pivot freely
around the bolt.
11102
11101
Figure 1
Attaching Second Section
Refer to Figure 1.
9. Attach the third section (33) to the second section (28) by using the pivot pin (29). Secure the pivot pin with the bolt (8) and
lock nut (9).
Fasten the loose end of chain bar (27) to the ears on the
Figure 1
Attaching Third Section
Refer to Figure 1.
10. Slide the fourth-section tube (37) inside the third section
(33). The holes in the fourth section must be to the outside of
the drill and on the top and bottom side as shown. Thread
the jam nuts (38) on the square-headed set screws (39).
Thread the set screws into the nuts welded to the outer end
of the third section (33). Tighten the set screws and jam nuts.
11. Slide the blade and spindle (40) over the f ourth-section tube
(37). Secure the spindle to the tube with bolts (41), flat
washers (42), lock washers (43) and nuts (44). Tighten the
two nuts.
4/9/04
■
24- and 30-Foot, No-Till Flat Fold Marker Option 113-502M
3
Page 4
Assembly Instructions
Great Plains Mfg., Inc.
11103
Attaching Fourth Section
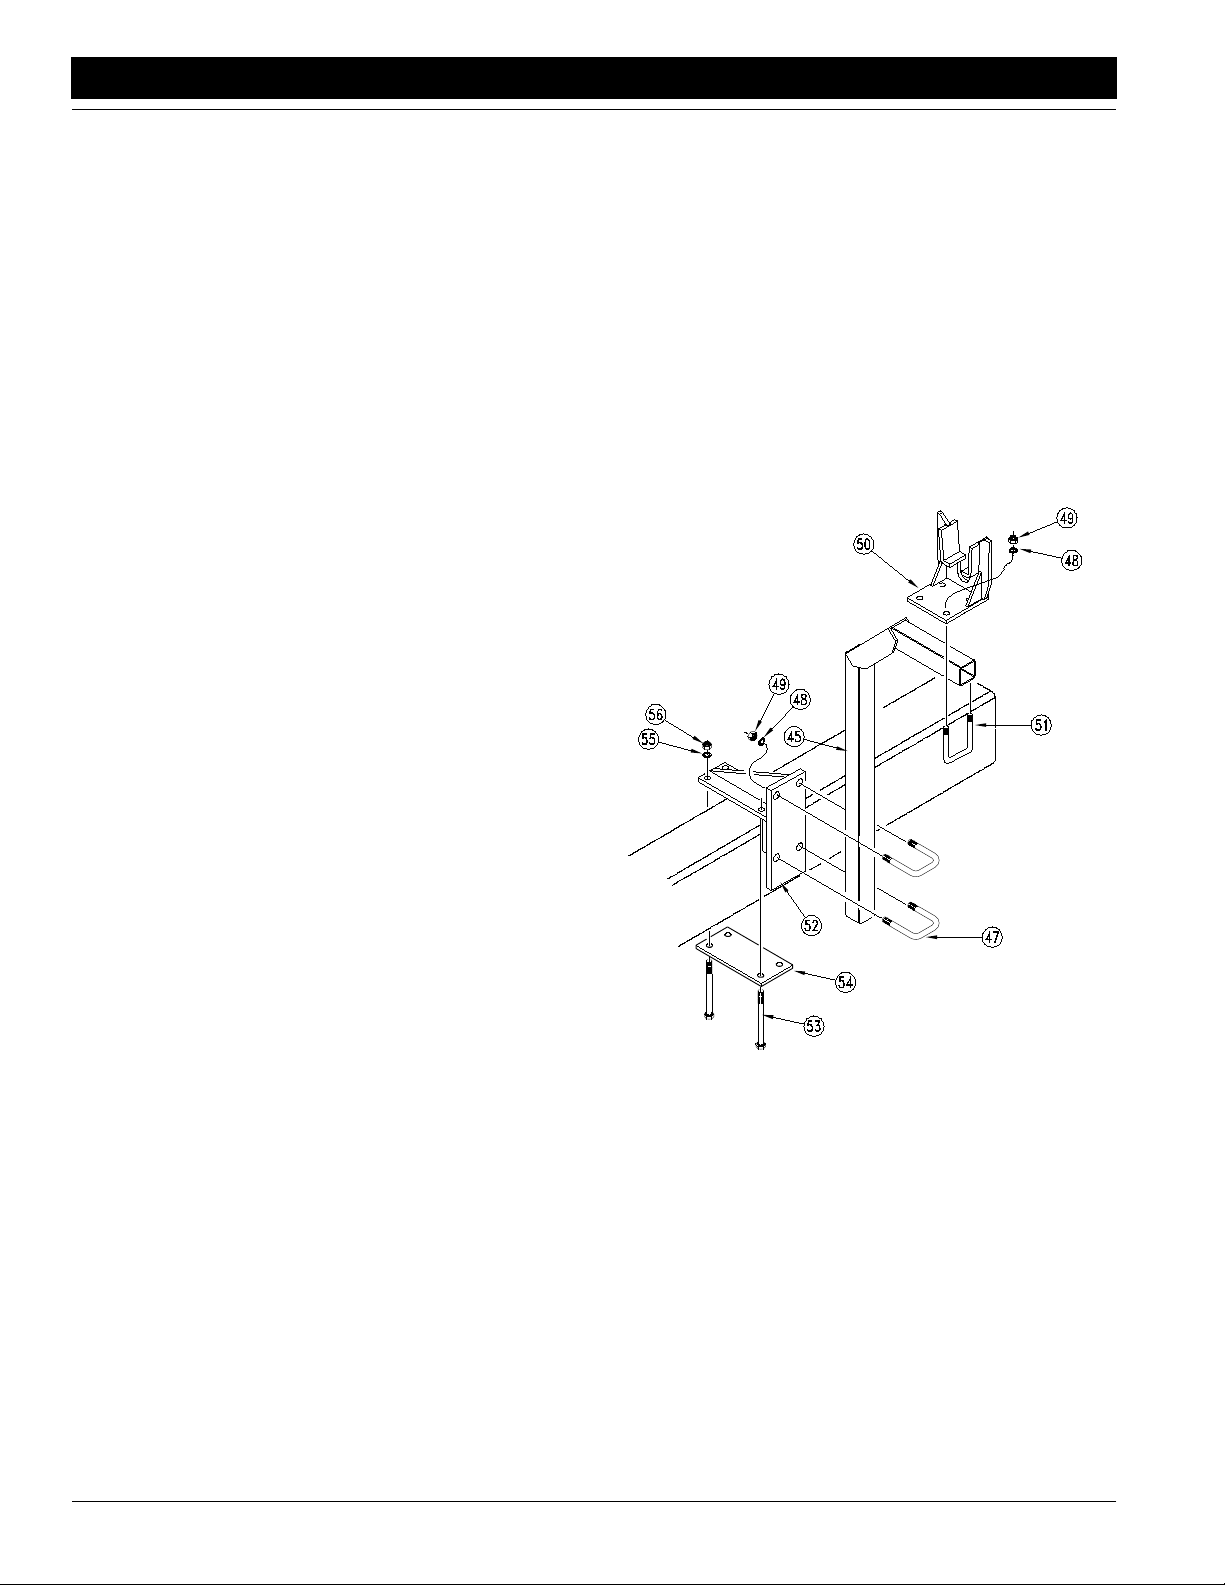
Refer to Figure 1.
12. Mount the transport carrier (45) to the box frame on the inside of the gauge-wheel mount. Use the mounting bracket
(52) and secure it with the four 1/2 x 9 1/2-inch bolts (53), the
plate (54), lock washers (55) and nuts (56).
NOTE: On 30-foot drills, y ou may need to reposition the optional
weight brackets to mak e room for the transport carrier.
13. Fasten the carrier to the mount using the two u-bolts
(47).Tighten the u-bolts with the lock washers (48) and nuts
(49) so that the top of the carrier is about 29 3/8 inches
above the top of the frame tube. You may need to re-adjust
carrier height after assembly. Refer to Transport Carrier,
"Setup Adjustments," page 7.
14. Mount the transport saddle (50) on the top of the carrier arm
(45) using the u-bolts (51), lock washers (48) and nuts (49).
On 24-foot drills, position the offset in the saddle to the outside of the drill as shown.
15. To complete assembly for dual markers, repeat steps three
through nine.
Figure 1
Figure 1
11701
Transport Carrier Mounting
16. After all parts are in place, tighten all bolts and u-bolts. Refer
to the torque chart in your drill operator’s manual. Torque ubolts to grade 5 values.
24- and 30-Foot, No-Till Flat Fold Marker Option 113-502M 4/9/04
4
■
Page 5

Great Plains Mfg., Inc.
Assembly Instructions
Single-Marker Hydraulics
IMPORTANT: JIC fittings do not require high torque. JIC and O-ring fittings do not require sealant. To
avoid cracking fittings or castings
from overtightening, do not use
plastic sealant tape.
Refer to Figure 1.
1. Attach the 90-degree swivel elbo w (1)
to the rod end of the marker cylinder
(2). Insert the orfice (3) in the base
end of the marker cylinder (2). Attach
the 90-degree swivel elbo w (1) to the
base end of the marker cylinder (2).
2. Uncoil and attach hose (4) to the swivel elbow at the rod end of the marker
cylinder (2). Uncoil and attach hose
(5) to the swivel elbow (1) at the base
end of the marker cylinder (2).
3. Install the two adapters (9) and two elbow fittings (7) in the top ports (A2 and
B2) of the manifold valv e (8). The
manifold valv e is located in rear-center of the main frame.
4. Route and connect the two marker
hoses (4 and 5) to the elbow fittings (7).
Route hoses through the frame member cut-outs and hose clamps. Route
the hoses parallel to the hoses feeding
the outer gauge-wheel cylinder. See
Figure 1.
Figure 1
Hydraulic Hose Routing
Refer to Figure 1.
5. Fine tune the hose placement. Make a generous loop in
both hoses near the folding hinge. This loop should be large
enough to allow the outer wing to flex without the hoses pulling tight. Maintain the loops by clamping the hoses in the
center hole of the existing hose clamps. Use the split rubber
sleeves as b ushings between the clamps and the mark er
hose. Use the cable ties (6) supplied with the kit to hold the
hoses away from an y pinch point.
Figure 1
Transport Carrier Mounting
IMPORTANT: Read and complete Setup Adjustments,
page 7 before folding the markers.
13005
4/9/04
■
24- and 30-Foot, No-Till Flat Fold Marker Option 113-502M
5
Page 6

Assembly Instructions
Great Plains Mfg., Inc.
Dual Marker Hydraulics
NOTE: JIC fittings do not require high torque. JIC and Oring fittings do not require sealant. To avoid cracking fittings or castings from overtightening, do not use plastic
sealant tape.
Refer to Figure 1.
1. Attach the 90˚ swivel elbows (1) to the rod end of both marker cylinders (2). Insert the orifices (7) in the base end of the
marker cylinders (2). Attach the 90˚ swivel elbo ws (1) to the
base end of the marker cylinders (2).
2. Uncoil and attach hoses (3 and 4) to the swivel elbows (1).
Notice that the longer hoses go to the rod end of the cylinders.
3. Attach the two adapters (9) and the 90-degree elbows (6) in
the manifold valv e (8) at ports A2 and B2. The manifold
valve is located in the rear-center of the main frame.
4. Attach the sequence valve (10) on the mounting brac ket using the lock washers (11) and 3/8 x 7/8-inch bolts (12).
5. Install hydraulic hoses (13) on the sequence valve (10).
Connect port A2 on the manifold valve (8) to port 2 on the
sequence valve (10). Connect port B2 on the manifold valv e
to port 1 on the sequence valve.
6. Connect the four hoses coming from the marker cylinders to
the sequence valve. Connect the base-end hoses (4) to
ports R1 and R2 (10) and the rod hoses (3) to ports C1 and
C2 as shown.
7. Route the hoses coming from the marker cylinders through
the frame member cut-outs and hose clamps. Run the hoses parallel to the hoses feeding the outer gauge-wheel cylinder as shown in Figure 1 on page 5.
8. Fine tune the hose placement. Make a generous loop in
both hoses near the box flex hinge. This loop should be
large enough to allow the outer wing to flex without the hoses pulling tight. Maintain the loops by clamping the hoses in
the center hole of the existing hose clamps. Use the split
rubber sleeves as bushings betw een the clamps and the
marker hose. Use the cable ties (6) supplied with the kit to
hold the hoses away from an y pinch point.
IMPORTANT: Read and complete Setup Adjustments,
page 7 before folding the markers.
Figure 1
Dual Marker Hydraulic Schematic
24- and 30-Foot, No-Till Flat Fold Marker Option 113-502M 4/9/04
6
14683
■
Page 7

Great Plains Mfg., Inc.
Assembly Instructions
Setup Adjustments
1. Storage Saddle. When folding the marker for the first time,
you may need to move the storage saddle into alignment
with the second section of the marker arm. Slowly fold the
marker and stop when the marker is just above the storage
saddle. Adjust the bracket in or out as needed.
2. T ransport Carrier. After centering the storage saddle and
folding the marker , visually check the height of the transport
carrier. The second section of the marker should appear
parallel with the top of the drill box. If not, loosen the transport carrier u-bolts and adjust the carrier up or down.
3. Marker Chain. There are two basic adjustments needed on
the marker chain, especially in new installations. They are
interrelated and should be done in the following order.
a. Lifting Slack. Start with the marker in the unfolded po-
sition. Back the adjustment bolt (Figure 2, page 2, 21)
down until the head extends as little as possible . Slowly
fold the marker , observing the motion of the disk. If the
marker disk slides across the ground more than about
one foot before the chain and linkage lifts it up , the chain
is too slack. Tighten the chain by moving the cle vis one
or two links at the inboard end of the chain. Recheck by
repeating this process.
If the chain does not have enough slack when the mark-
er is in the unfolded field position, the chain will prev ent
the end of the marker from dropping down to follow a depression in the field. Correct this condition by moving
the utility clevis one or two links, giving the chain more
slack.
b. Folding Slack. Fold the marker . Extend the adjustment
bolt until the slack is out of the chain. Lock the bolt in
this position by tightening the nuts on either side of the
upright channel.
!
CAUTION!
Never allow anyone near the drill when cycling the markers!
!
WARNING!
Escaping fluid under pressure can have sufficient pressure to
penetrate the skin causing serious injury. Avoid the hazard by
relieving pressure before disconnecting hydraulic lines. Use a
piece of paper or cardboard, NOT BODY PARTS, to check for
leaks. Wear protective gloves and safety glasses or goggles
when working with hydraulic systems. If an accident occurs, see
a doctor immediately. Any fluid injected into the skin must be
surgically removed within a few hours or gangrene will result.
1. Be sure tractor hydraulic reservoir is full.
2. With the drill unfolded and lowered, set the switch on the
control console to the left-marker position.
3. With the marker unfolded, crack the hose fitting at the base
end of the left-marker cylinder. With y our tractor at an idle
speed, activate your hydr aulic valve until oil seeps out
around the hose ends. Tighten the hose-end fittings.
4. Repeat step three with the hose-end fitting at the rod end of
the cylinder.
5. If dual markers are used, repeat steps three and four for the
right marker cylinder.
NOTE: For dual markers, both are controlled by the left-marker
switch.
6. Fold and unfold the marker(s) slo wly to work all the air out of
your marker hydraulics .
Bleeding Marker Hydraulics
To operate correctly, the marker h ydraulics must be free of air. If
not properly bled, the markers will fold in jerky, uneven motions.
Follow these instructions to bleed the marker h ydr aulics .
IMPORTANT: JIC fittings do not require high torque. JIC
and O-Ring fittings do not require sealant. Always use liquid pipe sealant when adding or replacing pipe thread fittings. To avoid possible danger of cracking hydraulic
fittings from over tightening, do not use plastic sealant
tape.
4/9/04
■
24- and 30-Foot, No-Till Flat Fold Marker Option 113-502M
7
Page 8

Listing of Parts
113-498A 24-Foot No-Till Left-Hand Flat-Fold Marker
Your Kit Includes:
Qty. Part No. Part Description
1 113-180H LH FIRST SECTION
1 113-197H MARKER CARRIER
1 113-248D MARKER CYLINDER PIN BODY
1 113-311D HINGE PIN
1 113-312D FIRST PIVOT SHAFT
1 113-313D SECOND PIVOT SHAFT
1 113-324D CYLINDER STOP
2 113-325D STOP BUSHING
1 113-342H NO-TILL MARKER 24' 2ND SECTION
1 113-344H NO-TILL MARKER 24' 3RD SECTION
1 113-350H NO-TILL BREAKAWAY JOINT LH
1 113-360S NOTILL MRKR DSK & 4BLT HUB ASY
1 113-379D NO-TILL 24' 4TH SECT TUBE
1 113-381H 2SNT L.H. MARKER MOUNT WMNT
4 800-001C GREASE ZERK STRAIGHT 1/4-28
2 801-013C SCREW SER SQ HD 1/2-12x1 1/2 +
2 802-042C HHCS 1/2-13X3 3/4 GR5
3 802-115C HHCS 5/16-18X2 GR5
1 802-201C HHCS 1/2-13X4 3/4 GR5
1 802-234C HHCS 7/16-14X2 1/4 GR5
1 802-260C HHCS 1/2-13X7 GR5
3 803-011C NUT LOCK 5/16-18 PLT
1 803-015C NUT HEX 7/16-14 PLT
2 803-019C NUT LOCK 1/2-13 PLT
2 803-020C NUT HEX 1/2-13 PLT
2 803-036C NUT HEX JAM 1/2-13 PLT
1 804-014C WASHER LOCK 7/16 PLT
2 804-015C WASHER LOCK SPRING 1/2 PLT
4 804-017C WASHER FLAT 1/2 USS PLT
2 804-029C WASHER FLAT 1 SAE
2 805-058C PIN COTTER 3/16 X 2
1 810-118C CYL 2.5X20X1.12 ROD (TIE)1 PIN
1 113-200H CHAIN BAR WELDMENT
1 113-311D HINGE PIN
1 113-316H MARKER TRNSPT ARM MOUNT WLDMT
1 113-323D CHAIN BAR
1 113-328D 24' MARKER CHAIN
1 113-365H NO-TILL SADDLE REST WELDMENT
1 113-398D RUBBER TUBE RD 3 OD X 5 LONG
1 113-502M MANUAL 24 & 30 2SNT FF MARKER
1 113-555D MARKER MOUNT PLATE
6 800-082C CABLE TIE .31X21.5 6DIA 120LB
1 802-022C HHCS 3/8-16X1 1/2 GR5
4 802-048C HHCS 1/2-13X9 1/2 GR5
1 802-115C HHCS 5/16-18X2 GR5
1 802-168C HHCS 3/8-16X3 1/4 GR5
1 802-261C HHCS 3/8-16X2 1/2 GR5 FTHD
1 803-011C NUT LOCK 5/16-18 PLT
4 803-013C NUT LOCK 3/8-16 PLT
12 803-020C NUT HEX 1/2-13 PLT
4 803-027C NUT HEX 3/4-10 PLT
2 804-011C WASHER FLAT 3/8 USS PLT
12 804-015C WASHER LOCK SPRING 1/2 PLT
4 804-023C WASHER LOCK SPRING 3/4 PLT
2 806-005C U-BOLT 1/2-13 X 2 X 3 GR 5
2 806-023C U-BOLT 1/2-13 X 2 1/32 X 3 1/4
2 806-037C U-BOLT 3/4-10 X 8 1/16 X 9 1/2
1 811-044C AD 3/8MNPT
2 811-133C AD 9/16MJIC 3/4MORB
2 811-169C EL 9/16MJIC 9/16FJIC
2 811-281C EL 3/8FNPT 9/16MORB
1 811-347C ORPL 1/16 9/16MORB
2 890-018C UTILITY CLEVIS 5/16
1 811-035C HH1/4R1 252 9/16FJIC 3/8MNPT
1 811-333C HH1/4R1 032 9/16FJIC
1 811-451C HH1/4R1 212 3/8MNPT 9/16FJIC
Great Plains Mfg., Inc.
24- and 30-Foot, No-Till Flat Fold Marker Option 113-502M 4/9/04
8
■
Page 9

Great Plains Mfg., Inc.
Listing of Parts
113-499A 24-Foot No-Till Dual Flat-Fold Markers
Your Kit Includes:
Qty. Part No. Part Description
1 113-180H LH FIRST SECTION
1 113-188H RH FIRST SECTION
2 113-197H MARKER CARRIER
2 113-248D MARKER CYLINDER PIN BODY
2 113-312D FIRST PIVOT SHAFT
2 113-313D SECOND PIVOT SHAFT
2 113-316H MARKER TRNSPT ARM MOUNT WLDMT
2 113-324D CYLINDER STOP
4 113-325D STOP BUSHING
2 113-342H NO-TILL MARKER 24' 2ND SECTION
2 113-344H NO-TILL MARKER 24' 3RD SECTION
1 113-350H NO-TILL BREAKAWAY JOINT LH
1 113-351H NO-TILL BREAKAWAY JOINT RH
2 113-360S NOTILL MRKR DSK & 4BLT HUB ASY
2 113-365H NO-TILL SADDLE REST WELDMENT
2 113-379D NO-TILL 24' 4TH SECT TUBE
1 113-381H 2SNT L.H. MARKER MOUNT WMNT
1 113-382H 2SNT R.H. MARKER MOUNT WMNT
2 113-398D RUBBER TUBE RD 3 OD X 5 LONG
8 800-001C GREASE ZERK STRAIGHT 1/4-28
4 801-013C SCREW SET SQ HD 1/2-13X1 1/2G5
2 802-042C HHCS 1/2-13X3 3/4 GR5
4 802-115C HHCS 5/16-18X2 GR5
2 802-201C HHCS 1/2-13X4 3/4 GR5
2 802-234C HHCS 7/16-14X2 1/4 GR5
2 802-260C HHCS 1/2-13X7 GR5
4 803-011C NUT LOCK 5/16-18 PLT
2 803-015C NUT HEX 7/16-14 PLT
4 803-019C NUT LOCK 1/2-13 PLT
6 803-020C NUT HEX 1/2-13 PLT
4 803-036C NUT HEX JAM 1/2-13 PLT
2 804-014C WASHER LOCK 7/16 PLT
4 804-015C WASHER LOCK SPRING 1/2 PLT
8 804-017C WASHER FLAT 1/2 USS PLT
4 804-029C WASHER FLAT 1 SAE
4 805-058C PIN COTTER 3/16 X 2
2 810-118C CYL 2.5X20X1.12 ROD (TIE)1 PIN
2 113-200H CHAIN BAR WELDMENT
4 113-311D HINGE PIN
2 113-323D CHAIN BAR
2 113-328D 24' MARKER CHAIN
1 113-502M MANUAL 24 & 30 2SNT FF MARKER
2 113-555D MARKER MOUNT PLATE
12 800-082C CABLE TIE .31X21.5 6DIA 120LB
2 802-022C HHCS 3/8-16X1 1/2 GR5
8 802-048C HHCS 1/2-13X9 1/2 GR5
4 802-115C HHCS 5/16-18X2 GR5
2 802-168C HHCS 3/8-16X3 1/4 GR5
2 802-261C HHCS 3/8-16X2 1/2 GR5 FTHD
2 802-417C HHCS 3/8-16X7/8 GR5
4 803-011C NUT LOCK 5/16-18 PLT
8 803-013C NUT LOCK 3/8-16 PLT
24 803-020C NUT HEX 1/2-13 PLT
8 803-027C NUT HEX 3/4-10 PLT
4 804-011C WASHER FLAT 3/8 USS PLT
2 804-013C WASHER LOCK SPRING 3/8 PLT
24 804-015C WASHER LOCK SPRING 1/2 PLT
8 804-023C WASHER LOCK SPRING 3/4 PLT
4 806-005C U-BOLT 1/2-13 X 2 X 3 GR 5
4 806-023C U-BOLT 1/2-13 X 2 1/32 X 3 1/4
4 806-037C U-BOLT 3/4-10 X 8 1/16 X 9 1/2
1 810-197C VALVE,SEQUENCE SHOEMAKER
2 811-133C AD 9/16MJIC 3/4MORB
2 811-169C EL 9/16MJIC 9/16FJIC
4 811-281C EL 3/8FNPT 9/16MORB
4 890-018C UTILITY CLEVIS 5/16
2 811-035C HH1/4R1 252 9/16FJIC 3/8MNPT
2 811-333C HH1/4R1 032 9/16FJIC
2 811-451C HH1/4R1 212 3/8MNPT 9/16FJIC
4/9/04
■
24- and 30-Foot, No-Till Flat Fold Marker Option 113-502M
9
Page 10

Listing of Parts
113-500A 30-Foot No-Till Left-Hand Flat-Fold Marker
Your Kit Includes:
Qty. Part No. Part Description
1 113-180H LH FIRST SECTION
1 113-197H MARKER CARRIER
1 113-248D MARKER CYLINDER PIN BODY
1 113-311D HINGE PIN
1 113-312D FIRST PIVOT SHAFT
1 113-313D SECOND PIVOT SHAFT
1 113-324D CYLINDER STOP
2 113-325D STOP BUSHING
1 113-350H NO-TILL BREAKAWAY JOINT LH
1 113-360S NOTILL MRKR DSK & 4BLT HUB ASY
1 113-381H 2SNT L.H. MARKER MOUNT WMNT
4 800-001C GREASE ZERK STRAIGHT 1/4-28
2 801-013C SCREW SER SQ HD 1/2-12x1 1/2 +
2 802-042C HHCS 1/2-13X3 3/4 GR5
3 802-115C HHCS 5/16-18X2 GR5
1 802-201C HHCS 1/2-13X4 3/4 GR5
1 802-234C HHCS 7/16-14X2 1/4 GR5
1 802-260C HHCS 1/2-13X7 GR5
3 803-011C NUT LOCK 5/16-18 PLT
1 803-015C NUT HEX 7/16-14 PLT
2 803-019C NUT LOCK 1/2-13 PLT
2 803-020C NUT HEX 1/2-13 PLT
2 803-036C NUT HEX JAM 1/2-13 PLT
1 804-014C WASHER LOCK 7/16 PLT
2 804-015C WASHER LOCK SPRING 1/2 PLT
4 804-017C WASHER FLAT 1/2 USS PLT
2 804-029C WASHER FLAT 1 SAE
2 805-058C PIN COTTER 3/16 X 2
1 810-118C CYL 2.5X20X1.12 ROD (TIE)1 PIN
1 113-200H CHAIN BAR WELDMENT
1 113-311D HINGE PIN
1 113-316H MARKER TRNSPT ARM MOUNT WLDMT
1 113-323D CHAIN BAR
1 113-365H NO-TILL SADDLE REST WELDMENT
1 113-398D RUBBER TUBE RD 3 OD X 5 LONG
1 113-502M MANUAL 24 & 30 2SNT FF MARKER
1 113-555D MARKER MOUNT PLATE
6 800-082C CABLE TIE .31X21.5 6DIA 120LB
1 802-022C HHCS 3/8-16X1 1/2 GR5
4 802-048C HHCS 1/2-13X9 1/2 GR5
1 802-115C HHCS 5/16-18X2 GR5
1 802-168C HHCS 3/8-16X3 1/4 GR5
1 802-261C HHCS 3/8-16X2 1/2 GR5 FTHD
1 803-011C NUT LOCK 5/16-18 PLT
4 803-013C NUT LOCK 3/8-16 PLT
12 803-020C NUT HEX 1/2-13 PLT
4 803-027C NUT HEX 3/4-10 PLT
2 804-011C WASHER FLAT 3/8 USS PLT
12 804-015C WASHER LOCK SPRING 1/2 PLT
4 804-023C WASHER LOCK SPRING 3/4 PLT
2 806-005C U-BOLT 1/2-13 X 2 X 3 GR 5
2 806-023C U-BOLT 1/2-13 X 2 1/32 X 3 1/4
2 806-037C U-BOLT 3/4-10 X 8 1/16 X 9 1/2
1 811-044C AD 3/8MNPT
2 811-133C AD 9/16MJIC 3/4MORB
2 811-169C EL 9/16MJIC 9/16FJIC
2 811-281C EL 3/8FNPT 9/16MORB
1 811-347C ORPL 1/16 9/16MORB
2 890-018C UTILITY CLEVIS 5/16
1 811-035C HH1/4R1 252 9/16FJIC 3/8MNPT
1 811-333C HH1/4R1 032 9/16FJIC
1 113-341H NO-TILL MARKER 30' 2ND SECTION
1 113-343H NO-TILL MARKER 30' 3RD SECTION
1 113-378D NO-TILL 30' 4TH SECT TUBE
1 113-319D MARKER CHAIN 30'
4 804-017C WASHER FLAT 1/2 USS PLT
1 811-014C HH1/4R1 288 9/16FJIC 3/8MNPT
Great Plains Mfg., Inc.
24- and 30-Foot, No-Till Flat Fold Marker Option 113-502M 4/9/04
10
■
Page 11

Great Plains Mfg., Inc.
Listing of Parts
113-501A 30-Foot No-Till Dual Flat-Fold Marker
Your Kit Includes:
Qty. Part No. Part Description
1 113-180H LH FIRST SECTION
1 113-188H RH FIRST SECTION
2 113-197H MARKER CARRIER
2 113-248D MARKER CYLINDER PIN BODY
2 113-312D FIRST PIVOT SHAFT
2 113-313D SECOND PIVOT SHAFT
2 113-316H MARKER TRNSPT ARM MOUNT WLDMT
2 113-324D CYLINDER STOP
4 113-325D STOP BUSHING
1 113-350H NO-TILL BREAKAWAY JOINT LH
1 113-351H NO-TILL BREAKAWAY JOINT RH
2 113-360S NOTILL MRKR DSK & 4BLT HUB ASY
2 113-365H NO-TILL SADDLE REST WELDMENT
1 113-381H 2SNT L.H. MARKER MOUNT WMNT
1 113-382H 2SNT R.H. MARKER MOUNT WMNT
2 113-398D RUBBER TUBE RD 3 OD X 5 LONG
8 800-001C GREASE ZERK STRAIGHT 1/4-28
4 801-013C SCREW SET SQ HD 1/2-13X1 1/2G5
2 802-042C HHCS 1/2-13X3 3/4 GR5
4 802-115C HHCS 5/16-18X2 GR5
2 802-201C HHCS 1/2-13X4 3/4 GR5
2 802-234C HHCS 7/16-14X2 1/4 GR5
2 802-260C HHCS 1/2-13X7 GR5
4 803-011C NUT LOCK 5/16-18 PLT
2 803-015C NUT HEX 7/16-14 PLT
4 803-019C NUT LOCK 1/2-13 PLT
2 803-020C NUT HEX 1/2-13 PLT
4 803-036C NUT HEX JAM 1/2-13 PLT
2 804-014C WASHER LOCK 7/16 PLT
4 804-015C WASHER LOCK SPRING 1/2 PLT
8 804-017C WASHER FLAT 1/2 USS PLT
4 804-029C WASHER FLAT 1 SAE
4 805-058C PIN COTTER 3/16 X 2
2 810-118C CYL 2.5X20X1.12 ROD (TIE)1 PIN
2 113-200H CHAIN BAR WELDMENT
4 113-311D HINGE PIN
2 113-323D CHAIN BAR
1 113-502M MANUAL 24 & 30 2SNT FF MARKER
2 113-555D MARKER MOUNT PLATE
12 800-082C CABLE TIE .31X21.5 6DIA 120LB
2 802-022C HHCS 3/8-16X1 1/2 GR5
8 802-048C HHCS 1/2-13X9 1/2 GR5
4 802-115C HHCS 5/16-18X2 GR5
2 802-168C HHCS 3/8-16X3 1/4 GR5
2 802-261C HHCS 3/8-16X2 1/2 GR5 FTHD
2 802-417C HHCS 3/8-16X7/8 GR5
4 803-011C NUT LOCK 5/16-18 PLT
8 803-013C NUT LOCK 3/8-16 PLT
24 803-020C NUT HEX 1/2-13 PLT
8 803-027C NUT HEX 3/4-10 PLT
4 804-011C WASHER FLAT 3/8 USS PLT
2 804-013C WASHER LOCK SPRING 3/8 PLT
24 804-015C WASHER LOCK SPRING 1/2 PLT
8 804-023C WASHER LOCK SPRING 3/4 PLT
4 806-005C U-BOLT 1/2-13 X 2 X 3 GR 5
4 806-023C U-BOLT 1/2-13 X 2 1/32 X 3 1/4
4 806-037C U-BOLT 3/4-10 X 8 1/16 X 9 1/2
1 810-197C VALVE,SEQUENCE SHOEMAKER
2 811-133C AD 9/16MJIC 3/4MORB
2 811-169C EL 9/16MJIC 9/16FJIC
4 811-281C EL 3/8FNPT 9/16MORB
4 890-018C UTILITY CLEVIS 5/16
2 811-035C HH1/4R1 252 9/16FJIC 3/8MNPT
2 811-333C HH1/4R1 032 9/16FJIC
2 113-341H NO-TILL MARKER 30' 2ND SECTION
2 113-343H NO-TILL MARKER 30' 3RD SECTION
2 113-378D NO-TILL 30' 4TH SECT TUBE
2 113-319D MARKER CHAIN 30'
8 804-017C WASHER FLAT 1/2 USS PLT
2 811-014C HH1/4R1 288 9/16FJIC 3/8MNPT
4/9/04
■
24- and 30-Foot, No-Till Flat Fold Marker Option 113-502M
11
 Loading...