

Page 1
Great Plains Mfg., Inc.
Installation Instructions
12, 15 and 20 Series Drill
Small Seeds Option
Used with:
1200, 1210 and 1220 Drills
•
1500, 1510 and 1520 Drills
•
2000, 2010 and 2020 Drills
•
When you see this symbol, the subsequent instructions and
warnings areserious - follow withoutexception. Your life and
!
!
the lives of others depend on it!
General Information
These instructions explainhow to install the small-seeds attachment. The small-seeds attachment mounts behind the main drill
box and allows you to evenly seed very fine seeds.
Manual Update
Refer to the drill operator’s manual for detailed information on
safely operating, adjusting, troubleshooting and maintaining the
small-seeds attachment. Refer to the parts manual for part identification.
• 12, 15 and 20 Series Drill Operator’sManual . .118-389M-A
• 12, 15 and 20 Series Drill Parts Manual. . . . . . . . . 118-389P
Definitions
Right and left as used in this manual are determined by facing
the direction the drill will travel in the field.
Assembly Instructions
If drill is outfitted with optional fertilizerbox,referto Small Seeds
with Fertilizer, page 4, for assembly instructions. If drill does not
have an optional fertilizer box, follow these instructions:
Small Seeds without Fertilizer
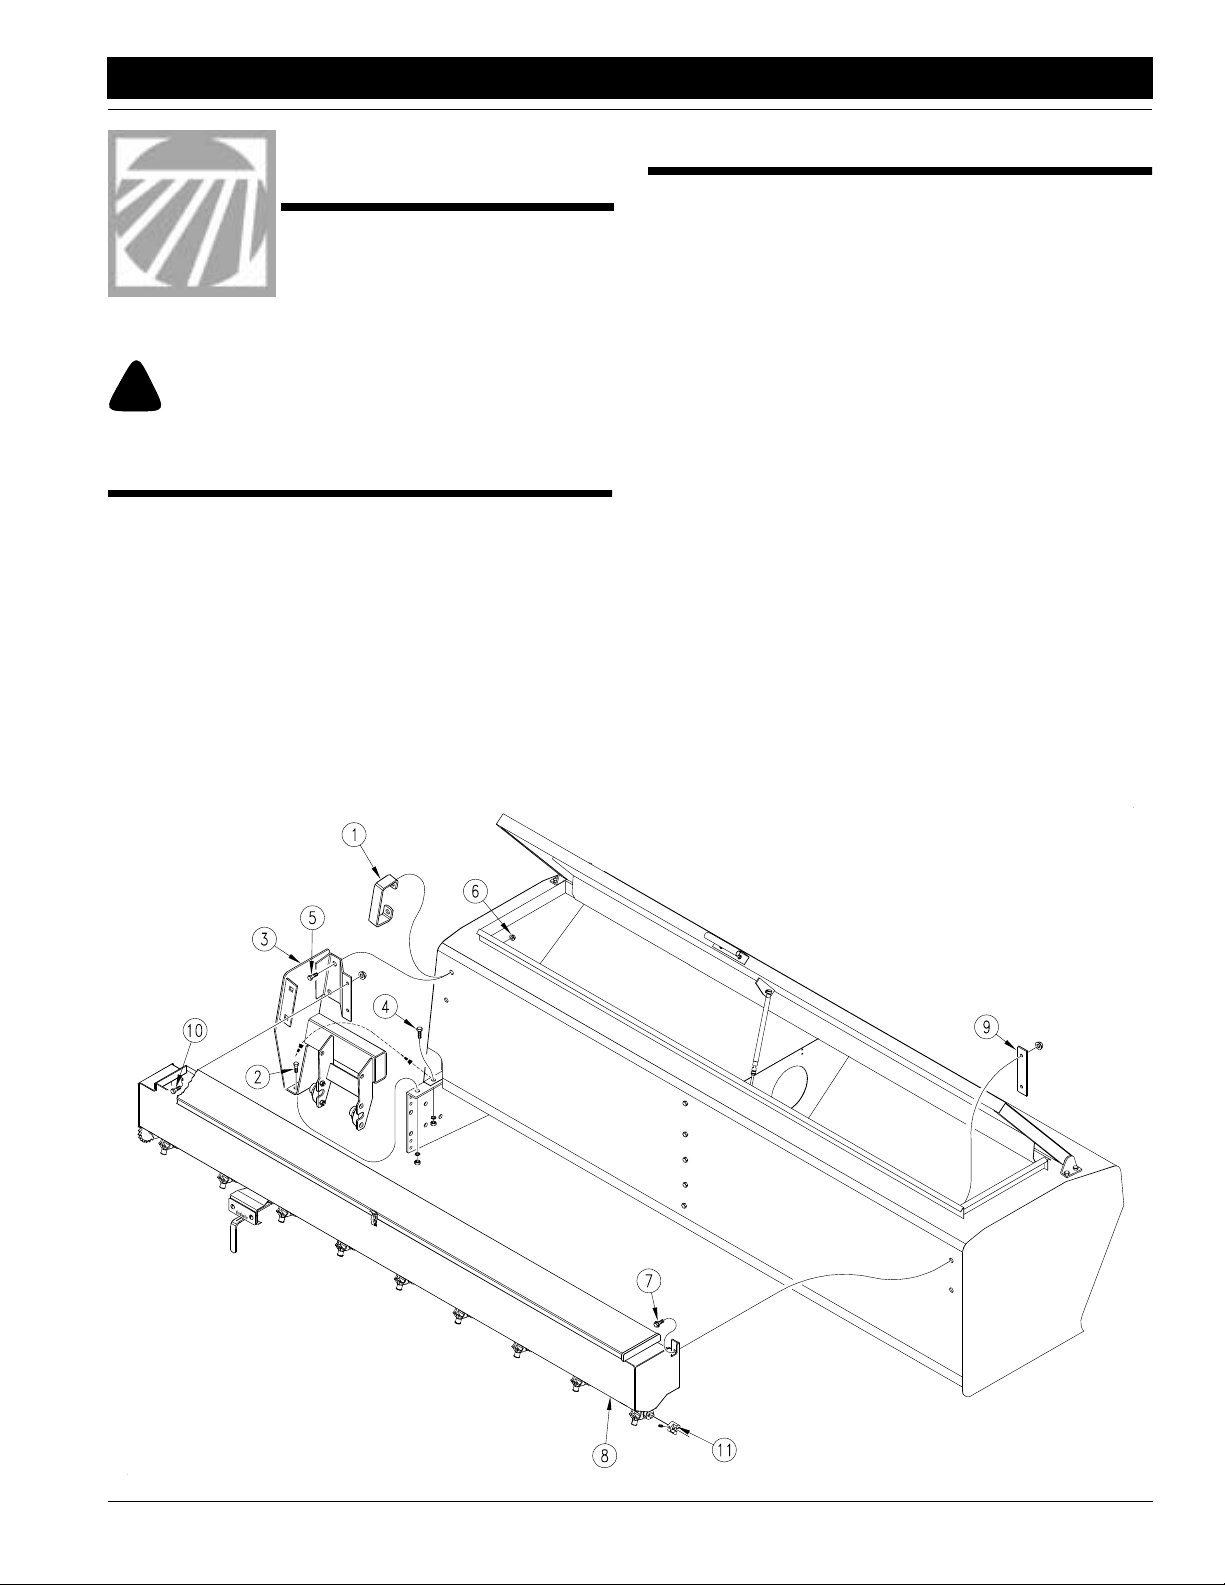
Refer to Figure 1.
1. Remove handles (1) from back side of main drill box. Keep
bolts, nuts and handles forlater use. Remove and save 1/2by-1-inch bolt (2) joining main drill box to drill frame.
2. Install left-hand mount for small-seeds box(3) using 1/2-by1-inchbolt(2)innewhole and 1/2-by-1 1/4-inchbolt(4)supplied in small-seeds kit. Fasten top of mount (3) to rear of
main drill box using handle holes. Use a new 1/2-by-1 1/4inchbolt(5) fromsmall-seedskit. Reuse1/2-inchhex-flange
locknut(6) oninsideof main drill box.Leavemountnutsand
bolts loose.
3. Removefour3/8-by-1-inchhex-flange bolts (7). Save these
bolts and nut for reuse in the same holes.
4. Bolt small-seeds box (8) to main drill box.Atright-hand end
of box, use 3/8-by-1-inch bolts (7) removed in step 3. Also
add reinforcementstrap(9)suppliedinsmall-seeds kit to inside of main drill box. At other end of box, bolt small-seeds
box to mount (3) using 3/8-by-1-inch hex-flange bolts, lock
washer,and nuts (10) supplied in small-seeds kit.
5. On 15- and 20-foot drills, repeat steps to install right-hand
small-seeds box.
6. Tighten all hardware. If you are installing a15-foot box,
check operation of flex coupler where main drill box meet.
Set both boxes at 50 percent open, and make sure that the
earsoncouplers(11)areoverlapping by about 3/8inch(9.5
mm).
12209
© Copyright 1999 Printed 1/23/07
Figure 1
Small-Seeds-Box, No Fertilizer
123-835M
1
Page 2
Assembly
Great Plains Mfg., Inc.
12210
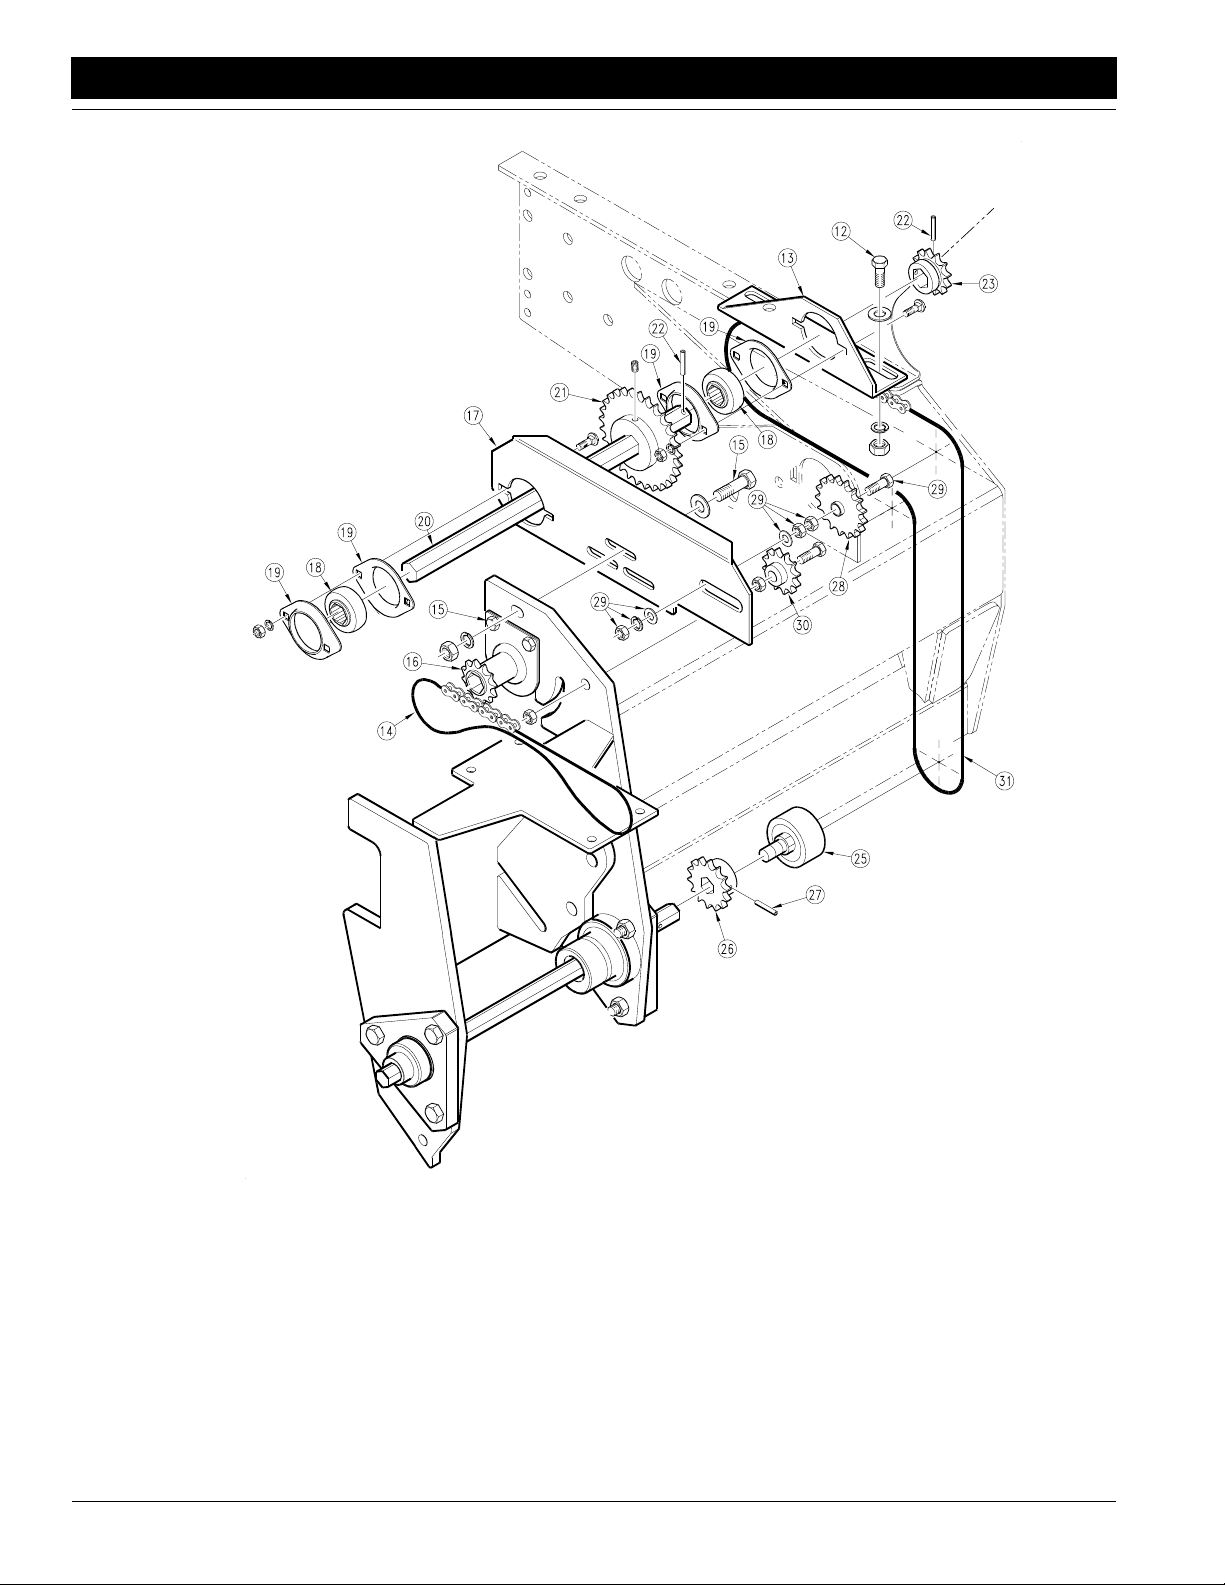
Refer to Figure 2.
1. Workingatfront,left-hand side of drill, removetwo1/2-by-1inch bolts (12) that join main drill box to drill frame. Install
left-hand bearing bracket(13) using 1/2-by-1 1/2-inch bolts
and flat washers from small-seeds kit. Leave these bolts
loose.
2. Relievetension on chain (14) that runs from gearbox-output
sprocket to seed jackshaft. Remove two 3/8-by-1 1/2-inch
bolts (15) that join sprocket and bearing assembly (16) to
gauge-wheel bracket. Bolt long idler plate (17) to gaugewheelbracketreusingtwo 3/8-by-11/2-inch bolts (15)plusa
third from small-seeds kit. Leave these bolts loose for now.
3. Install hex-bore bearings (18) on plates (13 and 17) using
flangettes (19) and hardware as shown.Be careful to place
bearings on side of plates as illustrated.
12, 15 and 20 Series Drill Small Seeds Option 123-835M 1/23/07
2
Front Drive, No Fertilizer
4. Slide 7/8-inch hex jackshaft (20) through hex-bore bearing
mounted above gauge wheel. Slip shaft through 29-tooth
sprocket(21) and into hex-borebearingnearend of box.Secureshaftbydriving a rollpin(22)on outside of bearing (18)
and 12-tooth sprocket(23).
5. Unscrew acremeter (25) from gauge-wheel jackshaft, and
install3/4-inchhexbore,14-tooth sprocket(26) using roll pin
(27). Orient sprocket as shown. Re-install acremeter.
6. Install 17-tooth, ball-bearing idler sprocket (28) on idler plate
(17) using 5/8-by-3 1/2-inch, full-thread bolt, flat washer,lock
washerandjam nut(29).Install plastic 12-toothidlersprocket
(30) on gauge-wheel bracketas shown. Install but do not
tighten 132 pitch, gauge-wheel-drive chain (31).
Figure 2
Page 3

Great Plains Mfg., Inc.
Assembly
Refer to Figure 3.
7. Workingatrearofdrill,installtwoflush-mount bearings (32)
on mount bracketusing 5/16-by-1-inch carriage bolts (33),
nuts and lock washers supplied with small-seeds kit. Install
3/4-inch round jackshaft (34) in bearings and slip two 17tooth sprockets (35 and 36) over shaft as shown.
8. Fasten idler arm (37) to mount bracket using 1/2-by-1 1/4inch carriage bolt (38). Place 12-tooth plastic idler sprocket
(39)onidler.Holdidler inplacewith1/2-inch flatwasher(40)
and cotter pin (41).
9. Align inner 17-tooth sprocket (35) with small-seeds-box
sprocket (42). Install 61-pitch chain (43) and remove chain
slack with idler sprocket.
12212
Figure 3
Rear Drive
Refer to Figure 4.
10. Thread 98-pitch chain (44) back through the cutout in box,
around rear sprocketand back to front 12-tooth sprocket
(45) as shown. After connecting chain, check alignment of
sprocket on rear of drill with sprocket at front. Move rear
sprocket if needed. Totighten this chain move 7/8-inch hex
jackshaft (46) forward by using slots in bearing plates (47
and 48). After removing excess slack, tighten bolts holding
both plates.
11. Tighten idler for gearbox-output chain.
12. Move 17-tooth idler sprocket(28) to removeexcessslack
from chain coming from gauge wheel.
12218
Figure 4
Chain Installation
Refer to Figure 5.
13. Place chain shield (49) over end of small-seeds box. Install
handle (50) using bolt (51) removed in step 1.
14. On 20-foot drills, repeat steps to install drive for right-hand
box.
12211
Figure 5
Handle and Cover Assembly
15. On 20-foot drills, repeat steps to install drive for right-hand
box.
1/23/07
12, 15 and 20 Series Drill Small Seeds Option 123-835M
3
Page 4

Assembly
Great Plains Mfg., Inc.
Small Seeds with Fertilizer
Refer to Figure 6.
1. Working on back, left-hand side of drill, loosen round fertilizerjackshaft(1) in bearings. Slip 12-tooth sprocket(2)onto
jackshafttoposition shown. On 20-footdrills,repeat step for
right-hand side of drill.
13732
Refer to Figure 7.
2. Remove handles (1) from back side of fertilizer box. Save
bolts, nuts and handles.
3. Install left-hand mount (2) forsmall-seeds box using 1/2-by1-inch bolt (3) in walkboardendbracket (4). Place boxspacer (5) between mount (2) and holes for fertilizer-box handles. Use 1/2-by-2 1/4-inch bolts (6) and reuse hex-flange
lock nut (7) on inside of fertilizer box. Leave nuts and bolts
loose.
4. Remove four 3/8-by-1-inch hex flange bolts (8).
5. Atright-handendof box,boltsmall-seeds box(9)to fertilizer
box using the 3/8-by-2-inch hex flange bolts (10) and box
spacer (5). Add reinforcing strap (11) supplied with smallseeds kit to inside of fertilizer box.
6. Onotherend of box,bolt small-seeds boxto mount (2)using
3/8-by-1-inch flange bolts (8) removed in step 4, and lock
washer and hex nut supplied in small-seeds kit.
7. On 15- and 20-foot drills, repeat steps to install right-hand
small-seeds box.
8. Tighten all nuts and bolts.
9. On 15-foot drills, check operation of flexcoupler where boxesmeetincenter of drill. Set both boxesat 50 percent open,
and make sure that the ears on couplers (12) are overlapping by about 3/8 inch (9.5 cm).
Figure 6
Assemble Sprocket on Fertilizer Jackshaft
Figure 7
Small-Seeds Box, with Fertilizer
12, 15 and 20 Series Drill Small Seeds Option 123-835M 1/23/07
4
13736
Page 5

Great Plains Mfg., Inc.
Assembly
Refer to Figure 8.
10. Working on back, left-hand side of drill, install two flushmounted bearings (1) using 5/16-by-1-inch carriage bolts (2)
in bearings. Slip two 17-tooth sprockets (3 and 4) over shaft
as shown.
11. Fasten idler arms (5) to mount bracketusing bolt (6). Place
12-tooth plastic idler sprocket (7) on idler. Hold idler in place
with 1/2-inch flat washer (8) and cotter pin (9).
12. Align outer 17-tooth sprocket (4) with small-seeds-box
sprocket (10). Install 60-pitch chain (11). Remove chain
slack with idler sprocket.
13737
Figure 8
Rear Drive
Refer to Figure 9.
13. Place chain shield (49) over end of box. Install handle (50)
using bolt (51) removed in step 2.
12211
Figure 9
Handle and Cover, with Fertilizer
14. On 20-foot drills, repeat steps to install drive for right-hand
box.
1/23/07
12, 15 and 20 Series Drill Small Seeds Option 123-835M
5
 Loading...