

Great Plains 1300 User Manual

Table of Contents Metric Charts
Manufacturing, Inc.
www.greatplainsmfg.com
Seed, Small Seeds and Fertilizer Rate Charts
for the 1300 and 1300F 13-Foot End Wheel Drill
The following pages are to assist in the proper setting of seeding and
fertilizer rates for the 1300 and 1300F. The rates indicated in the charts
are approximate. To assure the most accurate seeding, it is
recommended that the drill be calibrated for the desired seed at the time
of planting.
ORIGINAL INSTRUCTIONS
© Copyright 2008 Printed 2014-03-10 175-157B
EN

ii 1300 and 1300F Cover Metric Charts Great Plains Mfg., Inc.
Table of Contents
Introduction .................................................................. 1
Drill models covered by this manual .............................. 1
Document Family ........................................................... 1
Main Box Seed Rate..................................................... 2
Setting Drive Type ..........................................................3
Changing Drive Type ............................................. 3
Main Box Seed Rate Handle...........................................4
Position Seed Cup Doors................................................4
Main Seed Row Shutoff ..................................................4
Reading a Seed Rate Chart............................................5
Main Box Seed Rate Calibration.....................................6
Main Box Seed Rate Charts .......................................... 8
Alfalfa or Rape ........................................................... 8
Barley (1 of 3) ............................................................ 8
Buckwheat ................................................................. 8
Buffalograss (1 of 4)................................................... 9
Flax or Sudan............................................................. 9
Millet......................................................................... 10
Milo .......................................................................... 10
Peas......................................................................... 10
Pinto Beans.............................................................. 11
Rice, Short Grain (1 of 2) ......................................... 11
Rice, Long Grain (1 of 4).......................................... 11
Rye........................................................................... 12
Soybeans (1 of 4)..................................................... 12
Sunflower ................................................................. 13
Wheat (1 of 2) .......................................................... 13
Wheatgrass.............................................................. 14
Small Seeds Rate ....................................................... 15
Small Seeds Rate Calibration .......................................15
Small Seeds Row Shut-Off .................................. 17
Small Seeds Rate Charts............................................. 18
Alfalfa, Red Alsike, Crimson Clover ......................... 18
Kentucky Bluegrass,
Fescue, Annual Rye Grass .................................. 18
Bermuda, Red Top, Lespedeza Unhulled,
Sercia, Sand, Weeping Love Grass ..................... 18
Red & Sweet Clover, Lespedeza Hulled.................. 18
Orchard Grass ......................................................... 18
Millet, Reed Canary ................................................. 19
Ladino Clover, Canary Grass,
Timothy, Canola....................................................19
Birdsfoot, Trefoil, Sudan ...........................................19
Fertilizer Rate..............................................................20
Setting Fertilizer Rate ...................................................20
Adjusting for Density..................................................... 20
Setting Fertilizer Drive Range....................................... 21
Setting High Range...............................................21
Setting Low Range ...............................................21
Setting Fertilizer Transmission .....................................22
Fertilizer Rate Calibration ............................................. 22
Fertilizer Rate Chart .....................................................25
Appendix .....................................................................26
Metric Rate Charts, Main Seed Box .............................26
Alfalfa or Rape ..........................................................26
Barley (1 of 3) ...........................................................26
Buckwheat ................................................................26
Buffalograss (1 of 4) .................................................27
Flax or Sudan ...........................................................27
Millet .........................................................................28
Milo ...........................................................................28
Peas..........................................................................28
Pinto Beans ..............................................................29
Rice, Short Grain (1 of 2)..........................................29
Rice, Long Grain (1 of 4) ..........................................29
Rye ...........................................................................30
Soybeans (1 of 4) .....................................................30
Sunflower..................................................................31
Wheat (1 of 2) ...........................................................31
Wheatgrass...............................................................32
Metric Rate Charts, Small Seeds Box ..........................32
Alfalfa, Red Alsike, Crimson Clover..........................32
Kentucky Bluegrass,
Fescue, Annual Rye Grass...................................32
Bermuda, Red Top, Lespedeza Unhulled,
Sercia, Sand, Weeping Love Grass......................32
Red & Sweet Clover, Lespedeza Hulled...................32
Orchard Grass ..........................................................33
Millet, Reed Canary ..................................................34
Ladino Clover, Canary Grass,
Timothy, Canola....................................................34
Birdsfoot, Trefoil, Sudan ...........................................34
© Copyright 2003, 2004, 2006, 2008 All rights Reserved
Great Plains Manufacturing, Inc. provides this publication “as is” without warranty of any kind, either expressed or implied. While every precaution has
been taken in the preparation of this manual, Great Plains Manufacturing, Inc. assumes no responsibility for errors or omissions. Neither is any liability
assumed for damages resulting from the use of the information contained herein. Great Plains Manufacturing, Inc. reserves the right to revise and improve its products as it sees fit. This publication describes the state of this product at the time of its publication, and may not reflect the product in the
future.
175-157B Cover Metric Charts 2014-03-10
Trademarks of Great Plains Manufacturing, Inc. include: Singulator Plus, Swath Command, Terra-Tine.
Registered Trademarks of Great Plains Manufacturing, Inc. include:
Air-Pro, Clear-Shot, Discovator, Great Plains, Land Pride, MeterCone, Nutri-Pro, Seed-Lok, Solid Stand,
Terra-Guard, Turbo-Chisel, Turbo-Chopper, Turbo Max, Turbo-Till, Ultra-Till, Ver ti-Till, Whirlfilter, Yield-Pro.
Brand and Product Names that appear and are owned by others are trademarks of their respective owners.
Printed in the United States of America

Great Plains Manufacturing, Inc. Table of Contents Metric Charts 1
Introduction
This manual is your guide to planter adjustments for
achieving specific seed population and fertilizer density
targets.
Although some setup/adjustment material herein is
repeated from the drill Operator Manual, you need to be
thoroughly familiar with drill operations and adjustments
before applying this Seed Rate manual and its table data.
Drill models covered by this manual
1300:
1300-1610 10 inch / 24 cm
1300-2175 7.5 inch / 19 cm spacing
1300-2606 6 inch / 15 cm
1300F:
1300F-1610 10 inch / 24 cm
1300F-2175 7.5 inch / 19 cm spacing
1300F-2606 6 inch / 15 cm
Document Family
175-157M 1300 & 1300F Operator Manual
175-157P 1300 & 1300F Parts Manual
175-157B Seed Rate Manual (this document)
2014-03-10 Table of Contents Metric Charts 175-157B
2 1300 and 1300F Table of Contents Metric Charts Great Plains Manufacturing, Inc.
Main Box Seed Rate
Accurately obtaining the desired seed population
requires four steps:
1. Setting Drive Type sprockets (from chart)
2. Setting initial Seed Rate Handle (from chart)
3. Positioning Seed Cup Door (by seed type)
4. Calibration: checking predicted seeding rate
Main box seed rate charts begin on page 8. The charts
list proper sprocket pairings and seed-rate-handle
settings for various seeds and seeding rates.
The seed-rate charts are based on cleaned, untreated
seed of average size and test weight. The charts are
based on 7.5 x 20, 4-ply Rib Implement end wheel tires,
inflated to factory specification. Many factors affect
seeding rates including foreign material, seed treatment,
seed size, seed weight, field conditions, tire pressure
and test weight.
Use the charts only as a starting point. Minor
adjustments are commonly required. Set and check the
seeding rate using the procedures following, then
readjust the rate as necessary.
175-157B Table of Contents Metric Charts 2014-03-10

Great Plains Manufacturing, Inc. Table of Contents Metric Charts Main Box Seed Rate 3
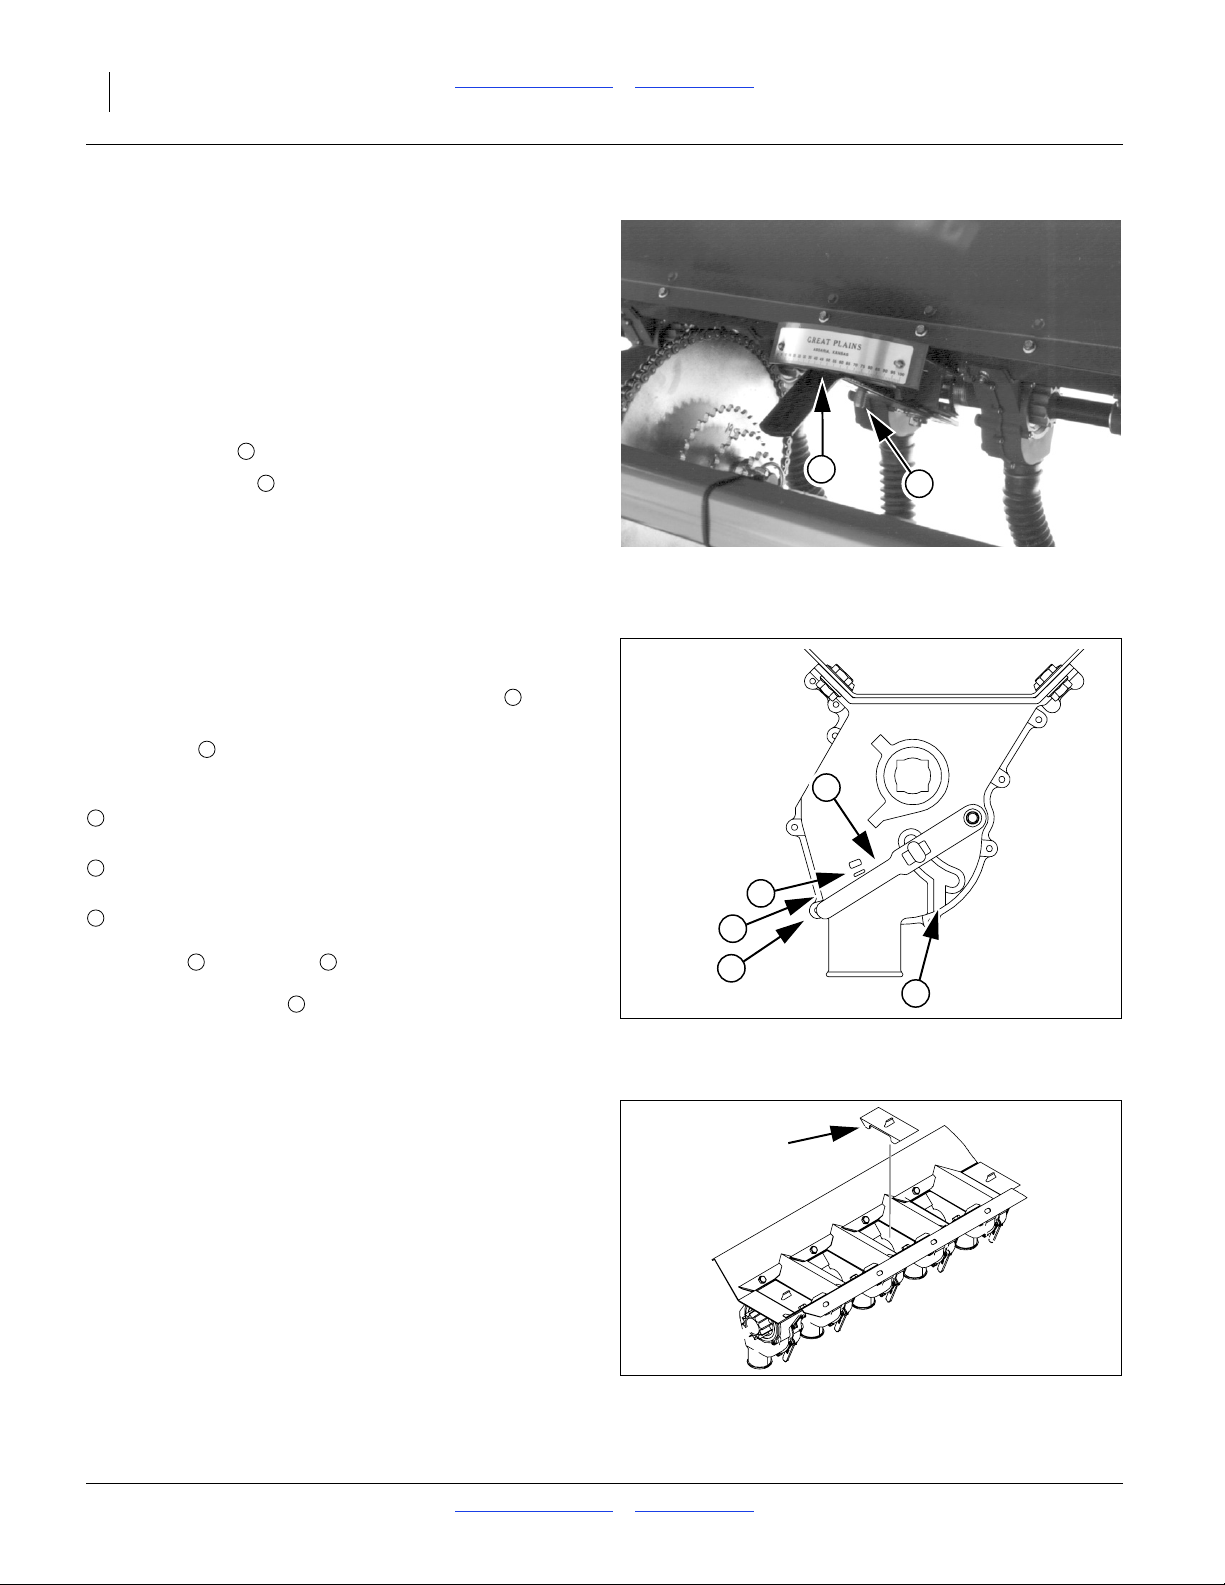
Setting Drive Type
Refer to Figure 1 and Figure 2
Drive Type is determined by the size (tooth count) of a
sprocket on the seed jackshaft .
For correct Drive Type, refer to the charts beginning on
page 8. The charts list Drive Types as 1, 2, 3 or 4. Each
Drive Type corresponds to a specific sized sprocket, per
the table below, and Figure 1.
1
Drive
Type
Changing Drive Type
1. Loosen top tightening idler and slide idler well aft,
2. Lift drive chain off sprocket currently in use.
3. Remove lynch pin and rearrange sprockets on
4. Remount drive chain on the innermost (Drive Type)
5. Re-engage top idler and secure. Allow1⁄2inch
Sprocket Relative Speed
1 72 Tooth Slowest
2 34 Tooth 2.12 times faster than Type 1
3 23 Tooth 3.13 times faster than Type 1
4 14 Tooth 5.14 times faster than Type 1
2
particularly if changing to Drive Type 1.
3
4 5
jackshaft .
• Sprocket corresponding to the required Drive Type
is innermost.
• Sprockets have offset hubs. On the driven drive
type sprocket, orient the longer hub side to drill
right (toward the bearing).
• Make sure all 4 sprockets are accounted for when
remounting them on the shaft. No particular hub
orientation is required for the sprockets in storage.
sprocket.
(1.3 cm) slack in longest (top) span of chain.
1
2
Figure 1
Drill Drive Type Decal
818-826C
4
3
1
5
Figure 2
Drive Type 1 Configured
2014-03-10 Table of Contents Metric Charts 175-157B
16650
4 1300 and 1300F Table of Contents Metric Charts Great Plains Manufacturing, Inc.
Main Box Seed Rate Handle
There is a single seed rate handle for the entire the drill.
The seed rate handle controls the percent engagement
of the seed sprocket in each seed cup. The initial setting
of the handle is given by the Seed Rate Chart.
Note: You can temporarily stop seed flow to the drill (such
as for adjusting level and depth) by setting the
handle to zero.
To set the handle:
Loosen wing nut under handle.
6. Move indicator from current setting to about 10
past the new desired value from calibration or the
Seed Rate Chart, then move it back to the new
desired value.
7. Tighten wing nut.
1
2
2
Figure 3
Seed Rate Handle
1
16653
Position Seed Cup Doors
Refer to Figure 4,
which depicts the seed cup door handle in position .
At each main seed box seed tube, adjust the seed cup
door handle for the seed size.
The handle has three normal operating position detents:
(top detent) is for the smallest seeds.
1
Use it for wheat and similar small seeds.
(middle detent) is for larger seeds.
2
Use it for soybeans and similar larger seeds.
(bottom detent) is for oversize or fragile seeds.
3
If you experience excessive cracking with
setting , use setting .
Note: Handle position is used for clean-out, not
4
2 3
5
planting. If set to this position with seed loaded, it
may be difficult to reset it to a normal operating
position.
3
4
1
2
3
5
Figure 4
Seed Cup Door Handle
26211
Main Seed Row Shutoff
If alternate row spacings are desired, the unused rows
can be shut off with optional plugs (see Operator
Manual).
Clean-out seed. The seed box must be empty prior to
inserting plugs. See “Main Box Clean-Out” in Operator
Manual.
8. Insert one plug at each row to shut off. Verify the
seed hose path before inserting the plug, as some
hoses do not make a strictly vertical drop to their row
units.
9. Review seed rate settings prior to planting. Perform
calibration calculations with the actual active row
count.
175-157B Table of Contents Metric Charts 2014-03-10
Figure 5
Seed Cup Plug
26279
Great Plains Manufacturing, Inc. Table of Contents Metric Charts Main Box Seed Rate 5
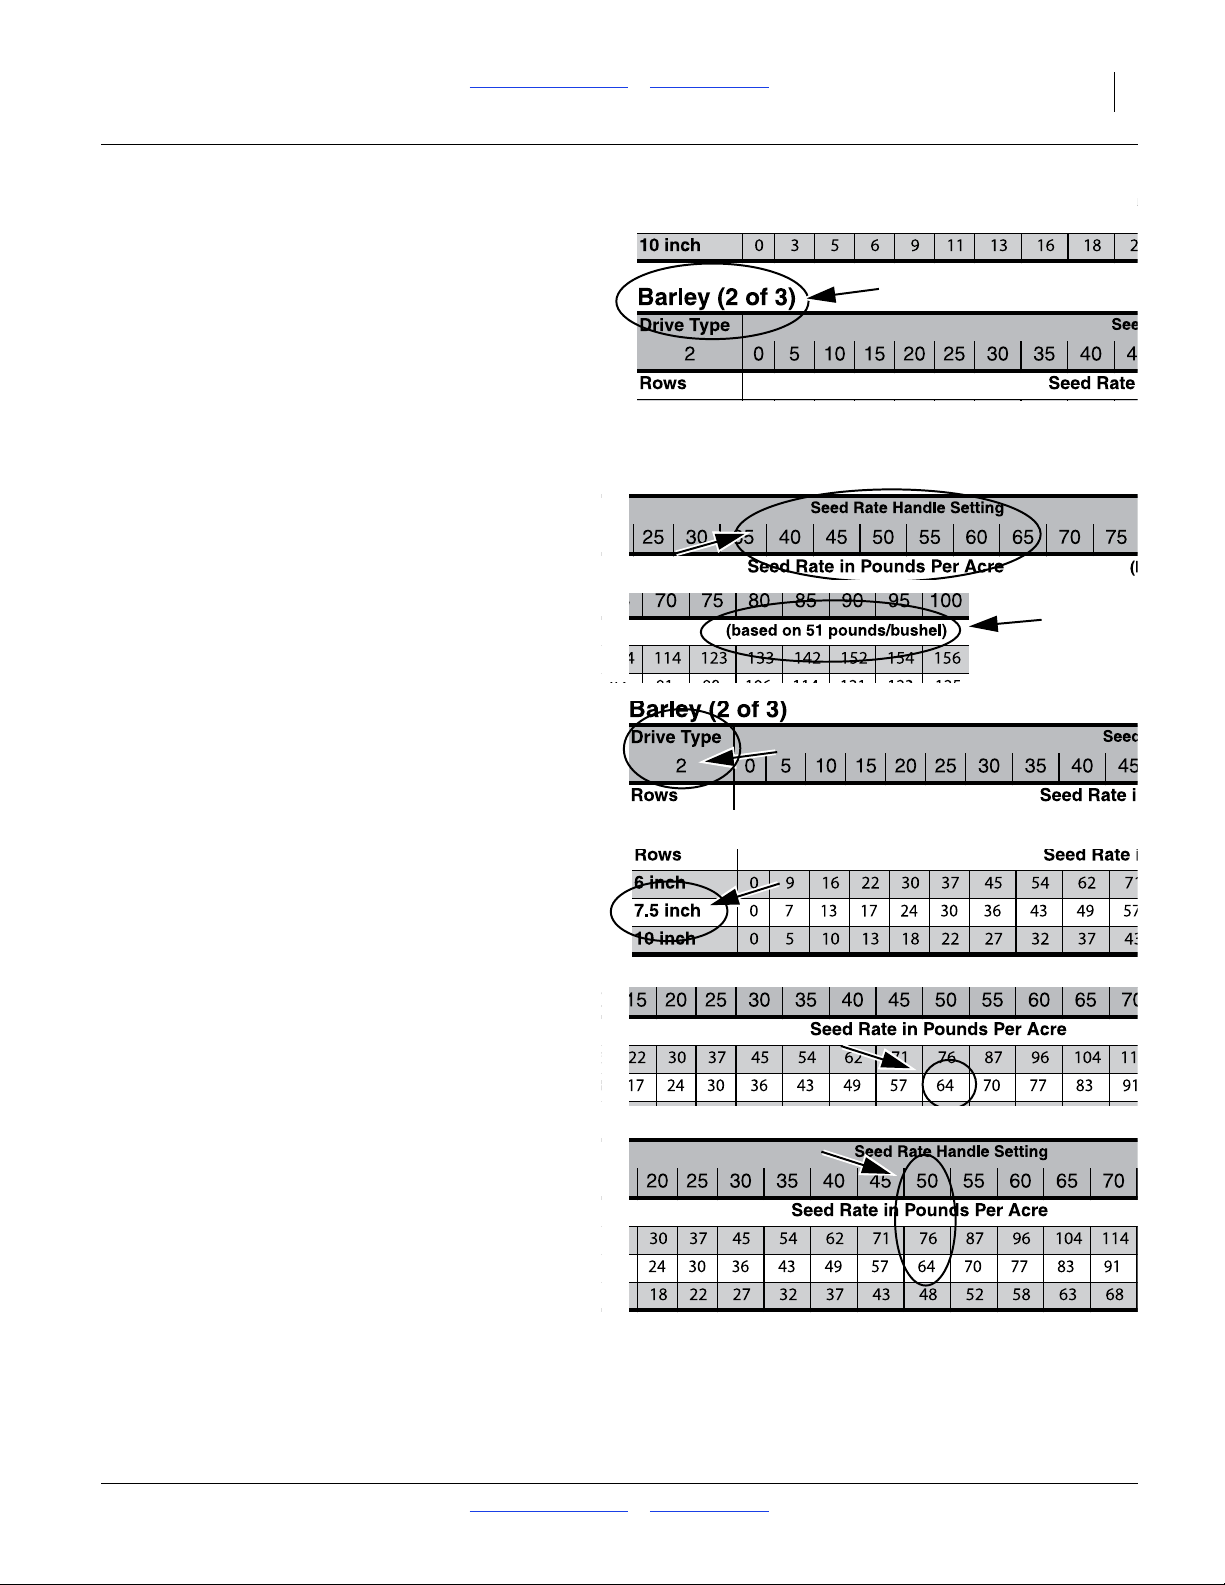
Reading a Seed Rate Chart
Find your seed. Charts are in alphabetical
order by seed name. Charts covering
more than one seed may be out of order.
For Rape, see Alfalfa.
For Sudan, see Flax.
The example presumes you desire to
plant:
Barley at 60 pounds per acre with a 7.5 inch drill.
There are multiple charts for some seeds, and the
rates may overlap. Use the chart where your desired
rate is closest to 50 on the Seed Rate Handle scale.
In our example, that would be Barley chart 2 of 3.
If your seed is not listed, find one with similar size,
shape and density. Density of the test seed used to
develop the chart appears under the right end of the
handle scale values.
10. Note the Drive Type in the upper left corner of the
chart for your seed. This number (1-4) is used to
determine the seed jackshaft sprocket. See page 3.
In the example, this is
Drive Type 2 (34T sprocket).
11. Find your row spacing in the far left column.
12. Locate your desired seed rate in the table row for
your row spacing.
In the example the rate closest to 60 is:
64
13. Note the Seed Rate Handle setting required, at the
top of the column at that seed rate. This is the initial
value set on the Seed Rate Handle. See page 4.
In the example, start with a handle setting of:
50 (or interpolate to 47),
and calibrate. When a target rate falls halfway
between handle settings, you can adjust the handle
slightly to compensate, as in the example, but
calibration is apt to result in further adjustment
anyway.
2014-03-10 Table of Contents Metric Charts 175-157B

6 1300 and 1300F Table of Contents Metric Charts Great Plains Manufacturing, Inc.
Main Box Seed Rate Calibration
Differences will exist between the tested seed and field
conditions used to generate the Seed Rate Charts, and
your seed and conditions. To accurately achieve your
target population, Great Plains recommends calibrating.
Perform the calibration with opener frames lowered (if
the openers are raised, the clutch disengages). Leave
the tractor hitched for movement control.
Estimate the sample sizes.
Take your planned population (in our example,
barley at 60 pounds per acre
and divide it by the row count of your drill
21 in our example.
The expected sample size is 2.9 pounds per row, or
8.6 pounds for 3 sample rows.
14. To perform this calibration, you need a scale that is
accurate near the aggregate sample size, and three
(3) light-weight containers, each capable of holding a
row’s sample.
15. Disengage the lock-out hub (see Operator Manual),
to permit independent rotation of the main jackshaft.
Refer to Figure 6
16. Remove the calibration crank from its storage stob
on the left top side of the main toolbar. Store the
retaining pin on the stob.
Refer to Figure 7
17. Place the hex socket of the crank on the left end of
the main jackshaft.
18. Pull the seed hoses off the top of three opener seed
tubes, at the top of the openers. Place the hoses into
each sample container.
19. If not already done, set the Drive Type, Seed Rate
Handle and Seed Cup Doors across the drill. If
fertilizer is loaded, remove the fertilizer drive chain
(unless you are simultaneously calibrating fertilizer
rate).
20. Load seed above the rows to be sampled. Load well
more than the expected sample size.
21. Rotate the crank several turns counter-clockwise to
ensure that the drives and seed cups are engaged,
working properly, free from foreign material, and that
seed is flowing steadily from the meters. Stop.
22. Note the current reading of the acremeter, unless
you do not plan to rely on it for the calibration.
23. Empty the sample containers back into the seed box.
24. Record the weight of the empty containers and place
them back under the three hoses to gather metered
seed.
Figure 6
Calibration Crank Stored
Figure 7
Calibration Crank Engaged
For example:
on a drill with a row spacing of:
7.5 inches
and row count of:
21
you desire to plant barley at:
60 pounds per acre
which, from the chart, is an initial Seed Rate Handle
scale setting of:
47 (interpolating from 50)
For example:
three empty 1.8 pound containers weigh:
5.4 lbs
16651
16652
175-157B Table of Contents Metric Charts 2014-03-10

Great Plains Manufacturing, Inc. Table of Contents Metric Charts Main Box Seed Rate 7
25. Turn crank at approximately 23 rpm until one acre is
tallied on acremeter. While turning, check that cups
have ample seed coming into them.
Row Spacing Rotations Per Acre (Ha)
6 inch (15.2 cm) 134 (331) rotations
7.5 inch(19.1 cm) 133 (329) rotations
10 inch (25.4 cm) 131 (324) rotations
26. Weigh metered seed. Subtract initial weight of
container(s)
27. Divide the net seed weight by three. Multiply by
number of openers on your drill to determine the
total of pounds-per-acre seeded.
28. The Seed Rate Handle scale is a percentage of
meter opening, and its effect is linear near scale
center. Calculate a new scale setting based on the
test.
Set the Seed Rate Handle to the new scale setting.
29. You may want to repeat calibration procedure at the
new setting if your results varied greatly from the
Seed Rate Chart, or if you must operate near the
ends of the Seed Rate handle scale (0-20 or
90-100).
30. With calibration complete, store calibration crank, reengage lock-out hub, reinstall fertilizer chain (if
removed) and reconnect seed hoses.
31. Check that your end-wheel tires are 7.5 x 20, 4-ply
Rib Implement and properly inflated. See “Tire
Inflation Chart” in Operator Manual.
When drilling, check seeding rate by noting acres drilled,
amount of seed added to drill and seed level in drill box.
If you are seeding more or less than desired, adjust rate
slightly to compensate for field conditions.
Crank rotations for one acre:
133
23 rpm (2.6 sec/rev) simulates a 6.5 mph (10.4 kph)
planting speed.
NetWeight GrossWeight ContainerWeights–=
For example: the containers weighed a total of 13.7
pounds after test:
8.3 pounds net
8.3 13.7 5.4–=
NetWeight
MeasuredRate
------------------------3
OpenerCount×=
For example:
on the 21-row 7.5in drill:
58 lbs/ac
8.3
NewScale
------ -
21×=
3
--------------------------------- MeasuredRate
TargetRate
OldScale×=
58.1
For example:
the target rate was 60 lbs/ac, and the initial scale 47:
the new scale setting is:
49
60
---- -
48.6
58
47×=
2014-03-10 Table of Contents Metric Charts 175-157B
8 1300 and 1300F Table of Contents Metric Charts Great Plains Manufacturing, Inc.
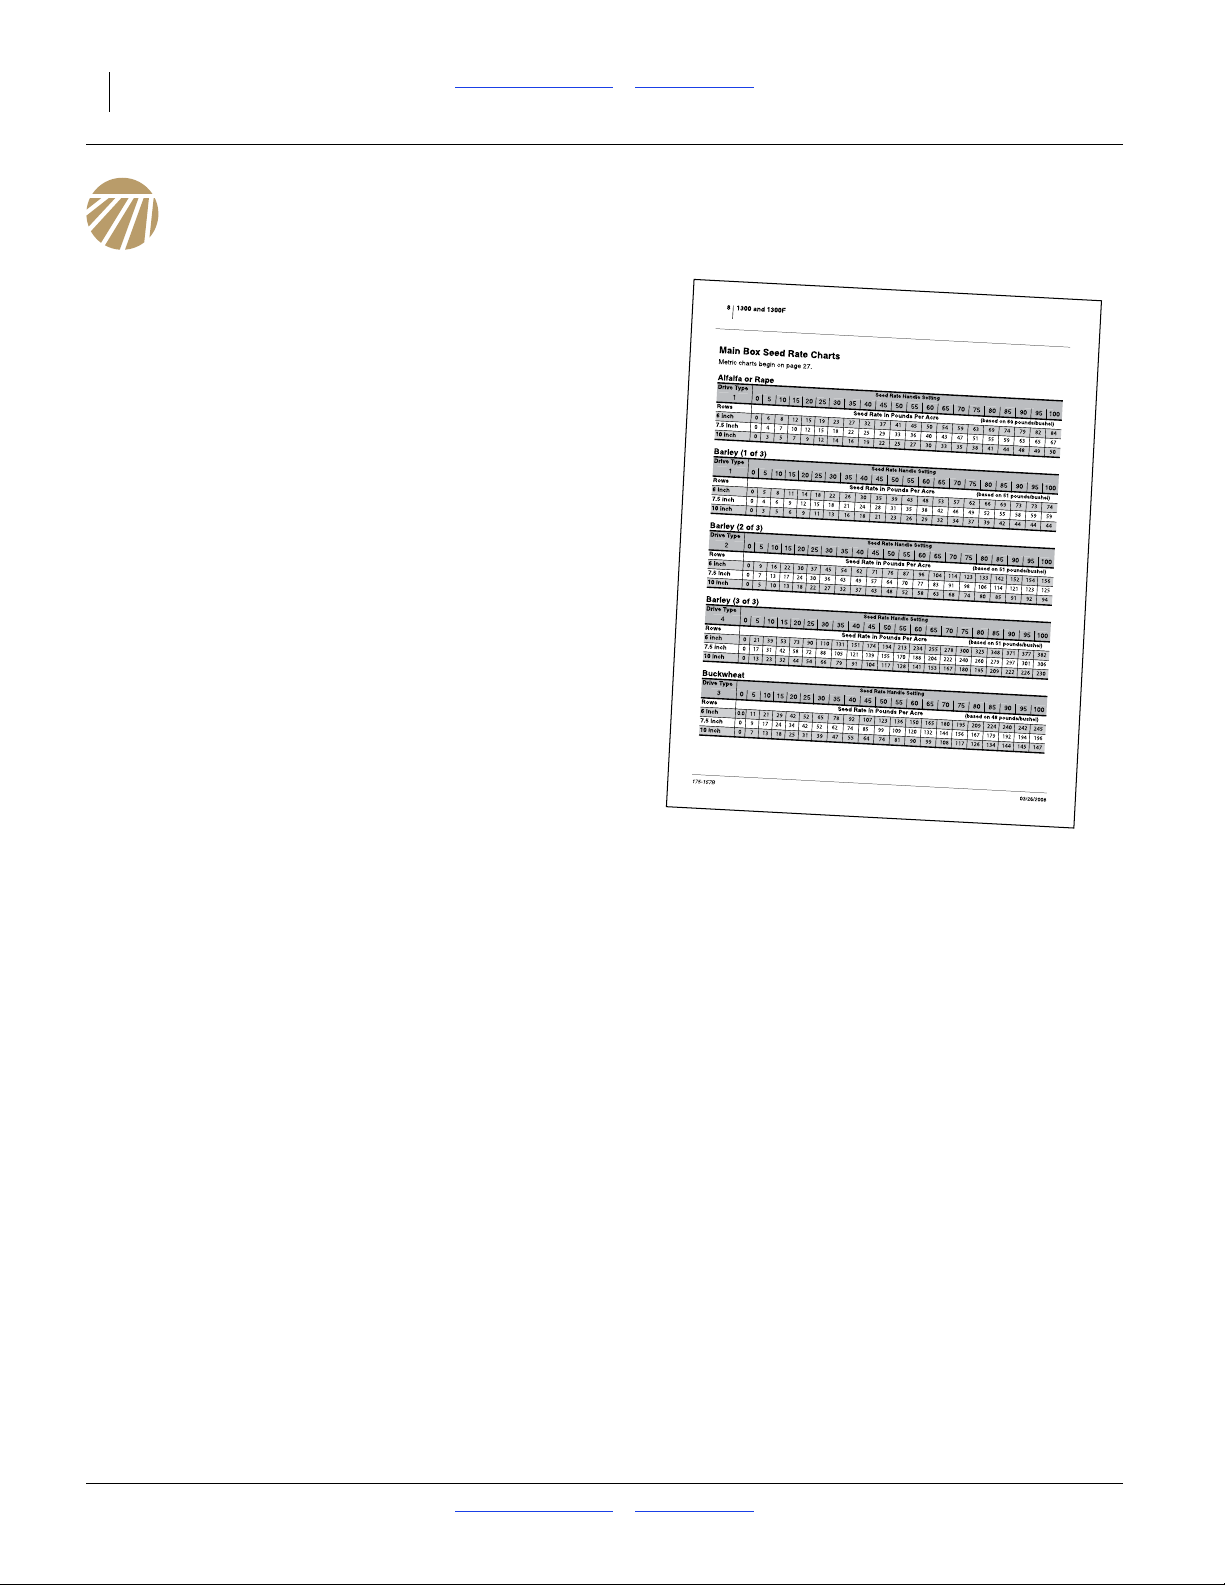
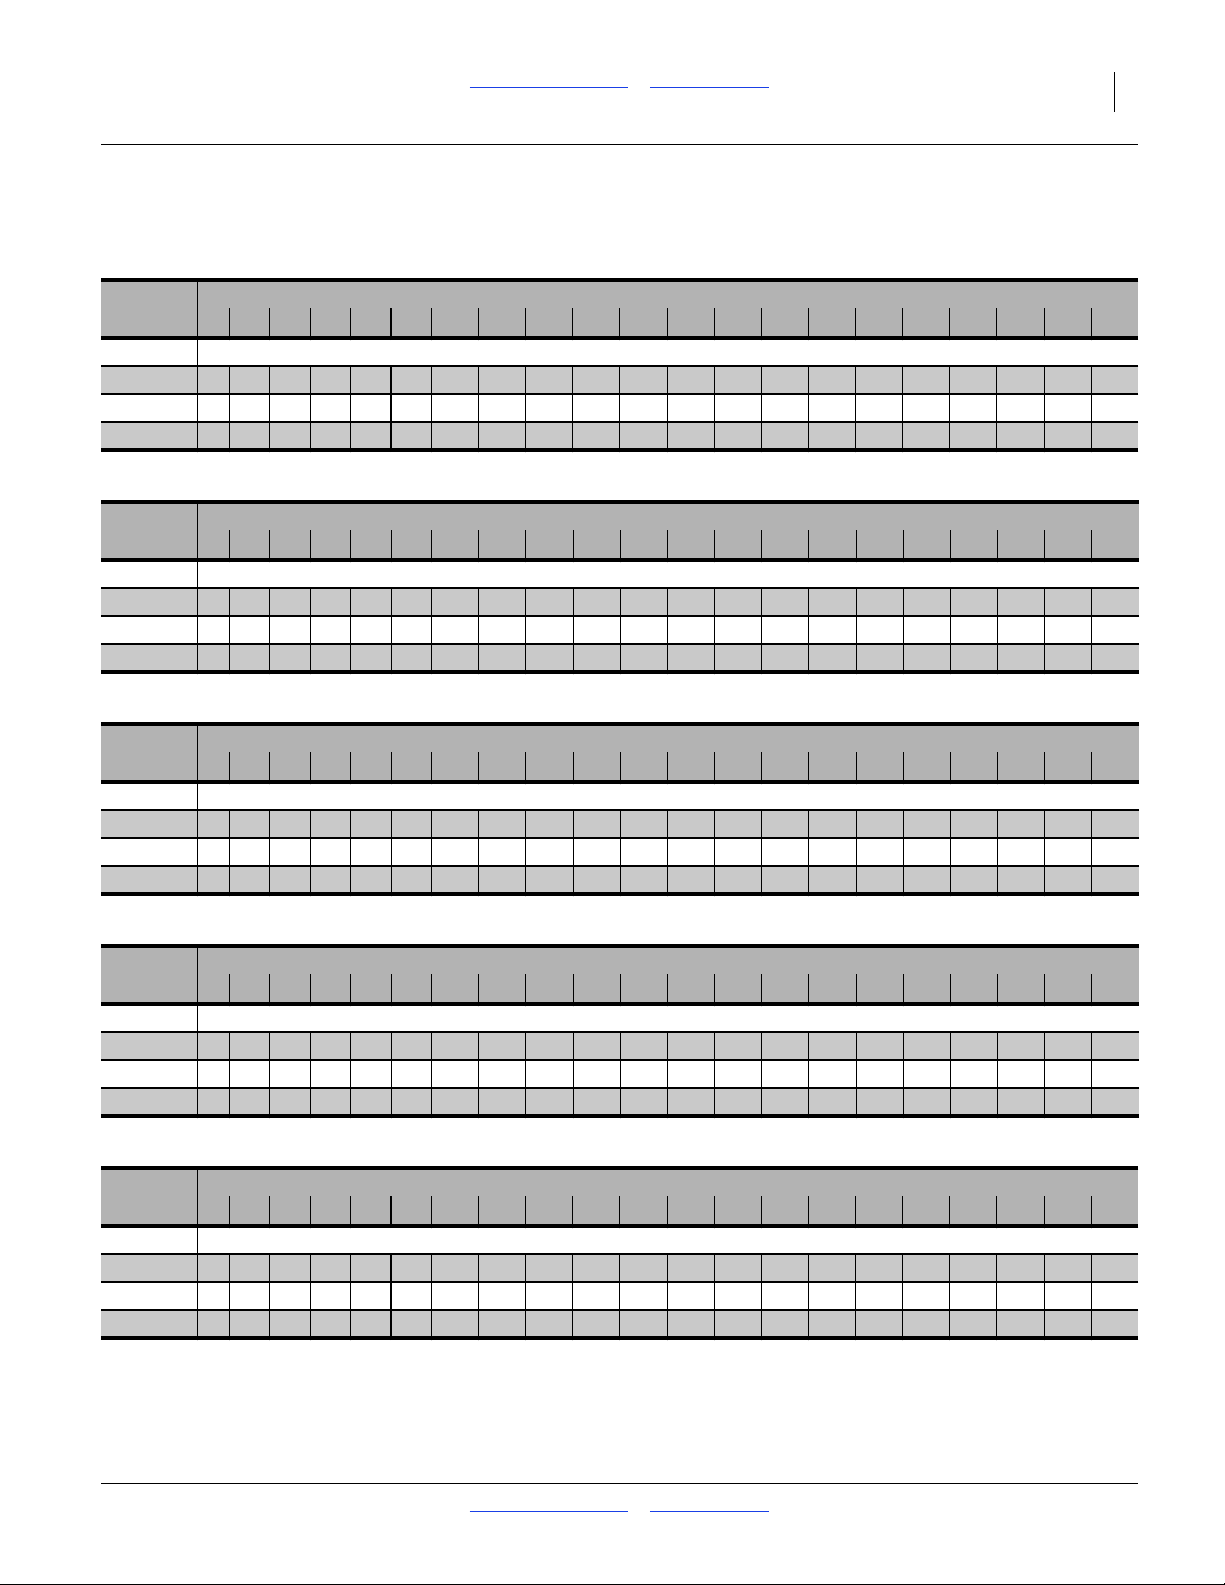
Main Box Seed Rate Charts
U.S customary units. Metric charts begin on page 26.
Alfalfa or Rape
Drive Type
1 0 5 10 15 20 25 30 35 40 45 50 55 60 65 70 75 80 85 90 95 100
Rows Seed Rate in Pounds Per Acre (based on 60 pounds/bushel)
6 inch 0 6 8 12 15 19 23 27 32 37 41 45 50 54 59 63 69 74 79 82 84
7.5 inch 04 7101215182225293336404347515559636567
10 inch 0 3 5 7 9 12 14 16 19 22 25 27 30 33 35 38 41 44 48 49 50
Barley (1 of 3)
Drive Type
1 0 5 10 15 20 25 30 35 40 45 50 55 60 65 70 75 80 85 90 95 100
Rows Seed Rate in Pounds Per Acre (based on 51 pounds/bushel)
6 inch 0 5 8 11 14 18 22 26 30 35 39 43 48 53 57 62 66 69 73 73 74
7.5 inch 0 4 6 9 12 15 18 21 24 28 31 35 38 42 46 49 52 55 58 59 59
10 inch 0 3 5 6 9 11 13 16 18 21 23 26 29 32 34 37 39 42 44 44 44
Seed Rate Handle Setting
Seed Rate Handle Setting
Barley (2 of 3)
Drive Type
2 0 5 10 15 20 25 30 35 40 45 50 55 60 65 70 75 80 85 90 95 100
Rows Seed Rate in Pounds Per Acre (based on 51 pounds/bushel)
6 inch 0 9 16 22 30 37 45 54 62 71 76 87 96 104 114 123 133 142 152 154 156
7.5 inch 0 7 13 17 24 30 36 43 49 57 64 70 77 83 91 98 106 114 121 123 125
10 inch 0 5 10 13 18 22 27 32 37 43 48 52 58 63 68 74 80 85 91 92 94
Seed Rate Handle Setting
Barley (3 of 3)
Drive Type
4 0 5 10 15 20 25 30 35 40 45 50 55 60 65 70 75 80 85 90 95 100
Rows Seed Rate in Pounds Per Acre (based on 51 pounds/bushel)
6 inch 0 21 39 53 73 90 110 131 151 174 194 213 234 255 278 300 325 348 371 377 382
7.5 inch 0 17 31 42 58 72 88 105 121 139 155 170 188 204 222 240 260 279 297 301 306
10 inch 0 13 23 32 44 54 66 79 91 104 117 128 141 153 167 180 195 209 222 226 230
Seed Rate Handle Setting
Buckwheat
Drive Type
3 0 5 10 15 20 25 30 35 40 45 50 55 60 65 70 75 80 85 90 95 100
Rows Seed Rate in Pounds Per Acre (based on 48 pounds/bushel)
6 inch 0.0 11 21 29 42 52 65 78 92 107 123 136 150 165 180 195 209 224 240 242 245
7.5 inch 0 9 17 24 34 42 52 62 74 85 99 109 120 132 144 156 167 179 192 194 196
10 inch 0 7 13 18 25 31 39 47 55 64 74 81 90 99 108 117 126 134 144 145 147
Seed Rate Handle Setting
175-157B Table of Contents Metric Charts 2014-03-10
Great Plains Manufacturing, Inc. Table of Contents Metric Charts Main Box Seed Rate 9
Seed Rate Charts, Main Box, continued...
Buffalograss (1 of 4)
Drive Type
1 0 5 10 15 20 25 30 35 40 45 50 55 60 65 70 75 80 85 90 95 100
Rows Seed Rate in Pounds Per Acre (based on 23 pounds/bushel)
6 inch 0 2 3 4 5 7 8 10 12 14 16 18 19 21 22 23 23 25 25 26 25
7.5 inch 0 1 2 3 4 5 7 8 10 11 13 14 15 17 18 19 20 20 20 20 20
10 inch 0 1 2 2 3 4 5 6 7 8 9 11 12 12 13 14 15 15 15 15 15
Buffalograss (2 of 4)
Drive Type
2 0 5 10 15 20 25 30 35 40 45 50 55 60 65 70 75 80 85 90 95 100
Rows Seed Rate in Pounds Per Acre (based on 23 pounds/bushel)
6 inch 0 3 5 8 11 14 17 21 25 29 32 36 39 43 46 48 50 51 52 52 52
7.5 inch 0 2 4 6 8 11 14 17 20 23 26 29 32 34 36 38 40 41 42 42 41
10 inch 0 2 3 5 6 8 10 13 15 17 19 22 24 26 27 29 30 31 31 31 31
Seed Rate Handle Setting
Seed Rate Handle Setting
Buffalograss (3 of 4)
Drive Type
3 0 5 10 15 20 25 30 35 40 45 50 55 60 65 70 75 80 85 90 95 100
Rows Seed Rate in Pounds Per Acre (based on 23 pounds/bushel)
6 inch 0 6 8 11 15 20 25 30 36 42 48 53 59 64 69 73 76 79 80 81 80
7.5 inch 0 5 7 9 12 16 20 24 29 34 38 43 47 51 55 58 61 63 64 65 64
10 inch 0 3 5 7 9 12 15 18 22 25 29 32 36 38 41 44 46 47 48 48 48
Seed Rate Handle Setting
Buffalograss (4 of 4)
Drive Type
4 0 5 10 15 20 25 30 35 40 45 50 55 60 65 70 75 80 85 90 95 100
Rows Seed Rate in Pounds Per Acre (based on 23 pounds/bushel)
6 inch 0 9 13 19 25 33 41 50 59 68 78 87 96 104 112 118 124 128 131 131 130
7.5 inch 0 7 11 15 20 26 33 40 47 55 62 70 77 83 90 95 99 102 104 105 104
10 inch 0 6 8 11 15 20 25 30 35 41 47 52 58 63 67 71 74 77 78 79 78
Seed Rate Handle Setting
Flax or Sudan
Drive Type
1 0 5 10 15 20 25 30 35 40 45 50 55 60 65 70 75 80 85 90 95 100
Rows Seed Rate in Pounds Per Acre (based on 55 pounds/bushel)
6 inch 0 4 8 12 16 20 24 28 33 37 42 46 50 54 59 65 70 76 82 83 85
7.5 inch 0 3 7 9 13 16 19 23 26 30 34 37 40 44 47 52 56 61 66 67 68
10 inch 0 2 5 7 10 12 15 17 20 22 25 27 30 33 35 39 42 45 49 50 51
Seed Rate Handle Setting
2014-03-10 Table of Contents Metric Charts 175-157B
10 1300 and 1300F Table of Contents Metric Charts Great Plains Manufacturing, Inc.
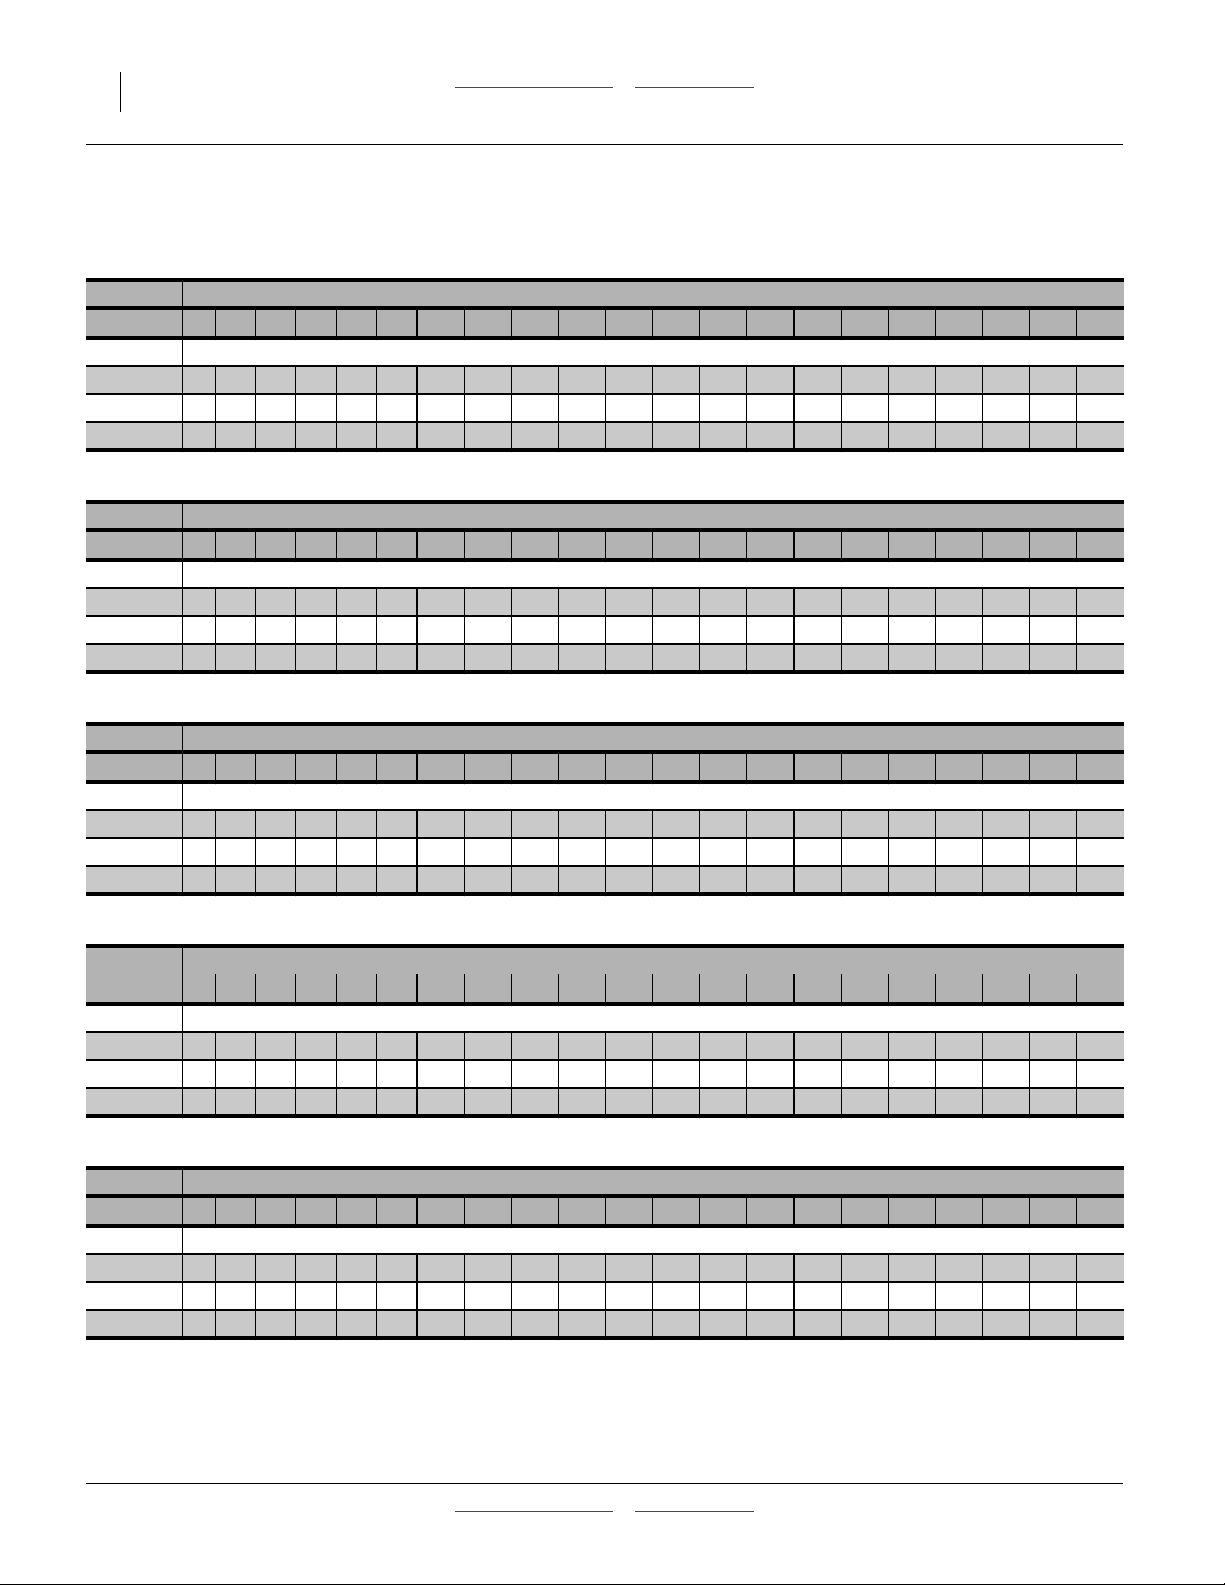
Seed Rate Charts, Main Box, continued...
Millet
Drive Type
1 0 5 10 15 20 25 30 35 40 45 50 55 60 65 70 75 80 85 90 95 100
Rows Seed Rate in Pounds Per Acre (based on 60 pounds/bushel)
6 inch 0 5 8 12 16 20 23 27 32 36 40 44 49 52 57 62 66 71 76 77 78
7.5 inch 0 4 7 9 13 16 19 22 25 29 32 35 39 42 46 49 53 57 61 62 63
10 inch 0 3 5 7 9 12 14 16 19 21 24 26 29 32 34 37 40 43 46 46 47
Milo
Drive Type
1 0 5 10 15 20 25 30 35 40 45 50 55 60 65 70 75 80 85 90 95 100
Rows Seed Rate in Pounds Per Acre (based on 64 pounds/bushel)
6 inch 0 5 9 13 18 23 28 34 39 45 52 57 63 69 75 81 87 92 98 100 102
7.5 inch 04 7101418222731364145505560656973788082
10 inch 0 3 5 8 11 14 17 20 23 27 31 34 38 41 45 49 52 55 59 60 61
Seed Rate Handle Setting
Seed Rate Handle Setting
Oats
Drive Type
3 0 5 10 15 20 25 30 35 40 45 50 55 60 65 70 75 80 85 90 95 100
Rows Seed Rate in Pounds Per Acre (based on 37 pounds/bushel)
6 inch 0 5 12 17 24 32 39 47 55 63 72 80 88 96 105 113 121 130 139 140 140
7.5 inch 0 4 10 14 19 25 31 37 44 51 58 64 70 77 84 90 97 104 111 112 112
10 inch 0 3 7 10 14 19 23 28 33 38 43 48 53 58 63 68 73 78 83 84 84
Seed Rate Handle Setting
Peas
Drive Type
3 0 5 10 15 20 25 30 35 40 45 50 55 60 65 70 75 80 85 90 95 100
Rows Seed Rate in Pounds Per Acre (based on 61 pounds/bushel)
6 inch 0 4 15 28 42 58 74 91 108 125 143 160 177 193 208 222 235 246 255 262 267
7.5 inch 0 3 12 23 34 46 59 73 86 100 114 128 141 154 166 178 188 197 204 210 214
10 inch 0 2 9 17 25 35 44 54 65 75 86 96 106 116 125 133 141 147 153 157 160
Seed Rate Handle Setting
Peas
Drive Type
4 0 5 10 15 20 25 30 35 40 45 50 55 60 65 70 75 80 85 90 95 100
Rows Seed Rate in Pounds Per Acre (based on 61 pounds/bushel)
6 inch 0 7 25 46 69 94 120 148 176 204 233 261 288 314 339 362 382 401 416 427 436
7.5 inch 0 5 20 37 55 75 96 118 141 163 186 209 230 251 271 289 306 320 333 342 349
10 inch 0 4 15 28 41 56 72 89 105 123 140 156 173 189 203 217 229 240 249 257 261
Seed Rate Handle Setting
175-157B Table of Contents Metric Charts 2014-03-10
 Loading...