

Page 1
Great Plains Mfg., Inc.
Native Grass Hex Shaft Update Kits
705NG and 1005NG Drills
Used with:
• 705NG drills serial number 1948Q and earlier
• 1005NG drills serial number 5533U and earlier
General Information
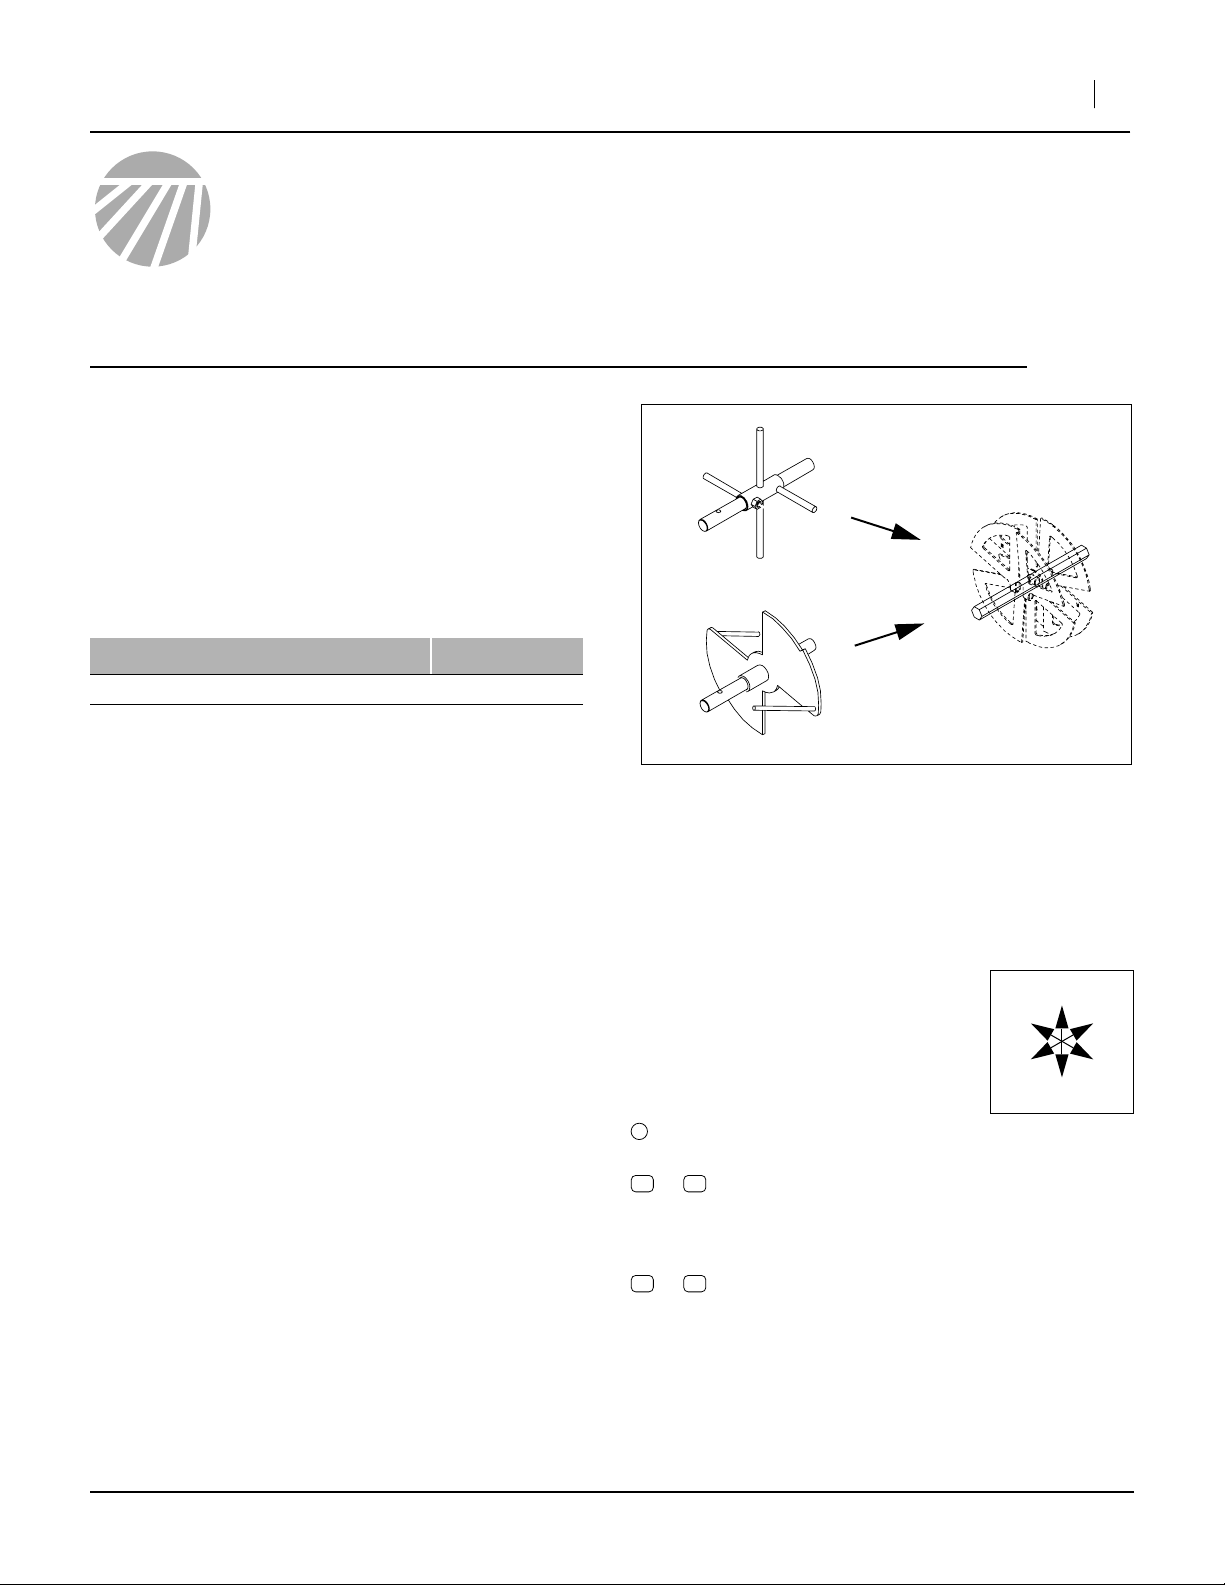
These instructions explain how to install the Hex Shaft
Update Kits. This upgrade is required if any other Native
Grass box components are being upgraded from round
shaft to hex shaft.
Note: The shaft in this kit is only compatible with
shaft paddles and agitators (not included). Any
existing round-shaft components will not fit on the
new hex shaft.
These instructions apply to:
3
⁄4in hex
Installation Instructions 1
Option Package Part Number
705 NG 3/4 HEX SHAFT KIT 202-610A
1005 NG 3/4 HEX SHAFT KIT 202-611A
Before You Start
Each kit converts one drill.
For each kit, inventory the contents per the “Parts Lists”
on page 7.
Review the instructions, to make sure the steps are
understood and what tools are expected.
Have the following items at hand:
• Operator’s Manual for your drill
• Updated Parts Manual for your drill
• Basic hand tools
If necessary, move the drill to a dry well-lighted location
suitable for disassembly. The drill may be raised or lowered for this work.
1. Empty the Native Grass box.
2. Secure the tractor.
Figure 1
Shaft Upgrade
Notations and Conventions
“Left” and “Right” are facing in the
direction of machine travel. An orientation rose in the line art illustrations
shows the directions of Left, Right,
Front, Back, Up, Down.
1
11 21
to
51 62
to
callouts identify components in the currently
referenced Figure or Figures.
callouts reference new parts from the list on
page 7. The descriptions match those on the
cartons, bags or item tags, as well as your
updated Parts Manual.
callouts reference affected existing parts.
The descriptions match those in your Parts
Manual.
26283
U
F
L
R
B
D
©Copyright 2007 Printed 02/29/2008 202-612M
Page 2
2 Hex Shaft Update Kits
Old Component Removal
Dismount Chain
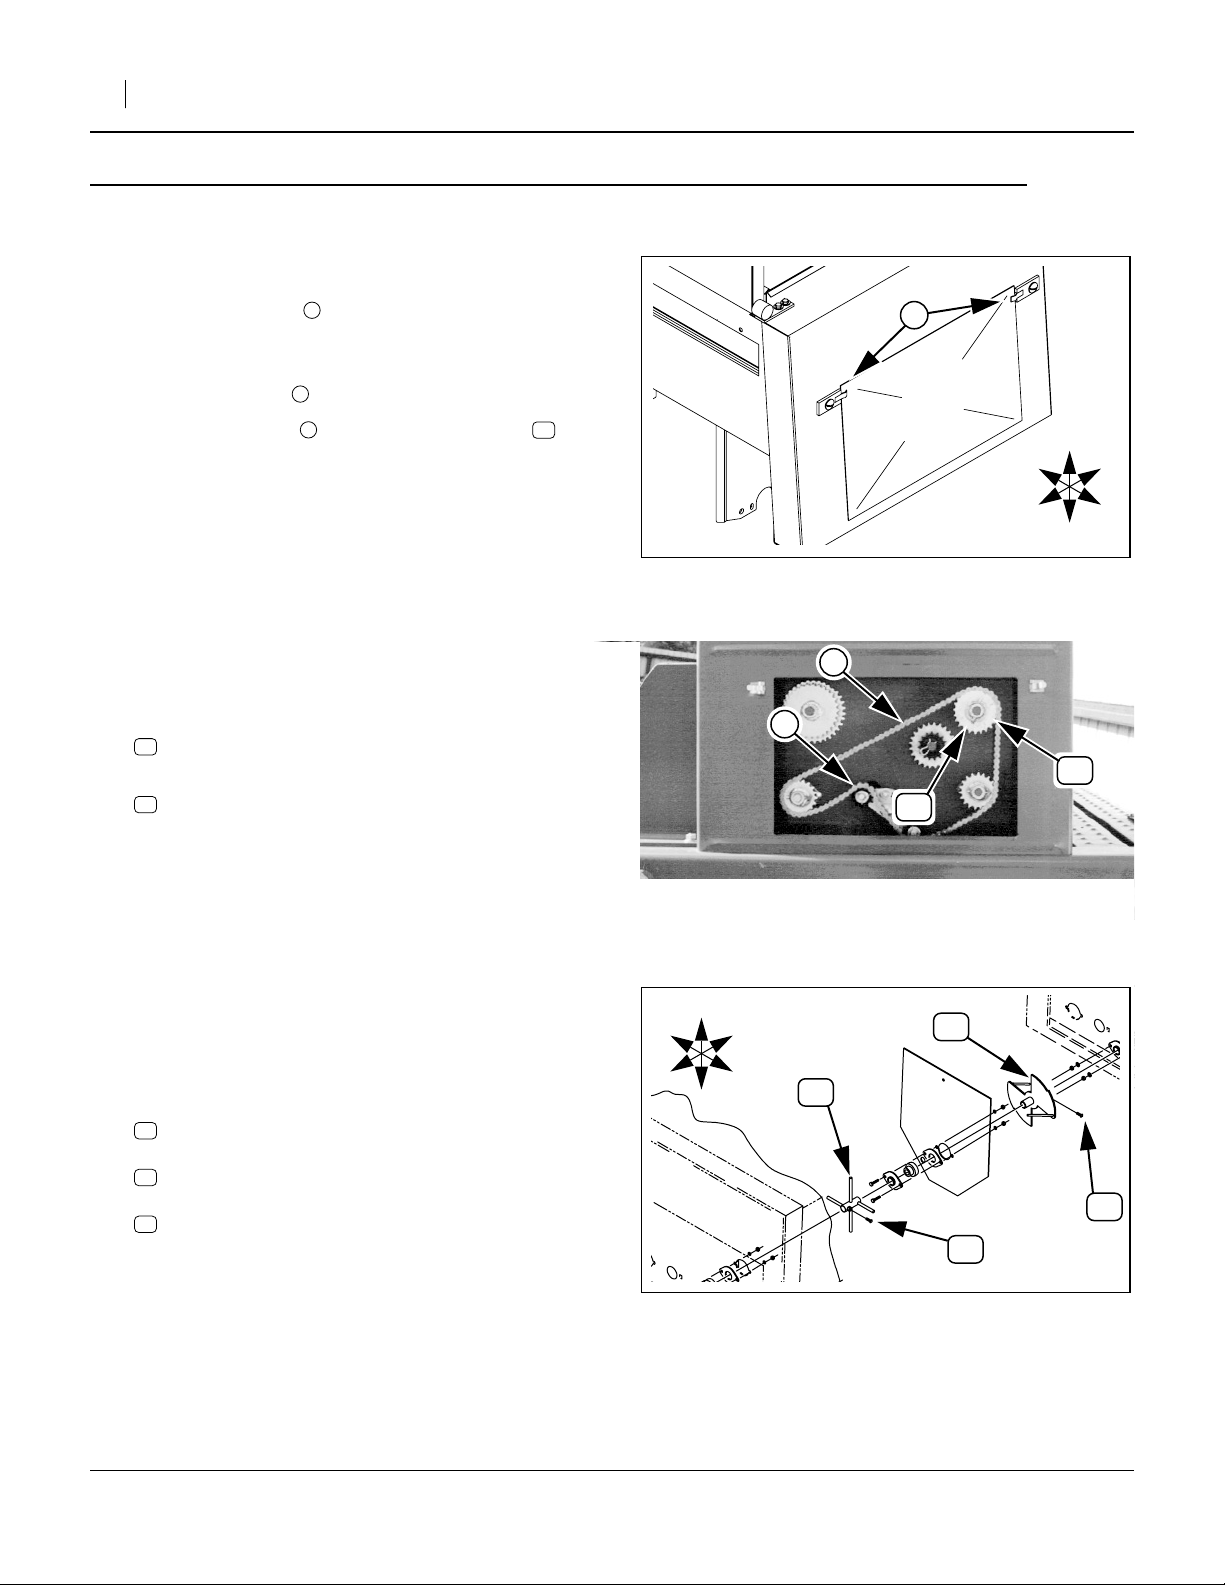
Refer to Figure 2
3. On both ends of the Native Grass seed box, flip out
the snap fasteners . Lift the access panels up
and out, and save them.
Refer to Figure 3
4. Loosen the idlers .
1
1
Great Plains Mfg., Inc.
1
5. Remove the chain from the drive sprocket
and let it hang toward the idlers.
253
Remove Old Sprocket
Refer to Figure 3
6. Remove and save the:
60
PIN LINCH 1/4 X 1 3/4 PLT
7. Remove the:
53
24T SPEED CHANGE SPROCKET
It is not re-used.
Loosen Shaft Components
Loosen Agitator Set Screws
Refer to Figure 4
8. At each Native Grass seed cup row, loosen or
remove one or two:
56
SCREW SET SQ HD 3/8-16 X 3/4CP
from each:
54
AGITATOR WELDMENT 7,7 1/2 & 8
or
55
ROD AGITATOR
The set screws are not re-used.
U
R
F
B
L
D
Figure 2
Remove Access Panels
26284
2
1
53
60
Figure 3
Dismount Chain
18113
U
54
D
R
B
55
F
L
56
56
Figure 4
Loosen Old Agitators
202-612M 02/29/2008
26285
Page 3
Great Plains Mfg., Inc.
Installation Instructions 3
Disassemble Flangettes
Refer to Figure 5
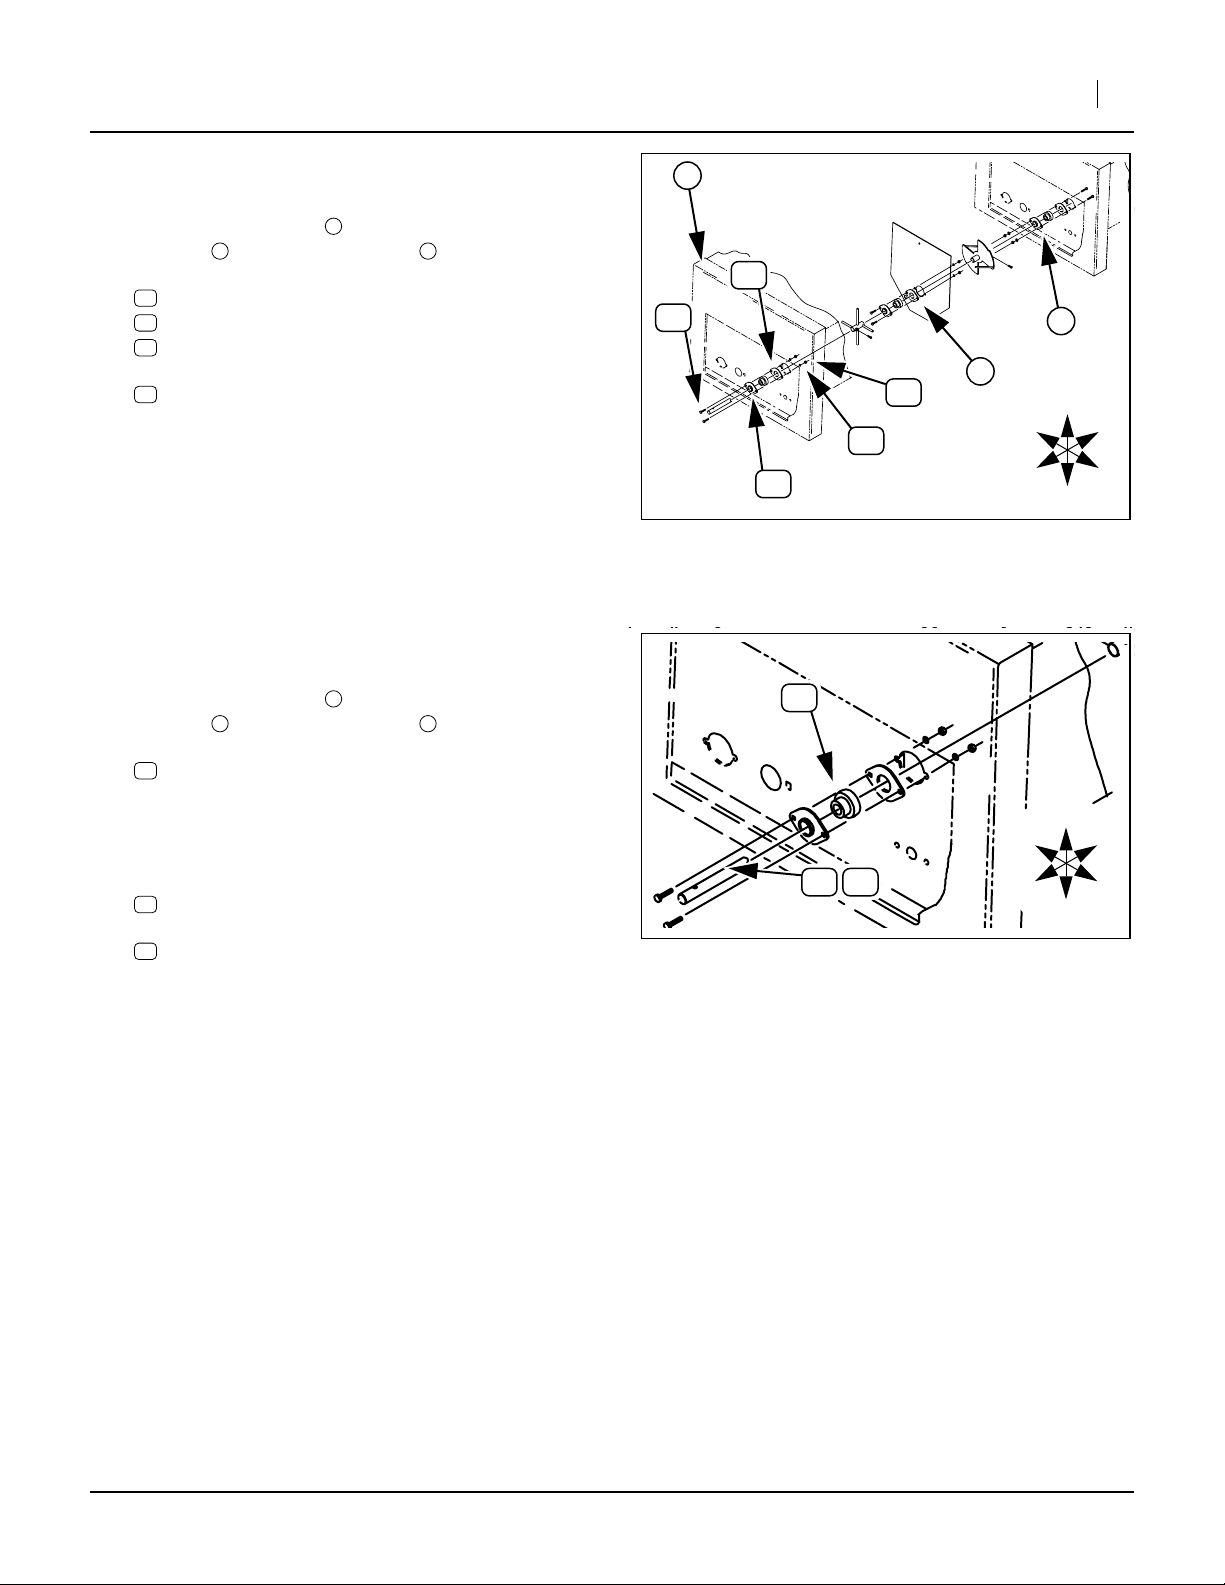
9. At the (left) drive end of the seed box, at each
partition , and at the right end , remove two
each:
58
59
57
from the halves of the
62
The fasteners are not re-used. The screws are
replaced by different size screws in the kit. The
flangettes, washers and nuts are the same as in
the kit, but the kit includes new parts.
2 3
NUT HEX 5/16-18 PLT
WASHER LOCK SPRING 5/16 PLT
HHCS 5/16-18X3/4 GR5
FLANGETTE 47 MST
1
Loosen Bearing Set Screws
Refer to Figure 5
10. At the (left) drive end of the seed box, at each
partition , and at the right end , loosen or
remove two set screws from each:
61
2 3
BEARING 3/4BORE 47MM SPHERE OD
1
57
1
62
3
2
58
59
62
Figure 5
Disassemble Flangettes
U
F
L
R
B
D
26285
61
The set screws are not re-used.
Remove Old Shaft
11. From the drive side, slide the
51
7’ NATIVE GRASS SHAFT
or
52
NATIVE GRASS 114 BOX SHAFT
out from all loosened components. The shaft is not
re-used.
12. Remove shaft components as they clear the end of
the shaft. None are re-used.
51 52
Figure 6
Loosen Old Bearings
U
F
L
R
B
D
26285
02/29/2008 202-612M
Page 4

4 Hex Shaft Update Kits
Install New Components
Great Plains Mfg., Inc.
Mount Bearings
Refer to Figure 7
Pre-Assemble Bearings
13. Select three (3) sets each new, consisting of one:
21
822-128C BEARING 3/4HEX B 47MM SPHER OD
and two each new:
20
822-041C FLANGETTE 47 MST
17
802-282C RHSNB 5/16-18X1 GR5
19
804-009C WASHER LOCK SPRING 5/16 PLT
18
803-008C NUT HEX 5/16-18 PLT
14. Place the bearings between a pair of flangette
20
halves, and place per the guidance in the fol-
lowing step.
Bearing Mount Locations
Refer to Figure 8
1
Box Drive End
2
Partitions
3
Box Right End
Note: By keeping the partition bearings clear of seed
cups, you minimize the number of agitators that
cannot be installed due to interference.
15. Loosely assemble the bearings at the suggested
locations. Insert the screw from the flangette
side. Leave the assemblies loose until after shaft
insertion.
21
Outside box
Whichever side of the partition
places the bearing center furthest
from both adjacent row unit seed
cups.
Outside box
17
F
L
17
U
D
R
B
21
20
Figure 7
New Bearings
17
1
Figure 8
Bearing Placement
20
18
19
26291
3
U
2
F
L
R
B
D
26286
202-612M 02/29/2008
Page 5

Great Plains Mfg., Inc.
Insert Shaft
Refer to Figure 9
16. Select one new:
13
202-223D 705 AGITATOR SHAFT
or:
14
202-224D 1005 AGITATOR SHAFT
Note that one end has a hole for the sprocket pin
and the other does not.
17. Select two new:
12
118-494D LOCK COLLAR 3/4 HEX BORE
18. Insert the solid (no hole) end of the shaft /
into the bearing at the drive side of the box.
13 14
Installation Instructions 5
16
12
13 14
60
19. While holding it level, slip a lock collar on the
12
solid end of the shaft.
20. Continue inserting the shaft through the new bearing(s) in the partition.
21. Before inserting the shaft through the right end
bearing, slip another lock collar onto the shaft.
12
Stop the insertion process at this point.
22. Select one new:
15
202-479H AGITATOR SPROCKET WELDMENT
and one used:
60
PIN LINCH 1/4 X 1 3/4 PLT
23. At the pinned end of the shaft / , place the
sprocket on the shaft (raised hub facing out),
and insert pin . Resume inserting the shaft in
15
60
13 14
the seed box.
24. Insert the solid end of the shaft through the new
bearing in the right end of the box.
25. Adjust the position of the shaft / until the
teeth of the sprocket are aligned with the driv-
15
13 14
ing, driven and idler sprockets of the Native Grass
drive.
26. Select four new:
16
801-035C SCREW SET 5/16-18 SKT KP X 3/8
15
Figure 9
Shaft Insertion
U
F
L
R
B
D
26288
27. Without disturbing the position of the shaft / ,
slide the left lock collar against the left end
12
13 14
bearing.
28. Insert two set screws and secure the collar.
16
29. Slide the right collar up against the right end bearing. Insert two set screws and secure the collar.
02/29/2008 202-612M
16
Page 6

6 Hex Shaft Update Kits
Closeout
30. Gently tighten the bolts of the left side flangette
while rotating the new sprocket.
31. Do the same for the right end flangette, and then the
partition flangettes.
32. When all are tightened, make sure the shaft rotates
freely.
33. Install any new agitators at this time, per the instructions included with the agitator kit. That installation
does not require shaft removal.
34. Remount the drive chain, engage the idlers, and
adjust for1⁄2in slack in the longest span.
35. Reinstall access panels and close snaps.
Note: No seed rate adjustments result from this shaft
update alone. Other kits that update your drill to
Native Grass II may require a new seed rate manual.
Great Plains Mfg., Inc.
202-612M 02/29/2008
Page 7

Great Plains Mfg., Inc.
Parts Lists
New Parts Included in the 202-610A and -611A Hex Shaft Update Kits:
Installation Instructions 7
Callout
11
12
13
14
15
16
17
18
19
20
21
Quantity per 202- Part
-610A -611A
1 1 202-612M This manual
2 2 118-494D LOCK COLLAR 3/4 HEX BORE
1 0 202-223D 705 AGITATOR SHAFT
0 1 202-224D 1005 AGITATOR SHAFT
1 1 202-479H AGITATOR SPROCKET WELDMENT
4 4 801-035C SCREW SET 5/16-18 SKT KP X 3/8
6 8 802-282C RHSNB 5/16-18X1 GR5
6 8 803-008C NUT HEX 5/16-18 PLT
6 8 804-009C WASHER LOCK SPRING 5/16 PLT
6 8 822-041C FLANGETTE 47 MST
3 4 822-128C BEARING 3/4HEX B 47MM SPHER OD
Reference Information
Abbreviations
CP Cotter Pin
GR5 Grade 5
HHCS Hex Head Cap Screw (Bolt)
KP Knurled cup Point
MST Metric Spherical Two-hole
OD Outside Diameter
PLT Plated
RHSNB Round Head Shank Neck Bolt
SKT Socket Head
SQ HD Square Head
Number
Part Description
Torque Values
Fastener/Fitting N-m Ft-Lbs
5
⁄16-18 GR5
02/29/2008 202-612M
24 17
Page 8

8 Hex Shaft Update Kits
Great Plains Mfg., Inc.
Great Plains Manufacturing, Inc.
Corporate Office: PO Box 5060
Salina, KS 67402-5060 USA
202-612M 02/29/2008
 Loading...