

Great Outdoors 3600G User Manual
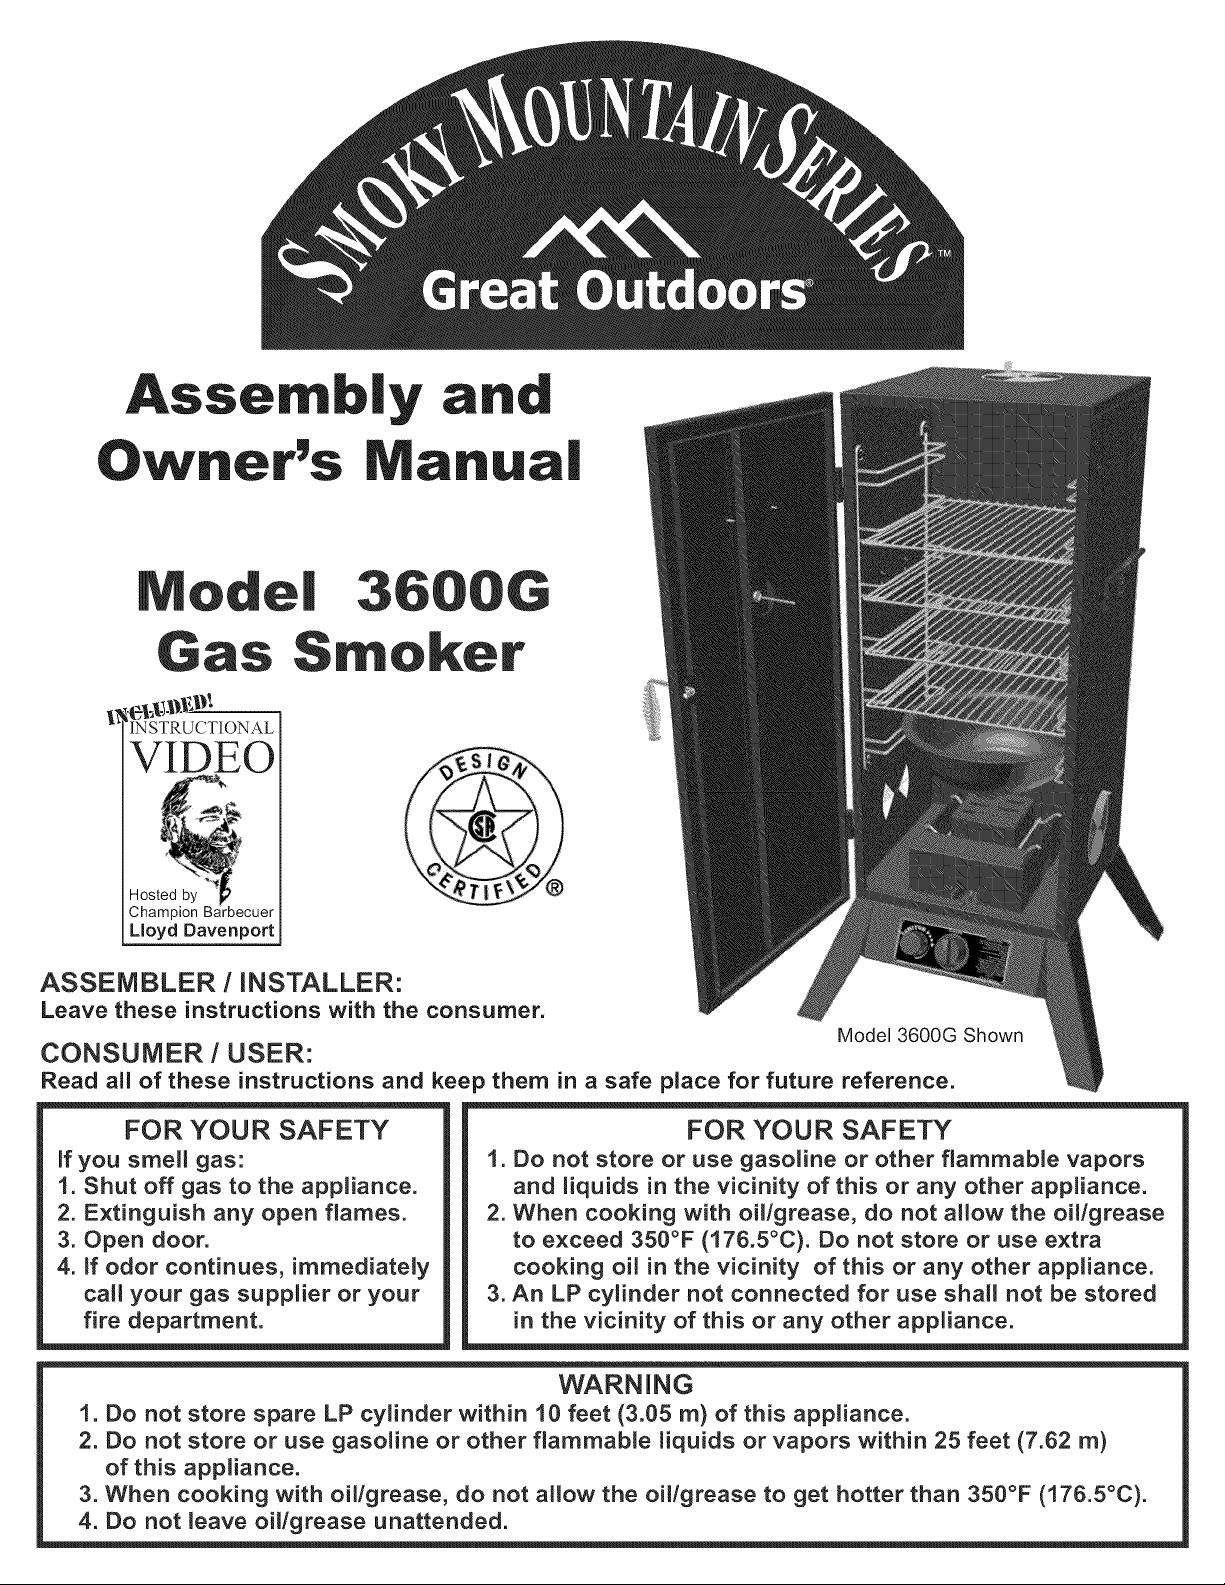
ssem y a
Owner's Manua
O
'INSTRUCTIONAL
VIDEO
Hosted by _
Champion Barbecuer
Lloyd Davenport
ASSEMBLER / iNSTALLER:
Leave these instructions with the consumer.
CONSUMER / USER:
Read all of these instructions and keep them in a safe place for future reference.
Model 3600G Shown
FOR YOUR SAFETY
if you smell gas:
1. Shut off gas to the appliance.
2. Extinguish any open flames.
3. Open door.
4. If odor continues, immediately
call your gas supplier or your
fire department.
1. Do not store or use gasoline or other flammable vapors
and liquids in the vicinity of this or any other appliance.
2. When cooking with oil/grease, do not allow the oil/grease
to exceed 350°F (176.5°C). Do not store or use extra
cooking oil in the vicinity of this or any other appliance.
3. An LP cylinder not connected for use shall not be stored
in the vicinity of this or any other appliance.
r,,___ml_-- _
FOR YOUR SAFETY
WARNING
1. Do not store spare LP cylinder within 10 feet (3.05 m) of this appliance.
2. Do not store or use gasoline or other flammaMe liquids or vapors within 25 feet (7.62 m)
of this appliance.
3. When cooking with oil/grease, do not allow the oillgrease to get hotter than 350°F (176.5°C).
4. Do not leave oillgrease unattended.

Statement of Commitment
Congratulations and thank you for your purchase
of your new Great Outdoors smoker. We are pleased
that you have recognized the value of the design,
function, and quality of components used in this
product. We believe it is among the finest on the
market. If or for any reason we have failed to meet
you're expectations, please allow us the opportunity
to make it right by calling us toll-free:
1-800-668-5323
between the hours of 8:00 a.m. and 5:00 p.m.
Eastern Standard time, Monday through Friday.
We want you to be completely satisfied with your purchase
CFM Corporation
2695 Meadowvale Boulevard
Mississauga, Ontario LSN 8A3 Canada
Service Note: If you are experiencing difficulties or are dissatisfied with your purchase, please contact CFM at
the telephone number listed above prior to returning your grill to the store.
For more information about our growing family
of grills, smokers, fireplaces, stoves and outdoor
products, please visit our website at:
www.cfmcorp.com
E L! STRUCT! !
YOUR SAFETY IS VERY IMPORTANT oFAILURE TO FOLLOW PROPER
PROCEDURES AND SAFEGUARDS MAY RESULT IN SERIOUS
PERSONAL INJURY OR PROPERTY DAMAGE.
DO NOT use this smoker in a manner other than its intended purpose. It is NOT intended for commercial use. It is NOT
intended to be installed or used in or on a recreational vehicle and/or boats. The smoker is not to be used as a heater.
A Keep a fire extinguisher accessible at all times.
A The use of alcohol, prescription or nonprescription drugs may impair the user's ability to properly assemble or safely
operate the smoker.
A This smoker is for outdoor use only, in a well-ventilated area. DO NOT operate the smoker indoors, in a garage, or in
any other enclosed area or under overhead construction.
A Use caution when assembling and operating the smoker to avoid cuts and scrapes from rough or sharp edges.
A Use caution when lifting and moving the smoker to avoid strains or back injury. 2 people are recommended to lift or
move the smoker. DO NOT move the smoker while it is in use.
!
m
A DO NOT operate the smoker near or under flammable or combustible materials such as decks, porches, or carports.
A minimum clearance range of 36 inches is recommended. DO NOT operate the smoker under overhead construction.
A Operate the smoker only on a stable, level, non-flammable surface such as asphalt, concrete or solid ground. DO NOT
operate the smoker on flammable material such as carpet or a wood deck.
A DO NOT store the smoker near gasoline or other combustible liquids or where combustible vapors may be present.
A DO NOT store or operate this smoker in an area accessible to children or pets. Store the smoker in a dry, protected
location.
A DO NOT leave the smoker unattended while in use. Operate the smoker with close supervision.
A DO NOT allow anyone to conduct activities around the smoker during or following use until it has cooled. It is hot during
operation and remains hot for a period of time following use.
A DO NOT leave hot ashes unattended until the smoker cools completely.
A DO NOT move the smoker while it is in use. Allow the smoker to cool completely before moving or storing.
A This smoker becomes extremely hot - allow the smoker to cool completely before handling. If you must handle the
smoker while it is hot, ALWAYS wear protective oven mitts or heat resistant gloves when handling the smoker or its
components.
A NEVER use gasoline or other highly volatile fluids as a starter. They can explode.
A The water bowl and wood chip box should not be moved while the smoker is operating or until the smoker has cooled
sufficiently. These contain hot ashes and liquids that may cause serious injury. If you must move these components,
ALWAYS wear protective oven mitts or heat resistant gloves.
A Dispose of cold ashes by wrapping them in heavy duty aluminum foil and putting them in a noncombustible container.
Be sure there are no other combustible materials in or near the container.
A If you must dispose of the ashes in less time than it takes for them to completely cool, remove the ashes from the
smoker, keeping them in heavy duty foil, and soak them completely with water before disposing of them in a
noncombustible container.
A DO NOT obstruct the flow of combustion air and/or ventilation air for the smoker.
1
continued...
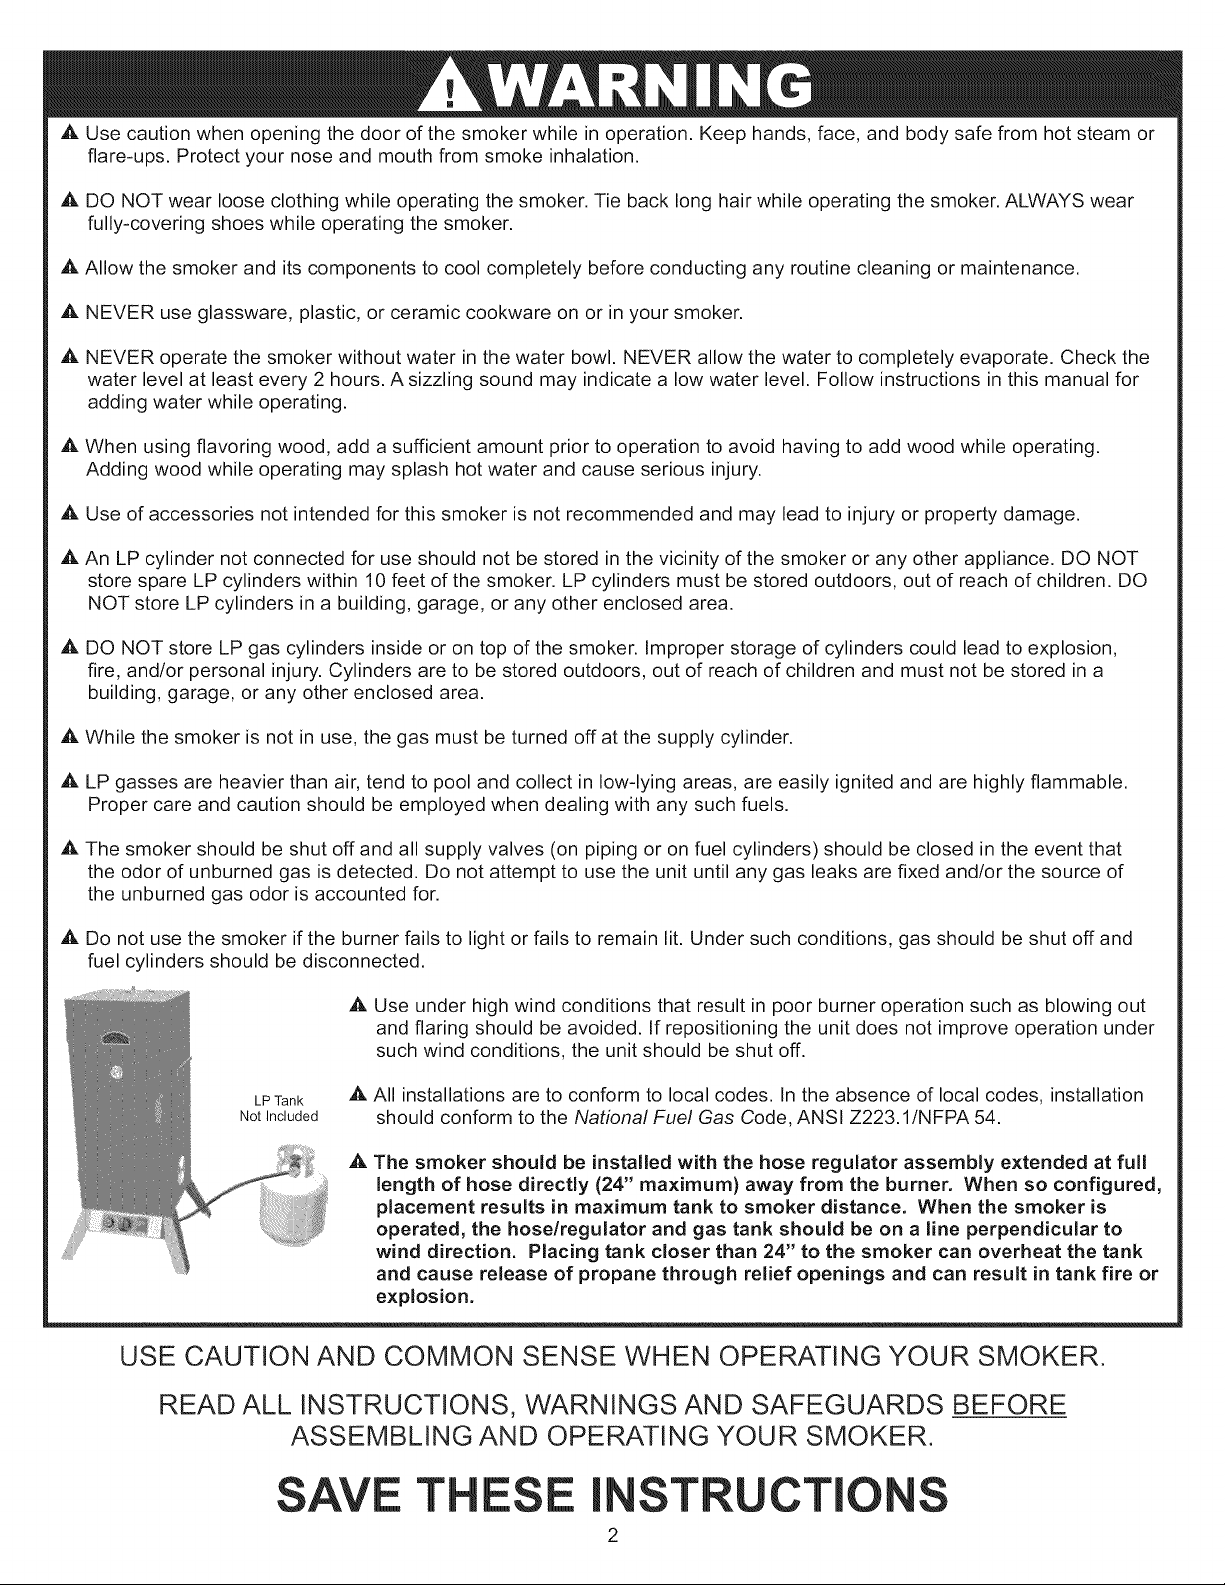
Use caution when opening the door of the smoker while in operation. Keep hands, face, and body safe from hot steam or
flare-ups. Protect your nose and mouth from smoke inhalation.
A DO NOT wear loose clothing while operating the smoker. Tie back long hair while operating the smoker. ALWAYS wear
fully-covering shoes while operating the smoker.
A Allow the smoker and its components to cool completely before conducting any routine cleaning or maintenance.
A NEVER use glassware, plastic, or ceramic cookware on or in your smoker.
A NEVER operate the smoker without water in the water bowl. NEVER allow the water to completely evaporate. Check the
water level at least every 2 hours. A sizzling sound may indicate a low water level. Follow instructions in this manual for
adding water while operating.
A When using flavoring wood, add a sufficient amount prior to operation to avoid having to add wood while operating.
Adding wood while operating may splash hot water and cause serious injury.
A Use of accessories not intended for this smoker is not recommended and may lead to injury or property damage.
A An LP cylinder not connected for use should not be stored in the vicinity of the smoker or any other appliance. DO NOT
store spare LP cylinders within 10 feet of the smoker. LP cylinders must be stored outdoors, out of reach of children. DO
NOT store LP cylinders in a building, garage, or any other enclosed area.
A DO NOT store LP gas cylinders inside or on top of the smoker. Improper storage of cylinders could lead to explosion,
fire, and/or personal injury. Cylinders are to be stored outdoors, out of reach of children and must not be stored in a
building, garage, or any other enclosed area.
A While the smoker is not in use, the gas must be turned off at the supply cylinder.
A LP gasses are heavier than air, tend to pool and collect in low-lying areas, are easily ignited and are highly flammable.
Proper care and caution should be employed when dealing with any such fuels.
A The smoker should be shut off and all supply valves (on piping or on fuel cylinders) should be closed in the event that
the odor of unburned gas is detected. Do not attempt to use the unit until any gas leaks are fixed and/or the source of
the unburned gas odor is accounted for.
A Do not use the smoker if the burner fails to light or fails to remain lit. Under such conditions, gas should be shut off and
fuel cylinders should be disconnected.
A Use under high wind conditions that result in poor burner operation such as blowing out
and flaring should be avoided. If repositioning the unit does not improve operation under
such wind conditions, the unit should be shut off.
LP Tank
Not Included
A All installations are to conform to local codes. In the absence of local codes, installation
should conform to the National Fuel Gas Code, ANSI Z223.1/NFPA 54.
,&
The smoker should be installed with the hose regulator assembly extended at full
length of hose directly (24" maximum) away from the burner. When so configured,
placement results in maximum tank to smoker distance. When the smoker is
operated, the hose/regulator and gas tank should be on a line perpendicular to
wind direction. Placing tank closer than 24" to the smoker can overheat the tank
and cause release of propane through relief openings and can result in tank fire or
explosion.
USE CAUTnON AND COMMON SENSE WHEN OPERATING YOUR SMOKER.
READ ALL INSTRUCTIONS, WARNINGS AND SAFEGUARDS BEFORE
ASSEMBLING AND OPERATING YOUR SMOKER.
SAVE ESE STRUCTION
2
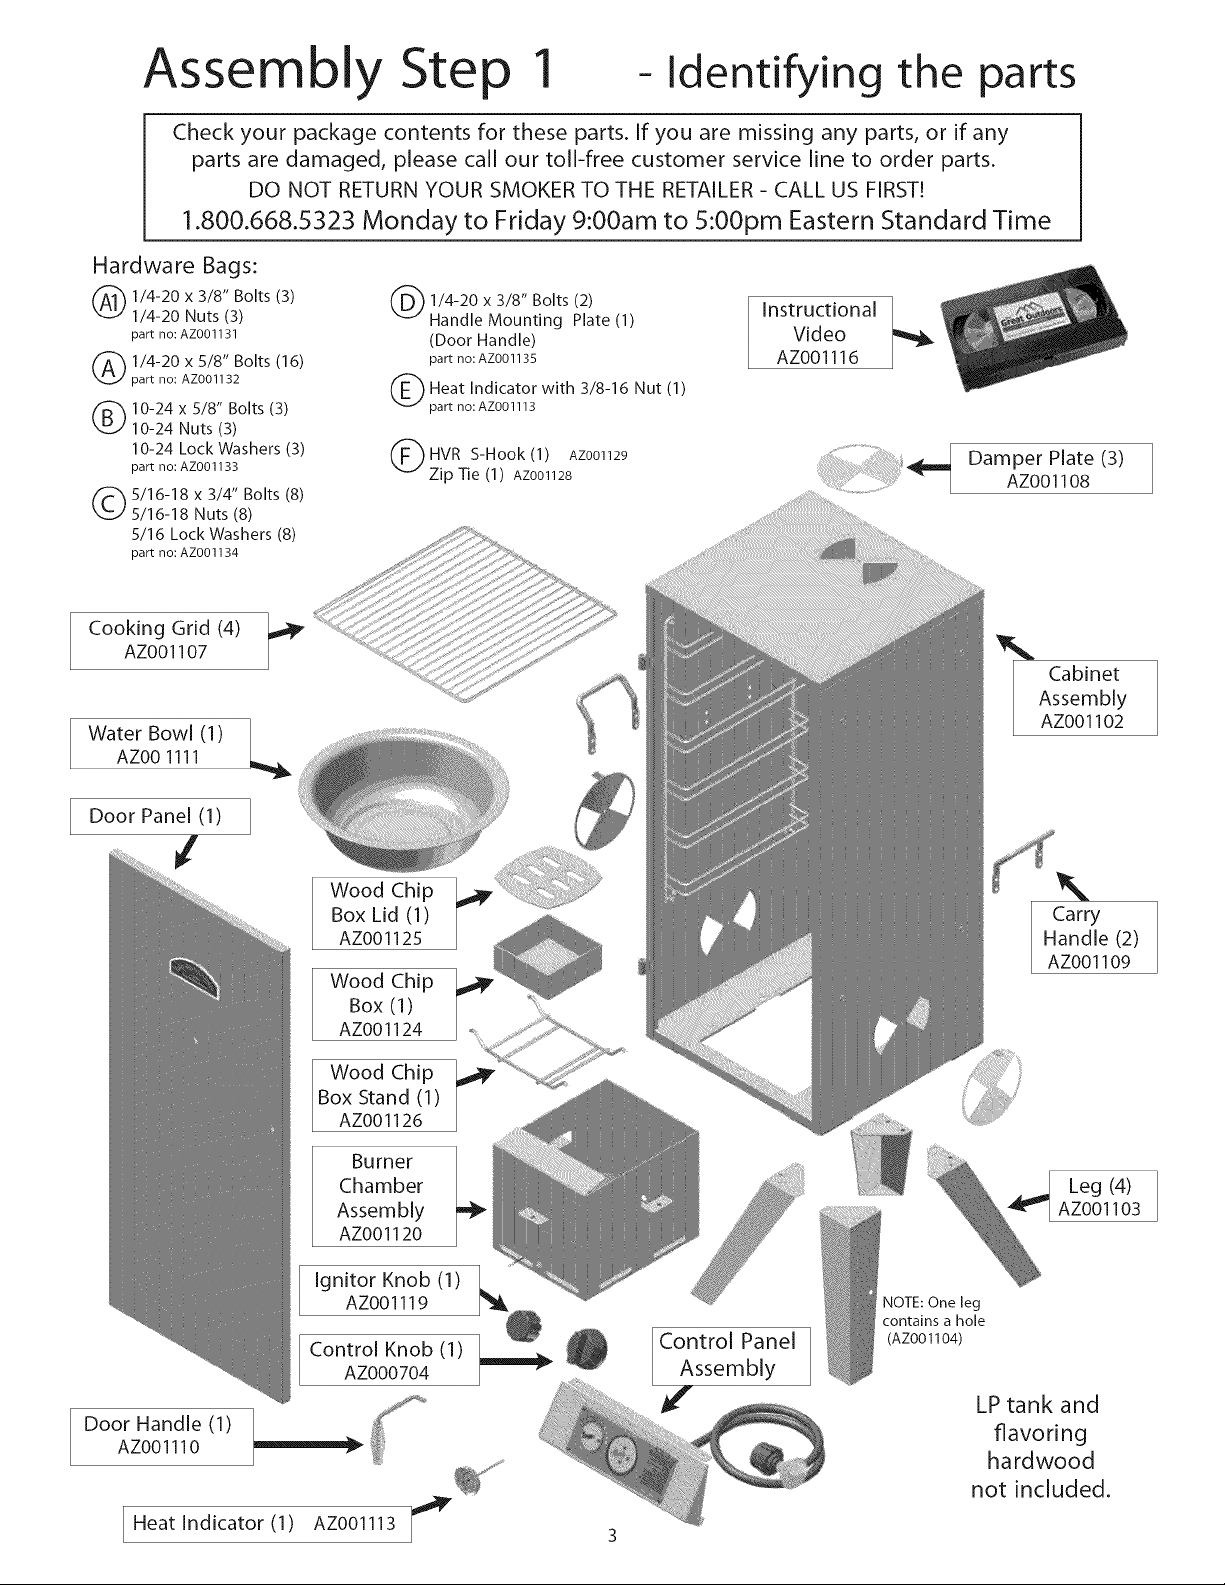
Assembly Step 1 -Identifying the parts
Check your package contents for these parts. If you are missing any parts, or if any
parts are damaged, please call our toll-free customer service line to order parts.
DO NOT RETURN YOUR SMOKER TO THE RETAILER- CALL US FIRST!
1.800.668.5323 Monday to Friday 9:00am to 5:00pro Eastern Standard Time
Hardware Bags:
1_ 1/4-20 x 3/8" Bolts (3)
1/4-20 Nuts (3)
part no: AZ001131
(_ 1/4-20 x 5/8" Bolts (16)
part no: AZ001132
10-24 x 5/8" Bolts (3)
®
10-24 Nuts (3)
10-24 Lock Washers (3)
part no: AZ001133
5/16-18 x 3/4" Bolts (8)
©
5/16-18 Nuts (8)
5/16 Lock Washers (8)
part no: AZ001134
Cooking Grid (4) _,
AZ001107
Water Bowl (1) |
AZ00 1111
J
(_) HVR S-Hook (1) AZ001129
X
1/4-20 3/8" Bolts (2)
Handle Mounting Plate (1)
(Door Handle)
part no: AZ001135
Heat Indicator with 3/8-16 Nut (1)
part no: AZ001113
Zip Tie (1) AZ001128
InstructionalAZ001VideOl16
Damper Plate (3)
AZ001108
Cabinet
Assembly
AZ001102
Door Panel (1)
J
Door Handle (1)
AZ001110
Wood Chip
Box Lid (1)
AZOO1125
Wood Chip
Box (1)
AZ001124
Wood Chip
Box Stand (1)
AZ001126
Chamber
Assembly
Burner L_
AZ001120
Ignitor Knob (1)
AZ001119
Control Knob (1)
AZ000704
____,¢"
Control Panel
Assembly
J
NOTE: One leg
contains a hole
(AZ001104)
Carry
Handle (2)
AZ001109
Leg (4)
AZ001103
LP tank and
flavoring
hardwood
not included.
Heat Indicator (1) AZ001113
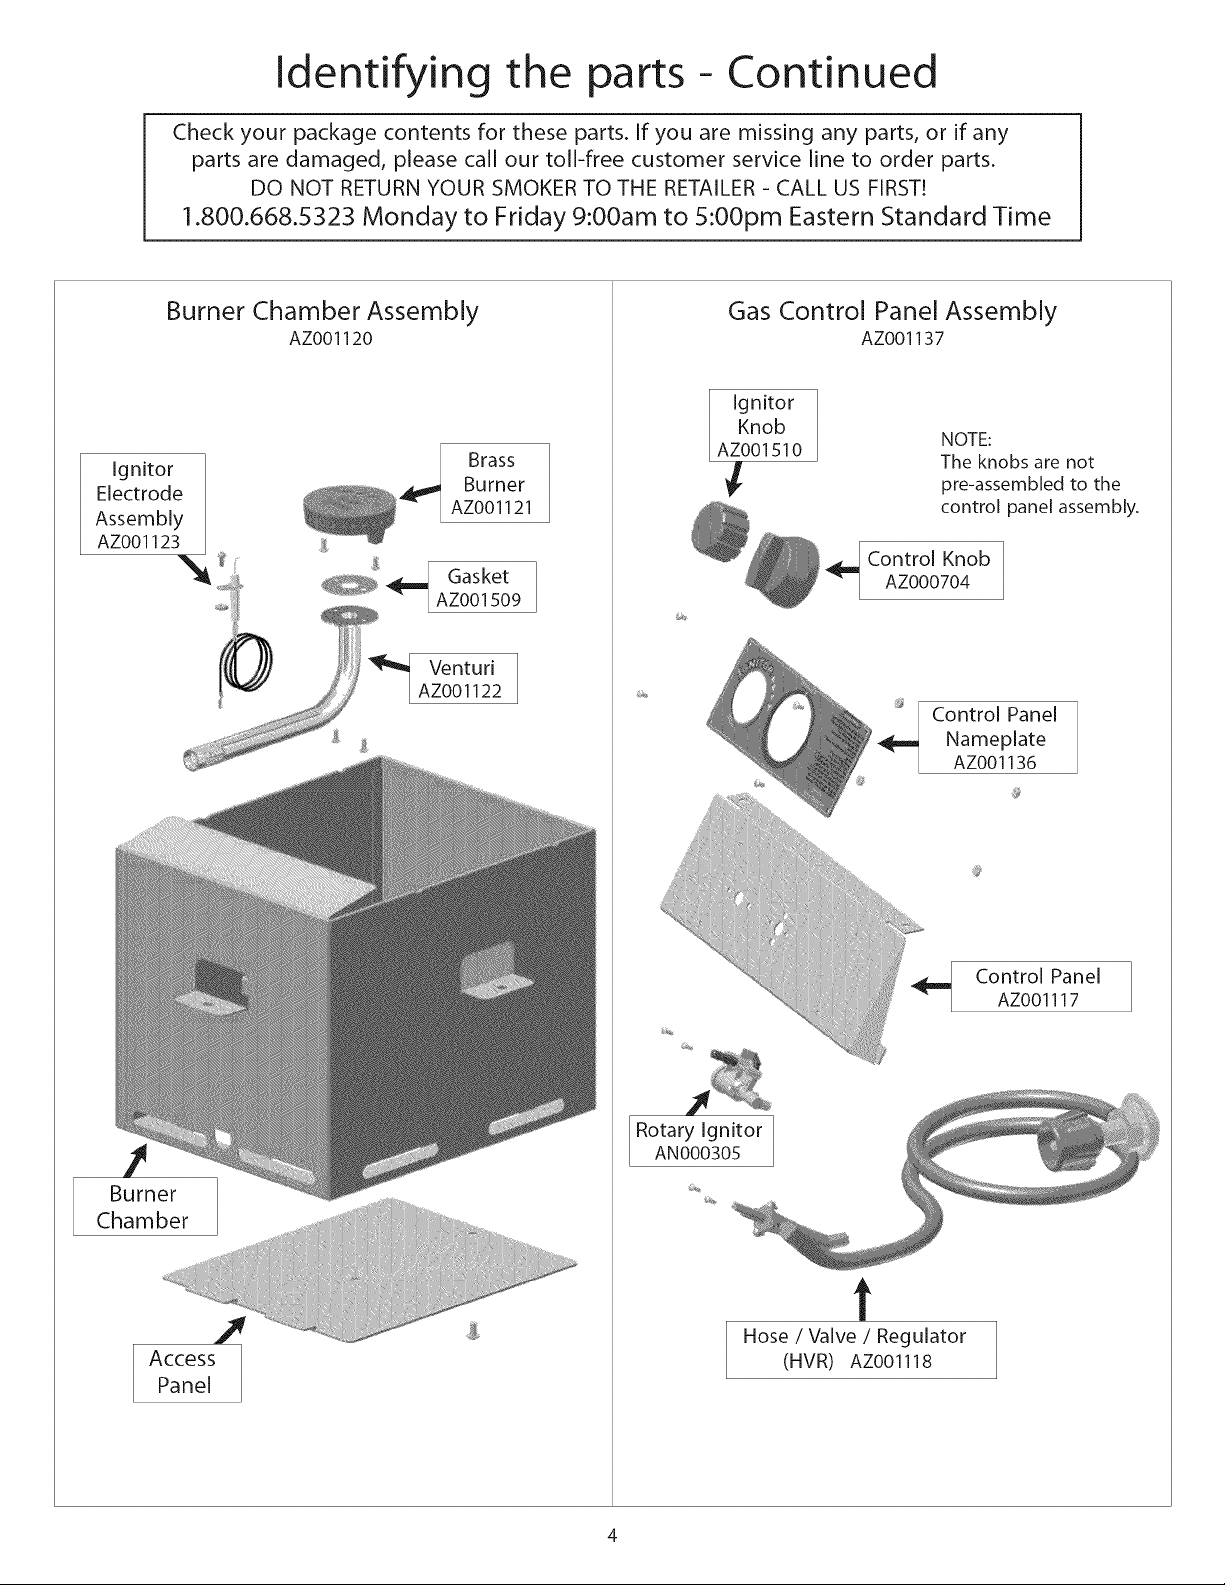
Identifying the parts - Continued
Check your package contents for these parts. If you are missing any parts, or if any
parts are damaged, please call our toll-free customer service line to order parts.
DO NOT RETURN YOUR SMOKER TO THE RETAILER - CALL US FIRST!
1.800.668.5323 Monday to Friday 9:00am to 5:00pro Eastern Standard Time
Burner Chamber Assembly
Ignitor
Electrode /
Assembly /
AZ001123 /
il¸
AZ001120
Burner
Brass
AZ001121
Gasket
AZ001509
Venturi
,,_ AZOO1122
Gas Control Panel Assembly
AZ001137
Ignitor
Knob
AZ001510
Control Knob
AZ000704
......:_i!iiiii:Mi!_iiiiiiiiiiiiiiiiiiiiiiii!iiiii_
_iiiiiiiiiiiiiii]iiiW_iiiiiii!!iiiiiii!iiiii!iiiii
NOTE:
The knobs are not
pre-assembled to the
control panel assembly.
Control Panel
Nameplate
AZ001136
l
Burner
Chamber
Rotary Ignitor
AN000305
t
Hose / Valve / Regulator
(HVR) AZ001118
Control Panel
AZ001117
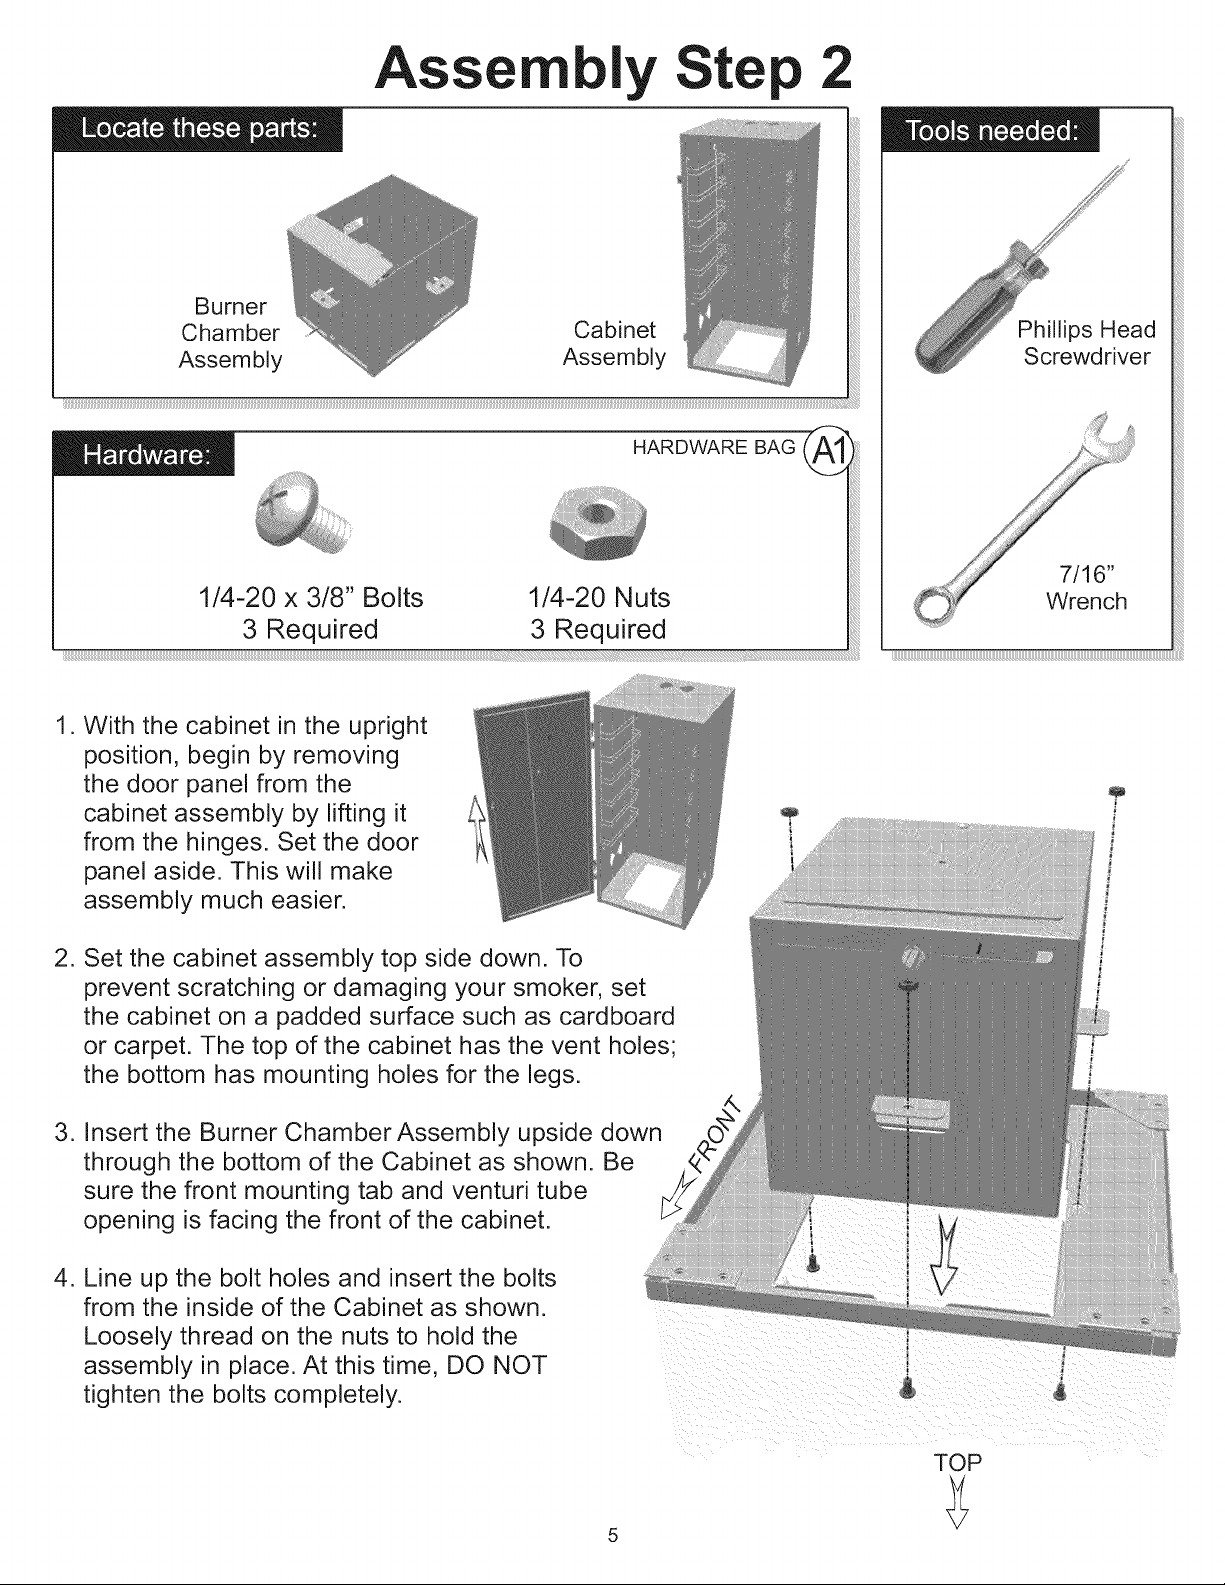
Assem
Burner
Chamber
Assembly
1/4-20 x 3/8" Bolts 1/4-20 Nuts
3 Required 3 Required
Cabinet
Assembly
ly Step 2
m
Phillips Head
Screwdriver
1. With the cabinet in the upright
position, begin by removing
the door panel from the
cabinet assembly by lifting it
from the hinges. Set the door
panel aside. This will make
assembly much easier.
2. Set the cabinet assembly top side down. To
prevent scratching or damaging your smoker, set
the cabinet on a padded surface such as cardboard
or carpet. The top of the cabinet has the vent holes;
the bottom has mounting holes for the legs.
3. Insert the Burner Chamber Assembly upside down
through the bottom of the Cabinet as shown. Be
sure the front mounting tab and venturi tube
opening is facing the front of the cabinet.
4. Line up the bolt holes and insert the bolts
from the inside of the Cabinet as shown.
Loosely thread on the nuts to hold the
assembly in place. At this time, DO NOT
tighten the bolts completely.
TOP
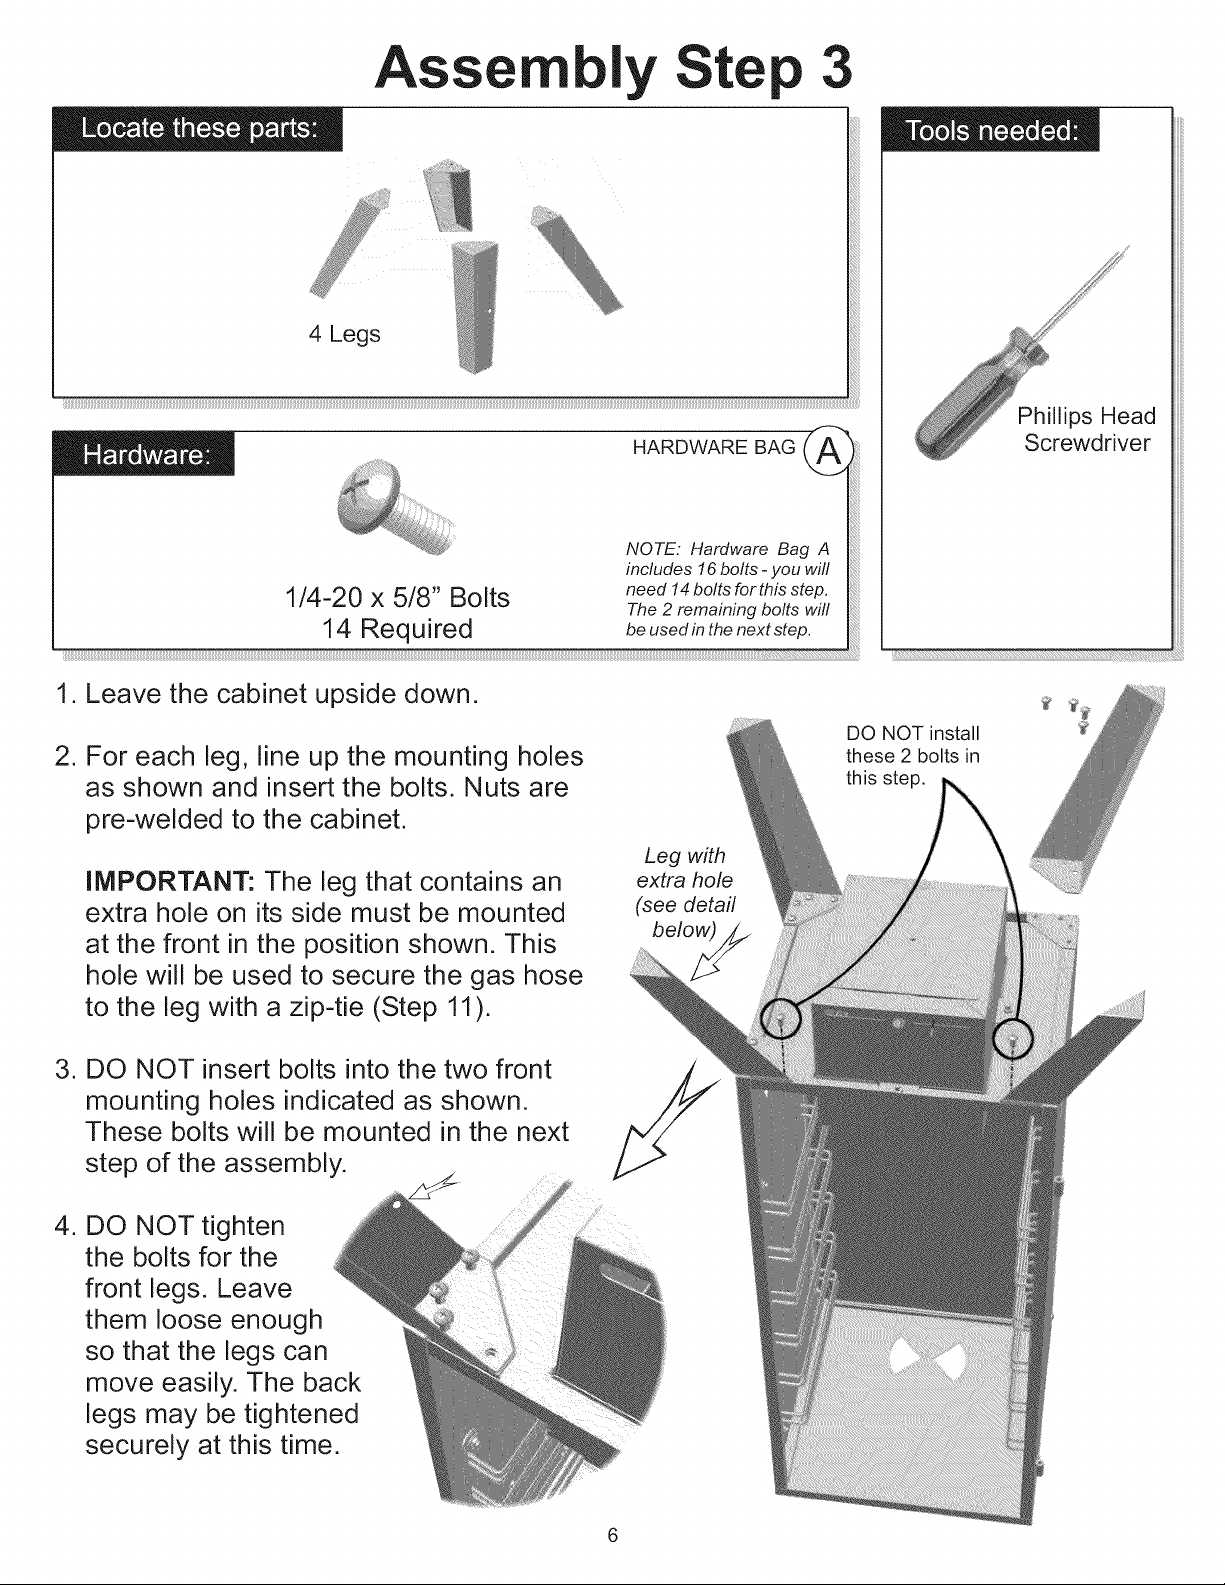
Assem
4 Legs
ly Step 3
HAROWAREOAG
NOTE. Hardware Bag A
includes 16 bolts - you will
1/4-20 x 5/8" Bolts need14boltsforthisstep.
14 Req uired beusedinthenextstep.
The 2 remaining bolts will
Phillips Head
Screwdriver
_!_!;:_i_;_i!_;_;_;:_;_;:_;_;:_;_;:_;_;:_;_;:_;_;:_;_;:_;_;:_;_;:_;_;:_;_;:_;_;:_;_;:_;_;:_;_;:_;_;:_;_;:_;_;:_;_;:_;_;:_;_;:_;_;:_;_;:_;_;:_;_;_i!;!_!i¸i!i!!i!!!;!_i_;iiiiiii!;!i¸I¸!ii!!iiiiiiiiiiiii_!!!_:i!iil¸iii!;iiiii!!
1. Leave the cabinet upside down.
2. For each leg, line up the mounting holes
as shown and insert the bolts. Nuts are
pre-welded to the cabinet.
IMPORTANT: The leg that contains an
extra hole on its side must be mounted
at the front in the position shown. This
hole will be used to secure the gas hose
to the leg with a zip-tie (Step 11).
3. DO NOT insert bolts into the two front
mounting holes indicated as shown.
These bolts will be mounted in the next
step of the assembly.
4. DO NOT tighten
the bolts for the
front legs. Leave
them loose enough
so that the legs can
move easily. The back
legs may be tightened
securely at this time.
DO NOT install
these 2 bolts in
this step.
Leg with
extra hole
(see detail
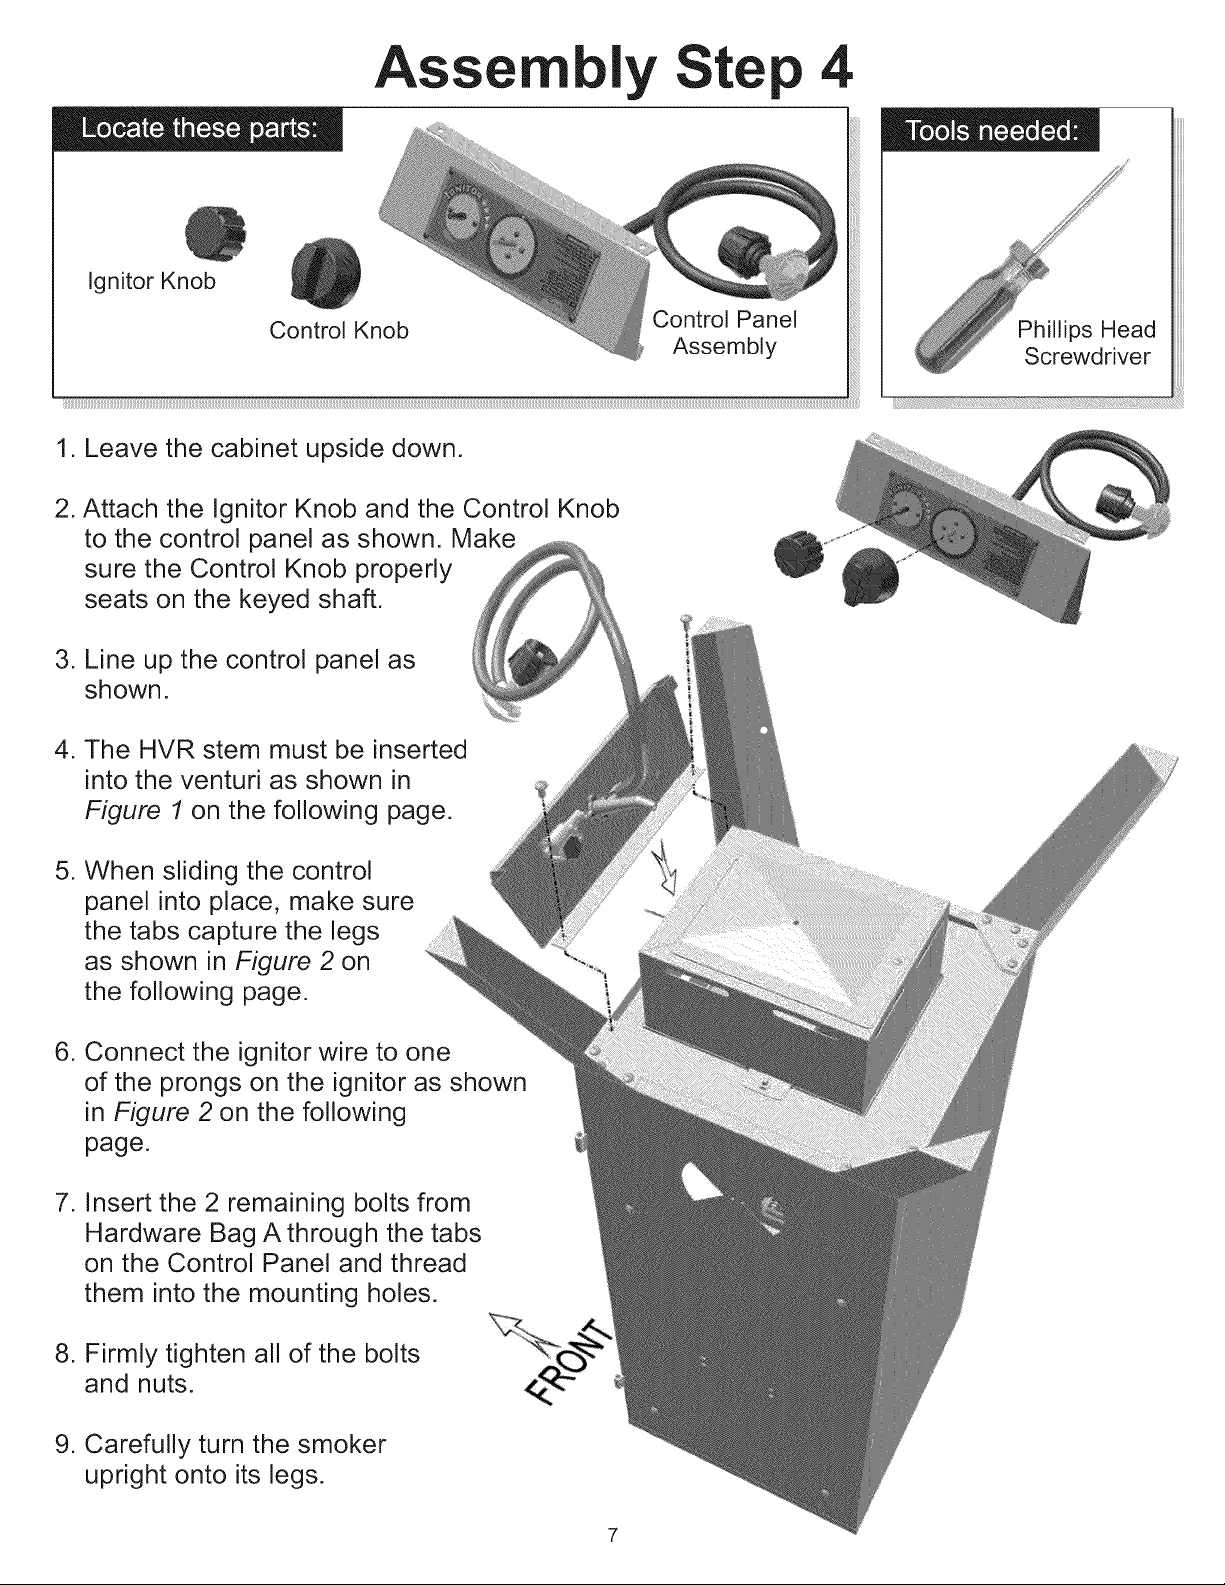
Assem
Ignitor Knob
Control Knob Control Panel
1. Leave the cabinet upside down.
2. Attach the Ignitor Knob and the Control Knob
to the control panel as shown. Make
sure the Control Knob properly
seats on the keyed shaft.
ly Step 4
iiiiiii
Assembly
Screwdriver
i!
3. Line up the control panel as
shown.
4. The HVR stem must be inserted
into the venturi as shown in
Figure 1 on the following page.
5. When sliding the control
panel into place, make sure
the tabs capture the legs
as shown in Figure 2 on
the following page.
6. Connect the ignitor wire to one
of the prongs on the ignitor as shown
in Figure 2 on the following
page.
7. Insert the 2 remaining bolts from
Hardware Bag A through the tabs
on the Control Panel and thread
them into the mounting holes.
8. Firmly tighten all of the bolts
and nuts.
9. Carefully turn the smoker
upright onto its legs.
 Loading...