

Page 1
AFTER SALES SUPPORT
USA
815-342-5850
7
General information
USA
General information
Reading and storing the user manual
This user manual accompanies this upper arm
blood pressure monitor and contains important
information on setup and handling. For
improved readability, the upper arm blood pressure
monitor will be referred to only as the “blood pressure
monitor” below.
Before using the blood pressure monitor, read the user
manual carefully. This particularly applies to the safety
notes. Failure to do so may result in personal injury or
damage to the blood pressure monitor.
Store the user manual for further use. Make sure to
include the user manual when passing the blood
pressure monitor on to third parties.
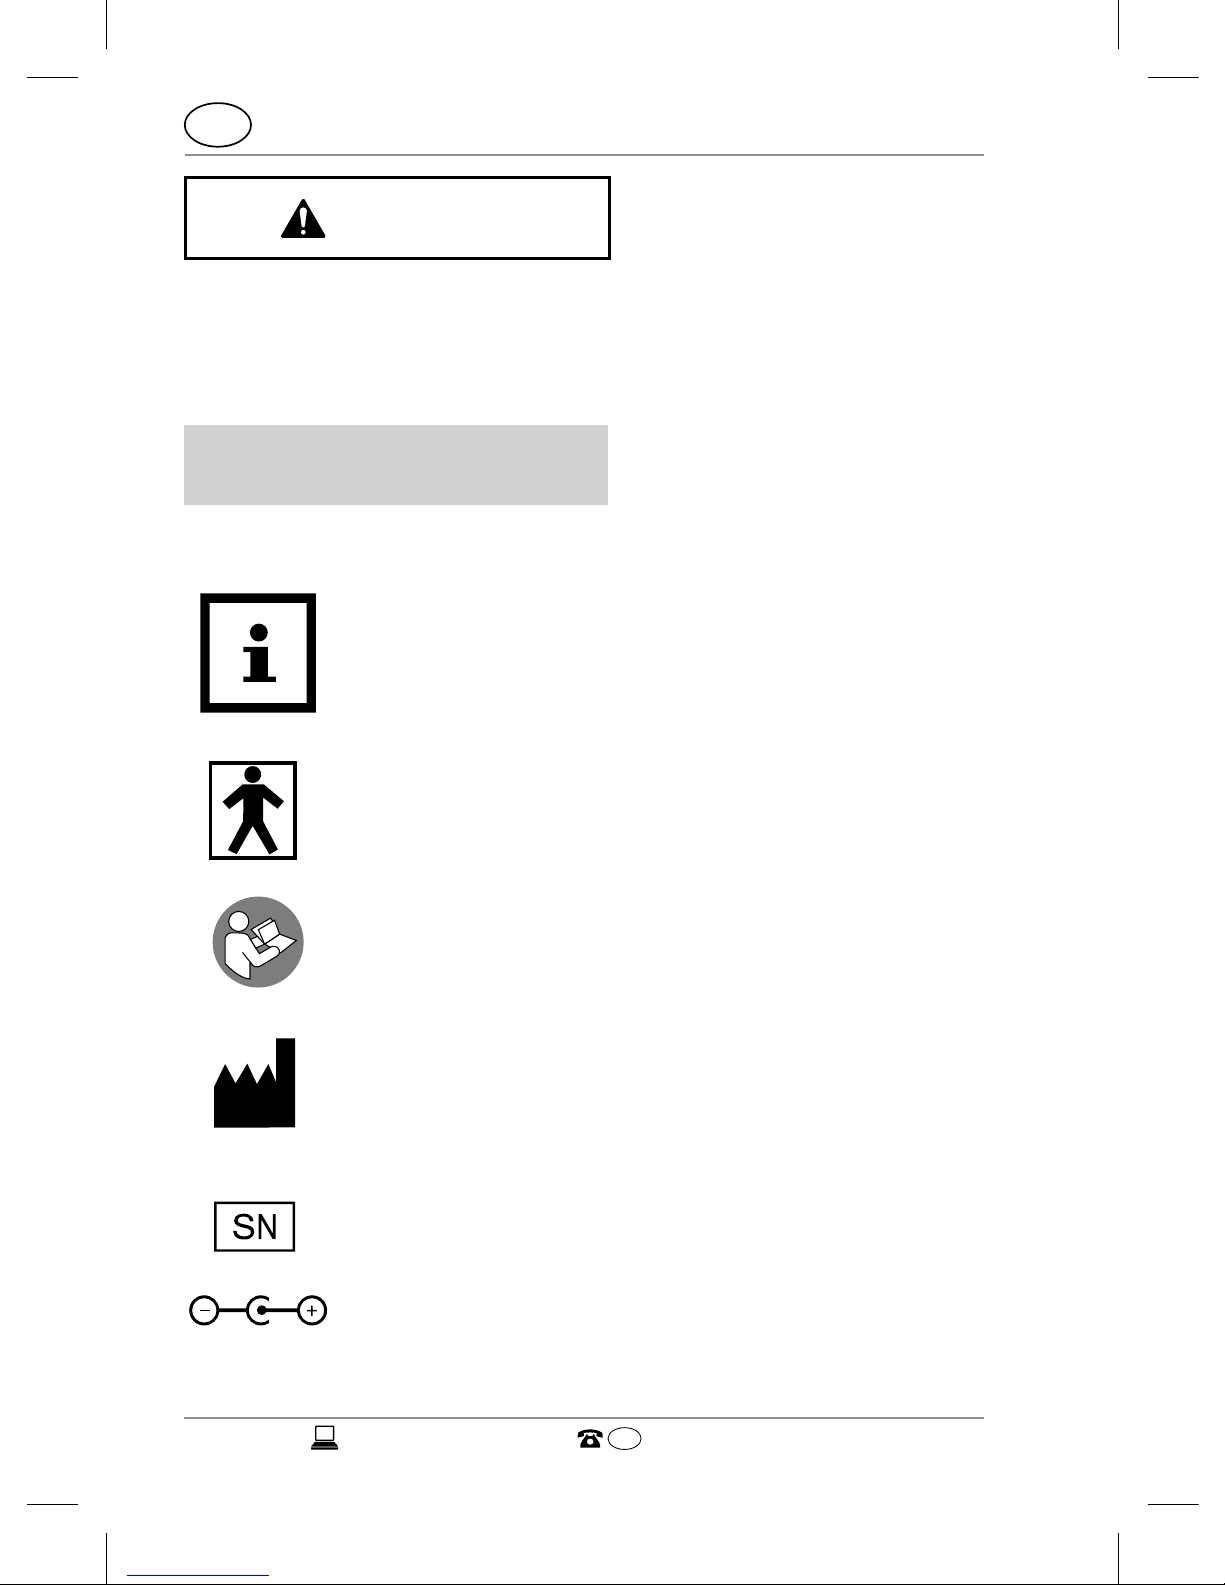
Explanation of symbols
The following symbols and signal words are used in this
user manual, on the blood pressure monitor or on the
packaging.
WARNING!
This signal symbol/word designates a hazard with
moderate risk, which may result in death or severe
injury if not avoided.
Page 2
AFTER SALES SUPPORT
General information
USA
8
USA
815-342-5850
CAUTION!
This signal symbol/word designates a hazard with low
risk, which may result in minor or moderate injury if not
avoided.
NOTICE!
This signal word warns of possible damage to property.
This symbol provides you with useful
additional information on handling and use.
This symbol identifies devices classified as
type BF.
This symbol indicates that you should read
the user manual and hold on to it.
This symbol identifies information from the
manufacturer (see chapter “Manufacturer
information”).
This symbol identifies the serial number of
the device.
This symbol indicates that the center (tip) of
the output plug is positive (+) and the barrel
(ring) of the output plug is negative (-).
Page 3
AFTER SALES SUPPORT
USA
815-342-5850
9
Safety
USA
Safety
Proper use
The blood pressure monitor is exclusively designed
for non-invasive measurement of an adult’s systolic,
diastolic blood pressure and pulse rate using the
oscillometric method. The readings are shown on the
display.
The blood pressure monitor issues a warning in the
event of cardiac arrhythmia. The levels measured
are classified and rendered in accordance with the
guidelines of the WHO (World Health Organisation).
The blood pressure monitor is not intended for use on
infants and children.
The blood pressure monitor is designed exclusively for
private use and is not suitable for commercial or clinical
use. The measurement position is on an adult’s upper
arm only.
Only use the blood pressure monitor as described in
this user manual. Any other use is deemed improper
and may result in damage to property or even personal
injury. The pressure blood monitor is not a toy for
children.
The manufacturer or vendor accepts no liability for
damage caused by improper or incorrect use.
Page 4
AFTER SALES SUPPORT
Safety
USA
10
USA
815-342-5850
Safety notes
WARNING!
Danger for children and persons with
impaired physical, sensory or mental
capacities (e.g. partially disabled
persons, older persons with reduced
physical and mental capacities) or lack
of experience and knowledge (e.g.
children).
− The blood pressure monitor may not
be used by children under the age of 8.
Keep the blood pressure monitor and its
accessories away from children under
the age of 8.
− The blood pressure monitor may be
used by children ages eight and over as
well as persons with impaired physical,
sensory or mental capacities or those
lacking experience and/or knowledge
if they are supervised or have been
instructed in how to safely use the blood
pressure monitor and have understood
the risks associated with operating it.
Page 5
AFTER SALES SUPPORT
USA
815-342-5850
11
Safety
USA
− Do not allow children to play with the
packaging wrapper. They may get
caught in it and suffocate.
WARNING!
Risk of injury!
Improper use of the blood pressure monitor
may result in injury.
− Only use the blood pressure monitor for
its intended purpose. Do not misuse in
any way.
− The blood pressure monitor is not
intended for infants or individuals who
cannot express their intentions.
− People with serious circulation problems
may experience discomfort. Consult
your physician prior to use.
− Contact your physician if test results
regularly indicate abnormal readings. Do
not attempt to self-treat these symptoms
without consulting a physician.
Page 6
AFTER SALES SUPPORT
Safety
USA
12
USA
815-342-5850
NOTICE!
Risk of damage!
Improper use of the blood pressure monitor
may result in inaccurate measurements and
damage to the blood pressure monitor.
− Do not disassemble or attempt to repair
the blood pressure monitor.
− Do not expose the blood pressure
monitor to strong magnetic fields (e.g.
transformers). Otherwise this could
cause errors in readings or damage to
the blood pressure monitor.
− Only use the blood pressure monitor at
an ambient temperature of +50 °F to
+104 °F and a humidity of 15 % to 90 %.
− Do not open the housing of the blood
pressure monitor.
− Protect the blood pressure monitor
against dirt, direct sunlight, severe
temperature fluctuations, chemicals and
mechanical shocks.
− Do not let the blood pressure monitor
fall down.
− Only use enclosed or original
replacement cuffs to ensure that the
Page 7
AFTER SALES SUPPORT
USA
815-342-5850
13
Safety
USA
measurements are correct.
− Do not start the measurement process
until the cuff has been fitted.
− Do not immerse the blood pressure
monitor in water and do not rinse it off
under running water.
− Protect the cuff and its hose from sharp
and pointy objects.
− Do not kink the cuff hose.
− Do not place any heavy objects on the
blood pressure monitor, the cuff or cuff
hose.
Battery notes
WARNING!
Health hazards!
There is a high health hazard if children or
animals swallow the batteries.
− Store the batteries so they are not
accessible to children and animals. If you
suspect a battery has been swallowed,
seek immediate medical advice.
Page 8
AFTER SALES SUPPORT
Safety
USA
14
USA
815-342-5850
WARNING!
Risk of explosion!
Improper handling of batteries increases
the risk of explosion.
− Store the batteries in a cool, dry place.
Never expose the batteries to excessive
heat (e.g. direct sunlight) and never
dispose of them in a fire.
− Only use batteries of the same type.
− Do not charge the batteries and do not
reactivate them with other means.
− Do not short circuit the batteries.
− Do not open the batteries.
− Ensure the correct polarity when
inserting the batteries. This is shown
in the battery compartment. Incorrect
installation may damage the blood
pressure monitor.
− Always use batteries of premium quality.
Batteries of poor quality may leak and
cause damage.
− Before inserting the batteries, make
sure the contacts inside the battery
Page 9
AFTER SALES SUPPORT
USA
815-342-5850
15
Safety
USA
compartment and on the battery itself
are clean and intact. Clean them if
necessary.
− Always replace all batteries in the
battery compartment at the same time.
− Remove the batteries from the blood
pressure monitor if they are dead.
Also remove the batteries if you do not
intend on using the blood pressure
monitor for a prolonged period of time.
Otherwise, the batteries may leak and
cause damages.
− If the batteries are leaking, remove
them immediately to prevent damaging
the blood pressure monitor. Do not
remove the batteries with your bare
hands or allow the battery fluid to come
into contact with skin, eyes or mucous
membranes. Wear normal household
rubber gloves to do so. If, however,
your skin has come into contact with
the battery fluid, wash your hands
immediately and consult a physician if
necessary.
Page 10
AFTER SALES SUPPORT
Safety
USA
16
USA
815-342-5850
− Batteries should be installed or replaced
only by an adult.
− Keep the blood pressure monitor away
from children when the battery cover is
removed.
− Remove the batteries before disposing
of the blood pressure monitor.
Safe use of power adaptor
WARNING!
Risk of injury!
Improper use of the power adaptor may
result in injury.
− Only use a suitable medical power
adaptor (DC 6.0 V, 600 mA, not provided)
with the blood pressure monitor.
− Only use the power adaptor in dry
and indoor areas. Do not let the power
adaptor come into contact with water or
other liquids.
− Connect the power adaptor only to an
alternating current (AC) power supply.
Make sure that the voltage corresponds
Page 11
AFTER SALES SUPPORT
USA
815-342-5850
17
Safety
USA
with the voltage details on the power
adaptor.
− Only connect the power adaptor to a
properly installed and easily accessible
socket so that you can quickly pull the
plug in an emergency.
− Never cover the power adaptor. Ensure
that sufficient ventilation is provided
in order to prevent the power adaptor
from overheating.
− Do not use the power adaptor if the
housing or cord is defective or has
other visible damages. In the event of
damage, only have the power adaptor
serviced by the manufacturer, its
customer service team or a similarly
qualified person to avoid risks.
− Always remove the power adaptor from
the power socket if you want to clean
the blood pressure monitor or do not
intend on using the blood pressure
monitor for a prolonged period of time.
Page 12
AFTER SALES SUPPORT
First use
USA
18
USA
815-342-5850
First use
Checking the blood pressure monitor
and package contents
NOTICE!
Risk of damage!
If you are not cautious when opening the
packaging with a sharp knife or other
pointy objects, you could damage the blood
pressure monitor.
− Be very careful when opening the
packaging.
1. Take the blood pressure monitor out of the
packaging and remove the packaging material.
2. Check to make sure that all components and
accessories have been received (see Fig. A).
3. Check whether the blood pressure monitor or the
individual parts exhibit damage. If this is the case,
do not use the blood pressure monitor. Contact the
manufacturer at the service address specified in the
warranty certificate.
Page 13
19
First use
USA
Installing or replacing batteries
NOTICE!
Risk of damage!
Incorrect battery installation may damage
the blood pressure monitor.
− Pay attention to the correct battery
polarity (+ or -).
1. Open the battery compartment
6
by removing the
battery compartment door
5
.
2. For battery replacement, remove the old batteries
first. Insert 4 batteries
12
(size AA) into the battery
compartment.
3. Close the battery compartment by replacing the
battery compartment door.
Using a power adaptor
The blood pressure monitor can also be
powered by a power adaptor (not provided).
A medical power adaptor (DC 6.0 V, 600 mA)
is recommended for use. The adaptor
connection pin must be positive inside and
negative outside with a 0.08 inch (2.1 mm)
coaxial joint.
1. Connect the output plug of the power adaptor (not
provided) to the power adaptor jack
8
.
2. Connect the power adaptor to a socket.
Page 14
AFTER SALES SUPPORT
System settings
USA
20
USA
815-342-5850
System settings
The system settings allow you to select users, and set
date, time and time format.
1. After the blood pressure monitor is powered, press
the SET button
4
.
Do not press the START/STOP button
3
at this
moment.
A user icon (
or )
14
will show on the display
1
.
2. Press the M button
2
to select either user icon 1 or
user icon 2.
This allows up to two users to save and accumulate
the test results (60 memory slots per user).
3. Press the SET button to confirm the setting.
A message “
” (year) will show on the display.
4. Press the M button to set the year and then press the
SET button to confirm.
5. Repeat steps 3 to 4 to set the month, date, hour time
and minute time.
The date
20
and time
21
are shown at the lower left
corner of the display.
6. After the minute time is set, press the M button to
select 12-hour time format or 24-hour time format.
The 12-hour time format is indicated by the message
“
” and the 24-hour time format by “ ”.
7. Press the SET button for the voice readout setting.
Press the M button to set it “
” (English),
“ ” (Spanish) or “ ” (OFF).
Page 15
21
Advice on use
USA
8. Press the SET button for the volume level setting.
Press the M button to set the volume level of the
voice readout function.
9. Press the START/STOP button to save the settings.
The blood pressure monitor will also automatically
save all settings and switch itself off without any
operations for 3 minutes.
It is important to set the date and time.
Otherwise, you will not be able to save the
measurement results correctly and to access
them again later.
Advice on use
For ideal measurement results, follow the
basic rules below when measuring your
blood pressure.
− If possible, always measure your blood pressure at
the same time of day for comparable results.
− Measurement comparisons should only be made
when the blood pressure monitor is used on the
same arm, in the same position and at the same time
of the day.
− Morning time or any time you feel relaxed and stressfree is the best for measurements.
− Do not stand during measurements. Sit or lay down
in a relaxed position while keeping your arm level
with your heart.
− Avoid speaking or moving the body parts during the
Page 16

AFTER SALES SUPPORT
Advice on use
USA
22
USA
815-342-5850
measurements.
− Relax at least 30 minutes before you perform a
measurement, do not smoke, eat or drink and avoid
physical exertion.
− Give the circulatory system about five minutes to
calm down each time before a measurement is
made.
− If the measurements are not plausible, repeat the
measurement.
− Wait at least five minutes before taking another
measurement for the same person.
− The results of the blood pressure measurements
are for information only and are no substitute for
a medical examination. Do not make any medical
decisions based on your own measurements (e.g.
with respect to taking medication or their dosage).
Consult your physician if you have questions about
the measurements.
− Do not use this blood pressure monitor to perform
any measurements on preeclampsia patients or
newborn babies.
− Consult a physician before using the blood pressure
monitor on pregnant persons.
− Do not use the blood pressure monitor together with
high-frequency surgical devices.
− Only use the blood pressure monitor for persons
with an upper arm circumference between 8.7 and
16.5 inch (22 and 42 cm).
− The function of the affected body part may be
Page 17
AFTER SALES SUPPORT
USA
815-342-5850
23
Advice on use
USA
impaired when inflating the cuff.
− Do not kink, compress or otherwise restrict the cuff
hose.
− Always measure the blood pressure on the same
arm, ideally, the left arm. Measuring on the left arm
may provide more accurate results as it is closer to
the heart.
− Do not use the cuff on limbs whose arteries or veins
are undergoing medical treatment, e.g. in the form
of intravascular access, intravascular therapy or
arteriovenous (A-V) shunt.
− Do not fit the cuff on persons, who have undergone a
mastectomy.
− Keep in mind that the restriction of circulation
through the inflation of the cuff may temporarily
cause other measurement devices connected to the
same body part to malfunction.
− Avoid performing frequent measurements and
prolonged pressure in the cuff to prevent injury.
− The following illnesses or symptoms may result in
incorrect measurements or affect the measurement
accuracy of the blood pressure monitor:
• Diseases of the cardiovascular system,
• very low blood pressure,
• diabetes,
• circulatory disorder and cardiac arrhythmia,
• shivering,
• shaking.
Page 18
AFTER SALES SUPPORT
Performing a measurement
USA
24
USA
815-342-5850
− The following conditions may result in incorrect
measurements or affect the measurement accuracy
of the blood pressure monitor:
• Improper cuff placement,
• Improper body position,
• Feeling anxious or nervous.
Performing a measurement
CAUTION!
Risk of injury!
Improper use of the blood pressure monitor
may result in injury.
− Avoid prolonged exposure to the
pressure exerted by the cuff, e.g. by
kinking the cuff hose and by performing
prolonged or frequent measurements.
− Do not place the cuff over wounds to
prevent further injury.
− Remove the cuff from your arm in the
event of a malfunction.
Fitting the cuff
1. Expose the arm where the blood pressure will be
measured. Use the left arm if possible.
Page 19
AFTER SALES SUPPORT
USA
815-342-5850
25
Performing a measurement
USA
2. Wrap the cuff
9
around the exposed upper arm.
The bottom edge of the cuff must be 0.4–0.8 inch
(1–2 cm) above the elbow and over the artery (see
step 1 in Fig. C). The cuff hose
10
must point towards
the middle of the palm.
3. Place the free end of the cuff around the arm.
The cuff must be fitted tightly enough so that two
fingers can fit under the cuff.
4. Once the cuff has been properly fitted, close the
hook and loop fastener on the cuff.
5. Connect the air plug
11
of the cuff to the air jack
7
.
Assuming the correct posture
Perform measurements while sitting or lying down and
observe the following instructions:
− The cuff must be roughly at the height of the heart,
but no higher (see step 2 in Fig. C).
− Rest the arms in a relaxed position. A chair with
armrests or a table are required for measurements
while sitting (see step 3 in Fig. C).
− Do not move and do not speak while performing a
measurement.
When sitting, observe also the following instructions:
− Sit in a relaxed position when measuring the blood
pressure and lean back.
− Place the feet flat on the ground.
− Do not cross the legs.
Page 20
AFTER SALES SUPPORT
Performing a measurement
USA
26
USA
815-342-5850
Starting a blood pressure measurement
You can always cancel blood pressure
measurements that are in progress (e.g. when
the pressure in the cuff becomes too extreme)
by pressing the START/STOP button.
1. After the blood pressure monitor is powered, press
the SET button
4
.
Do not press the START/STOP button
3
at this
moment.
A user icon (
or )
14
will show on the display
1
.
2. Press the M button
2
to select either user icon 1 or
user icon 2.
This allows the measurements to be saved into
the memory slots of the selected user after the
measurement is done.
3. Press the START/STOP button to save the setting.
You may skip steps 1–3 if you do not intend to
save the measurement results into memory.
4. Press the START/STOP button to start the
measurement.
5. You will hear a beep tone and then an English
instruction, saying that the measurement will now
begin.
If there is residual air in the cuff
9
from the previous
measurement, air will be released from the cuff until
Page 21
AFTER SALES SUPPORT
USA
815-342-5850
27
Performing a measurement
USA
the pressure is stablized before the measurement.
During this time, the air release indicator
24
will be
flashing on the display.
6. The cuff will be initially inflated to a pressure of
190 mmHg. You will feel it tightening.
If your systolic blood pressure is over 190 mmHg, the
blood pressure monitor will automatically re-inflate
the cuff to measure the blood pressure.
7. As soon as the pulse rate is detected, the pulse rate
indicator
17
will start to flash. Keep relaxed during
this time, avoid speaking and moving any body
parts.
8. Once the measurement is complete, the air will be
released from the cuff.
The systolic blood pressure
15
, diastolic blood
pressure
16
and pulse rate
18
will be shown on the
display. The measurements will also be read out in
English.
The corresponding WHO blood pressure classification
indicator
25
will also be shown (see chapter “WHO
classification”).
Page 22
AFTER SALES SUPPORT
Performing a measurement
USA
28
USA
815-342-5850
Deleting or storing measurement
results
− If due to unfavourable measurement conditions
or for any other reasons you think the current
measurement results are inaccurate, press the SET
button
4
to delete them.
− If the results are not deleted, they will be
automatically stored into the memory slots of the
selected user (see steps 1–3 in the chapter “Starting a
blood pressure measurement”).
Power off
− Press the START/STOP button
3
to switch the blood
pressure monitor off.
− The blood pressure monitor will automatically switch
off after 3 minutes.
Page 23
AFTER SALES SUPPORT
USA
815-342-5850
29
Evaluating the measurements
USA
Evaluating the measurements
About blood pressure
Blood pressure is the force of blood pushing against the
walls of arteries. It is typically measured in millimeters
of mercury (mmHg).
Systolic blood pressure is the maximum force exerted
against blood vessel walls each time the heart beats.
Diastolic blood pressure is the force exerted on blood
vessels when the heart is resting between beats.
An individual’s blood pressure frequently changes
throughout the course of a day. Excitement and tension
can cause blood pressure to rise, while drinking
alcohol and bathing can lower blood pressure. Certain
hormones like adrenaline (which your body releases
under stress) can cause blood vessels to constrict,
leading to a rise in blood pressure.
If the blood pressure measuring numbers become
too high, it means the heart is working harder than it
should.
Cardiac arrhythmia
− If the blood pressure monitor detects an irregular
heart rhythm two or more times during the
measuring process, the arrhythmia indicator
22
will
show on the display
1
.
− Irregular heart rhythm is defined as a heart rhythm
that is either 25 % slower or faster than the average
heart rhythm.
Page 24
AFTER SALES SUPPORT
Evaluating the measurements
USA
30
USA
815-342-5850
− Consult your physician if the arrhythmia indicator
frequently appears with your measurement
results. At the same time, make sure you comply
with the basic rules for correct measurement of
blood pressure (see chapters “Advice on use” and
“Performing a measurement”).
Average of measurement results
− When the blood pressure monitor is switched off,
press the M button
2
to show the average values
from the last three measurement results.
− The average indicator
23
will show on the display
along with the average values.
To check the average values from another
user, select the desired user before pressing
the M button. See steps 1–3 in the chapter
“Starting a blood pressure measurement”.
Checking memory
1. When the blood pressure monitor is switched
off, press and hold the M button
2
to access the
memory of the current user.
The memory slot indicator
19
will show along with
the current memory slot
18
.
2. Press the M button repeatedly to scroll through all
memory slots with the saved measurement results.
Page 25
31
Evaluating the measurements
USA
There are 60 memory slots for each user. When
all memory slots are used, the oldest stored
measurement results will be erased to free up a
memory slot for the new results.
To check the memory from another user,
select the desired user before you press
and hold the M button. See steps 1–3 in
the chapter “Starting a blood pressure
measurement”.
Deleting memory
− When you are checking the memory of a user, press
and hold the SET button
4
to delete all stored
measurement results.
− You will hear a beep tone when deletion is complete.
Memory cannot be recovered once deleted.
WHO classifications
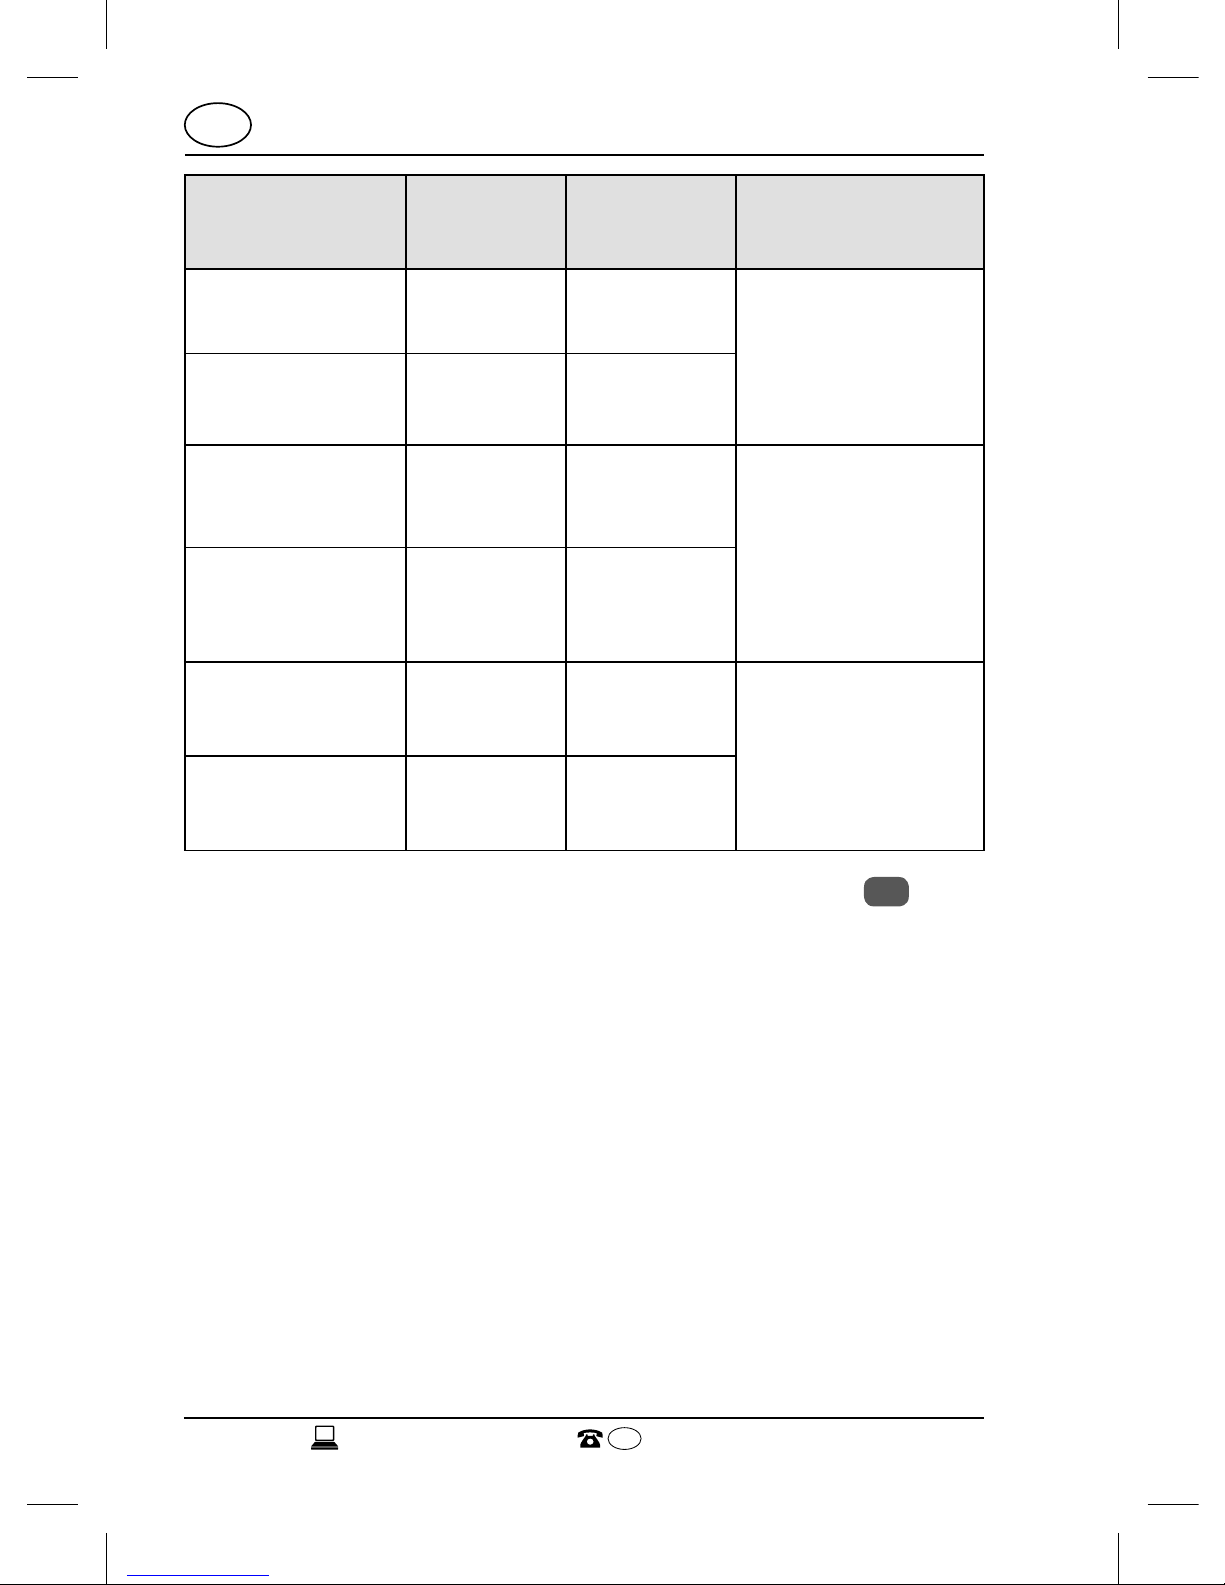
The World Health Organisation (WHO) has defined six
categories for the classification of blood pressure levels.
This classification is provided in the following table.
Page 26
AFTER SALES SUPPORT
Evaluating the measurements
USA
32
USA
815-342-5850
Range Systoles
(mmHg)
Diastoles
(mmHg)
Remarks
Optimal < 120 < 80 Check your
blood pressure
on your own
regularly.
Normal 120–129 80–84
High-normal 130–139 85–89 Have your
blood pressure
checked
regularly by a
physician.
Mild
hypertension
140–159 90–99
Moderate
hypertension
160–179 100–109 Have your
physician
examine you
promptly.
Severe
hypertension
≥ 180 ≥ 110
The WHO blood pressure classification indicator
25
indicates the range for the measured blood pressure.
If the values for systoles and diastoles are within two
different ranges, the higher of the two ranges will be
displayed.
The WHO only offers a general guideline. It is not
unusual that variances occur in different persons. Ask
your physician for blood pressure levels that are normal
for you and for levels that are considered dangerous.
Page 27
AFTER SALES SUPPORT
USA
815-342-5850
33
Cleaning and maintenance
USA
Cleaning and maintenance
NOTICE!
Risk of damage!
If you do not clean the blood pressure
monitor properly, you can damage the
blood pressure monitor.
− Do not use any cleaners or solvents.
− Do not use any brushes with metal or
nylon bristles, sharp or metallic cleaning
utensils such as knives, hard scrapers
and the like.
• Clean the blood pressure monitor, the cuff
9
and
the cuff hose
10
carefully with a damp cloth.
• After cleaning, use a soft cloth to dry all parts
completely.
Changing the batteries
When the low battery indicator
26
shows, change the
batteries
12
according to the steps described in the
chapter “Installing or replacing batteries”.
Page 28
AFTER SALES SUPPORT
Storage
USA
34
USA
815-342-5850
Storage
If you do not use the blood pressure monitor for a
prolonged period of time, observe the following notes:
− Take the batteries
12
out of the battery compart-
ment
6
or disconnect it from the power adaptor.
− Store the blood pressure monitor in the provided
storage bag
13
for protection.
− Do not store the blood pressure monitor near heat
sources.
− Take note to the information concerning the storage
environment (see chapter “Technical data”).
− Do not place any heavy objects on the blood
pressure monitor, the cuff
9
and the cuff hose
10
.
Troubleshooting
NOTICE!
Risk of damage!
If you do not handle the blood pressure
monitor properly, you may damage it.
− Do not open the housing of the blood
pressure monitor. Liability and warranty
claims are waived in the event of repairs
performed by the user or incorrect
operation.
Page 29
AFTER SALES SUPPORT
USA
815-342-5850
35
Troubleshooting
USA
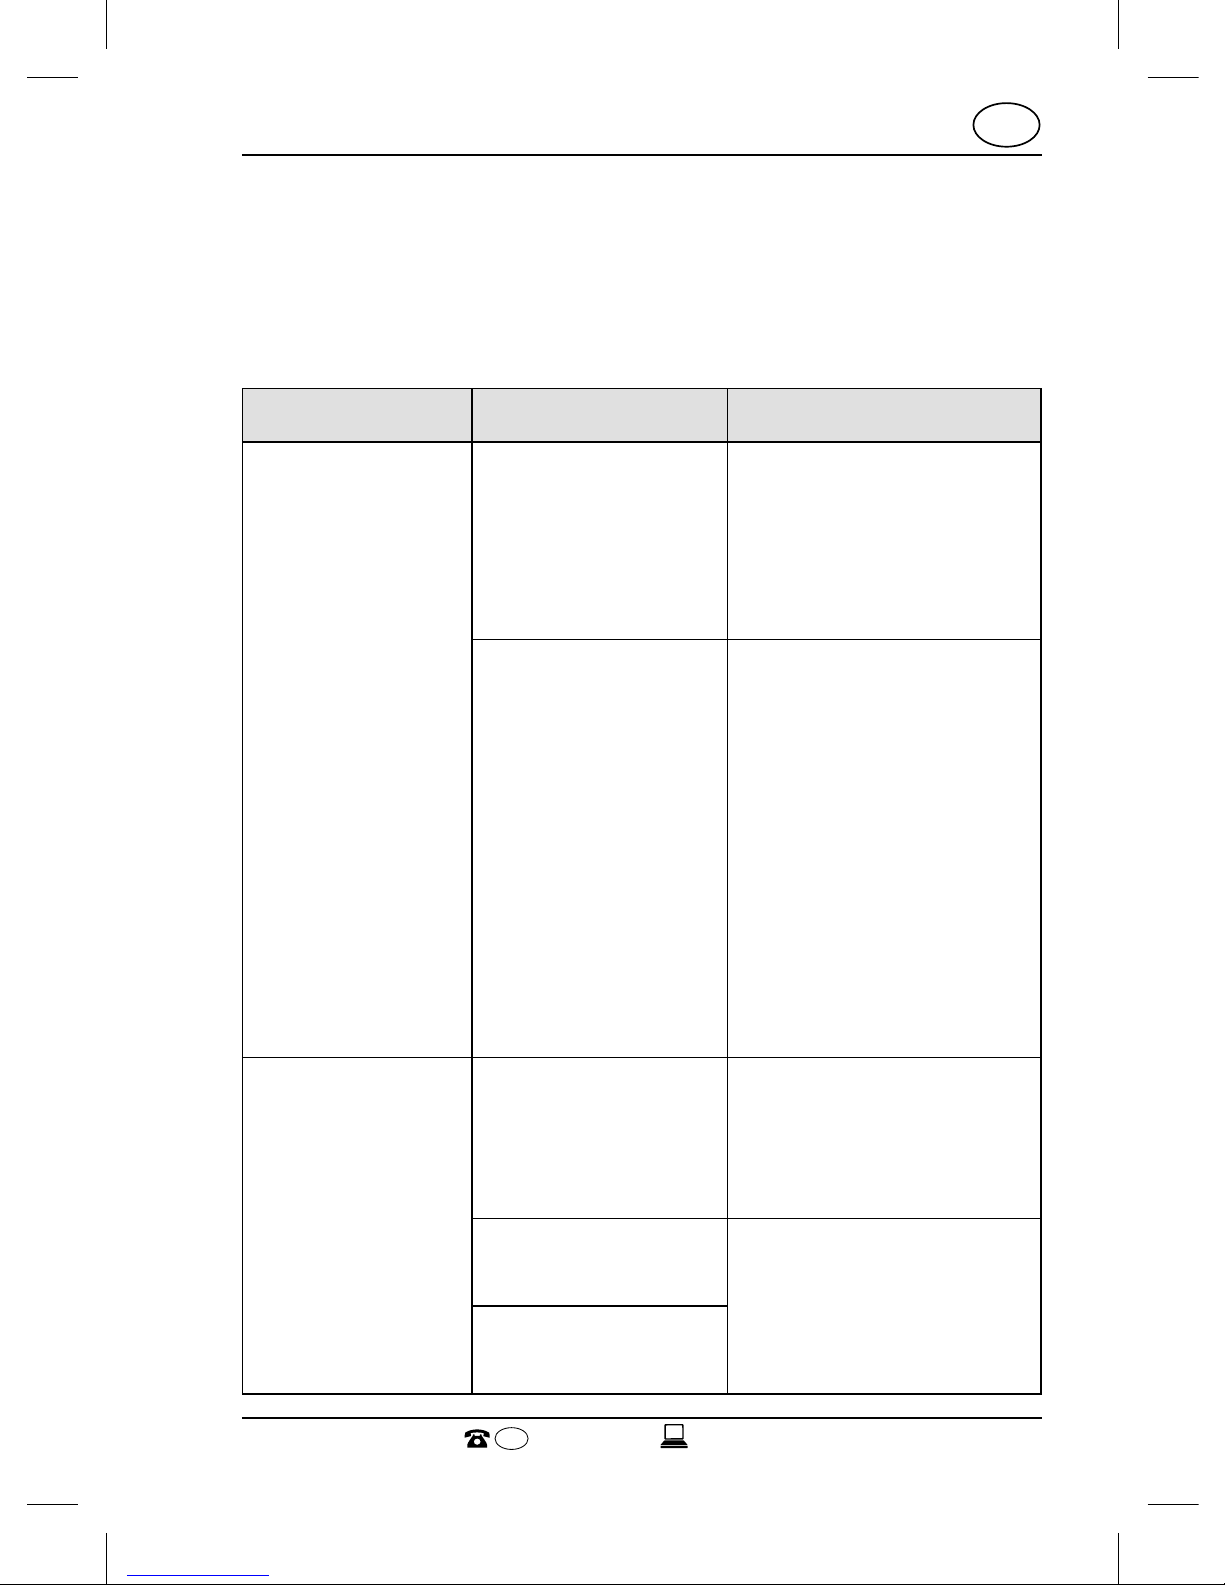
Some problems may be caused by minor faults that you
can fix yourself. To do so, follow the instructions in the
following table. If it is still not possible to resolve the
problem, contact the customer service. Do not repair
the blood pressure monitor yourself.
Problem Possible cause Solution
Blood pressure
results are not
within typical
range.
The cuff is too
tight or not properly positioned
on the arm.
Reposition the cuff
(approximately
0.4–0.8 inch (1–2 cm))
above the elbow
joint.
Inaccurate test
results due to
body movement
or blood pressure
monitor
movement.
Sit in a relaxed
position with the
arm placed near the
heart. Avoid speaking
or moving body parts
during measurement.
Make sure the blood
pressure monitor is
placed in a stationary
position throughout
the measurement.
“Err” is
displayed.
The cuff fails to
inflate properly.
Make sure the cuff
hose is properly
connected to the cuff
and monitor.
Improper
operation.
Read the user manual
carefully and perform
the measurement
again properly.
Pressurization is
over 300 mmHg.
Page 30

AFTER SALES SUPPORT
Technical data
USA
36
USA
815-342-5850
Technical data
Product description: Upper Arm Blood Pressure
Monitor
Model: ABO 523
Product code: 93630
Display: LCD Digital Display Size
Size of display: 4 × 2.7 inch
(102.1 mm × 68.9 mm)
Measurement method: Oscillometric method
Measurement range: Pressure: 0–300 mmHg
Pulse: 30–180 beats/minute
Measurement accuracy: Pressure: ± 3 mmHg
Pulse: ± 5 %
Tolerance: +/- 2 % of the reading above
200 mmHg
Pressurization: Automatic
Memory: 120 memory slots in two
groups with date and time
Function: Irregular heartbeat detection
WHO classification indicator
Average of last 3 measurements
Low battery detection
Automatic power-off
Page 31
AFTER SALES SUPPORT
USA
815-342-5850
37
Technical data
USA
Power source: 4× AA batteries or
medical power adaptor
(DC 6.0 V, 600 mA, not
provided)
Battery life: Approx. 2 months at
3 measurements per day
Weight of device: Approx. 12.5 oz (353 g)
(without batteries)
Weight of cuff: 2.7 oz (77 g)
Dimensions (L × W × H): Approx. 6.5 × 4.3 × 2.4 inch
(164 × 111 × 60 mm)
Cuff circumference: Approx. 5.7 (W) × 22 (L) inch
(145 (W) × 560 (L) mm)
(Medium cuff: Fits arm
circumference 8.7–16.5 inch
(22–42 cm))
Operating temperature: 50 °F–104 °F (10 °C–40 °C)
Operating humidity: 15 %–90 % R.H.
Operating pressure: Atmospheric pressure
Storage temperature: –4 °F–131 °F (–20 °C–55 °C)
Storage humidity: 15 %–90 % R.H.
Ingress protection rating:IP 22
Classification: Internal powered equipment,
Type BF
, cuff is the applied
part
Page 32

AFTER SALES SUPPORT
Technical data
USA
38
USA
815-342-5850
Specifications are subject to change without notice.
This blood pressure monitor complies with the
European regulations and bears the CE mark „CE 0123“.
This blood pressure monitor also complies with mainly
following standards (included but not limited):
Safety standard:
EN 60601-1 Medical electrical equipment part 1:
General requirements for safety
EMC standard:
EN 60601-1-2 Medical electrical equipment part 1-2:
General requirements for safety - Collateral standard:
Electromagnetic compatibility - Requirements and tests
Performance standards:
EN 1060-1 Non-invasive sphygmomanometers -
General requirements
EN 1060-3 Non-invasive sphygmomanometers Supplementary requirements for electromechanical
blood pressure measuring systems
EN 1060-4 Non-invasive sphygmomanometers - Test
procedures to determine the overall system accuracy of
automated non-invasive sphygmomanometers
Page 33
AFTER SALES SUPPORT
USA
815-342-5850
39
Full display reference
USA
Full display reference
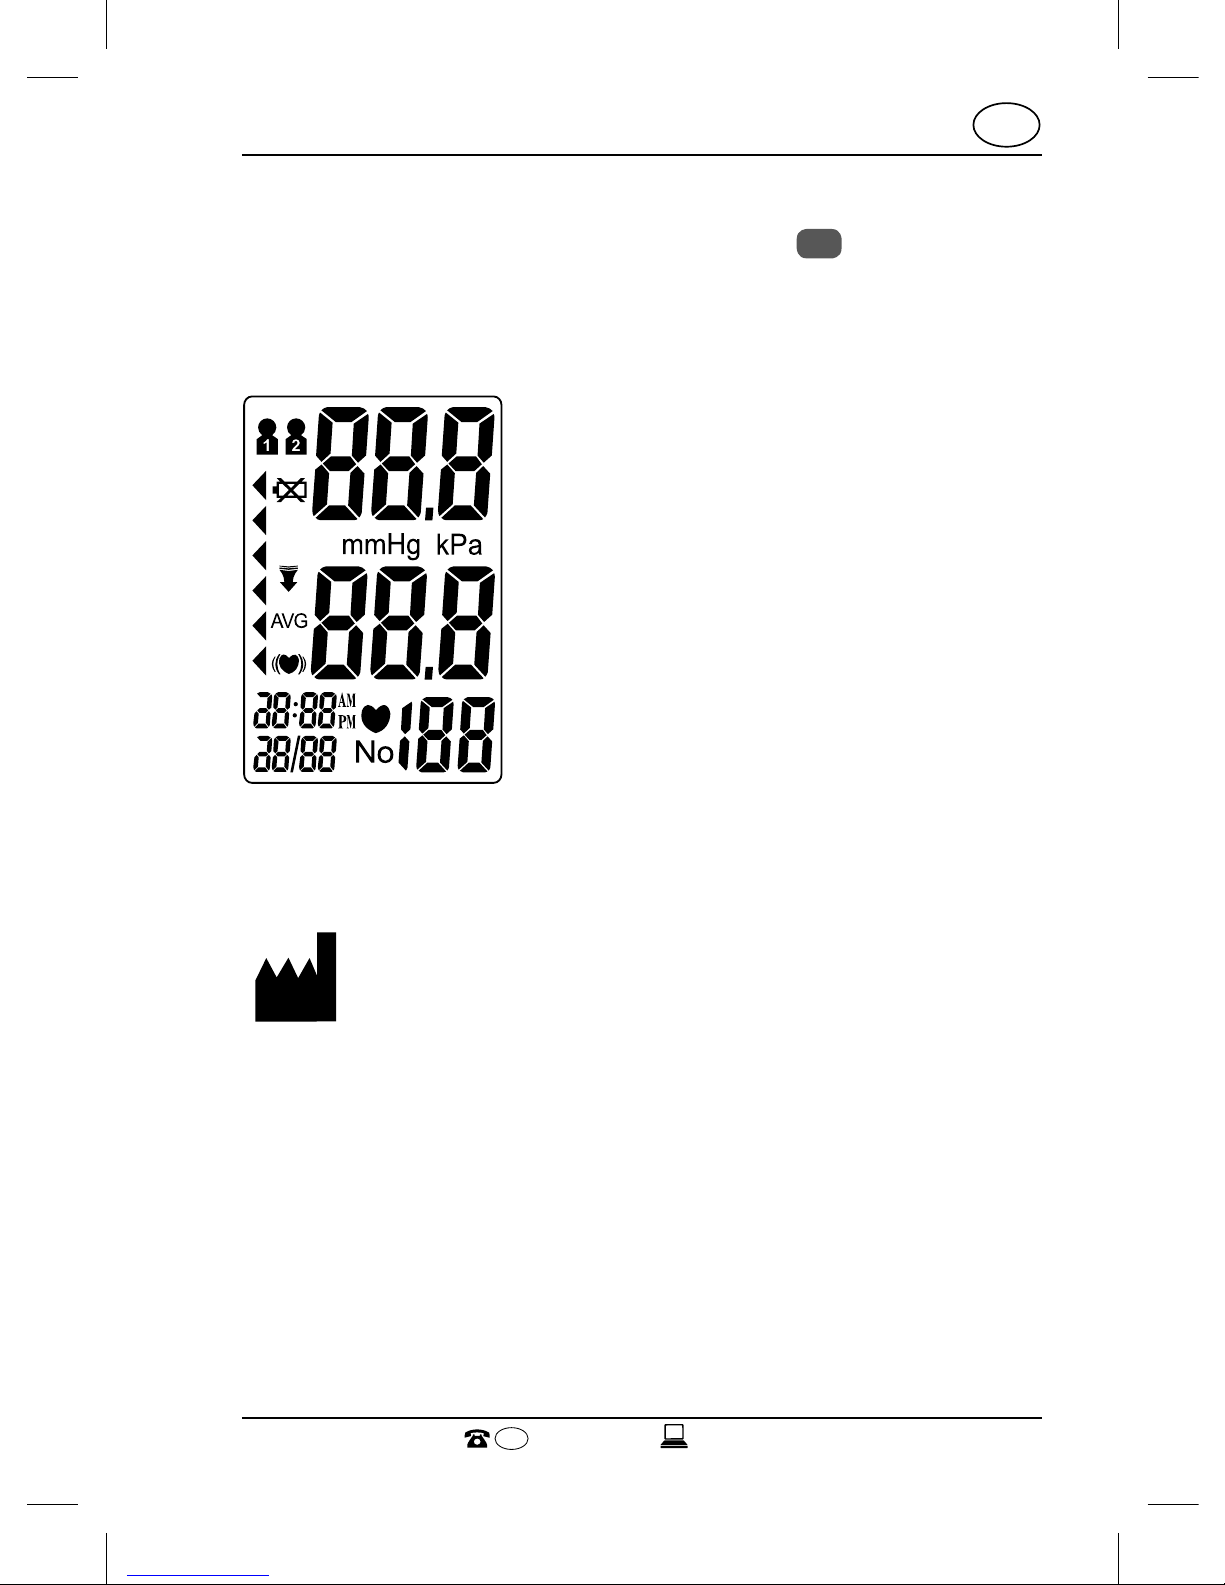
The following figure shows the display
1
with all
indicator segments. Use this figure to determine
whether the display is properly showing the
measurements.
Manufacturer information
Manufacturer:
Handelshaus Dittmann GmbH
Kissinger Straße 68
97727 Fuchsstadt
GERMANY
Page 34

AFTER SALES SUPPORT
FCC statement
USA
40
USA
815-342-5850
FCC statement
This device complies with Part 15 of the FCC Rules.
Operation is subject to the following two conditions: (1)
this device may not cause harmful interference, and
(2) this device must accept any interference received,
including interference that may cause undesired
operation.
NOTE: This equipment has been tested and found
to comply with the limits of a Class B digital device,
pursuant to Part 15 of the FCC Rules. These limits are
designed to provide reasonable protection against
harmful interference in a residential installation. This
equipment generates uses and can radiate radio
frequency energy and, if not installed and used in
accordance with the instructions, may cause harmful
interference to radio communications. However, there
is no guarantee that interference will not occur in a
particular installation. If this equipment does cause
harmful interference to radio or television reception,
which can be determined by turning the equipment
off and on, the user is encouraged to try to correct the
interference by one or more of the following measures:
• Reorient or relocate the receiving antenna.
• Increase the separation between the equipment and
receiver.
• Connect the equipment into an outlet on a circuit different from that to which the receiver is connected.
• Consult the dealer or an experienced radio/TV
technician for help.
Page 35
AFTER SALES SUPPORT
USA
815-342-5850
41
Disposal
USA
WARNING: changes or modifications to this unit not
expressly approved by the party responsible for
compliance could void user‘s authority to operate the
equipment.
Disposal
Disposing of the packaging
Dispose of the packaging separated into single type
materials. Dispose of cardboard and carton as waste
paper and foils via the recyclable material collection
service.
Disposing of the blood pressure monitor
Old devices do not belong in the household waste!
Should the blood pressure monitor no longer be
capable of being used at some point in time, dispose
of it in accordance with the regulations in force in your
state or country.
Batteries and rechargeable batteries may not be
disposed of with household waste!
As the end user you are required by law to bring all
batteries and storage batteries, regardless whether
they contain harmful substances* or not, to a collection
point run by the communal authority or to a retailer,
so that they can be disposed of in an environmentally
friendly manner.
* labelled with: Cd = cadmium, Hg = mercury, Pb = lead
Page 36
Page 37
USA
Description of malfunction
Return your completed
warranty card together
with the faulty product
to:
Greater Concepts By
Design Team
1803 Springside Drive
Plainfield IL 60586
USA
Your details:
Name
Address
E-mail
Date of purchase*
* We recommend you keep the receipt with this warranty card.
Location of purchase
UPPER ARM BLOOD
PRESSURE MONITOR
815-342-5850
Model: ABO 523 Product code: 93630 01/2017
WARRANTY CARD
AFTER SALES SUPPORT
USA
YEARS WARRANTY
3
Hotline: Regular landline fees
Page 38

USA
Warranty conditions
Dear Customer,
The ALDI warranty is a full warranty offering you the
following benefits:
Warranty period: 3 years from date of purchase.
6 months for movable parts and
consumables under normal and
proper conditions of use (e.g.
rechargeable batteries).
Costs: Free repair/exchange or refund.
No transport costs.
ADVICE: Please contact our service hotline by
phone, e-mail or fax before sending
in the device. This allows us to provide
support in the event of possible operator errors.
In order to make a claim under the warranty, please
send us:
• The faulty item with all component parts,
the original receipt and the warranty card
properly completed.
Page 39

USA
The warranty does not cover damage caused by:
• Accident or unanticipated events (e.g.
lightning, water, fire).
• Improper use or transport.
• Failure to follow the safety and
maintenance instructions.
• Other improper treatment or modifica-
tion.
After the expiration of the warranty period, you may wish
to have your product repaired at your own expense. You
will be notified of the repair costs in advance.
This warranty gives you specific legal rights, and you may
also have other rights which vary from state to state but
this warranty is not intended to exceed statutory minimum requirements beyond what is included above.
This warranty does not limit the statutory obligation of the
seller arising from any implied warranties. The period of
warranty can only be extended in accordance with applicable law.
Neither the service company nor ALDI will assume any liability for data or settings stored on any returned product.
Page 40
Page 41
SERVICIO POSVENTA
47
Contenido
USA
USA
815-342-5850
Conjunto ........................... 4
Uso ................................... 5
Volumen de suministro/
piezas del dispositivo .... 48
Código QR ....................... 49
Información general ......50
Leer y guardar este
manual del usuario..... 50
Descripción de
símbolos ....................... 50
Seguridad ...................... 52
Uso apropiado ..............52
Indicaciones de
seguridad ......................53
Aviso sobre las pilas ....56
Uso seguro del adap-
tador de potencia ....... 59
Primera puesta
en servicio .......................61
Comprobación del
tensiómetro y el conteni-
do del paquete .............61
Instalación o sustitución
de las pilas ....................62
Utilización de un adap-
tador de potencia ........62
Ajustes del sistema ........ 63
Consejo sobre el uso ...... 64
Ejecución de
una medición ................. 67
Ajuste del brazalete .....67
Adopción de la posición
correcta ........................68
Inicio de la medición de
la presión arterial ........ 69
Eliminación o almacenamiento de los resultados de la medición ... 71
Apagado ........................ 71
Evaluación de las
mediciones ......................72
Acerca de la presión
arterial ...........................72
Arritmia cardiaca .......... 72
Promedio de los resul-
tados de medición .......73
Comprobación de la
memoria ........................ 73
Eliminación de la
memoria ........................ 74
Clasificaciones
de la OMS .......................75
Limpieza y
mantenimiento ...............76
Cambio de las pilas .........76
Almacenamiento ............77
Resolución
de problemas ..................77
Datos técnicos ................ 79
Referencia del display
lleno ............................... 82
Información
del fabricante ................ 82
Declaración de la FCC ..... 83
Eliminación ....................84
Eliminación
del embalaje ................ 84
Eliminación del
tensiómetro ................. 84
Tarjeta de garantía ........ 87
Condiciones
de garantía ....................88
Contenido
Page 42
SERVICIO POSVENTA
Volumen de suministro/piezas del dispositivo
USA
48
USA
815-342-5850
1
Display
2
Botón M
3
Botón START/STOP
4
Botón SET
5
Tapa del compartimento de pilas
6
Compartimento de
pilas
7
Toma de aire
8
Toma del adaptador
de potencia
9
Brazalete
10
Tubo del brazalete
11
Clavija de aire
12
Pilas
13
Bolsa de
almacenamiento
14
Icono de usuario
(1 o 2)
15
Presión arterial
sistólica
16
Presión arterial
diastólica
17
Indicador de
frecuencia del pulso
18
Frecuencia del pulso /
unidad de memoria
19
Indicador de unidad
de memoria
20
Fecha
21
Hora
22
Indicador de arritmia
23
Indicador de
promedio
24
Indicador de salida
de aire
25
Indicador de la clasificación de presión
arterial de la OMS
26
Indicador de pilas
bajas
Volumen de suministro⁄piezas del
dispositivo
El volumen de suministro incluye
cuatro pilas de 1.5 V de tipo AA.
Page 43
SERVICIO POSVENTA
49
Códigos QR
USA
USA
815-342-5850
Los códigos QR le ayudan a encontrar
la información que busca fácilmente y
rápidamente
Si busca información sobre el producto, recambios o accesorios,
datos sobre garantías o soporte posventa, o si quiere ver un video
de demostración del producto, los códigos QR le ayudan a encontrar
lo que busca rápidamente.
¿Qué es un código QR?
Un código QR (QR = respuesta rápida) es un tipo de matriz que se puede leer con la cámara de su smartphone y que contiene, por ejemplo,
un enlace a una página web o información de contacto.
Ventaja: No es necesario introducir una dirección web o datos de
contacto de forma manual.
Cómo funciona
Para escanear el código QR solo necesita un smartphone con software
que pueda leer códigos QR y una conexión a Internet.*
Este tipo de software está disponible gratis en el app store de su
smartphone.
Pruébelo ahora
Escanee el código QR con su smartphone para
averiguar más sobre el producto Aldi que ha
comprado.*
Su portal de servicio de Aldi
Todos los datos mencionados también se encuentran en el portal de servicio de Aldi en www.aldi.
us.
* Según la tarifa contratada, se le puede cobrar por la
conexión.
Page 44
SERVICIO POSVENTA
Información general
USA
50
USA
815-342-5850
Información general
Leer y guardar este manual del usuario
Este manual del usuario acompaña al
tensiómetro para el brazo y contiene
información importante sobre la puesta en
marcha y el manejo. En aras de mejorar la legibilidad, el
tensiómetro para el brazo se denominará en adelante
únicamente “tensiómetro”.
Antes de usar el tensiómetro, lea detenidamente
el manual del usuario, en especial el apartado
correspondiente a las indicaciones de seguridad. Si no lo
hace, se pueden provocar lesiones personales o daños
en el tensiómetro.
Guarde el manual del usuario para su uso posterior.
Asegúrese de incluir este manual del usuario al
transferir el tensiómetro a terceros.
Descripción de símbolos
Los siguientes símbolos y términos de advertencia se
emplean en este manual del usuario, en el tensiómetro
o en el embalaje.
¡ADVERTENCIA!
Este símbolo/término de advertencia designa un peligro
de riesgo moderado que puede provocar la muerte o
lesiones severas si no se evita.
Page 45
SERVICIO POSVENTA
51
Información general
USA
USA
815-342-5850
¡ATENCIÓN!
Este símbolo/término de advertencia designa un peligro
de riesgo leve que puede provocar lesiones menores o
moderadas si no se evita.
¡AVISO!
Este término de advertencia avisa de posibles daños
materiales.
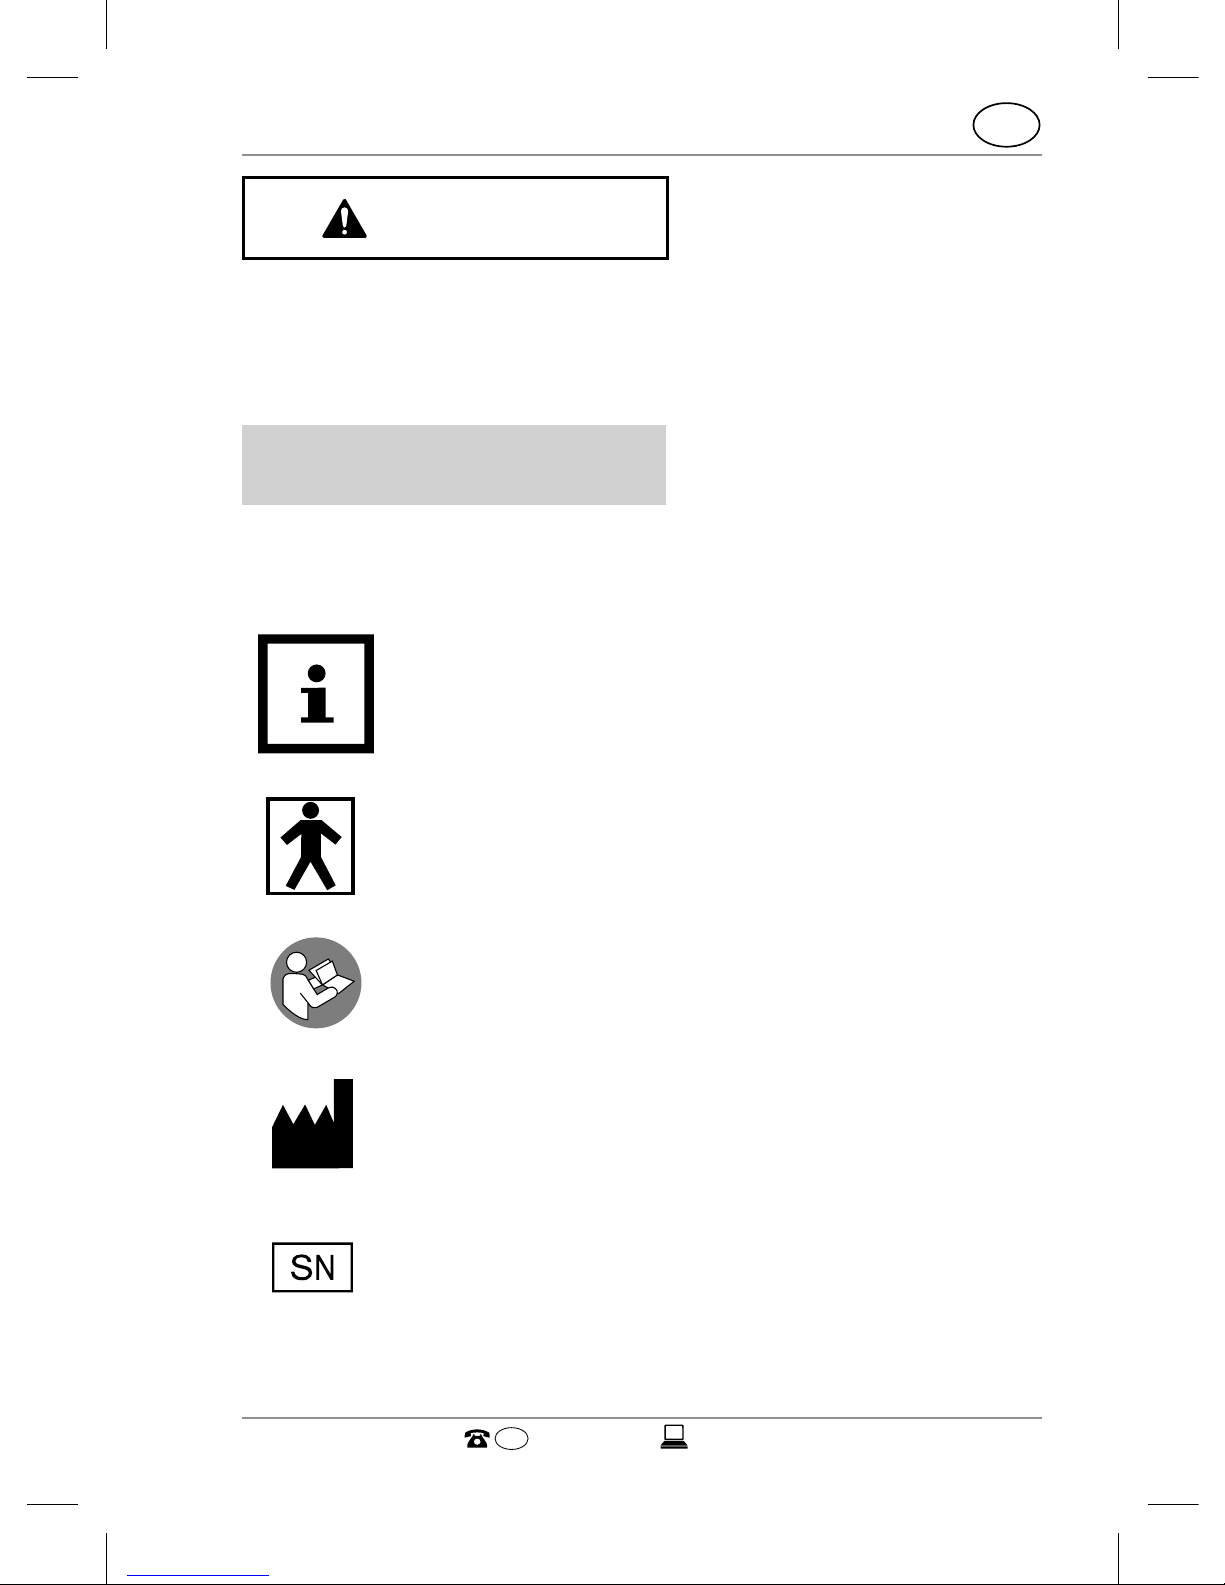
Este símbolo le ofrece información práctica
adicional sobre el manejo y el uso.
Este símbolo identifica los dispositivos clasificados como de tipo BF.
Este símbolo indica que debería leer y conservar el manual del usuario.
Este símbolo identifica información del fabricante (consulte el capítulo “Información del
fabricante”).
Este símbolo identifica el número de serie del
dispositivo.
Page 46
SERVICIO POSVENTA
Seguridad
USA
52
USA
815-342-5850
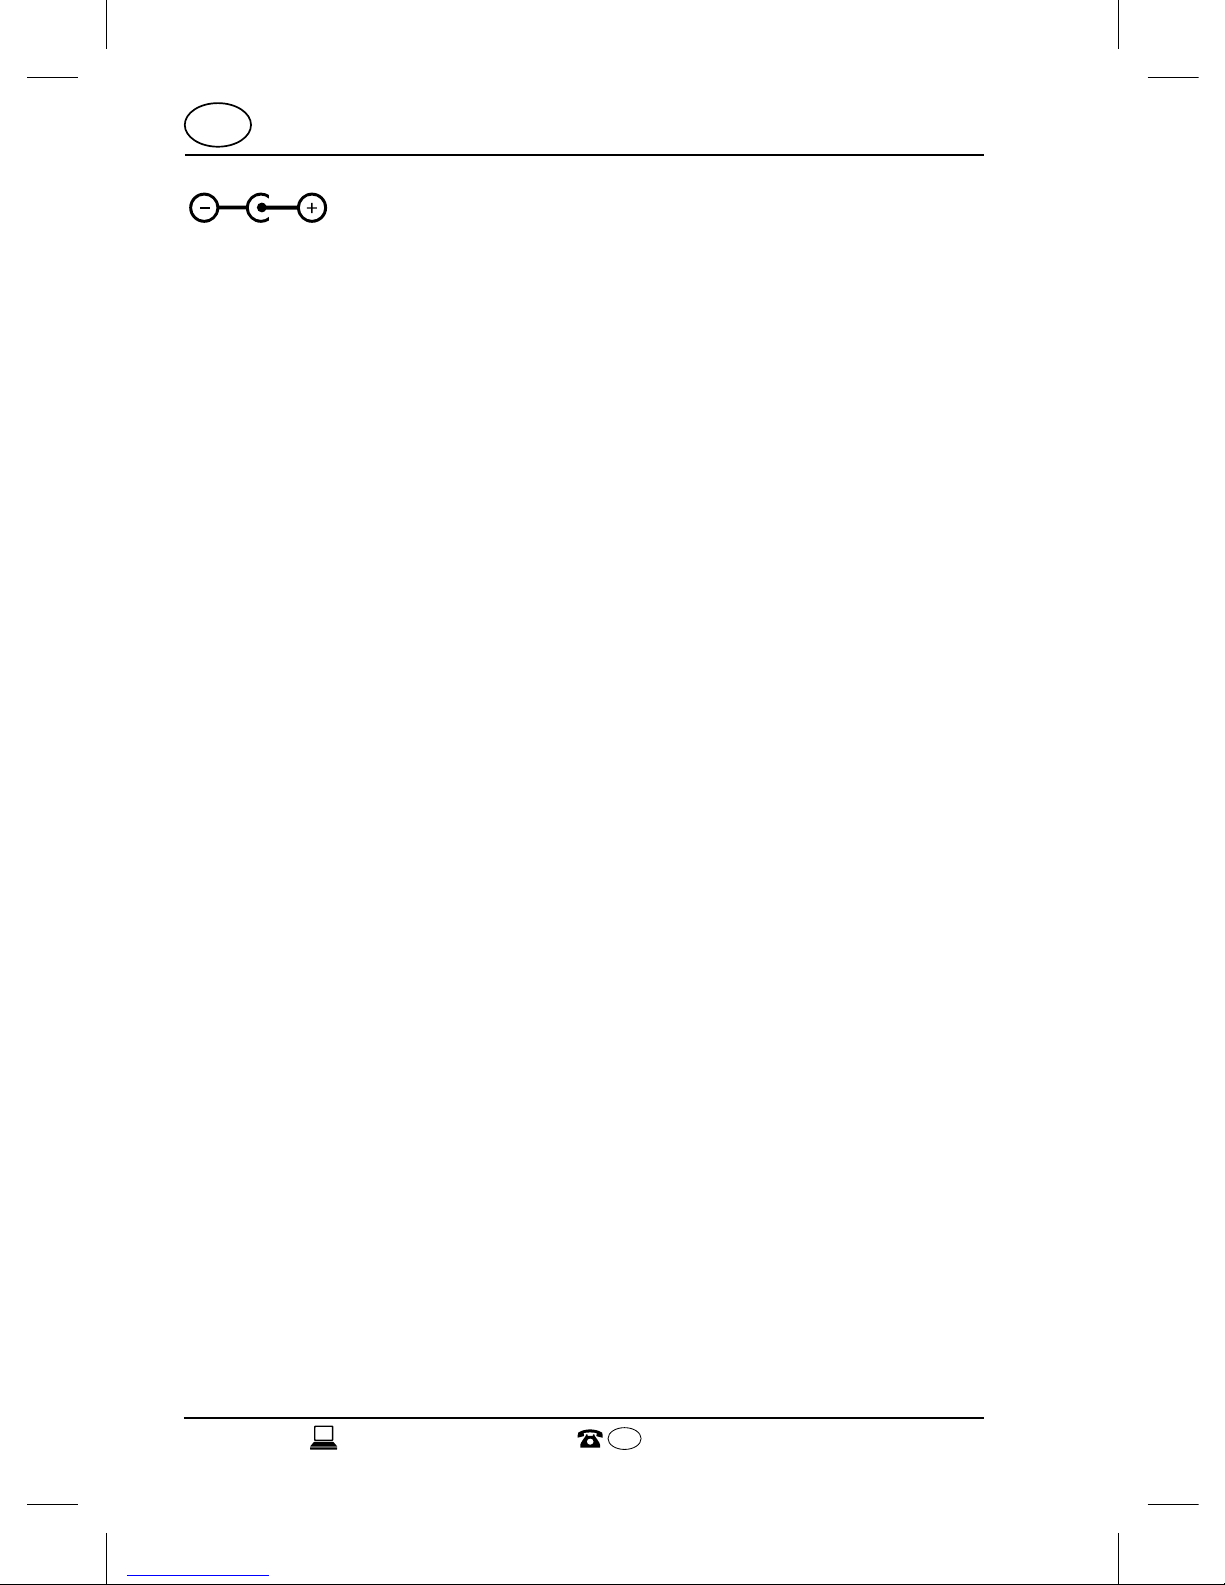
Este símbolo indica que el centro (punta) del
enchufe de salida es positivo (+) y el cuerpo
(anillo) del enchufe de salida es negativo (-).
Seguridad
Uso apropiado
El tensiómetro está diseñado exclusivamente para la
medición no invasiva de la presión arterial sistólica y
diastólica y la frecuencia del pulso de un adulto usando
el método oscilométrico. Las lecturas aparecen en el
display.
El tensiómetro emite un aviso en caso de arritmia
cardiaca. Los niveles medidos se clasifican e interpretan
conforme a las pautas de la OMS (Organización Mundial
de la Salud).
El tensiómetro no está previsto para usar con bebés ni
niños.
El tensiómetro está diseñado exclusivamente para uso
privado y no es apto para uso comercial ni clínico. La
medida se debe tomar únicamente en el brazo de un
adulto.
Utilice el tensiómetro solo como se describe en este
manual del usuario. Cualquier otra utilización se considerará inapropiada y puede provocar daños materiales
o incluso lesiones personales. El tensiómetro no es un
juguete para niños.
Page 47
SERVICIO POSVENTA
53
Seguridad
USA
USA
815-342-5850
El fabricante o proveedor no asume ninguna responsabilidad por los daños derivados de un uso inapropiado o
incorrecto.
Indicaciones de seguridad
¡ADVERTENCIA!
Peligro para niños y personas con
problemas físicos, sensoriales o
mentales (p. ej. personas parcialmente
discapacitadas, ancianos con aptitudes
físicas y mentales reducidas) o falta
de experiencia y conocimientos (p. ej.
niños).
− El tensiómetro no puede ser usado por
niños menores de 8 años. Mantenga el
tensiómetro y sus accesorios fuera del
alcance de niños menores de 8 años.
− El tensiómetro puede ser usado por
niños de más de ocho años y personas
con problemas físicos, sensoriales o
mentales, o quienes carezcan de experiencia y conocimientos, si están supervisados o han recibido instrucciones sobre
cómo usar el tensiómetro de forma
Page 48
SERVICIO POSVENTA
Seguridad
USA
54
USA
815-342-5850
segura, y han comprendido los riesgos
asociados al uso.
− No permita que los niños jueguen
con las láminas de embalaje. Pueden
quedar atrapados y asfixiarse.
¡ADVERTENCIA!
¡Riesgo de lesiones!
Un manejo inapropiado del tensiómetro
puede provocar lesiones.
− Emplee el tensiómetro solo para el fin
previsto. No haga un mal uso de él.
− El tensiómetro no está previsto para
bebés ni personas que no puedan
manifestar su voluntad.
− Las personas con problemas circulatorios serios pueden sentir molestias.
Consulte al médico antes de usar.
− Contacte con su médico si los resultados
de los tests indican lecturas anormales.
No intente tratar estos síntomas por sí
mismo sin consultar a un médico.
Page 49
SERVICIO POSVENTA
55
Seguridad
USA
USA
815-342-5850
¡AVISO!
¡Riesgo de daños!
El manejo inapropiado del tensiómetro
puede dar lugar a mediciones imprecisas y
daños en el tensiómetro.
− No desmonte ni intente reparar el tensiómetro.
− No exponga el tensiómetro a
campos magnéticos potentes (p.ej.
transformadores). Si no, podrían
darse errores de lectura o daños en el
tensiómetro.
− Utilice el tensiómetro únicamente con
una temperatura ambiente de +50°F
a +104°F y una humedad del 15% al
90%.
− No abra la carcasa del tensiómetro.
− Proteja el tensiómetro de la suciedad,
luz solar directa, fluctuaciones térmicas
extremas, sustancias químicas y golpes
mecánicos.
− No permita que el tensiómetro se caiga.
− Use solo los brazaletes incluidos o
recambios originales para garantizar
que las mediciones sean correctas.
Page 50
SERVICIO POSVENTA
Seguridad
USA
56
USA
815-342-5850
− No inicie el proceso de medición hasta
tener puesto el brazalete.
− No sumerja el tensiómetro en agua ni lo
lave bajo agua corriente.
− Proteja el brazalete y el tubo frente a
objetos afilados y puntiagudos.
− No doble el tubo del brazalete.
− No deposite objetos pesados sobre el
tensiómetro, el brazalete o el tubo del
brazalete.
Aviso sobre las pilas
¡ADVERTENCIA!
¡Riesgos para la salud!
Existe un riesgo elevado para la salud en
caso de que niños o animales ingieran las
pilas.
− Guarde las pilas de forma que queden
fuera del alcance de niños y animales.
Si sospecha que se ha ingerido una
pila, busque asesoramiento médico de
inmediato.
Page 51
SERVICIO POSVENTA
57
Seguridad
USA
USA
815-342-5850
¡ADVERTENCIA!
¡Riesgo de explosión!
Una manipulación inapropiada de las pilas
incrementa el riesgo de explosión.
− Almacene las pilas en un lugar fresco
y seco. Nunca exponga las pilas a calor
excesivo (p.ej. luz solar directa) ni las
lance al fuego.
− Use pilas solo del mismo tipo.
− No cargue las pilas ni las reactive por
ningún otro medio.
− No cortocircuite las pilas.
− No abra las pilas.
− Cerciórese de que la polaridad sea
correcta al insertar las pilas, que se
muestra en el compartimento de pilas.
Una instalación incorrecta puede dañar
el tensiómetro.
− Utilice siempre pilas de buena calidad.
Las pilas de mala calidad pueden
derramarse y causar daños.
− Antes de insertar las pilas, asegúrese
de que los contactos en el interior del
Page 52
SERVICIO POSVENTA
Seguridad
USA
58
USA
815-342-5850
compartimento de las pilas y de las
propias pilas estén limpios e intactos.
Límpielos si fuera necesario.
− Sustituya siempre todas las pilas del
compartimento de pilas a la vez.
− Retire las pilas del tensiómetro si ya
están gastadas. Extraiga las pilas
también si no prevé usar el tensiómetro
durante mucho tiempo. De lo contrario,
las pilas se pueden derramar y causar
daños.
− Si las pilas se derraman, retírelas de
inmediato para evitar daños en el
tensiómetro. No saque las pilas con las
manos desprotegidas ni permita que
el líquido de las pilas entre en contacto
con piel, ojos o membranas mucosas.
Emplee guantes normales de goma
para uso doméstico. No obstante, si el
líquido de las pilas entra en contacto
con la piel, lávese las manos de
inmediato y consulte a un médico si
fuera necesario.
− Las pilas deberían ser instaladas o
sustituidas por un adulto únicamente.
Page 53
SERVICIO POSVENTA
59
Seguridad
USA
USA
815-342-5850
− Mantenga el tensiómetro alejado de los
niños cuando quite la tapa de las pilas.
− Retire las pilas antes de eliminar el
tensiómetro.
Uso seguro del adaptador de potencia
¡ADVERTENCIA!
¡Riesgo de lesiones!
Un manejo inapropiado del adaptador de
potencia puede provocar lesiones.
− Emplee únicamente un adaptador de
potencia apto para usos médicos
(CC 6.0 V, 600 mA, no suministrado) con
el tensiómetro.
− Use solo el adaptador de potencia en
áreas interiores y secas. No deje que
el adaptador de potencia entre en
contacto con el agua ni demás líquidos.
− Conecte el adaptador de potencia solo
a un suministro eléctrico de corriente
alterna (CA). Asegúrese de que la
tensión corresponde a los datos de
tensión del adaptador de potencia.
Page 54
SERVICIO POSVENTA
Seguridad
USA
60
USA
815-342-5850
− Conecte el adaptador de potencia
solo a una toma de corriente accesible
bien instalada de la que pueda extraer
el enchufe rápidamente en caso de
emergencia.
− Nunca cubra el adaptador de potencia.
Asegure una ventilación suficiente para
evitar que el adaptador de potencia se
sobrecaliente.
− No emplee el adaptador de potencia si
la carcasa o el cable están defectuosos o
presentan otros daños visibles. En caso
de daño, mande reparar el adaptador
de potencia únicamente al fabricante,
su equipo de servicio al cliente o una
persona con una cualificación similar
para evitar riesgos.
− Desconecte siempre el adaptador de
potencia de la toma de corriente si
quiere limpiar el tensiómetro o si no
prevé usarlo durante mucho tiempo.
Page 55
SERVICIO POSVENTA
61
Primera puesta en servicio
USA
USA
815-342-5850
Primera puesta en servicio
Comprobación del tensiómetro y el
contenido del paquete
¡AVISO!
¡Riesgo de daños!
Si no tiene cuidado al abrir el embalaje con
un cuchillo afilado u otros objetos puntiagudos, podría dañar el tensiómetro.
− Tenga mucho cuidado al abrir el embalaje.
1. Saque el tensiómetro del embalaje y retire el material
de embalaje.
2. Asegúrese de haber recibido todos los componentes
y accesorios (véase la fig. A).
3. Compruebe si el tensiómetro o las piezas individuales
presentan daños. De ser así, no use el tensiómetro.
Contacte con el fabricante a través de la dirección de
servicio técnico indicada en el certificado de garantía.
Page 56
SERVICIO POSVENTA
Primera puesta en servicio
USA
62
USA
815-342-5850
Instalación o sustitución de las pilas
¡AVISO!
¡Riesgo de daños!
Una instalación incorrecta de las pilas
puede dañar el tensiómetro.
− Preste atención a la polaridad correcta
de las pilas (+ o -).
1. Abra el compartimento de pilas
6
retirando la tapa
del compartimento de pilas
5
.
2. Para sustituir las pilas, retire primero las antiguas.
Inserte 4 pilas
12
(tamaño AA) en el compartimento
de pilas.
3. Cierre el compartimento de pilas colocando la tapa
del compartimento de pilas de nuevo.
Utilización de un adaptador de potencia
El tensiómetro también se puede alimentar
con un adaptador de potencia (no suministrado). Se recomienda emplear un
adaptador de potencia para usos médicos
(CC 6.0 V, 600 mA). El pin de conexión del
adaptador debe ser positivo dentro y
negativo fuera con un empalme coaxial de
0.08 pulgadas (2.1 mm).
1. Conecte el enchufe de salida del adaptador de potencia (no suministrado) a la toma del adaptador de
potencia
8
.
Page 57
SERVICIO POSVENTA
63
Ajustes del sistema
USA
USA
815-342-5850
2. Conecte el adaptador de potencia a una toma de
corriente.
Ajustes del sistema
Los ajustes del sistema le permiten seleccionar usuarios,
y fijar la fecha, la hora y el formato de la hora.
1. Una vez encendido el tensiómetro, presione el botón
SET
4
.
No presione el botón START/STOP
3
en ese momento.
Un icono de usuario (
o )
14
se mostrará en el
display
1
.
2. Presione el botón M
2
para seleccionar el icono de
usuario 1 o el 2.
Hasta dos usuarios podrán guardar y acumular así los
resultados de los tests (60 unidades de memoria por
usuario).
3. Presione el botón SET para confirmar el ajuste.
El display mostrará un mensaje “
” (año).
4. Presione el botón M para fijar el año y luego el botón
SET para confirmar.
5. Repita los pasos 3 a 4 para fijar el mes, la fecha, la
hora y los minutos.
La fecha
20
y la hora
21
se muestran en la esquina
inferior izquierda del display.
6. Tras fijar los minutos, presione el botón M para seleccionar el formato de 12 o 24 horas.
El formato de 12 horas se indica con el mensaje “
” y
el de 24 horas con “ ”.
Page 58
SERVICIO POSVENTA
Consejo sobre el uso
USA
64
USA
815-342-5850
7. Presione el botón SET para ajustar la lectura por voz.
Presione el botón M para fijar “ ” (Inglés), “ ”
(Español) o “ ” (apagado).
8. Presione el botón SET para ajustar el nivel de volumen. Presione el botón M para ajustar el nivel de volumen de la función de lectura por voz.
9. Presione el botón START/STOP para guardar los
ajustes.
El tensiómetro guardará automáticamente todos los
ajustes y se apagará solo si no se realiza ninguna
operación en 3 minutos.
Es importante fijar la fecha y la hora. De lo
contrario, no podrá guardar los resultados de
la medición ni acceder a ellos de nuevo más
adelante.
Consejo sobre el uso
Para optimizar los resultados de la medición,
siga las siguientes reglas básicas al medir la
presión arterial.
− Si puede, mida siempre la presión arterial a la misma
hora del día para comparar los resultados.
− Solo se deberían comparar los resultados cuando se
emplee el tensiómetro en el mismo brazo, en la misma posición y a la misma hora del día.
− La mañana o cualquier momento en que se sienta
relajado y sin estrés son ideales para las mediciones.
− No se levante durante las mediciones. Siéntese o
Page 59
SERVICIO POSVENTA
65
Consejo sobre el uso
USA
USA
815-342-5850
túmbese en posición relajada mientras mantiene el
brazo a la altura del corazón.
− Evite hablar y mover partes corporales durante las
mediciones.
− Relájese al menos 30 minutos antes de efectuar la
medición, no fume, coma ni beba, y evite el ejercicio
físico.
− Espere unos cinco minutos a que se calme el sistema
circulatorio antes de cada medición.
− Si las mediciones no son verosímiles, repita la medición.
− Espere al menos cinco minutos antes de tomar otra
medición para la misma persona.
− Los resultados de las mediciones de presión arterial
son meramente informativos y no sustituyen al examen médico. No tome decisiones médicas conforme
a sus propias mediciones (p.ej. en relación con la ingesta de medicamentos o su dosificación). Consulte
al médico si tiene preguntas sobre las mediciones.
− No utilice este tensiómetro para efectuar mediciones
en pacientes con preemclampsia o recién nacidos.
− Consulte al médico antes de usar el tensiómetro con
embarazadas.
− No emplee el tensiómetro con otros dispositivos
quirúrgicos de alta frecuencia.
− Utilice el tensiómetro solo con personas que tenga
una circunferencia de brazo entre 8.7 y 16.5 pulgadas
(22 y 42 cm).
− La función de la parte corporal afectada se puede ver
Page 60
SERVICIO POSVENTA
Consejo sobre el uso
USA
66
USA
815-342-5850
perjudicada al inflar el brazalete.
− No doble, comprima ni restrinja de otro modo el tubo
del brazalete.
− Mida siempre la presión arterial en el mismo brazo, a
ser posible en el izquierdo. La medición en el brazo
izquierdo proporciona resultados más precisos puesto que está más cerca del corazón.
− No use el brazalete en extremidades con arterias o
venas en tratamiento médico, p.ej. en forma de
acceso intravascular, terapia intravascular o conexión
arteriovenosa (AV).
− No ponga el brazalete a personas que se hayan sometido a una mastectomía.
− Recuerde que la restricción de la circulación por el
inflado del brazalete puede provocar un mal
funcionamiento temporal en otros dispositivos de
medición conectados a la misma parte del cuerpo.
− Evite efectuar mediciones frecuentes y aplicar
presión prolongada en el brazalete para evitar
lesiones.
− Las siguientes enfermedades o síntomas pueden
derivar en mediciones incorrectas o afectar a la
precisión de la medición del tensiómetro:
• enfermedades del sistema cardiovascular,
• presión arterial muy baja,
• diabetes,
• trastorno circulatorio o arritmia cardiaca,
• escalofríos,
• temblores.
Page 61
SERVICIO POSVENTA
67
Ejecución de una medición
USA
USA
815-342-5850
− Las siguientes circunstancias pueden derivar en
mediciones incorrectas o afectar a la precisión de la
medición del tensiómetro:
• colocación incorrecta del brazalete,
• posición corporal inadecuada,
• ansiedad o nerviosidad.
Ejecución de una medición
¡ATENCIÓN!
¡Riesgo de lesiones!
Un manejo inapropiado del tensiómetro
puede provocar lesiones.
− Evite la exposición prolongada a la
presión ejercida por el brazalete, p.ej. al
doblar el tubo del brazalete o al realizar
mediciones prolongadas o frecuentes.
− No coloque el brazalete sobre heridas
para evitar más lesiones.
− Retire el brazalete del brazo en caso de
mal funcionamiento.
Ajuste del brazalete
1. Exponga el brazo donde se medirá la presión arterial.
Utilice el brazo izquierdo de ser posible.
2. Envuelva el brazalete
9
alrededor del brazo
expuesto.
Page 62
SERVICIO POSVENTA
Ejecución de una medición
USA
68
USA
815-342-5850
El borde inferior del brazalete debe quedar
0.4–0.8 pulgadas (1–2 cm) por encima del codo y
sobre la arteria (consulte el paso 1 en la fig. C). El tubo
del brazalete
10
debe apuntar hacia el centro de la
palma.
3. Coloque el extremo libre del brazalete alrededor del
brazo.
El brazalete debe quedar suficientemente apretado
de forma que quepan dos dedos bajo el brazalete.
4. Una vez bien ajustado el brazalete, cierre el velcro
sobre este.
5. Conecte la clavija de aire
11
del brazalete a la toma
de aire
7
.
Adopción de la posición correcta
Efectúe las mediciones mientras está sentado o tumbado, y siga las siguientes instrucciones:
− El brazalete debe quedar a la altura del corazón más
o menos, pero no por encima (consulte el paso 2 en
la fig. C).
− Apoye los brazos en posición relajada. Se precisa una
silla con reposabrazos o una mesa para las
mediciones cuando está sentado (consulte el paso 3
en la fig. C).
− No se mueva ni hable mientras realiza la medición.
Si está sentado, tenga en cuenta también las siguientes
instrucciones:
Page 63
SERVICIO POSVENTA
69
Ejecución de una medición
USA
USA
815-342-5850
− Siéntese en posición relajada al medir la presión arterial y reclínese.
− Coloque los pies planos sobre el suelo.
− No cruce las piernas.
Inicio de la medición de la presión
arterial
Siempre puede cancelar las mediciones de
presión arterial en marcha (p.ej. cuando la
presión del brazalete resulte extrema) con el
botón START/STOP.
1. Una vez encendido el tensiómetro, presione el botón
SET
4
.
No presione el botón START/STOP
3
en ese momento.
Un icono de usuario (
o )
14
se mostrará en el dis-
play
1
.
2. Presione el botón M
2
para seleccionar el icono de
usuario 1 o el 2.
Así se podrán guardar las mediciones en las unidades
de memoria del usuario seleccionado, una vez
finalizada la medición.
3. Presione el botón START/STOP para guardar el ajuste.
Puede obviar los pasos 1–3 si no pretende
guardar los resultados de la medición en la
memoria.
Page 64
SERVICIO POSVENTA
Ejecución de una medición
USA
70
USA
815-342-5850
4. Presione el botón START/STOP para iniciar la medición.
5. Escuchará un pitido y una locución en inglés que le
indicará que va a empezar la medición.
Si queda aire residual en el brazalete
9
de la
medición anterior, el aire saldrá del brazalete hasta
que se estabilice la presión antes de la medición.
Durante este tiempo, el indicador de salida de aire
24
parpadeará en el display.
6. El brazalete se inflará al principio con una presión de
190 mmHg. Sentirá que aprieta.
Si la presión arterial sistólica es superior a 190 mmHg,
el tensiómetro se volverá a inflar automáticamente el
brazalete para medir la presión arterial.
7. El indicador de frecuencia del pulso
17
comenzará
a parpadear en cuanto se detecte esta. Manténgase
relajado en todo momento, y evite hablar y mover
partes del cuerpo.
8. Una vez completa la medición, el aire saldrá del
brazalete.
La presión arterial sistólica
15
, la presión arterial
diastólica
16
y la frecuencia del pulso
18
se
reflejarán en el display. Las mediciones también se
escucharán en inglés.
El indicador de la clasificación de presión arterial
correspondiente de la OMS
25
también se mostrará
(consulte el capítulo “Clasificaciónes de la OMS”).
Page 65
SERVICIO POSVENTA
71
Ejecución de una medición
USA
USA
815-342-5850
Eliminación o almacenamiento de los
resultados de la medición
− Si cree que los resultados de la medición son
inexactos por condiciones de medición
desfavorables o por cualquier otro motivo, presione
el botón SET
4
para borrarlos.
− Si no se eliminan los resultados, se guardarán
automáticamente en las unidades de memoria del
usuario seleccionado (consulte los pasos 1–3 de
capítulo “Inicio de la medición de la presión arterial”).
Apagado
− Presione el botón START/STOP
3
para apagar el ten-
siómetro.
− El tensiómetro se apagará automáticamente tras 3
minutos.
Page 66
SERVICIO POSVENTA
Evaluación de las mediciones
USA
72
USA
815-342-5850
Evaluación de las mediciones
Acerca de la presión arterial
La presión arterial es la fuerza de la sangre que presiona
las paredes de las arterias. Se suele medir en milímetros
de mercurio (mmHg).
La presión arterial sistólica es la fuerza máxima ejercida
contra las paredes de los vasos sanguíneos cada vez
que el corazón late. La presión arterial diastólica es la
fuerza ejercida sobre los vasos sanguíneos cuando el
corazón descansa entre latidos.
La presión arterial de una persona cambia a menudo
a lo largo del día. La excitación y la tensión pueden
provocar un aumento de la presión arterial, mientras
que el consumo de alcohol o un baño pueden
reducirla. Ciertas hormonas como la adrenalina (que el
organismo libera con el estrés) pueden provocar que
los vasos sanguíneos se contraigan, lo que conlleva un
incremento de la presión arterial.
Si la medición de la presión arterial es demasiado alta,
significa que el corazón está funcionando con más
fuerza de la recomendada.
Arritmia cardiaca
− Si el tensiómetro detecta un ritmo cardiaco irregular
dos o más veces durante el proceso de medición, el
indicador de arritmia
22
se mostrará en
el display
1
.
Page 67
SERVICIO POSVENTA
73
Evaluación de las mediciones
USA
USA
815-342-5850
− Un ritmo cardiaco irregular se define como aquel
que es un 25% más lento o rápido que el ritmo
cardiaco medio.
− Consulte al médico si el indicador de arritmia
aparece con frecuencia en los resultados de la
medición. Al mismo tiempo, asegúrese de que
cumple las normas básicas de medición correcta de
la presión arterial (consulte los capítulos “Consejo
sobre el uso” y “Ejecución de una medición”).
Promedio de los resultados de medición
− Con el tensiómetro apagado, presione el botón M
2
para ver los valores medios de los resultados de las
tres últimas mediciones.
− El indicador de promedio
23
se verá en el display
junto a los valores medios.
Para comprobar los valores medios de otro
usuario, seleccione el usuario deseado antes
de presionar el botón M. Consulte los pasos
1–3 del capítulo “Inicio de la medición de la
presión arterial”.
Comprobación de la memoria
1. Con el tensiómetro apagado, mantenga presionado
el botón M
2
para acceder a la memoria del usuario
actual.
El indicador de unidad de memoria
19
se mostrará
con la unidad de memoria actual
18
.
Page 68
SERVICIO POSVENTA
Evaluación de las mediciones
USA
74
USA
815-342-5850
2. Presione el botón M varias veces para avanzar por
todas las unidades de memoria con los resultados de
medición guardados.
Hay 60 unidades de memoria para cada usuario.
Cuando se hayan usado todas las unidades de
memoria, los resultados de medición guardados más
antiguos se borrarán para dejar libre una unidad de
memoria para los nuevos resultados.
Para comprobar la memoria de otro usuario,
seleccione el usuario deseado antes de
mantener presionado el botón M. Consulte
los pasos 1–3 del capítulo “Inicio de la
medición de la presión arterial”.
Eliminación de la memoria
− Cuando esté comprobando la memoria de un
usuario, mantenga presionado el botón SET
4
para
borrar todos los resultados de medición guardados.
− Escuchará un pitido al finalizar el borrado. La
memoria no se puede recuperar una vez eliminada.
Page 69
SERVICIO POSVENTA
75
Evaluación de las mediciones
USA
USA
815-342-5850
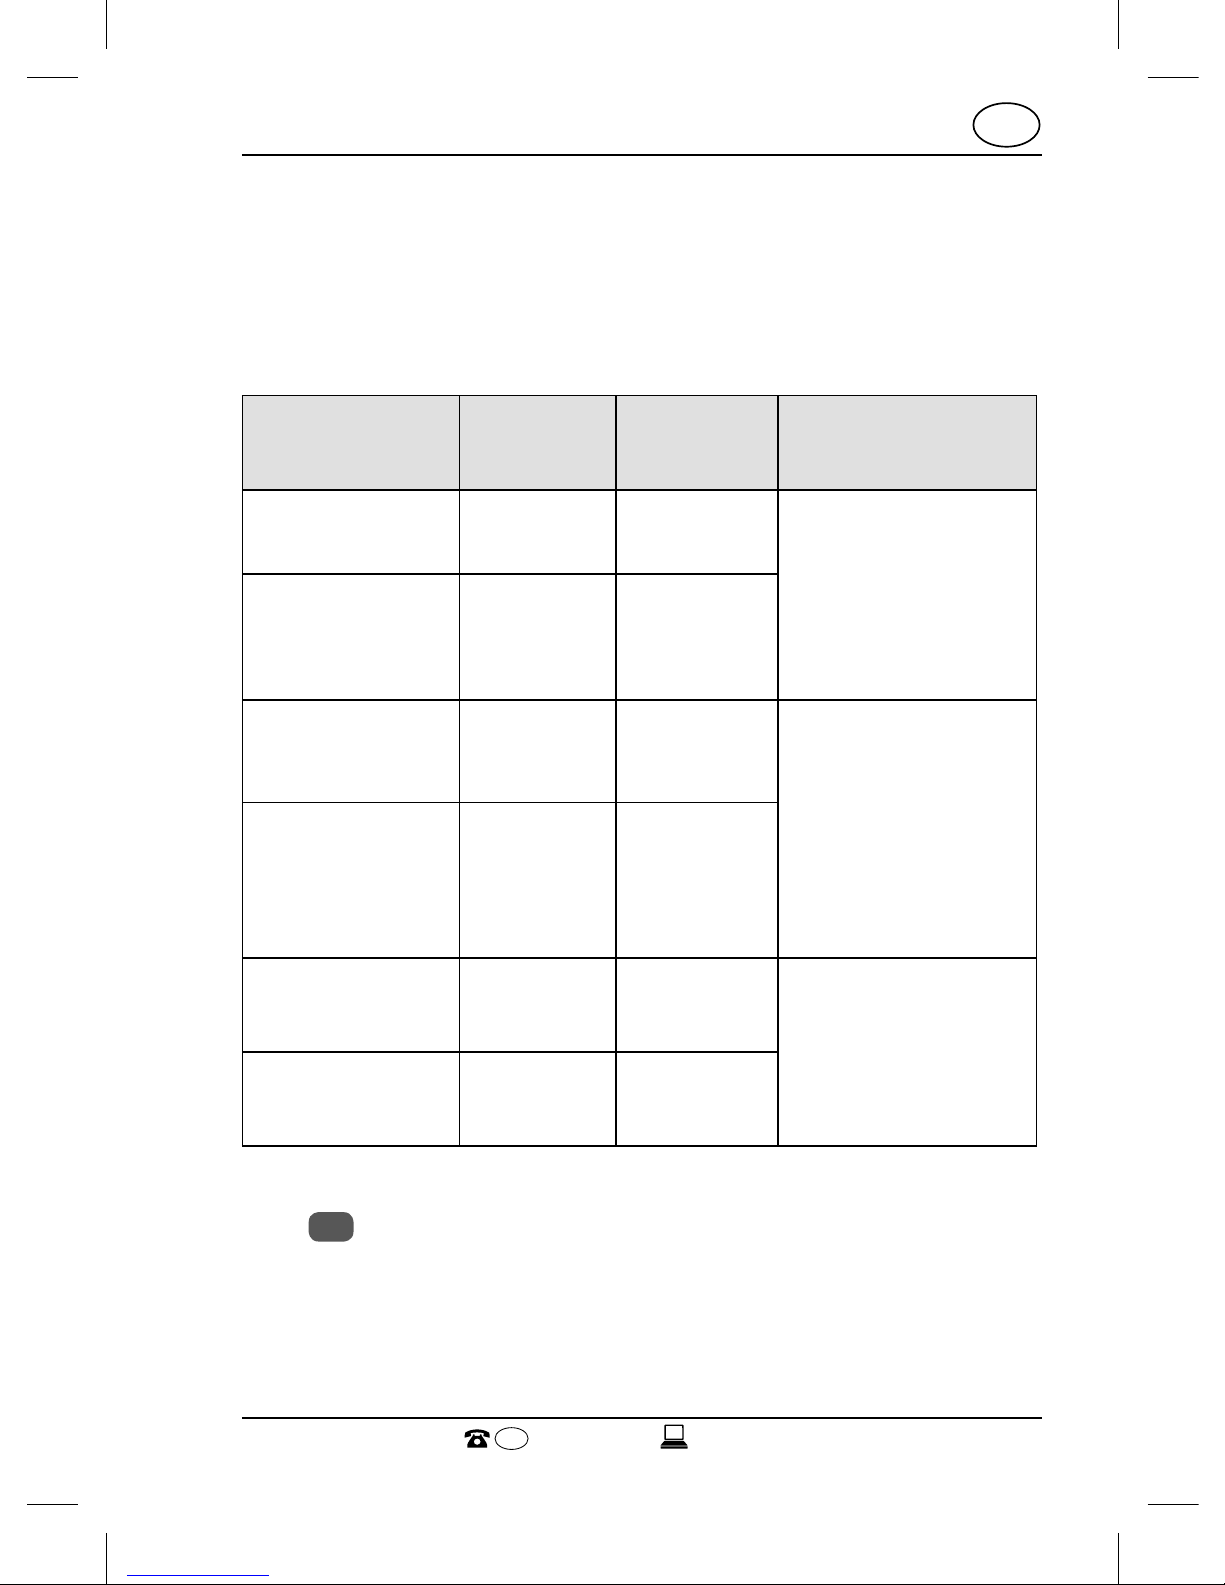
Clasificaciones de la OMS
La Organización Mundial de la Salud (OMS) ha definido
seis categorías para clasificar los niveles de presión
arterial. Esta clasificación viene indicada en la siguiente
tabla.
Rango Sístoles
(mmHg)
Diástoles
(mmHg)
Observaciones
Óptimo < 120 < 80 Compruebe la
presión arterial
periódicamente
por su cuenta.
Normal 120–129 80–84
Alta–normal 130–139 85–89 Procure que
un médico
compruebe
periódicamente
su presión
arterial.
Hipertensión
leve
140–159 90–99
Hipertensión
moderada
160–179 100–109 Procure que
un médico
lo examine
pronto.
Hipertensión
severa
≥ 180 ≥ 110
El indicador de la clasificación de presión arterial de la
OMS
25
indica el rango de la presión arterial medida.
Si los valores de sístoles y diástoles están dentro de
dos rangos diferentes, se mostrará el mayor de los dos
rangos.
Page 70
SERVICIO POSVENTA
Limpieza y mantenimiento
USA
76
USA
815-342-5850
La OMS solo ofrece una guía general. Es habitual que
haya divergencias entre diferentes personas. Pregunte
al médico cuáles son los niveles de presión arterial
normales para usted, y cuáles se consideran peligrosos.
Limpieza y mantenimiento
¡AVISO!
¡Riesgo de daños!
Si no limpia bien el tensiómetro, puede
dañar el tensiómetro.
− No emplee limpiadores ni disolventes.
− No utilice cepillos con cerdas metálicas
o de nylon, ni utensilios de limpieza
afilados o metálicos como cuchillos,
espátulas duras y objetos similares.
• Con cuidado, limpie el tensiómetro, el brazalete
9
y
el tubo del brazalete
10
con un paño húmedo.
• Tras su limpieza, use un paño suave para secar por
completo todas las piezas.
Cambio de las pilas
Cuando se muestra el indicador de pilas bajas
26
,
cambie las pilas
12
según los pasos descritos en el
capítulo “Instalación o sustitución de las pilas”.
Page 71
SERVICIO POSVENTA
77
Almacenamiento
USA
USA
815-342-5850
Almacenamiento
Si no usa el tensiómetro mucho tiempo, tenga en cuenta
lo siguiente:
− Saque las pilas
12
del compartimento de pilas
6
o
desconéctelo del adaptador de potencia.
− Guarde el tensiómetro en la bolsa de almacenamiento suministrada
13
para protegerlo.
− No guarde el tensiómetro cerca de fuentes de calor.
− Observe la información relativa al entorno de almacenamiento (consulte el capítulo “Datos técnicos”).
− No deposite objetos pesados sobre el tensiómetro, el
brazalete
9
y el tubo del brazalete
10
.
Resolución de problemas
¡AVISO!
¡Riesgo de daños!
Si no maneja el tensiómetro correctamente,
podría dañarlo.
− No abra la carcasa del tensiómetro. No
se aceptarán reclamaciones derivadas
de la garantía en caso de reparaciones
efectuadas por el usuario o por un
manejo incorrecto.
Page 72
SERVICIO POSVENTA
Resolución de problemas
USA
78
USA
815-342-5850
Algunos problemas pueden estar provocados por fallos
menores que puede solucionar usted mismo. Para ello,
siga las instrucciones de la siguiente tabla. Si el problema persiste, contacte con el servicio al cliente. No repare
el tensiómetro por su cuenta.
Problema Posible causa Solución
Los resultados
de presión
arterial quedan
fuera del rango
típico.
El brazalete está
demasiado apretado o no está
bien colocado en
el brazo.
Cambie de posición
el brazalete (unas
0.4–0.8 pulgadas
(1–2 cm)) por encima
del codo.
Resultados de
tests imprecisos
por movimiento
del cuerpo o del
tensiómetro.
Siéntese en posición
relajada con el brazo
colocado cerca del
corazón. Evite hablar
o mover partes
corporales durante la
medición. Asegúrese
de que el tensiómetro
esté fijo durante toda
la medición.
Aparece “Err”. El brazalete no se
infla bien.
Cerciórese de que el
tubo del brazalete
esté bien conectado
al brazalete y al
tensiómetro.
Funcionamiento
incorrecto.
Lea detenidamente el
manual del usuario y
vuelva a efectuar bien
la medición.
La presurización
es superior a 300
mmHg.
Page 73
SERVICIO POSVENTA
79
Datos técnicos
USA
USA
815-342-5850
Datos técnicos
Descripción del producto: Tensiómetro para el brazo
Modelo: ABO 523
Código del producto: 93630
Display: Tamaño de display digital LCD
Tamaño de display: 4 × 2.7 pulgadas
(102.1 mm × 68.9 mm)
Método de medición: Método oscilométrico
Rango de medición: Presión: 0–300 mmHg
Pulso: 30–180 pulsaciones/
minuto
Tolerancia: +/- 2 % de la lectura sobre
200 mmHg
Precisión de medición: Presión: ± 3 mmHg
Pulso: ± 5 %
Presurización: Automática
Memoria: 120 unidades de memoria en
dos grupos con fecha y hora
Función: Detección de pulsaciones
irregulares
Indicador de clasificación de
la OMS
Promedio de las 3 últimas
mediciones
Detección de pilas bajas
Apagado automático
Page 74
SERVICIO POSVENTA
Datos técnicos
USA
80
USA
815-342-5850
Suministro eléctrico: 4 pilas AA o adaptador de
potencia para usos médicos
(CC 6.0 V, 600 mA, no
suministrado)
Duración de pilas: Aprox. 2 meses con 3
mediciones diarias
Peso del dispositivo: Aprox. 12.5 onzas (353 g) (sin
pilas)
Peso del brazalete: 2.7 onzas (77 g)
Dimensiones (largo ×
ancho × alto):
Aprox. 6.5 × 4.3 × 2.4 pulgadas
(164 × 111 × 60 mm)
Circunferencia del
brazalete:
Aprox. 5.7 (ancho) × 22 (largo)
pulgadas
(145 (ancho) × 560 (largo) mm)
(Brazalete medio: Se ajusta a
una circunferencia de brazo de
8.7–16.5 pulgadas (22–42 cm))
Temperatura operativa: 50 °F–104 °F (10 °C–40 °C)
Humedad operativa: 15 %–90 % h. r.
Presión operativa: Presión atmosférica
Temperatura de
almacenamiento:
–4 °F–131 °F (–20 °C–55 °C)
Humedad de
almacenamiento:
15 %–90 % h. r.
Grado de protección: IP 22
Page 75
SERVICIO POSVENTA
81
Datos técnicos
USA
USA
815-342-5850
Clasificación: Equipo con alimentación inter-
na, tipo BF , el brazalete es la
parte aplicada
Las especificaciones están sujetas a cambio sin previo
aviso.
Este tensiómetro cumple la normativa europea y lleva la
marca CE “CE 0123”. Este tensiómetro también satisface
las siguientes normas principales (sin limitarse a estas):
Norma de seguridad:
EN 60601-1 Equipos electromédicos. Parte 1: requisitos
generales para la seguridad
Norma de CEM:
EN 60601-1-2 Equipos electromédicos. Parte 1-2: requisitos generales para la seguridad - Norma colateral: Compatibilidad electromagnética - Requisitos y ensayos
Normas de rendimiento:
EN 1060-1 Esfigmomanómetros no invasivos - Requisitos
generales
EN 1060-3 Esfigmomanómetros no invasivos - Requisitos
suplementarios aplicables a los sistemas electromecánicos de medición de la presión sanguínea
EN 1060-4 Esfigmomanómetros no invasivos Procedimientos de ensayo para determinar la exactitud
del sistema total de esfigmomanómetros no invasivos
automatizados
Page 76
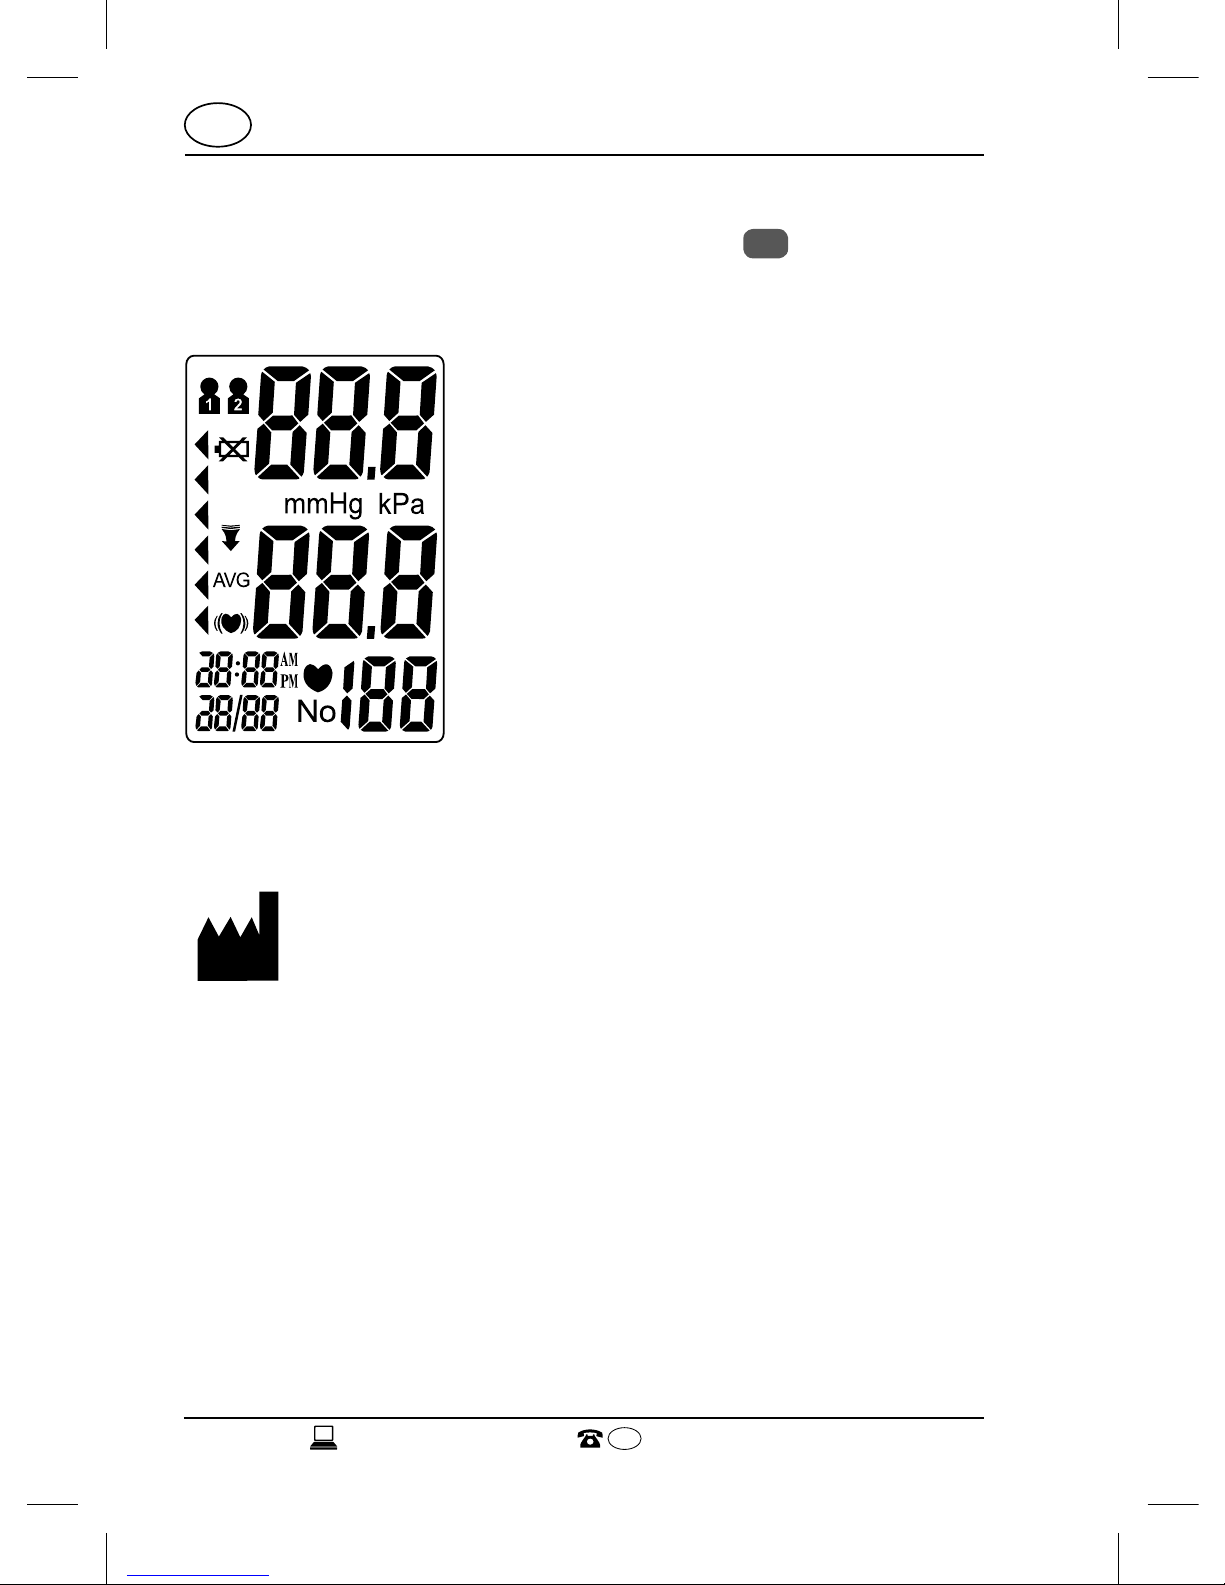
SERVICIO POSVENTA
Referencia del display lleno
USA
82
USA
815-342-5850
Referencia del display lleno
La siguiente imagen muestra el display
1
con todos los
segmentos de los indicadores. Utilice esta imagen para
determinar si el display muestra bien las mediciones.
Información del fabricante
Fabricante:
Handelshaus Dittmann GmbH
Kissinger Straße 68
97727 Fuchsstadt
GERMANY
Page 77
SERVICIO POSVENTA
83
Declaración de la FCC
USA
USA
815-342-5850
Declaración de la FCC
Este dispositivo cumple con el apartado 15 de las
normas de la FCC. El funcionamiento está sujeto a
las dos condiciones siguientes: (1) Este dispositivo
no puede provocar interferencias perjudiciales; y (2)
este dispositivo debe aceptar cualquier interferencia
recibida, incluidas las que puedan provocar un
funcionamiento no deseado.
AVISO: Este equipo se ha probado y ha demostrado
que cumple con los límites para un dispositivo digital
de la clase B, conforme al apartado 15 de las normas
de la FCC. Estos límites están diseñados para ofrecer
una protección razonable frente a interferencias
perjudiciales en una instalación residencial. Este
equipo genera, utiliza y puede irradiar energía de
radiofrecuencia y, si no se instala y se utiliza de acuerdo
con las instrucciones, puede ocasionar interferencias
perjudiciales para las comunicaciones por radio. No
obstante, no se puede garantizar que no se vaya a
producir interferencias en una instalación en particular.
Si este equipo ocasiona interferencias perjudiciales
en la recepción de radio o televisión, lo que puede
comprobarse encendiendo y apagando el equipo,
se recomienda al usuario que intente corregir la
interferencia mediante una o varias de las siguientes
medidas:
• Reoriente o reubique la antena receptora.
• Aumente la separación entre el equipo y el receptor.
Page 78
SERVICIO POSVENTA
Eliminación
USA
84
USA
815-342-5850
• Conecte el equipo en una toma de corriente de un
circuito eléctrico diferente del circuito eléctrico del
receptor.
• Consulte con su distribuidor o con un técnico
especializado en radio y televisión.
ADVERTENCIA: Los cambios o modificaciones de esta
unidad no aprobados expresamente por la parte
responsable del cumplimiento podrían anular la
autoridad del usuario para usar el equipo.
Eliminación
Eliminación del embalaje
Elimine el embalaje por separado según el tipo de materiales. El cartón y las láminas han de llevarse a un punto
de recogida de papel usado y un punto de recogida de
materiales respectivamente.
Eliminación del tensiómetro
¡Los equipos en desuso no deben ser depositados en
la basura doméstica!
Cuando el tensiómetro no se utiliza más, elimínelo
de acuerdo a las disposiciones de su estado o país en
materia de desechos.
Page 79
SERVICIO POSVENTA
85
Eliminación
USA
USA
815-342-5850
¡Las pilas y los acumuladores no se pueden tirar a la
basura doméstica!
Como usuario final, la ley le exige llevar las pilas y los
acumuladores, con independencia de si contienen
sustancias nocivas* o no, a un punto de recogida
gestionado por la comunidad, o a una tienda, para que
se puedan desechar de un modo respetuoso con el
entorno.
*etiquetado con: Cd = cadmio, Hg = mercurio, Pb = plomo
Page 80
Page 81
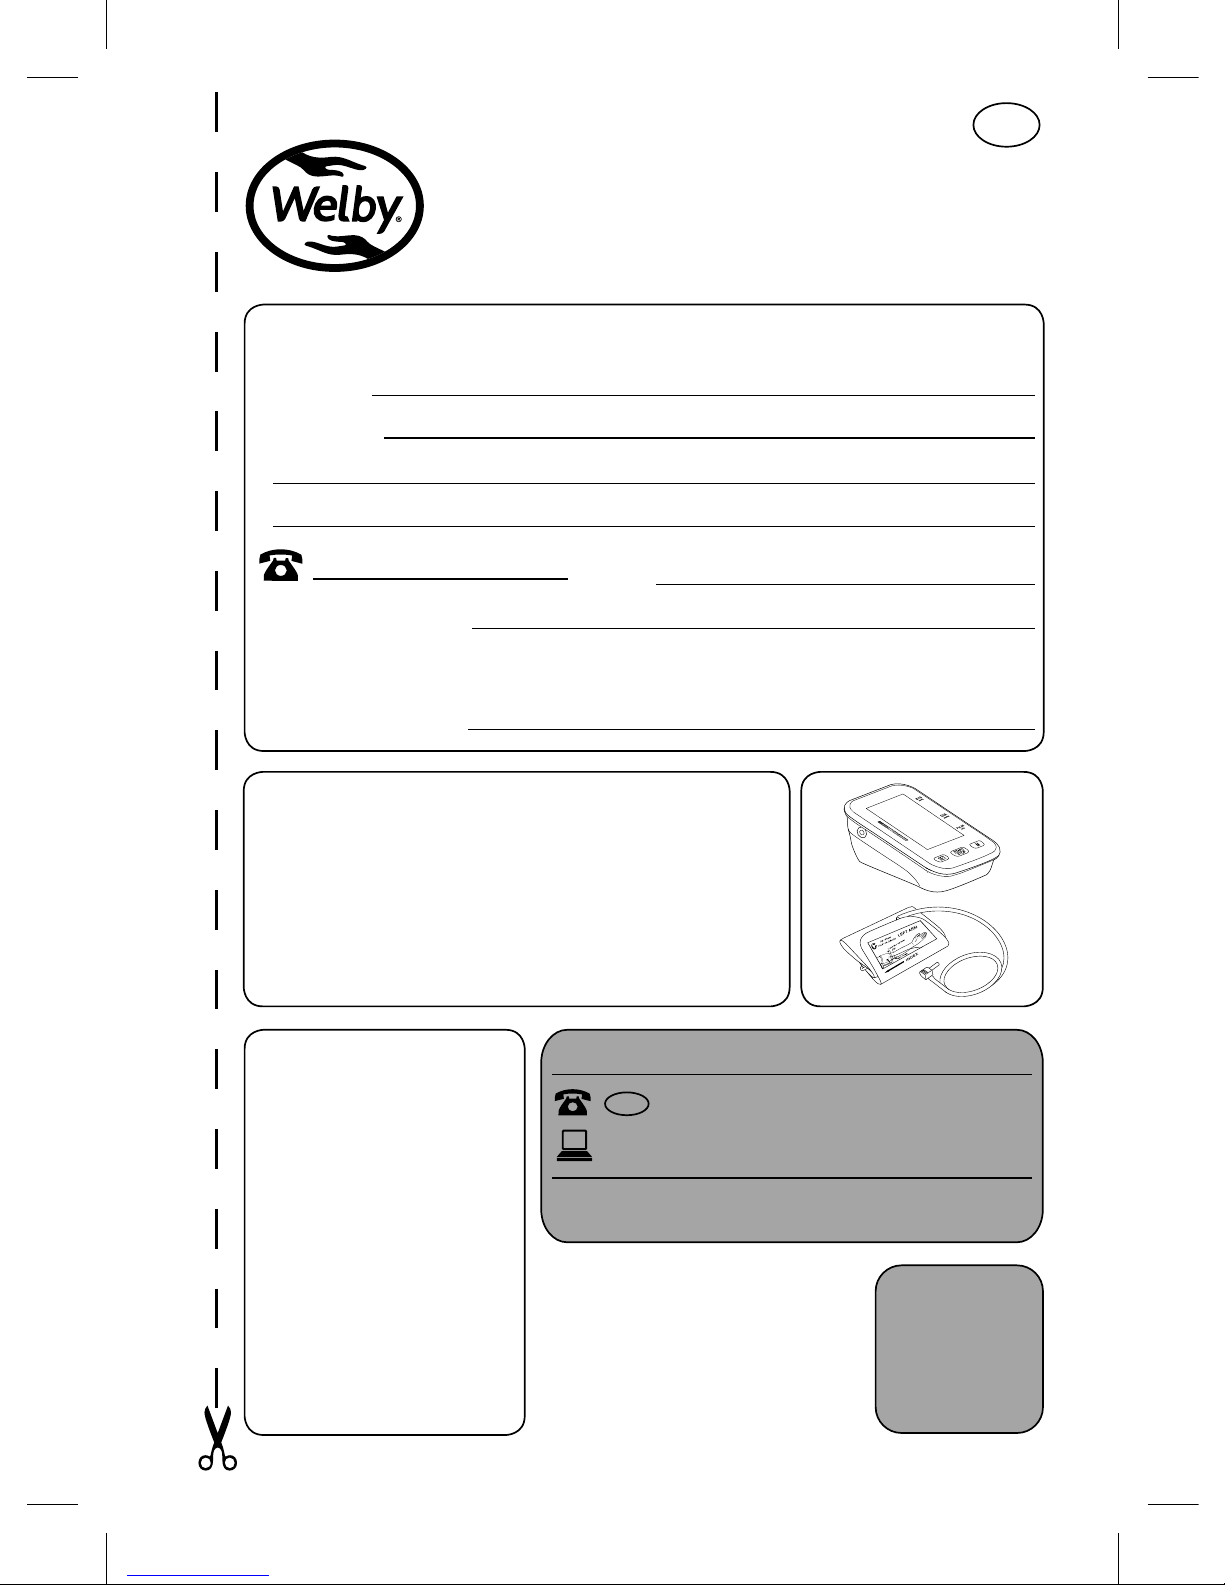
USA
Descripción del defecto:
Envíe la tarjeta de
garantía rellenada junto
con el producto defectuoso a:
Greater Concepts By
Design Team
1803 Springside Drive
Plainfield IL 60586
USA
Sus detalles:
Nombre
Dirección
E-Mail
Fecha de compra*
*Recomendamos guardar el recibo junto con esta tarjeta de garantía.
Lugar de compra
TENSIÓMETRO PARA EL BRAZO
TARJETA DE GARANTÍA
SERVICIO POSVENTA
USA
AÑOS DE GARANTÍA
815-342-5850
NO DEL MODELO: ABO 523
CÓDIGO DEL PRODUCTO: 93630 01/2017
3
Teléfono: tasas de red fija
Page 82

USA
Condiciones de garantía
Estimado cliente:
La Garantía ALDI es una garantía completa que le ofrece los
siguientes beneficios:
Periodo de garantía: 3 años a partir de la fecha de
compra.
6 meses para las piezas de recam-
bio y consumibles en condiciones
normales y adecuadas de uso (por
ejemplo, baterías recargables)
Costes: Reparación/sustitución gratis o
reembolso
No hay costos de transporte
AVISO: Póngase en contacto con nuestra
línea directa de atención por
teléfono, correo electrónico o fax
antes de retornar el producto. Esto
nos permite proporcionar ayuda
en caso de posibles errores del
operador.
Page 83

USA
Para hacer una reclamación bajo la garantía, por favor envíenos:
• El artículo defectuoso junto con todas las piezas, el
recibo de compra original y la tarjeta de garantía
completada de manera apropiada
La garantía no cubre los daños ocasionados por:
• Accidentes o eventos imprevistos (por ejemplo,
rayos, agua, fuego)
• Uso o transporte inadecuados
• Incumplimiento de las instrucciones de seguri-
dad y mantenimiento
• Otro tratamiento o modificación inadecuados
del producto.
Después del vencimiento del período de garantía, tiene
la posibilidad de mandar a reparar su producto si usted
corre con los gastos. Se le notificará por adelantado el
costo de reparación.
Esta garantía le otorga derechos legales específicos y es
posible que también tenga otros derechos que pueden
variar de un estado a otro, pero no tiene como fin
exceder los requisitos legales mínimos que aquí se
incluyen.
Esta garantía no limita la obligación legal del vendedor
derivada de cualquier garantía implícita. El período de
garantía solo se puede extender hasta donde lo permita
la ley.
Ni la compañía de servicio ni ALDI asumen ninguna
responsabilidad por los datos o configuraciones que
puedan haberse almacenado en cualquier producto
retornado.
Page 84

 Loading...