

Page 1
1
90236AU GE50-94 REV B 4-26-13
Homeowner’s
Installation Instructions &
Operating Manual
Model: EF68PEN , EF69PEN, EF70PEN, EF71PEN, EF72PEN
FOR YOUR SAFETY
SERVICE MUST BE PERFORMED BY A QUALIFIED SERVICE AGENCY.
DO NOT STORE OR USE GASOLINE OR OTHER FLAMMABLE VAPORS
AND LIQUIDS IN THE VICINITY OF THIS OR ANY OTHER APPLIANCE.
PLEASE READ THIS MANUAL BEFORE INSTALLING AND USING APPLIANCE.
DO NOT DISCARD THIS MANUAL
SAVE THESE INSTRUCTIONS FOR FUTURE REFERENCE.
Gallery Electric Fireplaces
Page 2

2
90236AU GE50-94 REV B 4-26-13
IMPORTANT INSTRUCTIONS
When using electrical appliances, basic precautions should always be followed to reduce the risk of fire, electrical shock,
and injury including the following:
1. Read all instructions before using this appliance.
2. This appliance is hot when in use. To avoid burns, do not let bare skin touch hot surfaces. Keep combustible materials,
such as furniture, pillows, bedding, papers, clothes and curtains at least 0.9m from the front of this appliance.
WARNING: In order to avoid overheating, do not cover the heater. Do not install in small enclosed spaces.
3. CAUTION: Whenever the heater is left operating and unattended, extreme caution is necessary if children are nearby.
4. The appliance is not be used by children or others, unless they have been given supervision or instruction.
5. Children should be supervised to ensure that they do not play with the appliance.
6. If possible, always unplug this appliance when not in use.
7. Do not operate any heater with a damaged cord or plug, after an appliance malfunction, or if it has been dropped or
damaged in any manner.
8. If the power cord is damaged, it must be replaced by the manufacturer, its service agent or similarly qualified persons
in order to avoid a hazard.
9. Any repairs to this fireplace should be carried out by a qualified service person.
10. Under no circumstances should this fireplace be modified. Parts which have been removed for service must be
replaced prior to operating this fireplace again.
11. Do not use outdoors.
12. This heater is not intended for use in bathrooms, laundry areas and similar indoor locations. Never locate this
appliance where it may fall into a bathtub or other water container.
13. Do not run cord under carpeting. Do not cover cord with throw rugs, runners or the like. Arrange cord away from traffic
areas and where it will not be tripped over.
14. To disconnect this appliance, turn controls to the off position, then remove plug from outlet.
15. Connect to properly grounded outlets only.
16. This appliance, when installed, must be electrically grounded in accordance with local codes or, in the absence of local
codes, with the current AS/NZS 3000:2007.
17. There is a thermostat limiter inside the heater. When the inner temperature over-heats or abnormal heating occurs, the
thermostat protective device will cut-off the power supply to avoid damage to the fireplace or risk of fire.
18. Do not insert or allow foreign objects to enter any ventilation or exhaust opening as this may cause an electric shock,
fire, or damage the appliance.
19. To prevent a possible fire, do not block air intakes or exhaust in any manner. Do not use on soft surfaces, such as beds
or carpeting where opening may become blocked.
20. This appliance has hot and arcing or sparking parts inside. Do not use it in areas where gasoline, paint or flammable
liquids are used or stored. This fireplace should not be used as a drying rack for clothing. Christmas stockings or
decorations should not be hung in the area of it.
21. Use this appliance only as described in the manual. Any other use not recommended by the manufacturer may cause
fire, electric shock or injury.
22. Avoid the use of an extension cord because the extension cord may overheat and cause risk of fire. However, if you
have to use an extension cord, the cord must be No.14
AWG minimum size and rated not less than 1875 Watts.
The extension cord must be a three wire cord with grounding
type plug and cord connection. The extension cord shall
not be more than 6m in length.
23. See directions in Figure 1.
This heater is to be used on a 220/240 V, 15 AMP, grounded
circuit. Do not use in an outlet controlled by a switch or dimmer
switch. Avoid plugging other appliances into the same circuit as heater.
Page 3
3
90236AU GE50-94 REV B 4-26-13
INSTALLATION INSTRUCTIONS
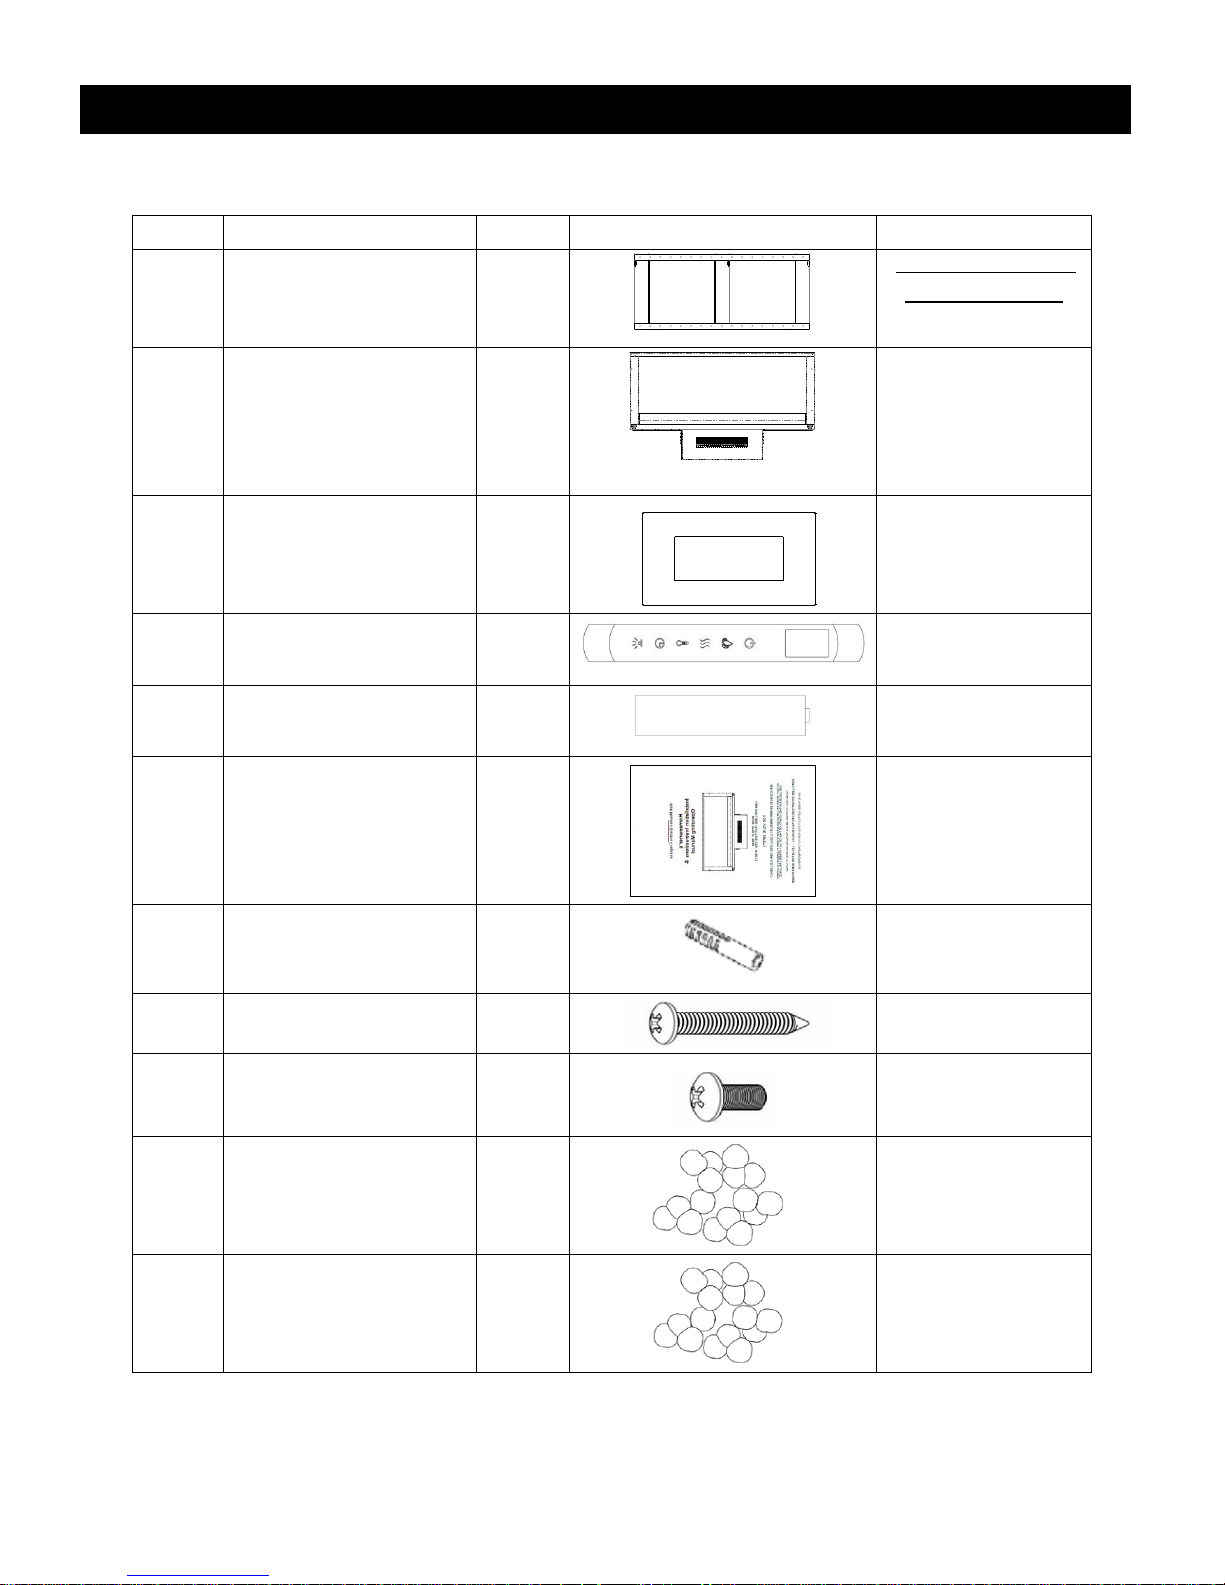
PACKAGE CONTENTS
Part
Description
Qty
Picture
Additional Info
1
Wall Mounting Bracket
1
ARRIVES ATTACHED TO
BACK OF FIREPLACE
2
Fire Box with Heater
1
EF68PEN = GE-50 AU
EF69PEN = GE-58 AU
EF70PEN = GE-70 AU
EF71PEN = GE-78 AU
EF72PEN = GE-94 AU
3
Fireplace Front
1
4
Remote Control
1
5
Battery
2
6
Instruction Manual
1
7
Plastic Wall Anchor Plug
6pcs for EF68/69PEN
8pcs for EF70/72PEN
8
Screw ST5×40
6pcs for EF68/69PEN
8pcs for EF70/72PEN
9
Bolt M5×10
2
10
White Stones
1 bag
11
Clear Resin Faux Stones
1 bag
Page 4
4
90236AU GE50-94 REV B 4-26-13
TOOLS REQUIRED
Magnetic Phillips Screw Driver
Electric drill or hammer drill (for concrete walls)
UNPACKING THE ELECTRIC FIREPLACE
WARNING! Do NOT use this Electric Fireplace if any part has been under water. Immediately call a
qualified service technician to inspect and to replace any part of the electrical system if necessary.
Keep plastic wrapping away from children.
● Open the packaging carefully and remove the foam.
● Remove and discard the plastic bag.
● Keep the original packaging for future transport and/or storage.
● Check that all listed parts have been included before discarding any packaging.
LOCATING YOUR ELECTRIC FIREPLACE
Your new electric fireplace may be installed virtually anywhere in your home. However, when choosing a location
ensure that the general instructions and warnings are followed. For best results, install out of direct sunlight. Power
supply service should be configured before finishing to avoid extra construction.
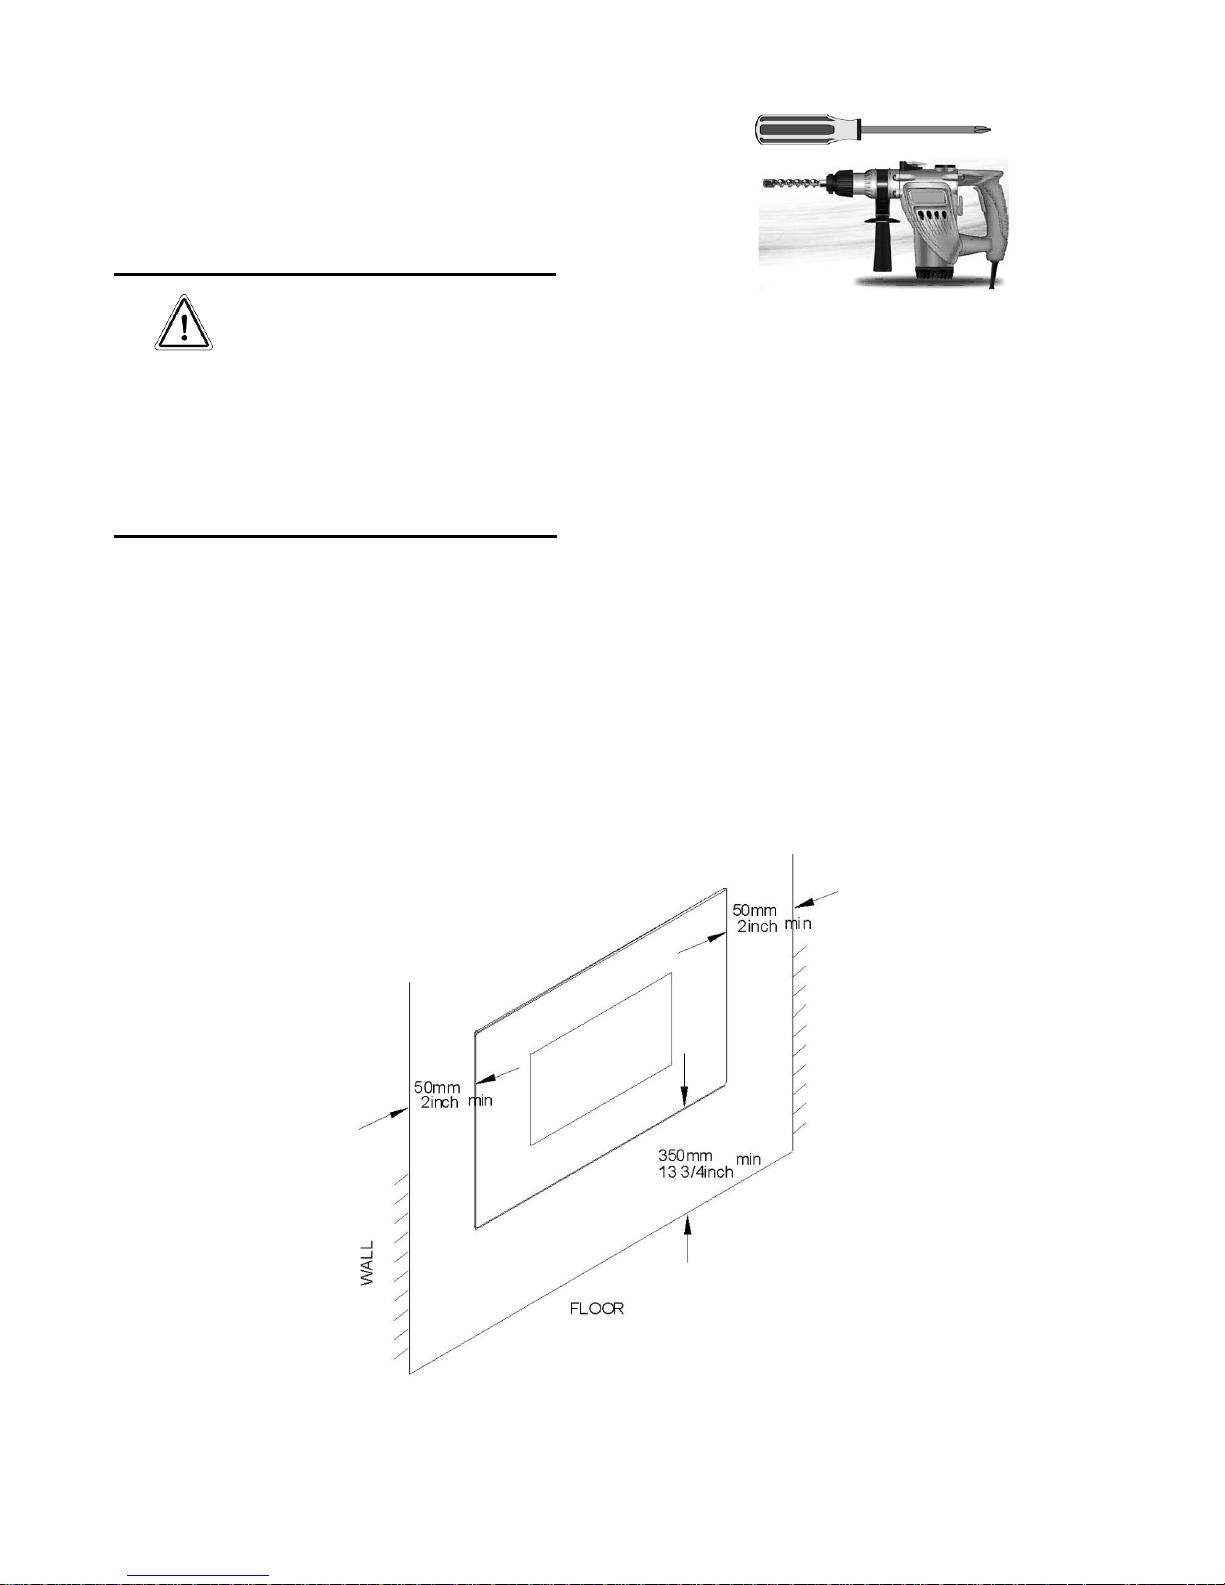
WARNING ! Keep drapery and other furnishings at least 0.9m from the front and sides of the electric fireplace.
Clearance to Combustibles
Sides ……………………………………..50 mm
Floor ……………………………………. 350 mm
Top …………………………….……..….0 mm
Back ……………………………….….....0 mm
Fig. 1
Figure 2
Page 5
5
90236AU GE50-94 REV B 4-26-13
INSTALLING YOUR FIREPLACE
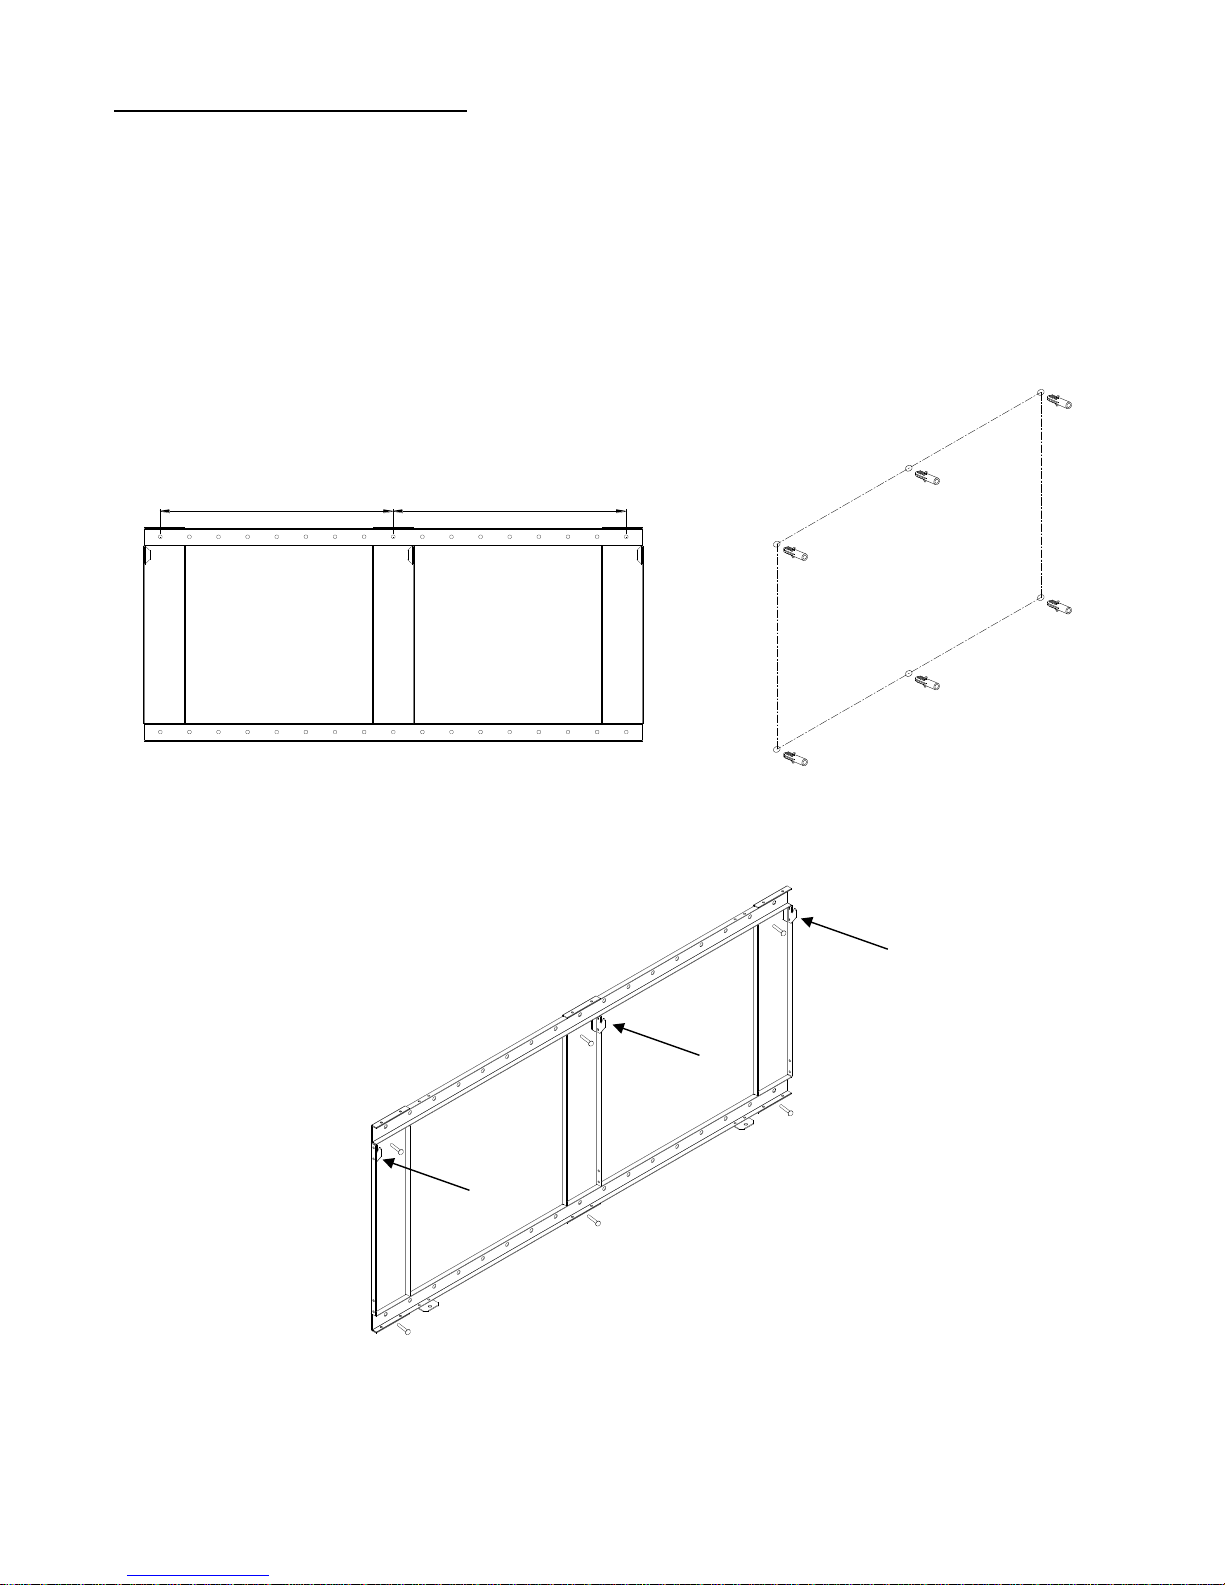
Wall mounting bracket installation:
1. Open the box and take out the fireplace. The wall mounting bracket is attached to the back side of the fireplace.
Remove the screws holding it on at the bottom.
2. Choose a solid plain wall and put the bracket in the position where you want to install the fireplace. Mark holes with a
pen (6 for EF68/69PEN, 8 for GE70/72PEN) using the holes in the mounting bracket as a guide (Fig. 3)
3. If locating the fireplace on existing wall studs or solid wood walls, Screws can be inserted at this time and you can
proceed to step 6, otherwise continue the steps below for placing wall anchors.
4. Take away the bracket and then, using an 8mm drill bit, drill pilot holes in the wall. Put the plastic wall anchors into the
holes. (Fig. 4)
5. Insert the included long screws to secure the bracket to wall (Fig. 5)
Fig. 3 Fig. 4
Fig. 5
IMPORTANT: Install in the
orientation shown with mounting
hooks at the TOP of bracket as
shown by arrows
406mm 406mm
Page 6
6
90236AU GE50-94 REV B 4-26-13
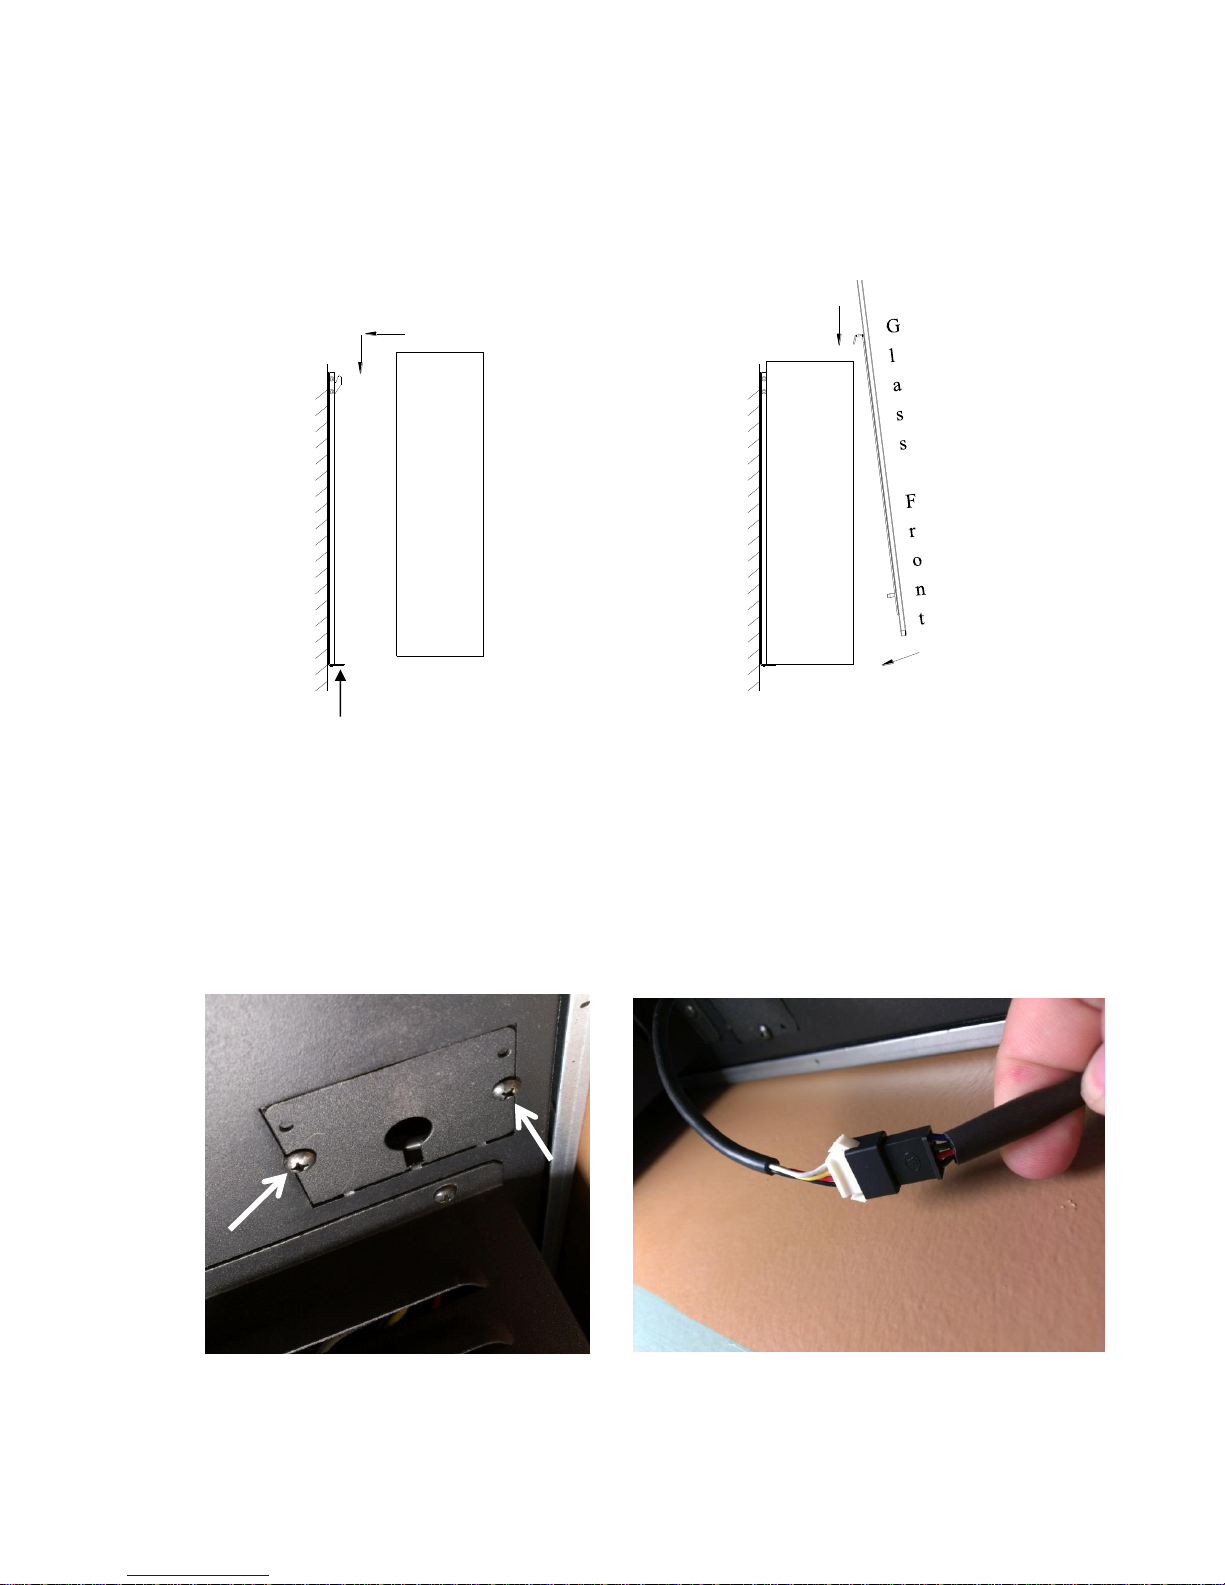
6. Hang the fireplace on the hooks at top and push the fireplace into the bracket and then insert the short M5×10 screws
into the bottom support tabs. (Fig. 6)
7. Arrange the white & clear faux stones along the inset window ledge at the front of the firebox.
8. Install the fireplace front as pictured. (Fig. 7) Secure the fireplace front with 2 M4×8 screws in the tabs on top of the fire
box
9. Connect the backlighting cable at the bottom of the glass to that of the fire box (Fig. 8, Fig.9,)
1
2
2
1
Fig. 6 Fig. 7
Insert M5x10 screws
F
i
r
e
p
l
a
c
e
On underside of fire box, remove the
screws holding access panel on. Pull long
cord out and thread through hole in access
panel. Replace access panel when finished.
Connect cord to front LED lighting plug
and tuck cords behind glass.
Fig. 8
Fig. 9
Page 7

7
90236AU GE50-94 REV B 4-26-13
ELECTRICAL CONNECTION
A 15 AMP, 220/240 Volt, 50 Hz circuit with a properly grounded outlet is required. The unit comes standard with 1.8 m
three-wire cord, exiting from the rear of the fireplace. Plan the installation to avoid the use of an extension cord. Preferably,
the fireplace will be on a dedicated circuit as other appliances on the same circuit may cause the circuit breaker to trip or
the fuse to blow when the heater is in operation.
CLEANING TRIM
Clean the glass trim using a soft cloth and household glass cleaner and buff with a clean soft cloth if streaking occurs.
MAINTENANCE
WARNING: ALWAYS UNPLUG THE CORD BEFORE MOVING OR SERVICING.
DO NOT IMMERSE HEATER IN WATER!
Always turn OFF the heater and disconnect the cord from the electrical outlet before cleaning your heater.
Light accumulated dust may be removed from the heater with a soft cloth or vacuum cleaner.
Wipe the exterior surfaces of the heater occasionally with a slightly damp cloth (not dripping wet) using a solution
of mild detergent and water. Dry the case thoroughly before operating the heater.
Caution: Do not allow water to run into the interior of the heater as this could create a fire or electric shock hazard.
The fan motor is factory lubricated for life and will not require further lubrication.
Warning: Any other servicing needed must be performed by an authorized service representative. Do not attempt to
service the unit yourself.
Page 8
8
90236AU GE50-94 REV B 4-26-13
OPERATING INSTRUCTIONS:
REMOTE CONTROL FUNCTIONS
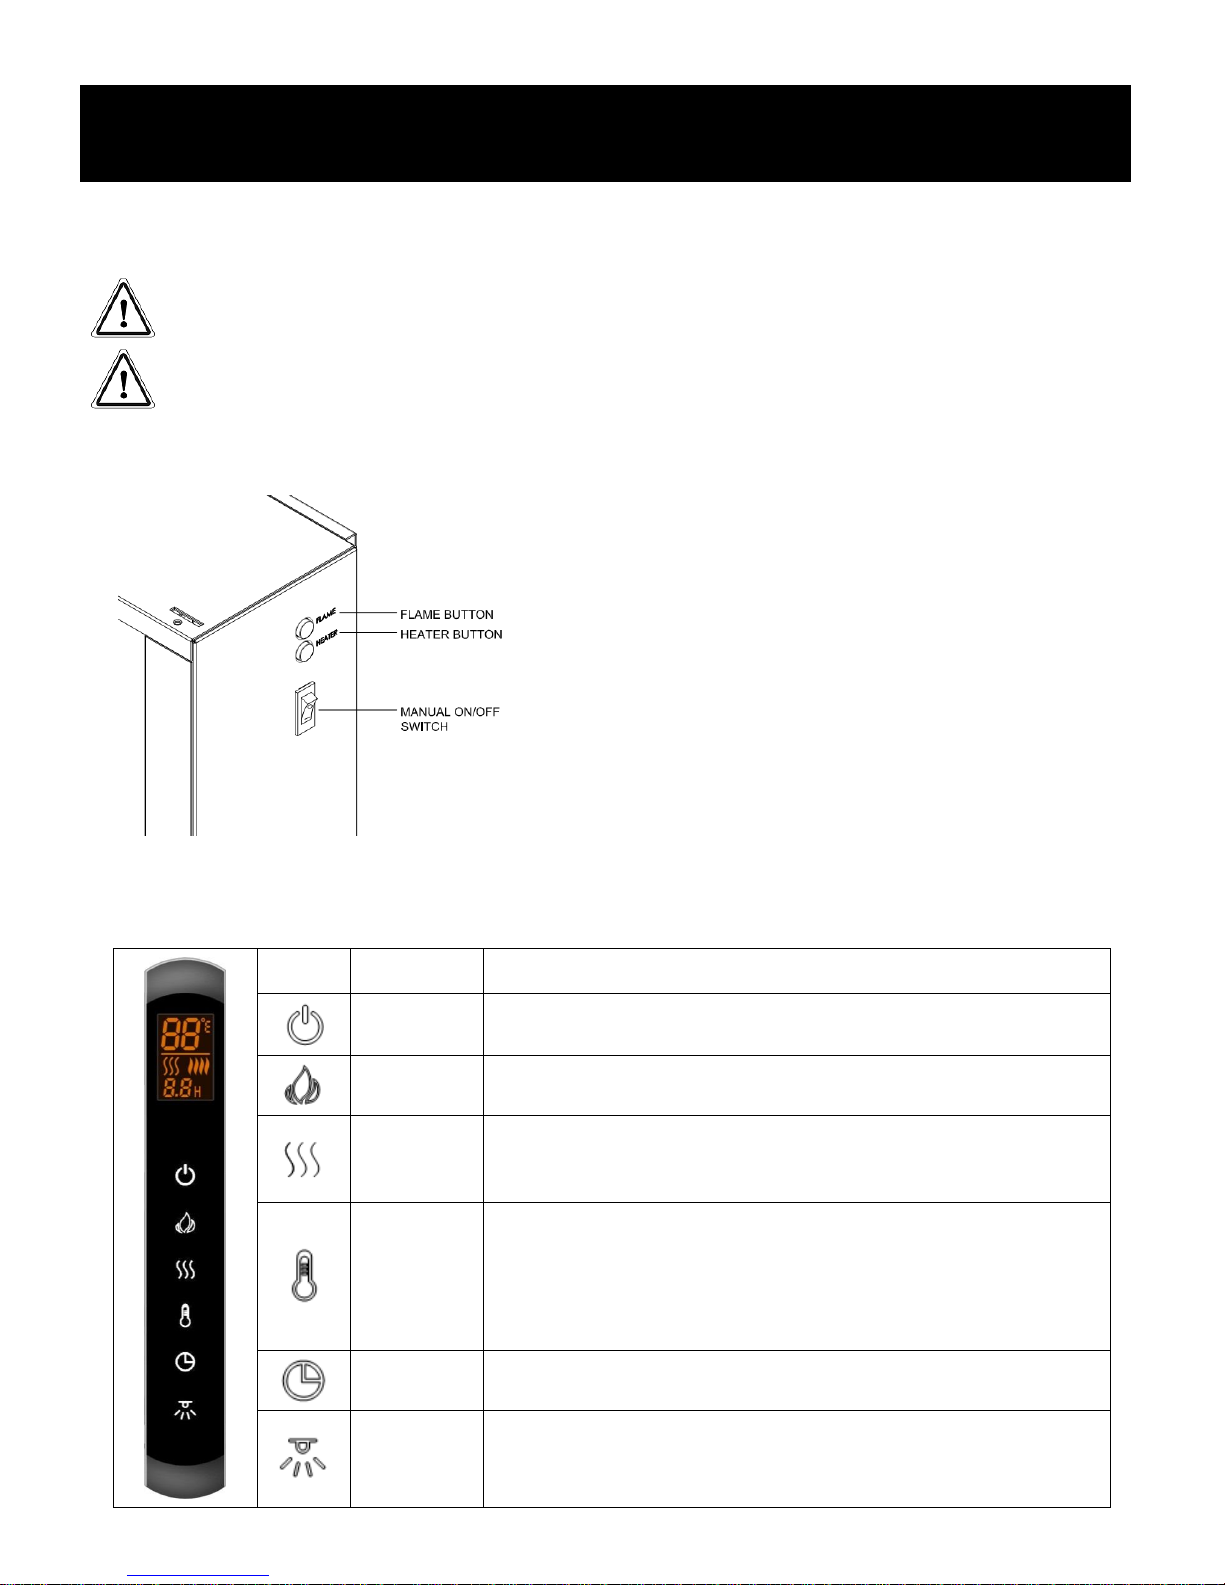
This appliance can be operated by both remote control and manual buttons located on the side of the fire box. Once the
unit has been properly connected to a grounded electrical outlet, turn on the main power switch located on the right-hand
side of the appliance. A beep should be heard when the power is first switched on.
CAUTION ! The unit’s power cord must be connected to a properly grounded and protected 220/240V outlet.
Always use ground fault protection where required by the electrical code.
WARNING! Do not operate the unit if it is damaged or has malfunctioned. If you suspect the unit is damaged,
please call a qualified service technician to inspect and to replace any part of the electrical system
If necessary.
NOTE! To use both remote and manual function the main power switch must be in “ON” position.
● Operating by Manual Button
MANUAL ON/OFF SWITCH
This switch turns heater on/off, and permits / prohibits use of remote
and panel push buttons.
FLAME BUTTON
The fire has four flame effects, by pressing the flame effect button the
unit will cycle through each effect.
HEATER BUTTON
Press once turns 1000W power on. (Pilot lights illuminated ●○)
Press again turns 2000W power on (Pilot lights illuminated ●●)
Press third time turns heater off. (Pilot lights illuminated ○○)
● Operating by Remote Handset
Make sure the battery are installed properly in the remote control.
The effective range of the remote control is up to 4 meters or 13 feet.
ICON
TITLE
FUNCTION
POWER
Press once turns appliance on. Press again turns appliance off.
FLAME
The fire has four flame effects, by pressing the flame effect button the
unit will cycle through each effect.
HEATER
Press once turns 1000W power on. (Pilot lights illuminated ●○)
Press again turns 2000W power on (Pilot lights illuminated ●●)
Press third time turns heater off. (Pilot lights illuminated ○○)
TEMP
Digital display shows the TEMP setting 23°C (default), with 14
settings circle from “OFF”, “16°C” to ”28°C”.
The TEMP will increase by 1°C up to 28°C when pressed each time.
By pressing the TEMP for 3S, the digital display can switch
between °C and °F.
TIMER
Cycles from OFF, 0.5H, 1H, 2H, 3H, 4H, 5H, 6H, 7H, 8H, to 9H.
BACK LIGHT
By pressing the backlight button the unit will cycle through 12 Colors,
a color-cycle mode, and OFF setting.
Page 9
9
90236AU GE50-94 REV B 4-26-13
WARRANTY
In the unlikely event of a problem occurring due to a manufacturing fault within 24 months from the date of purchase
of the appliance it will be repaired or replaced free of charge.
This warranty does not cover consumable items such as the bulbs and fuses which have a limited lifespan.
If a problem should occur, the nature of the problem together with the date of a purchase should be immediately
reported to the retailer that the appliance was purchased from. Proof of purchase will be required so the original receipt
should be retained.
Warranty applies to the original owner only and is non-transferrable.
TROUBLESHOOTING
Problem
Possible Causes
Solution
Fireplace not responding to remote
commands
Switch on fireplace not in the
ON position
Switch must be in the ON position for
remote operation
Remote control battery dead
or not inserted properly
Insert or check battery for correct
orientation
Remote is not in range of
fireplace or not aimed
correctly
Move closer to fireplace and aim remote
directly at it.
Fireplace trips circuit breaker or blows
fuse when turned on
Improper circuit rating
Ensure unit is plugged into a dedicated 15
amp circuit
Too many appliances
plugged into the same circuit
Unplug other appliances on the same
circuit
Heater is excessively noisy
Blower assembly is dirty
Unplug unit and clean blower
Defective blower
Blower replacement or repair necessary
Odor coming from heater/blower
Normal operation
Heater is burning off dust accumulated
during manufacture or non-use periods.
This should only be noticeable for a brief
period after turning on.
Defective heater
Heater may require replacement or repair
Flame effect frozen or stuttering
Defective flame motor
Flame motor repair or replacement
required.
Heater not outputting heat when turned
on.
Thermal switch tripped
Turn off unit and unplug for 5 minutes. This
is a safety feature to prevent overheating
Heater is defective
Replacement or repair may be required
Thermostat is cycled off
Set thermostat to higher setting
LED Lighting not turning on
Front glass panel not
plugged into fire box
Plug front panel in according to instructions
Lighting may be defective
Repair or replacement may be required.
For more information, you can visit us online at
Http://www.GreatCo.com
Or Call Us At:
1-651-287-7460
 Loading...