

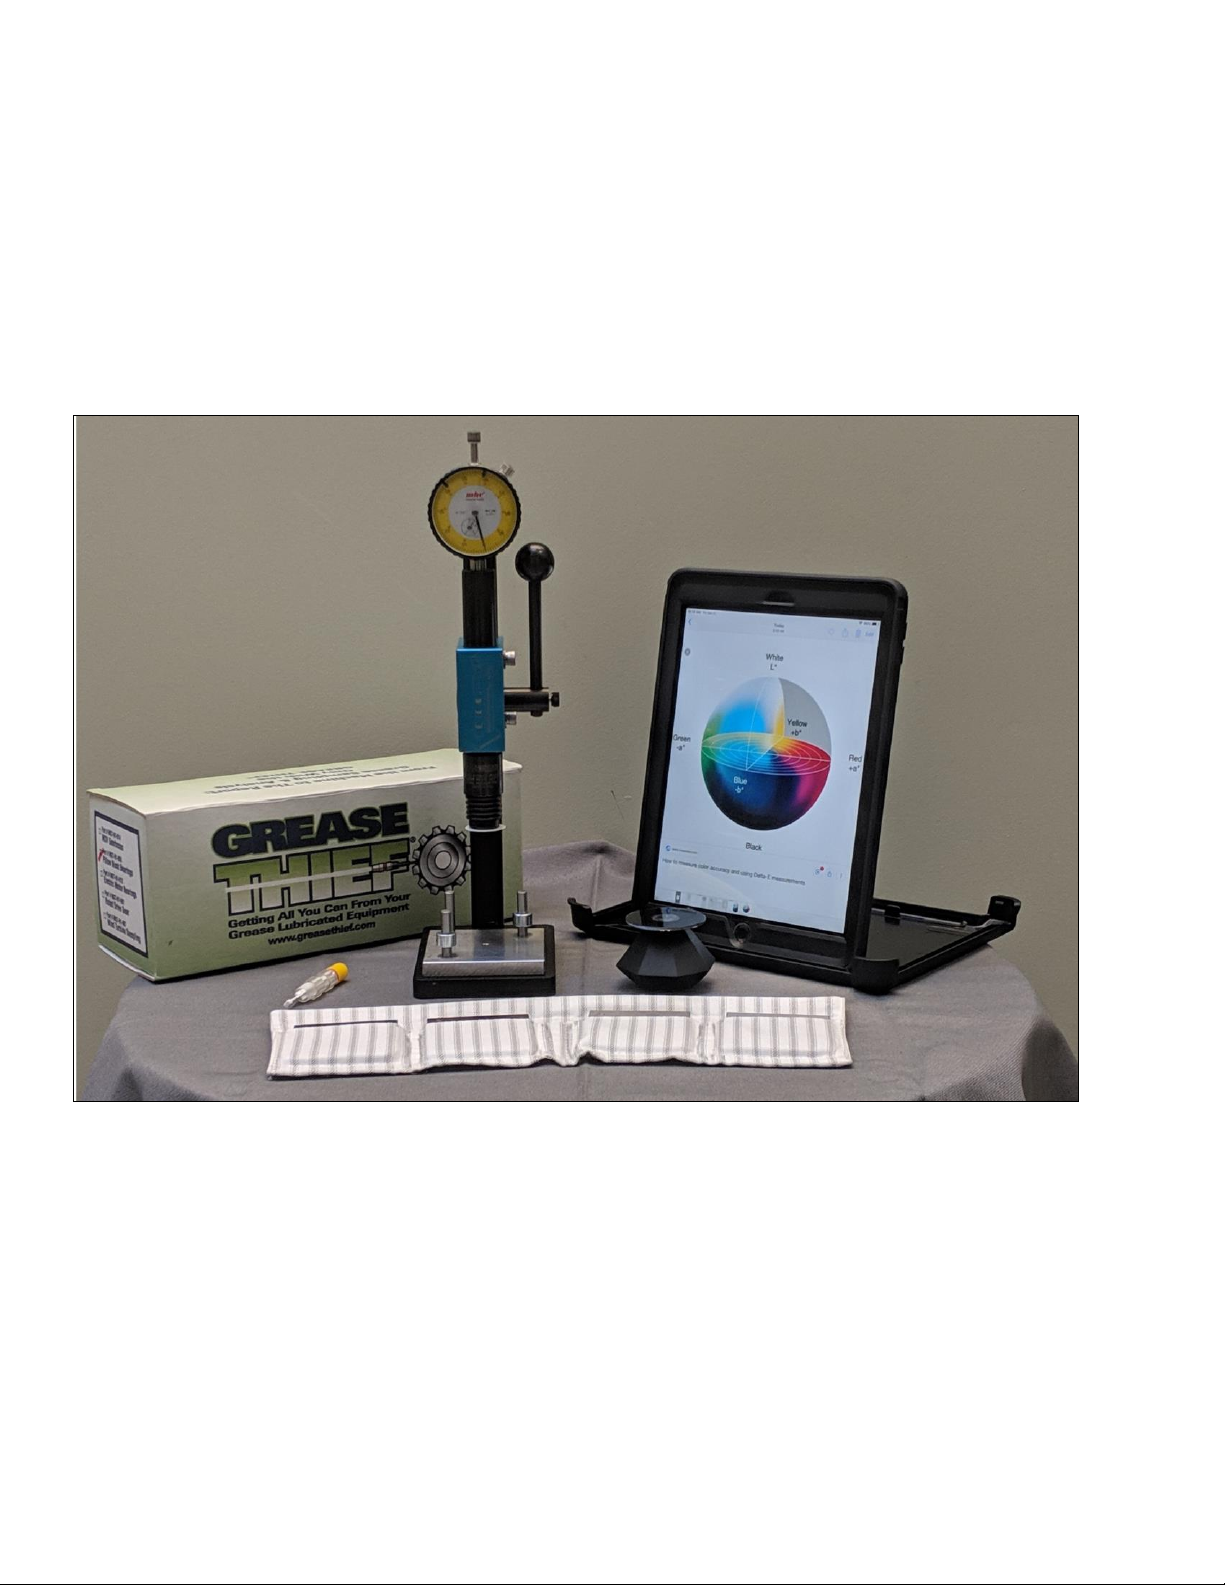
Grease Thief - COLORIMETER
MRG Labs
USER MANUAL
REV 1 Page 1 of 30

Table of Contents
Set Up Procedures
Check Spacer Stack 3
Taring Arbor Press 3
Final Press Checks 5
iPad Setup 6
iPad Email/Mail Account 6
Sampling Procedures
RGB Values and CIE L*a.b. Values 7
Getting Started 7
Sampling Grease Overview 8
Nix Pro Sensor Application
Sampling with Nix Pro Sensor App 10
Two Grease Comparison with Nix Pro Sensor App 14
Exporting Data with Nix Pro Sensor App 17
Nix Quality Control Application
Sampling with Nix Quality Control App 21
Editing Graphical Thresholds with Nix Quality Control App 27
Exporting Data with Nix Quality Control App 28
REV 1 Page 2 of 30
Set Up Procedures
Check Spacer Stack
Carefully check and wipe clean each Spacer then place all four together as a stack. Using a Dial
Indicator, verify the total stack thickness within 0.948” ± 0.002”; if the stack fails this check,
contact MRG Labs for to schedule reconditioning or obtain replacement spacers if necessary.
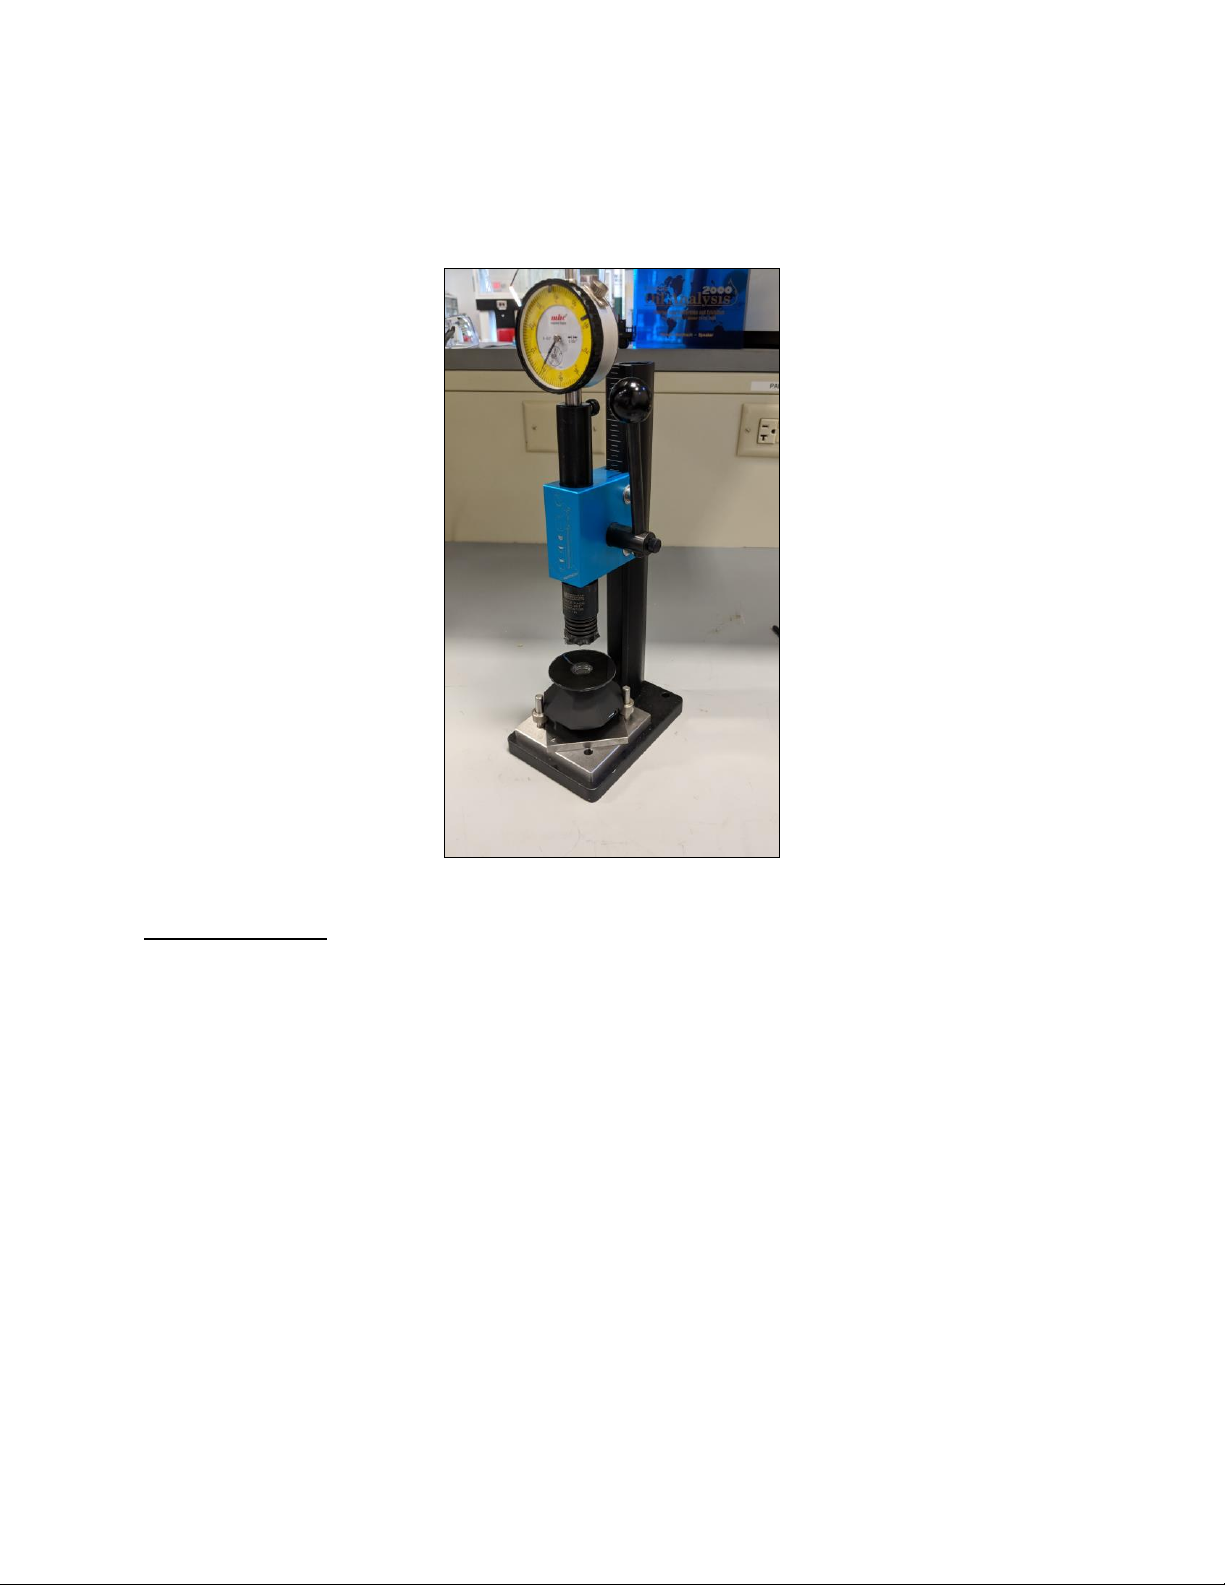
Taring Arbor Press
The arbor press is designed to compress the grease to various thicknesses (0.035”, 0.010”, and
0.005”). Spacer A is the thickest and used to zero out the distance between the press with foil
applied and the flat adapter.
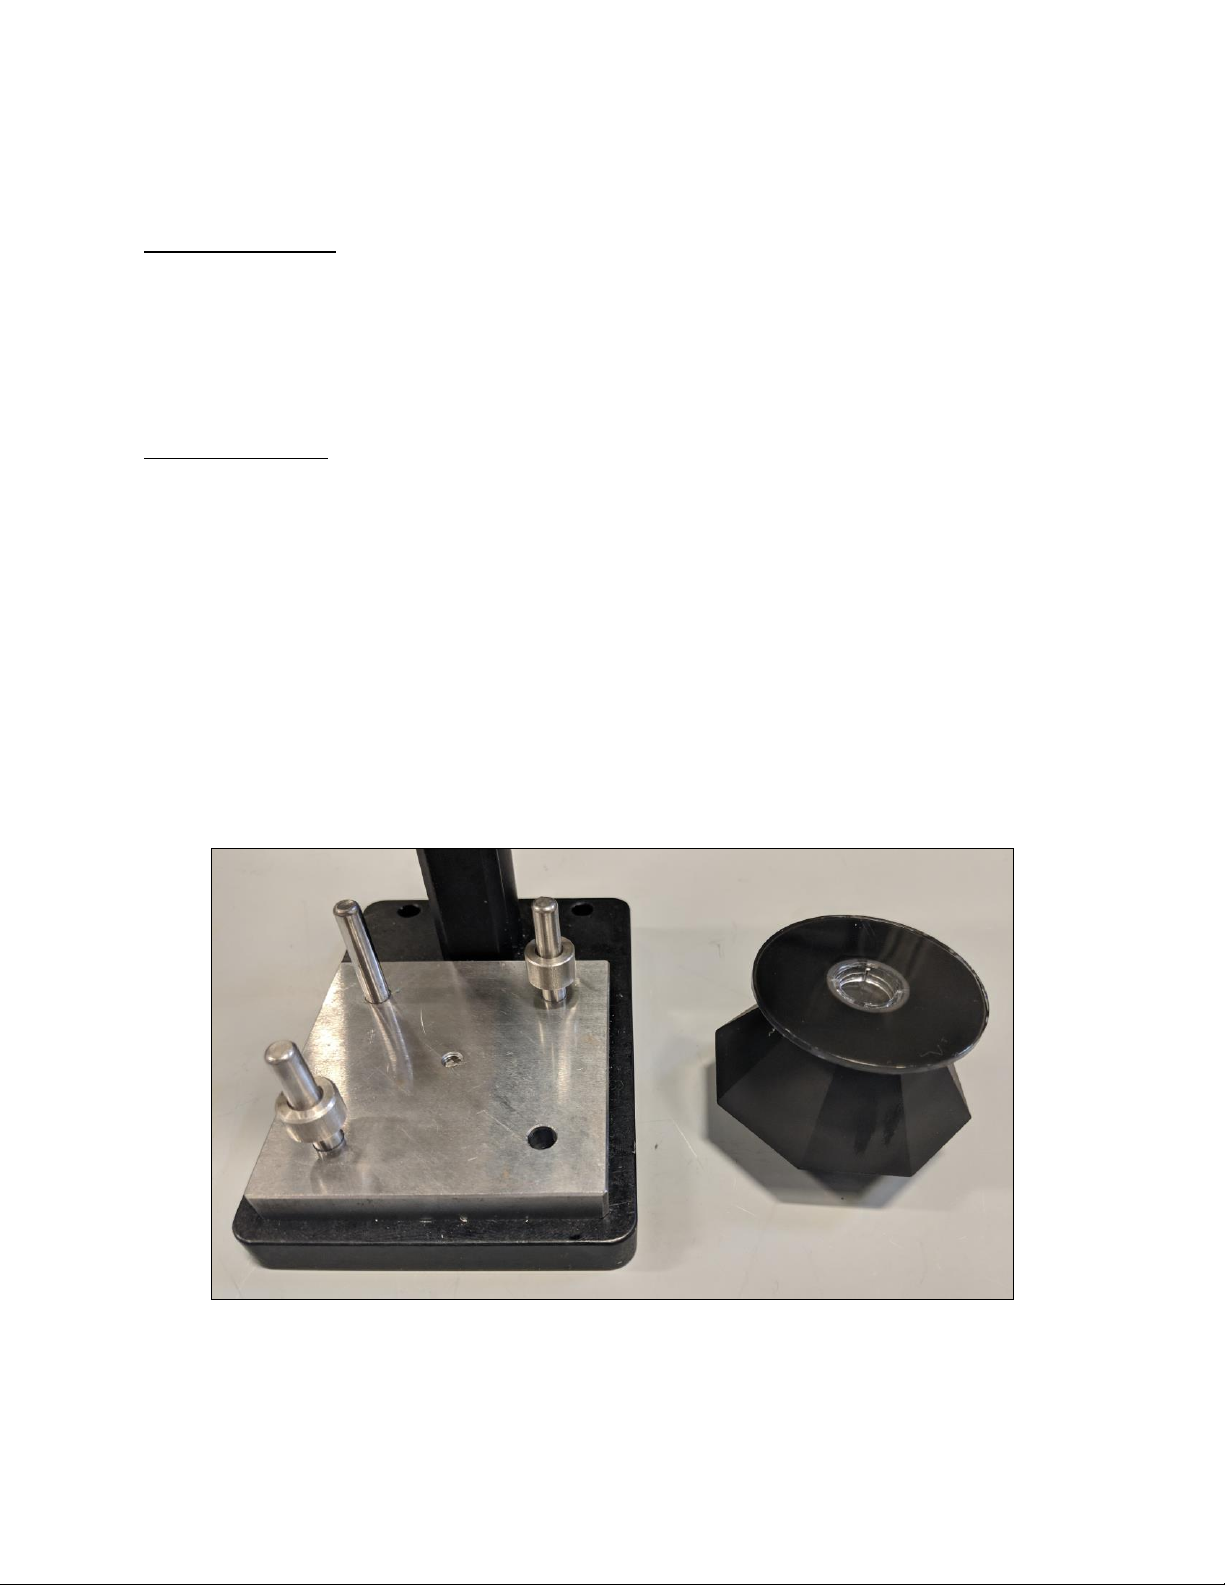
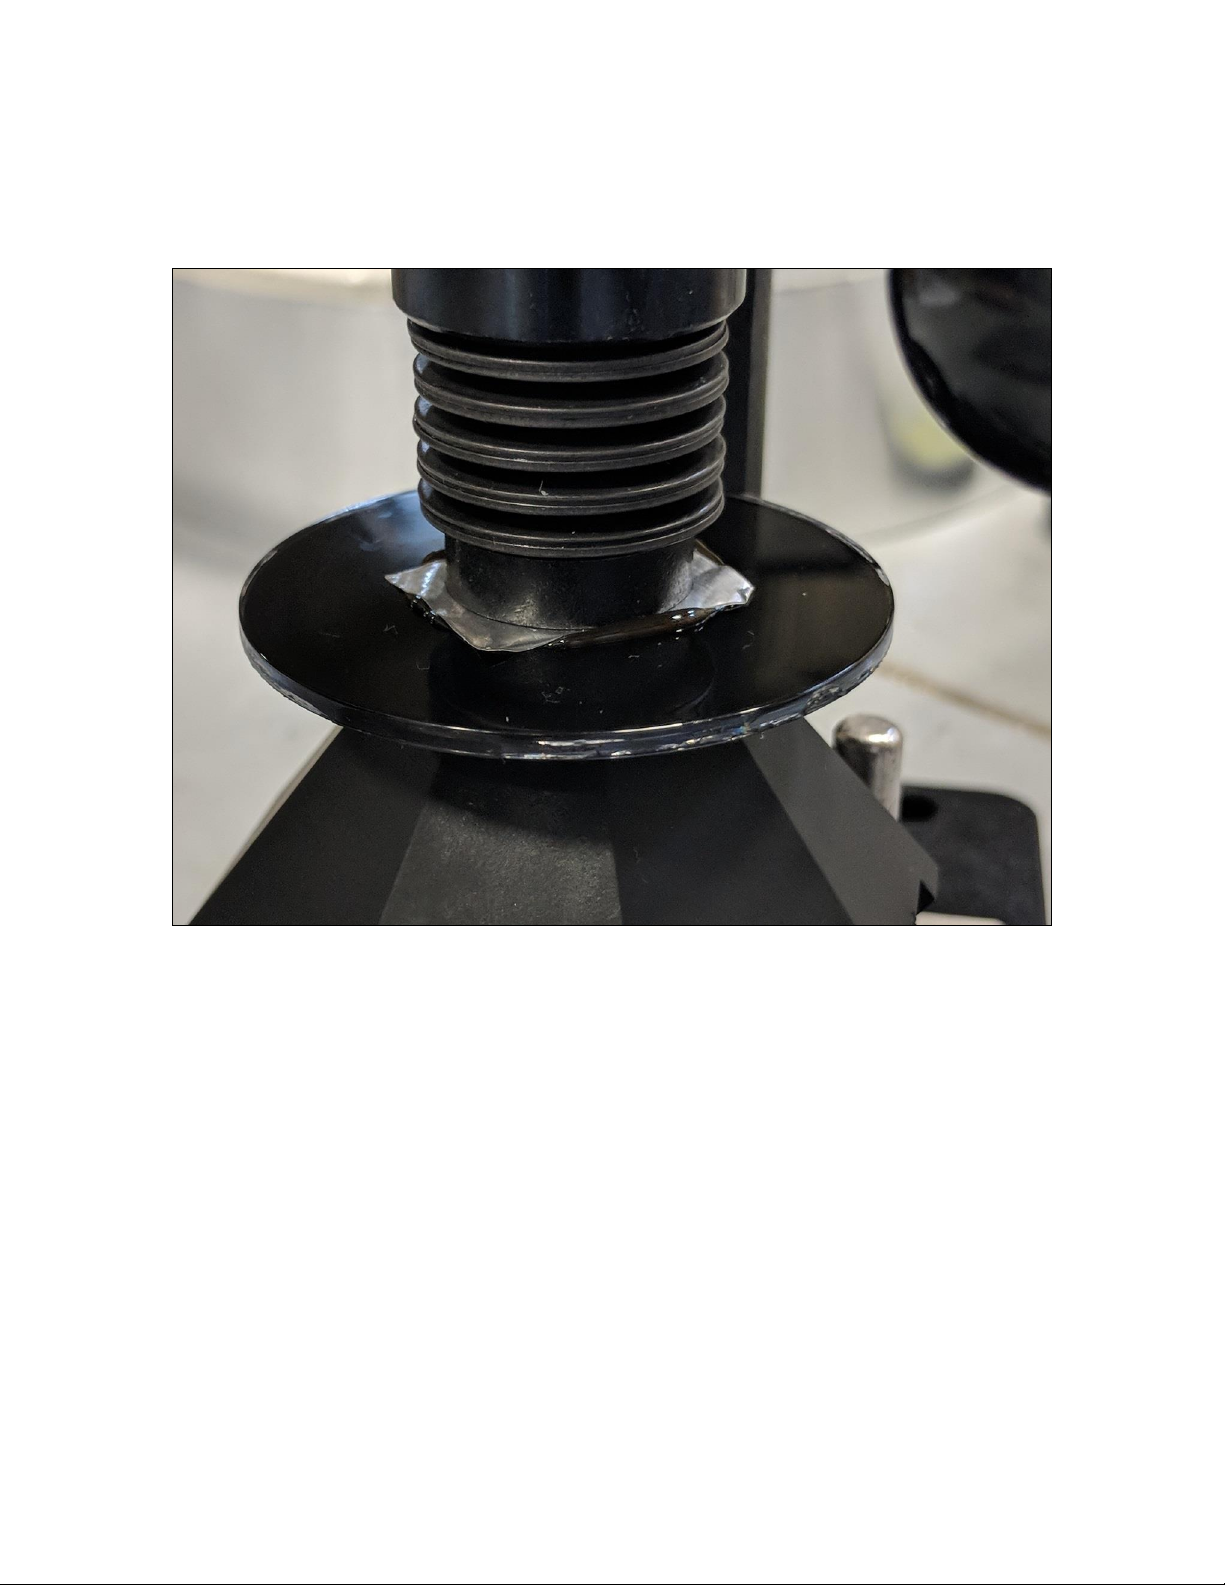
Remove all Spacers (A, B, C, D) from colorimeter base. Feel for presence of debris, grit, or other
interferences to flatness of base, including dents and/or dings on the metal surface. Wipe clean
with clean hands. Check and wipe clean Spacer A and carefully lower Spacer A onto the
colorimeter base with the short side aligned to the arbor press tower.
REV 1 Page 3 of 30

Place a Flat Adapter into the optical channel hole on the GT Colorimeter Sensor and firmly seat
the adapter. If necessary, clean the flat adapter window of any debris and/or smudges. Place the
GT Colorimeter Sensor, with the Flat Adapter facing up, under the arbor press. The sensor
should nest between the three pins and sit flat on Spacer A. Power connection should be facing
either to the left or right side of the unit. Remove one circle of disposable foil and affix flatly
and smoothly to the flat piston press end.
Holding the blue lever housing securely, loosen both cap screws with an allen-wrench and lower
the foil covered press end into contact with the Flat adapter. With foil in contact with the Flat
Adapter window, pull the press lever down as far as it will go, as this will raise the blue housing
to the appropriate height. Moving the press lever downward as far as it will go is called the fulltravel limit of the arbor press.
REV 1 Page 4 of 30
While holding the lever securely in this full-travel limit position, snug each cap screw and then
alternate increasing the torque on each screw until they are both firmly seated to secure the blue
lever housing.
Final Press Checks
Install and zero the dial indicator in the hole in the top of the ram arm. Verify that at full-travel
limit that the dial indicator deflection is less than 0.001”. Place the smallest feeler gauge
(0.0015”) between the foil and the Flat Adapter window. Verify a deflection between 0.0005”
and 0.003” on the dial indicator.
Remove the GT Colorimeter Sensor and Spacer A from base of the press. Handle all Spacers
carefully and ensure Spacers are in protective holders if not in use. Check and wipe clean Spacer
D and carefully slide onto base. Place GT Colorimeter Sensor with Flat Adapter facing up on
top of the Spacer.
REV 1 Page 5 of 30

iPad Setup
If not using a smart-phone, the supplied iPad will be used. Charge the iPad prior to setup with the
charging cable to a USB or wall outlet supplied power source. To access the application store
for downloads of the required applications an Apple ID will need to be created for this iPad.
Refer to the website https://support.apple.com/apple-id for login and password support.
Select appropriate Language, Region, and connect to a Wi-Fi Network. Do not set up the Touch
ID as this may lock out other users. On the Passcode screen select “Passcode Options” and
“Don’t Use Passcode”. Set Up as New iPad. Enter appropriate personal or business
information. Select security question/answers. Enter the app store and search “Nix color” to find
the NIX Pro Color Sensor and NIX Quality Control applications. When first downloading any
application, the iPad will prompt to further fill out additional business information to complete
the log in process. Once log in is finalized, access the App Store to download Nix Pro Color
Sensor and Nix Quality Control applications to the iPad.
iPad Email/Mail Accounts
To first setup an iPad email, select the Mail icon on the iPad. From the list, select the email
hosting options and enter the email information and select Next. To create an email, select
iCloud from the list and on the spot create an email/password for the iPad.
To add an email address to the iPad, first select the Setting icon. Select Mail, Contacts,
Calendars. Select Add Account, and finally select Other. Enter the information for the
additional email address along with Name, Address, Password, and Description. Select Save to
finish the process.
REV 1 Page 6 of 30

Sampling Procedure
RGB Values and CIE L*a.b. Values
Nix Pro Color Sensor and Nix Quality Control applications are used to determine the RGB
Values and the CIE L*a.b. Values of grease references and samples. These values calculate the
Delta-E2000 for difference in color-space and Delta-E2000 may be used as a go/no-go
depending on need.
For a proper threshold of data and accurate RGB and CIELAB values, at least one RGB color
value must be greater than 100. If not achieved with Spacer D (0.035”), continue sampling with
Spacer C (0.010”) and then subsequently Spacer B, should Spacer C also not return an RGB
color value above 100. This action closes the gap between the press and the window, thinning
the grease sample. Thinner grease allows for more light to reflect back to the sensor and more
accurately indicate the grease’s color.
Getting Started
Prior to sampling, ensure the Nix Pro Color Sensor and Nix Quality Control applications are
downloaded to the iPad or smart-phone or other device via the correspoding app store. The
device must be set up prior to download. For instructions on setting up the supplied iPad, refer
to section iPad Setup for details. For specific use of Nix Pro Color Sensor and Nix Quality
Control applications, refer to their respective sections, or for additional information visit
https://www.nixsensor.com/.
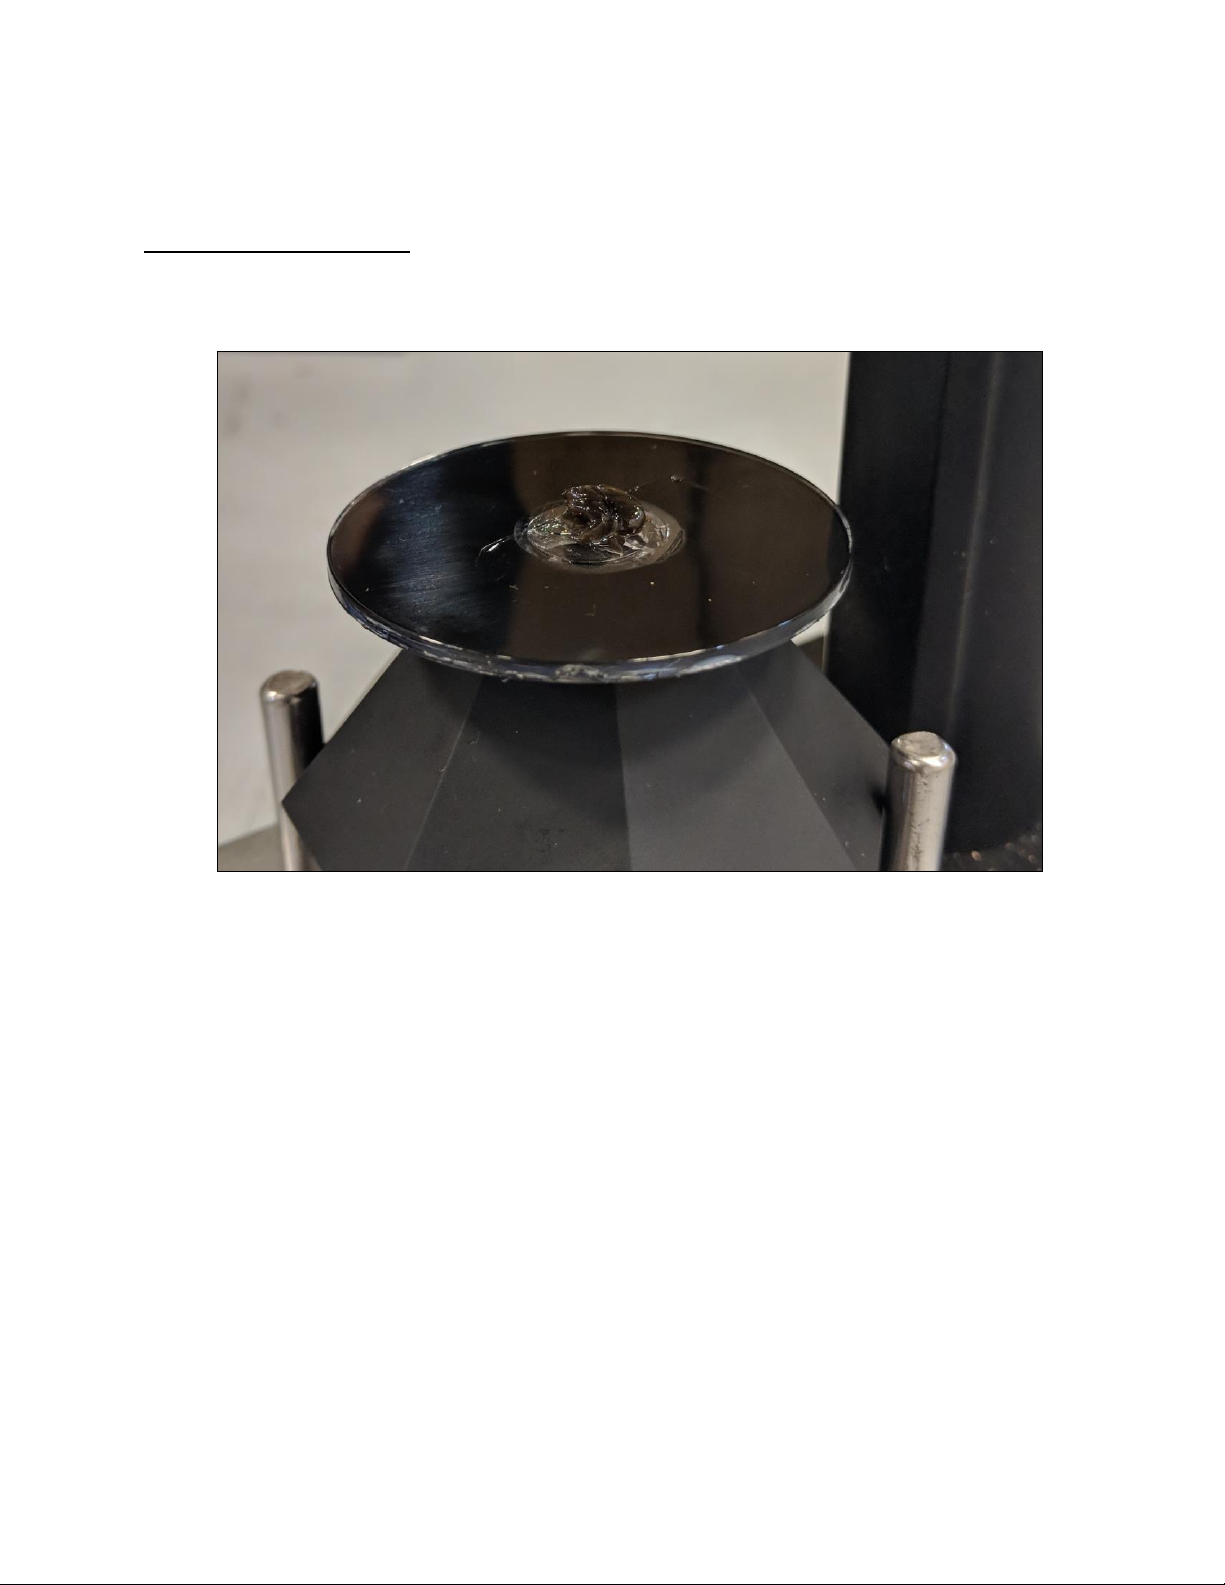
Ensure Spacer D (0.035”) is installed under the Sensor with the D etching opposite from the
arbor press tower. Apply grease to the Flat Adapter window and press grease flat with arbor
press lever. Release lever slowly and ensure grease has fully coated the window portion of the
Flat Adapter – add more grease if needed.
REV 1 Page 7 of 30
Sampling Grease Overview
Apply grease sample to cover center window of sensor.
To sample grease at first spacer, Spacer D (0.035”), pull arbor press lever to its full-travel limit
to press the grease to the corresponding thinness. .
REV 1 Page 8 of 30
Use the lever to lift the column press and ensure the grease imprint is covering the entire sensor
window. If necessary, apply additional sample grease and press again to ensure full coverage.
With the press at full-travel limit and with proper sensor window coverage, select Scan with Nix
Pro on the app screen. Once data shows in phone app, secure the sensor wit a free hand and
slowly release the lever. Refer to each applications section for more specific details.
REV 1 Page 9 of 30

Nix Pro Sensor Application
Sampling with Nix Pro Sensor App
Open the Nix Pro Sensor application. Select Connect to Nix Pro. Select the appropriate Nix
sensor unit. More than one unit can be displayed if they are in Blue-tooth range.
REV 1 Page 10 of 30

Once Nix Sensor is connected to iPad via blue-tooth, prepare the grease sample for testing.
While grease sample is pressed and thinned, select Scan with Nix Pro to scan and obtain results.
REV 1 Page 11 of 30

The Nix Pro Sensor has the functionality to label a sample, add description, and add a folder to
save on the device. To finish, select OK.
REV 1 Page 12 of 30

To clean Flat Adapter between grease samples, remove GT Colorimeter Sensor from arbor press
base. Use cotton balls to remove the grease and wipe clean the GT Colorimeter Flat Adapter
window. Remove the adhesive foil from the arbor press piston and replace with a clean piece of
adhesive foil to ensure no crossover contamination.
Replace Spacer D with Spacer C. Remember to handle Spacer with care. Install Spacer C on the
base with the C etching opposite the arbor press tower. Replace the cleaned GT Colorimeter
Sensor onto Spacer C with Flat Adapter window facing up. The grease is ready to be sampled at
0.010”. Once grease is sampled and data saved, remove Spacer C and replace with Spacer B.
With Spacer B in place, the grease is ready to be sampled at 0.005”. Once grease has been
sampled and data saved, remove Spacer B and replace with Spacer D for the next grease sample.
Replace the cleaned GT Colorimeter Sensor onto Spacer D with Flat Adapter window facing up.
REV 1 Page 13 of 30

Two Grease Comparisons with Nix Pro Sensor App
The Nix Pro Sensor App has the capability to compare samples of grease after they are labeled
and saved to the device
Open the menu, via tapping the 3 horizontal lines in top left-hand corner of the app screen.
Select the Compare option. This will open the two-color comparison screen.
REV 1 Page 14 of 30

In the two-color comparison screen tap, the LEFT and chose to either sample new grease now
with Scan with Nix Pro or pull a prior grease sample from saved samples with Saved Color.
REV 1 Page 15 of 30

Once the first sample is populated into the screen, select the second sample or reference for
comparison by tapping the RIGHT side. Select the sample again from either the saved or
previous samples, or through taking a new grease sample.
Delta-E2000 values may be used to determine sample acceptability.
Exporting Data with Nix Pro Sensor App
REV 1 Page 16 of 30

The Nix Pro Sensor app exports data by means of previously made folders. To export a data set
together, all samples of that data set must be run and saved under the same folder name within
the Nix Pro Sensor application prior to exporting.
To begin exporting a data set, first select the 3-Bar Icon to open the menu and select
Settings.
REV 1 Page 17 of 30

Under IMPORT & EXPROT, select Export Scanned Colors to bring up the current selection of
user made folder swatches.
Select the folder of swatches (data set) to export.
REV 1 Page 18 of 30

Select the Mail icon
REV 1 Page 19 of 30

Enter email address, subject, and body of text for receiver.
The CSV file can be opened via Microsoft Excel.
Note: Nix Pro Sensor does not export or measure the Delta-E2000 values for the samples against
any references. A sample must be measured individually against a baseline reference using the
Compare option to obtain its Delta-E2000 value, refer to the Two Grease Comparisons section.
REV 1 Page 20 of 30

Nix Quality Control Application
Sampling with Nix Quality Control App
The Nix Quality Control application graphically represents the CIELAB color space.
Open the Nix Quality Control app and use Login Information: QCTester // NixDemo
REV 1 Page 21 of 30

Select Connect to a Nix Pro to connect to a Nix Pro Sensor unit
REV 1 Page 22 of 30

Once connected to the Nix Pro Sensor unit, select the square to the right of the L/A/B. Two
options, Scan with Nix Pro and Select from Library, will appear. Select Scan with Nix Pro.
REV 1 Page 23 of 30

The reference for this sample set is now saved. The Nix Quality Control application can only
store one reference at a time, though there is no cap on the amount of samples
.
REV 1 Page 24 of 30

Prepare and run the grease sample, see Sampling Procedure, using the Nix Pro Sensor unit.
Select Scan Samples and grease sample results will numerically populate onto the graph. Sample
shows as green if within set thresholds or red if not within set thresholds.
REV 1 Page 25 of 30

Individual sample data may be chosen by selecting the corresponding data point on the graph. If
many samples have been run, select the list option in the top right corner to produce a numerical
list of all samples.
Selecting a sample from the Sampled Colors will return the screen to the graph with the
corresponding sample highlighted and data shown.
Editing Graphical Thresholds with Nix Quality Control App
REV 1 Page 26 of 30

Select the image of the gear to change graph settings of the Pass/Fail Threshold (dE) and
Graph Scale (dL, dA, dB). Consult with MRG Labs to determine best Pass/Fail Thresholds for
particular grease types/families.
Exporting Data with Nix Quality Control
REV 1 Page 27 of 30

To export the reference and samples as a CSV file, select the share icon and select the
Mail option.
REV 1 Page 28 of 30

An email will populate with the CSV file attached. Enter email address, subject, and body of
text for receiver.
The CSV file can be opened via Microsoft Excel. Counts refers to the corresponding
numerically ran sample. Nix Quality Control does not have the ability to assign names/IDs with
in the app.
Note: Nix Quality Control does not export or measure RGB values. Nix Pro Sensor application
must be used to obtain RGB values of baseline references and samples. Refer to Nix Pro Sensor
section.
REV 1 Page 29 of 30

Grease Thief Colorimeter - Oil Analysis
Oil analysis follows ASTM D7843-16 procedure for membrane patch preparation prior to Grease
Thief Colorimeter measurements.
REV 1 Page 30 of 30
 Loading...