

Page 1

PSR-216
200-Channel Portable Scanner
OWNER'S MANUAL
1
PSR216OM.p65 2004/04/08, 16:49Page 1 AdobePageMaker6.5J/Win
Page 2

INTRODUCTION
Your new PSR-216 Programmable Scanner lets you in on all
the action! This scanner gives you direct access to over
35,000 frequencies. You can store frequencies in your
scanner's 200 channels, and you can change your selections at any time.
It incorporates a custom-designed microprocessor — a tiny,
built-in computer which gives your scanner these special
features:
Ten Preprogrammed Search Bands – let you search for
transmissions within preset frequency ranges, so you can
find interesting frequencies more quickly.
Ten Channel-Storage Banks – lets you group your stored
frequencies so you can easily identify calls.
Duplicate Frequency Check – automatically warns you if
you try to store a frequency you’ve already stored, to help
you use the scanner’s memory more efficiently.
Liquid Crystal Display – shows the selected channel and
frequency.
Two Second Scan Delay – helps prevent the loss of replies
on a channel while you are scanning.
Memory Backup – keeps the channel frequencies stored in
your scanner's memory for up to 1 hour without the battery.
Lockout Function – makes your scanner skip over specified channels.
Priority Channel – helps keep you from missing important
calls on the selected priority channel.
Monitor Memories – let you save up to 20 channels located
during a frequency search.
Flexible Antenna with BNC Connector – provides excellent reception. The BNC connector makes it easy to attach
and remove the antenna or a variety of optional antennas.
Your PSR-216 covers the following bands:
68–88 MHz
108–174 MHz
380–512 MHz
806–960 MHz
2
PSR216OM.p65 2004/04/08, 16:49Page 2 AdobePageMaker6.5J/Win
Page 3

Use of scanners must conform to the requirements of the
law of the country where they are utilized. Always check that
your intended use is legally permitted.
Avoid using your scanner in close proximity to a Radio or TV
receiver to prevent unwanted interference.
CONTENTS
PREPARATION .............................................................................. 4
Power Sources ............................................................................. 4
Connecting The Antenna ............................................................. 6
Using The Belt Clip ....................................................................... 7
Connecting An Earphone/Headphones ....................................... 7
Connecting An Extension Speaker .............................................. 7
YOUR SCANNER .......................................................................... 8
A Look At The Keypad .................................................................. 8
The Display ................................................................................... 9
Understanding Bank/Bands/Monitor Memory ........................... 10
OPERATION ............................................................................... 11
Turning On The Scanner/Setting Volume And Squelch............. 11
Programming Frequencies ......................................................... 11
Scanning Stored Channels ........................................................ 13
Searching ................................................................................... 14
Monitoring One Channel ............................................................ 15
Deleting a Frequency From A Channel ...................................... 16
Deleting All Channel Frequencies .............................................. 16
Deleting All Locked Out Channel Frequencies .......................... 16
Monitor Memory ......................................................................... 16
Store The Frequency In Monitor Memory .................................. 17
SPECIAL FEATURE .................................................................... 18
Locking Out ................................................................................ 18
Using Keylock ............................................................................. 18
Using Delay ................................................................................ 18
Turning the Key Tone On And Off ............................................... 19
Battery-Saving Feature ...............................................................19
GENERAL GUIDE TO SCANNING ............................................. 20
Birdie Frequencies ..................................................................... 20
Specified Intervals ...................................................................... 20
TROUBLESHOOTING ................................................................ 21
Resetting/Initializing The Scanner .............................................. 22
CARE AND MAINTENANCE ....................................................... 23
SPECIFICATIONS ....................................................................... 24
3
PSR216OM.p65 2004/04/08, 16:49Page 3 AdobePageMaker6.5J/Win
Page 4

PREPARATION
POWER SOURCES
You can power your scanner from any of four sources:
• Internal batteries (not supplied) with the provided battery
holder
• A rechargeable scanner battery pack (not supplied)
• Standard AC power (using an optional AC adapter)
• Vehicle battery power (using an optional DC cigarette-
lighter adapter)
You can power your scanner from six AA batteries. For the
longest operation and best performance, we recommend
alkaline batteries. You can also power the scanner using a
rechargeable scanner battery pack or rechargeable nickelcadmium batteries, and recharge it as you use the scanner.
Caution: Do not mix old and new batteries, different types of
batteries (standard, alkaline, or rechargeable), or rechargeable batteries of different capacities.
Notes:
• The POWER jack lets you connect an external AC or DC
adapter to operate the scanner. Connecting an adapter
to POWER disconnects the internal batteries. You can use
the POWER jack with either non-rechargeable or rechargeable nickel-cadmium batteries installed.
• The CHARGE jack lets you connect an external AC or DC
adapter to operate the scanner. The internal batteries remain connected when you connect an adapter to
CHARGE, and get recharged when you connect a charger.
Warning: Never use the CHARGE jack with non-recharge-
able batteries! If you try to recharge non-rechargeable batteries, they could get very hot and explode.
Battery Install
1. Press down on the battery compartment cover on the bottom of the scanner and slide the cover in the direction of
the arrow to remove it.
2. Slide the battery holder out of the battery compartment.
3. If you are installing individual batteries, insert six AA batteries in the battery holder as indicated by the polarity
4
PSR216OM.p65 2004/04/08, 16:49Page 4 AdobePageMaker6.5J/Win
Page 5

symbols (+ and –) marked on the battery holder.
4. Slide the battery holder or battery pack into the compartment.
Caution: The battery holder or battery pack fits only one
way inside the battery compartment. Do not force it.
5. Replace the cover.
When battery power is low, BATT flashes and the scanner
beeps about every 3 seconds. Immediately replace all six
non-rechargeable batteries or recharge the rechargeable
batteries or battery pack.
Caution: Always dispose of old batteries promptly and properly. Do not bury or burn them.
Using Standard AC Power
To power the scanner from AC power, you need an AC
adapter.
Cautions:
• You must use an AC adapter that supplies 9 volts and
delivers at least 300 milliamps. Its center tip must be set
to negative, and its barrel plug must correctly fit the
scanner's POWER/CHARGE jack. The recommended
adapter meets these specifications. Using an adapter that
does not meet these specifications could damage the
scanner or the adapter.
• When you finish using the AC adapter, disconnect it from
the AC outlet first. Then disconnect it from the scanner.
Plug the adapter's barrel plug into the scanner's POWER
jack. Then plug the adapter's power module into a standard
AC outlet.
Using Vehicle Battery Power
To power the scanner from your vehicle's cigarette-lighter
socket, you need a DC adapter.
Cautions:
• You must use a DC adapter that supplies 9 volts and delivers at least 300 milliamps. Its center tip must be set to
negative, and its plug must correctly fit the scanner's
POWER/CHARGE jack. The recommended adapter
meets these specifications. Using an adapter that does
not meet these specifications could damage the scanner
or the adapter.
5
PSR216OM.p65 2004/04/08, 16:49Page 5 AdobePageMaker6.5J/Win
Page 6

• To protect your vehicle's electrical system, always plug
the adapter into the scanner before you plug it into your
vehicle's cigarette-lighter socket. Always unplug the
adapter from the vehicle's cigarette-lighter socket before
you unplug it from the scanner.
Plug the adapter's barrel plug into the scanner's POWER
jack. Then plug the adapter's power module into your vehicle's
cigarette-lighter socket.
Charging a Rechargeable Battery Pack/
Rechargeable Batteries
Your scanner has a built-in charging circuit that lets you
charge a rechargeable battery pack or rechargeable nickelcadmium batteries while it is in the scanner. To charge it,
simply connect an AC or DC adapter to the scanner's
CHARGE jack.
It takes about 14–16 hours to recharge a battery pack (or
nickel-cadmium rechargeable batteries) that is fully discharged. You can operate the scanner while recharging the
battery pack (rechargeable batteries), but charging takes
longer.
Note: A rechargeable battery pack (rechargeable batteries)
lasts longer if you let it fully discharge once a month. To do
this, simply use the scanner until BATT flashes and the scanner beeps about every 3 seconds. Then fully charge it.
CONNECTING THE ANTENNA
Follow these steps to attach the supplied flexible antenna to
your scanner.
1. Align the slots around the scanner's connector with the
tabs on the ANT jack.
2. Press the antenna down over the jack and turn the
antenna's base clockwise until it locks into place.
Connecting an Optional Antenna
The ANT jack on the top of the scanner makes it easy to use
the scanner with a variety of antennas. Instead of the supplied antenna, you can attach a different one, such as an
external mobile antenna or outdoor base station antenna.
Follow the installation instructions supplied with the antenna,
route the antenna cable to the scanner, then connect it to the
ANT jack.
6
PSR216OM.p65 2004/04/08, 16:49Page 6 AdobePageMaker6.5J/Win
Page 7

Warning: Use extreme caution when installing or removing
an outdoor base station antenna. If the antenna starts to fall,
let it go! It could contact overhead power lines, if the antenna touches a power line, contact with the antenna, mast,
cable or guy wires can cause electrocution and death! Call
the power company to remove the antenna. Do not attempt
to do so yourself.
USING THE BELT CLIP
You can use the belt clip for hands-free carrying when you
are on the go. Simply slide the belt clip over your belt or
waistband.
CONNECTING AN EARPHONE/
HEADPHONES
For private listening, you can plug an earphone or mono
headphones with a 3.5 mm plug into the PHONE jack on top
of your scanner. This disconnects the internal speaker.
Caution: To protect your hearing, follow these guidelines
when you use an earphone or headphones:
• Do not listen at extremely high volume levels. Extended
high-volume listening can lead to permanent hearing loss.
• Once you set the volume, do not increase it. Over time,
your ears adapt to the volume level, so a volume level
that does not cause discomfort might still damage your
hearing.
Warning: Do not use an earphone or headphones with your
scanner when operating a motor vehicle or riding a bicycle,
in or near traffic. Doing so can create a traffic hazard and
could be illegal in some areas.
CONNECTING AN EXTENSION SPEAKER
In a noisy area, an amplified speaker might provide more
comfortable listening.
Plug the speaker cable's 3.5 mm plug into your scanner's
PHONE jack.
7
PSR216OM.p65 2004/04/08, 16:49Page 7 AdobePageMaker6.5J/Win
Page 8
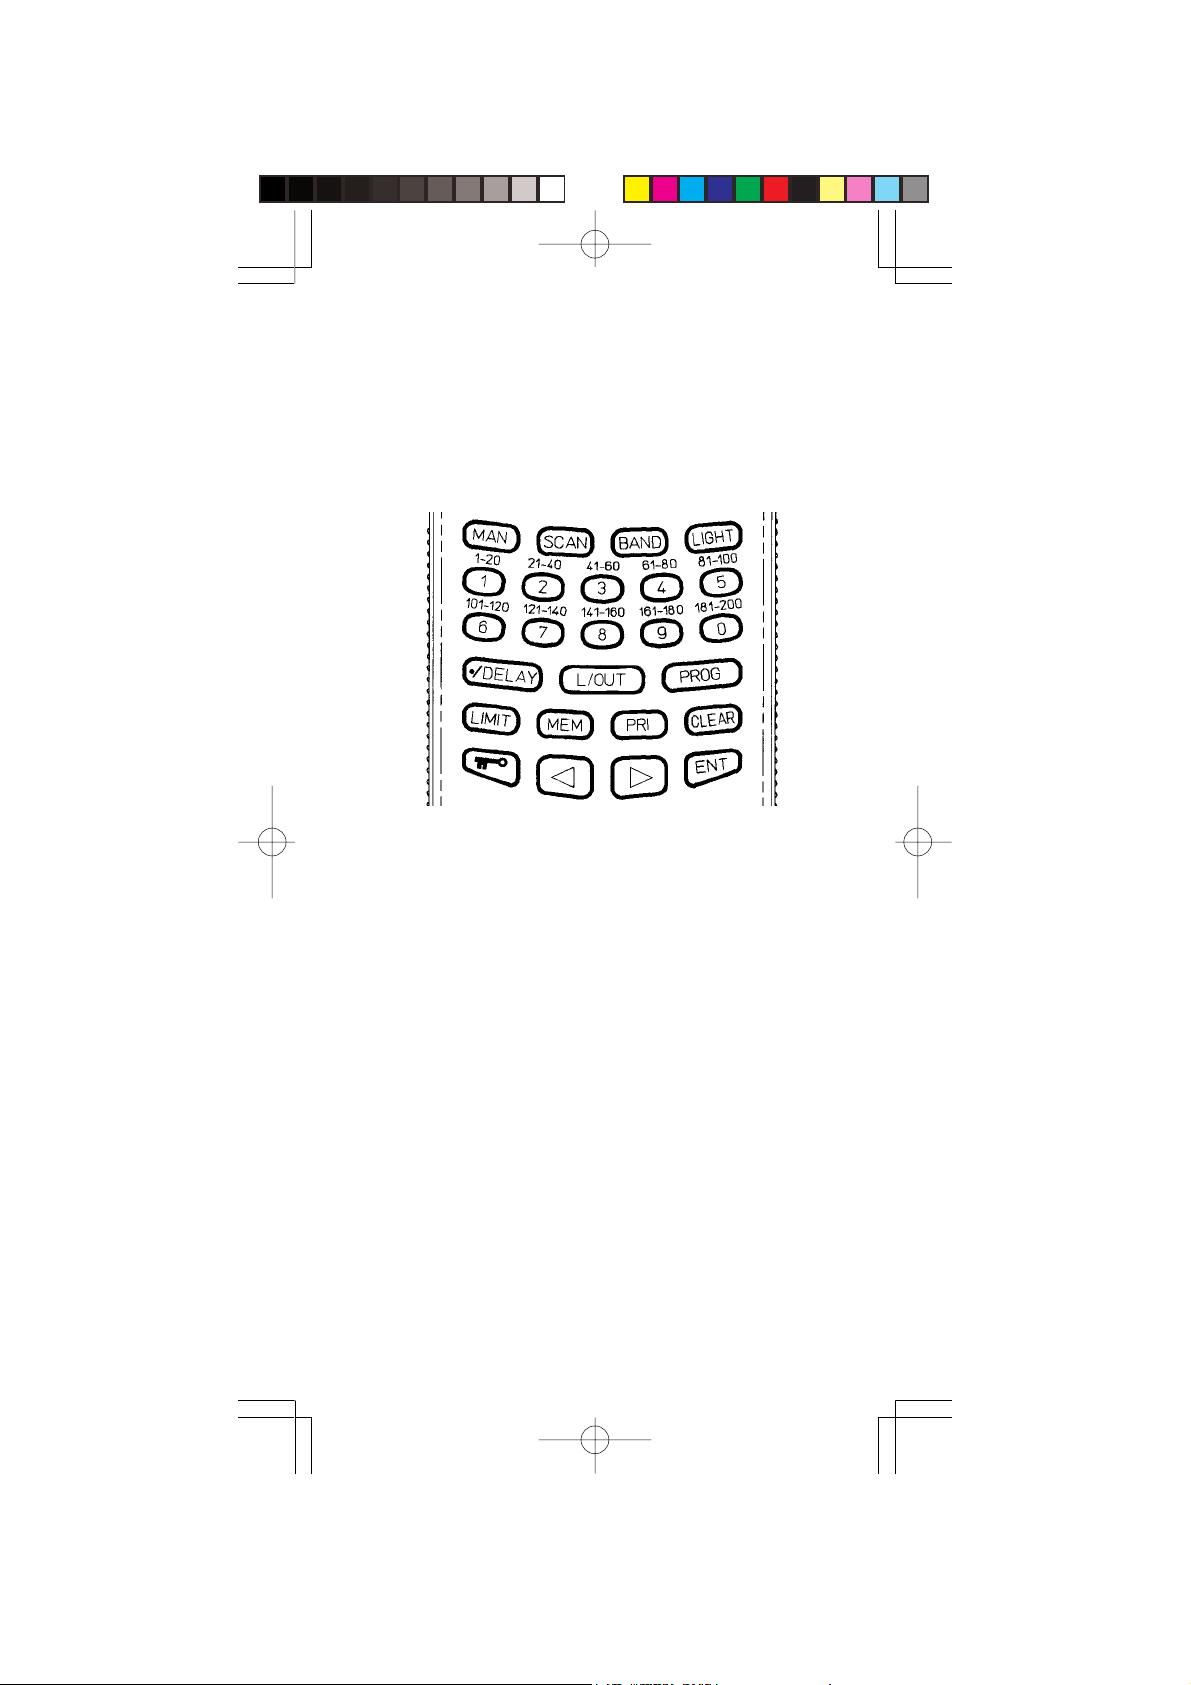
YOUR SCANNER
A LOOK AT THE KEYPAD
Your scanner’s keys might seem confusing at first but this
information should help you understand each key’s function.
MAN – stops scanning to let you directly enter a channel
number.
SCAN – scans through the programmed channels.
BAND – selects a preprogrammed search band.
LIGHT – turns on/off the displays backlight.
Number Keys – use these keys to enter the numbers for a
channel or frequency. The range of numbers above the key
(21-40 for example) indicate the channels that make up a
channel-storage bank.
•/DELAY – programs a two-second delay while scanning or
searching, or enters a decimal point.
L/OUT – turns the channel lock on or off.
PROG – lets you program frequencies into channels.
LIMIT – enters the limit search mode; allows you to set the
search range.
MEM – accesses the monitor memory or store the frequency
to the monitor memory.
PRI – turns the priority function on and off.
CLEAR – clears an incorrect entry or helps initialize the scan-
ner.
8
PSR216OM.p65 2004/04/08, 16:49Page 8 AdobePageMaker6.5J/Win
Page 9
- turns Keylock feature on or off.
< > - selects a scan or search direction.
ENT - stores a frequency into channels.
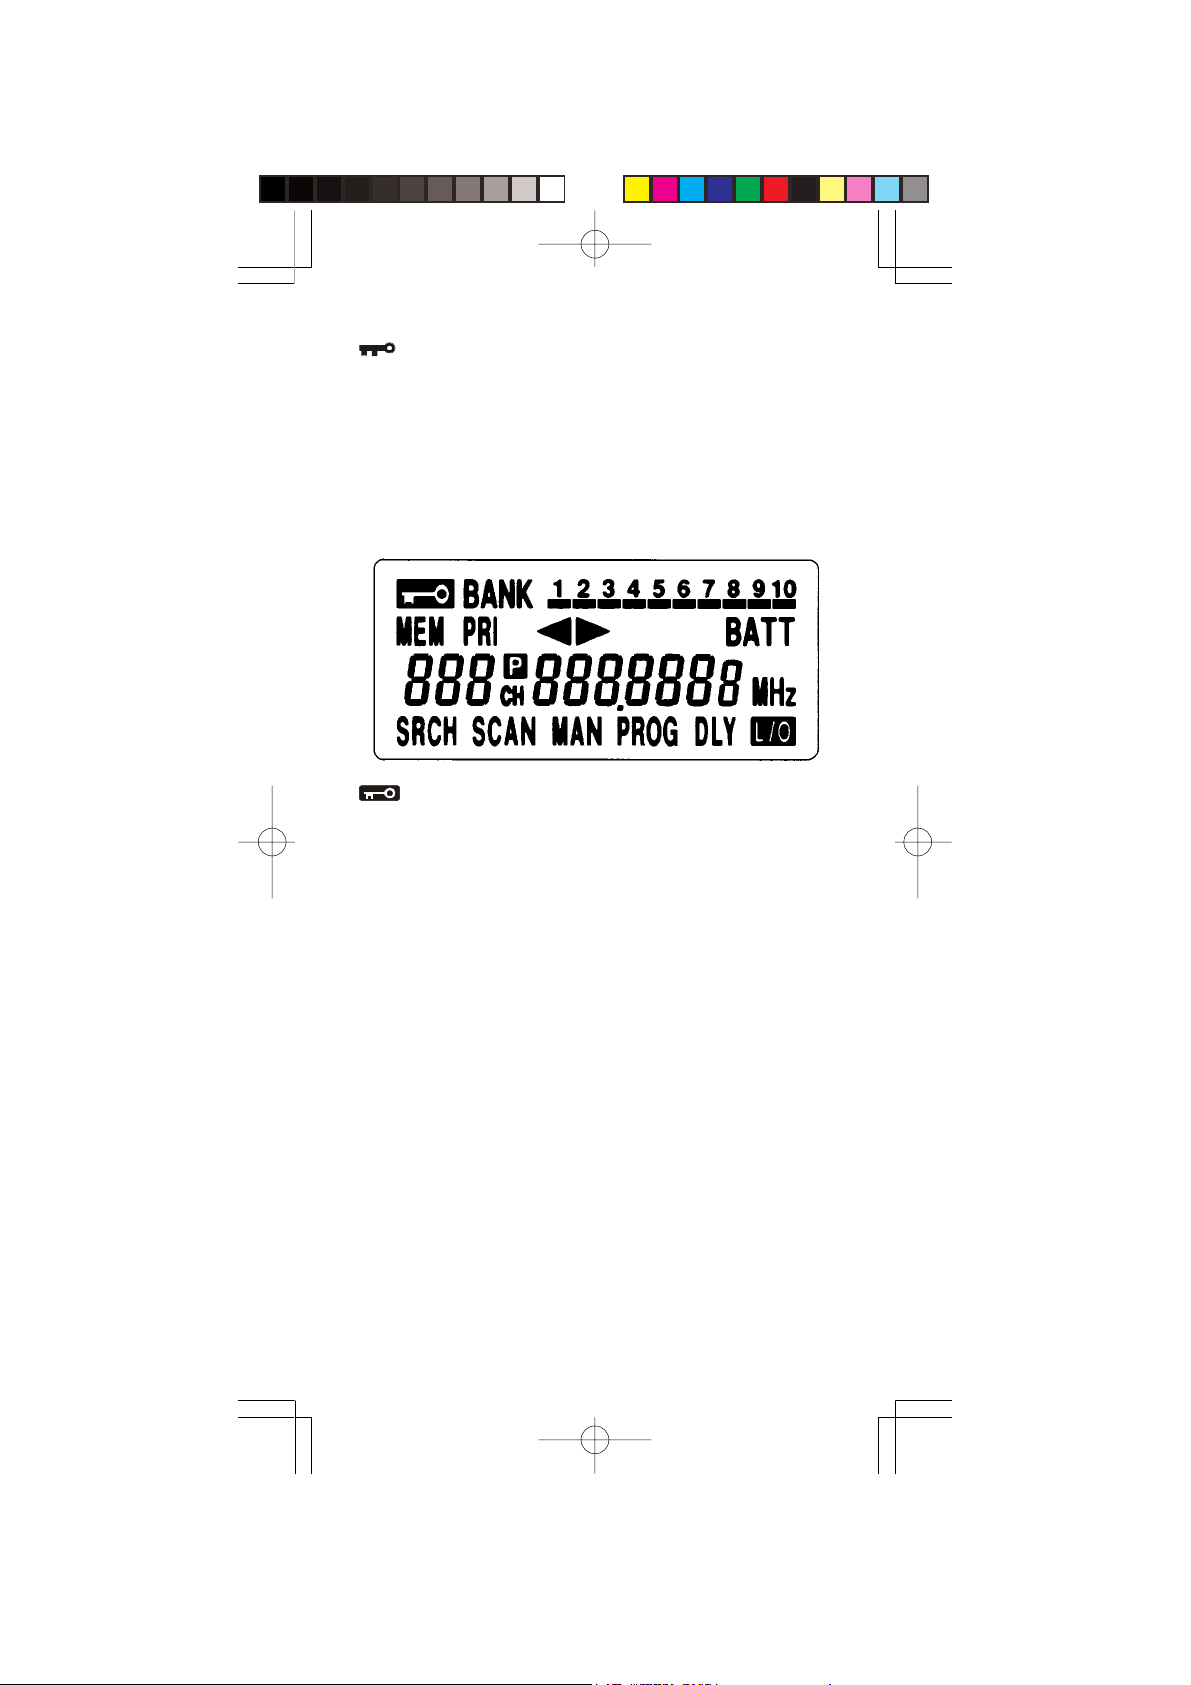
THE DISPLAY
The display lets you know what your unit is doing. The following is a list of display messages you will encounter and
what they mean.
– appears when the keylock is turned on.
BANK – appears with numbers (1-10). Numbers with a bar
under them show which channel-storage banks are turned
on for scanning.
MEM – appears when you listen to a frequency stored in
monitor memory.
PRI – appears when the priority feature is on.
< > – appear to indicate the scan or search direction.
BATT – appears when the batteries are low.
P – appears when you listen to the priority channel.
000 CH – indicates the channel number.
000.0000 MHz – digits that precede this indicator show which
of the 35,000 possible frequencies you have tuned the scanner to.
SRCH – appears during frequency search.
SCAN – appears when you scan through the channels.
MAN – appears when you manually select a channel.
PROG – appears when you program a frequency into a chan-
nel.
DLY – appears when the scanner tunes to the delay feature.
9
PSR216OM.p65 2004/04/08, 16:50Page 9 AdobePageMaker6.5J/Win
Page 10

L/O – appears when you listen to a channel that is locked
out of the scan mode.
Display Message
Error – appears when you make an entry error.
–dUPL– – (duplicate) appears when you try to store a fre-
quency that is already stored in another channel.
–L– – appears during a limit search.
Lo – appears when you program a lower limit frequency
range.
Hi – appears when you program a higher limit frequency
range.
–d– – appears during a direct search.
bX (X: 1 to 0, search band number) – appears during a
band search.
ALL Ch0000 – appears when you clear all stored channels.
Ch–FULL – appears when you try to enter a frequency into a
channel during a search when all channels are full.
L–o Ch0000 – appears when you clear all locked-out channels.
Lo ALL–CL – appears when you remove all lockouts from
channels.
P.–SA – appears when the scanner turns on the power save
feature.
rE. St – appear when press CLEAR to stop limit search or
band search. In this condition press > to start up search
from the bottom band edge and press < to start down search
from the top band edge.
UNDERSTANDING BANK/BANDS/MONITOR
MEMORY
Channel Storage banks
To make it easier to identify and select the channels you want
to listen to, channels are divided into 10 banks of 20 channels each. Use each channel-storage bank to group frequencies, such as those used by the fire department, ambulance
services, or aircraft.
10
PSR216OM.p65 2004/04/08, 16:50Page 10 AdobePageMaker6.5J/Win
Page 11

For example, the fire department might use four frequencies, one for each side of town. You could program the fire
frequencies starting with Channel 1 (the first channel in bank
1) and program the aircraft frequencies starting with chan-
nel 21 (the first channel in bank 2).
Search Bands
Your scanner can tune over 35,000 different frequencies.
Many of these frequencies are grouped within permanent
memory locations called search bands.
Band Displayed Search Range Freq. Coverage (MHz)
1 68–78 68.000 to 78.000
2 78–88 78.000 to 88.000
3 108–137 108.000 to 136.9875
4 137–144 137.000 to 143.995
5 144–146 144.000 to 146.000
6 146–174 146.005 to 174.000
7 380–450 380.000 to 450.000
8 450–512 450.000 to 512.000
9 806–880 806.000 to 880.000
0 880–960 880.000 to 960.000
You can search these bands to quickly find active frequencies you might want to store into the scanner's channels.
Note: The frequencies in the scanner's search bands are
preset. You cannot change them.
Monitor Memory
The scanner also has a monitor memory that you can use to
temporarily store a frequency while you decide whether to
save it into a channel. This is handy for quickly storing an
active frequency when you are searching through an entire
band using direct search.
11
PSR216OM.p65 2004/04/08, 16:50Page 11 AdobePageMaker6.5J/Win
Page 12

OPERATION
TURNING ON THE SCANNER/SETTING
VOLUME AND SQUELCH
1. Turn the SQUELCH knob fully counterclockwise.
2. Turn the VOLUME knob clockwise until it clicks and you
hear a hissing sound.
3. Turn the SQUELCH knob clockwise until the hissing sound
stops.
Notes:
• If the scanner picks up unwanted, partial, or very weak
transmissions, turn SQUELCH clockwise to decrease the
scanner's sensitivity to these signals. If you want to listen
to a weak or distant station, turn SQUELCH counterclockwise.
• If SQUELCH is adjusted so you always hear a hissing
sound, the scanner does not scan properly.
• If you have not stored frequencies into any channels, the
scanner does not scan.
PROGRAMMING FREQUENCIES
Your scanner is capable of storing up to 200 frequencies.
You can program the frequencies randomly or match channel numbers with car numbers, TV and radio call numbers,
etc.
To program frequencies:
1. Press PROG. PROG appears.
2. To select the channel where you want to store the frequency, use the number keys to enter the channel number, then press PROG.
3. Using the number keys and •/DELAY, enter the frequency
you want to store into that channel.
4. Press ENT to store the frequency.
Notes:
• If you entered an invalid frequency in Step 3, the scanner
beeps and displays the channel number and Error. Simply repeat Steps 3 and 4.
12
PSR216OM.p65 2004/04/08, 16:50Page 12 AdobePageMaker6.5J/Win
Page 13

• Your scanner automatically rounds the entered frequency
down to the closest valid frequency. For example, if you
try to enter a frequency of 151.473, your scanner accepts
it as 151.470
• If you entered a frequency that is already stored in another channel, the scanner beeps three times and displays the lowest channel number where the frequency is
already stored, and –dUPL– briefly flashes about three
seconds. If you want to store the frequency anyway, press
ENT again.
5. Repeat Steps 2-4 to store more frequencies into channels.
SCANNING STORED CHANNELS
To begin scanning channels or to start scanning again after
monitoring a specific channel, press SCAN. The scanner
scans through all channels (except those you have locked
out) in the active banks.
To change the scanning direction, press < or >.
Adjust the SQUELCH knob to resume scan if the scanner
stays on a frequency after the transmission has ended.
Turning Channel-Storage Banks Off and
On
To turn off banks while scanning, press the bank's number
key until the bar under the bank's number disappears. The
scanner does not scan any of the channels within the banks
you have turned off.
Notes:
• You cannot turn off all banks. There must be at least one
active bank.
• You can manually select any channel in a bank, even if
the bank is turned off.
To turn on banks while scanning, press the bank's number
key until a bar appears under the bank's number.
13
PSR216OM.p65 2004/04/08, 16:50Page 13 AdobePageMaker6.5J/Win
Page 14

SEARCHING
Notes:
• Press and hold < or > about a second to start search.
• Press and release < or > to move the next frequency.
• To quickly move upward or dounward through the range
of frequencies, press and hold down > or <. The scanner tunes through the frequencies until you release > or
<.
• Press MEM during search to store a frequency in a moni-
tor memory.
• Press ENT while search stops, to store a frequency in the
lowest available channel. Then the scanner continue the
search.
• When the scanner shows Ch–FULL if you press ENT, there
is no empty channels. If you want to enter more frequencies, you must clear some channels.
• You can use the scanner's delay feature by pressing •/
DELAY while search.
Limit Search
In a Limit Search, you choose the range within which the
scanner will find frequencies.
1. Press PROG and then LIMIT. Lo appears on the display.
2. Key in the lowest frequency in the search range and press
ENT.
3. Press LIMIT. Hi appears on the display.
4. Key in the highest frequency in the search range and then
press ENT.
5. Choose the direction you want to search in (< or >) and
press and hold about a second the appropriate button.
–L– and SRCH will appear in the display.
Note: When the scanner has exhausted the search range,
it will begin again.
Band Search
Follow these steps to search for and store active frequencies using band search.
14
PSR216OM.p65 2004/04/08, 16:50Page 14 AdobePageMaker6.5J/Win
Page 15

1. Press BAND. The last selected band number (b followed
by a number, such as b2) and the associated frequency
search range appear on the display.
2. To select a different band, within 2 seconds, enter the desired band number or repeatedly press BAND until the
desired band number appears on the display. After about
2 seconds, SRCH, > appears, and the scanner begins
searching rapidly upward in that band (from lowest to highest frequency) for an active frequency.
Note: To select a different band after the scanner begins
searching the current band, simply repeat this step.
3. When the scanner finds an active frequency, it stops
searching and displays that frequency's number. To continue the search, press and hold > or < about a second.
Direct Search
During a direct search, the scanner searches upward or
downward, starting from a frequency you specify. Follow
these steps to use direct search.
1. Press MAN or PROG, then enter the frequency you want
to use as a starting point for the search.
Note: To start from a frequency already stored in one of
your scanner's channels, press MAN or PROG, enter the
desired channel number, then press MAN or PROG again.
2. Press and hold > or < for about a second to search upward or downward. –d–, SRCH and > or < appear on
the display.
3. When the scanner finds an active frequency, it stops
searching and displays that frequency's number. To continue the search, press and hold > or < about a second.
MONITORING ONE CHANNEL
You can continuously monitor a specific channel without
scanning. This is useful if you hear an emergency broadcast
on a channel and do not want to miss any details — even
though there might be periods of silence — or if you simply
want to monitor that channel.
Follow these steps to manually select a channel.
1. Press MAN.
2. Enter the channel number.
3. Press MAN again.
15
PSR216OM.p65 2004/04/08, 16:50Page 15 AdobePageMaker6.5J/Win
Page 16

DELETING A FREQUENCY FROM A
CHANNEL
1. Press PROG.
2. Use the number keys to enter the channel number containing the frequency you want to delete.
3. Press PROG.
4. Press 0.
5. Press ENT.
The frequency is now deleted. To delete other frequencies in the same way, use Steps 2-5.
DELETING ALL CHANNEL FREQUENCIES
1. Press PROG.
2. Press and hold CLEAR, then press 0. ALL Ch0000 ap-
pears in the display.
3. Press ENT to clear all frequencies from all channels. If
you do not clear all channels, press CLEAR to do so.
DELETING ALL LOCKED OUT CHANNEL
FREQUENCIES
1. Press PROG.
2. Press and hold CLEAR, then press L/OUT. L-o Ch0000
appears in the display.
3. Press ENT to clear all locked-out channels. If you do not
clear all locked-out channels, press CLEAR to do so.
MONITOR MEMORY
Once you have temporarily stored a frequency in a monitor
memory, you need to decide whether or not you want to
store it permanently in a channel.
Note: Remember that monitor memories are not scannable.
To Listen to a Frequency in Monitor Memory
Since you cannot scan monitor memories, you must manually select the frequency you want to hear.
1. Press MAN. MAN appears on the display.
2. Press MEM.
16
PSR216OM.p65 2004/04/08, 16:50Page 16 AdobePageMaker6.5J/Win
Page 17

3. Press the number key of the monitor memory location
you want to hear (1-20).
4. Press MEM again.
STORE THE FREQUENCY IN MONITOR
MEMORY
When the scanner stops on an active frequency while search,
and you want to temporarily save it, press the MEM button
to store it in the monitor memory with the flashing indicator
beneath it.
If you do not want to save the active frequency, press either
< or > to continue the search.
Store the Monitor Memory Frequency in a
Permanent Channel
1. Press PROG. PROG appears on the display.
2. Enter the channel number where you want to store the
monitor frequency, then press PROG.
3. Press MEM. MEM flushes. Use the number key to enter
the monitor memory's number (1-20), then press MEM.
4. Press ENT. The scanner stores the frequency in the selected channel.
5. To move another monitor memory frequency to the next
channel, press PROG and repeat Steps 3 and 4.
17
PSR216OM.p65 2004/04/08, 16:50Page 17 AdobePageMaker6.5J/Win
Page 18
SPECIAL FEATURES
LOCKING OUT
You can scan existing channels faster by locking out channels that have a continuous transmission.
To lock out a channel while scanning, press L/OUT when
the scanner stops on the channel. To lock out a channel
manually, manually select the channel and press L/OUT until L/O appears on the display.
To remove the lockout from a channel, manually select the
channel and press L/OUT until L/O disappears from the display.
Note: You can still manually select locked-out channels.
To remove all lockout from a channels as follows:
1. Press MAN.
2. Press and hold CLEAR then press L/OUT. Lo ALL–CL
appears on the display.
3. Press ENT to clear all lock out. If you do not clear lockout, press CLEAR.
USING KEYLOCK
After programming your scanner, you can eliminate accidental
program and/or functional changes by locking the keypad.
To turn the keylock on, press and hold for approximately 3 seconds, or until the scanner beeps three times
and appears in the display. The only usable keys while
this function is active are , MAN, SCAN, LIGHT,
SQUELCH and VOLUME.
To turn the keylock function off, press and hold for
approximately 3 seconds until the scanner beeps three times
and disappears in the display.
USING DELAY
Many agencies use a two-way radio system that has a period of several seconds between a query and a reply. To avoid
missing a reply, you can program a 2-second delay into any
channel or frequency. When your scanner stops on a channel or frequency with a programmed delay, DLY appears on
the display and the scanner continues to monitor that frequency for 2 seconds after the transmission stops before
resuming scanning.
18
PSR216OM.p65 2004/04/08, 16:50Page 18 AdobePageMaker6.5J/Win
Page 19

You can program a 2-second delay in these ways:
• If the scanner is scanning and stops on an active channel, quickly press •/DELAY before it continues scanning
again.
• If the desired channel is not selected, manually select the
channel, then press •/DELAY.
• If the scanner is in the search mode, press •/DELAY while
the scanner is searching. DLY appears on the display and
the scanner automatically adds a 2-second delay to every transmission it stops on.
To turn off the 2-second delay, press •/DELAY while the scanner is monitoring the channel or frequency. DLY disappears
from the display.
TURNING THE KEY TONE ON AND OFF
Each time you press any of the scanner's keys, the scanner
sounds a tone.
Follow these steps to turn the scanner's key tone on or off.
1. If the scanner is on, turn VOLUME counterclockwise until
it clicks to turn it off.
2. While you press and hold down 2 and ENT, turn on the
scanner.
3. After a second, release 2 and ENT.
BATTERY-SAVING FEATURE
Your scanner has been equipped with a battery-saving circuit. This feature sends the unit into a standby mode, which
uses only 30 percent of the available power, if no signal is
detected within a 5 second time interval, P.–SA (power save)
appears in the display.
The scanner will continue to operate in the standby mode
until it receives a signal or you press a button.
19
PSR216OM.p65 2004/04/08, 16:50Page 19 AdobePageMaker6.5J/Win
Page 20

GENERAL GUIDE TO SCANNING
BIRDIE FREQUNCIES
Every scanner has birdie frequencies. Birdies are signals
created inside the scanner's receiver. These operating frequencies might interfere with broadcasts on the same frequencies. If you program one of these frequencies, you hear
only noise on that frequency. If the interference is not severe, you might be able to turn SQUELCH clockwise to cut
out the birdie.
The birdie frequencies on this unit to watch for are:
72.170 80.300 85.775 136.5125
144.550 150.150 152.575 160.605
168.635 385.450 392.925 393.725
401.7625 409.050 415.1875 425.1250
429.050 431.225 441.200 466.050
489.150 497.875 505.900 809.900
811.5625 819.600 825.9375 827.6375
836.700 814.975 843.7125 851.750
859.7875 867.250 891.925 899.9625
908.000 915.4375 924.075 930.1875
940.150 944.050 947.550 956.2125
To find the birdies in your scanner, being by disconnecting
the antenna and moving it away from the scanner. Make sure
that no other nearby radio or TV sets are turned on near the
scanner. Use the search function and scan every frequency
range from its lowest frequency to the highest. Occasionally,
the searching will stop as if it had found a signal, often without any sound. That is a birdie. Make a list of all the birdies in
your scanner for future reference.
SPECIFIED INTERVALS
Frequencies in different bands are accessible only at specific intervals. For example:
Frequency Ranges Specified Interval
68-88, 137-144 and 146-174 MHz 5.0 kHz steps
108-136.9875, 144-146,
380-512 and 806-960 MHz 12.5 kHz steps
20
PSR216OM.p65 2004/04/08, 16:50Page 20 AdobePageMaker6.5J/Win
Page 21
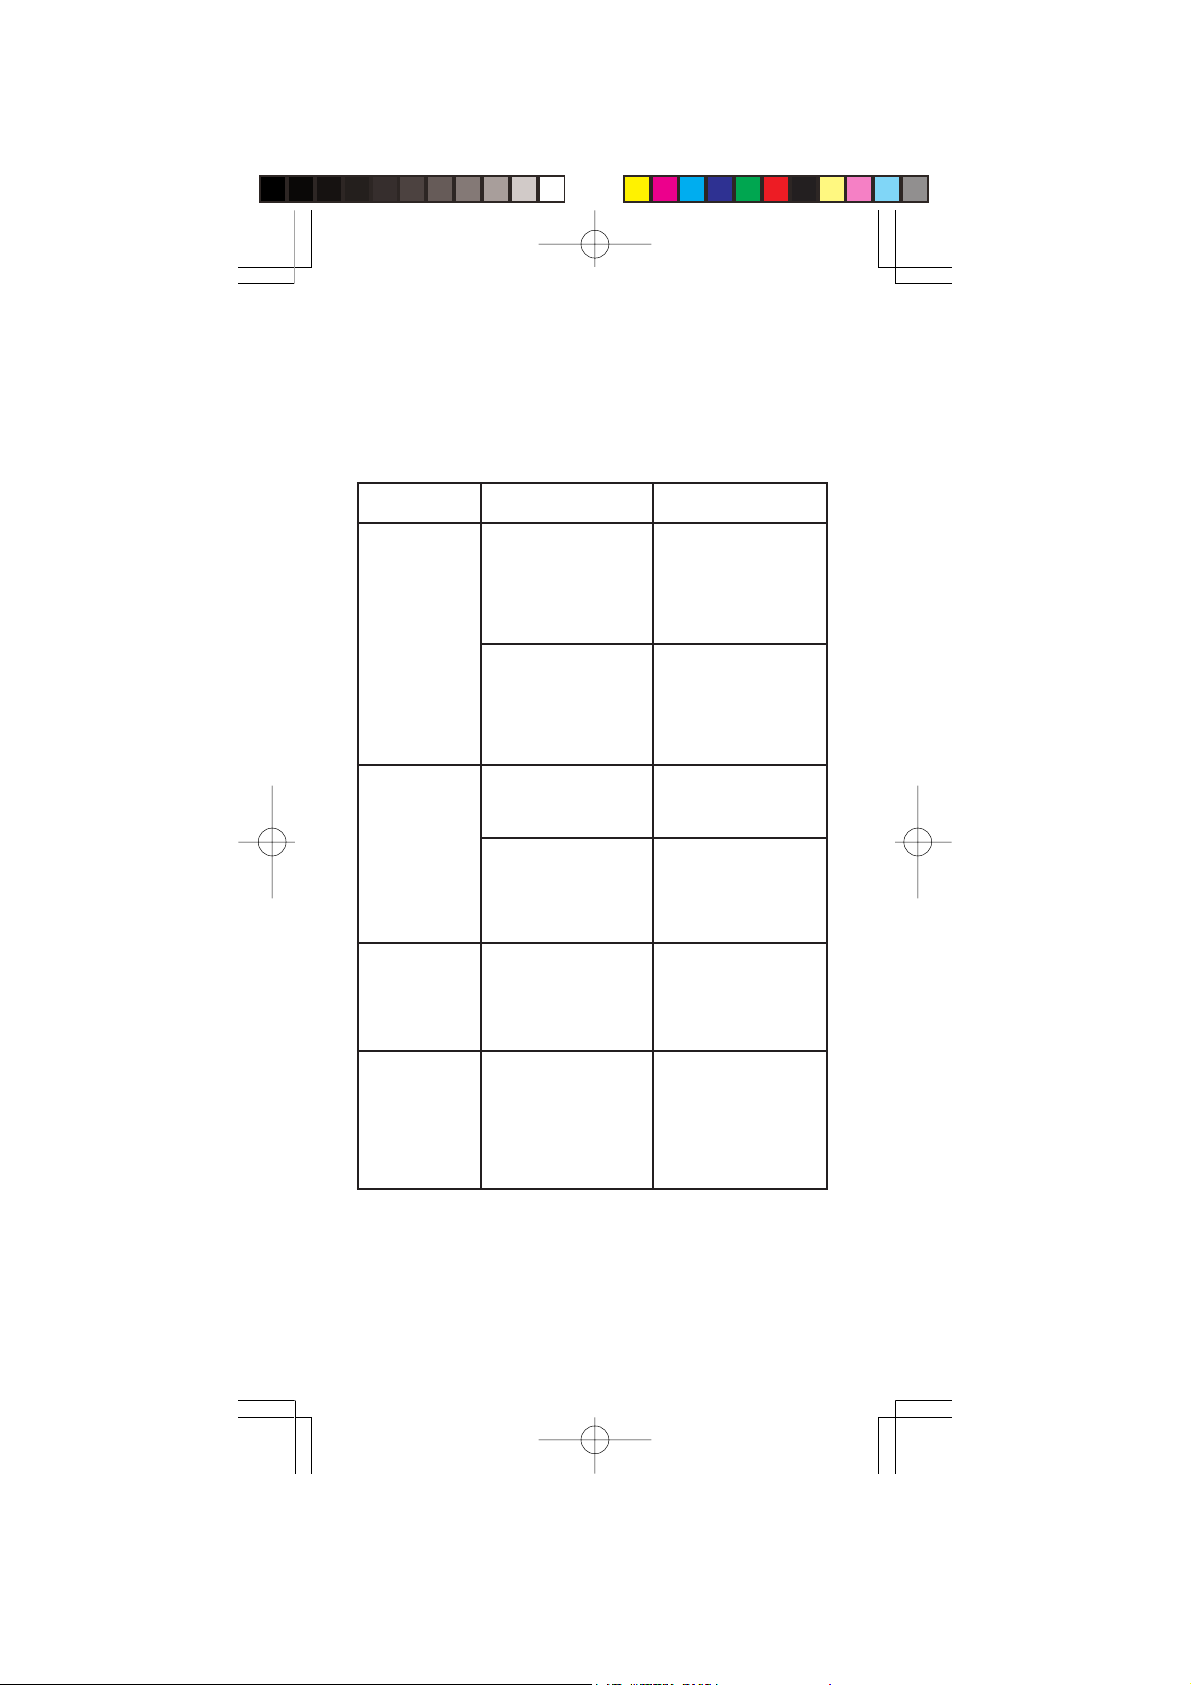
TROUBLESHOOTING
If your scanner is not working as it should, these suggestions might help you eliminate the problem. If the scanner
still does not operate properly, take it to your local store for
assistance.
melborPsesuaCelbissoPseidemeR
rennacsehT
krowtonseod
.llata
onrorooP
.noitpecer
,nosirennacS
tonseodtub
.nacs
nacsehtnI
eht,edom
skcolrennacs
seicneuqerfno
naevahtaht
raelcnu
.noissimsnart
.detcennoc
lanretniehT
ebotsdeen
.annetna
demmargorP
.seicneuqerf
HCLEUQS tonsi
demmargorP
.seicneuqerf
retpadaCDroCAehT
ylreporptonsi
REWOP .kcaj
kcapyrettab/seirettab
ehtro,degrahcer
elbaegrahcer-non
.daederaseirettab
detcennocylreporpmI
ehteraseicneuqerf
eidribsaemas
.detsujdayltcerroc
ehteraseicneuqerf
eidribsaemas
ehtegrahC
-nonecalper
eidriB"rednu
.02
tsujdA HCLEUQS
eidriB"rednu
mehtotnetsil
.yllaunam
siretpadaehteruseB
aotnideggulp
roteltuoCAgnikrow
tekcosrethgil-etteragic
s'rennacsehtotni
seirettabelbaegrahcer
ro,kcapyrettabro
seirettabelbaegrahcer
.seirettabhserfhtiw
siannetnaehteruseB
.detcennocylreporp
gnimmargorpdiovA
detsilseicneuqerf
egaPno"seicneuqerF
ees(esiwkcolc
ehtnOgninruT"
gnitteS/rennacS
."hcleuqSdnaemuloV
gnimmargorpdiovA
detsilseicneuqerf
ylnoro"seicneuqerF
21
PSR216OM.p65 2004/04/08, 16:50Page 21 AdobePageMaker6.5J/Win
Page 22

RESETITNG/INITIALIZING THE SCANNER
If the scanner's display locks up or does not work properly
after you connect a power source, you might need to reset
or initialize it.
Important: If you have problems, first try to reset the scanner. If that does not work, you can initialize the scanner, however, initializing clears all frequencies you stored in the
scanner's memory and initialilzes the scanner to its default
settings.
Resetting the Scanner
1. Turn off the scanner, then turn it on again.
2. Insert a pointed object, such as a straightened paper clip,
into the reset hole on the side of the scanner. Then gently
press and release the reset button inside the opening.
The display goes blank, then information reappears.
Initializing the Scanner
Important: This procedure clears all frequencies you stored
in the scanner's memory and initializes the scanner to its
default settings. Initialize the scanner only when you are sure
the scanner is not working properly.
1. Turn off the scanner, then turn it on again.
2. While holding down CLEAR, insert a pointed object, such
as a straightened paper clip, into the reset hole on the
side of the scanner. Then gently press and release the
reset button inside the opening. The display goes blank,
then information reappears.
Note: You must release the reset button before you release CLEAR. Otherwise, the memory might not clear.
3. When the display reappears, release CLEAR.
22
PSR216OM.p65 2004/04/08, 16:50Page 22 AdobePageMaker6.5J/Win
Page 23

CARE AND MAINTENANCE
• This unit is to be kept dry at all times. Should the unit
become wet, dry immediately with a soft cloth. Electronic
circuits may corrode should they come in contact with
liquids containing minerals.
• Do not drop the unit. Circuit boards may be damaged
and cause the scanner to malfunction if it is dropped.
• Store unit at normal temperatures. Avoid sudden temperature changes. Excessive hot or cold temperatures may
damage or disfigure plastic parts and/or shorten the life
of electronic devices.
• To prevent premature wear and tear on parts, keep the
unit clean and free of dust and dirt.
• Do not use harsh chemicals, solvents or strong detergents
to clean the unit.
• Do not attempt to alter or modify the internal component's
of the unit.
23
PSR216OM.p65 2004/04/08, 16:50Page 23 AdobePageMaker6.5J/Win
Page 24

SPECIFICATIONS
Frequency Coverage
68–88 MHz (in 5 kHz steps) (FM)
108–136.9875 MHz (in 12.5 kHz steps) (AM)
137–143.995 MHz (in 5 kHz steps) (FM)
144–146 MHz (in 12.5 kHz steps) (FM)
146.005–174 MHz (in 5 kHz steps) (FM)
380–512 MHz (in 12,5 kHz steps) (FM)
806–960 MHz (in 12.5 kHz steps) (FM)
Operational Channels 200 channels plus
20 monitor memories
Sensitivity: FM: (S+N)/N 20 dB, Dev.: 3kHz at 1kHz
AM: (S+N)/N 20 dB, Mod.: 60% at 1 kHz
68–88 MHz 1 µV
108–136.975 MHz 2 µV
137–174 MHz 1 µV
380–512 MHz 1 µV
806–960 MHz 2 µV
Spurious Rejection (FM at 154 MHz) 40 dB
Selectivity
±10 kHz –6 dB
±18 kHz –50 dB
IF Interference Ration
257.5 MHz at 154 MHz 50 dB
21.4 MHz at 154 MHz 100 dB
Scanning Rate 25 channels/sec
Search Rate 50 steps/sec
Delay Time 2 sec
IF Frequencies 257.5 MHz, 21.4 MHz, and 455 kHz
24
PSR216OM.p65 2004/04/08, 16:50Page 24 AdobePageMaker6.5J/Win
Page 25

Squelch Sensitivity
Threshold less than 1.0 µV
Tight (FM) (S+N)/N 25 dB
Tight (AM) (S+N)/N 20 dB
Antenna Impedance 50 ohms
Audio Power 240 mWatts nominal (10%THD)
Built-in Speaker 36 mm, 8-ohm, dynamic type
Power Req. +9V DC, 6 AA batteries
or a suitable adapter (negative ground only)
Current Drain (Squelched) 70 mA
OP Temp. –10°C to +60°C
Dimensions 150 x 63 x 45 mm (HWD)
Weight approx. 260 g without antenna
25
PSR216OM.p65 2004/04/08, 16:50Page 25 AdobePageMaker6.5J/Win
Page 26

NOTES
26
PSR216OM.p65 2004/04/08, 16:50Page 26 AdobePageMaker6.5J/Win
Page 27

NOTES
27
PSR216OM.p65 2004/04/08, 16:50Page 27 AdobePageMaker6.5J/Win
Page 28

GE-00D-3690
08G00
Printed in Hong Kong
28
PSR216OM.p65 2004/04/08, 16:50Page 28 AdobePageMaker6.5J/Win
 Loading...